
十二、MySQL系列
一、MySQL版本选择
MySQL:推荐使用5.6与5.7
关于5.6:选择GA版本,GA 6个月-1年之间的版本,5.6.38尽量选择双数版本
关于5.7:选择GA版本,GA 6个月-1年之间的版本,5.717以上,推荐使用5.7.20
二、Mysql安装


#1.下载:MySQL Community Server 5.7.20
https://downloads.mysql.com/archives/community/

#2.解压
将下载好的压缩包,解压到指定目录,如C:\mysql-5.7.20-winx64

#3.添加环境变量
【右键计算机】--》【属性】--》【高级系统设置】--》【高级】--》【环境变量】--》【在第二个内容框汇总找到 变量名为Path 的一行,双击】--》【将M有SQL的bin目录路径追加到变值中,用;分割】

#4、初始化
mysqld --initialize-insecure --explicit_defaults_for_timestamp

#5、启动MySQL服务
mysqld    #启动MySQL服务

#6、启动MySQL客户端并连接MySQL服务
mysql -u root -p    #连接MySQL服务器
#1.在初始化时mysql --initialize-insecure报错?
报错提示:TIMESTAMP with implicit DEFAULT value is deprecated. Please use --explicit_defaults_for_timestamp server option (see documentation for more details)
解决办法:使用:mysql --initialize-insecure --explicit_defaults_for_timestamp

#2.在mysqld --initialize-insecure --explicit_defaults_for_timestamp报错
报错提示:[ERROR] –initialize specified but the data directory has files in it. Aborting.
解决办法:删除安装目录下的data文件夹
在命令行里执【mysqld】启动MySQL服务器时,当前终端窗口会被hang住,那么将mysql设置为系统服务即可解决此问题:
ps:--install前,必须用mysql启动命令的绝对路径
#制作MySQL的Windows服务,在终端执行命令:
mysql-5.7.20-winx64\bin\mysqld --install

#移除MySQL的Windows服务,在终端执行此命令:
mysql-5.7.20-winx64\bin\mysqld --remove


注册成服务之后,以后在启动和关闭MySQ服务时,仅需执行如下命令:
#启动MySQL服务
net start mysql

#关闭MySQL服务
net stop mysql
Centos7
#1.下载MySQL官方的Yum Repository
wget -i -c http://dev.mysql.com/get/mysql57-community-release-el7-10.noarch.rpm

#2.yum 安装MySQL官方的Yum Repository
yum -y install mysql57-community-release-el7-10.noarch.rpm

#3.安装M有SQL服务器
yum -y install mysql-community-server

#4.启动MySQL
systemctl start  mysqld.service

#5.查看MySQL状态
systemctl status mysqld.service

#6.通过日志文件找出默认密码,称为p1
grep "password" /var/log/mysqld.log

#7.进入数据库命令
mysql -uroot -p
三、账号权限
#1.授权远程用户登陆权限
##授权远程主机192.168.60.96通过用户名zabbix,密码password访问数据库zabbix里所有表权限
grant all PRIVILEGES on zabbix.* to zabbix@'192.168.60.96'  identified by 'password';

#2.修改密码
##此命令前提,是通过mysql -uroot -p进入,而不是通过在配置文件/etc/my.cnf,里新增跳过密码命令skip-grant-tables
ALTER USER 'root'@'localhost' IDENTIFIED BY 'new password';
四、库操作
4.1创建数据库
#1.语法
CREATE DATABASE 数据库名 charset utf8;

#2. 数据库命名规则
##可以由字母、数字、下划线、@、#、$
##区分大小写
##唯一性
##不能使用关键字如 create select
##不能单独使用数字
##最长128位
4.2数据库增删改查
#1.查看数据库
show databases;
show create database db1;
select database();

#2.选择数据库
USE 数据库名

#3. 删除数据库
DROP DATABASE 数据库名;

#4.修改数据库
ALTER DATABASE 数据库名 charset utf8;

#5.创建数据库
CREATE DATABASE 数据库名 charset utf8;
五、表操作
5.1 创建表
#1 语法
create  table  表名(
字段名1  类型[(宽度)  约束条件],
字段名2  类型[(宽度)  约束条件],
字段名3  类型[(宽度)  约束条件]
);

#2 注意事项
    2.1在同一张表中,字段名不能相同
    2.2宽度和约束条件可选
    2.3字段名和类型是必须的
5.2 创建表代码示例
mysql> create table user_info();
ERROR 1064 (42000):
mysql> create table user_info(
    -> id int,
    -> name varchar(50),
    -> sex enum('male','female'),
    -> age int(3)
    -> );
Query OK, 0 rows affected (0.09 sec)

mysql> show tables;
+---------------+
| Tables_in_db1 |
+---------------+
| user_info     |
+---------------+
1 row in set (0.00 sec)

mysql> desc user_info;
+-------+-----------------------+------+-----+---------+-------+
| Field | Type                  | Null | Key | Default | Extra |
+-------+-----------------------+------+-----+---------+-------+
| id    | int(11)               | YES  |     | NULL    |       |
| name  | varchar(50)           | YES  |     | NULL    |       |
| sex   | enum('male','female') | YES  |     | NULL    |       |
| age   | int(3)                | YES  |     | NULL    |       |
+-------+-----------------------+------+-----+---------+-------+
4 rows in set (0.01 sec)
5.3 往表中插入数据代码示例
#插入表中数据
mysql> insert into user_info values
    -> (1,'lisl','male',18),
    -> (2,'lvxq','female',28);
Query OK, 2 rows affected (0.02 sec)

mysql>
mysql>
mysql>
mysql> select * from user_info;            #查看表中数据
+------+------+--------+------+
| id   | name | sex    | age  |
+------+------+--------+------+
|    1 | lisl | male   |   18 |
|    2 | lvxq | female |   28 |
+------+------+--------+------+
2 rows in set (0.00 sec)

mysql>
5.4 查看表结构
mysql> describe user_info;
+-------+-----------------------+------+-----+---------+-------+
| Field | Type                  | Null | Key | Default | Extra |
+-------+-----------------------+------+-----+---------+-------+
| id    | int(11)               | YES  |     | NULL    |       |
| name  | varchar(50)           | YES  |     | NULL    |       |
| sex   | enum('male','female') | YES  |     | NULL    |       |
| age   | int(3)                | YES  |     | NULL    |       |
+-------+-----------------------+------+-----+---------+-------+
4 rows in set (0.00 sec)

mysql>
5.5 表的数据类型
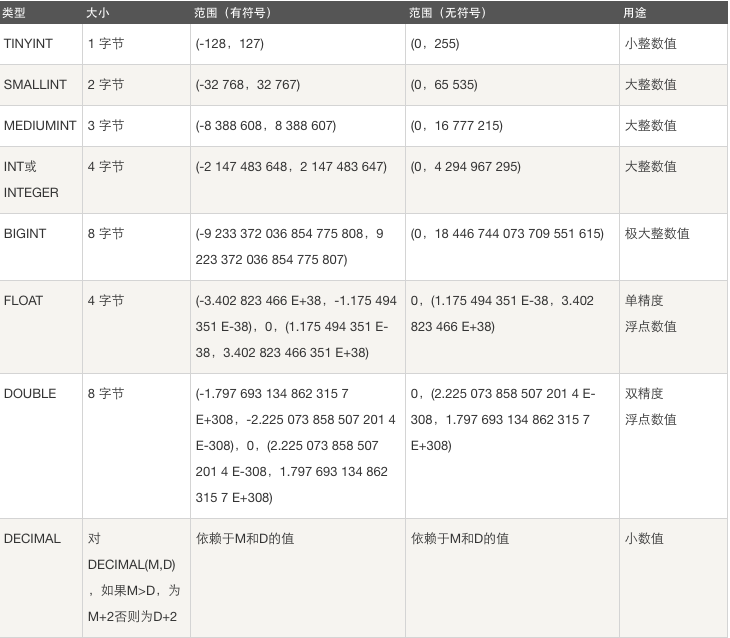
#1.数字
  1.1整型:tinyint int bigint
       tinyint [(m)] [unsigned] [zerofill] 默认m为4
         小整数,数据类型用于保存一些范围的整数数值范围:
         有符号:-128~127
         无符号:0~255
               ps:MySQL中无布尔值,使用tinyint(1)构造

       int [(m)] [unsigned] [zerofill]
          整数,数据类型用于保存一些范围的整数数值范围:
          有符号:-2147483648~2147483647
          无符号:0 ~ 4294967295

       bigint [(m)] [unsigned] [zerofill]
           大整数,数据类型用于保存一些范围的整数数值范围:
          有符号:-9223372036854775808 ~9223372036854775807
          无符号:0 ~ 18446744073709551615


    1.2 小数:
            float:在位数比较短的情况下不不精准
         float[(M,D)] [UNSIGNED] [ZEROFILL]
         m是数字总个数,最大值为255;d是小数点后个数,d最大值为30
         有符号:-3.402823466E+38 to -1.175494351E-38,
         无符号:1.175494351E-38 to 3.402823466E+38

            double:在位数比较长的情况下不精准
               double[(M,D)] [UNSIGNED] [ZEROFILL]
               m是数字总个数,最大值为255;d是小数点后个数,d最大值为30
               eg:0.000001230123123123,存成:0.000001230000
         有符号:-1.7976931348623157E+308 to -2.2250738585072014E-308
         无符号:2.2250738585072014E-308 to 1.79769313486231            decimal:(如果用小数,则用推荐使用decimal          decimal [(m[,d])] [unsigned] [zerofill]           m是数字总个数,最大值为65;d是小数点个数,d最大值为30

                精准
                内部原理是以字符串形式去存

#2. 字符串
    char(10):10个字符长度,简单粗暴,浪费空间,存取速度快
        存root    写入硬盘的时候是root000000
     字符串长度范围:0 ~ 255 (一个中文是一个字符,是utf8编码的3个字节)
     存储:存储char类型的值时,会往右填充空格来满足长度
             例如:指定长度为10,存>10个字符则报错,存<10个字符则用空格填充直到凑够10个字符存储
    检索:在检索或者说查询时,查出的结果会自动删除尾部的空格,除非我们打开pad_char_to_full_length SQL模式
       (SET sql_mode = 'PAD_CHAR_TO_FULL_LENGTH';)

    varchar(10):精准,节省空间,存取速度慢
     字符长度范围:0 ~ 65535(如果大于21845会提示用其他类型,mysql行最大限制65535字节,字符编码为utf-8)
     存储:varchar类型存储数据的真实内容,不会用空格填充,如果'ab  ',尾部的空格也会被存起来
       强调:varchar类型会在真实数据前加1-2Bytes的前缀,该前缀用来表示真实数据的bytes字节数(1-2Bytes最
            大表示65535个数字,正好符号mysql对row的最大字节限制,即已经足够使用)
       如果真实的数据<255bytes则需要1Bytes的前缀(1Bytes=8bit 2**8最大表示的数字为255)
       如果真实的数据>255bytes则需要2Bytes的前缀(2Bytes=16bit  2**16最大表示的数字为65535)

     检索:尾部有空格会保存下来,在检索或者说查询时,也会正常显示包含空格在内的内容


    sql优化:创建表时,定长的类型往前放,比如性别,变长的往后放,比如地址或描述信息

    >255个字符,超了就把文件路径存放到数据库中,比如图片,视频等找一个文件服务器存放,数据库中只保存路径或url


#3.时间类型

  作用:存储用户注册时间,文章发布时间,员工入职时间,出生时间,过期时间等
   最常用:datetime
  在实际应用的很多场景中,MySQL的这俩种日期类型都能够满足我们的需要,存储精度都为秒,但在某些情况下,会展现出他们
  各自的优劣。下面总结一下俩种日期类型的区别
  1.DATATIME的日期范围1001-9999年,TIMESTAMP的时间范围是1970-2038年
  2.DATATIME存储时间与时区无关,TIMESTAMP存储时间与时区有关,显示的值也依赖于时区。在mysql服务器,操作系统以及
    客户端连接都有时区的设置。
  3.DATATIME使用8字节的存储空间,TIMESTAMP的存储空间为4字节。因此,TIMESTAMP比DATATIME的空间利用率更高。
  4.DATATIME的默认值为null;TIMESTAMP的字段默认不为空(not null),默认值为当前时间(CURRENT_TIMESTAMP),
   如果不做特殊处理,并且update语句中没有指定该列的更新值,则默认更新为当前时间


#4.枚举类型与集合类型
  字段的值只能在给定范围中选择,如单选框,多选框
    enum单选只能在给定的范围内选一个值,如性别sex 男male/女female
   set 多选 在给定的范围内可以选择一个或一个以上的值(爱好1,爱好2,爱好3...)

以下在进行具体代码举例
5.7 数据类型之整型代码示例
##########################tinyint类型##########################
mysql> create table t1 (x tinyint);    #创建表t1字段x为tinyint类型
Query OK, 0 rows affected (0.07 sec)

mysql> desc t1;        #查看表t1结构,默认为4
+-------+------------+------+-----+---------+-------+
| Field | Type       | Null | Key | Default | Extra |
+-------+------------+------+-----+---------+-------+
| x     | tinyint(4) | YES  |     | NULL    |       |
+-------+------------+------+-----+---------+-------+
1 row in set (0.01 sec)

#插入数据,数据-129报错,说明默认有符号,范围-128 ~ 127
mysql> insert into t1 values
    -> (128);
ERROR 1264 (22003):

mysql> insert into t1 values
    -> (-128),
    -> (-127),
    -> (127);
Query OK, 3 row affected (0.00 sec)

mysql> select * from t1;    #查询数据
+------+
| x    |
+------+
| -128 |
| -128 |
| -127 |
|  127 |
+------+
4 rows in set (0.00 sec)


#指定tinyint为无符号类型
mysql> create table t2 (x tinyint unsigned);
Query OK, 0 rows affected (0.07 sec)

#值-1超出无符号范围,报错
mysql> insert into t2 values (-1);
ERROR 1264 (22003):

mysql> insert into t2 values
    -> (0),
    -> (255);
Query OK, 2 rows affected (0.01 sec)

#值256超出无符号范围,报错
mysql> insert into t2 values (256);
ERROR 1264 (22003):
mysql>
mysql>
mysql> desc t2;        #查看表结构,默认是3,因为有1位是符号位
+-------+---------------------+------+-----+---------+-------+
| Field | Type                | Null | Key | Default | Extra |
+-------+---------------------+------+-----+---------+-------+
| x     | tinyint(3) unsigned | YES  |     | NULL    |       |
+-------+---------------------+------+-----+---------+-------+
1 row in set (0.00 sec)

mysql> select * from t2;    #查询数据
+------+
| x    |
+------+
|    0 |
|  255 |
+------+
2 rows in set (0.00 sec)

##########################int类型##########################
mysql> create table t3 (x int);
Query OK, 0 rows affected (0.12 sec)

mysql> desc t3;        #默认长度为11
+-------+---------+------+-----+---------+-------+
| Field | Type    | Null | Key | Default | Extra |
+-------+---------+------+-----+---------+-------+
| x     | int(11) | YES  |     | NULL    |       |
+-------+---------+------+-----+---------+-------+
1 row in set (0.01 sec)

mysql> insert into t3 values (-2147483649);        #超出有符号范围
ERROR 1264 (22003):
mysql> insert into t3 values (-2147483648);
Query OK, 1 row affected (0.01 sec)

mysql> insert into t3 values (2147483647);
Query OK, 1 row affected (0.01 sec)

mysql> insert into t3 values (2147483648);        #超出有符号范围
ERROR 1264 (22003):
mysql>
mysql> select * from t3;
+-------------+
| x           |
+-------------+
| -2147483648 |
|  2147483647 |
+-------------+
2 rows in set (0.00 sec)


#指定int为无符号类型
mysql> create table t4 (x int unsigned);
Query OK, 0 rows affected (0.10 sec)

mysql> desc t4;
+-------+------------------+------+-----+---------+-------+
| Field | Type             | Null | Key | Default | Extra |
+-------+------------------+------+-----+---------+-------+
| x     | int(10) unsigned | YES  |     | NULL    |       |
+-------+------------------+------+-----+---------+-------+
1 row in set (0.00 sec)

mysql>
mysql>
mysql>
mysql> insert into t4 values (-1);                #超出有符号范围
ERROR 1264 (22003):
mysql> insert into t4 values (0);
Query OK, 1 row affected (0.01 sec)

mysql> insert into t4 values (4294967295);
Query OK, 1 row affected (0.01 sec)

mysql> insert into t4 values (4294967296);        #超出有符号范围
ERROR 1264 (22003):
mysql>
mysql> select * from t4;
+------------+
| x          |
+------------+
|          0 |
| 4294967295 |
+------------+
2 rows in set (0.00 sec)

mysql>
5.8 数据类型之字符串代码示例
#对比char与varchar存储空间(存储大小不等同于显示大小)
mysql> create table t2 (x char(5),y varchar(5));
Query OK, 0 rows affected (0.11 sec)

mysql> desc t2
    -> ;
+-------+------------+------+-----+---------+-------+
| Field | Type       | Null | Key | Default | Extra |
+-------+------------+------+-----+---------+-------+
| x     | char(5)    | YES  |     | NULL    |       |
| y     | varchar(5) | YES  |     | NULL    |       |
+-------+------------+------+-----+---------+-------+
2 rows in set (0.01 sec)


mysql> insert into t2 values('yes ','yes ');
Query OK, 1 row affected (0.00 sec)

mysql> select x,char_length(x),y,char_length(y) from t2;    #char_length()表示字符个数,不管该字符是英文,中文,空格都算一个
+------+----------------+------+----------------+
| x    | char_length(x) | y    | char_length(y) |
+------+----------------+------+----------------+
| yes  |              3 | yes  |              4 |
+------+----------------+------+----------------+
1 row in set (0.00 sec)

mysql> SET sql_mode = 'PAD_CHAR_TO_FULL_LENGTH';    #修改sql_mode,让char的显示的跟存储空间大小一致
Query OK, 0 rows affected, 1 warning (0.00 sec)

mysql> select x,char_length(x),y,char_length(y) from t2;
+-------+----------------+------+----------------+
| x     | char_length(x) | y    | char_length(y) |
+-------+----------------+------+----------------+
| yes   |              5 | yes  |              4 |
+-------+----------------+------+----------------+
1 row in set (0.00 sec)

mysql> select x,length(x),y,length(y) from t2;      #length()表示显示bytes字节长度
+-------+-----------+------+-----------+
| x     | length(x) | y    | length(y) |
+-------+-----------+------+-----------+
| yes   |         5 | yes  |         4 |
+-------+-----------+------+-----------+
1 row in set (0.00 sec)

mysql>
mysql> select concat('数据:',x,'长度:',char_length(x)),concat(y,char_length(y)) from t2;
+------------------------------------------+--------------------------+
| concat('数据:',x,'长度:',char_length(x)) | concat(y,char_length(y)) |
+------------------------------------------+--------------------------+
| 数据:yes  长度:5                         | yes 4                    |
+------------------------------------------+--------------------------+
1 row in set (0.00 sec)
5.8.1 CHAR与VARCAR相同点
虽然CHAR和VARCHAR的存储方式不太相同,但是对于两个字符串的比较,都只比较其值,忽略CAHR值存在的右填充,即使将SQL_MODE设置为PAD_CHAR_TO_FULL_LENGTH也一样,但不适用于like
#char在不同的sql_mode模式取值或者使用like的差别
mysql> create table t4 (name char(10));
Query OK, 0 rows affected (0.04 sec)

mysql> insert into t4 values ('Monty');
Query OK, 1 row affected (0.01 sec)

mysql> select name = 'Monty',name = 'Monty   ' from t4;     #不管sql_mode模式,char被取值都可正常匹配到
+----------------+-------------------+
| name = 'Monty' | name = 'Monty   ' |
+----------------+-------------------+
|              1 |                 1 |
+----------------+-------------------+
1 row in set (0.00 sec)

mysql> select name  LIKE 'Monty' , name LIKE 'Monty' from t4;   #当sql_mode = 'PAD_CHAR_TO_FULL_LENGTH',使用like,只有当"Monty     "为10个字符,才可被匹配到
+--------------------+-------------------+
| name  LIKE 'Monty' | name LIKE 'Monty' |
+--------------------+-------------------+
|                  0 |                 0 |
+--------------------+-------------------+
1 row in set (0.00 sec)

mysql> SET sql_mode =''                 #修改sql_mode模式为空
    -> ;
Query OK, 0 rows affected (0.00 sec)

mysql> select name  LIKE 'Monty' , name LIKE 'Monty ' from t4;  #当sql_mode='',空格会被自动去除,因此like可以匹配到Monty
+--------------------+--------------------+
| name  LIKE 'Monty' | name LIKE 'Monty ' |
+--------------------+--------------------+
|                  1 |                  0 |
+--------------------+--------------------+
1 row in set (0.00 sec)

mysql>
5.8.2 关于字符串总结
#InnoDB存储引擎:建议使用VARCHAR类型
单从数据类型的实现机制去考虑,char数据类型的处理速度更快,有时甚至可以超出varchar处理速度的50%

但对于InnoDB数据表,内部的行存储格式没有区分固定长度和可变长度列(所有数据行都使用指向数据列值的头指针),因此在本质上,使用固定长度的CHAR列不一定比使用可变长度VARCHAR列性能要好。因而,主要的性能因素是数据行使用的存储总量。由于CHAR平均占用的空间多于VARCHAR,因此使用VARCHAR来最小化需要处理的数据行的存储总量和磁盘I/O是比较好的

#其他字符串系列(效率:char>varchar>text)
TEXT系列  TINYTEXT    TEXT    MEDIUMTEXT    LOGTEXT
BLOB系列    TINYBLOB    BLOB    MEDIUMBLOB    LONGBLOB
BINARY系列    BINARY    VARBINARY
5.9 时间类型代码示例
mysql> create table t5 (born_year year);    #year的范围1901 ~ 2155
Query OK, 0 rows affected (0.04 sec)

mysql> desc t5;
+-----------+---------+------+-----+---------+-------+
| Field     | Type    | Null | Key | Default | Extra |
+-----------+---------+------+-----+---------+-------+
| born_year | year(4) | YES  |     | NULL    |       |
+-----------+---------+------+-----+---------+-------+
1 row in set (0.01 sec)

mysql> insert into t5 values (1990),(1901),(2155),(2156);   #2156超出范围,存储为000
Query OK, 4 rows affected, 1 warning (0.07 sec)
Records: 4  Duplicates: 0  Warnings: 1

mysql> select * from t5;
+-----------+
| born_year |
+-----------+
|      1990 |
|      1901 |
|      2155 |
|      0000 |
+-----------+
4 rows in set (0.00 sec)

mysql> insert into t5 values (1900);        #能插入,但是存储为000
Query OK, 1 row affected, 1 warning (0.01 sec)

mysql> insert into t5 values (1901);
Query OK, 1 row affected (0.00 sec)

mysql> select * from t5
    -> ;
+-----------+
| born_year |
+-----------+
|      1990 |
|      1901 |
|      2155 |
|      0000 |
|      0000 |
|      1901 |
+-----------+
6 rows in set (0.00 sec)

mysql>
mysql> create table t6 (d date,t time, dt datetime);    #date为日期 ;time为时间;datetime为日期+时间
Query OK, 0 rows affected (0.04 sec)

mysql> desc t6;
+-------+----------+------+-----+---------+-------+
| Field | Type     | Null | Key | Default | Extra |
+-------+----------+------+-----+---------+-------+
| d     | date     | YES  |     | NULL    |       |
| t     | time     | YES  |     | NULL    |       |
| dt    | datetime | YES  |     | NULL    |       |
+-------+----------+------+-----+---------+-------+
3 rows in set (0.01 sec)

mysql> insert into t6 values (now(),now(),now());   #显示当前日期,时间,日期+时间
Query OK, 1 row affected, 1 warning (0.01 sec)

mysql> select * from t6;
+------------+----------+---------------------+
| d          | t        | dt                  |
+------------+----------+---------------------+
| 2018-07-15 | 10:04:42 | 2018-07-15 10:04:42 |
+------------+----------+---------------------+
1 row in set (0.00 sec)
mysql> create table t7 (time timestamp);    #时间戳
Query OK, 0 rows affected (0.04 sec)

mysql> insert into t7 values();     #默认是当前时间,格式与datetime一样
Query OK, 1 row affected (0.01 sec)

mysql> insert into t7  values(null);    #null也为当前时间
Query OK, 1 row affected (0.01 sec)

mysql> select * from t7;
+---------------------+
| time                |
+---------------------+
| 2018-07-15 10:07:45 |
| 2018-07-15 10:08:05 |
+---------------------+
2 rows in set (0.00 sec)
时间类型总结1
#1.单独插入时间时,需要以字符串的形式,按照对应的格式插入
#2.插入年份时,尽量使用4位值
#3.插入两位年份时,<=69,以20开头,比如50,结果2050
                            >=70,以19开头,比如71,结果1971

mysql> create table t8 (y year);
Query OK, 0 rows affected (0.04 sec)

mysql> insert into t8 values (50),(71);
Query OK, 2 rows affected (0.01 sec)
Records: 2  Duplicates: 0  Warnings: 0

mysql> select * from t8;
+------+
| y    |
+------+
| 2050 |
| 1971 |
+------+
2 rows in set (0.00 sec)
时间类型总结2
在实际应用的很多场景中,MySQL的这两种日期类型都能够满足我们的需要,存储精度都为秒,但在某些情况下,会
展现出他们各自的优劣。下面就来总结一下两种日期类型的区别。

1.DATETIME的日期范围1001-9999年,TIMESTAMP的时间范围是1970-2038年
2.DATETIME存储时间与时区无关,TIMESTAMP存储时间与时区有关,显示的值也依赖于时区。在mysql服务器,
操作系统以及客户端连接都有时区的设置。
3.DATETIME使用8字节的存储空间,TIMESTAMP的存储空间为4字节。因此,TIMESTAMP比DATETIME空间利用
率更高
4.DATETIME的默认值为null;TIMESTAMP的字段默认不为空(not null),默认值为当前时间(CURRENT_TIMESTAMP),
如果不做特殊处理,并且update语句中没有指定该列的更新值,则默认更新为当前时间
mysql> create table t9 (update_time datetime not null default now()); #设置不为空,默认为当前时间
Query OK, 0 rows affected (0.04 sec)
mysql> create table t10 (update_time timestamp); #不用设置,允许为空就是当前时间
Query OK, 0 rows affected (0.03 sec)
mysql> insert into t9 values();
Query OK, 1 row affected (0.01 sec)
mysql> insert into t10 values();
Query OK, 1 row affected (0.01 sec)
mysql> select * from t9;
+---------------------+
| update_time |
+---------------------+
| 2018-07-15 10:27:52 |
+---------------------+
1 row in set (0.00 sec)
mysql> select * from t10;
+---------------------+
| update_time |
+---------------------+
| 2018-07-15 10:27:58 |
+---------------------+
1 row in set (0.00 sec)
5.10 枚举类型代码举例
mysql> create table consumer(
    -> name varchar(50),
    -> sex enum('male','female'),
    -> level enum('vip1','vip2','vip3','黑卡'),   #多选一
    -> hobby set ('play','music','read','study')    #多选多
    -> );
Query OK, 0 rows affected (0.04 sec)

mysql> desc consumer;
+-------+------------------------------------+------+-----+---------+-------+
| Field | Type                               | Null | Key | Default | Extra |
+-------+------------------------------------+------+-----+---------+-------+
| name  | varchar(50)                        | YES  |     | NULL    |       |
| sex   | enum('male','female')              | YES  |     | NULL    |       |
| level | enum('vip1','vip2','vip3','黑卡')  | YES  |     | NULL    |       |
| hobby | set('play','music','read','study') | YES  |     | NULL    |       |
+-------+------------------------------------+------+-----+---------+-------+
4 rows in set (0.01 sec)

mysql> insert into consumer values
    -> ('lisl','male','黑卡','play,read'),
    -> ('chenhong','female','vip1','gilr');     #'girl'不存在hobby里,警告,不报错,查询显示该字段为空
Query OK, 2 rows affected, 1 warning (0.01 sec)
Records: 2  Duplicates: 0  Warnings: 1

mysql> select * from consumer;
+----------+--------+-------+-----------+
| name     | sex    | level | hobby     |
+----------+--------+-------+-----------+
| lisl     | male   | 黑卡  | play,read |
| chenhong | female | vip1  |           |
+----------+--------+-------+-----------+
2 rows in set (0.00 sec)

mysql>
5.11 修改表ALTER TABLE
#语法
#1.修改表名
    ALTER TABLE 表名    RENAME 新表名

#2.增加字段
    ALTER TABLE  表名    ADD 字段名 数据类型 [完整性约束条件...],
                                   ADD 字段名 数据类型  [完整性约束条件...];

     ALTER TABLE 表名   ADD 字段名   数据类型  [完整性约束条件...] FIRST;

    ALTER TABLE  表名   ADD 字段名   数据类型  [完整性约束条件...] AFTER 字段名;


#3.删除字段
    ALTER TABLE 表名    DROP  字段名;

#4.修改字段
    ALTER TABLE 表名    MODIFY 字段名  数据类型 [完整性约束条件...];

    ALTER TABLE 表名  CHANGE 旧字段名  新字段名 旧数据类型 [完整性约束条件...];

    ALTER TABLE 表名    CHANGE 旧字段名  新字段名 新数据类型[完整性约束条件...];
########################修改表名###########################
mysql> alter table t1 rename t1111;
Query OK, 0 rows affected (0.03 sec)

mysql> show tables;
+---------------+
| Tables_in_db1 |
+---------------+
| t1111         |
| t2            |
| t3            |
| t4            |
| t5            |
| user_info     |
+---------------+
6 rows in set (0.00 sec)

mysql>
mysql> desc t1111
    -> ;
+-------+------------+------+-----+---------+-------+
| Field | Type       | Null | Key | Default | Extra |
+-------+------------+------+-----+---------+-------+
| x     | tinyint(4) | YES  |     | NULL    |       |
+-------+------------+------+-----+---------+-------+
1 row in set (0.00 sec)


########################增加字段###########################
mysql> alter table t1111 add name varchar(15) not null;
Query OK, 0 rows affected (0.21 sec)

mysql> alter table t1111 add id int  FIRST;
Query OK, 0 rows affected (0.15 sec)

mysql> alter table t1111 add host char(20) not null after id;
Query OK, 0 rows affected (0.20 sec)

mysql> desc t1111
    -> ;
+-------+-------------+------+-----+---------+-------+
| Field | Type        | Null | Key | Default | Extra |
+-------+-------------+------+-----+---------+-------+
| id    | int(11)     | YES  |     | NULL    |       |
| host  | char(20)    | NO   |     | NULL    |       |
| x     | tinyint(4)  | YES  |     | NULL    |       |
| name  | varchar(15) | NO   |     | NULL    |       |
+-------+-------------+------+-----+---------+-------+
4 rows in set (0.00 sec)

########################修改字段###########################
#修改id约束条件默认值0
mysql> alter table t1111 modify id int default 0;
Query OK, 0 rows affected (0.01 sec)

mysql> desc t1111;
+-------+-------------+------+-----+---------+-------+
| Field | Type        | Null | Key | Default | Extra |
+-------+-------------+------+-----+---------+-------+
| id    | int(11)     | YES  |     | 0       |       |
| x     | tinyint(4)  | YES  |     | NULL    |       |
| name  | varchar(15) | NO   |     | NULL    |       |
+-------+-------------+------+-----+---------+-------+
3 rows in set (0.00 sec)

#修改id数据类型为char类型,没有默认值
mysql> alter table t1111 modify id char(10);
Query OK, 4 rows affected (0.25 sec)

mysql> desc t1111;
+-------+-------------+------+-----+---------+-------+
| Field | Type        | Null | Key | Default | Extra |
+-------+-------------+------+-----+---------+-------+
| id    | char(10)    | YES  |     | NULL    |       |
| x     | tinyint(4)  | YES  |     | NULL    |       |
| name  | varchar(15) | NO   |     | NULL    |       |
+-------+-------------+------+-----+---------+-------+
3 rows in set (0.00 sec)

#修改字段x为computer_id
mysql> alter table t1111 change x computer_id int default 0;
Query OK, 4 rows affected (0.22 sec)

mysql> desc t1111;
+-------------+-------------+------+-----+---------+-------+
| Field       | Type        | Null | Key | Default | Extra |
+-------------+-------------+------+-----+---------+-------+
| id          | char(10)    | YES  |     | NULL    |       |
| computer_id | int(11)     | YES  |     | 0       |       |
| name        | varchar(15) | NO   |     | NULL    |       |
+-------------+-------------+------+-----+---------+-------+
3 rows in set (0.00 sec)

mysql> select * from t1111;
+------+-------------+------+
| id   | computer_id | name |
+------+-------------+------+
| NULL |        -128 |      |
| NULL |        -128 |      |
| NULL |        -127 |      |
| NULL |         127 |      |
+------+-------------+------+
4 rows in set (0.00 sec)
5.12 复制表
#复制表结构 + 记录   (key不会复制:主键、外键和索引)
create table e2 select * from employees;

#只复制表结构
#方法一:缺点(key不会复制:主键、外键和索引)
mysql> create table e3 select * from employees where 1=2;  //条件Wie假,查不到任何记录

#方法二 :优点(完整复制表结构)
create table e4 like employees;
#复制表结构+记录
#查看原表
mysql> desc employees;
+-------+----------+------+-----+---------+----------------+
| Field | Type     | Null | Key | Default | Extra          |
+-------+----------+------+-----+---------+----------------+
| id    | int(11)  | NO   | PRI | NULL    | auto_increment |
| name  | char(15) | NO   |     | NULL    |                |
+-------+----------+------+-----+---------+----------------+
2 rows in set (0.00 sec)

mysql> select * from employees;
+----+----------+
| id | name     |
+----+----------+
|  1 | lisl     |
|  2 | zhangsan |
+----+----------+
2 rows in set (0.00 sec)

#复制原表的表结构和记录,无法复制表结构中的主键,外键,递增id,并设置默认值为0
mysql> create table e2 select * from employees;
Query OK, 2 rows affected (0.10 sec)

mysql> desc e2;
+-------+----------+------+-----+---------+-------+
| Field | Type     | Null | Key | Default | Extra |
+-------+----------+------+-----+---------+-------+
| id    | int(11)  | NO   |     | 0       |       |
| name  | char(15) | NO   |     | NULL    |       |
+-------+----------+------+-----+---------+-------+
2 rows in set (0.00 sec)

mysql> select * from e2;
+----+----------+
| id | name     |
+----+----------+
|  1 | lisl     |
|  2 | zhangsan |
+----+----------+
2 rows in set (0.00 sec)

#只复制表结构一
mysql> create table e3 select * from employees where 1=2;
Query OK, 0 rows affected (0.08 sec)

mysql> desc e3;
+-------+----------+------+-----+---------+-------+
| Field | Type     | Null | Key | Default | Extra |
+-------+----------+------+-----+---------+-------+
| id    | int(11)  | NO   |     | 0       |       |
| name  | char(15) | NO   |     | NULL    |       |
+-------+----------+------+-----+---------+-------+
2 rows in set (0.00 sec)

#只复制表结构二
mysql> create table e4 like employees;
Query OK, 0 rows affected (0.08 sec)

mysql> desc e4;
+-------+----------+------+-----+---------+----------------+
| Field | Type     | Null | Key | Default | Extra          |
+-------+----------+------+-----+---------+----------------+
| id    | int(11)  | NO   | PRI | NULL    | auto_increment |
| name  | char(15) | NO   |     | NULL    |                |
+-------+----------+------+-----+---------+----------------+
2 rows in set (0.00 sec)

mysql> select * from e4;
Empty set (0.00 sec)
5.13 删除表
DROP TABLE 表名
mysql> drop table e4;
六、完整性约束
6.1介绍
约束条件与数据类型的宽度一样,都是可选参数
作用:用于保证数据的完整性和一致性
主要分为:
PRIMARY KEY (PK)    标识该字段为该表的主键,,可以唯一的标识记录
foreign key (FK)        标识该字段Wie该表的外键
not null     标识字段不能为空
unique key (uk)        标识该字段的值是唯一的
auto_increment        标识该字段的值自动增长(整数类型,而且为主键)
default        为该字段设置默认值

unsigned    无符号
zerofill        使用0 填充
6.2 各个约束条件示例集锦
##################not null#############################
#在linux下操作:(windows下默认是0)
mysql> create table t5 (id int not null);
Query OK, 0 rows affected (0.08 sec)

mysql> desc t5;
+-------+---------+------+-----+---------+-------+
| Field | Type    | Null | Key | Default | Extra |
+-------+---------+------+-----+---------+-------+
| id    | int(11) | NO   |     | NULL    |       |
+-------+---------+------+-----+---------+-------+
1 row in set (0.01 sec)

mysql> insert into t5 values ();    #为空报错
ERROR 1364 (HY000):


##################default#############################
#设置age字段有默认值后,无论age字段是null还是not null,都可以插入空
#插入空默认填入default指定值
mysql> create table t12 (age int default 18);
Query OK, 0 rows affected (0.04 sec)

mysql> insert into t12 values();
Query OK, 1 row affected (0.01 sec)

mysql> desc t12;
+-------+---------+------+-----+---------+-------+
| Field | Type    | Null | Key | Default | Extra |
+-------+---------+------+-----+---------+-------+
| age   | int(11) | YES  |     | 18      |       |
+-------+---------+------+-----+---------+-------+
1 row in set (0.00 sec)

mysql> select * from t12;
+------+
| age  |
+------+
|   18 |
+------+
1 row in set (0.00 sec)


##################unique#############################
mysql> create table t13 (id int unique);
Query OK, 0 rows affected (0.05 sec)

mysql> insert into t13 values(100);
Query OK, 1 row affected (0.01 sec)

mysql> insert into t13 values(100); #不能重复,否则报错
ERROR 1062 (23000): Duplicate entry '100' for key 'id'
mysql> select * from t13
    -> ;
+------+
| id   |
+------+
|  100 |
+------+
1 row in set (0.00 sec)

#联合唯一
mysql> create table t14 (ip char(20),port int,unique(ip,port));
Query OK, 0 rows affected (0.05 sec)

mysql> insert into t14 values('127.0.0.1',3306);
Query OK, 1 row affected (0.01 sec)

mysql> insert into t14 values('127.0.0.1',3307);
Query OK, 1 row affected (0.01 sec)

mysql> insert into t14 values('127.0.0.1',3306);
ERROR 1062 (23000): Duplicate entry '127.0.0.1-3306' for key 'ip'
mysql> select * from t14;
+-----------+------+
| ip        | port |
+-----------+------+
| 127.0.0.1 | 3306 |
| 127.0.0.1 | 3307 |
+-----------+------+
2 rows in set (0.00 sec)

##################primary key#############################
#定义主键的三种方法:
#单列做主键方法
##方法一:not null + unique

mysql> create table t1 (
    -> id int not null unique,    #成为主键
    -> name varchar(20) not null unique,    #已经有主键了,因此依然是not null 和unique
    -> comment varchar(100)
    -> );
Query OK, 0 rows affected (0.08 sec)

mysql> show tables;
+---------------+
| Tables_in_db2 |
+---------------+
| t1            |
+---------------+
1 row in set (0.00 sec)

mysql> desc t1;
+---------+--------------+------+-----+---------+-------+
| Field   | Type         | Null | Key | Default | Extra |
+---------+--------------+------+-----+---------+-------+
| id      | int(11)      | NO   | PRI | NULL    |       |
| name    | varchar(20)  | NO   | UNI | NULL    |       |
| comment | varchar(100) | YES  |     | NULL    |       |
+---------+--------------+------+-----+---------+-------+
3 rows in set (0.00 sec)

##方法二:在某一个字段后用primary key
mysql> create table t2 (
    -> id int primary key,    #设置为主键
    -> name varchar(20),
    -> comment varchar(100)
    -> );
Query OK, 0 rows affected (0.05 sec)

mysql> desc t2;
+---------+--------------+------+-----+---------+-------+
| Field   | Type         | Null | Key | Default | Extra |
+---------+--------------+------+-----+---------+-------+
| id      | int(11)      | NO   | PRI | NULL    |       |
| name    | varchar(20)  | YES  |     | NULL    |       |
| comment | varchar(100) | YES  |     | NULL    |       |
+---------+--------------+------+-----+---------+-------+
3 rows in set (0.00 sec)

##方法三:在所有字段后单独定义primary key
mysql> create table t4 (
    -> id int,
    -> name varchar(20),
    -> comment varchar(100),
    -> constraint pk_name primary key(id));    #创建id为主键,并命名为pk_name
Query OK, 0 rows affected (0.06 sec)

mysql> desc t4;
+---------+--------------+------+-----+---------+-------+
| Field   | Type         | Null | Key | Default | Extra |
+---------+--------------+------+-----+---------+-------+
| id      | int(11)      | NO   | PRI | NULL    |       |
| name    | varchar(20)  | YES  |     | NULL    |       |
| comment | varchar(100) | YES  |     | NULL    |       |
+---------+--------------+------+-----+---------+-------+
3 rows in set (0.00 sec)


#多列做主键
mysql> create table t5 (
    -> ip varchar(15),
    -> port char(5),
    -> service_name varchar(10) not null,
    -> primary key(ip,port)        #并列ip-port为主键
    -> );
Query OK, 0 rows affected (0.06 sec)

mysql> desc t5;
+--------------+-------------+------+-----+---------+-------+
| Field        | Type        | Null | Key | Default | Extra |
+--------------+-------------+------+-----+---------+-------+
| ip           | varchar(15) | NO   | PRI | NULL    |       |
| port         | char(5)     | NO   | PRI | NULL    |       |
| service_name | varchar(10) | NO   |     | NULL    |       |
+--------------+-------------+------+-----+---------+-------+
3 rows in set (0.00 sec)

mysql> insert into t5 values
    -> ('127.0.0.1','3306','mysqld'),
    -> ('127.0.0.1','8080','http')
    -> ;
Query OK, 2 rows affected (0.02 sec)

mysql> insert into t5 values ('127.0.0.1','3306','nginx');    #ip_port已存在
ERROR 1062 (23000): Duplicate entry '127.0.0.1-3306' for key 'PRIMARY'


##################auto_increment#############################

#自增id
mysql> create table t6 (
    -> id int primary key auto_increment,
    -> name varchar(20),
    -> sex enum('male','female') default 'male'
    -> );
Query OK, 0 rows affected (0.07 sec)

mysql> desc t6;
+-------+-----------------------+------+-----+---------+----------------+
| Field | Type                  | Null | Key | Default | Extra          |
+-------+-----------------------+------+-----+---------+----------------+
| id    | int(11)               | NO   | PRI | NULL    | auto_increment |
| name  | varchar(20)           | YES  |     | NULL    |                |
| sex   | enum('male','female') | YES  |     | male    |                |
+-------+-----------------------+------+-----+---------+----------------+
3 rows in set (0.00 sec)

mysql> insert into t6(name) values
    -> ('lisl'),
    -> ('lvq')
    -> ;
Query OK, 2 rows affected (0.02 sec)

mysql> select * from t6;
+----+------+------+
| id | name | sex  |
+----+------+------+
|  1 | lisl | male |
|  2 | lvq  | male |
+----+------+------+
2 rows in set (0.00 sec)

##################foreign key#############################
#外键:多对一,在多的这张表设置外键关联一的那张表

mysql> create table department(
    -> id int primary key,
    -> name varchar(20) not null
    -> )engine=innodb;
Query OK, 0 rows affected (0.07 sec)

mysql> create table employee(
    -> id int primary key,
    -> name varchar(20) not null,
    -> dpt_id int,
    -> constraint fk_name foreign key(dpt_id) references department(id) on delete cascade on update cascade     #设置外键,更新与删除原表操作会同步到外键表
    -> )engine=innodb;
Query OK, 0 rows affected (0.07 sec)

#插入部门表数据
mysql> insert into department values
    -> (1,'HR'),
    -> (2,'Sale'),
    -> (3,'IT');
Query OK, 3 rows affected (0.01 sec)

#插入员工表数据
mysql> insert into employee values
    -> (1,'lisl',1),
    -> (2,'lvx',2),
    -> (3,'hsy',2),
    -> (4,'wcx',3)
    -> ;
Query OK, 4 rows affected (0.02 sec)

#查询员工表数据
mysql> select * from employee;
+----+------+--------+
| id | name | dpt_id |
+----+------+--------+
|  1 | lisl |      1 |
|  2 | lvx  |      2 |
|  3 | hsy  |      2 |
|  4 | wcx  |      3 |
+----+------+--------+
4 rows in set (0.00 sec)

#查询部门表数据
mysql> select * from department;
+----+------+
| id | name |
+----+------+
|  1 | HR   |
|  2 | Sale |
|  3 | IT   |
+----+------+
3 rows in set (0.00 sec)

#删除部门表id=3的部门,员工表与该部门相关的也随之被删除同步
mysql> delete from department where id=3;
Query OK, 1 row affected (0.01 sec)

mysql> select * from department;
+----+------+
| id | name |
+----+------+
|  1 | HR   |
|  2 | Sale |
+----+------+
2 rows in set (0.00 sec)

mysql> select * from employee;
+----+------+--------+
| id | name | dpt_id |
+----+------+--------+
|  1 | lisl |      1 |
|  2 | lvx  |      2 |
|  3 | hsy  |      2 |
+----+------+--------+
3 rows in set (0.00 sec)

#更新部门表id=2为2222,员工表对应的部门id也随之更新同步
mysql> update department set id=2222 where id=2;
Query OK, 1 row affected (0.02 sec)

mysql> select *from employee;
+----+------+--------+
| id | name | dpt_id |
+----+------+--------+
|  1 | lisl |      1 |
|  2 | lvx  |   2222 |
|  3 | hsy  |   2222 |
+----+------+--------+
3 rows in set (0.00 sec)

mysql>


##################多对多#############################
#作者表与书表属于多对多关系,即额外在构建一张author2book表,关联俩个字段外键(author_id,book_id)

#创建作者表
mysql> create table author(
    -> id int primary key auto_increment,
    -> name varchar(20)
    -> );
Query OK, 0 rows affected (0.07 sec)

#创建书表
mysql> create table book(
    -> id int primary key auto_increment,
    -> name varchar(20)
    -> );
Query OK, 0 rows affected (0.07 sec)

#创建作者与书多对多关系的author2book表
mysql> create table author2book(
    -> id int not null unique auto_increment,
    -> author_id int not null,
    -> book_id int not null,
    -> constraint fk_author foreign key(author_id) references author(id)
    -> on delete cascade
    -> on update cascade,
    -> constraint fk_book foreign key(book_id) references book(id)
    -> on delete cascade
    -> on update cascade,
    -> primary key(author_id,book_id)
    -> );
Query OK, 0 rows affected (0.06 sec)

#添加作者表数据
mysql> insert into author(name) values('lisl'),('lxq'),('wcx');
Query OK, 3 rows affected (0.02 sec)

#添加书表数据
mysql> insert into book(name) values('python'),('linux'),('network');
Query OK, 3 rows affected (0.01 sec)

#关联作者与书的关系
mysql> insert into author2book(author_id,book_id) values
    -> (1,1),
    -> (1,2),
    -> (2,3),
    -> (2,2);
Query OK, 4 rows affected (0.01 sec)


mysql> select * from author2book
    -> ;
+----+-----------+---------+
| id | author_id | book_id |
+----+-----------+---------+
|  1 |         1 |       1 |
|  2 |         1 |       2 |
|  3 |         2 |       3 |
|  4 |         2 |       2 |
+----+-----------+---------+
4 rows in set (0.00 sec)

mysql> select * from author;
+----+------+
| id | name |
+----+------+
|  1 | lisl |
|  2 | lxq  |
|  3 | wcx  |
+----+------+
3 rows in set (0.00 sec)

mysql> select * from book;
+----+---------+
| id | name    |
+----+---------+
|  1 | python  |
|  2 | linux   |
|  3 | network |
+----+---------+
3 rows in set (0.00 sec)

##################一对一#############################
#客户表与学生表
#学生一定来自于客户,一对一,外键关联客户表
#客户不一定是学生

#创建客户表
mysql> create table customer(
    -> id int primary key auto_increment,
    -> name varchar(20) not null,
    -> qq varchar(10) not null,
    -> phone char(16) not null
    -> );
Query OK, 0 rows affected (0.06 sec)

#创建学生表
mysql> create table student(
    -> id int primary key auto_increment,
    -> class_name varchar(20) not null,
    -> customer_id int unique,  #保证属于客户是唯一
    -> foreign key(customer_id) references customer(id)     #关联外键
    -> on delete cascade
    -> on update cascade
    -> );
Query OK, 0 rows affected (0.06 sec)

#插入客户表哦数据
mysql> insert into customer(name,qq,phone) values
    -> ('lisl','6666',18233882288),
    -> ('lxq','8888',13611112222);
Query OK, 2 rows affected (0.01 sec)

#插入学生表数据
mysql> insert into student(class_name,customer_id) values
    -> ('python class',1);
Query OK, 1 row affected (0.01 sec)


mysql> select * from customer;
+----+------+------+-------------+
| id | name | qq   | phone       |
+----+------+------+-------------+
|  1 | lisl | 6666 | 18233882288 |
|  2 | lxq  | 8888 | 13611112222 |
+----+------+------+-------------+
2 rows in set (0.00 sec)

mysql> select * from student;
+----+--------------+-------------+
| id | class_name   | customer_id |
+----+--------------+-------------+
|  1 | python class |           1 |
+----+--------------+-------------+
1 row in set (0.00 sec)

mysql>
七、数据操作
6.1 插入数据
#1.插入完整数据(顺序插入)
    语法一:
    INSERT INTO 表名(字段1,字段2,字段3...字段n) VALUES(值1,值2,值3,...值n);

    语法二:
    INSERT INTO 表名 VALUES (值1,值2,值3,...值n)

#2.指定字段插入数据
    语法:
    INSERT INTO 表名(字段1,字段3,字5,...) VALUES (值1,值3,值5,..)

#3.插入多条记录
    语法:
    INSERT INTO 表名 VALUES
        (值1,值2,值3,...值n),
        (值1,值2,值3,...值n),
        (值1,值2,值3,...值n);

#4.插入查询结果
    语法:
    INSERT INTO 表名(字段1,字段2,字段3,...字段n)
        SELECT (字段1,字段2,字段3,...字段n) FROM 表2
            WHERE ...;

    eg:
        #将book表里的id=3的条目的name字段,插入到book表里
        insert into book(name) select name from book where id=3;
6.2 删除数据
语法:
    DELETE FROM 表名 WHERE condition;   #删出的数据,不会影响原本的自增id顺序

    eg:
        #删除id=2的数据
        delete from book where id =2;
6.3修改数据
语法:
    UPDATE 表名 SET 字段1=值1,字段2=值2,where condition;
    eg:
        #修改mysqlroot密码
         update mysql.user set authentication_string=password('123456') where User='root';
         flush privileges;  #刷新权限
6.4查询数据
八、pymysql模块使用
8.1 安装
pip3 install pymysql
8.2 数据库数据信息

8.3 pymysql模块常规使用
import pymysql
sip='10.53.34.83'
sport='37196'


#链接
conn = pymysql.connect(host='127.0.0.1',user='root',password='123456',database='shenji',charset='utf8')

#获取游标
cursor=conn.cursor()    #执行完毕返回的结果集默认已元组显示
cursor=conn.cursor(cursor=pymysql.cursors.DictCursor)   #以字典形式返回

#执行sql语句,(此方法有安全隐患)
sql='select * from shenji3 where sip="%s" and sport="%s"'%(sip,sport)
print(sql)
res=cursor.execute(sql) #执行sql语句,返回sql查询成功的记录
print(res)

cursor.close()
conn.close()

if res:
    print('登录成功')
else:
    print('登录失败')
8.4 execute()之sql注入
注意:注意--会注释掉它之后的sql,正确的语法:--后至少有一个任意字符
sql注入根本原理:根据程序的字符串拼接name='%s',我们输入一个xxx' --haha,用我们输入的xxx加‘在程序中拼接成一个判断条件name='xxx' --haha'

最后那一个空格,在一条sql语句中如果遇到select * from t1 where id > 3 -- and name='lisl';则--之后的条件被注释掉了
