


思科交换机与路由器的小型局域网互通配置
此次实验通过配置一个小型局域网来梳理细节
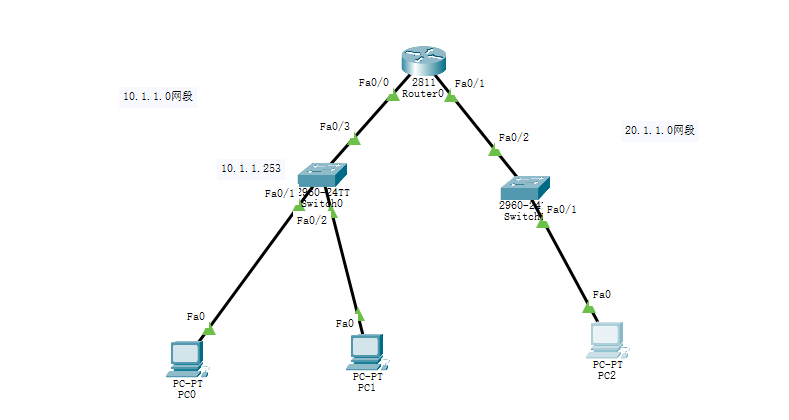
实验拓扑:
实验目标:
1. 实现两个网段互通
2.配置交换机和路由器的用户密码和特权密码(都为123)
3.PC通过telnet和ssh实现远程控制(需要用交换机和路由器的本地账号)
4.10网段主机能够远程控制20网段的交换机
实验ip预定 :
PC0 10.1.1.1
PC1 10.1.1.2
PC2 20.1.1.1
sw0(左) 10.1.1.253
sw1 20.1.1.253
route 10.1.1.254 20.1.1.254
实验开始交换机用2960 路由器用2811
实现目标:两个网段互通
一.对路由器的操作
进入路由器的CLI界面手动进行配置
由于路由器的三层端口都是管理员手动关掉


route> en
route#conf t
route(config)#int f0/0
route(config-if)# no shutdown
route(config-if)#int f0/1
route(config-if)#no shut
#成功开启路由器的两个三层接口

#配置接口的ip
route(config-if)# ip add 20.1.1.254 255.255.255.0
route(config-if)#int f0/0
route(config-if)#ip add 10.1.1.1254 255.255.255.0
#ip配置完毕
二.配置pc ip(这里先用静态)
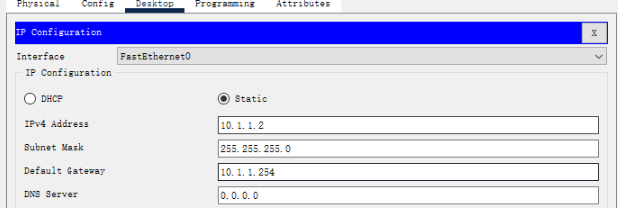
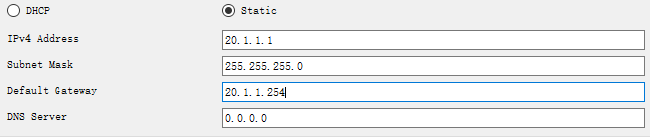
至此应该可以实现两个网段的互通了
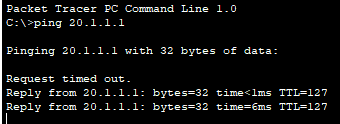
10.1.1.1ping 20.1.1.1 测试成功
实验目标 配置交换机和路由器的用户模式密码和特权模式密码
解析:用户模式密码需要在line console 0口进行配置
特权模式密码要在全局模式配置 tips:本地用户创建也是在全局模式设置
一. 对交换机的操作
进入sw0的CLI界面
#配置用户模式登录密码
Switch>
Switch>en
Switch#conf t
Enter configuration commands, one per line.  End with CNTL/Z.
Switch(config)#line con
Switch(config)#line console 1
Switch(config)#line console 0
Switch(config-line)#password 123
Switch(config-line)#login
Switch(config-line)#exit

#配置特权模式登录密码
Switch(config)#enable password 123 #明文密码
Switch(config)#enable secret 123 #也可以用secret 如果用了secret则在running-config文件是加密密码
路由器也是一样的命令
实验目标 PC通过telnet和ssh实现远程控制(需要用交换机和路由器的本地账号)
解析:
1.要开启交换机和路由器的vlan口并配置一个ip让pc能连接
2.要开启交换机和路由器的本地账户
3.ssh生成一对密钥
4.开启虚拟端口
一 对交换机telnet操作
进入交换机的CLI界面
 1 Switch(config)#line vty 0 4 #VTY是路由器的远程登陆的虚拟端口,0 4表示可以同时打开5个会话,line vty 0 4是进入VTY端口,对VTY端口进行配置
 2 Switch(config-line)#transp
 3 Switch(config-line)#transport inpu
 4 Switch(config-line)#transport input ? #查看有什么远程登陆的方式 可以指定
 5   all     All protocols
 6   none    No protocols
 7   ssh     TCP/IP SSH protocol
 8   telnet  TCP/IP Telnet protocol
 9 Switch(config-line)#transport input all
10 Switch(config-line)#login local  #配置是本地登录
11 Switch(config-line)#exit
12 Switch(config)#int vlan1      #配置vlan1的ip 这个接口的名字可以通过 do sh ip int b 来查看
13 Switch(config-if)#no sh
   Swithc(config-if)#ip add  10.1.1.253 255.255.255.0
14 Switch(config-if)#exit
15 Switch(config)#username lisenmiller password 123 #配置本地账户命令
用PC0telnet测试
C:\>telnet 10.1.1.253
Trying 10.1.1.253 ...Open

User Access Verification

Username: lisenmiller
Password:
Switch> #进入到交换机的命令配置页面 成功
二.对路由器telnet的操作
 1 Router(config)#
 2 Router(config)#do sh ip int b
 3 Interface              IP-Address      OK? Method Status                Protocol
 4 FastEthernet0/0        10.1.1.254      YES manual up                    up
 5 FastEthernet0/1        20.1.1.254      YES manual up                    up
 6 Vlan1                  unassigned      YES unset  administratively down down
 7 Router(config)#lin
 8 Router(config)#line vty 0 4
 9 Router(config-line)#login local
10 Router(config-line)#trans input all
11 Router(config-line)#exit
12 Router(config)#username lisenmiller password 123
由于路由器已经有了两个ip 10.1.1.254 20.1.1.254都代表路由器 所以可以不用配置vlanip代表它
用pc0telnet测试
C:\>telnet 20.1.1.254  tips:当用PC远程telnet 网关时,如果网关之前没有配置过特权模式的密码PC机也不能登录进去。所以只能通过配置网关的特权模式密码调整
Trying 20.1.1.254 ...Open

User Access Verification

Username: lisenmiller
Password:
Router>  #进入到路由器的命令配置页面 成功
三 ssh连接
解析:
1.配置vlan口的ip
2.配置本地用户并且本地登录
3.配置hostname 和domain-name
4.生成密钥对
对交换机操作
route(config)#host route
route(config)#ip domain-name HackTB.com
route(config)#crypto key generate rsa
The name for the keys will be: route.HackTB.com
Choose the size of the key modulus in the range of 360 to 2048 for your
  General Purpose Keys. Choosing a key modulus greater than 512 may take
  a few minutes.

How many bits in the modulus [512]:
% Generating 512 bit RSA keys, keys will be non-exportable...[OK]

route(config)#
PC测试
C:\>ssh -l lisenmiller 10.1.1.254  tips :注意这里的ssh格式是思科软件的 现实中的ssh登录应该是 ssh 用户名@ip

Password:

route> #成功
路由器的操作相似
实验目标 10网段主机能够远程控制20网段的交换机
解析 需要
Switch(config)#ip default-gateway 10.1.1.254
PC2测试sw0 20.1.1.1 连接sw0
C:\>ipconfig
FastEthernet0 Connection:(default port)

   Connection-specific DNS Suffix..:
   Link-local IPv6 Address.........: FE80::2D0:58FF:FE05:41A0
   IPv6 Address....................: ::
   IPv4 Address....................: 20.1.1.1
   Subnet Mask.....................: 255.255.255.0
   Default Gateway.................: ::
                                     20.1.1.254
C:\>telnet 10.1.1.253
Trying 10.1.1.253 ...Open
User Access Verification

Username: lisenmiller
Password:
Switch> #成功


【推荐】国内首个AI IDE,深度理解中文开发场景,立即下载体验Trae
【推荐】编程新体验,更懂你的AI,立即体验豆包MarsCode编程助手
【推荐】抖音旗下AI助手豆包,你的智能百科全书,全免费不限次数
【推荐】轻量又高性能的 SSH 工具 IShell:AI 加持,快人一步
· Manus爆火,是硬核还是营销?
· 终于写完轮子一部分:tcp代理 了,记录一下
· 别再用vector<bool>了!Google高级工程师:这可能是STL最大的设计失误
· 单元测试从入门到精通
· 震惊!C++程序真的从main开始吗?99%的程序员都答错了