
ASIHTTPRequest类库简介和使用说明
官方网站: http://allseeing-i.com/ASIHTTPRequest/ 。可以从上面下载到最新源码,以及获取到相关的资料。
使用iOS SDK中的HTTP网络请求API,相当的复杂,调用很繁琐,ASIHTTPRequest就是一个对CFNetwork API进行了封装,并且使用起来非常简单的一套API,用Objective-C编写,可以很好的应用在Mac OS X系统和iOS平台的应用程序中。ASIHTTPRequest适用于基本的HTTP请求,和基于REST的服务之间的交互。
ASIHTTPRequest功能很强大,主要特色如下:
- l 通过简单的接口,即可完成向服务端提交数据和从服务端获取数据的工作
- l 下载的数据,可存储到内存中或直接存储到磁盘中
- l 能上传本地文件到服务端,文件需符合html文件格式
- l 可以方便的访问和操作请求和返回的Http头信息
- l 可以获取到上传或下载的进度信息,为应用程序提供更好的体验
- l 支持上传或下载队列,并且可获取队列的进度信息
- l 支持基本、摘要和NTLM身份认证,在同一会话中授权凭证会自动维持,并且可以存储在Keychain(Mac和iOS操作系统的密码管理系统)中
- l 支持Cookie
- l 当应用(iOS 4+)在后台运行时,请求可以继续运行
- l 支持GZIP压缩数据
- l 内置的ASIDownloadCache类,可以缓存请求返回的数据,这样即使没有网络也可以返回已经缓存的数据结果
- l ASIWebPageRequest –可以下载完整的网页,包括包含的网页、样式表、脚本等资源文件,并显示在UIWebView /WebView中。任意大小的页面都可以无限期缓存,这样即使没有网络也可以离线浏览
- l 支持客户端证书
- l 支持通过代理发起Http请求
- l 支持带宽限制。在iOS平台,可以根据当前网络情况来自动决定是否限制带宽,例如当使用WWAN(GPRS/Edge/3G)网络时限制,而当使用WIFI时不做任何限制
- l 支持断点续传
- l 支持同步和异步请求
- | (Mac OS X 10.6, IOS 4及以上)支持请求过程中的状态变化通知,通过delegation或者blocks获取
- | 支持单元测试
2.1.1安装说明
如果想在iOS项目中使用ASIHTTPRequest,需要在项目中进行简单的配置,步骤如下:
1) 添加文件
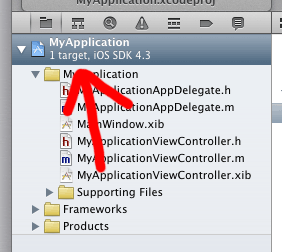
往一个Xcode项目中添加第三方类库文件,有两种方式:
1. 第一种方式,在Finder中打开需要添加到文件或文件夹,在Xcode中打开要添加文件的项目,然后选中要添加的文件或文件夹,将它从Finder中拖 到Xcode中,然后释放。在弹出的对话框中,如果文件已经拷贝到了项目文件目录中,则不需要选中“Copy items”的复选框;如果文件没有拷贝到项目文件目录,就需要选中“Copy items”的复选框,这样Xcode会自动把文件复制到项目文件目录下。如下图所示:


2. 第二种方式,在Xcode中,在要添加文件的分组下点右键,选中“Add Files to “My
Project”…”菜单,在弹出的文件浏览对话框中选中要添加到文件或文件夹。如果要添加文件已经拷贝到了项目文件目录中,则不需要选中“Copy
items”的复选框;如果文件没有拷贝到项目文件目录,就需要选中“Copy
items”的复选框,这样Xcode会自动把文件复制到项目文件目录下。如下图所示:


根据上面的说明,添加ASIHTTPRequest相关文件到Xcode项目中,所需文件列表如下:
ASIHTTPRequestConfig.h
ASIHTTPRequestDelegate.h
ASIProgressDelegate.h
ASICacheDelegate.h
ASIHTTPRequest.h
ASIHTTPRequest.m
ASIDataCompressor.h
ASIDataCompressor.m
ASIDataDecompressor.h
ASIDataDecompressor.m
ASIFormDataRequest.h
ASIInputStream.h
ASIInputStream.m
ASIFormDataRequest.m
ASINetworkQueue.h
ASINetworkQueue.m
ASIDownloadCache.h
ASIDownloadCache.m
ASIAuthenticationDialog.h
ASIAuthenticationDialog.m
Reachability.h (在源码的 External/Reachability 目录下)
Reachability.m (在源码的 External/Reachability 目录下)
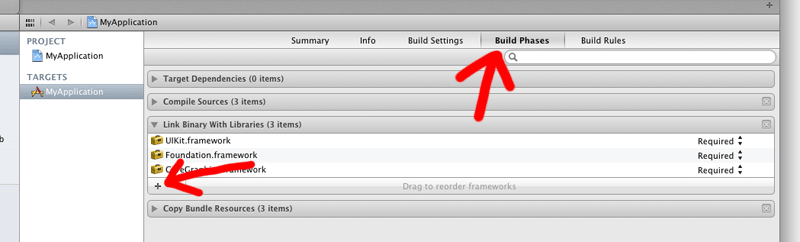
2) 链接相关类库
1. 选中项目
2. 选中目标
3. 跳转到“Build Phases”标签
4. 展开“Link Binary With Libraries”分组
5. 点击“+”添加类库
如下图所示:

6. 从列表中选择CFNetwork.framework,然后点击“Add”按钮。

7. 按照上一步相同的方法添加:SystemConfiguration.framework, MobileCoreServices.framework,CoreGraphics.framework和libz.1.2.3.dylib这几个类库。
8. 添加完后,可以将添加好的一起类库拖到Xcode项目的Frameworks目录下

2.1.2使用说明
ASIHTTPRequest有很多功能,所有功能说明都可以在其官方网站的相关文档中查到,限于篇幅,本章仅简单介绍一下如何使用ASIHTTPRequest来进行同步Http请求和异步Http请求。在后面的章节中,我们还会用到它的一些其他功能。
在使用ASIHTTPRequest之前,请确认已经正确安装,然后在需要应用它的代码文件头部,加入:
#import “ASIHTTPRequest.h”
这样就可以在代码中使用ASIHTTPRequest相关的类。
创建一个同步请求
这是ASIHTTPRequest最简单的一种使用模式,发送startSynchronous消息后即开始在同一线程中执行HTTP请求,线程将一直等待直到请求结束(请求成功或者失败)。通过检查error属性可以判断请求是否成功或者有错误发生。
要获取返回的文本信息,调用responseString方法。如果下载的是二进制文件,例如图片、MP3,则调用responseData方法,可以得到一个NSData对象。
- (IBAction)grabURL:(id)sender
{
NSURL *url = [NSURL URLWithString:@"http://allseeing-i.com"];
ASIHTTPRequest *request = [ASIHTTPRequest requestWithURL:url];
[request startSynchronous];
NSError *error = [request error];
if (!error) {
NSString *response = [request responseString];
}
}
一般情况下,应该优先使用异步请求代替同步请求,当在主线程中使用ASIHTTPRequest同步请求,应用程序的界面会锁定,无法进行任何操作,直到请求完成。
创建一个异步请求
上例中的同步请求,如果换成异步方式来调用,请求是在后台线程中运行,当请求执行完后再通知调用的线程。这样不会导致主线程进行网络请求时,界面被锁定等情况。
- (IBAction)grabURLInBackground:(id)sender
{
NSURL *url = [NSURL URLWithString:@"http://allseeing-i.com"];
ASIHTTPRequest *request = [ASIHTTPRequest requestWithURL:url];
[request setDelegate:self];
[request startAsynchronous];
}
- (void)requestFinished:(ASIHTTPRequest *)request
{
// 当以文本形式读取返回内容时用这个方法
NSString *responseString = [request responseString];
// 当以二进制形式读取返回内容时用这个方法
NSData *responseData = [request responseData];
}
- (void)requestFailed:(ASIHTTPRequest *)request
{
NSError *error = [request error];
}
Using ASIHTTPRequest in an iOS project
1) Add the files
Copy the files you need to your project folder, and add them to your Xcode project. An overview of the ASIHTTPRequest source files appears here.
If you aren't sure which files you need, it's best to copy all the following files:
- ASIHTTPRequestConfig.h
- ASIHTTPRequestDelegate.h
- ASIProgressDelegate.h
- ASICacheDelegate.h
- ASIHTTPRequest.h
- ASIHTTPRequest.m
- ASIDataCompressor.h
- ASIDataCompressor.m
- ASIDataDecompressor.h
- ASIDataDecompressor.m
- ASIFormDataRequest.h
- ASIInputStream.h
- ASIInputStream.m
- ASIFormDataRequest.m
- ASINetworkQueue.h
- ASINetworkQueue.m
- ASIDownloadCache.h
- ASIDownloadCache.m
iPhone projects must also include:
- ASIAuthenticationDialog.h
- ASIAuthenticationDialog.m
- Reachability.h (in the External/Reachability folder)
- Reachability.m (in the External/Reachability folder)
2) Link with CFNetwork, SystemConfiguration, MobileCoreServices, CoreGraphics and zlib
Open the settings for your target by clicking on the blue bar at the very top of the Xcode sidebar:
Open the Build Phases tab, expand the box labeled Link Binary With Libraries then click the plus button.
Choose CFNetwork.framework from the list, and click Add:

Repeat the last two steps to add the following: SystemConfiguration.framework, MobileCoreServices.framework, CoreGraphics.framework and libz.dylib.
Using ASIHTTPRequest in a Mac OS X project
To use ASIHTTPRequest in a Mac project, you'll need to link against:
- SystemConfiguration.framework + zlib (as above)
- CoreServices.framework
CFNetwork is part of the CoreServices framework on Mac OS X. Unless you are writing a console-based application, your application is probably already setup to link with CoreServices, but if not, simply add CoreServices.framework in the same way as described above.
Building the tests

Most users can skip this part!
The tests that come with ASIHTTPRequest primarily exist for my benefit, so I can check I haven’t broken something when I make changes. You only need to run the tests if you are making changes to ASIHTTPRequest, or want to confirm that something is working as expected.
ASIHTTPRequest uses Gabriel Handford’s wonderful GHUnit framework for running tests.
As of v1.8-50, GHUnit is no longer included as a git submodule. Instead, build scripts automatically download a pre-compiled framework if one does not already exist locally. If you would prefer to build GHUnit yourself, simply grab a copy from GitHub, and drop your built framework in External/GHUnit.
Some of the tests require additional information to run:
- To run the S3 tests, you need to specify your S3 access details in the top of ASIS3RequestTests.m
- To run the proxy tests, you need to specify details of your proxy server, and a PAC file if you want to run the PAC tests. Note that the proxy tests require a proxy server, while all the other tests require that you don't have a proxy server.

 浙公网安备 33010602011771号