
Jenkins SCM实现Git仓库定期编译
本文解决的问题:
- 利用Jenkins SCM定期触发GitSCM构建。
- 如何配置Jenkins SCM机制。
- 如何写一个jenkinsfile,学习基本的Groovy DSL语法。
- GitSCM插件,通过GIT_BRANCH变量得到分支名。
- 将本地分支切换到触发构建的分支,将所有子模块切换到同名的分支并git pull最新代码。
Jenkins是一款自动化任务的软件。软件开发经常需要编译版本发布。于是我们可以利用Jenkins定期获得代码进行编译。
一、Jenkins运行原理
- Jenkins官方文档: https://www.jenkins.io/doc/book/pipeline/getting-started/
- Jenkins文档: https://rtyler.github.io/jenkins.io/doc/book/pipeline/getting-started/#defining-a-pipeline-in-scm
参考:jenkins原理图
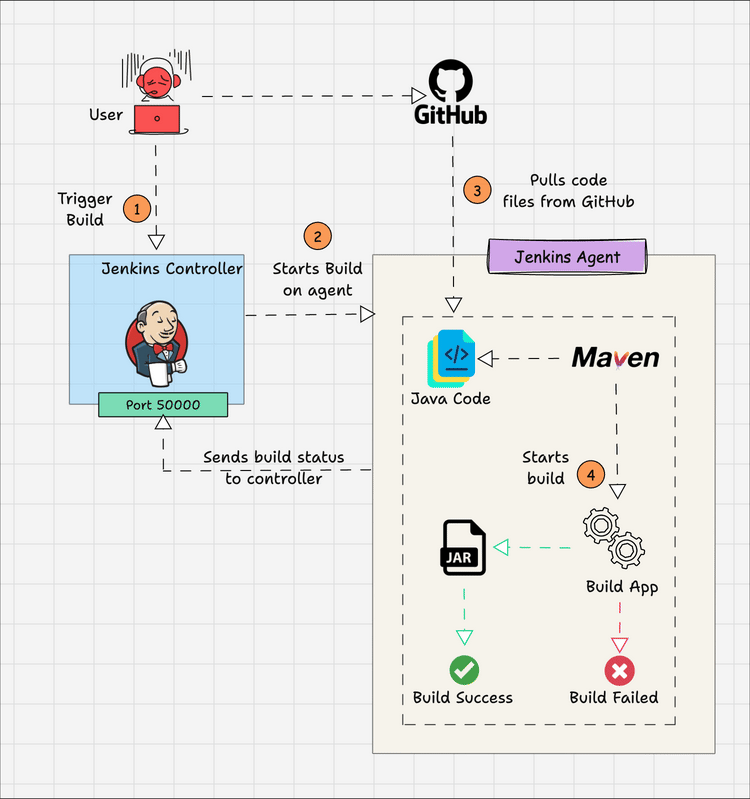
日常工作场景为开发者将代码提交到代码服务器如:Github。如果要实现自动化编译。基本步骤如下:
- 首先安装Jenkins后,Jenkins Agent有完整的编译环境,与开发者代码编译环境完全一样。
- 在Jenkins Controller上创建流水线(pipline)任务。例如:SCM任务可以定期去代码服务器上拉取代码。
二、Jenkins SCM
本章内容解决每周自动触发编译的问题,在满足以下条件时执行编译:
- 代码仓库在本周有新的代码提交。
- 代码仓库如果有多个不同分支有新提交,则采用不同编译时段错开。
创建Jenkins任务步骤:
- Jenkins上创建任务(Job)名为:
build_pipline。 - 进入任务设置界面:Dashboard >>
build_pipline。 - 在Jenkins配置界面 “构建触发器” 中选择任务触发条件:定时构建,轮询SCM,触发远程构建等。这些条件之间是或的关系,也就是任何一个条件满足都会运行任务(Job)。
- 在Jenkins配置界面 “流水线” 中设置任务执行的具体内容。
Jenkins的任务执行规则为首先根据构建触发器里的条件满足后触发Jenkins任务启动,任务查找流水线里定义的执行内容。流水线由Groovy脚本编写,里面定义了不同的stage阶段。Jenkins是由第一个stage执行到最后一个stage,执行完毕后返回执行结果。
Jenkins配置界面如下:

2.1 配置构建触发器:轮询SCM
勾选轮询SCM后需要配置“日程表”设置周期。点图标“?”号可以获取帮助提示。
输入格式为:
MINUTE HOUR DOM MONTH DOW
说明:
MINUTE: Minutes within the hour (0–59)
HOUR: The hour of the day (0–23)
DOM: The day of the month (1–31)
MONTH: The month (1–12)
DOW: The day of the week (0–7) where 0 and 7 are Sunday.
2.2 配置流水线:GitSCM
环境要求:Jenkins安装GitSCM插件。
参考:
[!NOTE] SCM配置
https://dev.to/logesh-sakthivel/jenkins-pipeline-script-from-scm-2k3k
PrerequisiteJenkinsfile must be located in the SCM(Github,Bitbucket,…)
配置步骤:
- 定义选择:Pipline Script from SCM。
- SCM中,因为我用的是Git就选Git。
- Repositories:填上仓库URL,也就是git clone的地址。如:
ssh://myuser@mygitserver/git/myrepo。注意网络一定是能通这个仓库地址的。 - Credentials:设置仓库的账号密码。建议设置好免密登录。
- 指定分支:选择你需要定期编译的分支名。如:
*/master。 - 脚本路径:jenkinsfile目录。所以代码仓库
myrepo需要准备好jeninsfile。jenkinsfile里面的内容是定义流水线的执行阶段。下一章具体讲到jenkinsfile的语法规则。
配置界面如下:

2.2.1 Repositories:仓库地址
填写的仓库地址一定是Jenkins服务器能连接的。如果仓库是一个私有Gitlab的仓库。可以在Gitlab服务器上配置好jenkins的ssh key认证后就可以免密登录。虽然可以在Credentials设置好账号密码但对于测试不是很方便。
在调试阶段需要设置一个方便测试的仓库地址,一般不是Gitlab这样的团队公共地址。如果仓库地址是自己的一台主机的git仓库,可以通过下面方法设置好免密。使用jenkins运行任务的账号,登录jenkins服务器:
// 设置免密登录git仓库服务器
ssh-copy-id myuser@172.2.0.3
因为git仓库地址也是ssh的,所以只要jenkins服务器能ssh到git仓库的服务器就可以。
2.2.2 jenkinsfile目录
我的仓库名为myrepo,则jenkinsfile路径为:
myrepo/mydir/jenkinsfile
2.3 定时构建和轮询(SCM)的区别
- 定时构建:即使没有代码变更也计划执行。
- 轮询SCM:定期检查SCM(如:Git仓库),检测到有新提交时才触发构建。
三、jenkinsfile
解决的问题:
- 定义clone了仓库后如何编译。
参考:
[!NOTE]
- web界面创建
- Pipeline script from SCM(How to create Jenkins File)
Create a text file and name it Jenkinsfile.txt. Place your pipeline code in this text file. Add this text file to the root folder of your project in the code repository.We can add post-build actions in the Jenkins file. These actions will be executed every time after work is finished.
jenkinsfile由Groovy DSL语法定义了流水线的工作流(work flow)。
3.1 Groovy语法
参考:
- [Jenkins构建脚本 - 简书 (jianshu.com)](https://www.jianshu.com/p/1a4f35f9678d
- 【Jenkinsfile语法示例:parameters参数化构建】
3.1.1 注释
举例:
/* stage('mystage') {
	steps {
		script {
		    // 打印。 Groovy单行注释
			echo "branch: ${env.TARGET_BRANCH}"
		}

		sh '''
			  # 更新子模块的远程分支信息  <<< shell里注释采用shell注释语法
			  git submodule sync --recursive
		"""
	}
} */   <<< Groovy多行注释
3.2 设置子模块默认分支
解决的问题:
- 子模块如何有默认的本地分支。
- 如何关联到仓库
.git/modules/config目录下配置的注分支。
默认情况下git clone下来的代码子模块是不会自动拉取的。
build_pipline$ git submodule
-1df5654c75 mysubmodule_1
并且本地分支未创建,子模块也没有submodule upate --init。这种情况我们要利用Jenkins的GitSCM配置extensions。
extensions: [
    // 强制创建myrepo仓库的本地分支
    [$class: 'LocalBranch', localBranch:  env.TARGET_BRANCH],

    // 实现子模块递归检出记住的commit id
    //[$class: 'SubmoduleOption', recursiveSubmodules: true],
],
在git仓库中会设置默认的分支
$ cat myrepo/.git/modules/mysubmodule_1/config
[core]
        repositoryformatversion = 0
        filemode = true
        bare = false
        logallrefupdates = true
        worktree = ../../../mysubmodule_1
[remote "origin"]
        url = ssh://mygitserver/mysubmodule_1
        fetch = +refs/heads/*:refs/remotes/origin/*
[branch "master"]
        remote = origin
        merge = refs/heads/master
这样子模块默认有本地master分支且追踪了远端远端master分支。
mysubmodule_1$ git checkout master
Switched to branch 'master'
Your branch is up to date with 'origin/master'.

/workspace/build_pipline/mysubmodule_1$ git pull
Already up to date.
3.3 子模块切分支
遍历所有子模块并切到与GIT_BRANCH同名的本地分支。采用的是调用shell脚本利用git命令实现。
// 更新子模块并追踪远端分支
script {
	sh '''
		git checkout -B "${TARGET_BRANCH}" --track "${GIT_BRANCH}"
		git submodule update --init --recursive
		git submodule foreach --recursive "
			if ! git rev-parse --verify "${TARGET_BRANCH}" >/dev/null 2>&1; then
				# 分支不存在时,创建并跟踪远程分支
				git checkout -b "${TARGET_BRANCH}" --track "${GIT_BRANCH}"
			else
				# 分支存在时,切换到该分支并拉取更新
				git checkout "${TARGET_BRANCH}" && git pull
			fi
		"
   '''
}
3.4 设置环境变量将代码clone到指定目录
在 Jenkins 的 Git SCM 配置中,默认会将代码克隆到工作空间(Workspace)的根目录。若需将代码克隆到指定子目录,可通过 extensions 中的 CheckoutToSubdirectory 扩展实现。
extensions: [
	// 关键配置:指定克隆目录为工作空间下的 `myrepo` 子目录
	[$class: 'CheckoutToSubdirectory', parentDir: 'myrepo'] //目标目录路径(相对工作空间)
]
高级场景:动态目录生成。若目录名需基于环境变量动态生成:
script {
    def envDir = "build-${env.BUILD_ID}"  // 动态目录名(如 build-123)
    checkout([
        $class: 'GitSCM',
        extensions: [
	        [$class: 'CleanBeforeCheckout'], // 清理目标目录
            [$class: 'CheckoutToSubdirectory', parentDir: envDir]
        ]
    ])
}
3.5 jenkinsfile实现示例
实现了SCM编译,拉取git仓库并切出本地分支。jenkinsfile示例如下:
pipeline {
    agent any

    environment {
        APP_NAME = "MYAPP"
    }
    stages {
        stage('GitSCMEnv') {
            steps {
                script {
                    env.TARGET_BRANCH = env.GIT_BRANCH.split('/').last()
                    echo "branch: ${env.TARGET_BRANCH}"

                    checkout([
                        // 作用是声明使用Git作为源代码管理工具,并配置与之相关的核心参数
                        $class: 'GitSCM',
                        // 指定待检出的分支
                        branches: [[name: env.GIT_BRANCH]],
                        // 配置远程仓库地址和认证信息
                        userRemoteConfigs: scm.userRemoteConfigs,
                        extensions: [
                            // 强制创建myrepo本地分支,不包括子模块
                            //[$class: 'LocalBranch', localBranch:  env.TARGET_BRANCH],
                            [$class: 'LocalBranch',
                                localBranch: env.TARGET_BRANCH,// 动态指定本地分支名
                                trackingBranch: env.GIT_BRANCH // 绑定远程分支
                            ],
                            // 子模块递归检出的是记住的commit id,子模块默认的本地分支
                            [$class: 'SubmoduleOption',
                                recursiveSubmodules: true,     // 递归更新嵌套子模块
                                parentCredentials: true,       // 统一使用父仓库凭证
                                shallow: false,                // 禁用浅克隆确保可pull
                                trackingSubmodules: true       // 跟踪子模块远程分支
                            ],
                            [$class: 'CleanBeforeCheckout'],    // 清理之前的同名目录
                        ]
                    ])
                }

                sh """
                    echo "Application Name: \${APP_NAME}"
                    pwd
                    ls -la
                    env | sort
                """

            }
        }

        // 更新子模块并追踪远端分支
        stage('Submodules'){
            steps {
                script {
                    sh '''
                        git checkout -B "${TARGET_BRANCH}" --track "origin/${TARGET_BRANCH}"
                        git submodule update --init --recursive
                        git submodule foreach --recursive "
                            if ! git rev-parse --verify "${TARGET_BRANCH}" >/dev/null 2>&1; then
	                            # 分支不存在时,创建并跟踪远程分支
                                git checkout -b "${TARGET_BRANCH}" --track "origin/${TARGET_BRANCH}"
                            else
	                            # 分支存在时,切换到该分支并拉取更新
                                git checkout "${TARGET_BRANCH}" && git pull
                            fi
                        "
                   '''
                }
            }
        }
        /* stage('build') {
            steps {
                sh './build.sh' // 执行编译脚本
            }
        } */
    }
}
四、调试方法
4.1 直接登录到Jenkins服务器上查看
可以到Jenkins的工作目录查看实际clone的代码,切的分支。
// 登录Jenkins用户
su jenkins
/var/lib/jenkins/workspace/build_pipline/
4.2 查看日志:Console Output
Dashboard >> build_pipline >> {job} >> Console Output
查看jenkins各个stage的日志打印
4.2.1 打印出环境变量日志
+ env
+ sort
APP_NAME=SIMPLE_APP
BUILD_DISPLAY_NAME=#17
BUILD_ID=17
BUILD_NUMBER=17
BUILD_TAG=jenkins-build_pipline-17
BUILD_URL=[http://myjenkins:8080/job/build_pipline/17/](http://myjenkins:8080/job/build_pipline/17/)
CI=true
EXECUTOR_NUMBER=1
GIT_BRANCH=origin/master
GIT_COMMIT=131d6ae6e
GIT_PREVIOUS_COMMIT=131d6ae6e
GIT_PREVIOUS_SUCCESSFUL_COMMIT=131d6ae6e
GIT_URL=ssh://jenkins@mygitserver/mybuild
HOME=/var/lib/jenkins
HUDSON_COOKIE=463b-f94f-4f72-aea4-0400
HUDSON_HOME=/var/lib/jenkins
HUDSON_SERVER_COOKIE=1de5db4ef9069b3e
HUDSON_URL=[http://myjenkins:8080/](http://myjenkins:8080/)
INVOCATION_ID=6420
JENKINS_HOME=/var/lib/jenkins
JENKINS_NODE_COOKIE=4f2d-d9ff-4921-866d-ac9f
JENKINS_SERVER_COOKIE=durable-5059
JENKINS_URL=[http://myjenkins:8080/](http://myjenkins:8080/)
JOB_BASE_NAME=build_pipline
JOB_DISPLAY_URL=[http://myjenkins:8080/job/build_pipline/display/redirect](http://myjenkins:8080/job/build_pipline/display/redirect)
JOB_NAME=build_pipline
JOB_URL=[http://myjenkins:8080/job/build_pipline/](http://myjenkins:8080/job/build_pipline/)
JOURNAL_STREAM=8:74272520
LANG=en_US.UTF-8
LC_ADDRESS=zh_CN.UTF-8
LC_IDENTIFICATION=zh_CN.UTF-8
LC_MEASUREMENT=zh_CN.UTF-8
LC_MONETARY=zh_CN.UTF-8
LC_NAME=zh_CN.UTF-8
LC_NUMERIC=zh_CN.UTF-8
LC_PAPER=zh_CN.UTF-8
LC_TELEPHONE=zh_CN.UTF-8
LC_TIME=zh_CN.UTF-8
LOGNAME=jenkins
NODE_LABELS=built-in
NODE_NAME=built-in
NOTIFY_SOCKET=/run/systemd/notify
PATH=/usr/local/sbin:/usr/local/bin:/usr/sbin:/usr/bin:/sbin:/bin:/snap/bin
PWD=/var/lib/jenkins/workspace/build_pipline
RUN_ARTIFACTS_DISPLAY_URL=[http://myjenkins:8080/job/build_pipline/17/display/redirect?page=artifacts](http://myjenkins:8080/job/build_pipline/17/display/redirect?page=artifacts)
RUN_CHANGES_DISPLAY_URL=[http://myjenkins:8080/job/build_pipline/17/display/redirect?page=changes](http://myjenkins:8080/job/build_pipline/17/display/redirect?page=changes)
RUN_DISPLAY_URL=[http://myjenkins:8080/job/build_pipline/17/display/redirect](http://myjenkins:8080/job/build_pipline/17/display/redirect)
RUN_TESTS_DISPLAY_URL=[http://myjenkins:8080/job/build_pipline/17/display/redirect?page=tests](http://myjenkins:8080/job/build_pipline/17/display/redirect?page=tests)
SHELL=/bin/bash
STAGE_NAME=Stage 2
USER=jenkins
WORKSPACE_TMP=/var/lib/jenkins/workspace/build_pipline@tmp
WORKSPACE=/var/lib/jenkins/workspace/build_pipline
4.3 Git 轮询日志
Dashboard >> build_pipline >> Git 轮询日志
[poll] Latest remote head revision on refs/heads/master is: 131d6ae6e - already built by 16
Done. Took 0.29 sec
No changes   <<< 提示git仓库没有新提交所以没有触发编译。
五、遇到的问题
5.1 如何设置免密git clone : Permission denied (publickey,password).
5.2 报错:Bad substitution
现象:
 [Shell Script -- git submodule update --init --recursive git submodule foreach --recursive " if ! git rev-parse --verify "${env.targetBranch}" >/dev/null 2>&1; then git checkout -b ${env.targetBranch} --track "origin/${env.targetBranch}" else echo "${targetBranch}" fi "]

 (http://myjenkins:8080/job/build_pipline/48/execution/node/45/log) (self time 533ms)
+ git submodule update --init --recursive
/var/lib/jenkins/workspace/build_pipline@tmp/durable-5a39671e/script.sh: 3: Bad substitution
解决:
语法错误。变量不需要加env,将${env.targetBranch}替换为${targetBranch}
5.3 submoduleCfg配置报错:git.SubmoduleConfig.branches
现象:
// 语句
checkout([
	$class: 'GitSCM',
	submoduleCfg: [
		[path: 'modules/mysubmodule_1', branches: env.TARGET_BRANCH],
	]
])
报错
java.lang.ClassCastException: hudson.plugins.git.SubmoduleConfig.branches expects java.util.Collection<java.lang.String> but received class java.lang.String
解决:变量加上中括号。
// 子模块分支绑定,(不过测试由于Jenkins版本不支持并为生效)
submoduleCfg: [
	[path: 'modules/mysubmodule_1', branches: [env.TARGET_BRANCH]]
]

 浙公网安备 33010602011771号