云计算与虚拟化
什么是云计算?
资源使用和交付模式,并不是技术,分为公有云,私有云,混合云,依赖虚拟化技术,从而实现弹性扩展
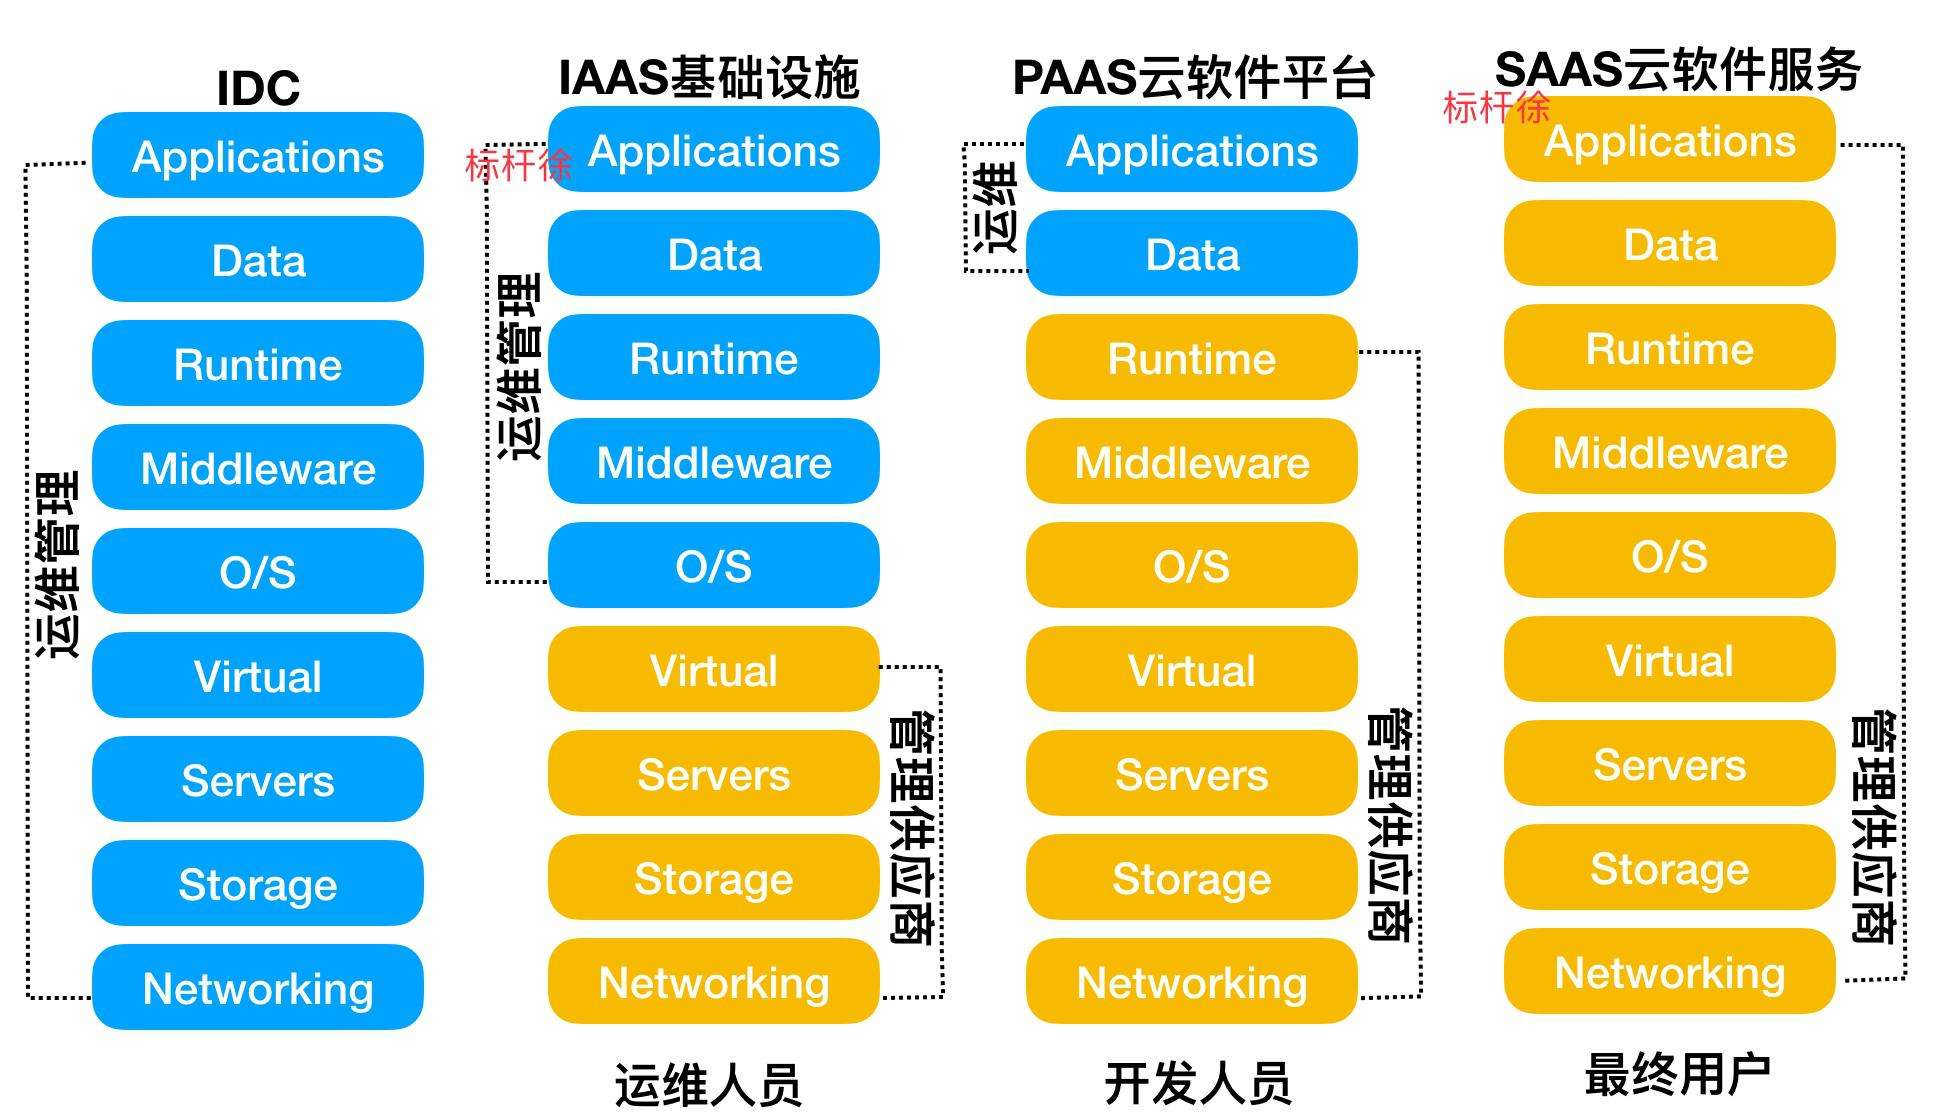
云计算 iaas pass saas图层
- Iaas(基础设施即服务Infrastructure as a Servic)
- Paas(平台即服务Platform-as-a-Service)
- Saas(软件即服务Software-as-a-Service)

KVM
KVM是开源软件,全称是kernel-based virtual machine(基于内核的虚拟机)。
是x86架构且硬件支持虚拟化技术(如 intel VT 或 AMD-V)的Linux全虚拟化解决方案。
它包含一个为处理器提供底层虚拟化 可加载的核心模块kvm.ko(kvm-intel.ko或kvm-AMD.ko)。
KVM还需要一个经过修改的QEMU软件(qemu-kvm),作为虚拟机上层控制和界面。
KVM能在不改变linux或windows镜像的情况下同时运行多个虚拟机,(它的意思是多个虚拟机使用同一镜像)并为每一个虚拟机配置个性化硬件环境(网卡、磁盘、图形适配器……)。
在主流的Linux内核,如2.6.20以上的内核均已包含了KVM核心
kvm安装
1.是否支持虚拟化
因特尔 vmx amd svm
[root@localhost ~]# grep -E '(vmx|svm)' /proc/cpuinfo
如果是vmware虚拟机,请在配置cpu选择intel VT-X/EPT或 AMD-V/RVI
如果输出的信息中有vmx,说明intel处理器支持完全虚拟化。如果显示svm,说明是AMD的处理器支持虚拟化。
2.安装kvm和其他虚拟化所需管理软件包
[root@localhost ~]# yum install qemu-kvm qemu-kvm-tools virt-manager libvirt virt-install -y
软件包名称介绍:
Kvm:软件包中含有KVM内核模块,它在默认linux内核中提供kvm管理程序
Libvirts:安装虚拟机管理工具,使用virsh等命令来管理和控制虚拟机。
Bridge-utils:设置网络网卡桥接。
Virt-*:创建、克隆虚拟机命令,以及图形化管理工具virt-manager
Qemu-img:安装qemu组件,使用qemu命令来创建磁盘等
3.加载kvm模块,查看kvm模块是否被加载
[root@localhost ~]# lsmod | grep kvm
kvm_intel             170181  0
kvm                   554609  1 kvm_intel
这里最好reboot,在查看一下,是否随着系统重启也是支持的
4.启动libvirtd,管理虚拟机和其他虚拟化功能

包括一个API库,一个守护程序(libvirtd)和一个命令行工具(virsh),libvirt的主要目标是为各种虚拟化工具提供一套方便、可靠的编程接口,用一种单一的方式管理多种不同的虚拟化提供方式
[root@localhost ~]# systemctl enable libvirtd.service
[root@localhost ~]# systemctl start libvirtd.service
5.准备想要虚拟出的操作系统,iso镜像文件
[root@localhost ~]# dd if=/dev/cdrom of=/opt/CentOS-7.3.iso
6.创建镜像文件,虚拟机使用的磁盘镜像文件,实际是个空间
[root@localhost ~]# qemu-img create -f raw /opt/CentOS-7.3-x86_64.raw 8G
Formatting '/opt/CentOS-7.3-x86_64.raw', fmt=raw size=8589934592
[root@localhost ~]# ls -lh /opt/CentOS-7.3-x86_64.raw
-rw-r--r--. 1 root root 8.0G Dec 16 08:02 /opt/CentOS-7.3-x86_64.raw
创建磁盘 -f 文件格式 路径 磁盘大小
7.创建虚拟机,cpu默认是一个
[root@localhost ~]# virt-install --name CentOS-7.3-x86_64 --virt-type kvm --ram 1024 --cdrom=/opt/CentOS-7.3.iso --disk path=/opt/CentOS-7.3-x86_64.raw
 --network=default --graphics vnc,listen=0.0.0.0 --noautoconsole

Starting install...
Domain installation still in progress. You can reconnect to
the console to complete the installation process.
8.查看是否监听5900端口
[root@localhost opt]# netstat -ntlp
Active Internet connections (only servers)
Proto Recv-Q Send-Q Local Address           Foreign Address         State       PID/Program name
tcp        0      0 0.0.0.0:5900            0.0.0.0:*               LISTEN      20009/qemu-kvm
9.vnc 下载客户端,利用vnc链接,你就会看到安装centos7.3的界面
https://www.realvnc.com/en/connect/download/viewer/macos/
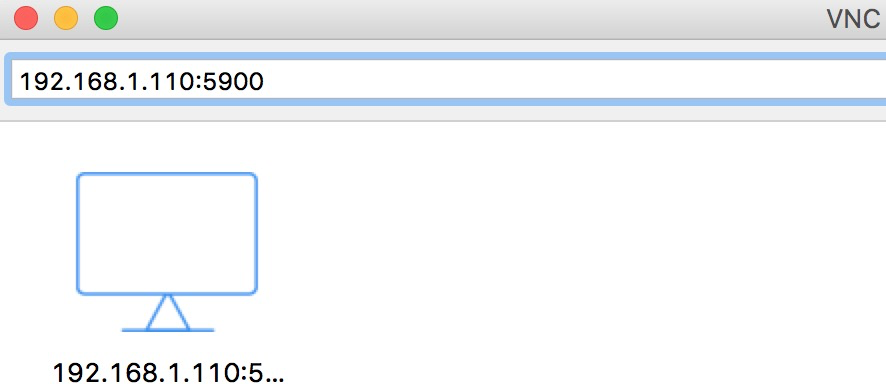
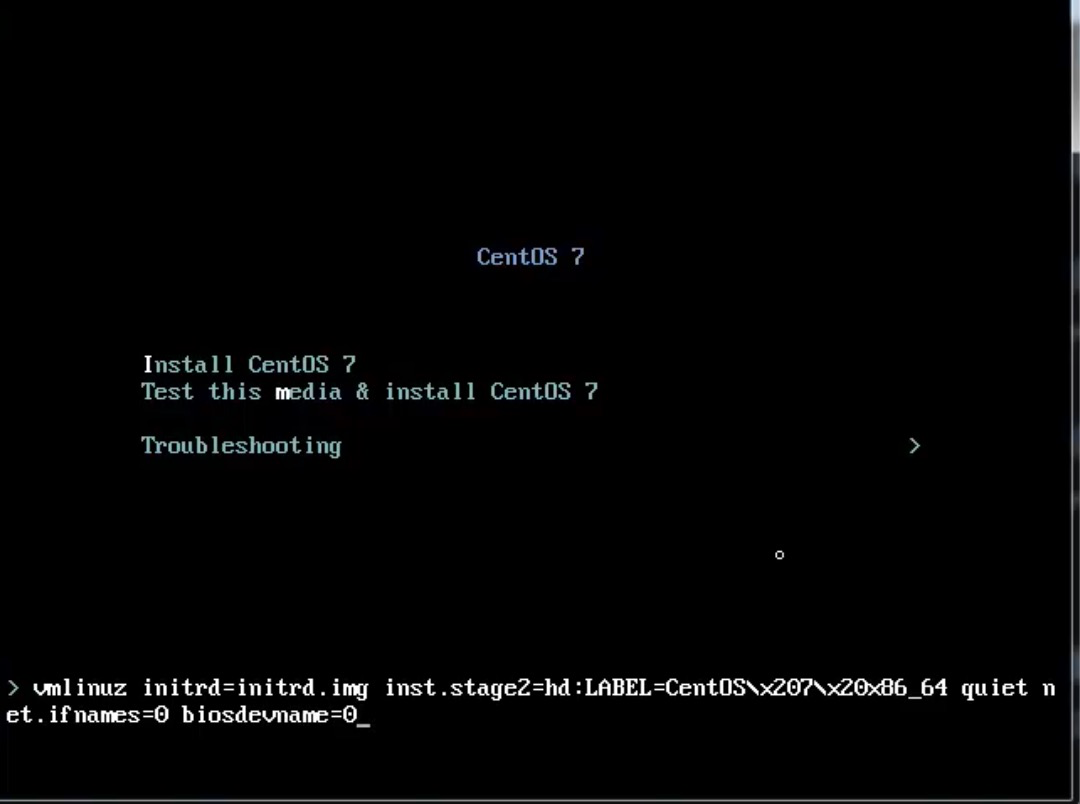
10.如果按tab键,输入net.ifnames=0 biosdevname=0 ,网卡就会是eth0
宿主机与虚拟机网络问题
1.宿主机网络状态
[root@localhost ~]# ps aux|grep kvm
就是一个进程
[root@localhost ~]# cat /etc/libvirt/qemu/CentOS-7.3-x86_64-2.xml
<!--
WARNING: THIS IS AN AUTO-GENERATED FILE. CHANGES TO IT ARE LIKELY TO BE
OVERWRITTEN AND LOST. Changes to this xml configuration should be made using:
  virsh edit CentOS-7.3-x86_64-2
or other application using the libvirt API.
-->
这个文件时自动生成的,如果你非要修改它,请virsh edit CentOS-7.3-x86_64-2

[root@localhost ~]# virsh edit CentOS-7.3-x86_64-2
与进程参数是一样的,这是配置里面的网络,默认会多出一个叫virbr0:虚拟网卡

    <interface type='network'>
      <mac address='52:54:00:89:e2:81'/>
      <source network='default'/>
      <model type='virtio'/>
      <address type='pci' domain='0x0000' bus='0x00' slot='0x03' function='0x0'/>
    </interface>

[root@localhost ~]# ifconfig
virbr0: flags=4163<UP,BROADCAST,RUNNING,MULTICAST>  mtu 1500
        inet 192.168.122.1  netmask 255.255.255.0  broadcast 192.168.122.255
        ether 52:54:00:25:22:31  txqueuelen 1000  (Ethernet)
        RX packets 0  bytes 0 (0.0 B)
        RX errors 0  dropped 0  overruns 0  frame 0
        TX packets 0  bytes 0 (0.0 B)
        TX errors 0  dropped 0 overruns 0  carrier 0  collisions 0

默认是nat网络,我们在下边会说到如何改成桥接
[root@localhost ~]# iptables -t nat -vnL
2.虚拟机网络状态
1.启动虚拟机
[root@localhost ~]# virsh list --all
 Id    Name                           State
----------------------------------------------------
 -     CentOS-7.3-x86_64              shut off
 -     CentOS-7.3-x86_64-2            shut off

[root@localhost ~]# virsh start  CentOS-7.3-x86_64-2
Domain CentOS-7.3-x86_64-2 started

2.vnc继续链接,我们看下虚拟机的网卡
[root@localhost ~]# ifconfig
virbr0: flags=4163<UP,BROADCAST,RUNNING,MULTICAST>  mtu 1500
        inet 192.168.122.1  netmask 255.255.255.0  broadcast 192.168.122.255
3.上面的网卡virbr0都是192.168.122.1,为什么会这样,是默认dnsmasq起了个dhcp
[root@localhost ~]# ps aux|grep dns
nobody    10384  0.0  0.0  53884  1112 ?        S    07:37   0:00 /usr/sbin/dnsmasq --conf-file=/var/lib/libvirt/dnsmasq/default.conf --leasefile-ro --dhcp-script=/usr/libexec/libvirt_leaseshelper
root      10385  0.0  0.0  53856   564 ?        S    07:37   0:00 /usr/sbin/dnsmasq --conf-file=/var/lib/libvirt/dnsmasq/default.conf --leasefile-ro --dhcp-script=/usr/libexec/libvirt_leaseshelper
root      31126  0.0  0.0 112708   976 pts/2    R+   08:40   0:00 grep --color=auto dns

[root@localhost ~]# cat /var/lib/libvirt/dnsmasq/default.conf
##WARNING:  THIS IS AN AUTO-GENERATED FILE. CHANGES TO IT ARE LIKELY TO BE
##OVERWRITTEN AND LOST.  Changes to this configuration should be made using:
##    virsh net-edit default
## or other application using the libvirt API.
##
## dnsmasq conf file created by libvirt
strict-order
pid-file=/var/run/libvirt/network/default.pid
except-interface=lo
bind-dynamic
interface=virbr0
dhcp-range=192.168.122.2,192.168.122.254
dhcp-no-override
dhcp-authoritative
dhcp-lease-max=253
dhcp-hostsfile=/var/lib/libvirt/dnsmasq/default.hostsfile
addn-hosts=/var/lib/libvirt/dnsmasq/default.addnhosts
kvm管理
cpu热修改只能加不能减,不能超过设置的最大数
配置cpu的2种方法
1. 通过启动时候命令行指定
2. 通过xml指定,可以热修改

通过xml文件更改
1.将cpu调成最大四个,当前一个
[root@localhost ~]# virsh edit CentOS-7.3-x86_64-2
  <vcpu placement='auto' current='1'>4</vcpu>

2.重启生效
[root@localhost ~]# virsh shutdown  CentOS-7.3-x86_64-2
Domain CentOS-7.3-x86_64-2 is being shutdown

[root@localhost ~]# virsh list --all
 Id    Name                           State
----------------------------------------------------
 -     CentOS-7.3-x86_64-2              shut off
[root@localhost ~]# virsh start  CentOS-7.3-x86_64-2
Domain CentOS-7.3-x86_64-2 started

3.登录到虚拟机,查看cpu个数

4.热修改将cpu设置成2个
[root@localhost ~]# virsh setvcpus  CentOS-7.3-x86_64-2 2 --live

5.再次登陆到虚拟机,查看cpu个数
centos7是自动激活了cpu,如果不是的话需要echo 1 > [root@localhost ~]# cat /sys/devices/system/cpu/cpu0/online
1

注意热修改,只能加不能减,也不能超过设置的最大数
[root@localhost ~]# virsh setvcpus  CentOS-7.3-x86_64-2 1 --live
error: unsupported configuration: failed to find appropriate hotpluggable vcpus to reach the desired target vcpu count
内存,热球技术能加能减,不能超过设置的最大数
1.修改xml
[root@localhost ~]# virsh edit CentOS-7.3-x86_64-2
  <memory unit='KiB'>1048576</memory> 最大内存
  <currentMemory unit='KiB'>1048576</currentMemory> 现内存

2.重启生效
[root@localhost ~]# virsh shutdown  CentOS-7.3-x86_64-2
Domain CentOS-7.3-x86_64-2 is being shutdown

[root@localhost ~]# virsh list --all
 Id    Name                           State
----------------------------------------------------
 -     CentOS-7.3-x86_64-2              shut off
[root@localhost ~]# virsh start  CentOS-7.3-x86_64-2
Domain CentOS-7.3-x86_64-2 started


3.显示虚拟机当前内存
[root@localhost ~]# virsh qemu-monitor-command CentOS-7.3-x86_64-2 --hmp --cmd info balloon
balloon: actual=1024

4.修改虚拟机内存,减少
[root@localhost ~]# virsh qemu-monitor-command CentOS-7.3-x86_64-2 --hmp --cmd balloon 600

显示虚拟机当前内存
[root@localhost ~]# virsh qemu-monitor-command CentOS-7.3-x86_64-2 --hmp --cmd info balloon
balloon: actual=600

5.修改虚拟机内存,添加
[root@localhost ~]# virsh qemu-monitor-command CentOS-7.3-x86_64-2 --hmp --cmd balloon 1024

显示虚拟机当前内存
[root@localhost ~]# virsh qemu-monitor-command CentOS-7.3-x86_64-2 --hmp --cmd info balloon
balloon: actual=1024

6.登录到虚拟机查看
注意,内存也不能超过最大内存
磁盘
[root@localhost ~]# qemu-img --help
支持如下硬盘格式
Supported formats: vvfat vpc vmdk vhdx vdi ssh sheepdog rbd raw host_cdrom host_floppy host_device file qed qcow2 qcow parallels nbd iscsi gluster dmg tftp ftps ftp https http cloop bochs blkverify blkdebug

1.全镜像模式
raw,设置多大,就是多大。写入块,方便转换成其他格式,性能最优

2.稀疏模式
qcow2,功能全,压缩,快照,镜像,更小存储空间,设置多大,它也只是用多大
所有磁盘管理,可以使用qemu -img管理
网络
1.默认nat,生产最多的是网桥
[root@localhost ~]# brctl show
bridge name     bridge id               STP enabled     interfaces
virbr0          8000.525400252231       yes             virbr0-nic
                                                        vnet0
2.如果没有这个命令请安装,默认有
[root@localhost ~]# yum install bridge-utils

3.添加一个网桥
[root@localhost ~]# brctl addbr br0

[root@localhost ~]# brctl show
bridge name     bridge id               STP enabled     interfaces
br0             8000.000000000000       no
virbr0          8000.525400252231       yes             virbr0-nic
                                                        vnet0

4.将eth0添加到br0网桥里,网络会断,这个时候xshell,vnc都会断
[root@localhost ~]# brctl addif br0 eth0

5.登录到宿主机,不能通过xshell登录了,本地去
[root@localhost ~]# brctl show
bridge name     bridge id               STP enabled     interfaces
br0             8000.000c29672760       no              enth0
virbr0          8000.525400252231       yes             virbr0-nic
                                                        vnet0
bro 和 eth0关联,eth0有ip,br0没有

6.我们给br0设置一个ip
[root@localhost ~]# ip addr del dev eth0 192.168.1.110/24
[root@localhost ~]# ifconfig br0 192.168.1.11/24 up

注意,排错
尝试xshell链接宿主机,如果链接不上,在宿主机上排查问题
[root@localhost ~]# ip ro li
[root@localhost ~]#route add default gw 192.168.1.1 网关
[root@localhost ~]#iptables -F

因为断网的缘故,我们需要一条命令去执行,这样的话避免去宿主机
[root@localhost ~]# brctl addif br0 eth0 && ip addr del dev eth0 192.168.1.11/24 && ifconfig br0 192.168.1.11/24 up && route add default gw 192.168.1.1 && iptables -F
virsh命令
查看运行的虚拟机
[root@localhost ~]# virsh list
 Id    Name                           State
----------------------------------------------------

查看所有状态的虚拟机
[root@localhost ~]# virsh list --all
 Id    Name                           State
----------------------------------------------------
 -     CentOS-7.3-x86_64              shut off
 -     CentOS-7.3-x86_64-2            shut off

停止虚拟机
[root@localhost ~]# virsh shutdown  CentOS-7.3-x86_64-2
Domain CentOS-7.3-x86_64-2 is being shutdown

[root@localhost ~]# virsh list --all
 Id    Name                           State
----------------------------------------------------
 -     CentOS-7.3-x86_64              shut off
 -     CentOS-7.3-x86_64-2            shut off

启动虚拟机
[root@localhost ~]# virsh start CentOS-7.3-x86_64-2
Domain CentOS-7.3-x86_64-2 started

[root@localhost ~]# virsh list --all
 Id    Name                           State
----------------------------------------------------
 2     CentOS-7.3-x86_64-2            running
 -     CentOS-7.3-x86_64              shut off


拔电源停止虚拟机,不会考虑友好的退出
[root@localhost ~]# virsh destroy  CentOS-7.3-x86_64-2
Domain CentOS-7.3-x86_64-2 destroyed

[root@localhost ~]# virsh list --all
 Id    Name                           State
----------------------------------------------------
 -     CentOS-7.3-x86_64              shut off
 -     CentOS-7.3-x86_64-2            shut off

终止挂起状态,可恢复
[root@localhost ~]# virsh suspend CentOS-7.3-x86_64-2
Domain CentOS-7.3-x86_64-2 suspended

[root@localhost ~]# virsh list --all
 Id    Name                           State
----------------------------------------------------
 3     CentOS-7.3-x86_64-2            paused
 -     CentOS-7.3-x86_64              shut off

恢复挂机状态
[root@localhost ~]# virsh resume CentOS-7.3-x86_64-2
Domain CentOS-7.3-x86_64-2 resumed

[root@localhost ~]# virsh list --all
 Id    Name                           State
----------------------------------------------------
 3     CentOS-7.3-x86_64-2            running
 -     CentOS-7.3-x86_64              shut off

黑名单,禁止操作
virsh undefine 永久删除
但是如果你提前备份一个xml文件,可以在建起来
kvm优化
不建议去做,很多centos7已经优化好了,了解即可
cpu
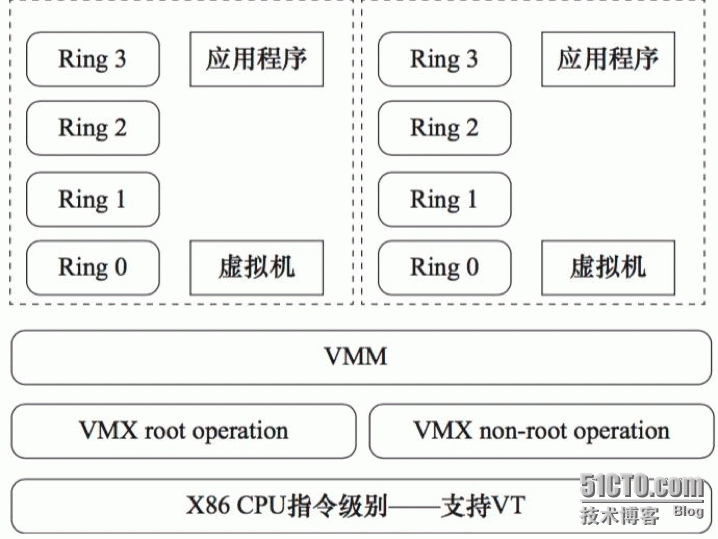
cpu有四个形态,用户态r3到内核态r0就是上下文切换,而kvm是全虚拟化,也就是虚拟机里面也有内核态到用户态转化,再到宿主机。而cpu有3级缓存,会存在miss现象,所以我们可以将kvm进程绑定在一个cpu上
1.xml文件
2.taskset cpu亲和力绑定进程到固定的cpu,减少cache miss
taskset -cp 1,2 pid,
缺陷没法动态迁移了
Intel vt-x/EPT AMD-v/RVI技术 cpu替你上下文硬件加速,默认开启
内存
内存寻址
虚拟机的虚拟内存 -> 虚拟机的物理内存 -> 宿主机虚拟内存 -> 宿主机物理内存
1.影子页表
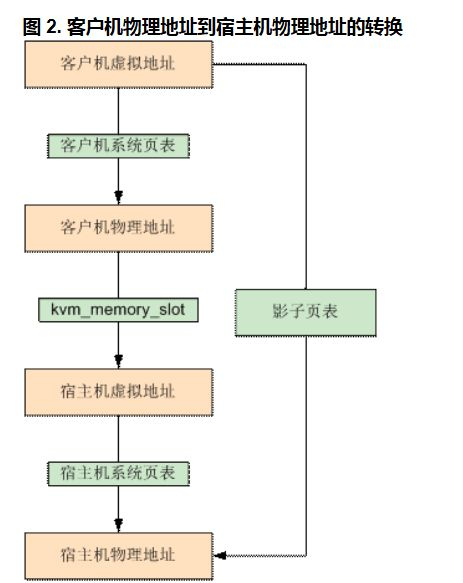
转化过程也是需要开辟内存空间
2.EPT技术
因特尔通过cpu寄存器,默认打开的
3.进程ksm,内存合并,相同的合并起来,默认开启的
[root@localhost ~]# ps -aux|grep ksm
root         36  0.0  0.0      0     0 ?        SN   06:25   0:00 [ksmd]
4.大页内存也是开启的
[root@localhost ~]# cat /sys/kernel/mm/transparent_hugepage/enabled
[always] madvise never

khugepaged扫描内存地址连续的合并到一起,将4k合并2M的
[root@localhost ~]# ps -aux|grep kh
root         20  0.0  0.0      0     0 ?        S    07:36   0:00 [khungtaskd]
root         38  0.0  0.0      0     0 ?        SN   07:36   0:00 [khugepaged]
i/o
io调度算法
[root@localhost ~]# dmesg | grep -i scheduler
[    2.196112] io scheduler noop registered
[    2.196115] io scheduler deadline registered (default)
[    2.196178] io scheduler cfq registered
[    2.196181] io scheduler mq-deadline registered
[    2.196184] io scheduler kyber registered
[root@localhost ~]# cat /sys/block/sda/queue/scheduler
noop [deadline] cfq
[root@localhost ~]# echo cfg > /sys/block/sda/queue/scheduler ^C
[root@localhost ~]# elevator = cfg 永久修改
1,Noop算法
Noop调度算法是内核中最简单的IO调度算法。Noop调度算法也叫作电梯调度算法,它将IO请求放入到一个FIFO队列中,然后逐个执行这些IO请求,当然对于一些在磁盘上连续的IO请求,Noop算法会适当做一些合并。这个调度算法特别适合那些不希望调度器重新组织IO请求顺序的应用。
这种调度算法在以下场景中优势比较明显:
1)在IO调度器下方有更加智能的IO调度设备。如果您的Block Device Drivers是Raid,或者SAN,NAS等存储设备,这些设备会更好地组织IO请求,不用IO调度器去做额外的调度工作;
2)上层的应用程序比IO调度器更懂底层设备。或者说上层应用程序到达IO调度器的IO请求已经是它经过精心优化的,那么IO调度器就不需要画蛇添足,只需要按序执行上层传达下来的IO请求即可。
3)对于一些非旋转磁头氏的存储设备,使用Noop的效果更好。因为对于旋转磁头式的磁盘来说,IO调度器的请求重组要花费一定的CPU时间,但是对于SSD磁盘来说,这些重组IO请求的CPU时间可以节省下来,因为SSD提供了更智能的请求调度算法,不需要内核去画蛇添足。这篇文章提及了SSD中使用Noop效果会更好。
2,Deadline算法
Deadline算法的核心在于保证每个IO请求在一定的时间内一定要被服务到,以此来避免某个请求饥饿。
Deadline算法中引入了四个队列,这四个队列可以分为两类,每一类都由读和写两类队列组成,一类队列用来对请求按起始扇区序号进行排序,通过红黑树来组织,称为sort_list;另一类对请求按它们的生成时间进行排序,由链表来组织,称为fifo_list。每当确定了一个传输方向(读或写),那么将会从相应的sort_list中将一批连续请求dispatch到requst_queue的请求队列里,具体的数目由fifo_batch来确定。只有下面三种情况才会导致一次批量传输的结束:
1)对应的sort_list中已经没有请求了
2)下一个请求的扇区不满足递增的要求
3)上一个请求已经是批量传输的最后一个请求了。
所有的请求在生成时都会被赋上一个期限值(根据jiffies),并按期限值排序在fifo_list中,读请求的期限时长默认为为500ms,写请求的期限时长默认为5s,可以看出内核对读请求是十分偏心的,其实不仅如此,在deadline调度器中,还定义了一个starved和writes_starved,writes_starved默认为2,可以理解为写请求的饥饿线,内核总是优先处理读请求,starved表明当前处理的读请求批数,只有starved超过了writes_starved后,才会去考虑写请求。因此,假如一个写请求的期限已经超过,该请求也不一定会被立刻响应,因为读请求的batch还没处理完,即使处理完,也必须等到starved超过writes_starved才有机会被响应。为什么内核会偏袒读请求?这是从整体性能上进行考虑的。读请求和应用程序的关系是同步的,因为应用程序要等待读取的内容完毕,才能进行下一步工作,因此读请求会阻塞进程,而写请求则不一样,应用程序发出写请求后,内存的内容何时写入块设备对程序的影响并不大,所以调度器会优先处理读请求。
默认情况下,读请求的超时时间是500ms,写请求的超时时间是5s。
这篇文章说在一些多线程应用下,Deadline算法比CFQ算法好。这篇文章说在一些数据库应用下,Deadline算法比CFQ算法好。
3,Anticipatory算法
Anticipatory算法的核心是局部性原理,它期望一个进程昨晚一次IO请求后还会继续在此处做IO请求。在IO操作中,有一种现象叫“假空闲”(Deceptive idleness),它的意思是一个进程在刚刚做完一波读操作后,看似是空闲了,不读了,但是实际上它是在处理这些数据,处理完这些数据之后,它还会接着读,这个时候如果IO调度器去处理另外一个进程的请求,那么当原来的假空闲进程的下一个请求来的时候,磁头又得seek到刚才的位置,这样大大增加了寻道时间和磁头旋转时间。所以,Anticipatory算法会在一个读请求做完后,再等待一定时间t(通常是6ms),如果6ms内,这个进程上还有读请求过来,那么我继续服务,否则,处理下一个进程的读写请求。
在一些场景下,Antocipatory算法会有非常有效的性能提升。这篇文章有说,这篇文章也有一份评测。
值得一提的是,Anticipatory算法从Linux 2.6.33版本后,就被移除了,因为CFQ通过配置也能达到Anticipatory算法的效果。
4,CFQ算法
CFQ(Completely Fair Queuing)算法,顾名思义,绝对公平算法。它试图为竞争块设备使用权的所有进程分配一个请求队列和一个时间片,在调度器分配给进程的时间片内,进程可以将其读写请求发送给底层块设备,当进程的时间片消耗完,进程的请求队列将被挂起,等待调度。 每个进程的时间片和每个进程的队列长度取决于进程的IO优先级,每个进程都会有一个IO优先级,CFQ调度器将会将其作为考虑的因素之一,来确定该进程的请求队列何时可以获取块设备的使用权。IO优先级从高到低可以分为三大类:RT(real time),BE(best try),IDLE(idle),其中RT和BE又可以再划分为8个子优先级。实际上,我们已经知道CFQ调度器的公平是针对于进程而言的,而只有同步请求(read或syn write)才是针对进程而存在的,他们会放入进程自身的请求队列,而所有同优先级的异步请求,无论来自于哪个进程,都会被放入公共的队列,异步请求的队列总共有8(RT)+8(BE)+1(IDLE)=17个。
从Linux 2.6.18起,CFQ作为默认的IO调度算法。
对于通用的服务器来说,CFQ是较好的选择。
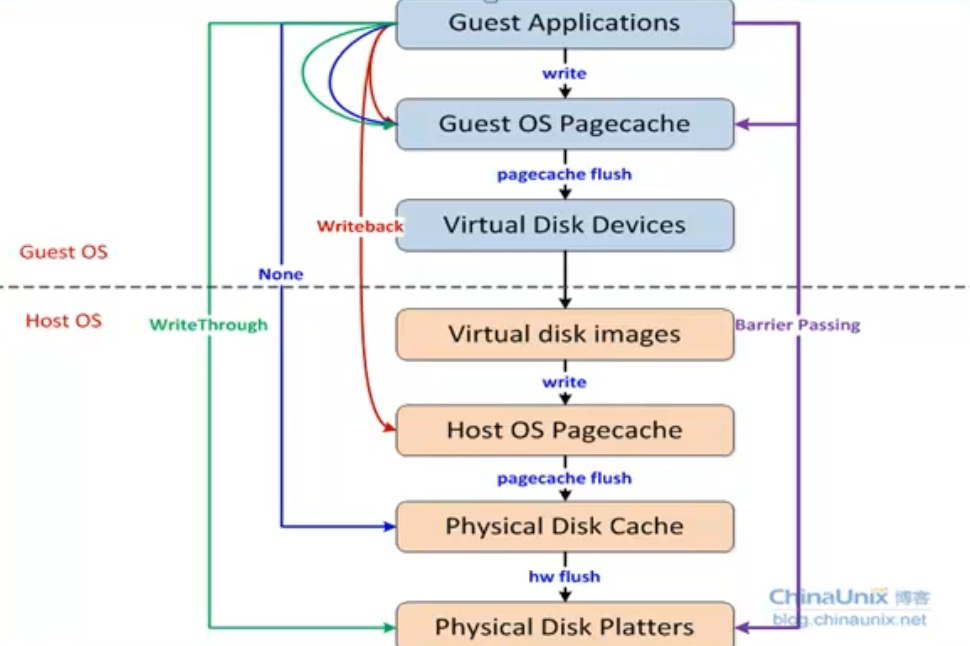
越外层越安全,但是效率低
镜像制作
kvm管理平台
OpenStack
CloudStack cloud.com公司-Ctrix-Apache基金会
OpenNebula
oVirt RHEV的开源版本
管理端+客户端组成 oVirt Engine oVirt 主机/节点
对应vm vCenter ESXi
https://www.ovirt.org/尝试安装管理平台查看
http://www.ovirt.org/Download
[root@localhost ~]# yum localinstall http://resources.ovirt.org/pub/yum-repo/ovirt-release36.rpm
[root@localhost ~]# ovirt-engine
[root@localhost ~]# yum install -y ovirt-engine-setup-plugin-allinone
注意域名解析,设置好后,注意防火墙,url访问本机ip即可看到页面

