TesorFlow03-TesorFlow的基础
1 TesorFlow的数据结构
list :[1,1.2,'Hello',(1,2)] ,这个list里面什么都可以存储,但是如果存储一个图片[64,32,32,3]里面全是数字的话,大小会很大,所以引入np.array
np.array :可以很方便的做一些同类型的数据的运算,比如加、减、乘、除、转置。但是有一个致命的弱点,就是np是在深度学习之前就设计好的库函数,所以他没有GPU的支持很慢,也没有求导
tf.Tensor :
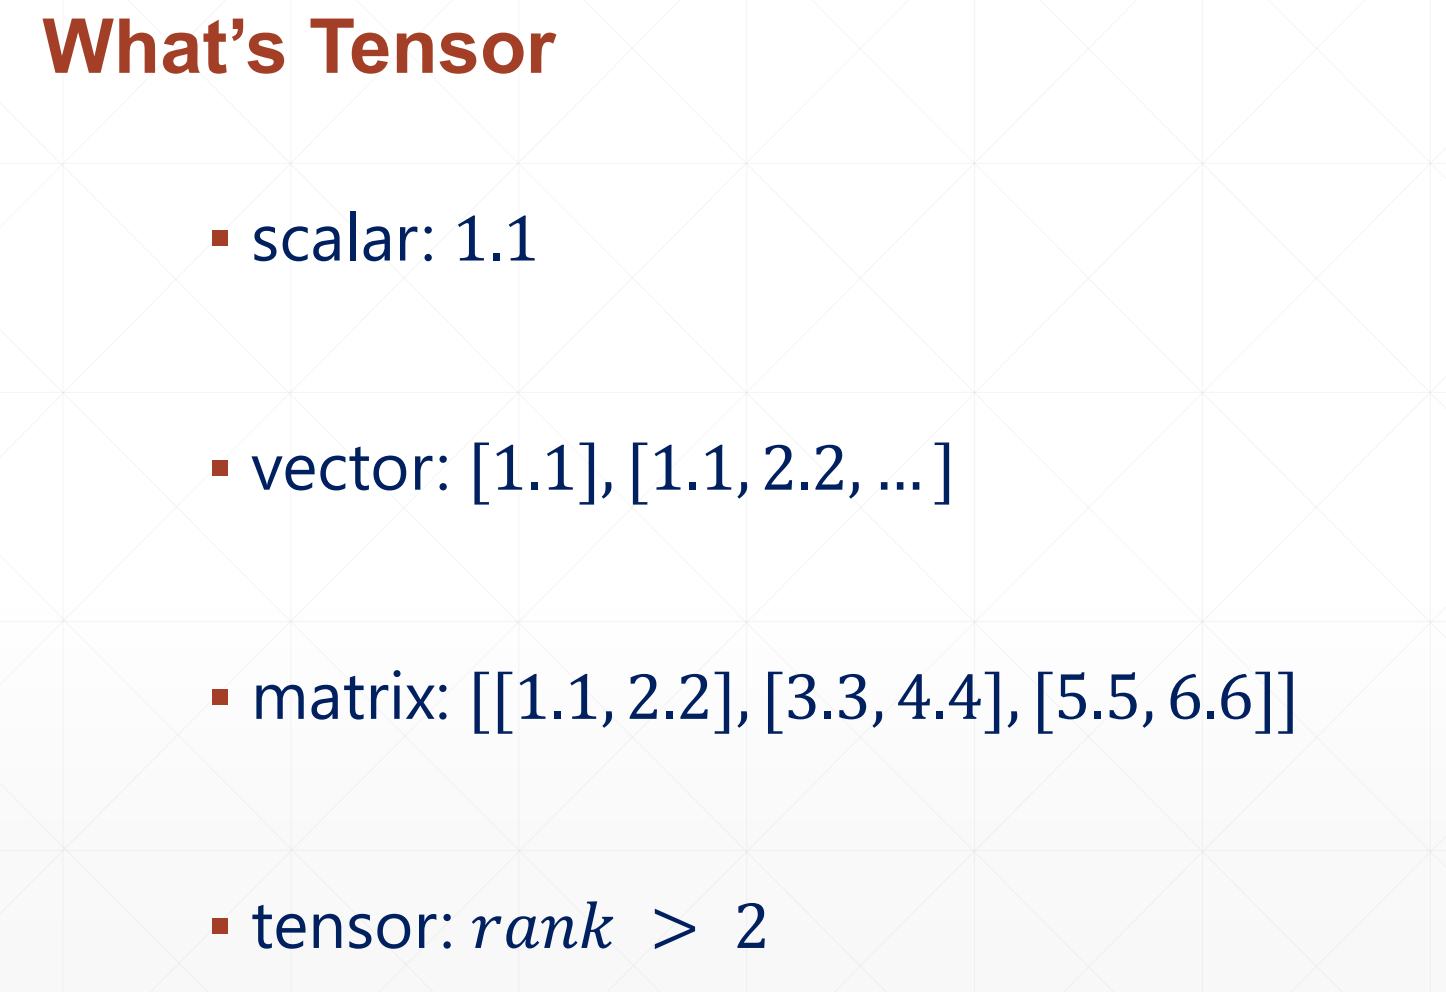
scalar 是一个标量,dim=0,然后vector是一个一维数组dim=1
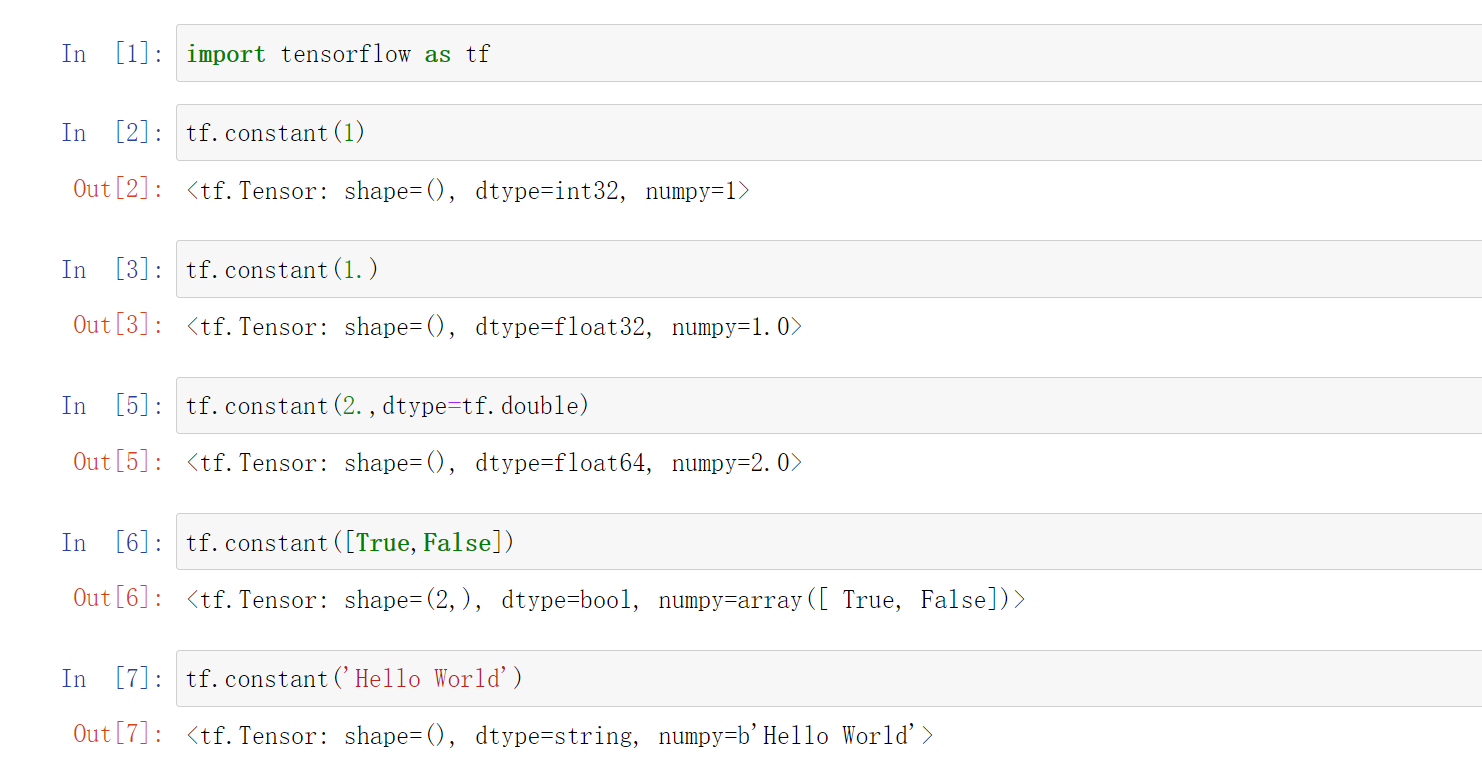
TF支持的计算类型:
▪ int, float, double
▪ bool
▪ string
1.1 常见数据类型的创建
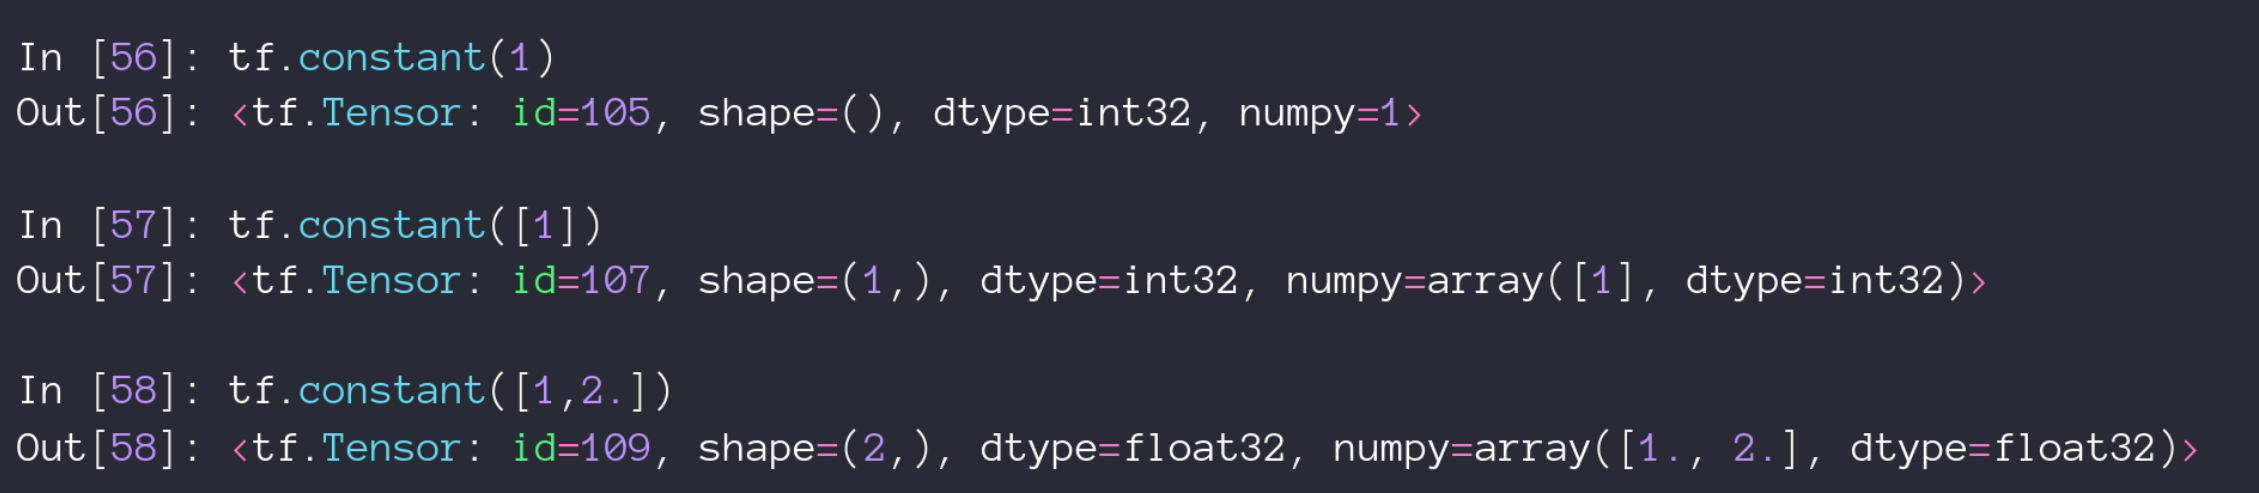
#创建一个常量
tf.constant(1)
#创建一个浮点数常量,这里默认是float32类型
tf.constant(1.)
#创建一个double型常量
tf.constant(2.,dtype=tf.double)
#创建一个bool类型的常量
tf.constant([True,False])
#创建一个string类型的常量
tf.constant('Hello World')
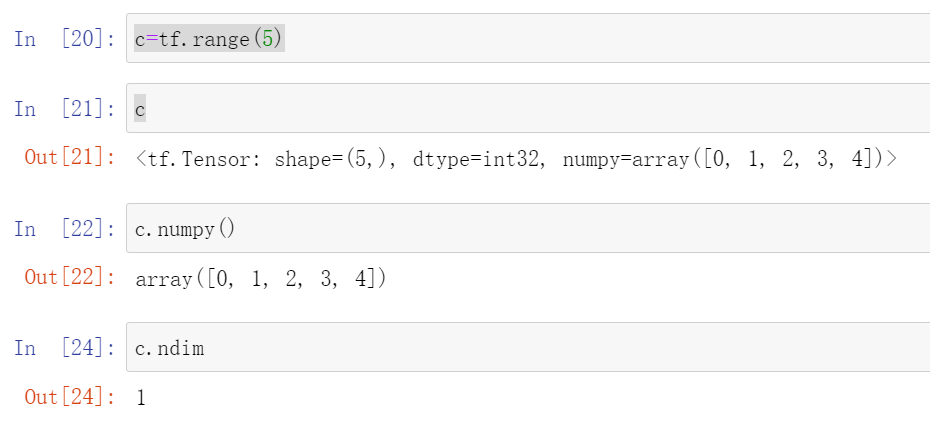
1.2 tensorflow变成numpy
.numpy()函数
c=tf.range(5)
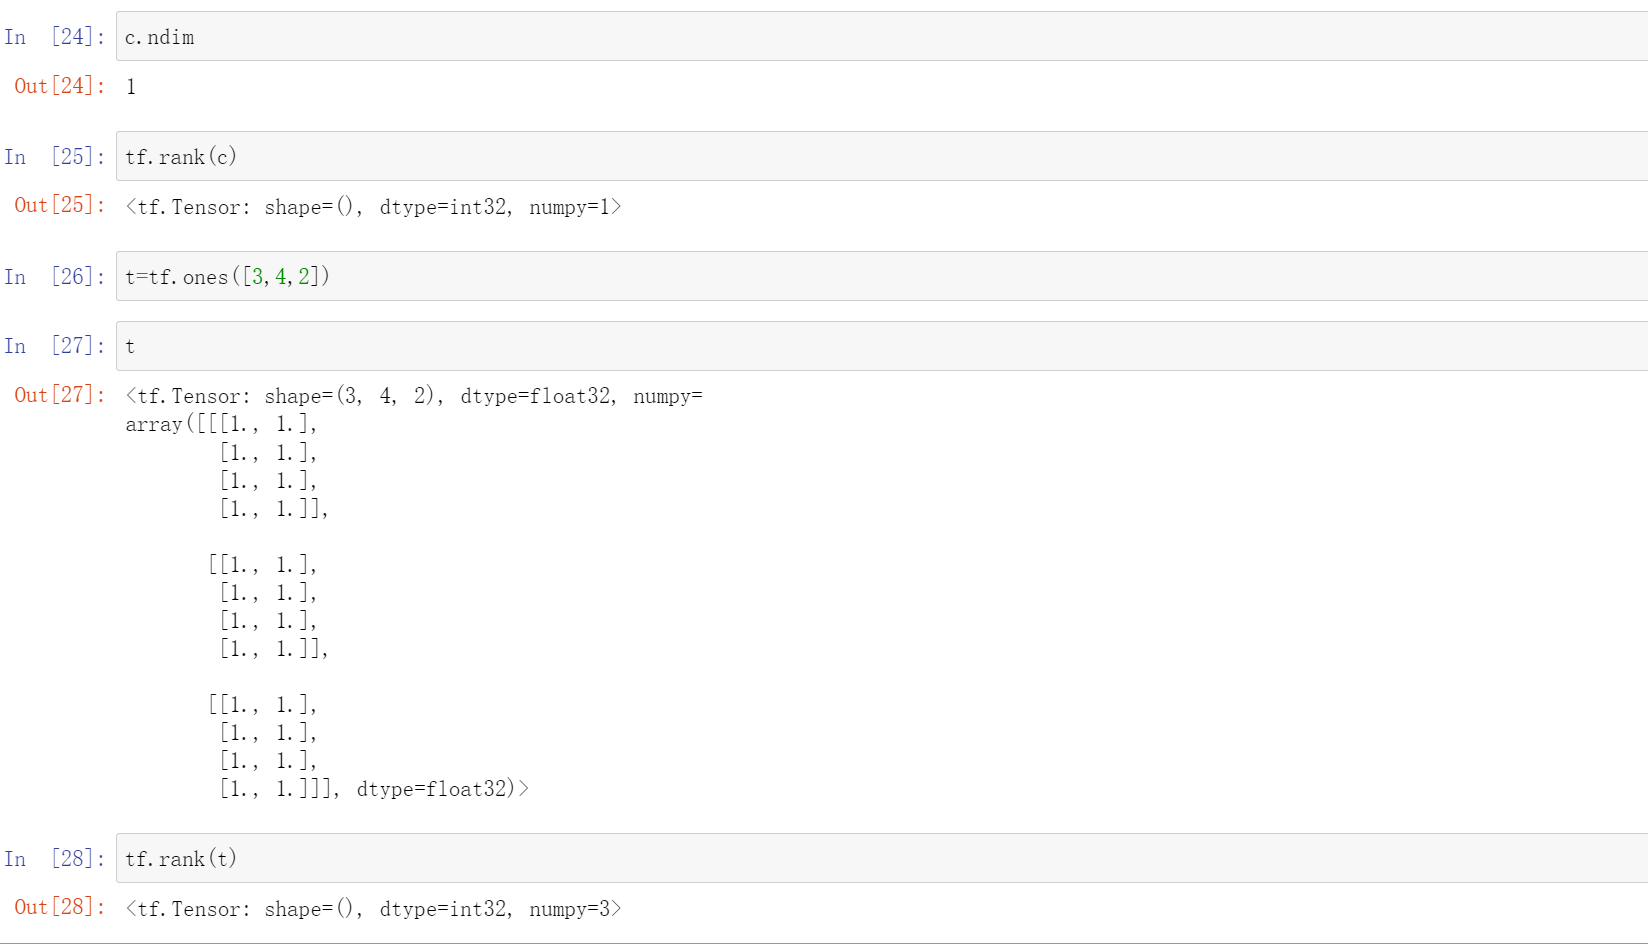
c.numpy()
#查看c的维度
c.ndim
1.3 rank函数
这个也是返回维数的比如说
其中tf.ones([3,4,2])是弄一个三维的数组
1.4 检验函数是不是tensor类型
tf.is_tensor(t)

1.5 numpy转化成tensor
aa=tf.conver_to_tensor(a)
a=np.arange(5)
aa=tf.conver_to_tensor(a)
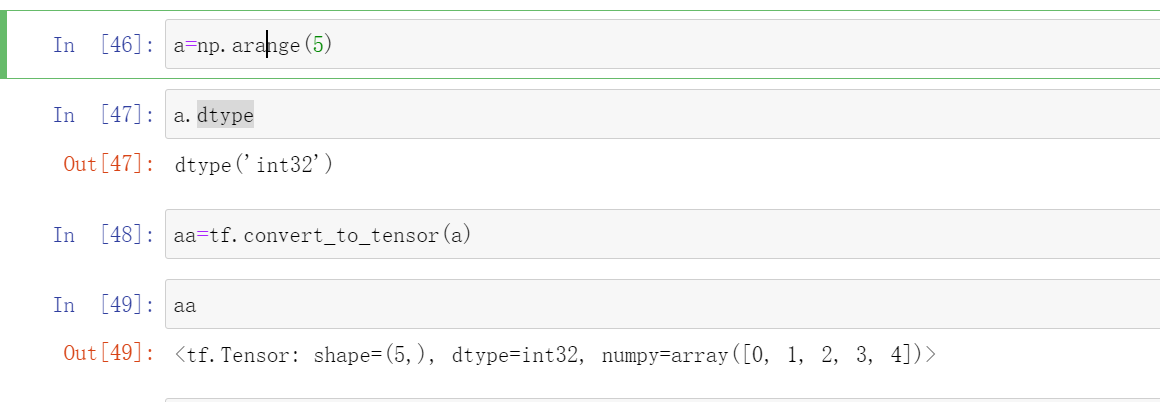
如果转化的时候想改变类型的话
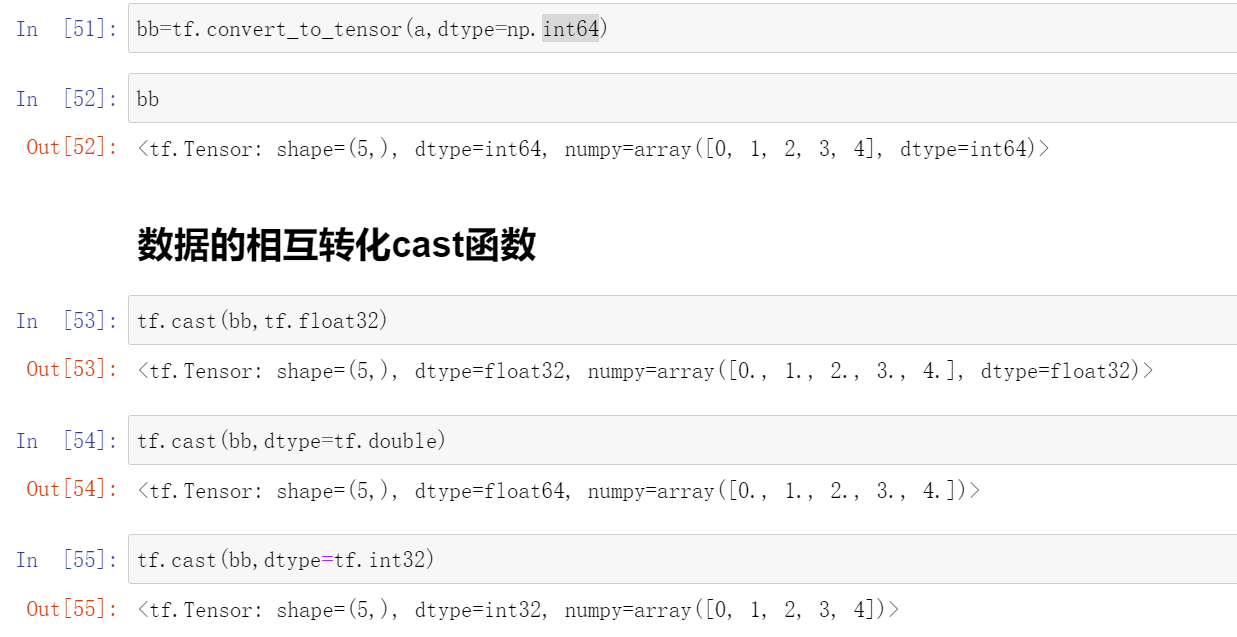
bb=tf.convert_to_tensor(a,dtype=np.int64)

1.6 tensor中数据的相互转化
API:
tf.cast(aa,tf.float32)就是把aa里面的数变成float32
tf.cast(bb,tf.float32)
tf.cast(bb,dtype=tf.double)
tf.cast(bb,dtype=tf.int32)
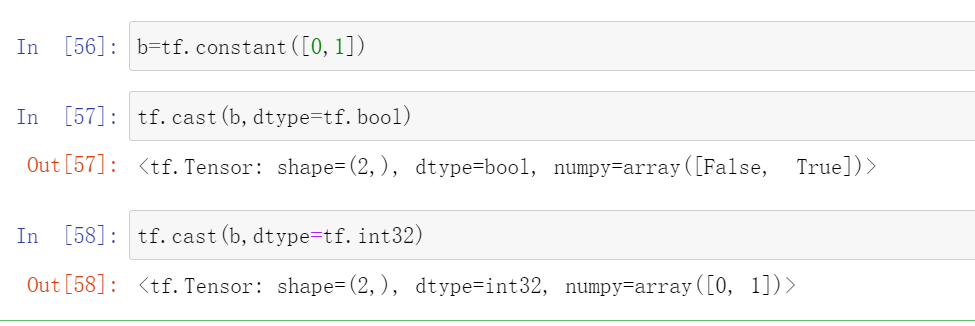
我们后面比较常见的就是整形和bool型之间的转化
b=tf.constant([0,1])
tf.cast(b,dtype=tf.bool)
#输出:<tf.Tensor: shape=(2,), dtype=bool, numpy=array([False,  True])>
tf.cast(b,dtype=tf.int32)
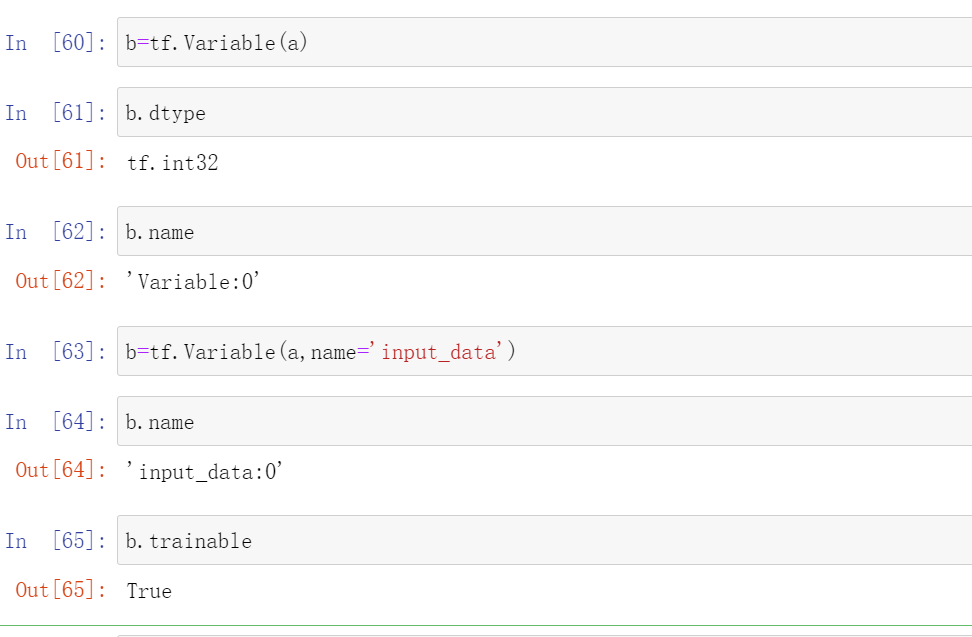
1.7 Variable 类型
这个是专门为神经网络设计的一个类型,比如收y=w*x+b这个函数,我们在求梯度下降的时候会对w进行求导,所以我们可以将w设置成Variable类型,这样它进行梯度关系的一个跟踪,如果记录成Variable 就会自动的进行一些梯度的记录
2 创建tensor
其中方法有很多:
▪ from numpy, list
▪ zeros, ones
▪ fill
▪ random
▪ constant
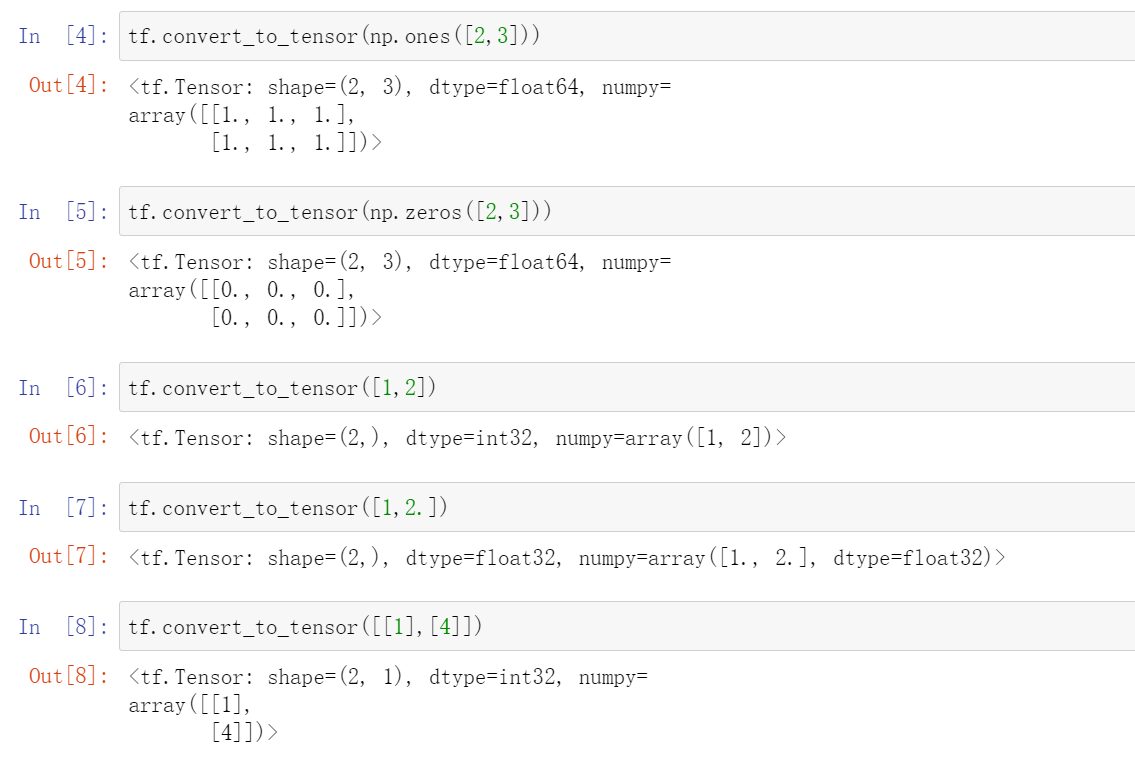
2.1 from numpy,list
API:
conver_to_tensor()
tf.convert_to_tensor(np.ones([2,3]))
#这里创建的默认是float64类型的
tf.convert_to_tensor(np.zeros([2,3]))
#这里创建的默认是float64类型的
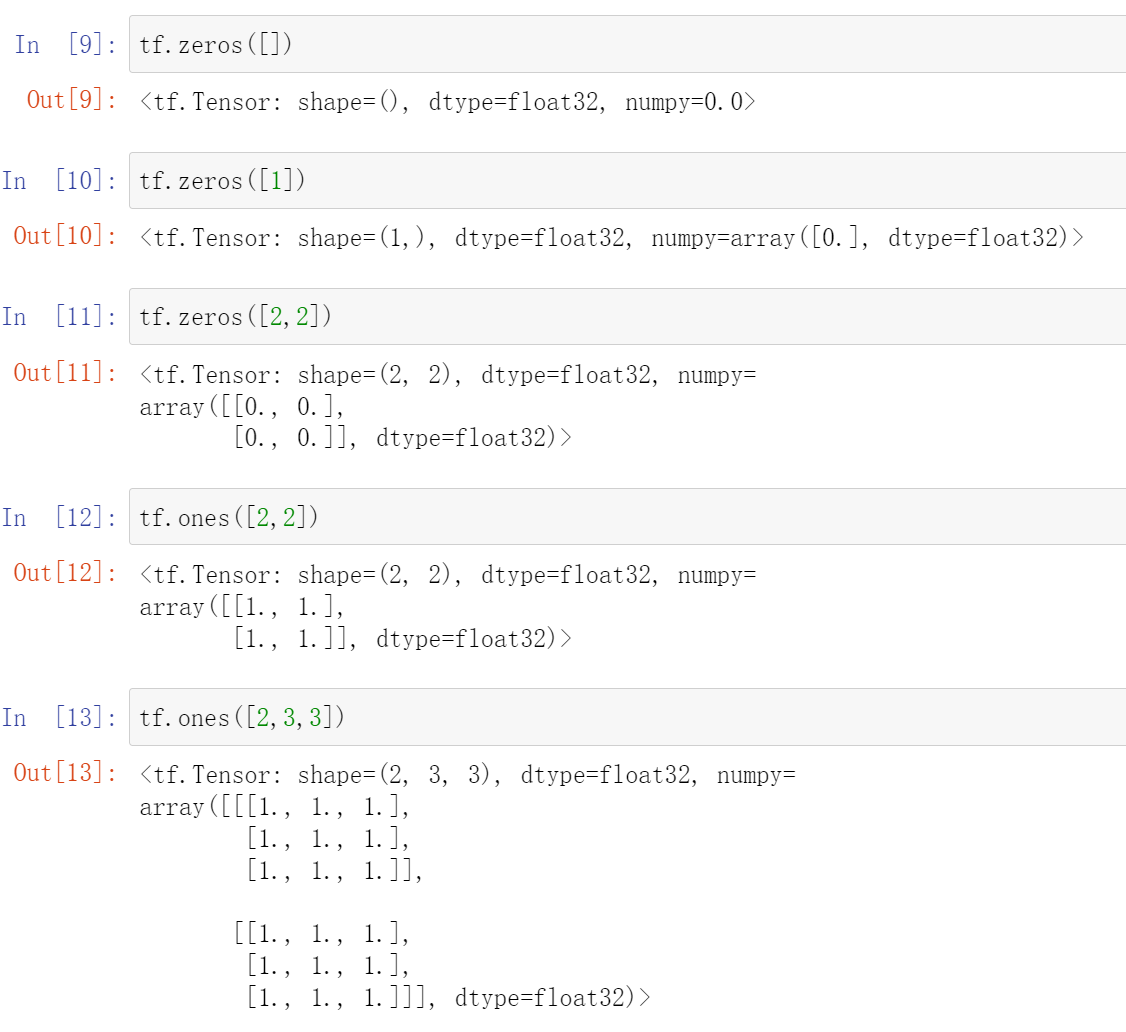
2.2 zeros, ones
tf.zeros()这个里面是维度
tf.ones()这个里面也是维度
注意这个括号里面的是维度,不如tf.zeros([2,2])这是创建了一个两行两列的0
tf.zeros([])
#这里就是一个标量0.
tf.zeros([2,3,4])
#这是一个三维的
2.3 tf.zeros.like(),tf.ones.like()
比如说这个tf.zeros.like(a),就是创建了一个和a形状相同的但是全0的矩阵,等价于tf.zeros.like(a.shape)
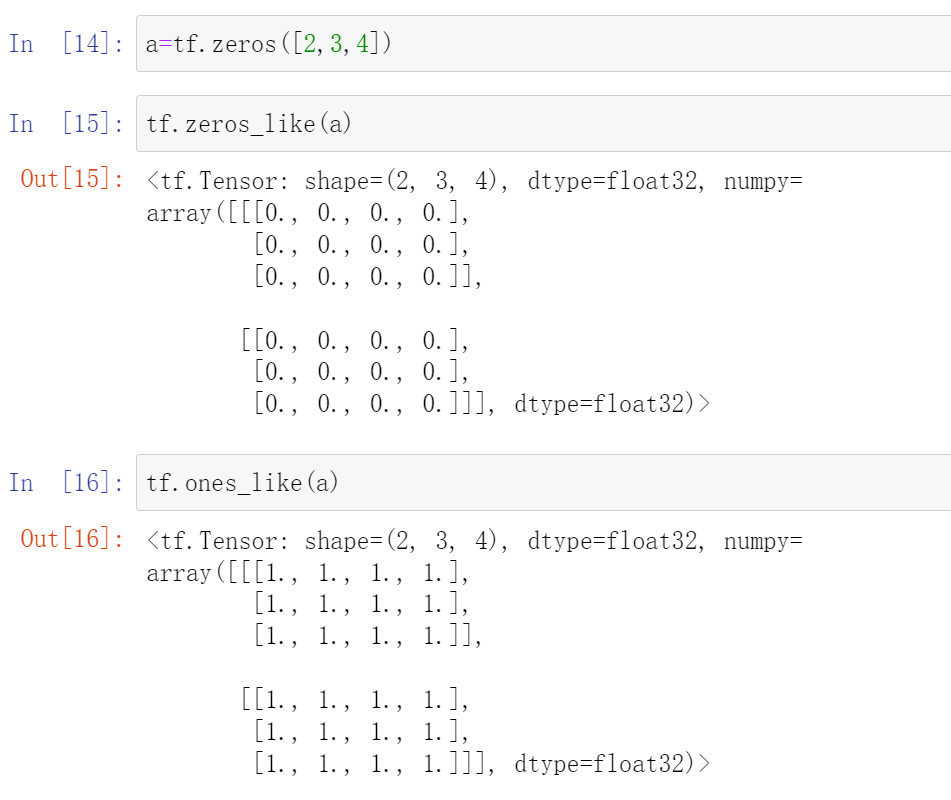
这个tf.zeros.like(),tf.ones.like(),tf.zeros(),tf.ones()用处是非常广泛的,比如y=wx+b,w通常都初始化为全1,b初始化为全0
2.4 fill
顾名思义,就是填满的意思
tf.fill([n,m],k)
意思就是用k填满这个[n,m]的矩阵

2.5 random(常见)
这个是创建一个随机数组,这个最常见其中包含正态分布,
1.正态分布
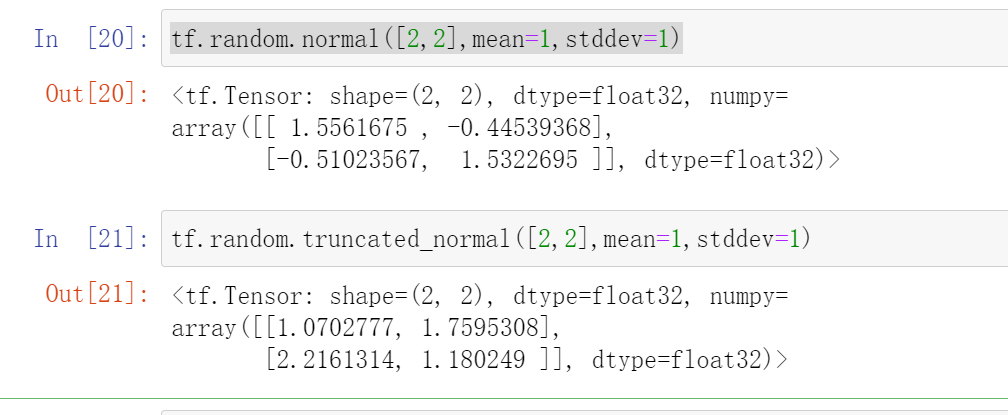
tf.random.normal([n,m],mean=1,stddev=1)
n行m列,然后均值mean为1,方差stddev为1
不指定的话就是01分布
tf.random.truncated_normal([2,2],mean=1,stddev=1)这是一个截断了的正态分布,有时候使用这个会好一点
tf.random.normal([2,2],mean=1,stddev=1)
tf.random.truncated_normal([2,2],mean=1,stddev=1)
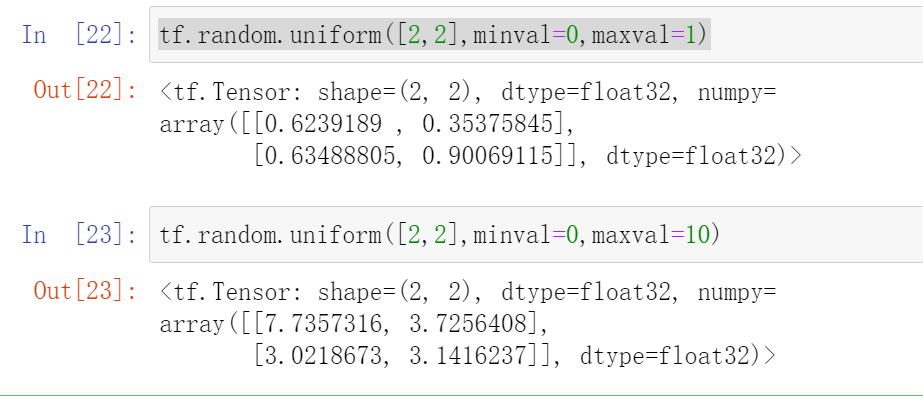
2.均匀分布
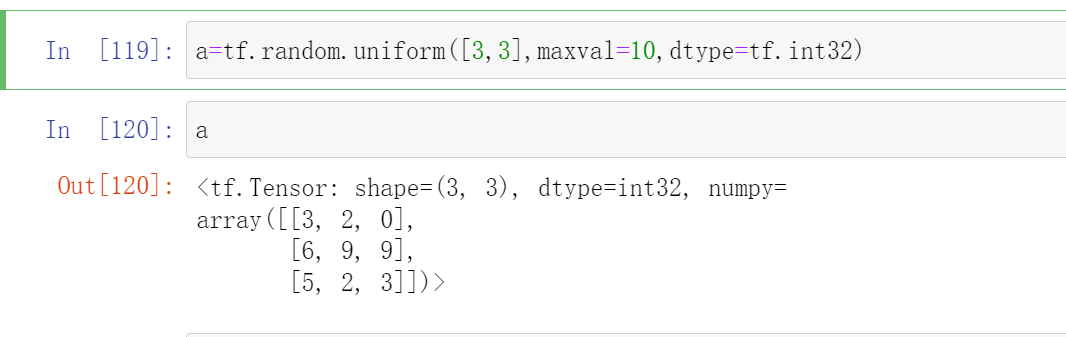
tf.random.uniform([n,m],minval=,maxval=,dtype=)
这个就是在minval和maxval之间均匀取样n行m列的数组
这里也可以加上dtype=tf.int32,就是返回的都是整数,不加默认是float32
tf.random.uniform([2,2],minval=0,maxval=1)
tf.random.uniform([2,2],minval=0,maxval=10)
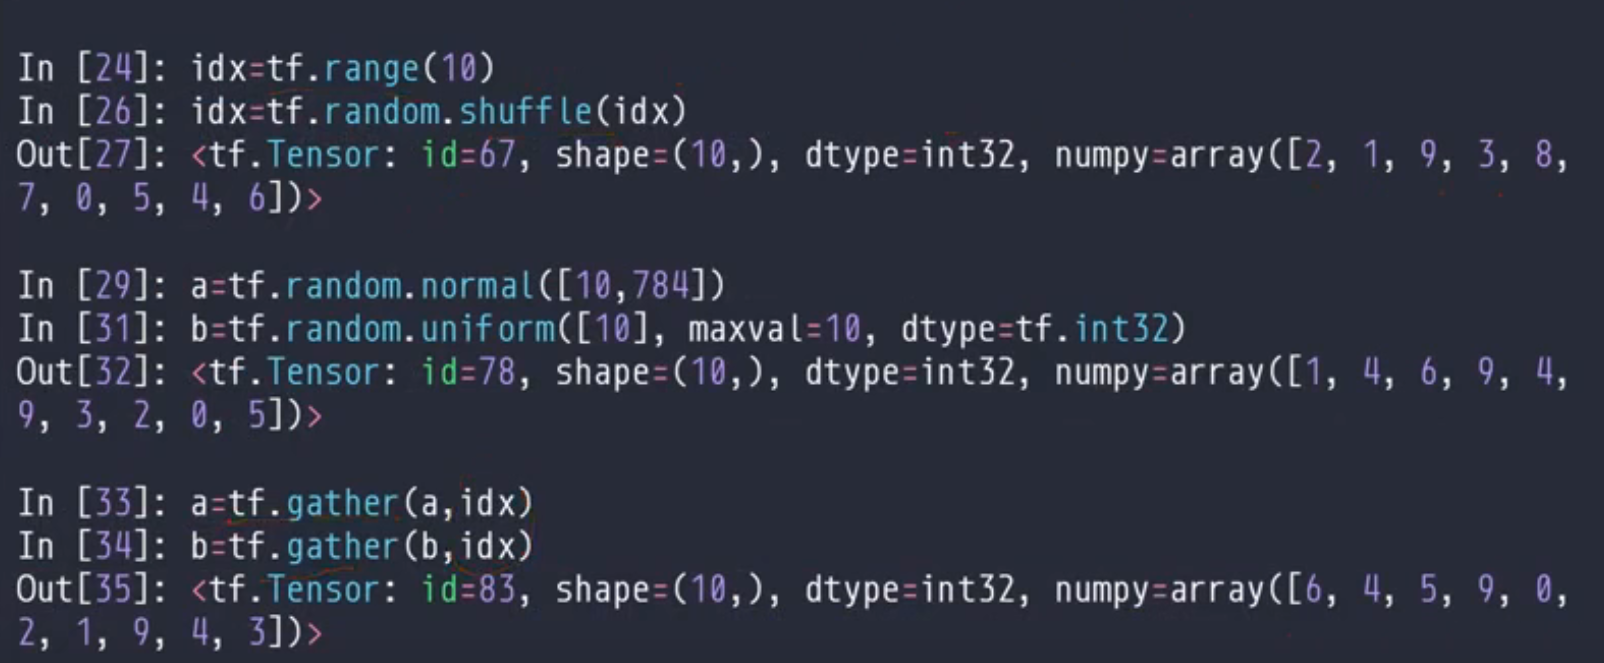
2.6 应用(random Permutation)
这个是将一个数组再重新打乱
2.7 tf.constant函数
就是这个和conver_to_tensor是一样的
3 存在意义
3.1 Scalar(标量)

这个里面的shape=()就是标量
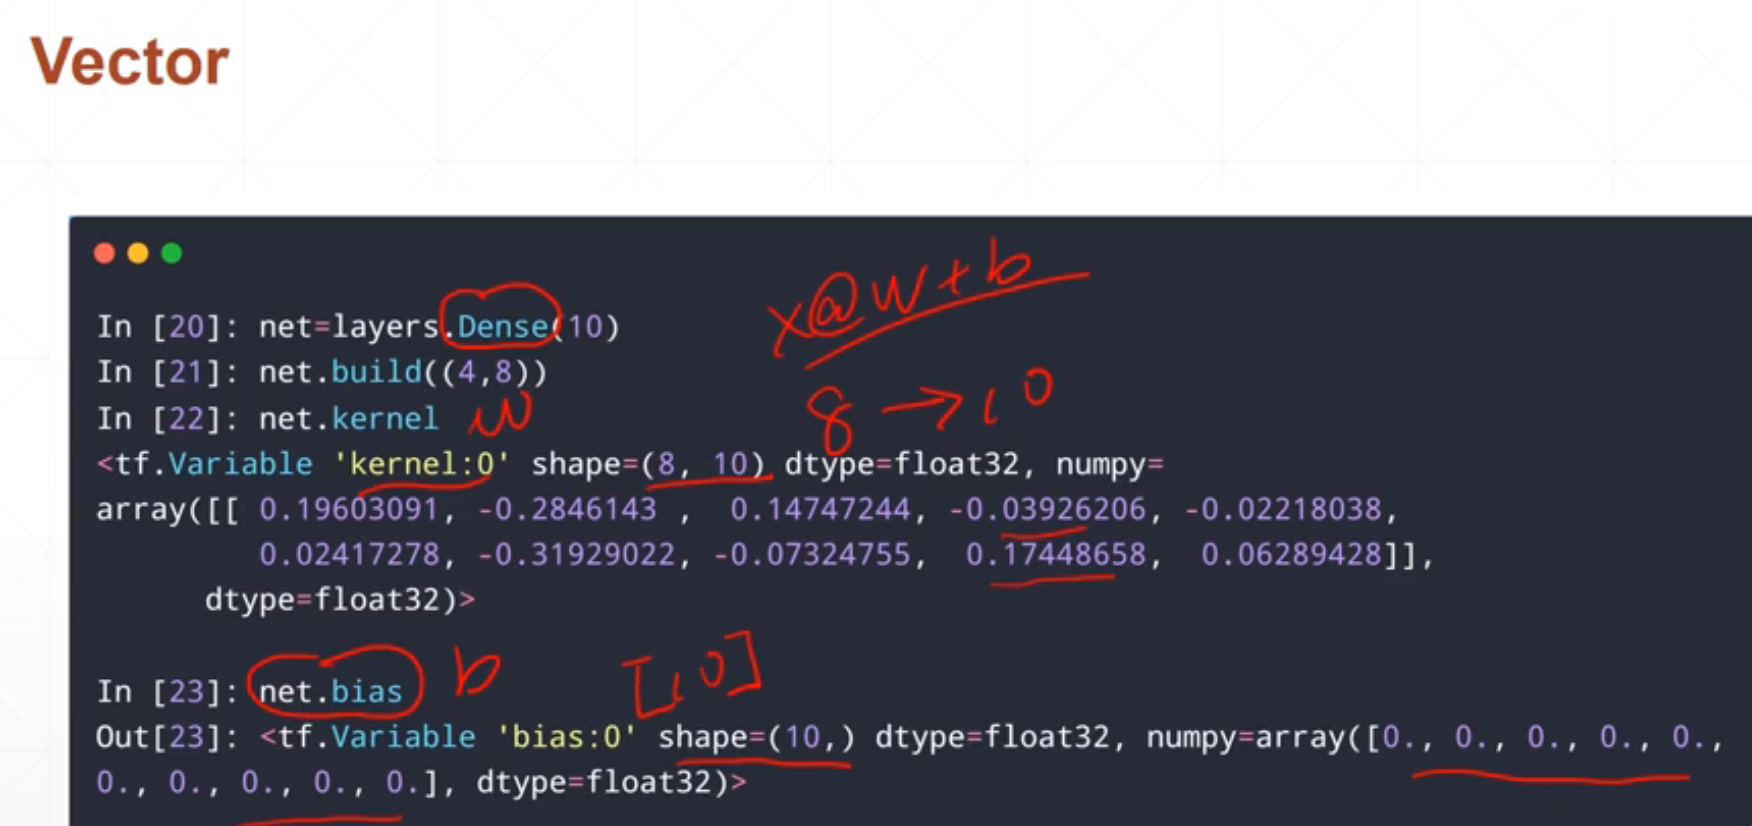
3.2 Vector(向量)
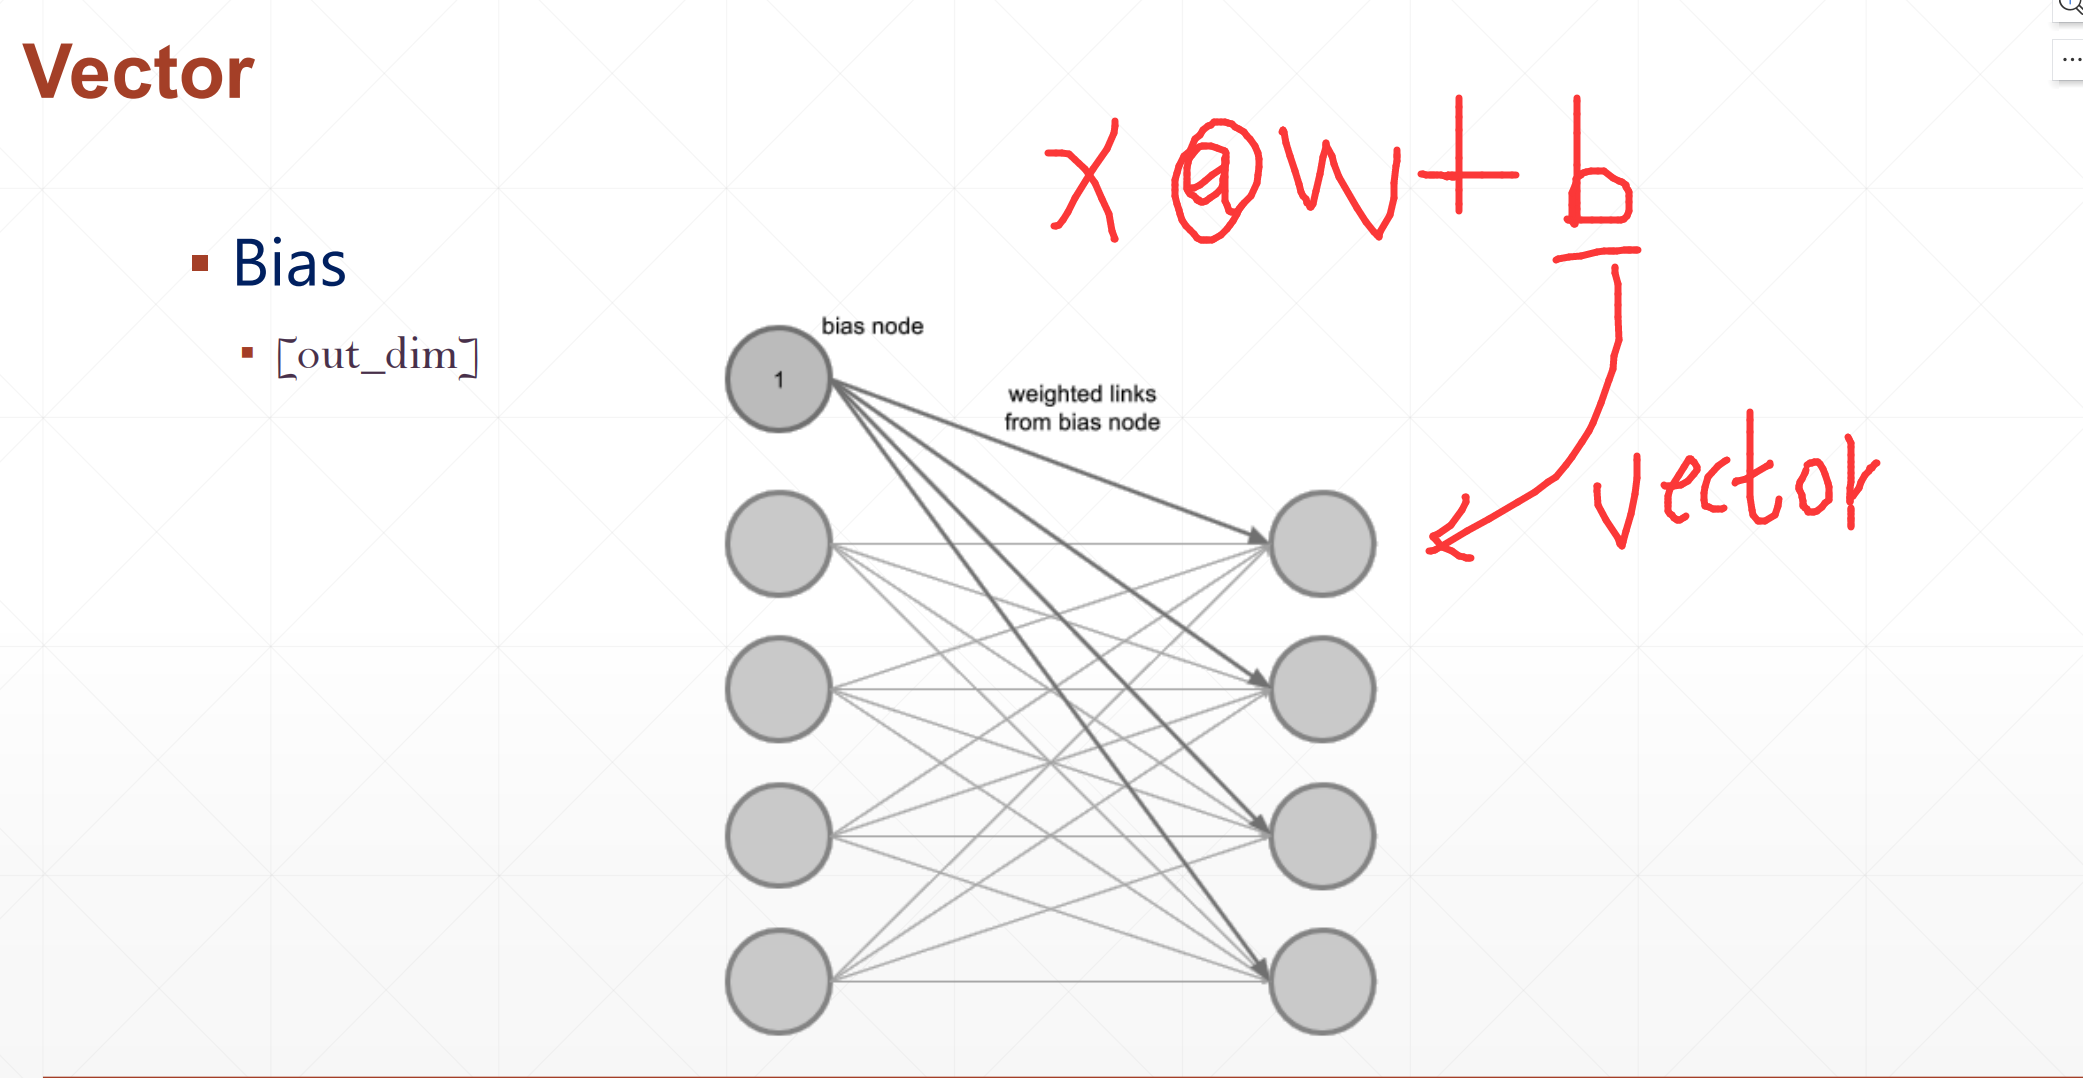
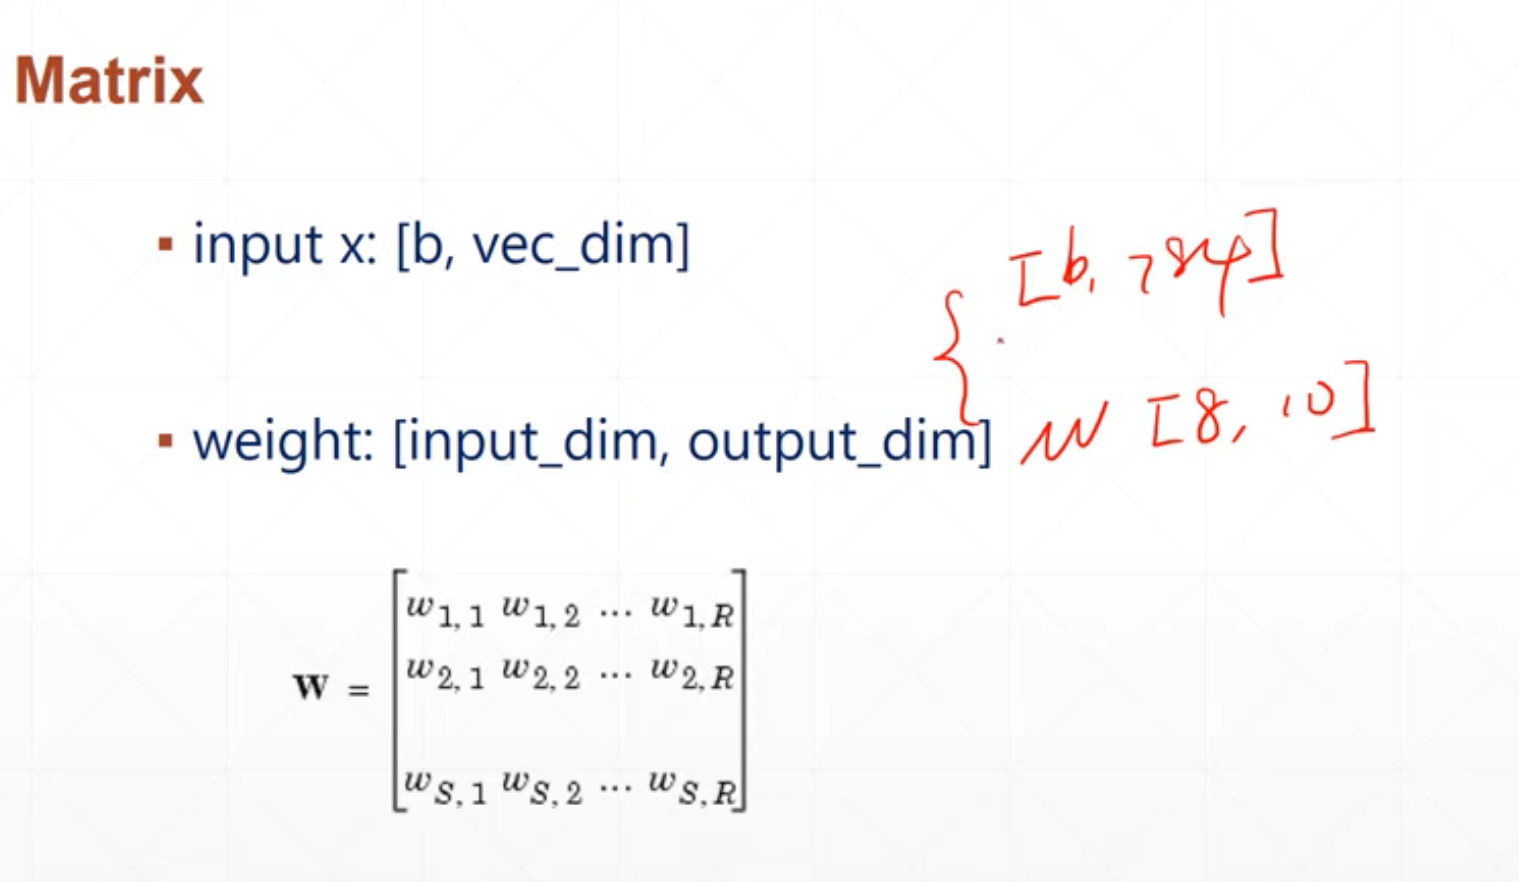
其中这个x@w+b,这个b就是一个vector
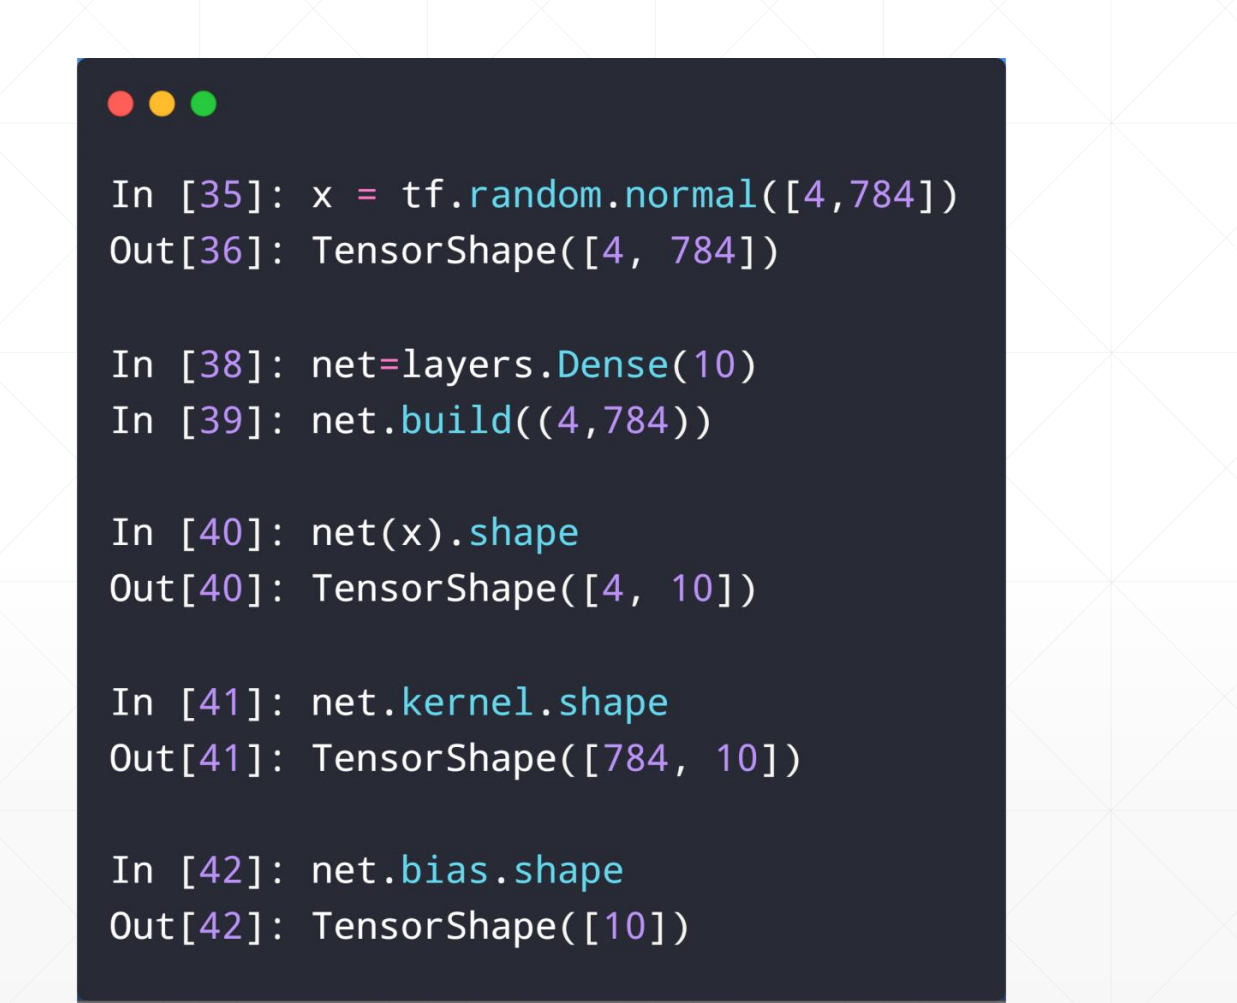
3.3 Matrix(矩阵)
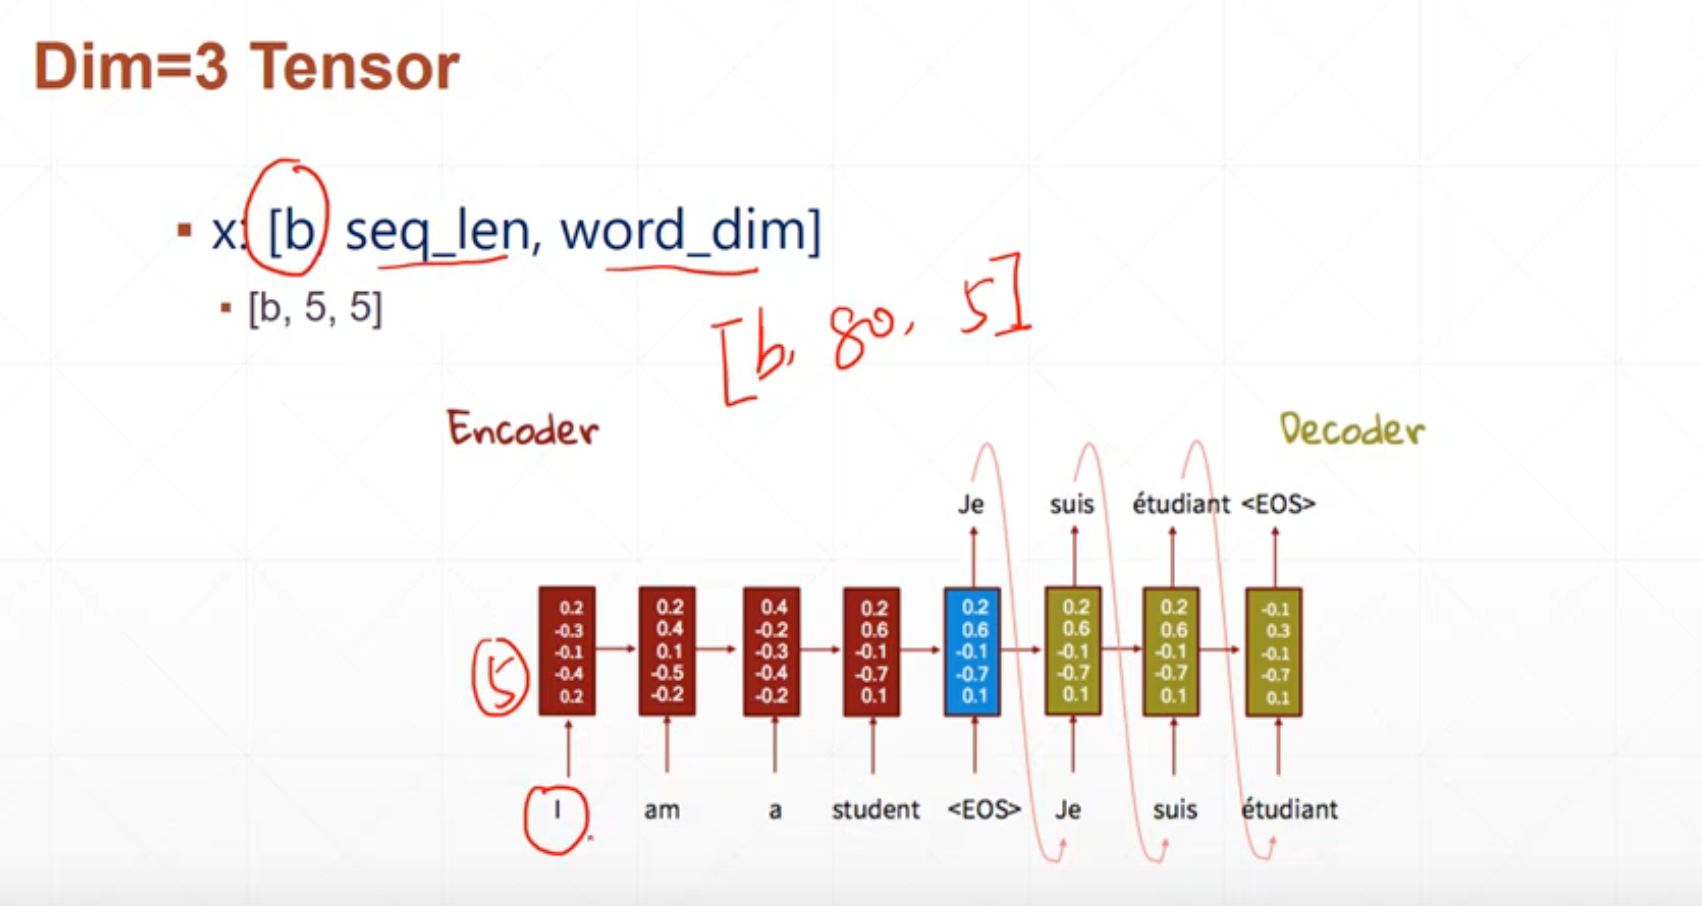
3.4 Dim=3 Tensor
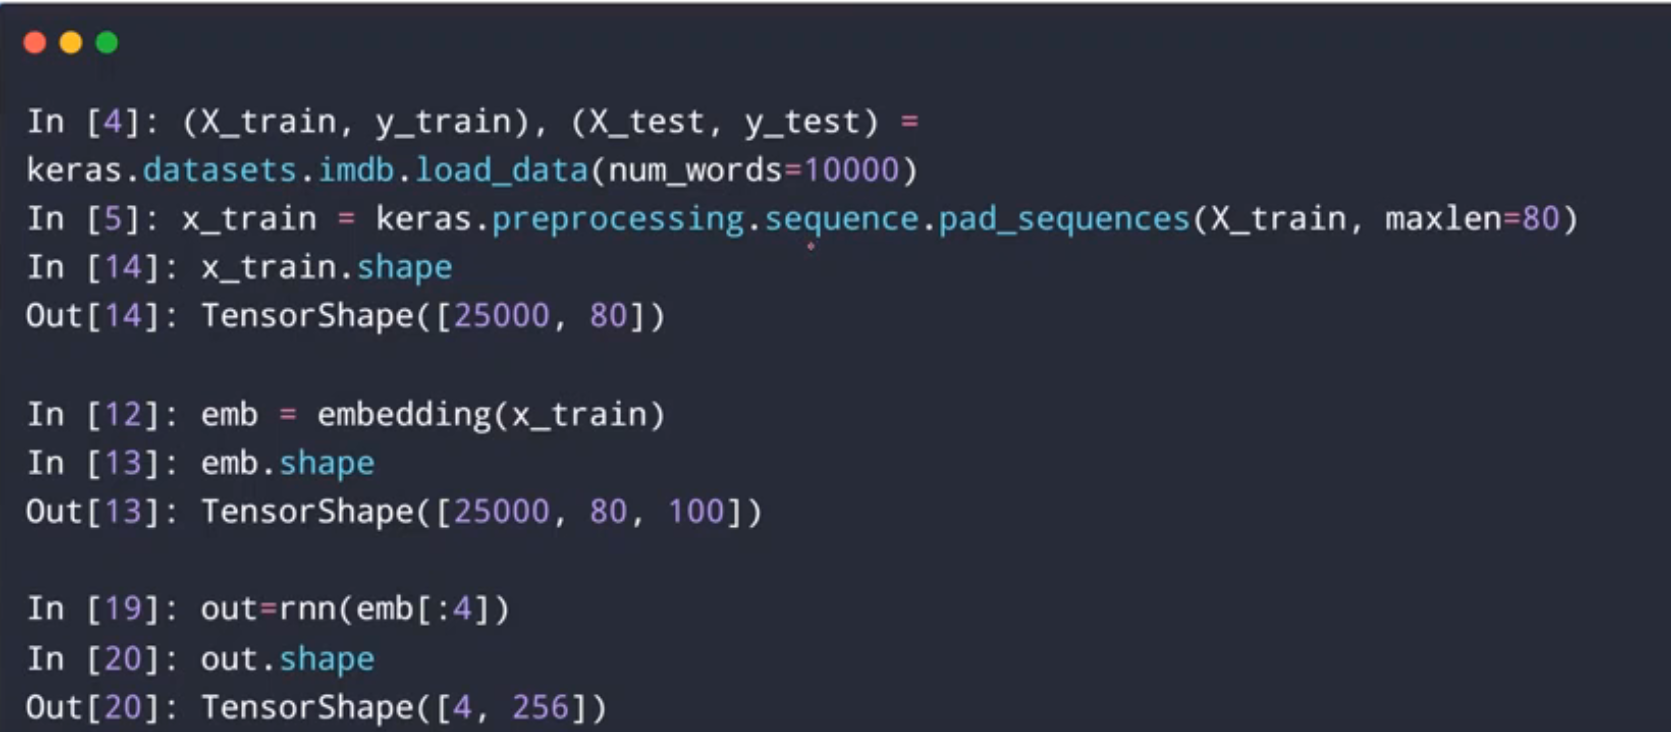
这个在自然语言用的比较多,一个单词5个特征,1句话80个单词。
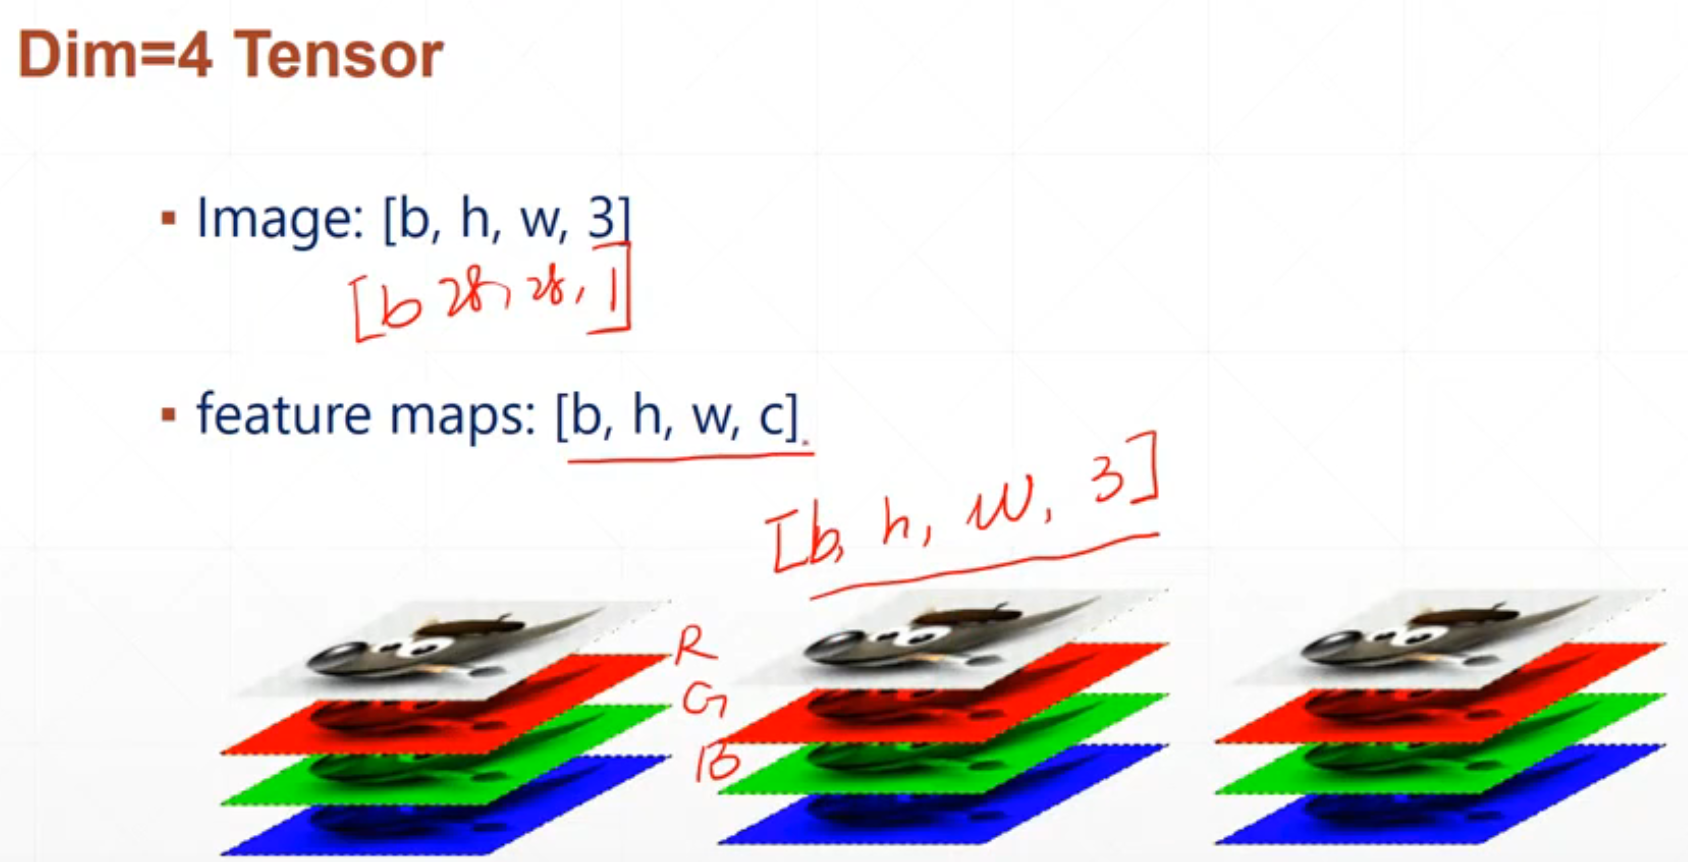
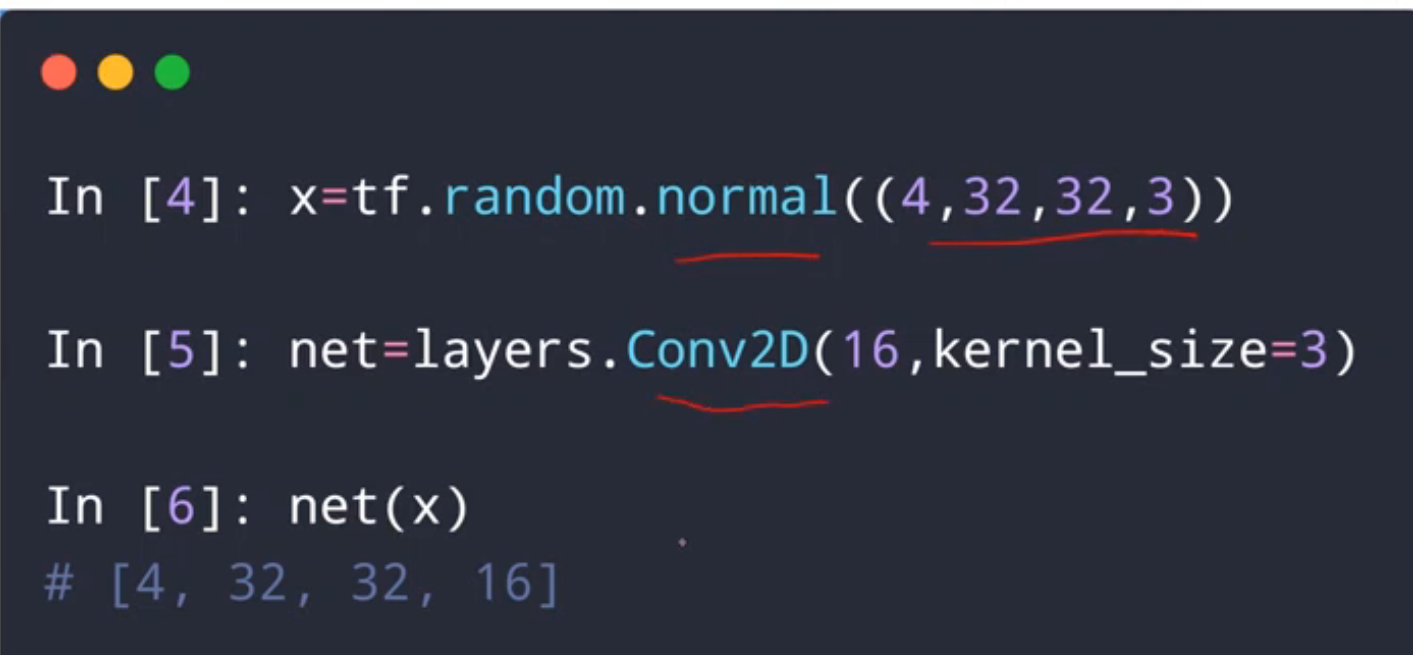
3.5 Dim=4 Tensor
这个通常对应图片,多张图片是[b,h,w,c],b是代表多张图片,h高,w宽,c什么样的图片,c=3彩色的
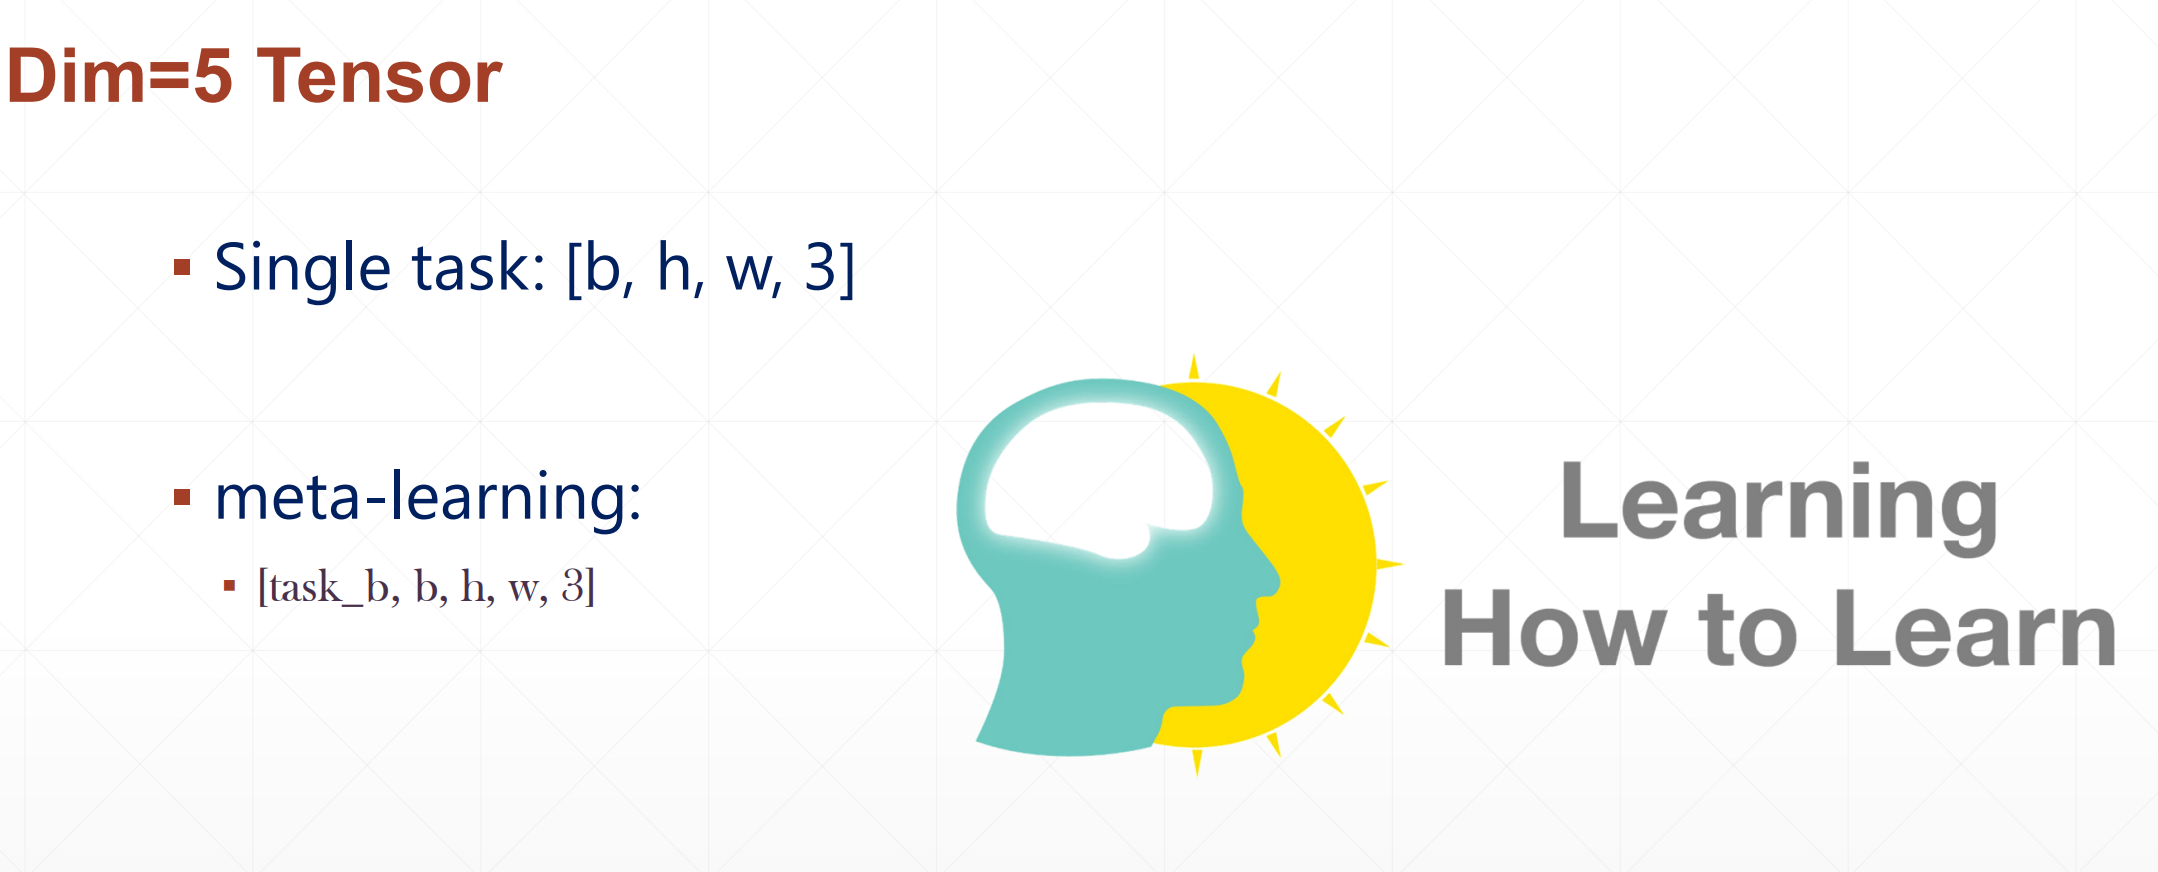
3.6 Dim=5 Tensor
4 Tensor 的索引和切片
▪ Basic indexing
-------1.[idx][idx][idx]
▪ Same with Numpy
-----1.[idx, idx,…]
-----2.start:end
-----3.start:end :step
4.1 基本索引(Basic indexing)
4.1.1 [,,,],索引
在这里如果我们想访问的时候一般不用[][],一般用[,,,]。
例如:
a=tf.random.normal([4,28,28,3])
a[1].shape #一般代表第二张照片的信息
=>[28,28,3]
a[1,2].shape #代表
=>[28,28]
a[1,2,3].shape
=>[3]
a[1,2,3,2].shape #代表某一张图片的像素,一般为0-256,或者标准化后的图像
4.1.2 start:end
在这里从前向后数第一个为0,从后往前数第一个为-1,但是注意这里是左闭右开的
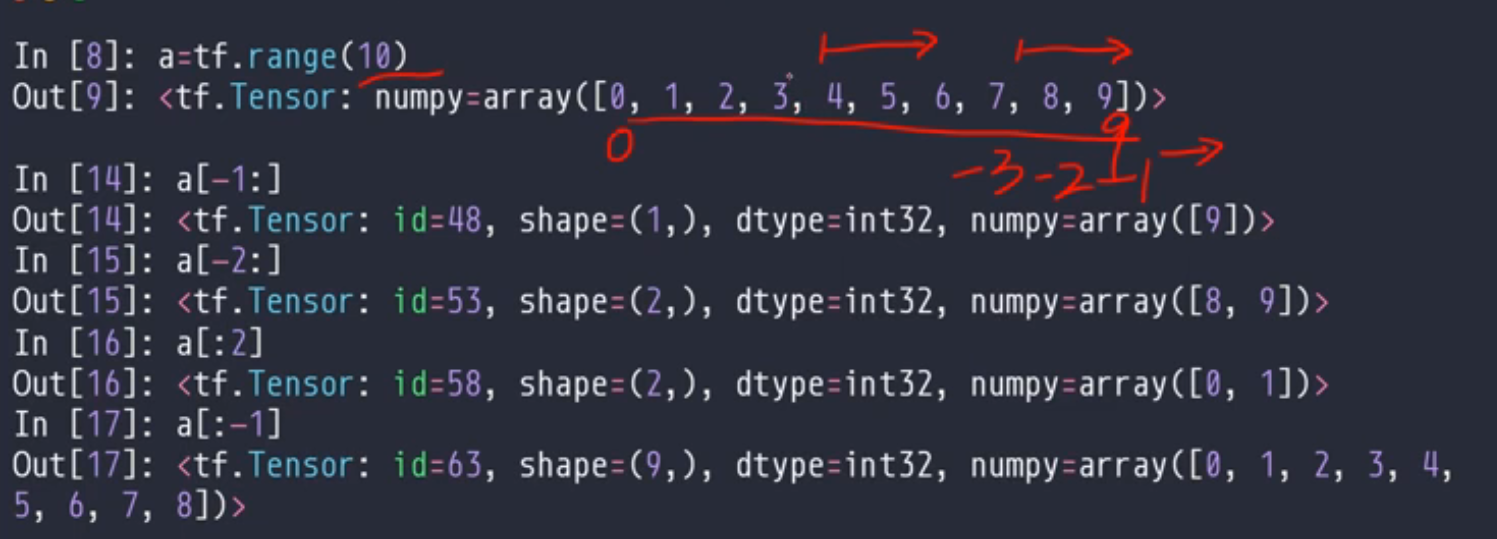
扩展到高维中去:a[0,:,:,:]就是第一张图片的全部信息,a[:,:,:,0]单通道的
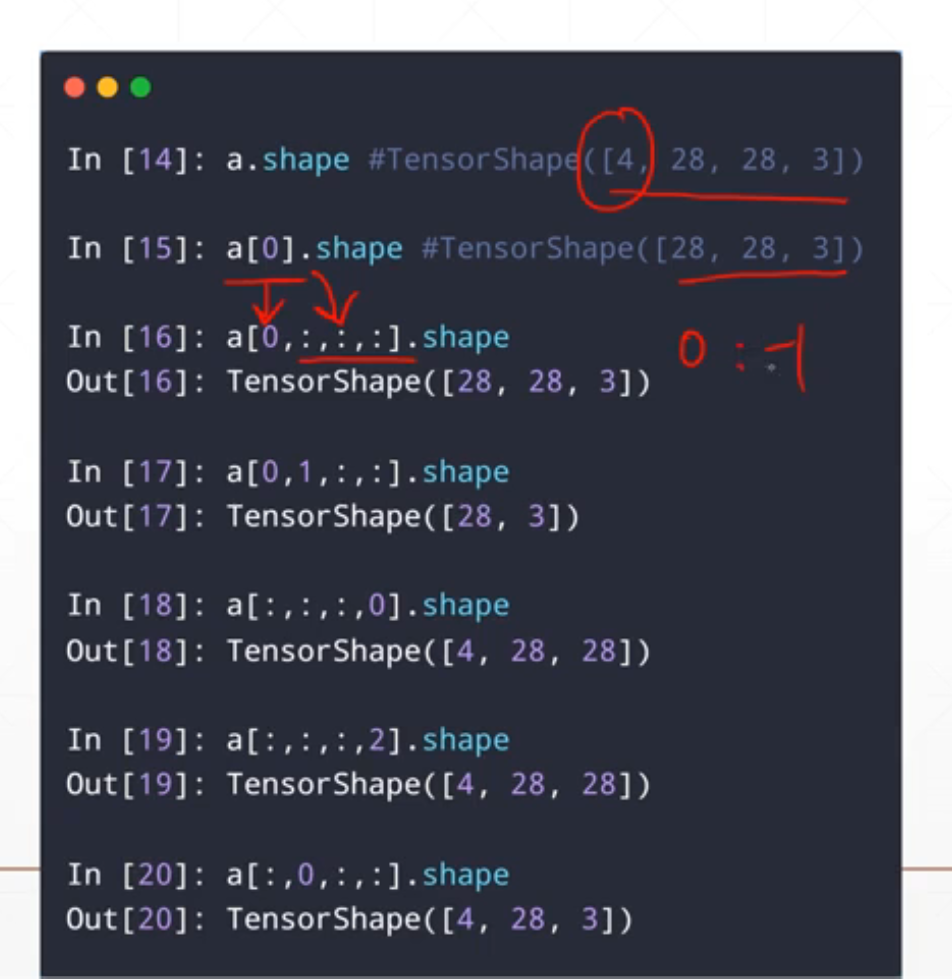
4.1.3 start:end :step
隔行取样,设置步长state🔚step或者::step
注意这里是每个维度都可以这样弄的,比如:
a[0:2,:,:,:].shape
a[:,0:28:2,0:28:2,:].shape
a[:,::2,::2,:].shape
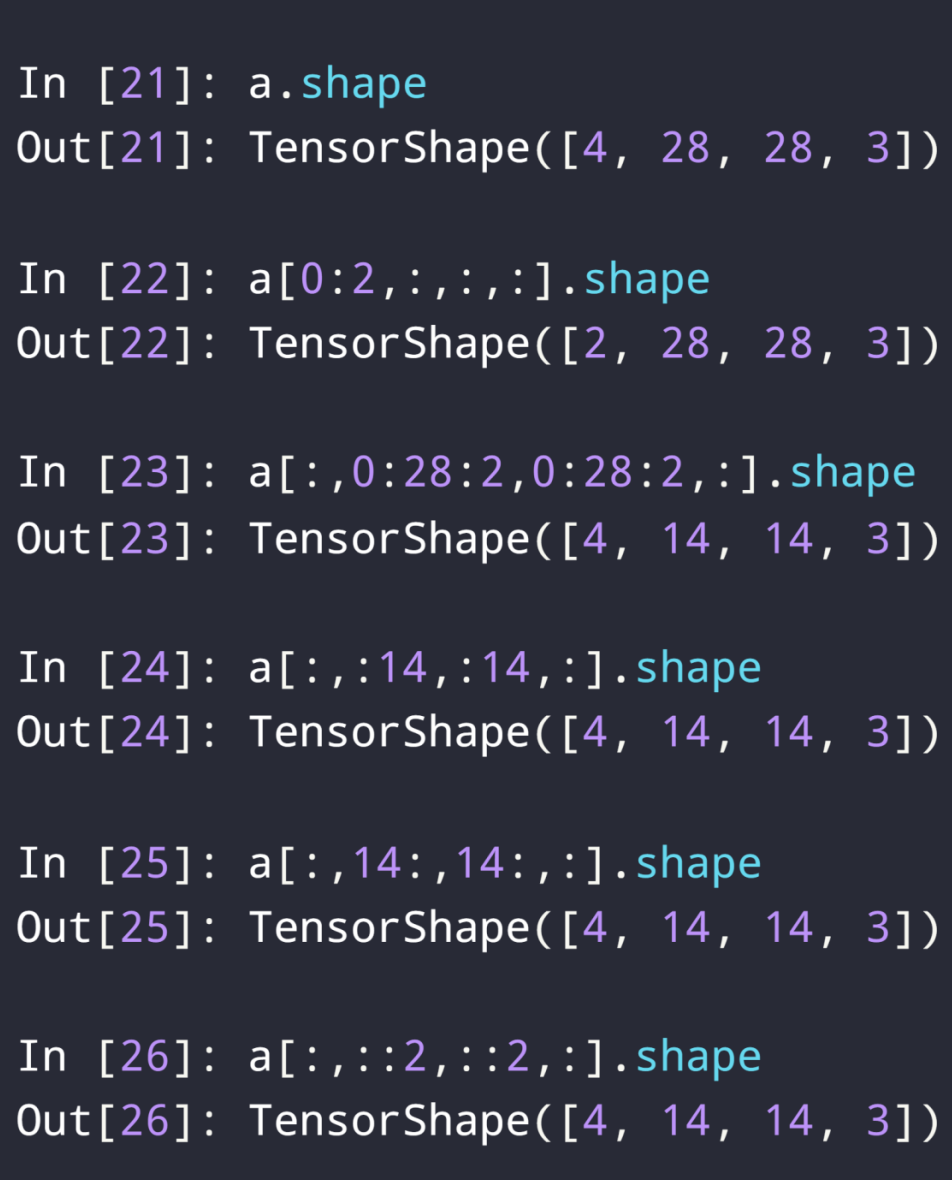
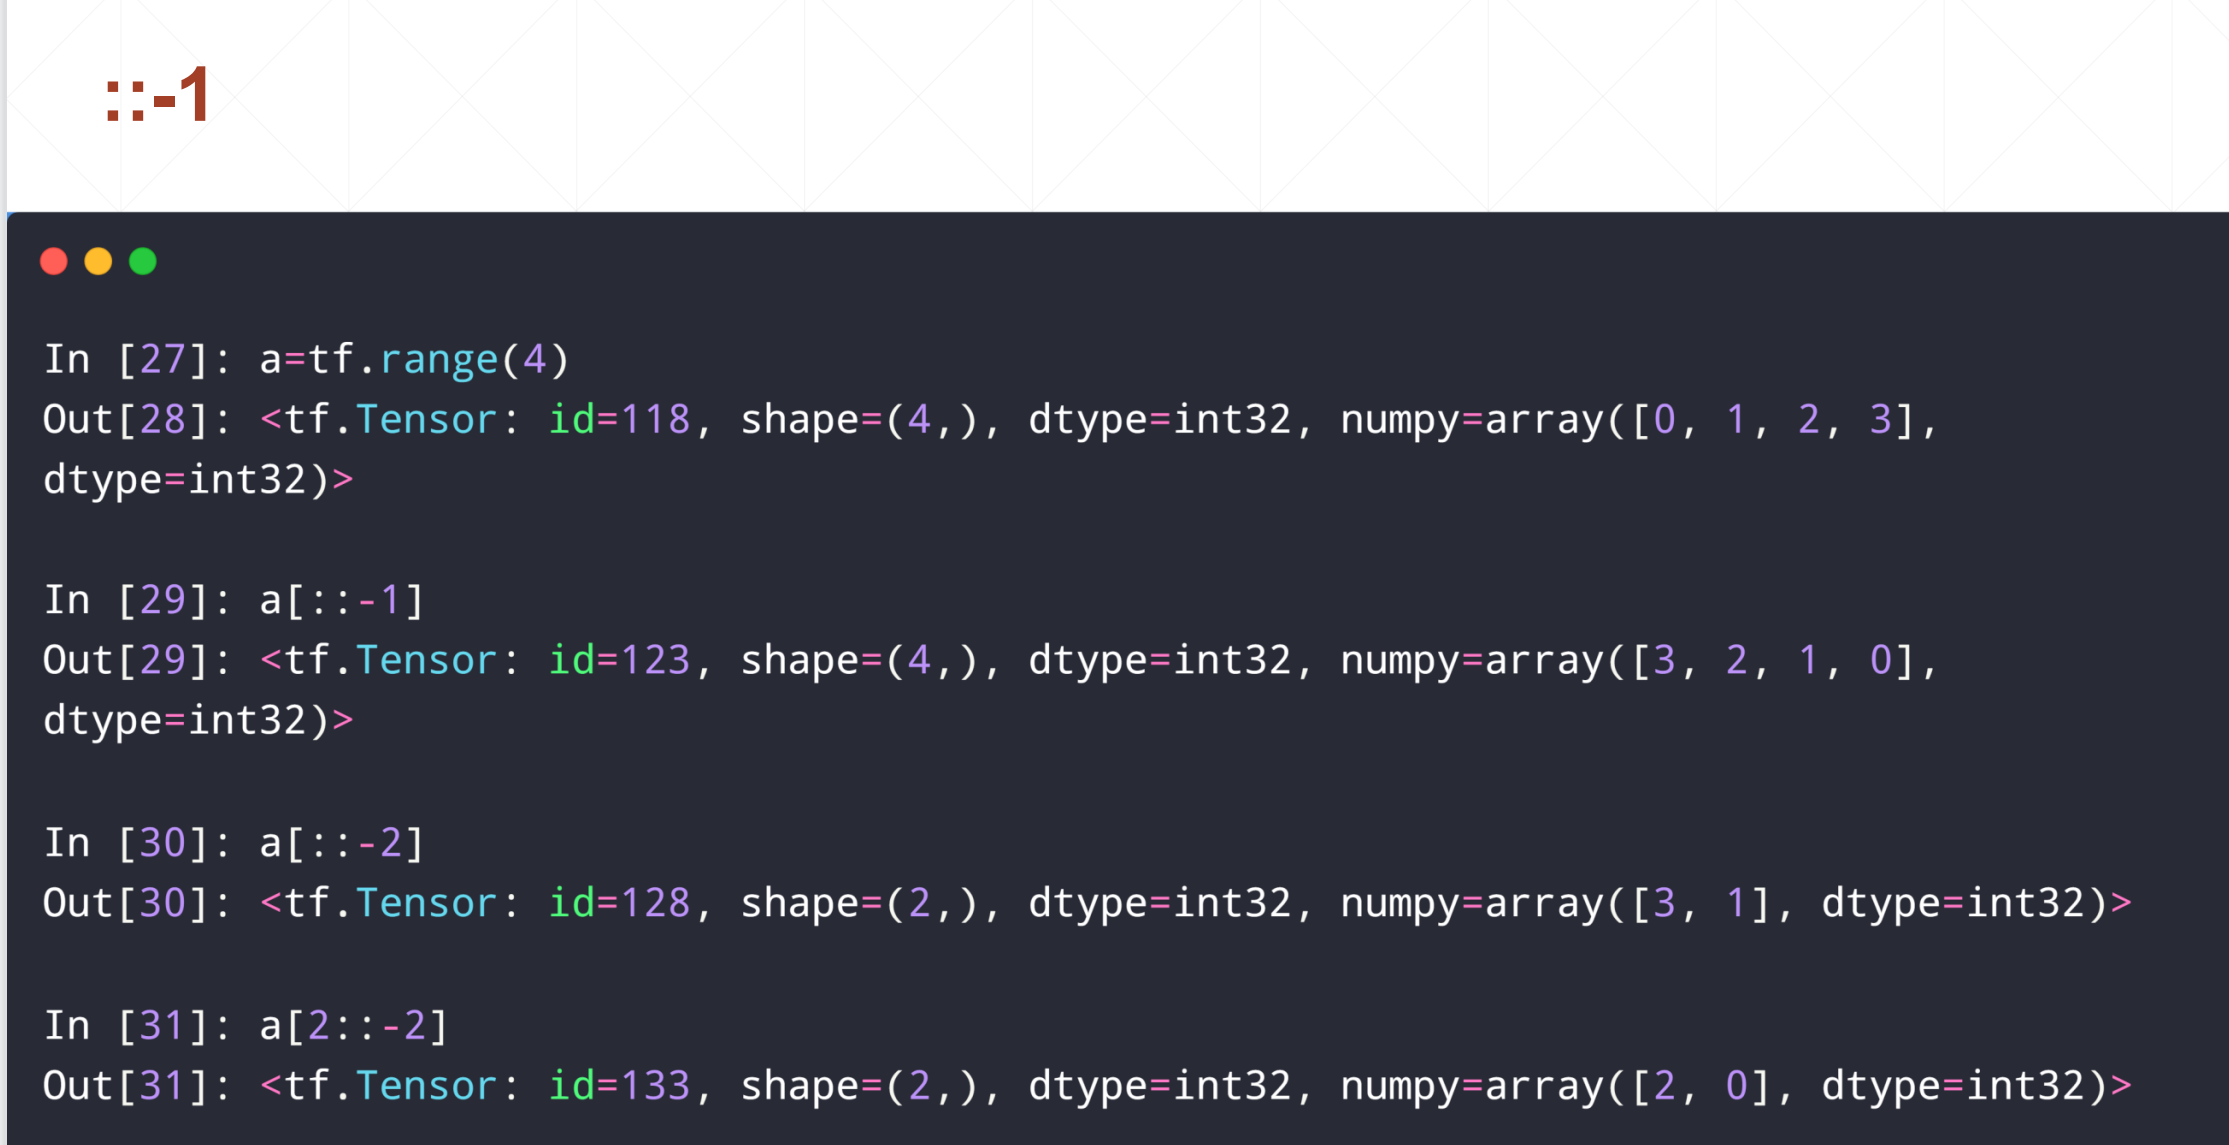
这里需要注意的是如果step为负值的话,代表这个倒着采样
如果是[::-1]的话就是把数组倒序
[::-2],就是倒着隔着采样
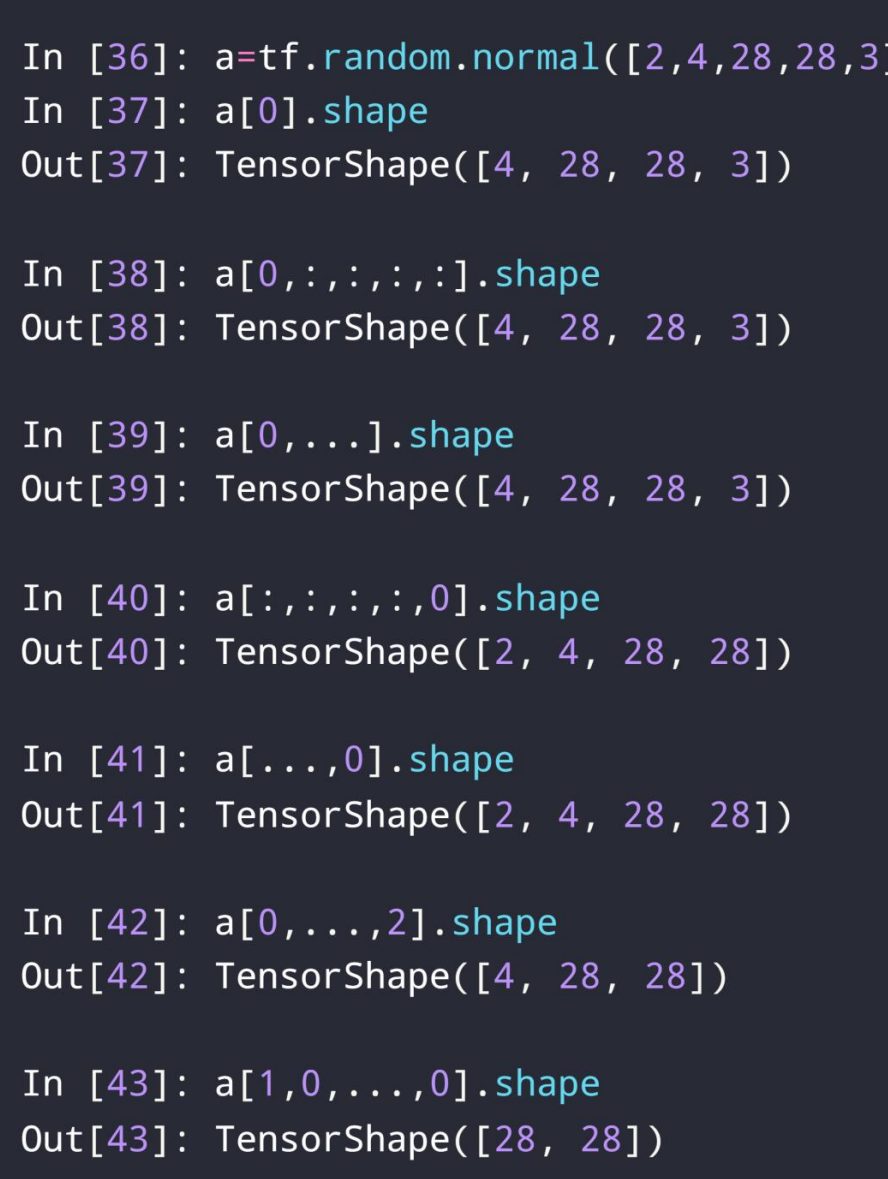
4.1.4 ...方式
其实这个"..."就是一个省略表示。
比如:a[2,4,28,28,3]
a[0,:,:,:,:]=>a[0,...]
a[:,:,:,:,0]=>a[...,0]
a[0,...,2]也是可以的
4.2 选择索引(Selective Indexing)
▪ tf.gather
▪ tf.gather_nd
▪ tf.boolean_mask
4.2.1 tf.gather
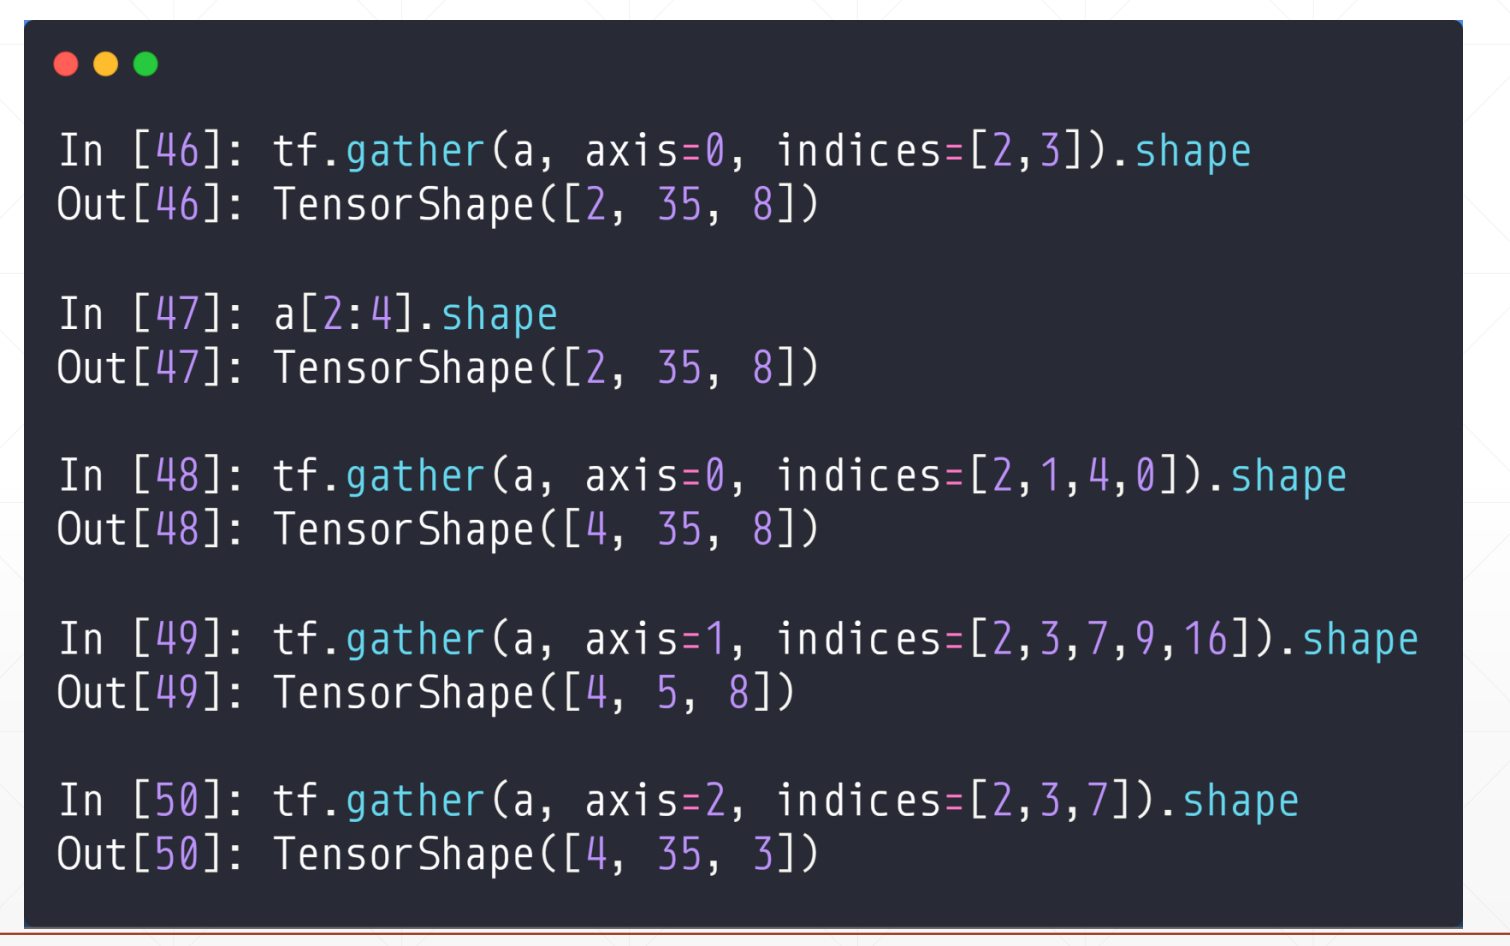
假如说[4,28,28,3],在第二维我们想采样[3,27,9,13]这些无规则行,怎么办?
tf.gather(a,axis,indices=[])其中a为目标函数,axis是第几维(比如[2,35,8]中axis=1,的话就是去第1维,35的那个),indices=[],这个就是要取得编号)
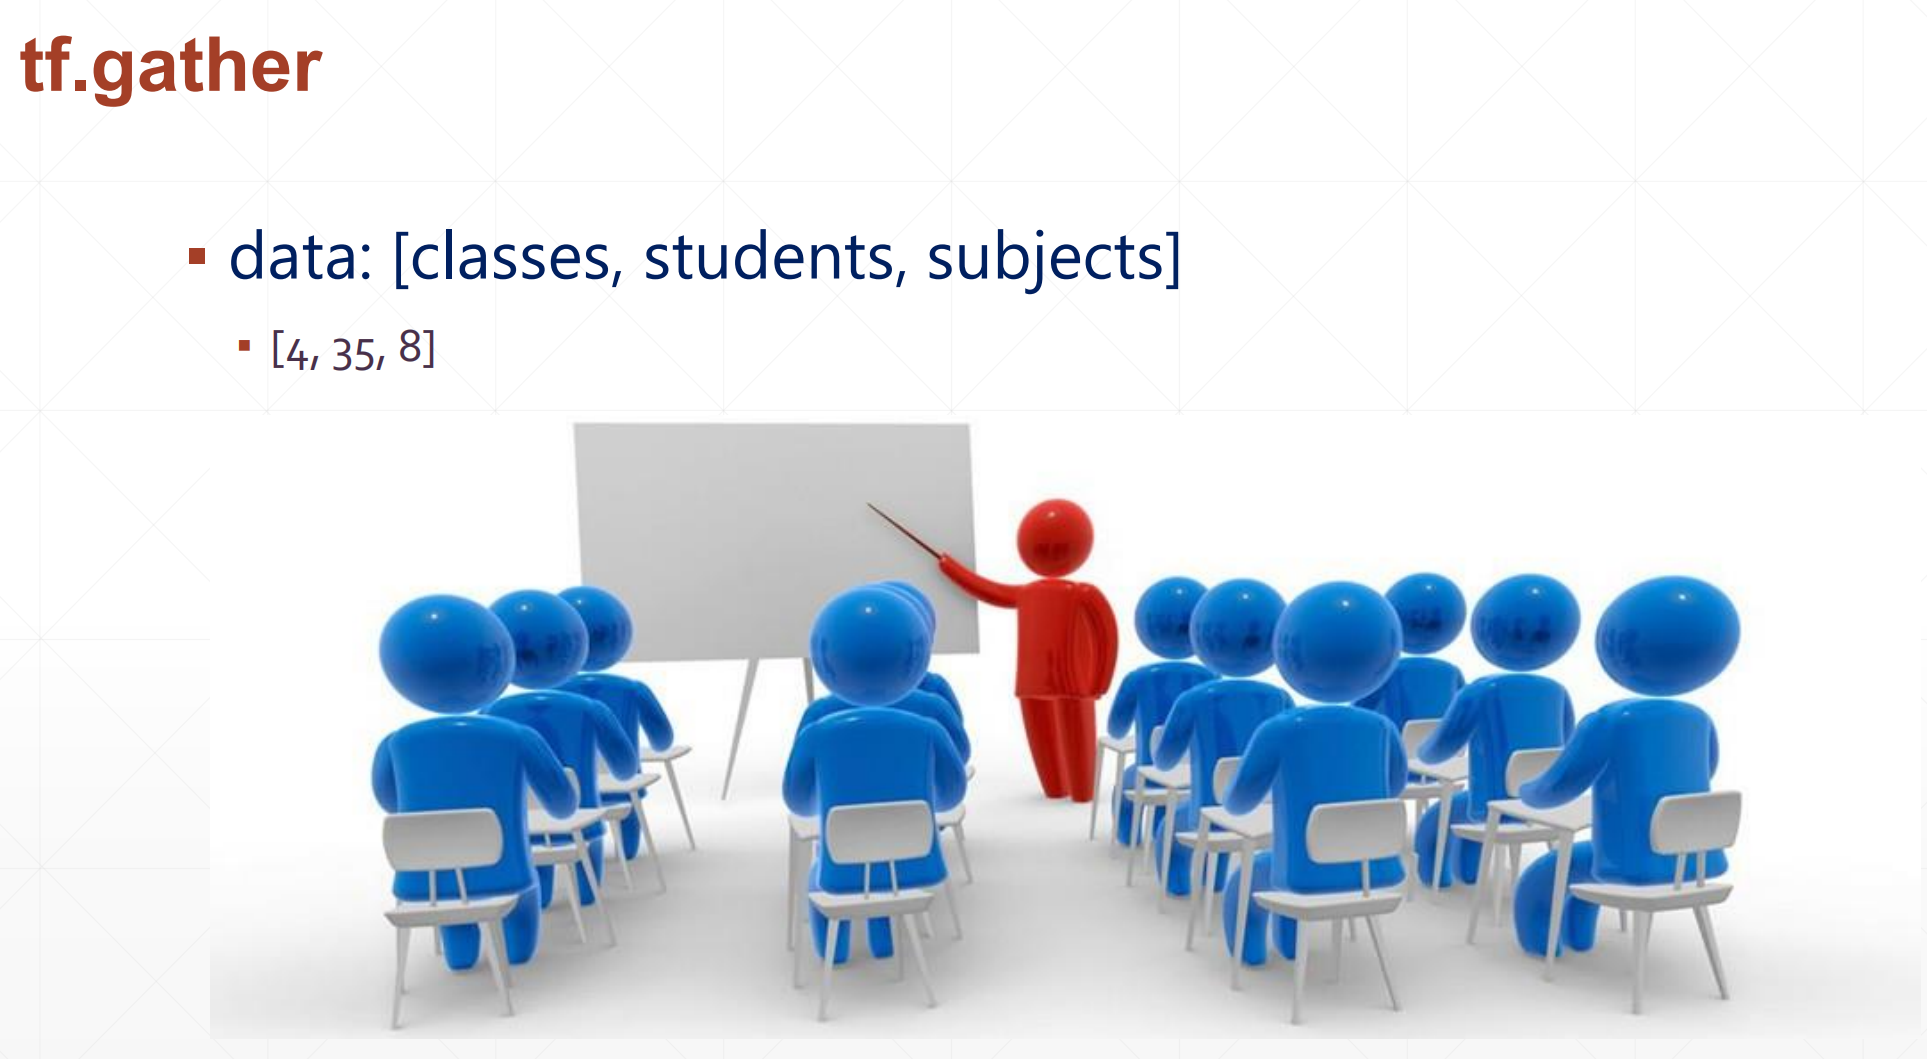
例如:data:[classes,student,subjects]其中[4,35,8]
例如:
tf.gather(a,axis=0,indices=[2,3]).shape
#上面那个是在班级的维度上,采集了下标是2,3班的全部学生的信息,返回[2,35,8],等价于a[2:4].shape
tf.gather(a,axis=0,indicces=[2,1,4,0])#这样还是那些信息但是不是那个顺序了
tf.gather(a,axis=1,indices=[2,3,7,9,16]).shape#这是在第学生的维度进行采样,也就是取全部班级的[2,3,7,9,16]的全部科目的成绩
4.2.2 tf.gather_nd
上面我们都是在一个维度任意取,其他维度都得保留,但是我如果我想取第2个学生的第0门课,第3个学生的第4门课,第8个学生的第二门课,怎么取呢?
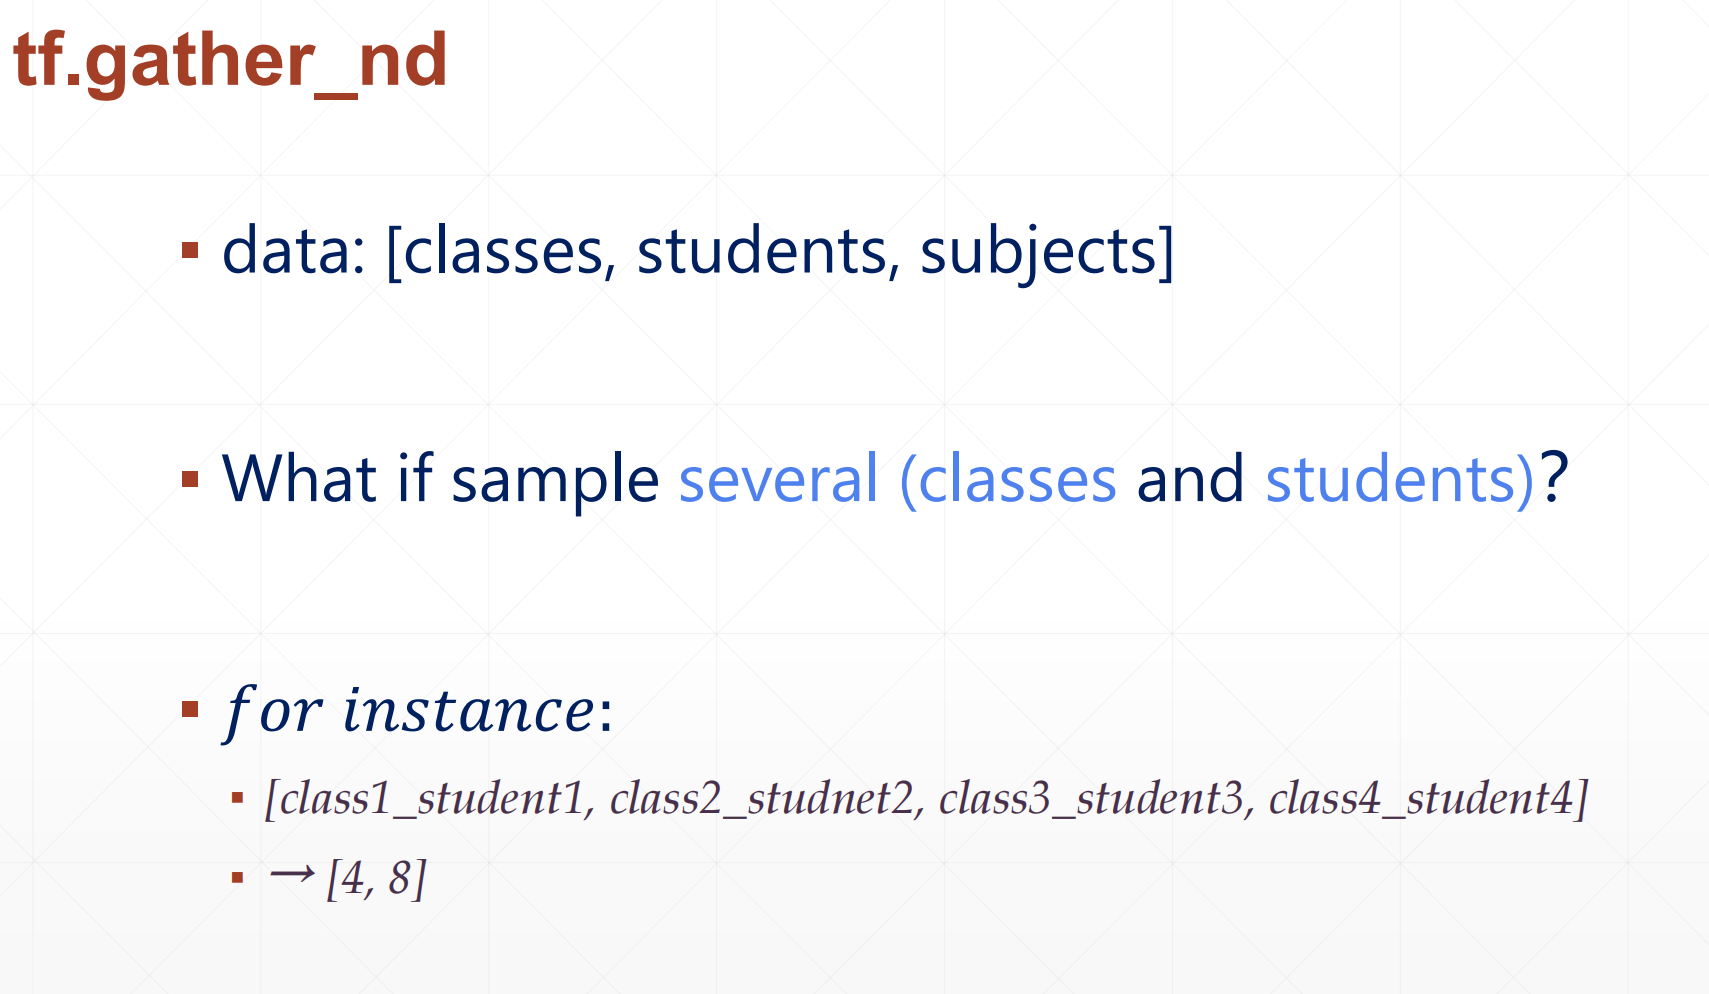
上面是在两个维度进行操作。

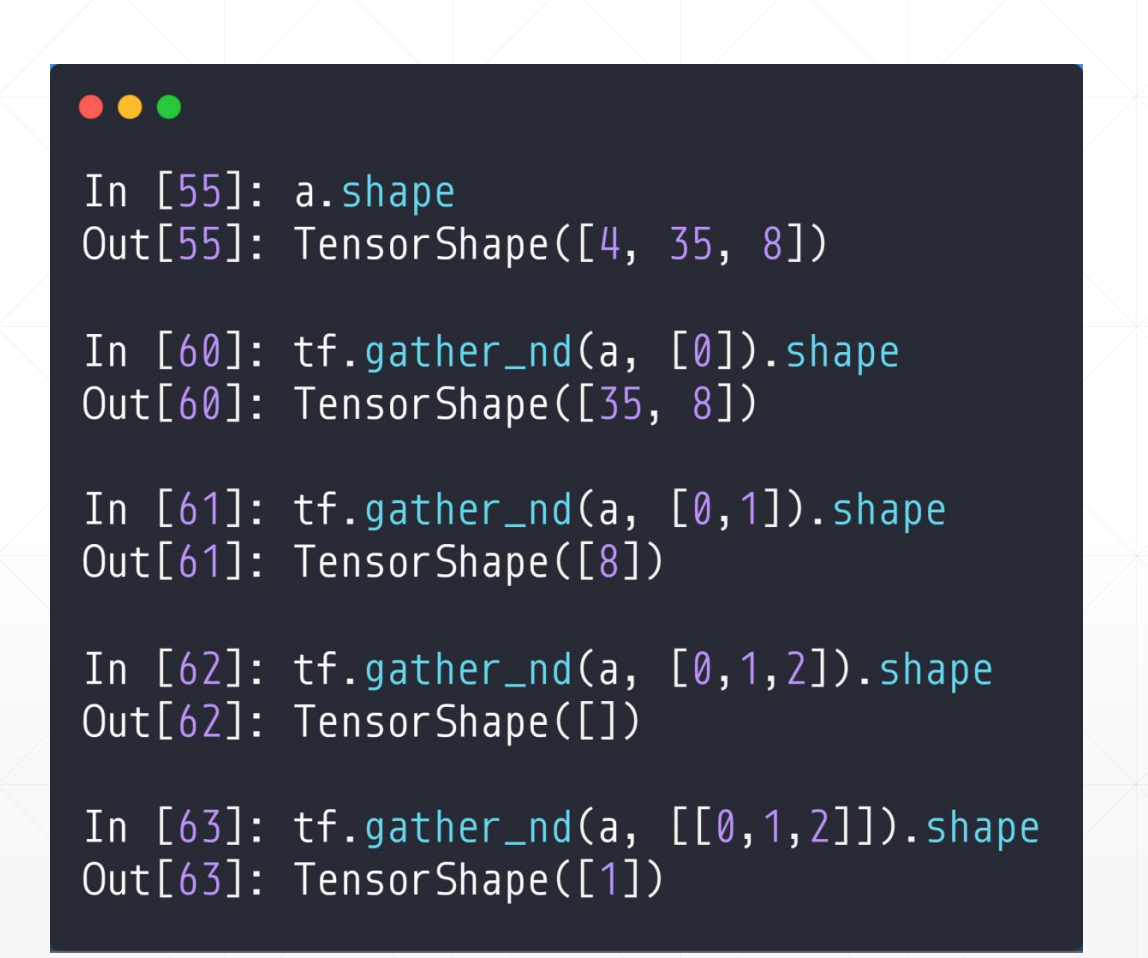
单个条件
比如说:[4,35,8]
tf.gather_nd(a,[0]).shape
#这个就相当于a[0,::],就是第一个班级的全部同学的成绩,返回[35,8]
#其实这里是(a,[[0]]),由于只取了一种所以外面的大括号省了
tf.gather_nd(a,[0,1]).shape
#这里就是取a中的相当于a[0,1,:],就是取第一个班级的第二个学生的全部成绩,返回TensorShape[8]
tf.gather_nd(a,[0,1,2]).shape
#返回一个数,第一个班级的第二个学生的第三门课的成绩
tf.gather_nd(a,[[0,1,2]]).shape
#上面两个不一样,第二个返回一个长度为一的数据
多个条件
比如说:
tf.gather_nd(a,[[0,0],[1,1]]).shape
这是返回的两个[8]的vector,所以是一个[2,8]
tf.gether_nd(a,[[0,0,0],[1,1,1],[2,2,2]]).shape
#这里是三个同学的成绩所以返回一个TensorShape[3]
但是这个注意看于上面的区别
tf.gether_nd(a,[[[0,0,0],[1,1,1],[2,2,2]]]).shape
#这里面返回的是一个[1,3],因为它多加了一个[]
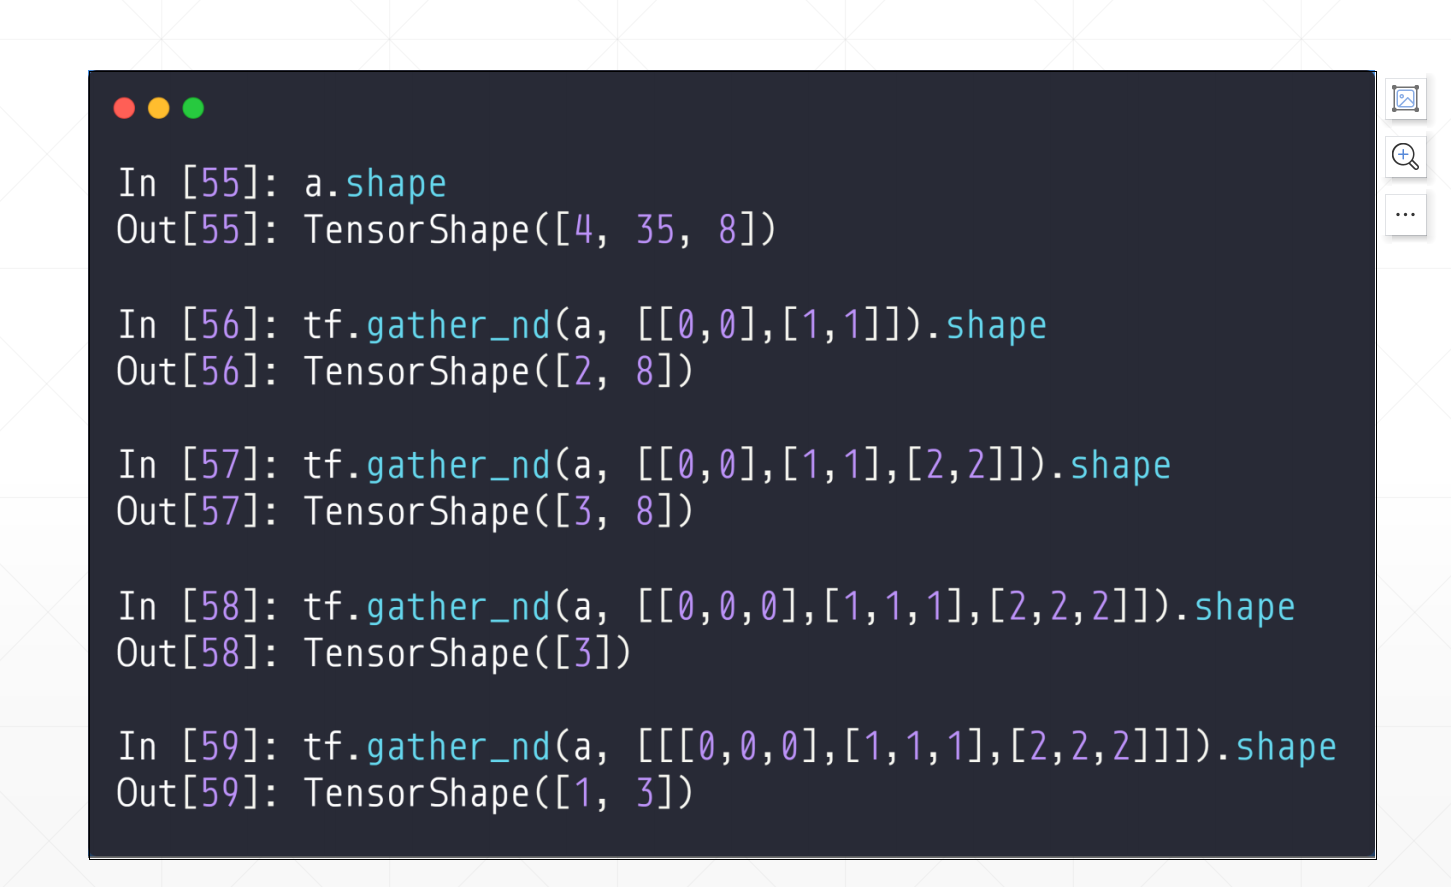
这里比较建议的是:如果是一个条件的话用这个[[0]],这样返回[1,35,8],最后把1消掉就行
▪ recommended indices format:
▪ [[0], [1],…]
▪ [[0,0], [1,1],…]
▪ [[0,0,0], [1,1,1],…]
4.3 tf.boolean_mask
每一个点都有一个mask,把mask为True的点给取出来。
比如:TensorShape([4,28,28,3])
tf.boolean_mask(a,mask=[True,True,False,False]).shape
这里没指定维数axis=0,第一列的四个弄成了[True,True,False,False],所以返回的结果为[2,28,28,3]
tf.boolean_mask(a,mask=[True,True,False],axis=3).shape
#这里的axis=3,所以就是那个R G B通道的三个有两个弄成了True,然后返回的结果就是[4,28,28,2]
tf.boolean_mask(a,mask=[[True,False,False],[False,True,True]])
然后返回的就是(3,4)全是1。
所以返回array(
[[1.,1.,1.,1.],
[1.,1.,1.,1.],
[1.,1.,1.,1.],])
5 维度变换
▪ shape, ndim #求维度
▪ reshape #维度变换
▪ expand_dims/squeeze #增加/减少维度
▪ transpose #维度先后顺序变换
▪ broadcast_to #
5.1 Reshape
tf.reshape(a,[,,,]).shape
其中矩阵[,,,]是一种矩阵的理解方式
[b,28,28,1]=>[banch,heigh,width,channel]
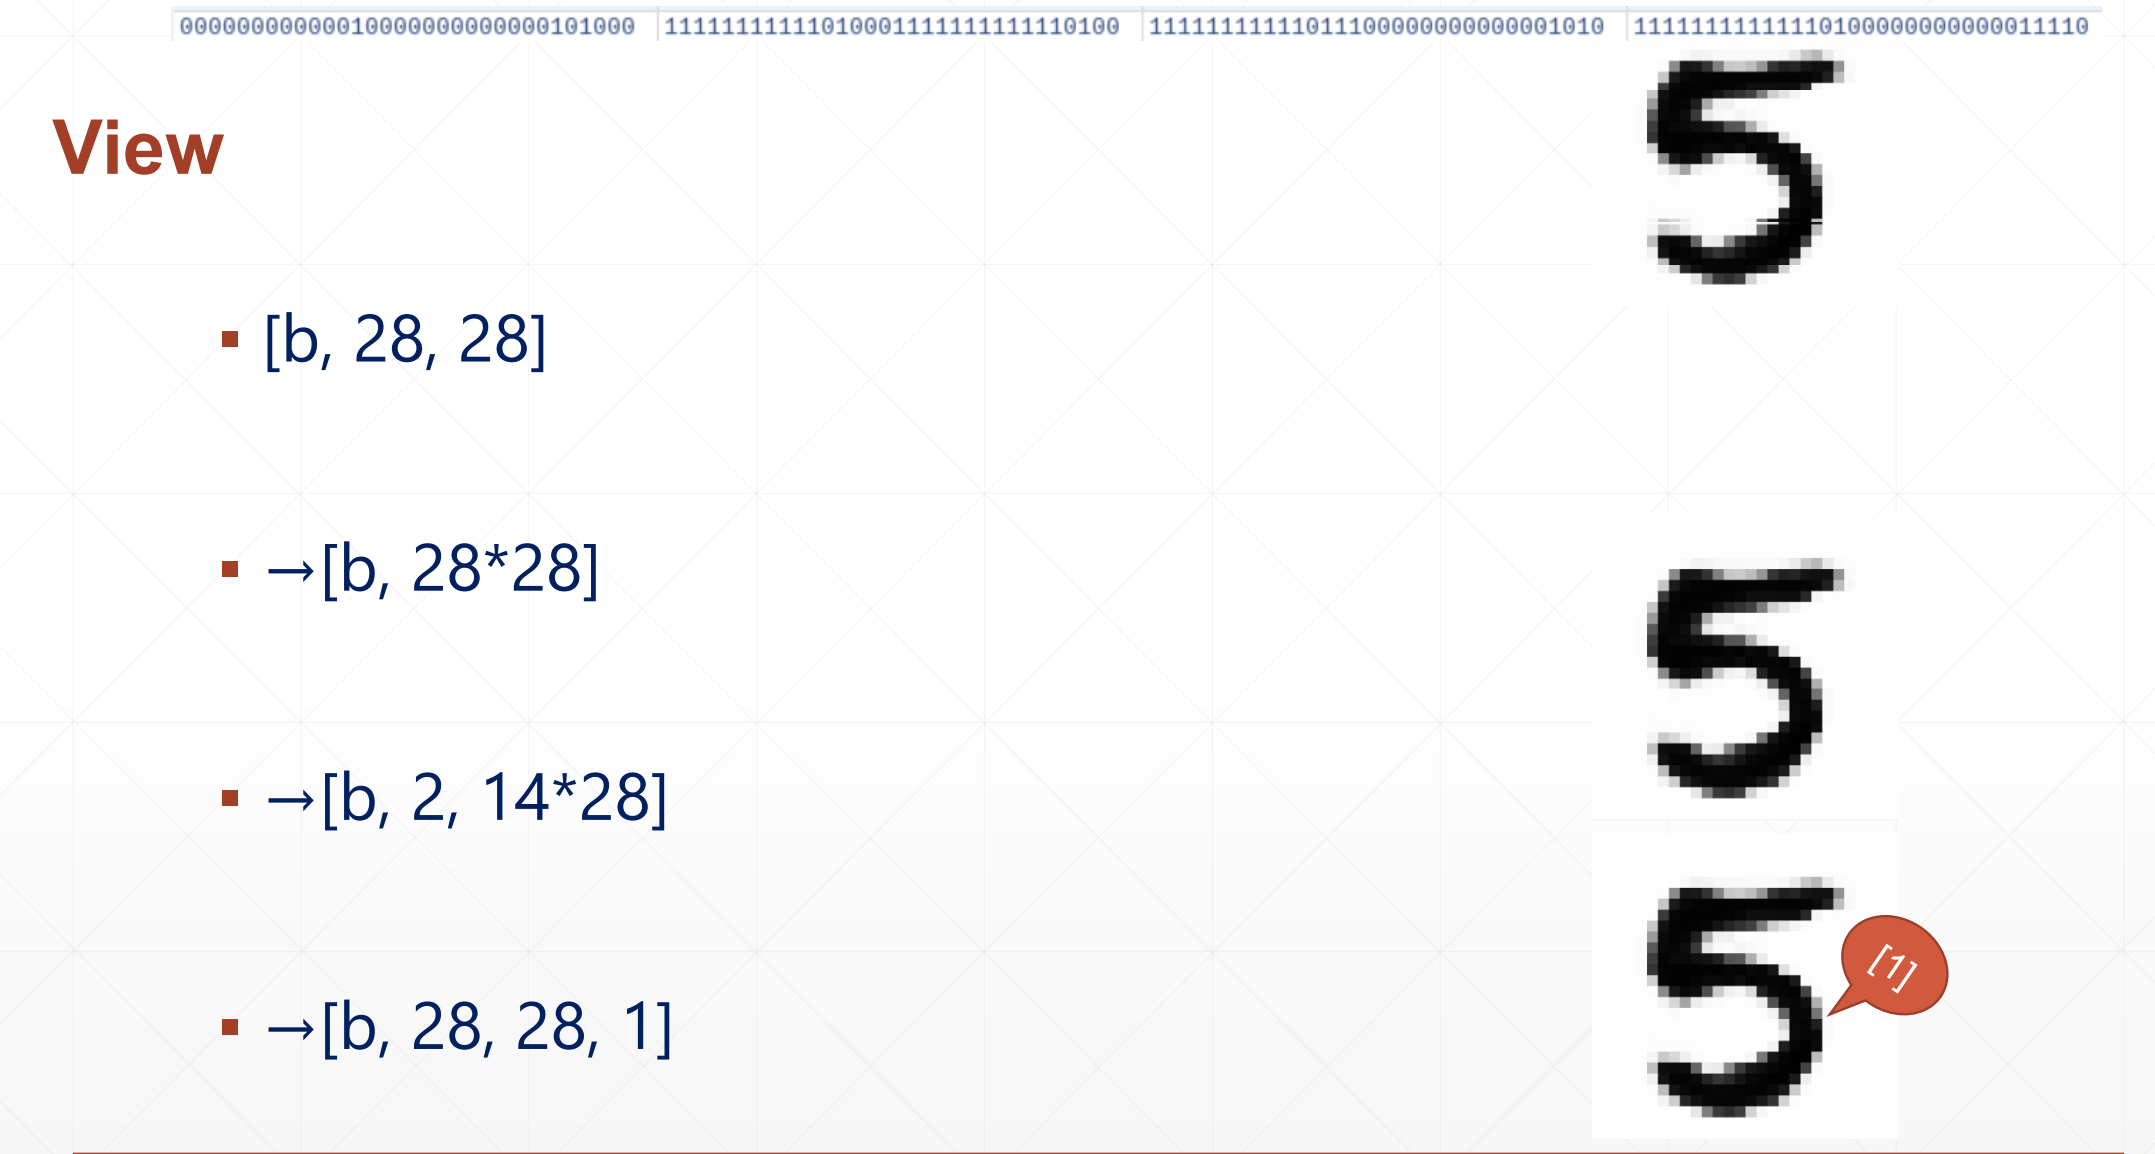
View:
▪ [b,28,28] 这里一般的表示 View1
▪ ->[b,28*28]这里不考虑行列的 View2
▪ ->[b,2,14 * 28],这里有行和列的表示,但是不知道具体有多少行和列,View3
▪ ->[b, 28, 28, 1]这里增加了一个通道,View4
这上面是三种理解方式
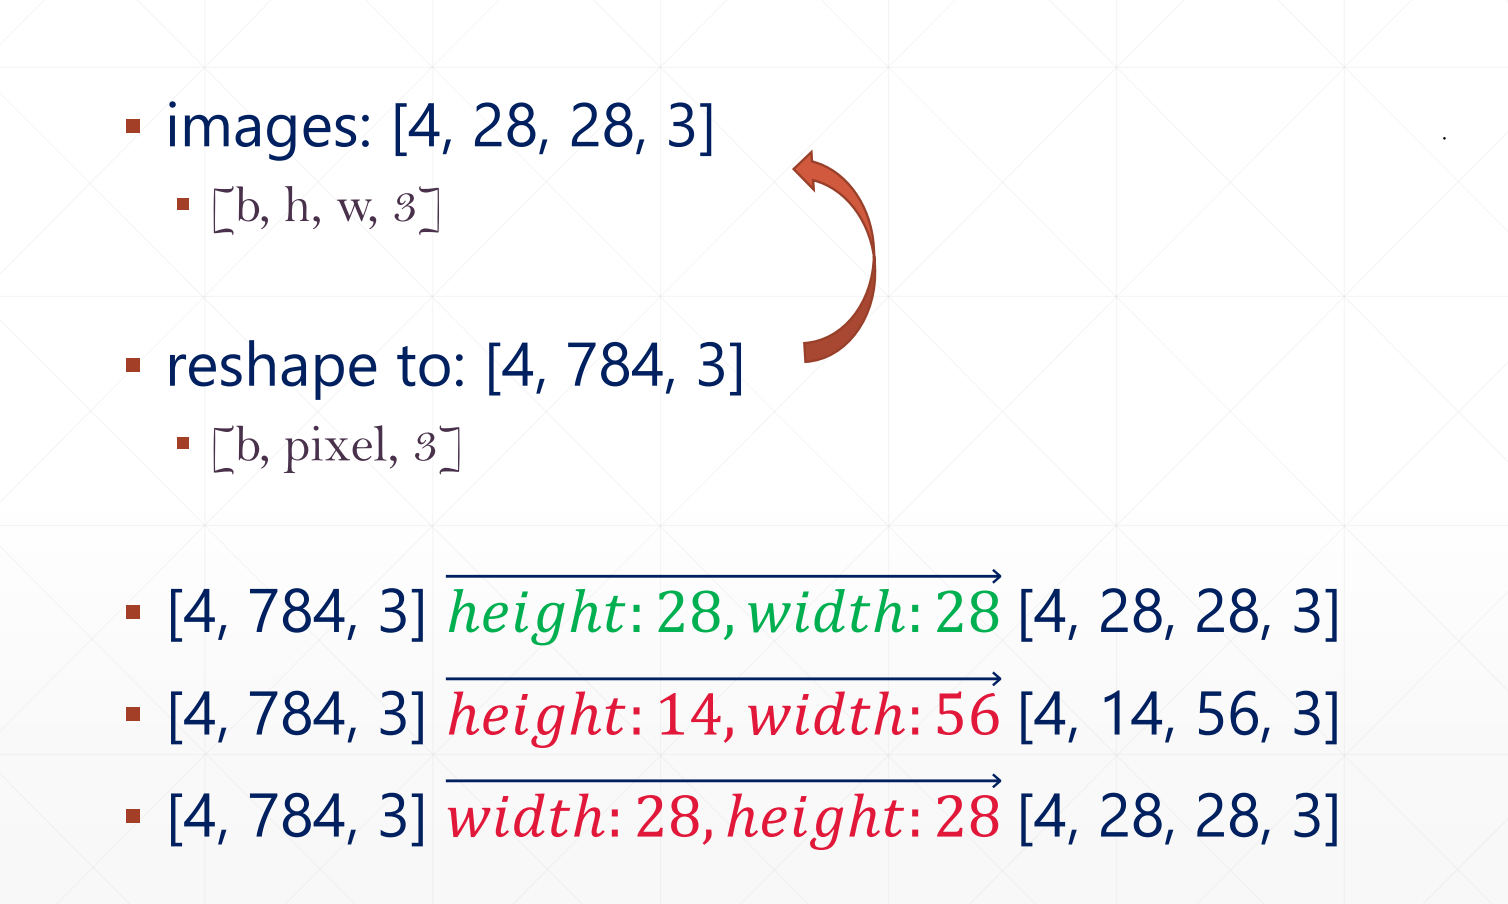
对应下面的代码:其中a是[4,28,28,3]
tf.reshape(a,[4,784,3]).shape
#这里就是[4,28*28,3]
#或者你可以图省事写成
tf.reshape(a,[4,-1,3]).shape
#这里得到的也是[4,784,3],要保证其总的size相同
tf.reshape(a,[4,784*3]).shape
tf.reshape(a,[4,-1]).shape
这里上面两个都是[4,2352]
这个Reshape是非常灵活的,只要原来的size==改变后的size就可以变化,可以变化很多种
同样这个Reshape也有很多潜在的bug,就是如果你还要变回来的话,你需要记录一个height和width,heigh和width的顺序不要错了
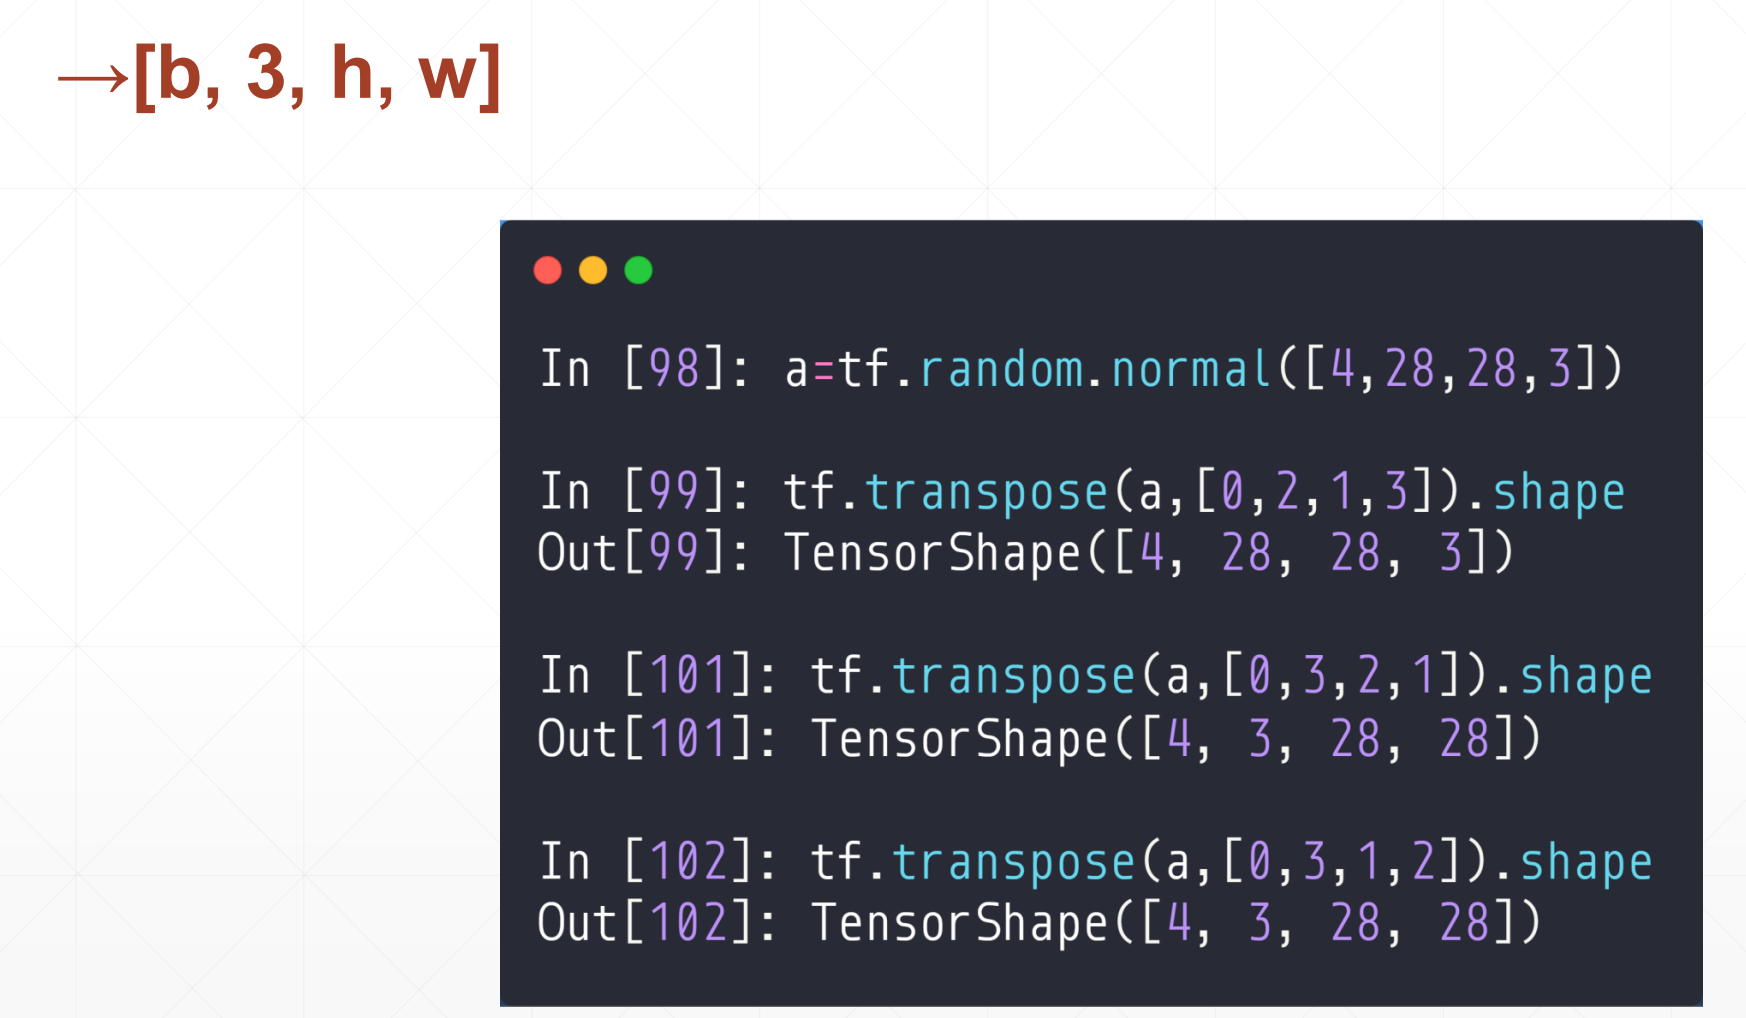
5.2 tf.transpose
[b,h,w,c]如果我们想把h,w换一下,或者想把c弄到b后面怎么办呢?
API:
tf.transpose(a,perm=[])
这个perm种传的是改变后的顺序,如果不传perm的话,默认全部转置
再这里的交换就是content的交换[b,h,w,c],就是这四个的交换。
例如:[4,3,2,1]
tf.transpose(a).shape
=>TensorShape([1,2,3,4])
tf.transpose(a,perm[0,1,3,2])
=>TensorShape([4,3,1,2])
其中这个perm中传的是改变后的顺序
例子
其中原本的顺序是[b,h,w,3]
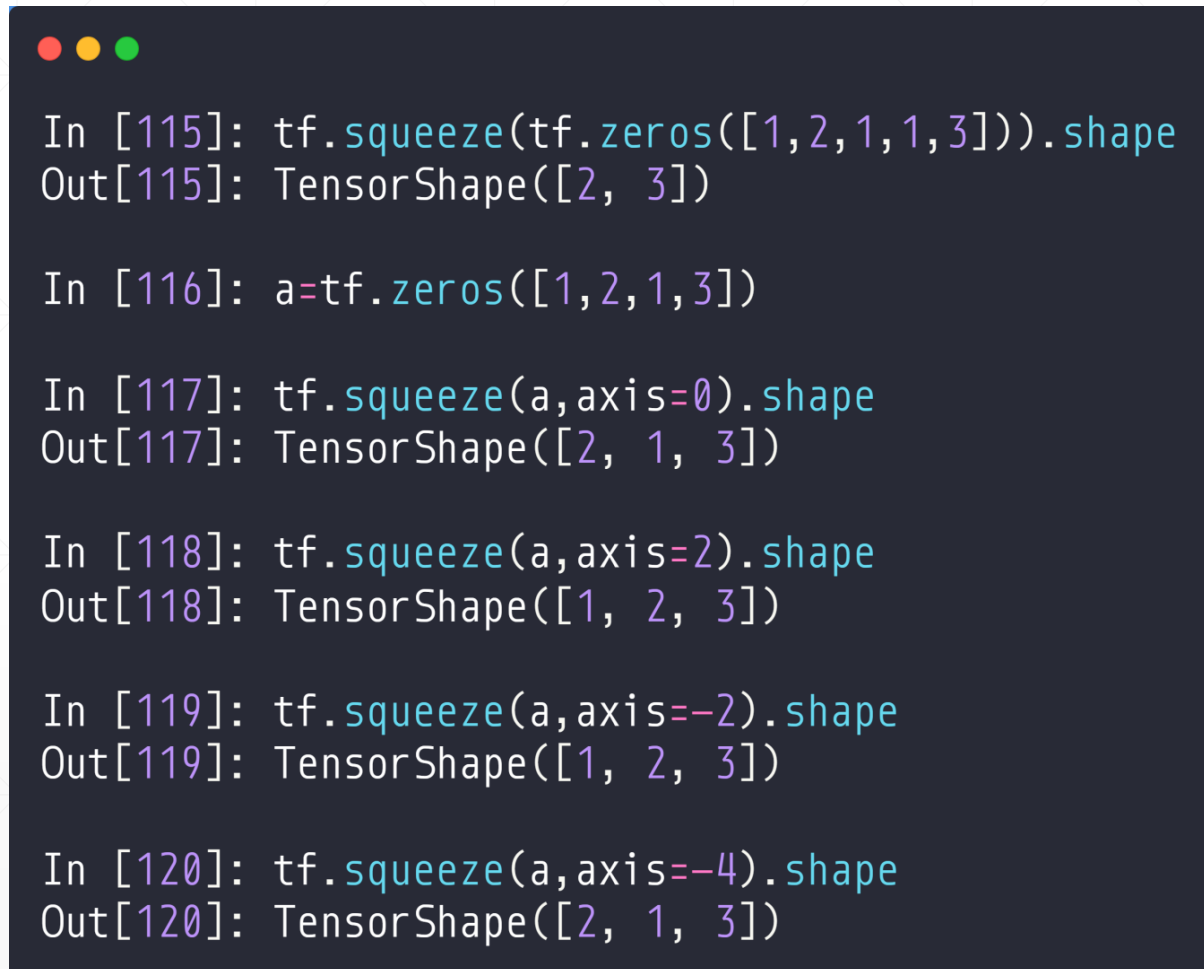
5.3 Squeeze VS Expand_dims(减少增加维度)
5.3.1 expand_dims
对于这个[classes,student,grade],如果有两个不同学校的,我们需要增加一个学校的维度
比如:
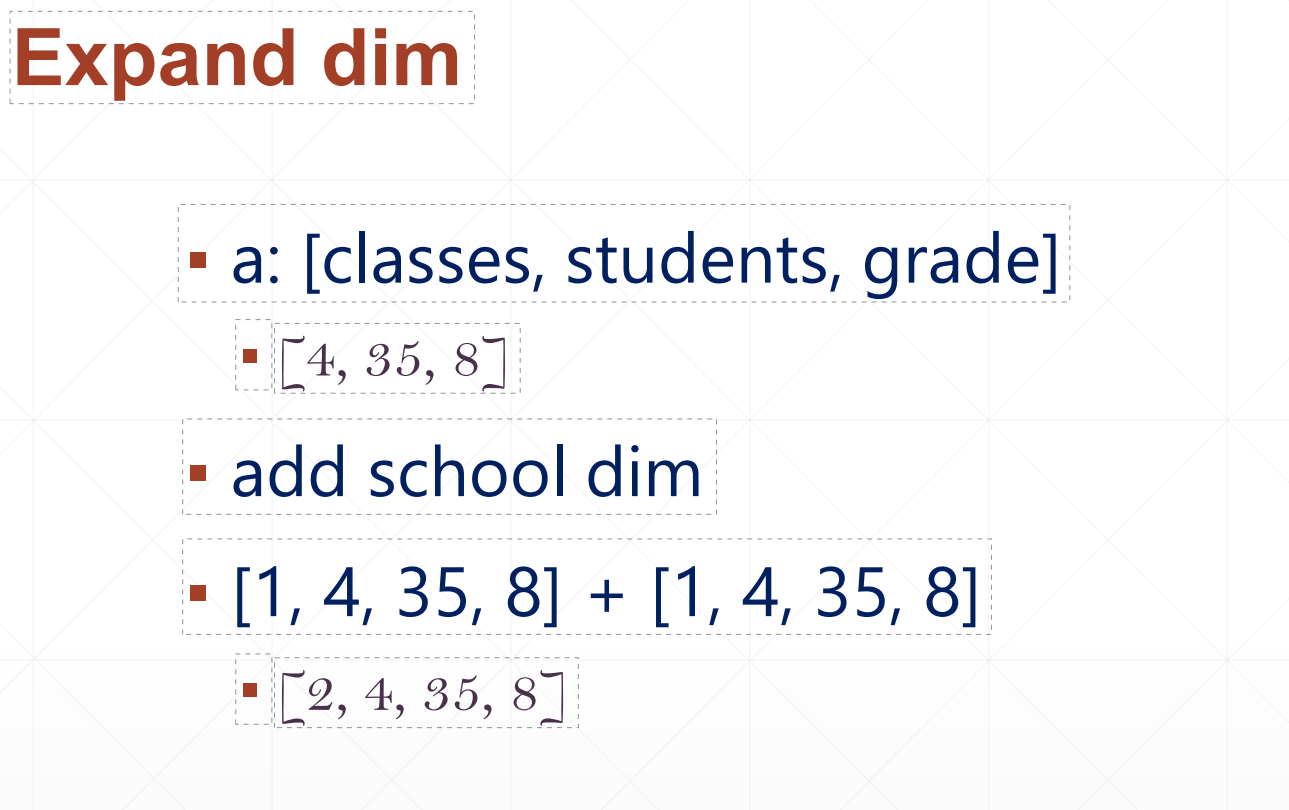
例如:
a=tf.random.normal([4,35,8])
tf.expand_dims(a,axis=0).shape
=>TensorShape([1,4,35,8])
tf.expand_dims(a,axis=3).shape
=>TensorShape([4,35,8,1])
对于这个我们可以看一下怎么增加的
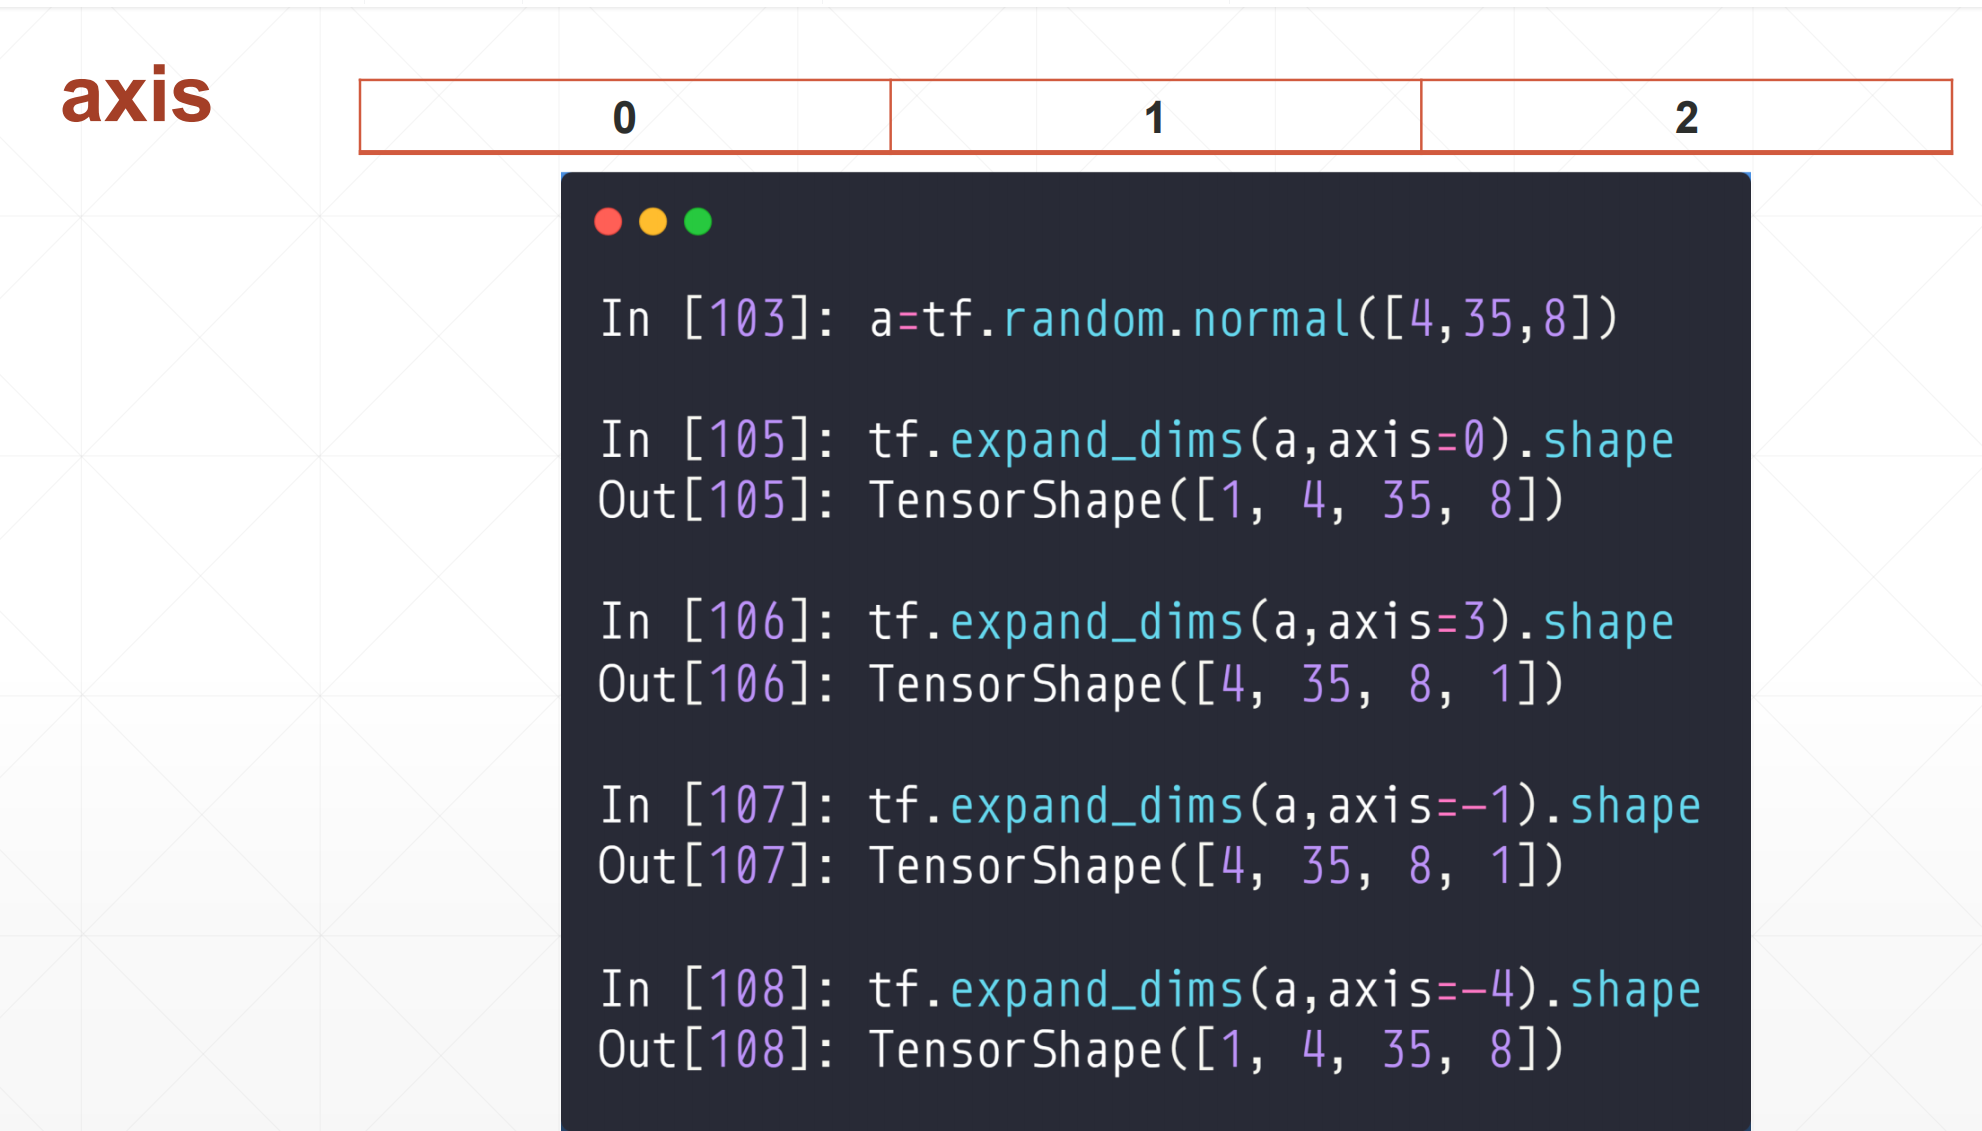
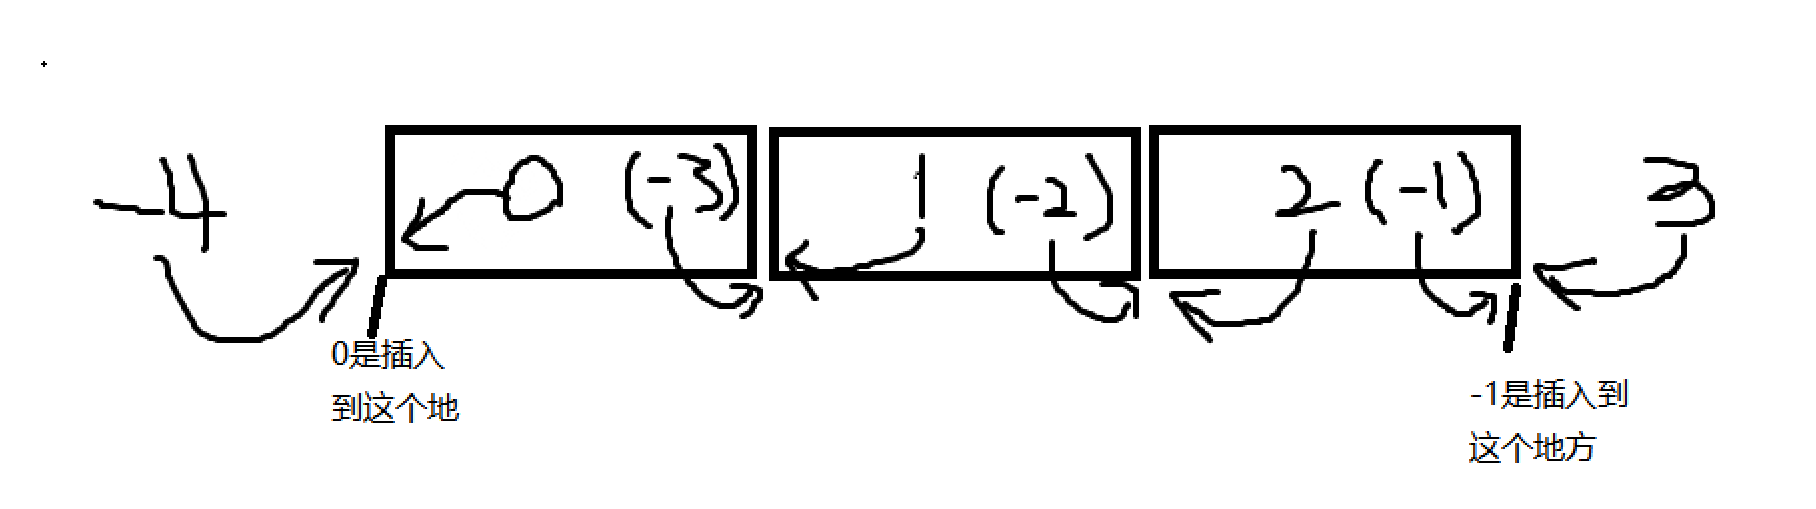
这个图是插入的规律,我们发现正数都是插入到数前面的,负数都是插入到数后面的。
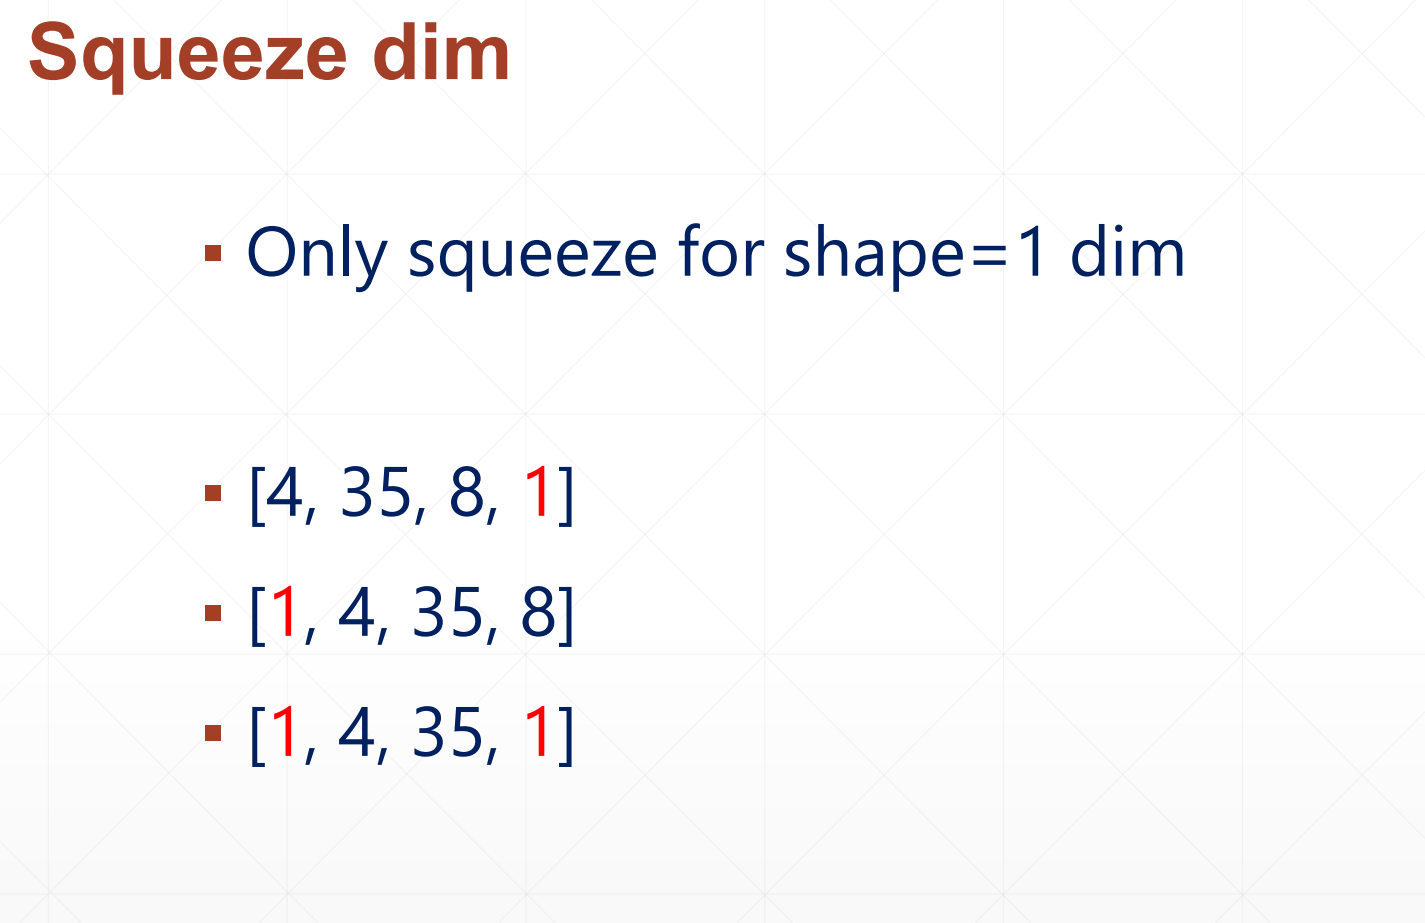
5.3.2 squeeze_dims
这个是减少维度的一个函数
这个只能减少shape=1的那一维。
squeeze_dims(a,axis=),如果不指定axis的话,默认可以把a中全部的shape=1的维度全部除去
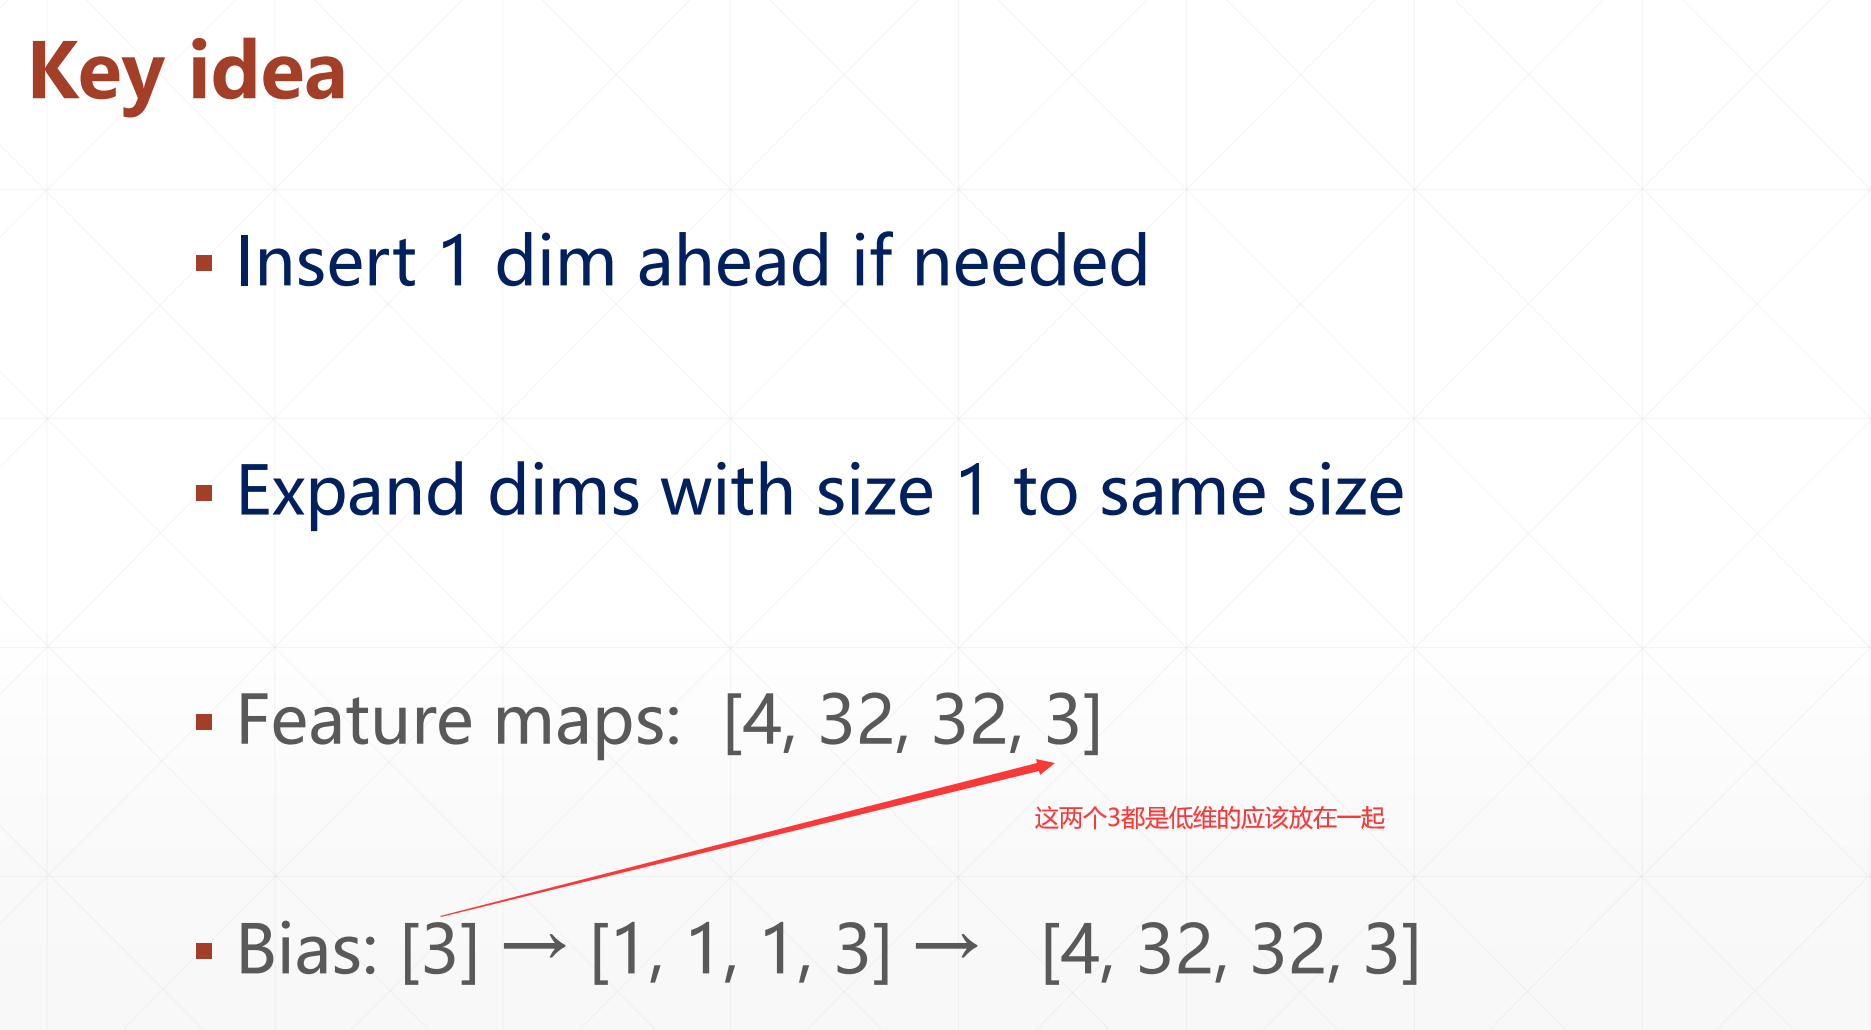
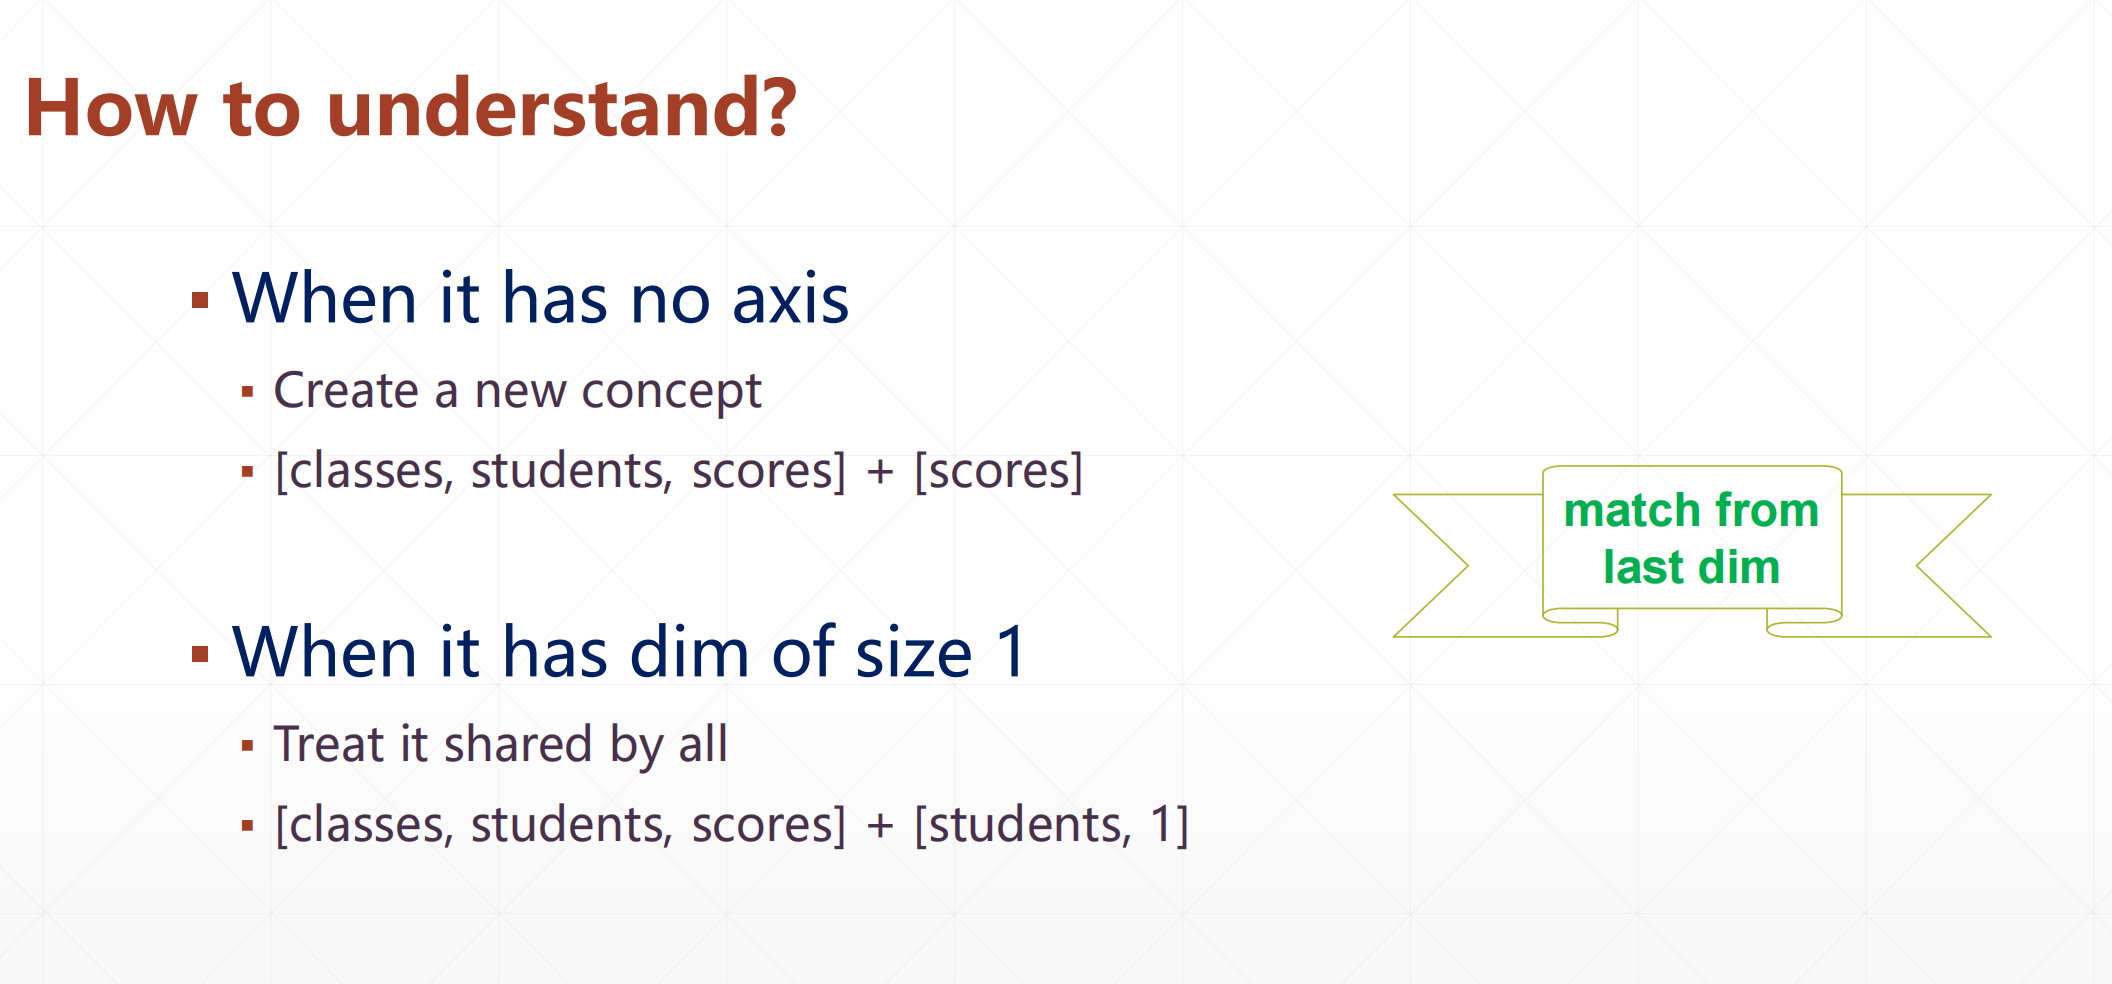
6 Broadcasting(广播机制)
▪ expand
▪ without copying data
▪ VS tf.tile
▪ tf.broadcast_to
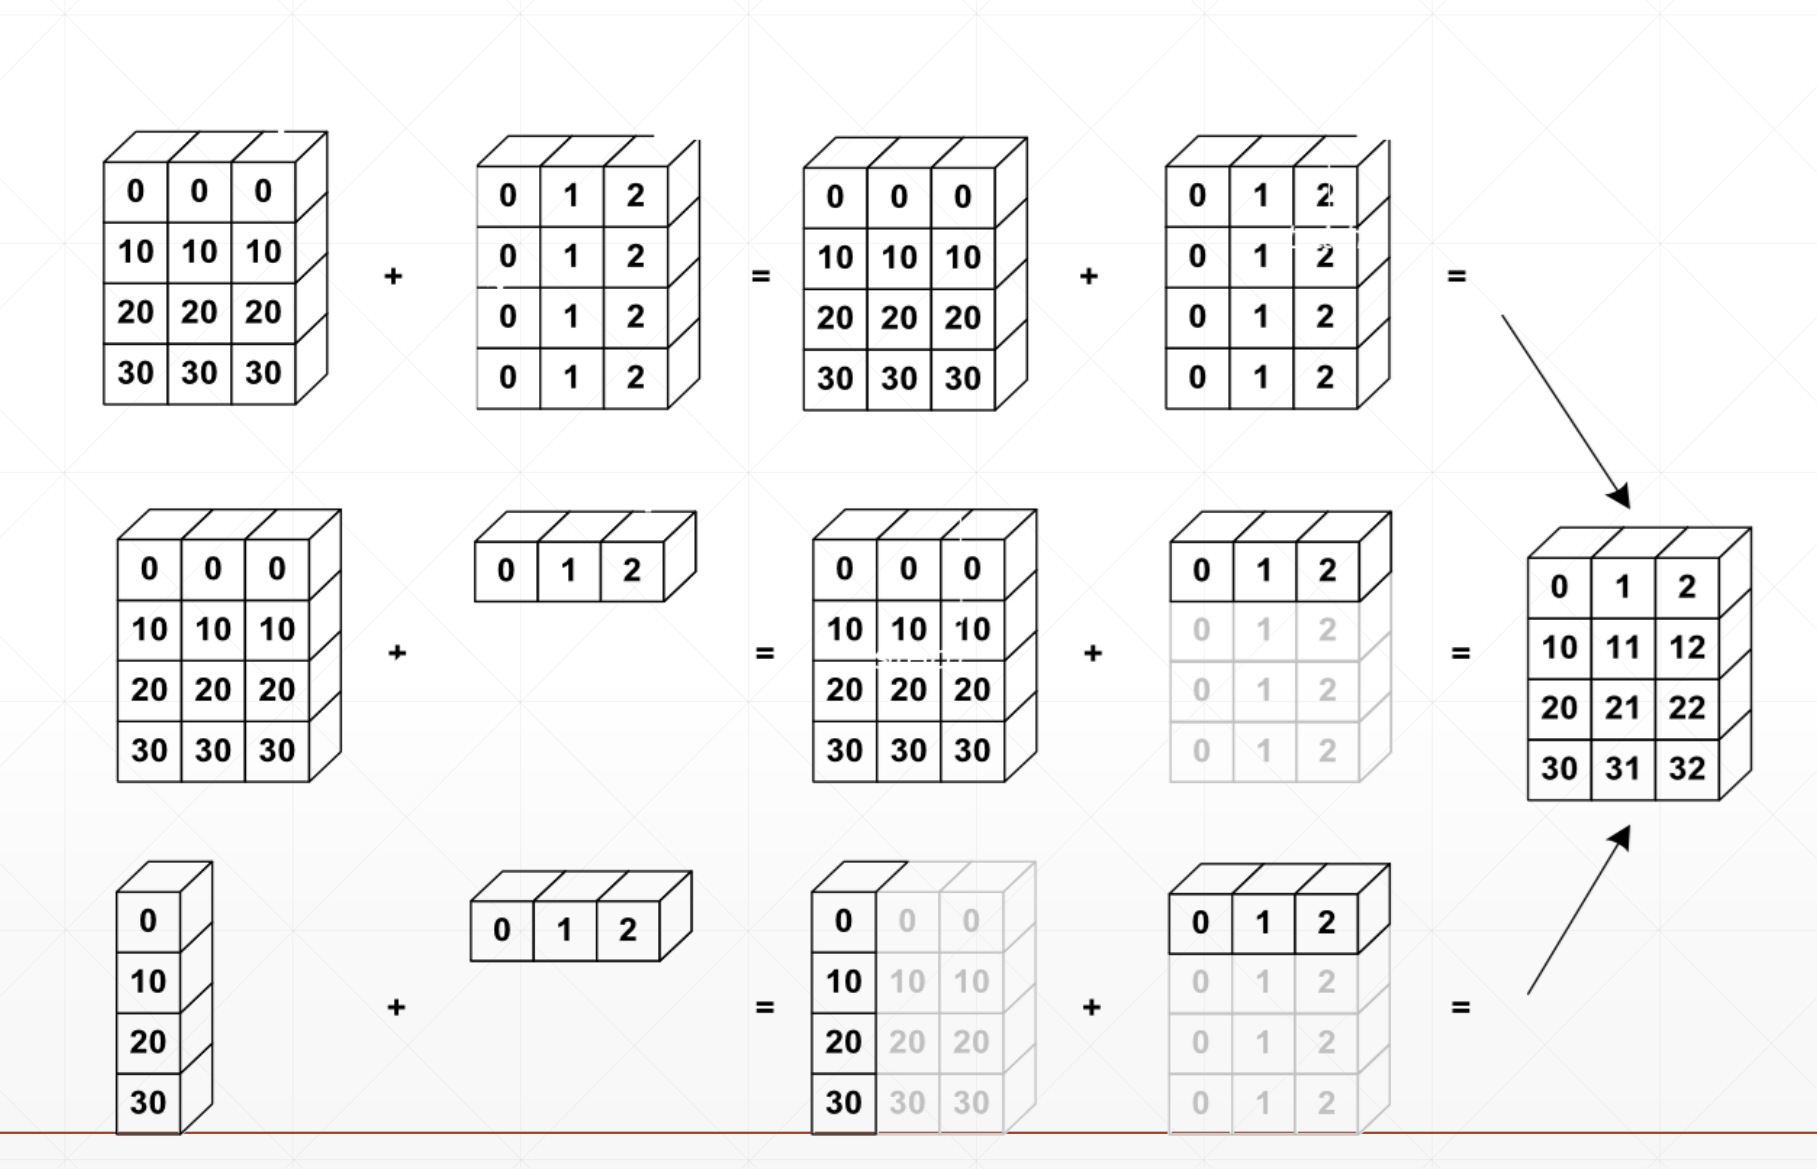
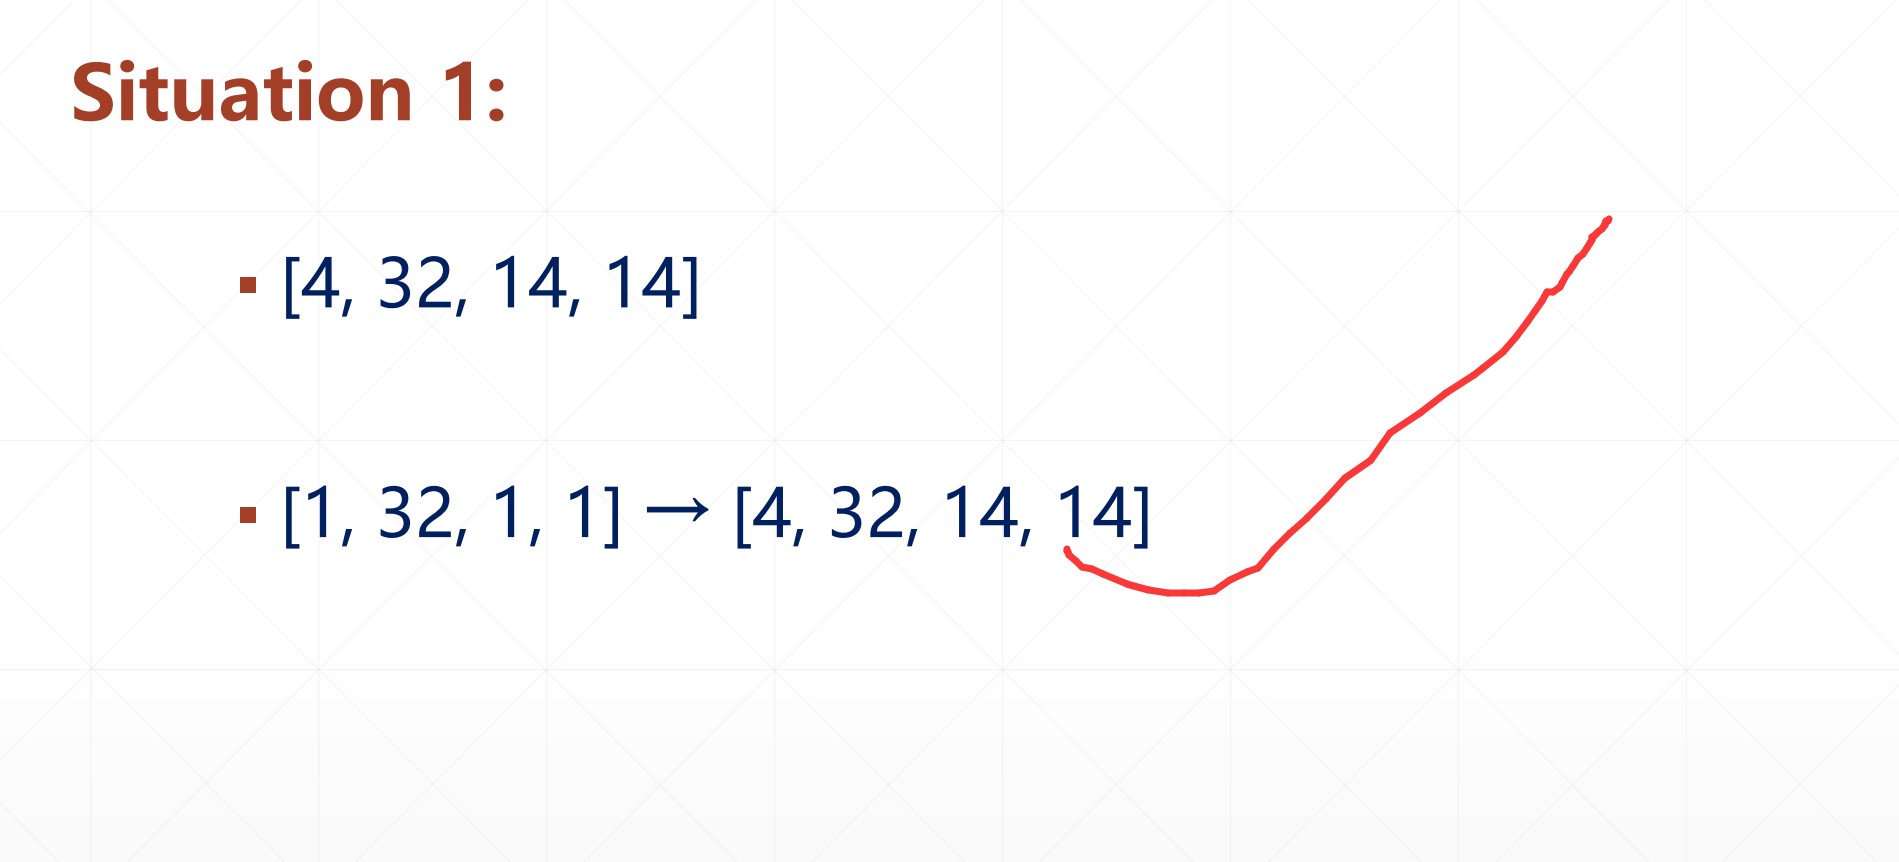
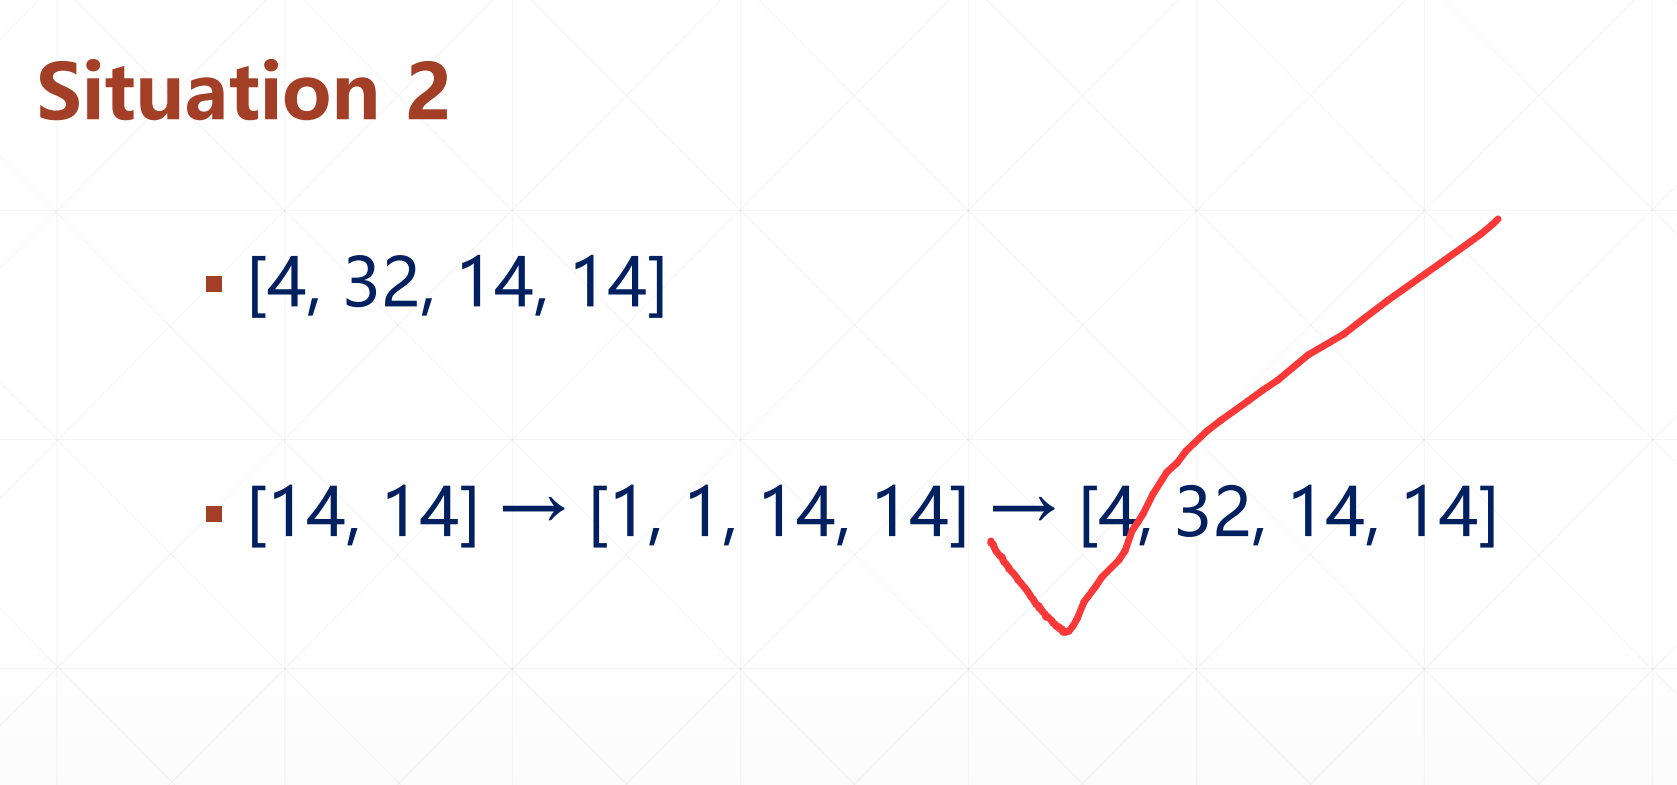
对于我们前面所学的[b,10]+[10]它可以自动的扩张成[b,10]+[b,10]进行相加。这就是广播机制
再相加是我们首先做的是先小维度进行对其,然后,相应位置不一样,但是有一个维度是1的话是可以进行运算的。
下面一个就是广播机制的一个应用:
看这个
a:(3,1)
[[0],
[1],
[2]]
b:(1,2)
[[0, 1]]
如果这两个相加的话,如果这两个相加的话
a会变成a(3,2),b会变成b(3,2)。
就是a会变成:
[[0,0]
[1,1]
[2,2]]
b会变成:
[[0,1],
[0,1],
[0,1]]
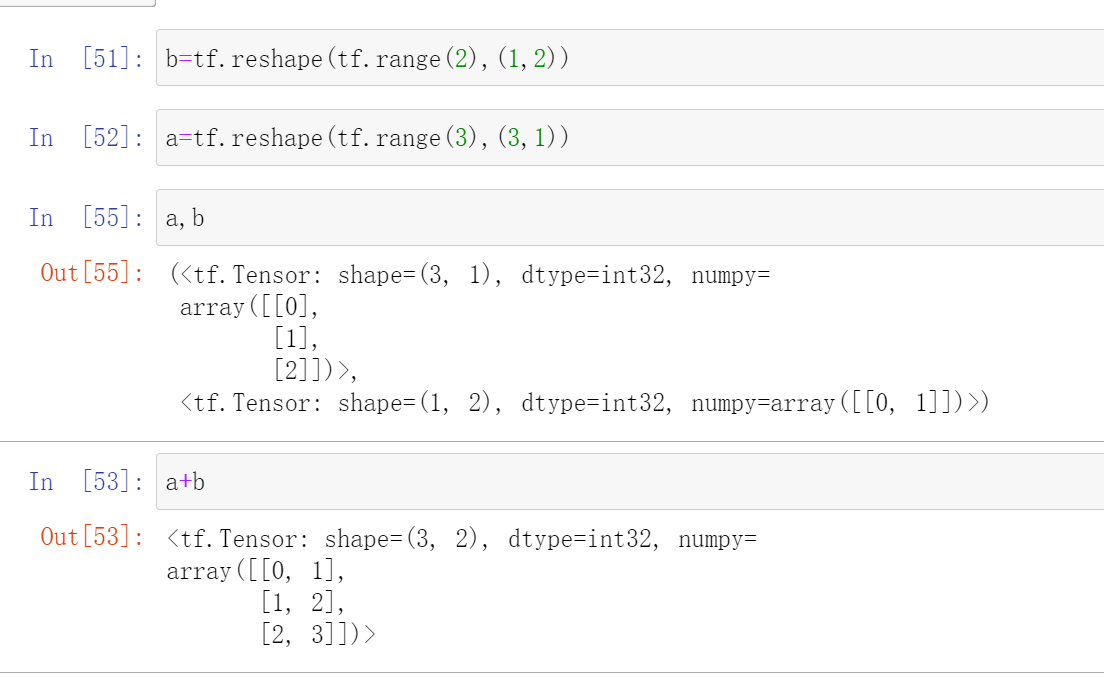
注意下面的那两个三都是低维的。
这样会好理解一点:
然后就是why broadcasting?
这个就是又低维度和高维度之分
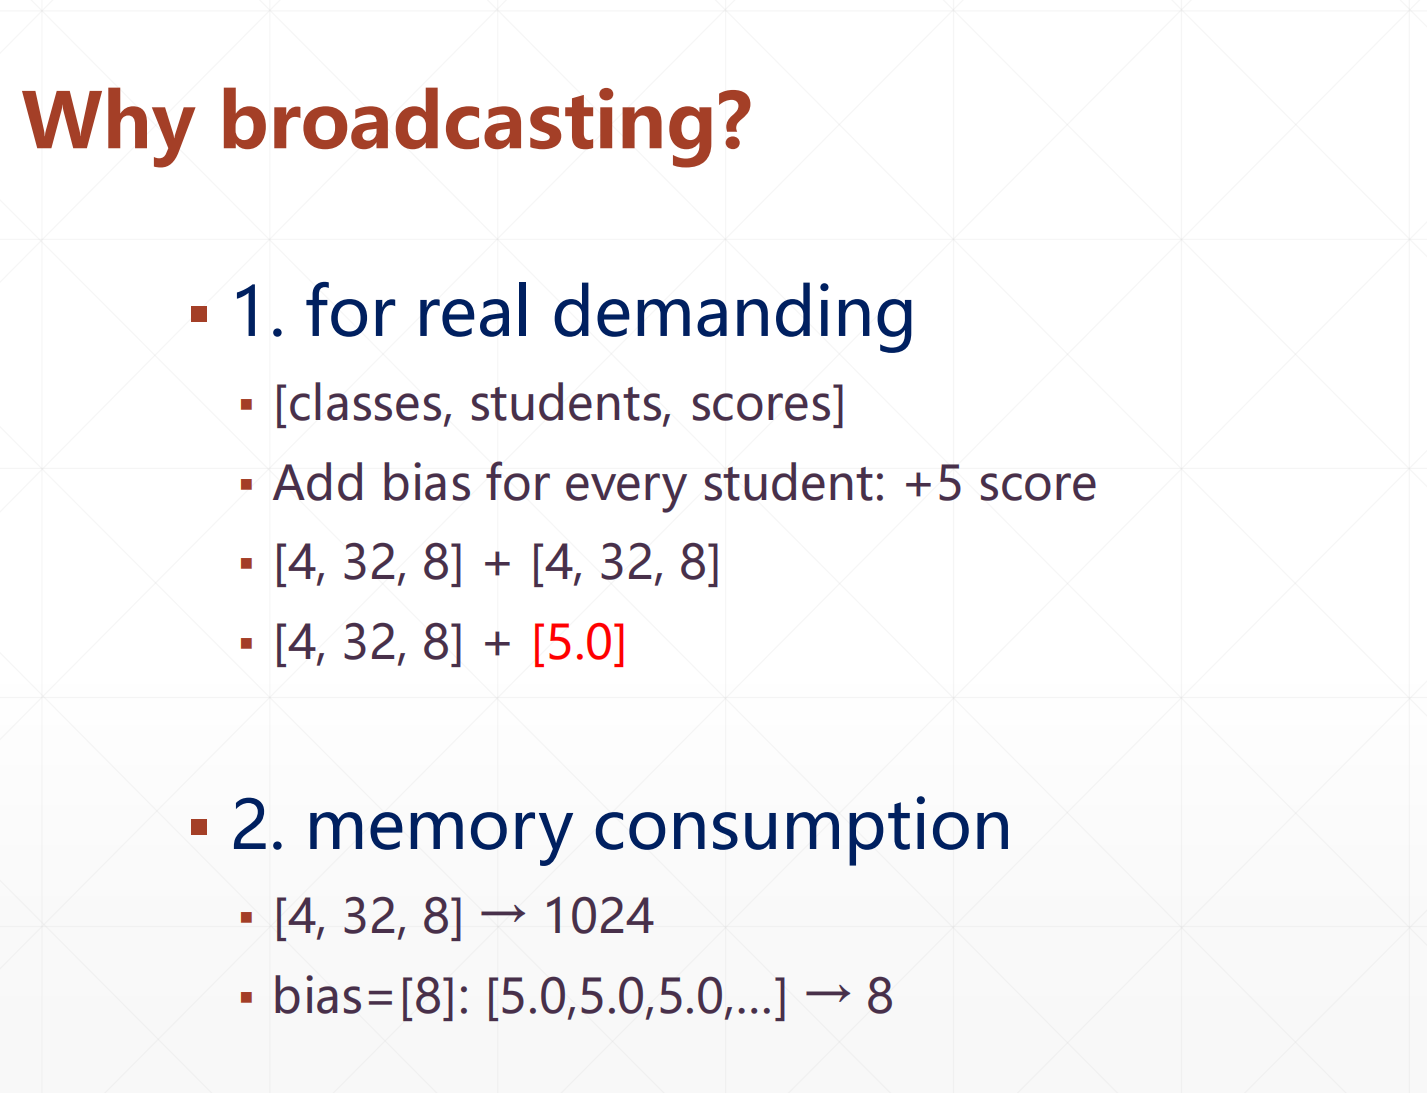
下面是一些例子:
2.
3.

具体例子:
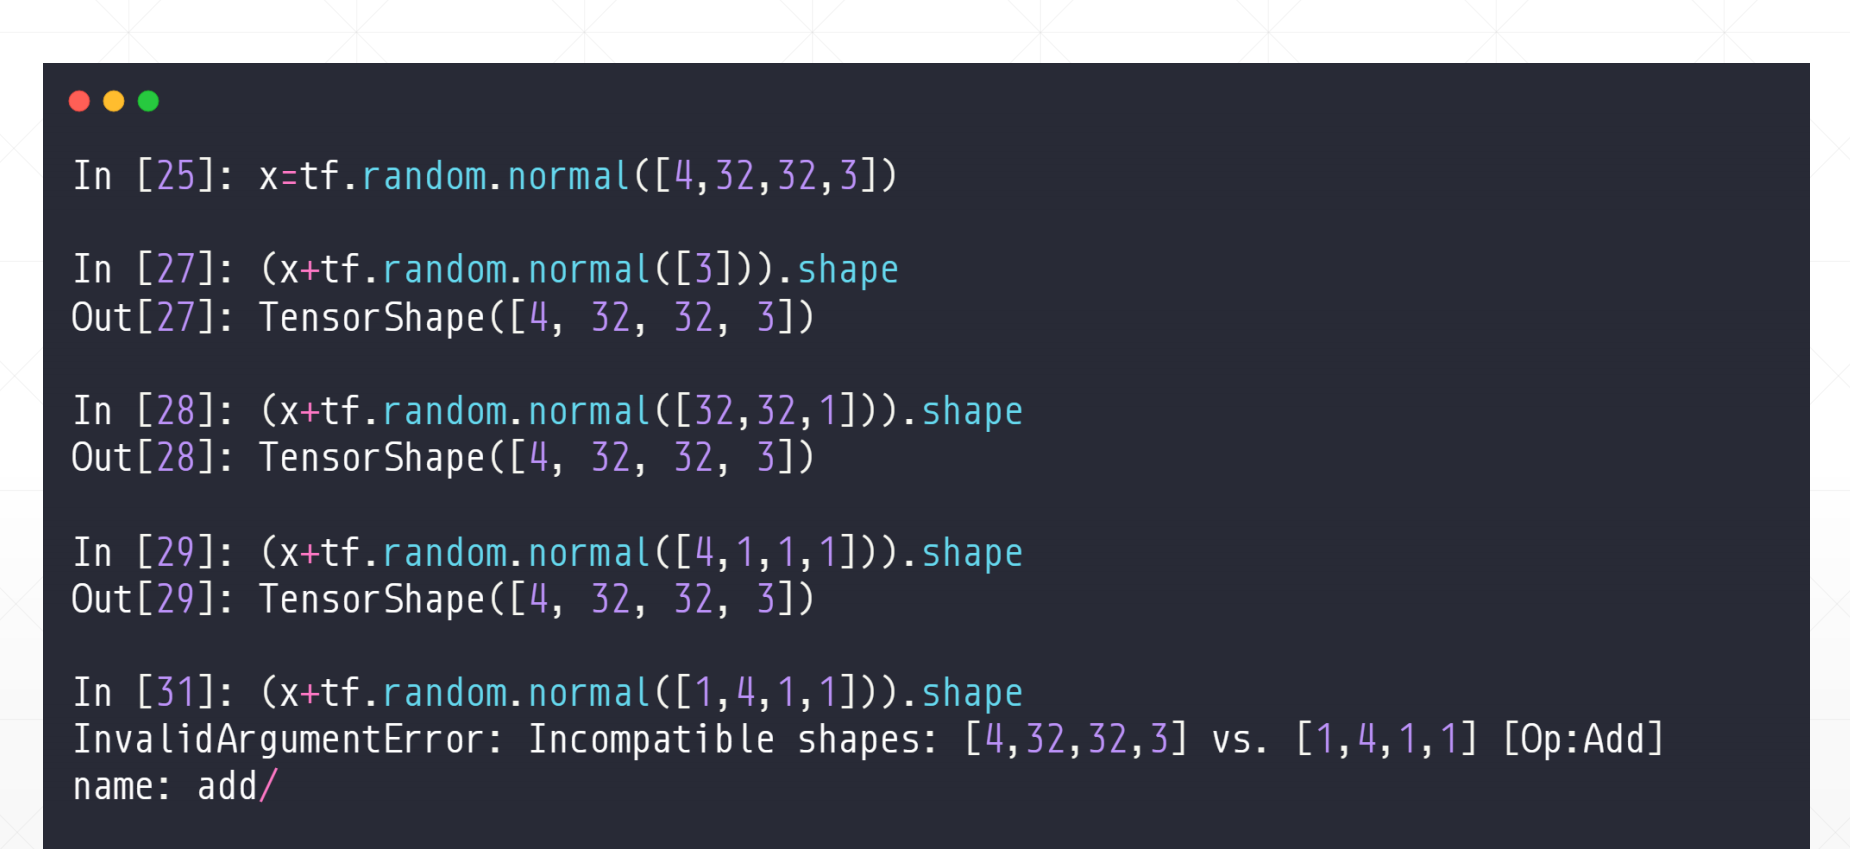
上面的例子都是需要加一个数,我们也可以让他显示的扩张成一个:这个时候我们就会用到
tf.broadcast_to(a,[要变化的格式])
这个要变化的格式一定要符合规则
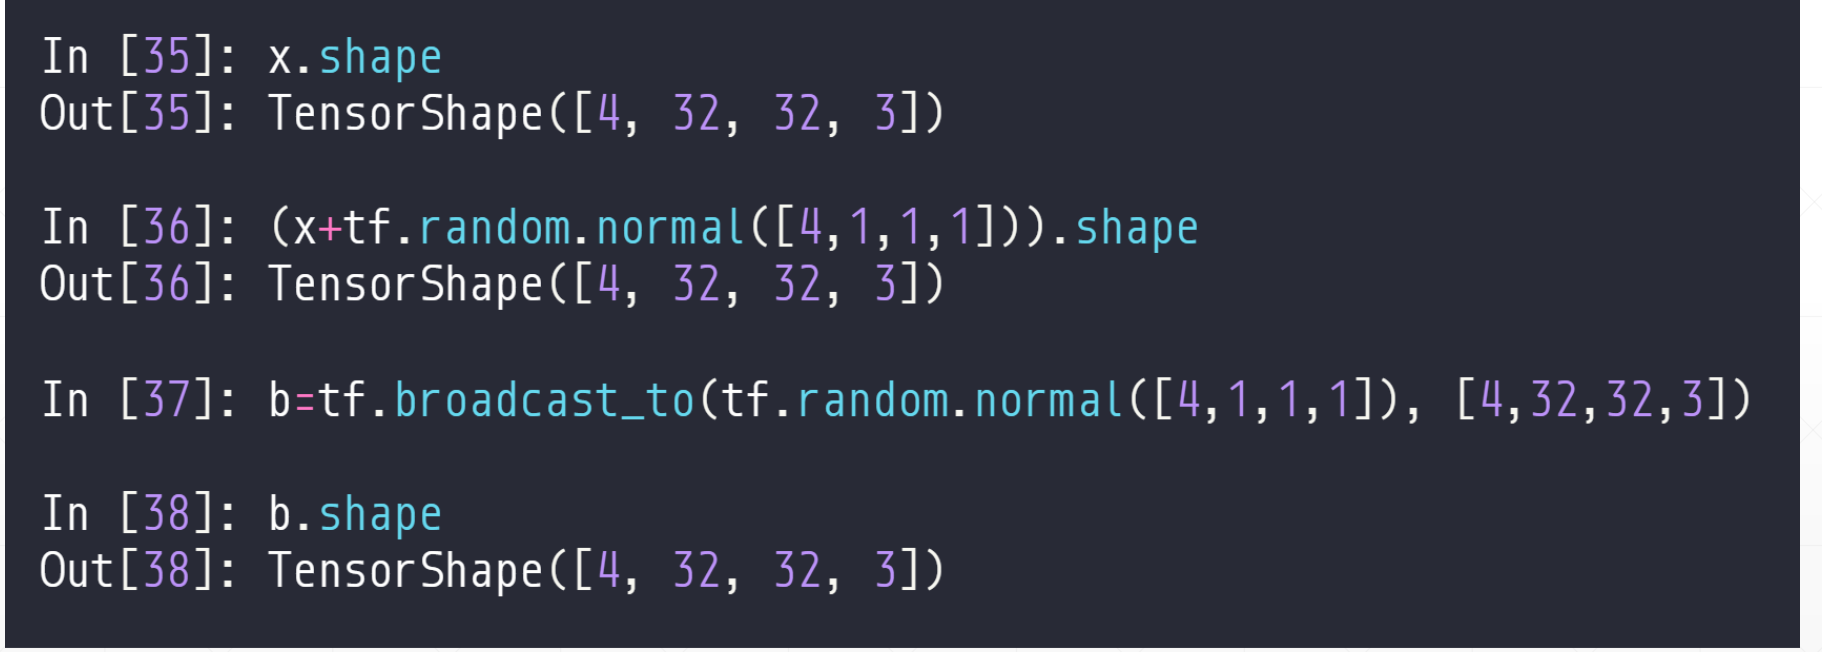
Broadcast Vs Tile
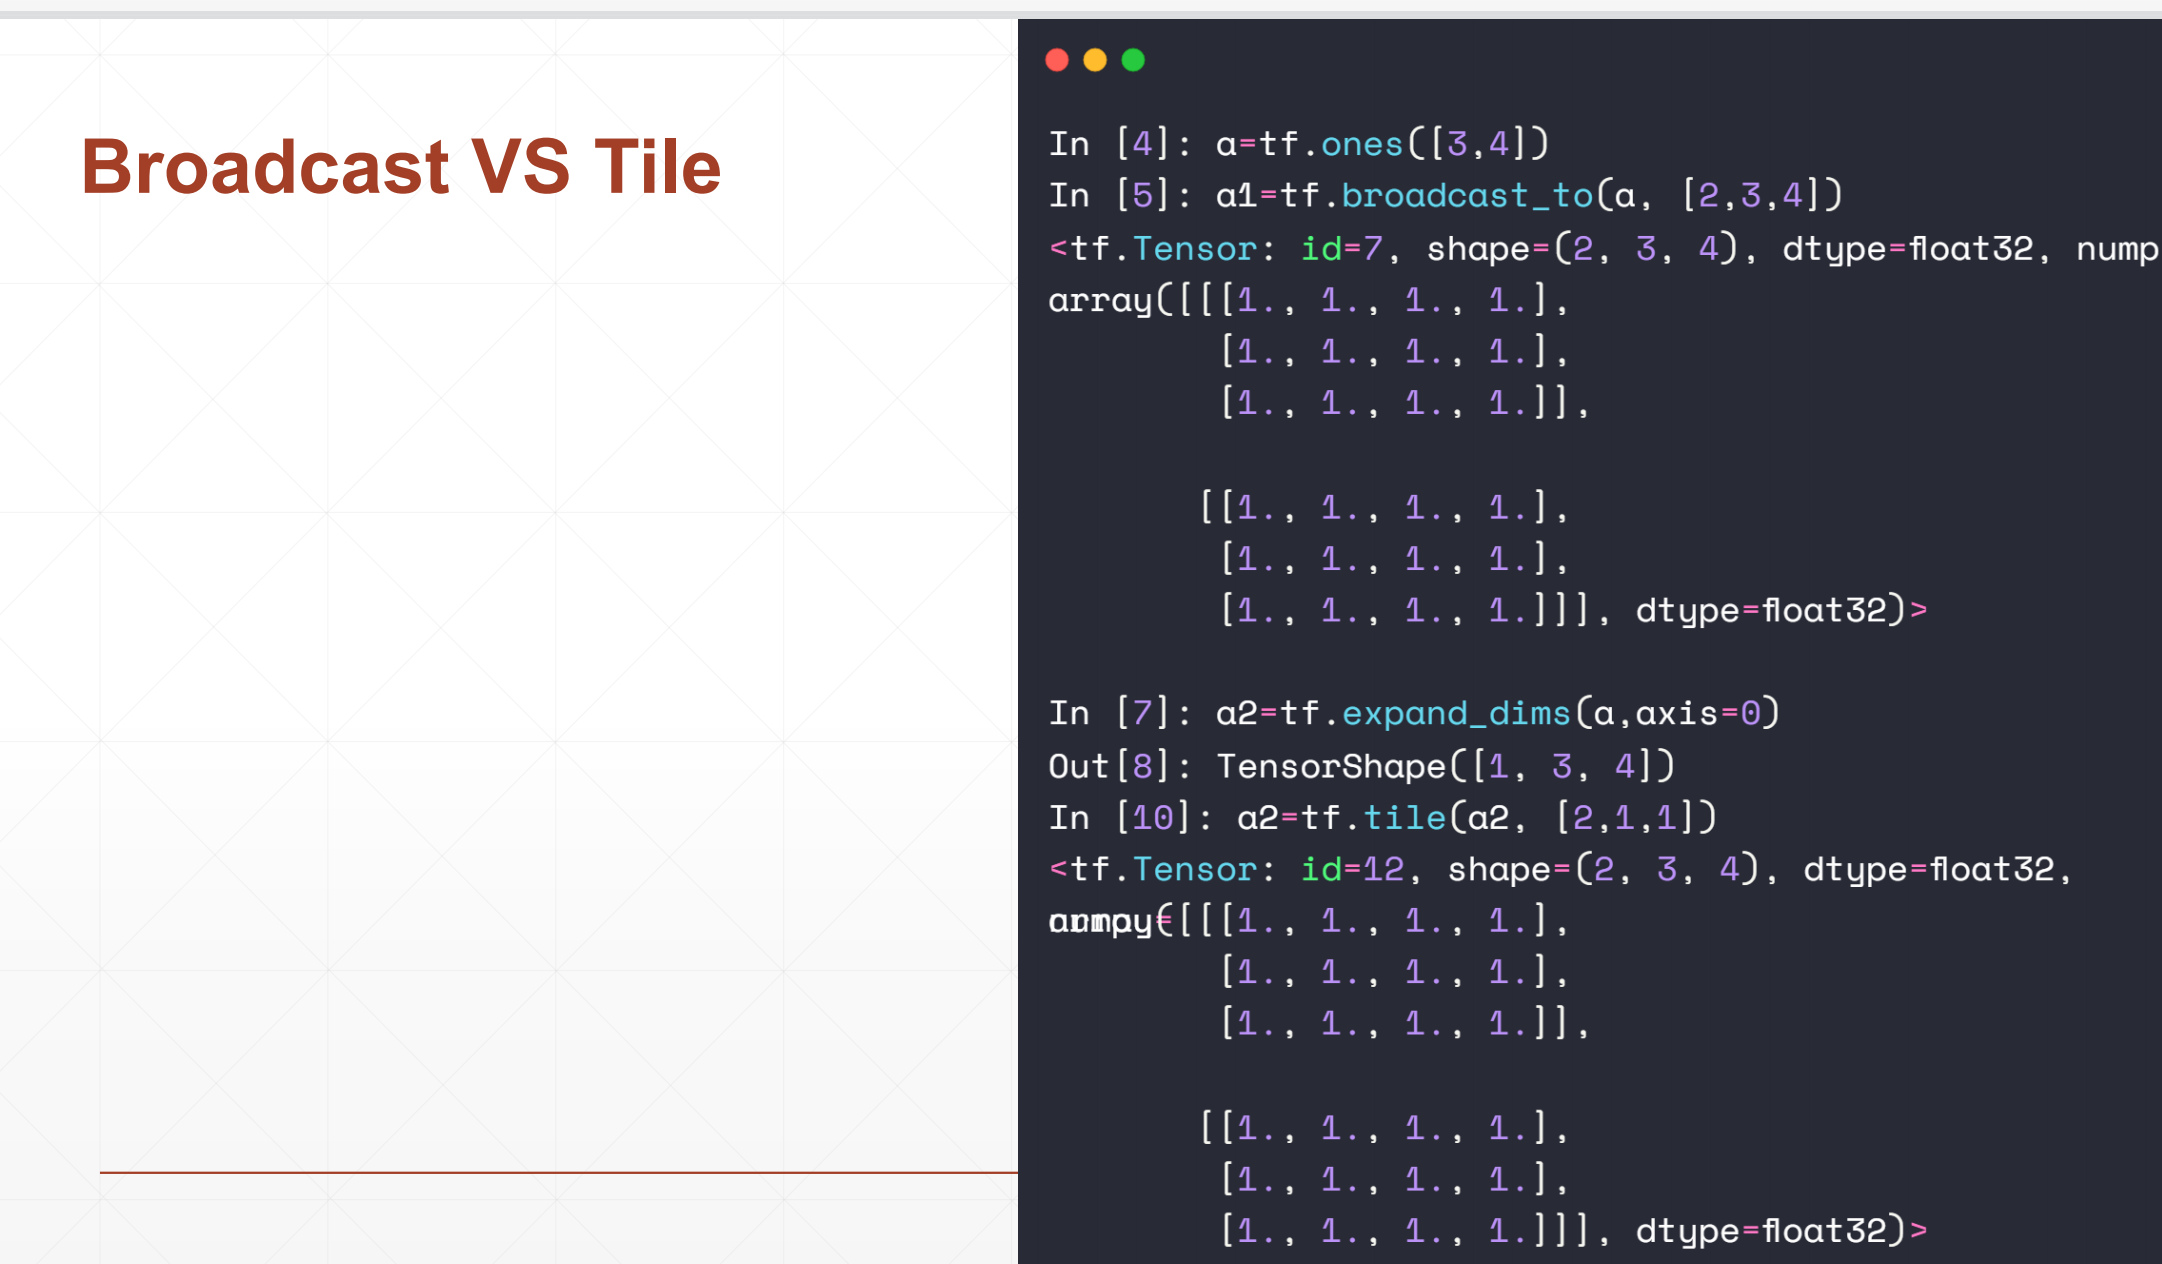
这里Tile用的内存更大
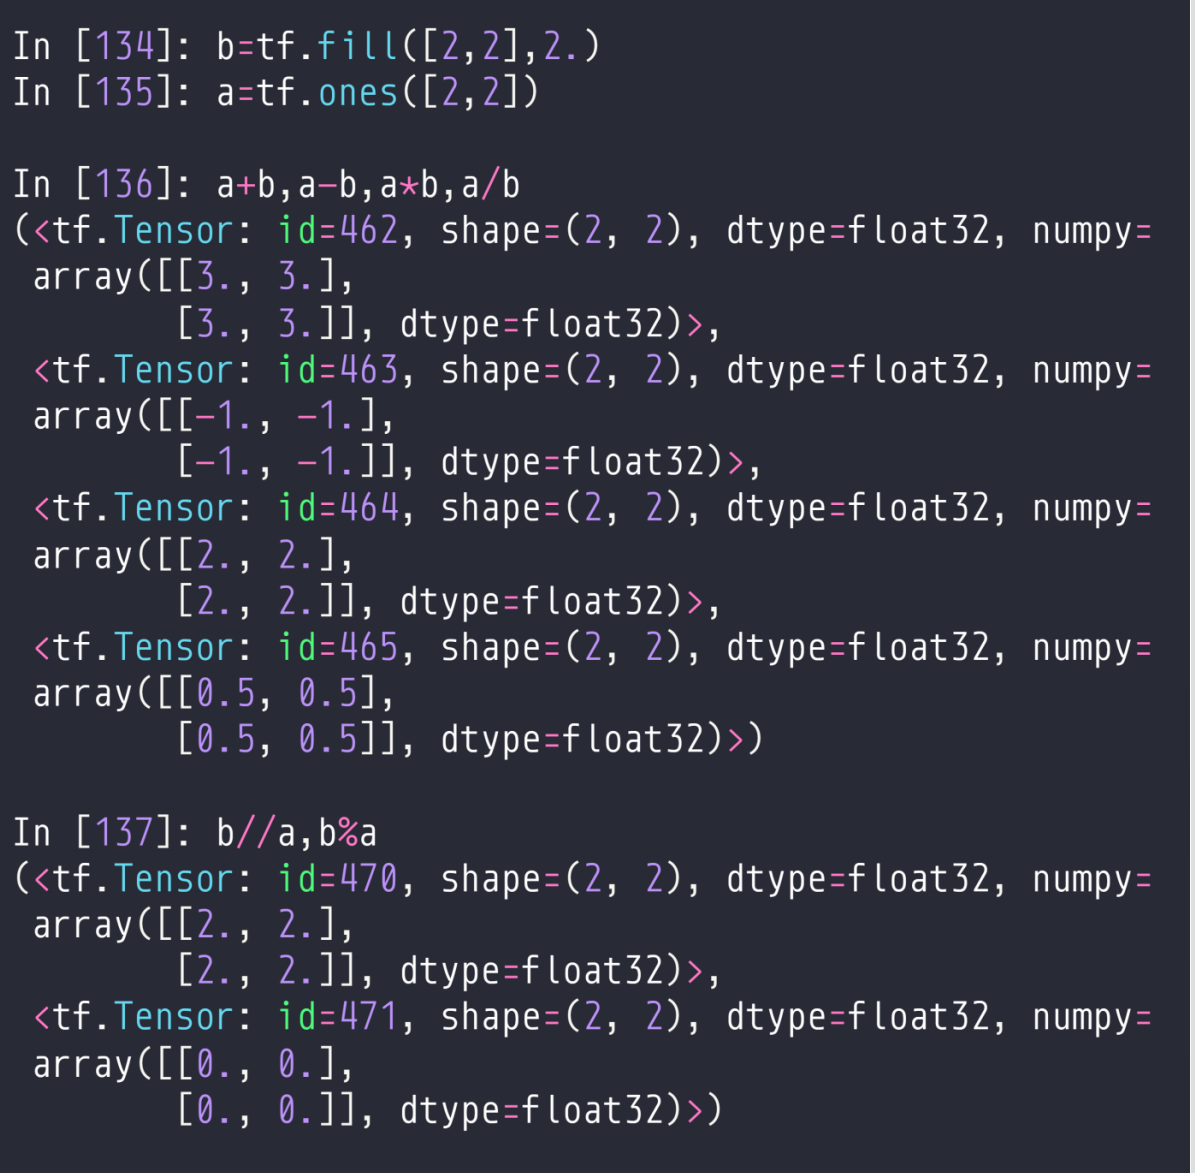
7 数学运算
这是比较常见的:
▪ +-*/
▪ **, pow, square
▪ sqrt
▪ //, %
▪ exp, log
▪ @, matmul
▪ linear layer
7.1 基本运算
▪ element-wise
- +、-、*、/、//(整除)、%(余除)
▪ matrix-wise(两个矩阵)
- @, matmul
▪ dim-wise(一个矩阵的一维)
- reduce_mean/max/min/sum
在matrix-wise中,[b,3,4]@[b,4,5]=[b,3,5]
这个里面是有b个[3,4]@[4,5]的,这个是一个计算机的并行工作原理。
7.1.1 +-*/%//
注意:这里的//是整除,%是余除
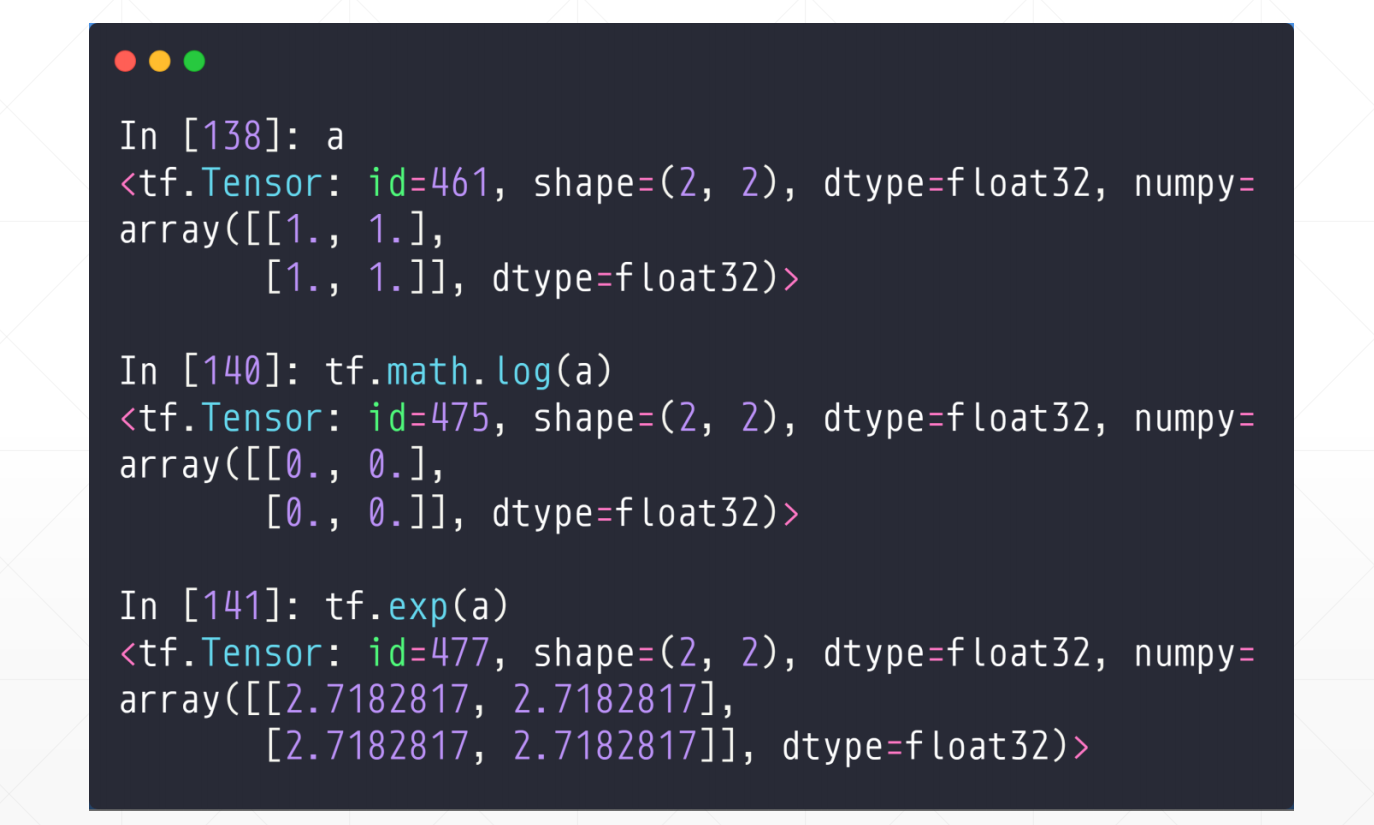
7.1.2 tf.math.log 和 tf.exp
tf.exp(),是e^x
tf.math.log()是以e为底的对数函数
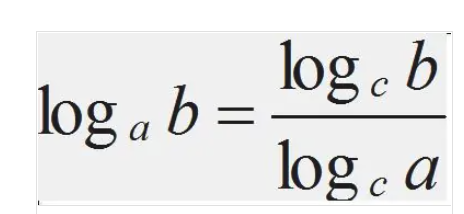
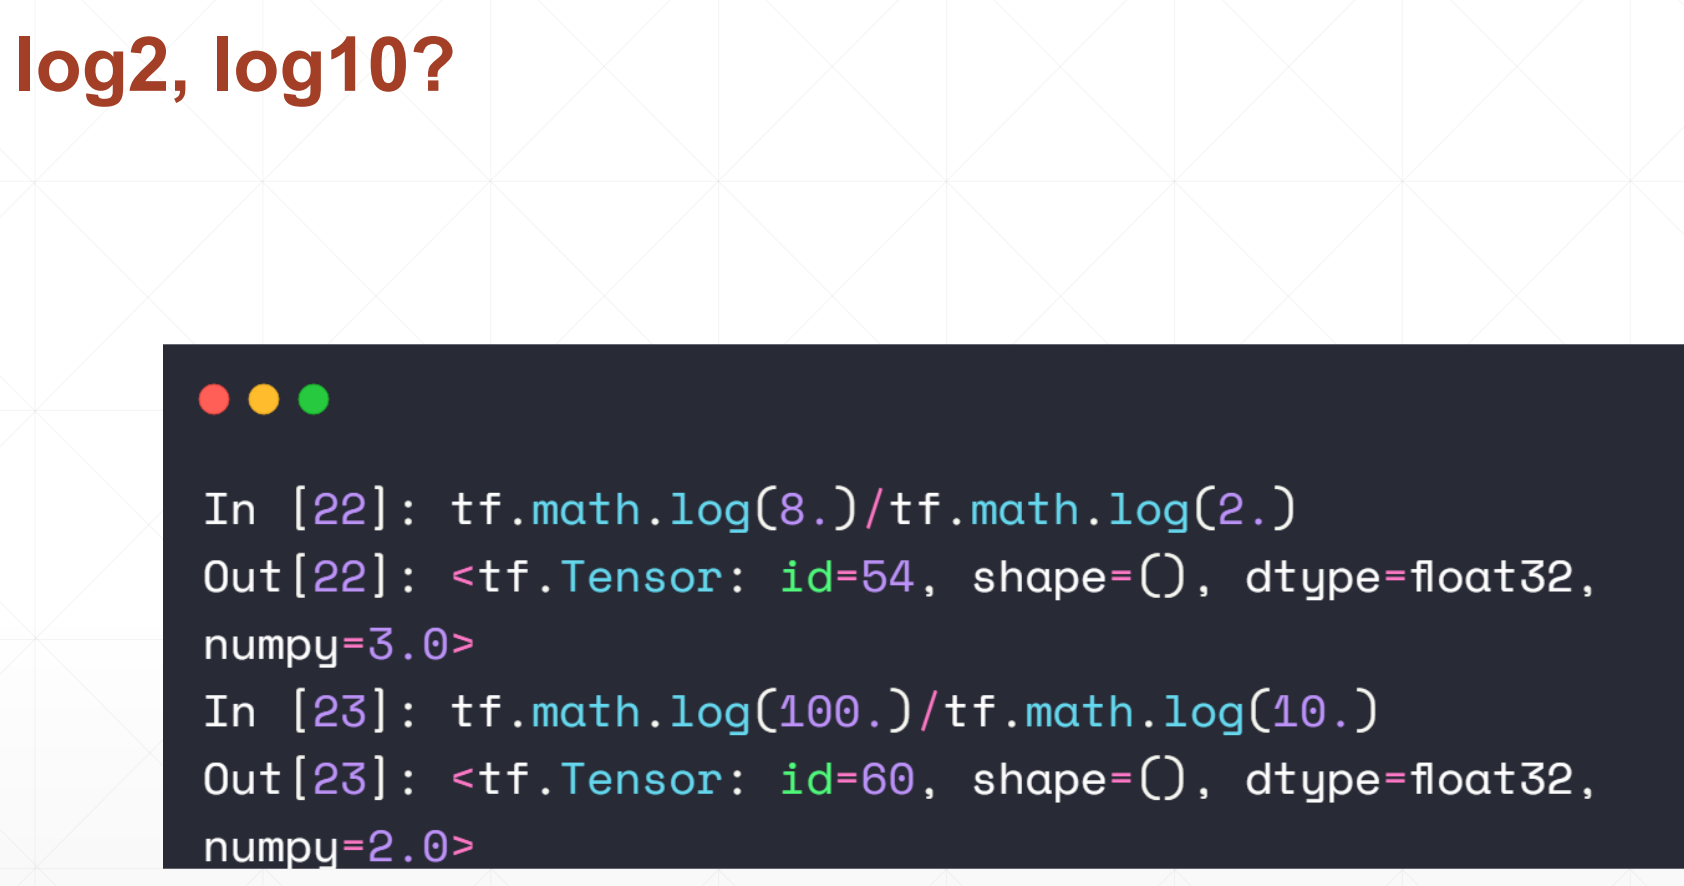
注意这里的log都是loge(),就是以自然函数为底的。如果我们想实现其他的,就是要用到一个换底公式
例子:
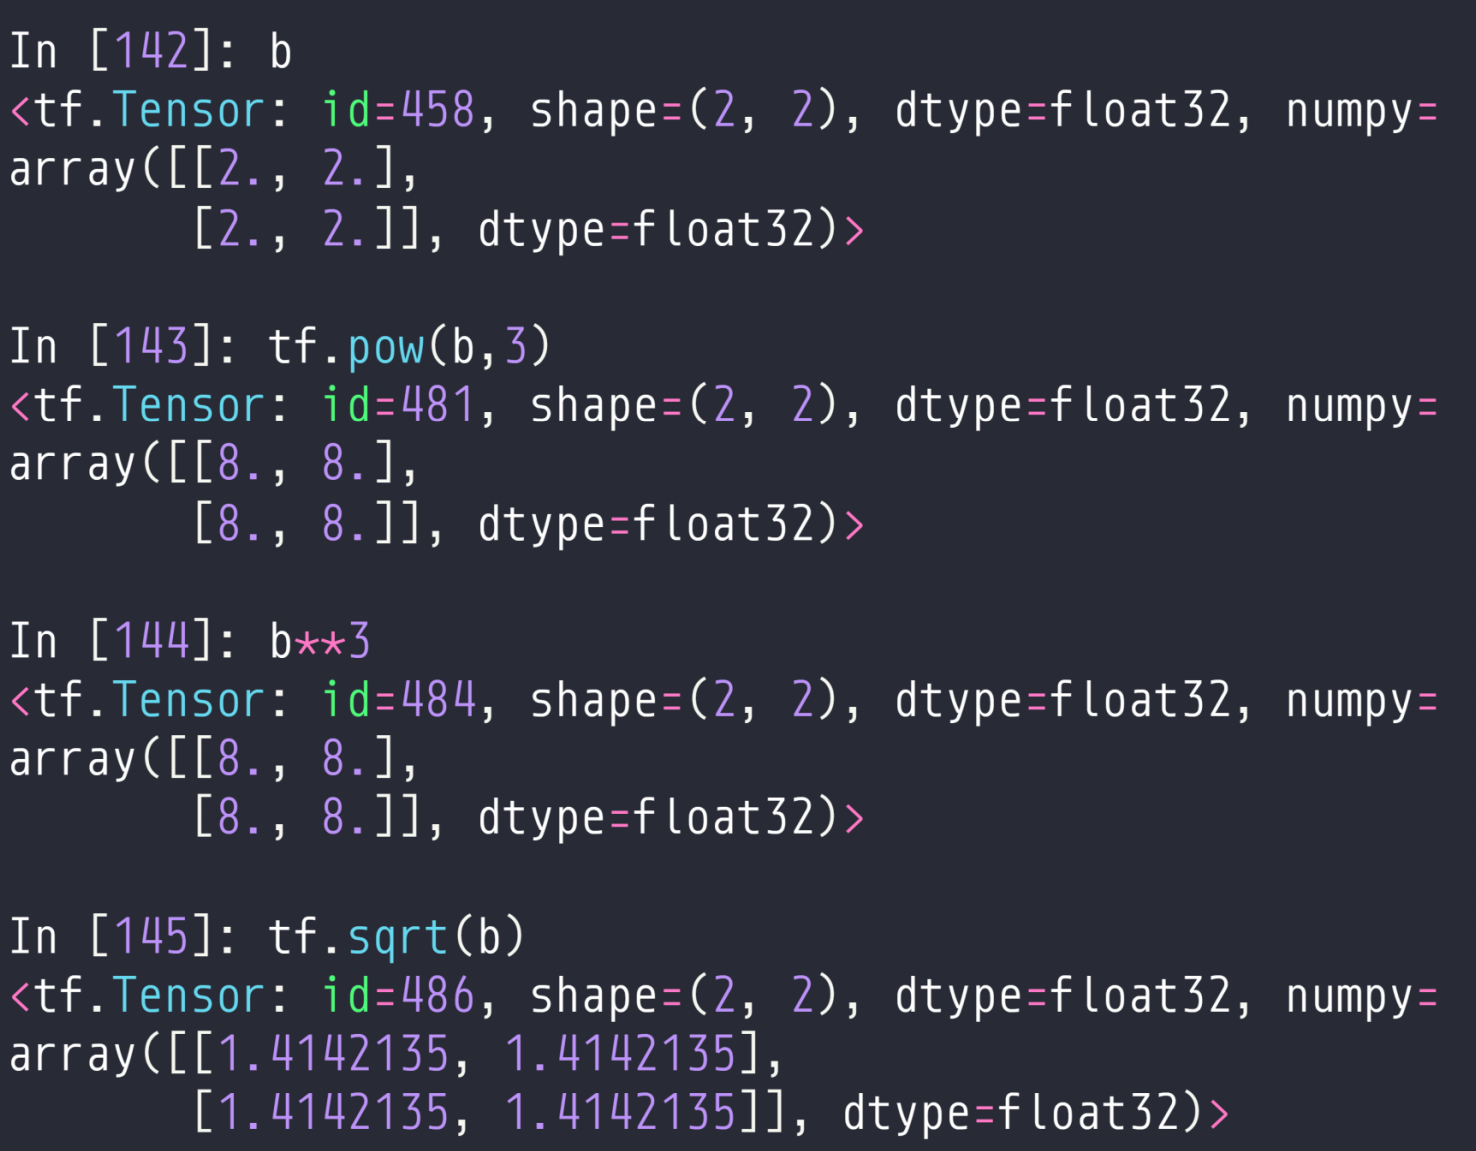
7.1.2 pow和sqrt
这两个一个开方,一个开根号
tf.pow(a,k):a^k
tf.sqrt(a,k):k次跟下a
其实这个pow(a,k)<=>a**k
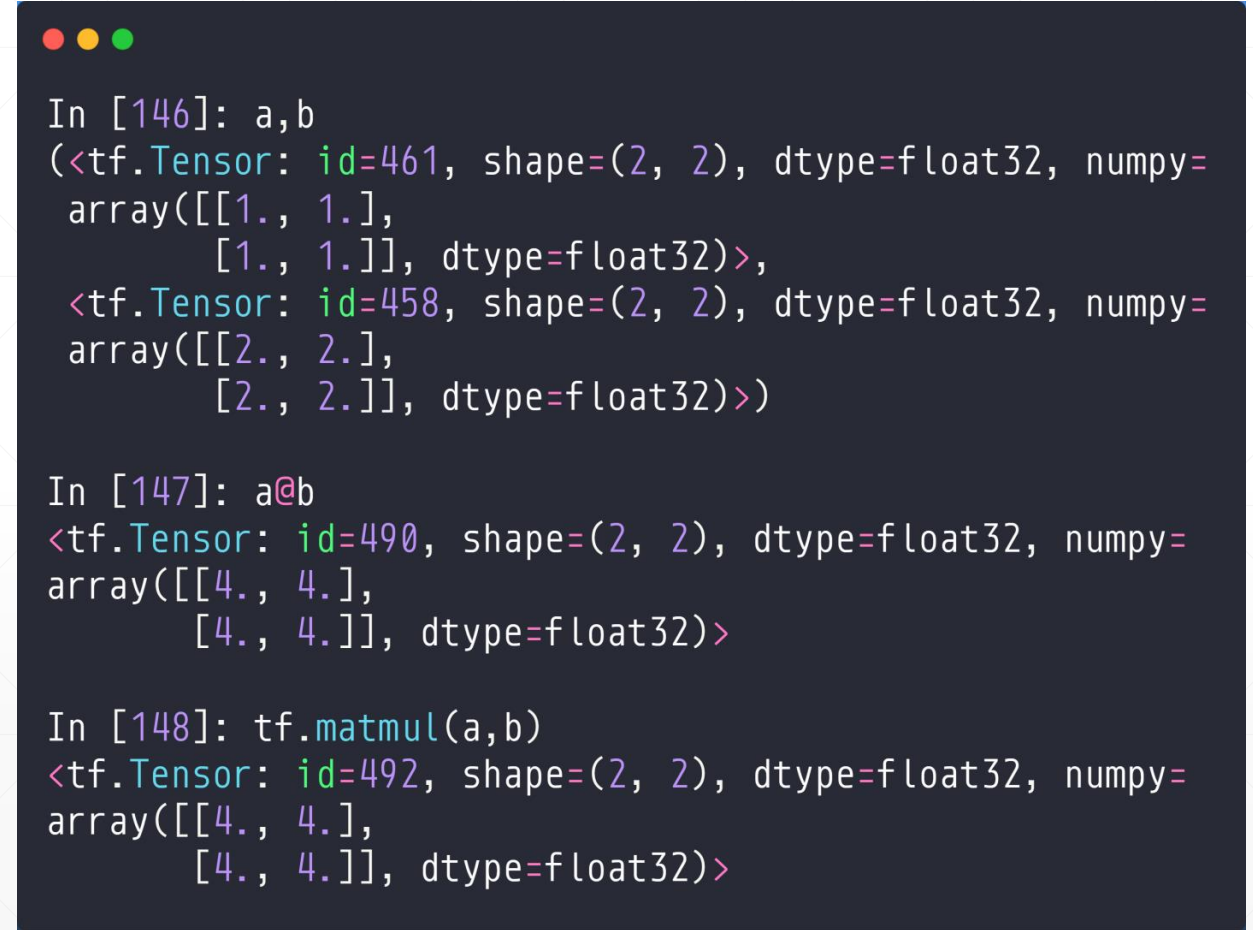
7.1.3 @和matmul 矩阵运算
矩阵相乘的话,我们可以a@b或者tf.matmul(a,b)
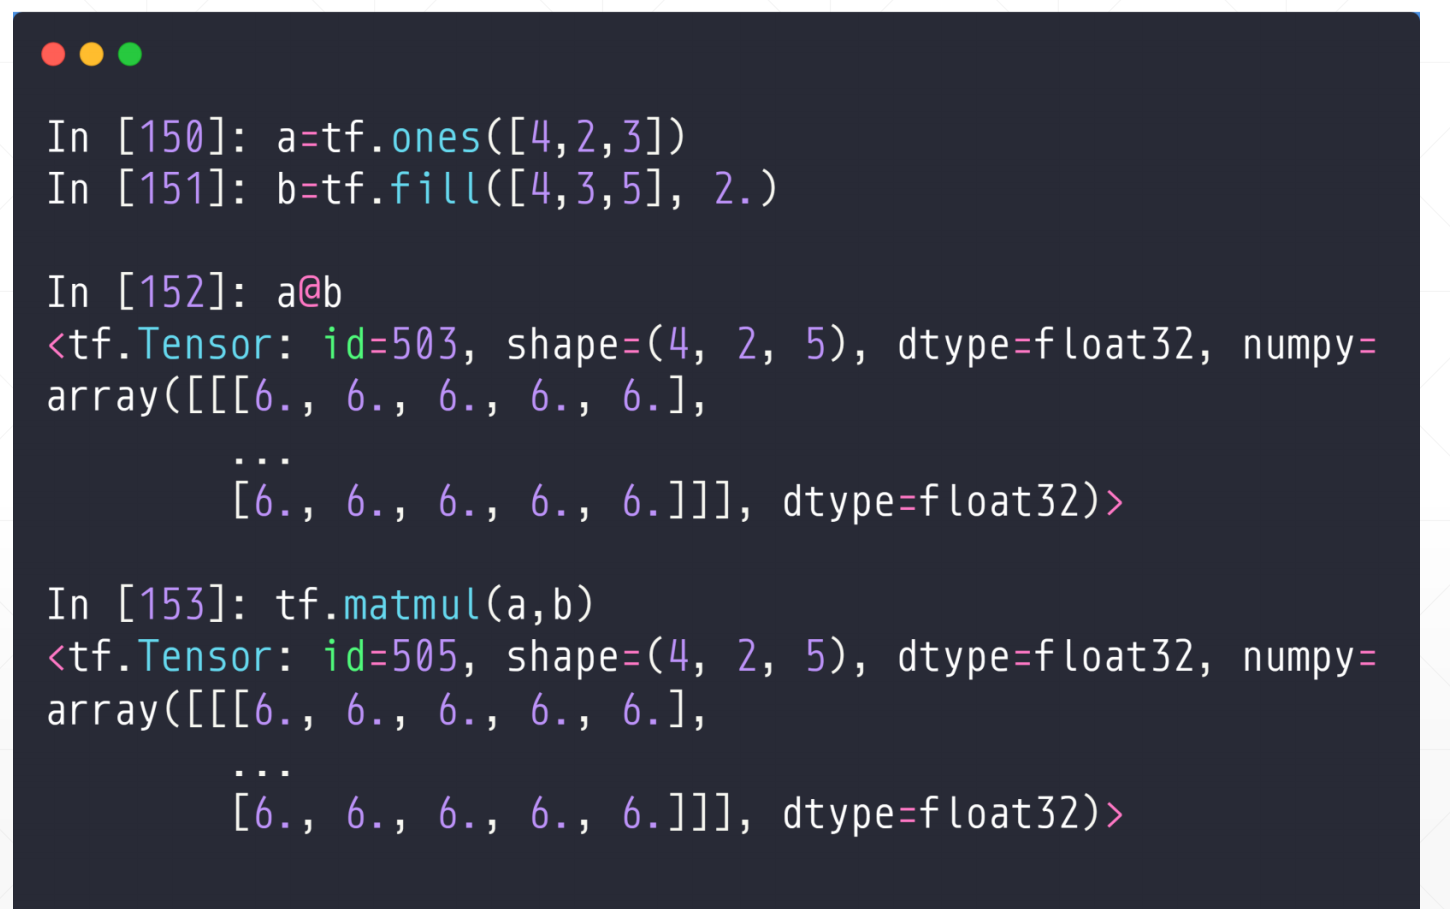
对于高纬度的话,例如:[4,2,3]@[4,3,5],这里维度4,算是并行吧,一次并行4个,实际上也是[2,3]@[3,5]只不过一次并行4个。
with broadcasting:
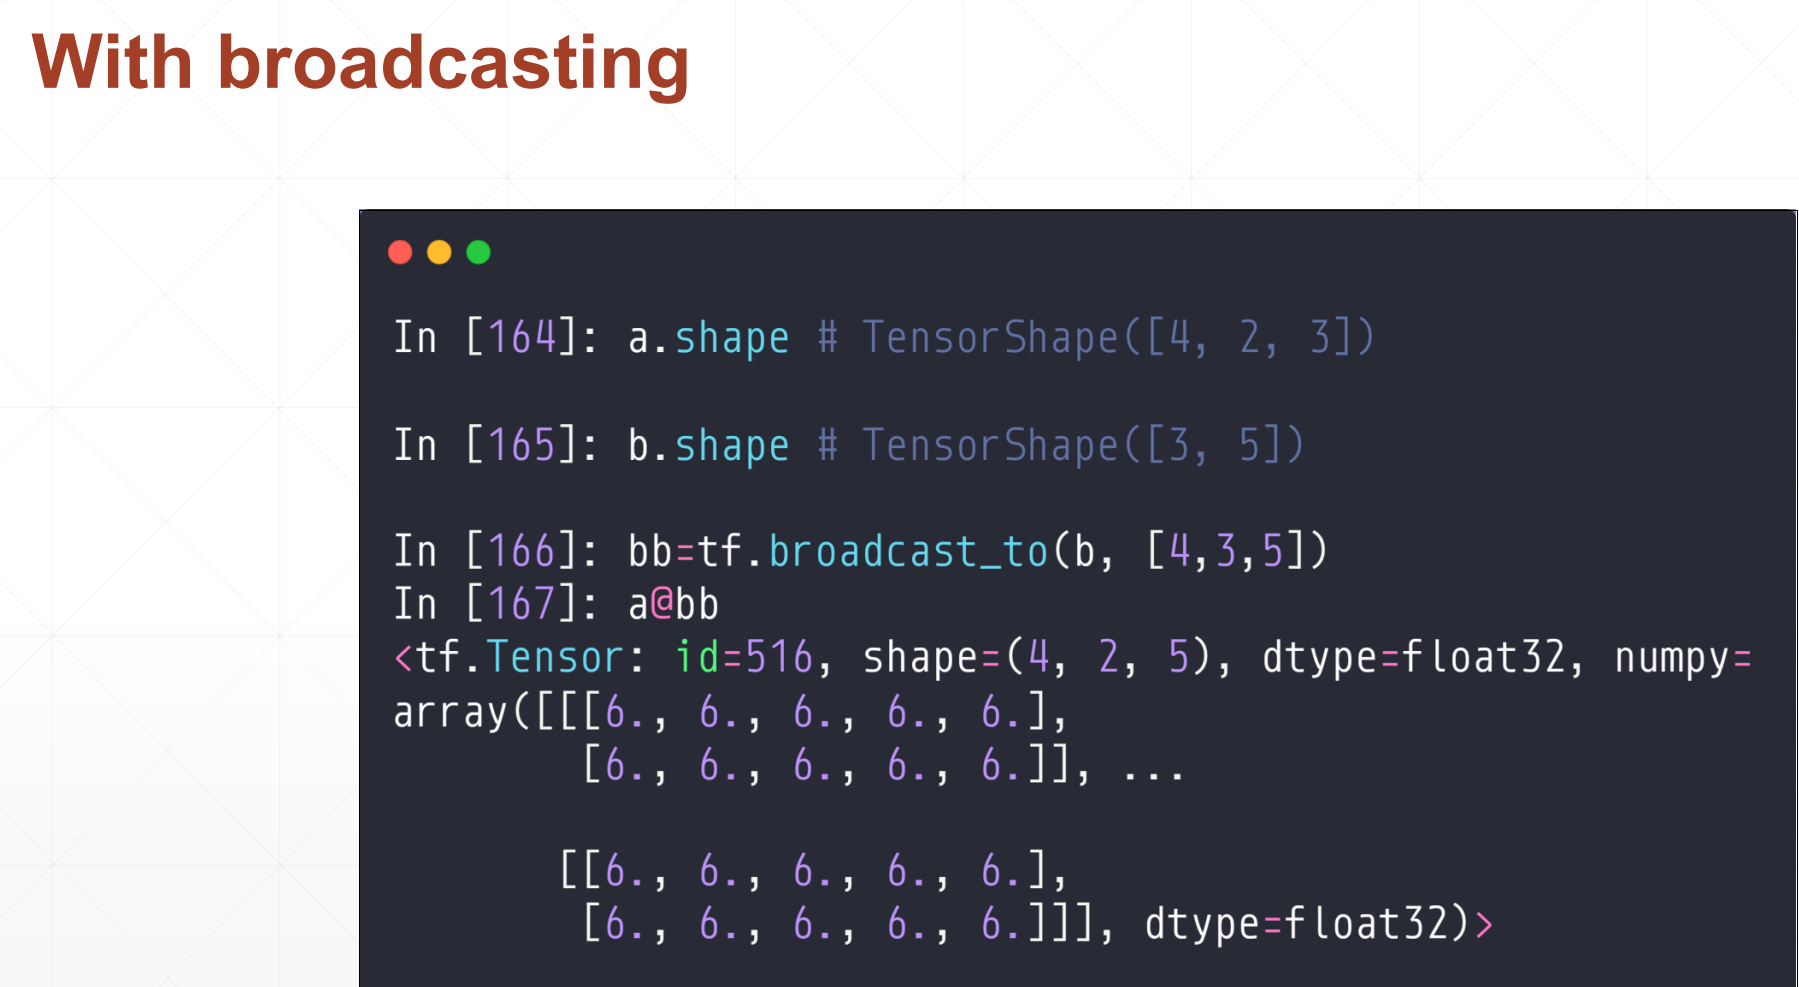
例子:Recap:

Y=X@W + b
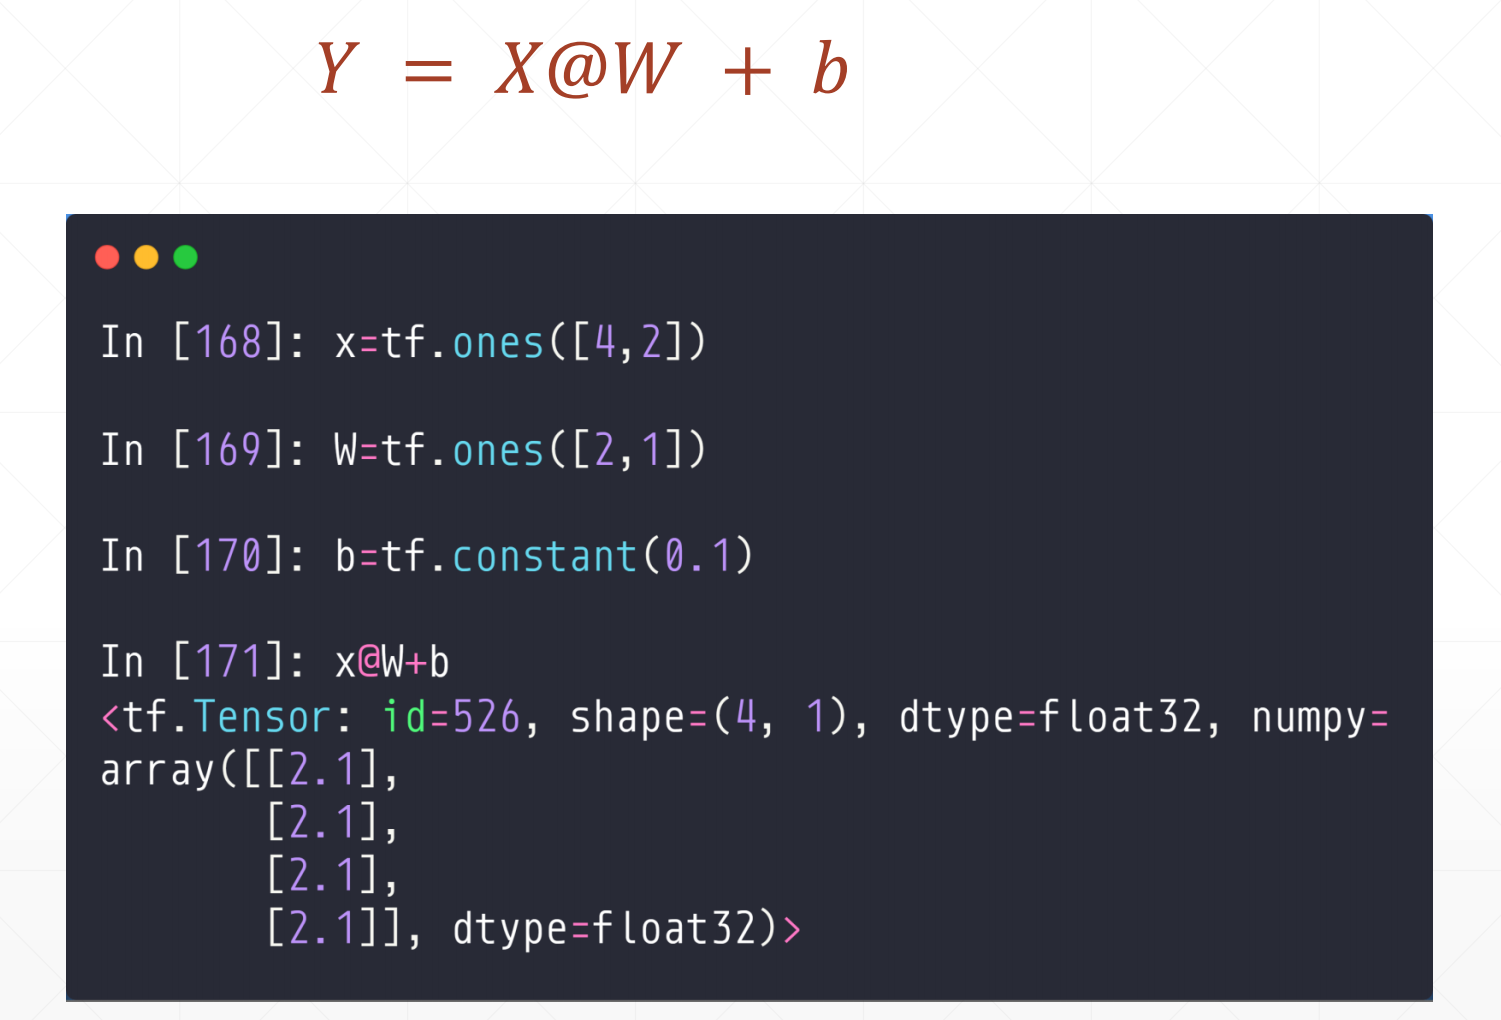
out=relu(X@W+b)

7.2 tf.reduce-sum/mean/max/min()
7.2.1 tf.reduce_sum()
tf.reduce_sum(
input_tensor, axis=None, keepdims=False, name=None
)
说明:在指定维度上求多维tensor元素之和,并且按照axis消除该维度,除非keepdims为True
input_tensor:输入张量
axis:需要降维的维度,就是在第几维度进行操作
keepdims:是否保留维度
name:操作数的名字(可选)
我们可以看一下这个,取自博主
>a = np.random.random_integers(3,size=(2,3,4))
>input = tf.constant(a)
tf.Tensor(
[[[2 3 1 1]
  [1 1 2 2]
  [1 2 2 1]]

 [[1 2 1 2]
  [2 2 3 3]
  [3 1 3 3]]], shape=(2, 3, 4), dtype=int32)

>output = tf.reduce_sum(input);
tf.Tensor(45, shape=(), dtype=int32)

#axis为None的时候,所有维度都会被降维(展成一维加起来),所有元素加起来为45


>output = tf.reduce_sum(input,axis=0)
tf.Tensor(
[[3 5 2 3]
 [3 3 5 5]
 [4 3 5 4]], shape=(3, 4), dtype=int32)

#axis=0时,最外的维度相加,这里就是2+1、3+2、1+1、1+2 ...,最终得到一个(3,4)的张量

如果keepdims=True
>output = tf.reduce_sum(input,axis=0,keepdims=True)
tf.Tensor(
[[[3 5 2 3]
  [3 3 5 5]
  [4 3 5 4]]], shape=(1, 3, 4), dtype=int32)

#保留了axis指定的维度,(2,3,4)变成(1,3,4)


>output = tf.reduce_sum(input,axis=1);
tf.Tensor(
[[4 6 5 4]
 [6 5 7 8]], shape=(2, 4), dtype=int32)

#axis=1时,dim1维度相加,这里就是2+1+1、3+1+2、1+2+2、1+2+1 ...,最终得到一个(2,4)的张量
7.2.2 reduceMax
tf.reduce_max(
input_tensor, axis=None, keepdims=False, name=None
)
也是相同的结果
>a = np.random.random_integers(3,size=(2,3,4)) #创建一个固定dim的numpy
>input = tf.constant(a)
tf.Tensor(
[[[2 3 1 2]
  [3 2 2 1]
  [2 1 1 1]]

 [[2 3 3 2]
  [3 1 3 1]
  [1 1 2 1]]], shape=(2, 3, 4), dtype=int32)


>output = tf.reduce_max(input)
tf.Tensor(3, shape=(), dtype=int32)

#axis为None时取所有元素最大值

>output = tf.reduce_max(input,axis=0)
tf.Tensor(
[[2 3 3 2]
 [3 2 3 1]
 [2 1 2 1]], shape=(3, 4), dtype=int32)

#axis=0的时候,按照dim0取最大值,即:max(2,2)、max(3,3)、max(1,3)、max(2,2)。。。
#最终得到一个(3,4)的tensor
7.2.3 reduceMean
说明:指定axis代表的维度求均值,并且按照axis消除该维度,除非keepdims为True
>input = tf.constant([[1., 1.], [2., 2.]])
>output = tf.reduce_mean(input)
tf.Tensor(1.5, shape=(), dtype=float32)

#所有元素求均值


>output = tf.reduce_mean(input, 0)
tf.Tensor([1.5 1.5], shape=(2,), dtype=float32)

#dim0维度求均值,即计算[1,2]、[1,2]均值为1.5、1.5

>output = tf.reduce_mean(input, 1)
tf.Tensor([1. 2.], shape=(2,), dtype=float32)

#dim0维度求均值,即计算[1,1]、[2,2]均值为1.、2.

 浙公网安备 33010602011771号