数据集分类
CIFAR10 数据集分类
对于视觉数据,PyTorch 创建了一个叫做 totchvision 的包,该包含有支持加载类似Imagenet,CIFAR10,MNIST 等公共数据集的数据加载模块 torchvision.datasets 和支持加载图像数据数据转换模块 torch.utils.data.DataLoader。
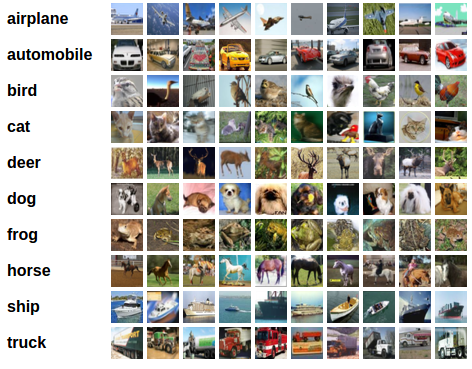
下面将使用CIFAR10数据集,它包含十个类别:‘airplane’, ‘automobile’, ‘bird’, ‘cat’, ‘deer’, ‘dog’, ‘frog’, ‘horse’, ‘ship’, ‘truck’。CIFAR-10 中的图像尺寸为3x32x32,也就是RGB的3层颜色通道,每层通道内的尺寸为32*32。
!
使用CNN对CIFAR10分类
首先,加载并归一化 CIFAR10 使用 torchvision 。torchvision 数据集的输出是范围在[0,1]之间的 PILImage,我们将他们转换成归一化范围为[-1,1]之间的张量 Tensors。
import torch
import torchvision
import torchvision.transforms as transforms
import matplotlib.pyplot as plt
import numpy as np
import torch.nn as nn
import torch.nn.functional as F
import torch.optim as optim

device = torch.device("cuda:0" if torch.cuda.is_available() else "cpu")
transform = transforms.Compose(
    [transforms.ToTensor(),
     transforms.Normalize((0.5, 0.5, 0.5), (0.5, 0.5, 0.5))])

# 注意下面代码中:训练的 shuffle 是 True,测试的 shuffle 是 false
# 训练时可以打乱顺序增加多样性,测试是没有必要
trainset = torchvision.datasets.CIFAR10(root='./data', train=True,
                                        download=True, transform=transform)
trainloader = torch.utils.data.DataLoader(trainset, batch_size=64,
                                          shuffle=True, num_workers=2)

testset = torchvision.datasets.CIFAR10(root='./data', train=False,
                                       download=True, transform=transform)
testloader = torch.utils.data.DataLoader(testset, batch_size=8,
                                         shuffle=False, num_workers=2)

classes = ('plane', 'car', 'bird', 'cat',
           'deer', 'dog', 'frog', 'horse', 'ship', 'truck')
展示图片:
def imshow(img):
    plt.figure(figsize=(8,8))
    img = img / 2 + 0.5     # 转换到 [0,1] 之间
    npimg = img.numpy()
    plt.imshow(np.transpose(npimg, (1, 2, 0)))
    plt.show()

# 得到一组图像
'''
这里next的用法是每次取出trainloader这个迭代器的一个元素,然后指向下一个元素,类似于指针的后移。如果再一次next操作,则images和labels都将发生变化。
'''
images, labels = iter(trainloader).next()
# 展示图像
imshow(torchvision.utils.make_grid(images))
# 展示第一行图像的标签
for j in range(8):
    print(classes[labels[j]])
!
定义网络,损失函数和优化器:
# 结构为 卷积层-池化层-卷积层-全连接层-全连接层
class Net(nn.Module):
    def __init__(self):
        super(Net, self).__init__()
        self.conv1 = nn.Conv2d(3, 6, 5)
        self.pool = nn.MaxPool2d(2, 2)
        self.conv2 = nn.Conv2d(6, 16, 5)
        self.fc1 = nn.Linear(16 * 5 * 5, 120)
        self.fc2 = nn.Linear(120, 84)
        self.fc3 = nn.Linear(84, 10)

    def forward(self, x):
        x = self.pool(F.relu(self.conv1(x)))
        x = self.pool(F.relu(self.conv2(x)))
        # 展平操作
        x = x.view(-1, 16 * 5 * 5)
        x = F.relu(self.fc1(x))
        x = F.relu(self.fc2(x))
        x = self.fc3(x)
        return x

# 网络放到GPU上
net = Net().to(device)
# 损失函数
criterion = nn.CrossEntropyLoss()
# 优化器选择Adam
optimizer = optim.Adam(net.parameters(), lr=0.001)
训练网络:
for epoch in range(10):  # 重复多轮训练
    for i, (inputs, labels) in enumerate(trainloader):
        inputs = inputs.to(device)
        labels = labels.to(device)
        # 优化器梯度归零
        optimizer.zero_grad()
        # 正向传播 + 反向传播 + 优化
        outputs = net(inputs)
        loss = criterion(outputs, labels)
        loss.backward()
        optimizer.step()
        # 输出统计信息
        if i % 100 == 0:
            print('Epoch: %d Minibatch: %5d loss: %.3f' %(epoch + 1, i + 1, loss.item()))

print('Finished Training')
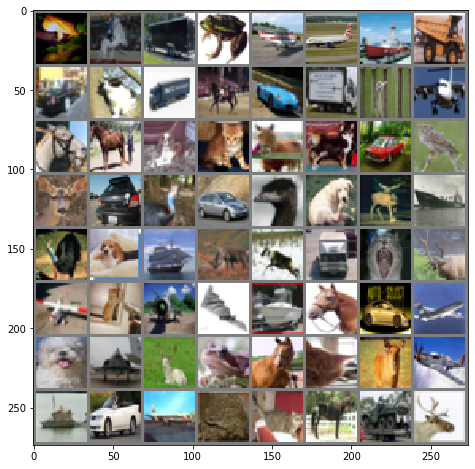
提取8张图片并输入模型,观察识别效果:
# 得到一组图像
images, labels = iter(testloader).next()
# 展示图像
imshow(torchvision.utils.make_grid(images))
# 展示图像的标签
for j in range(8):
    print(classes[labels[j]])

'''
cat
ship
ship
plane
frog
frog
car
frog
'''
outputs = net(images.to(device))
# 由于不需要返回的第一个参数,所以使用_来接收
_, predicted = torch.max(outputs, 1)

# 展示预测的结果
for j in range(8):
    print(classes[predicted[j]])

'''

cat
ship
plane
ship
frog
frog
car
deer
'''
识别的准确率一般,在整个数据集上观察:
correct = 0
total = 0

for data in testloader:
    images, labels = data
    images, labels = images.to(device), labels.to(device)
    outputs = net(images)
    _, predicted = torch.max(outputs.data, 1)
    total += labels.size(0)
    correct += (predicted == labels).sum().item()

print('Accuracy of the network on the 10000 test images: %d %%' % (
    100 * correct / total))

'''
Accuracy of the network on the 10000 test images: 64 %
'''
可以看到整体的识别率仅仅64%。
如何进行优化呢?
使用 VGG16 对 CIFAR10 分类
VGG是由Simonyan 和Zisserman在文献《Very Deep Convolutional Networks for Large Scale Image Recognition》中提出卷积神经网络模型,其名称来源于作者所在的牛津大学视觉几何组(Visual Geometry Group)的缩写。
该模型参加2014年的 ImageNet图像分类与定位挑战赛,取得了优异成绩:在分类任务上排名第二,在定位任务上排名第一。
VGG16的网络结构如下图所示:
!
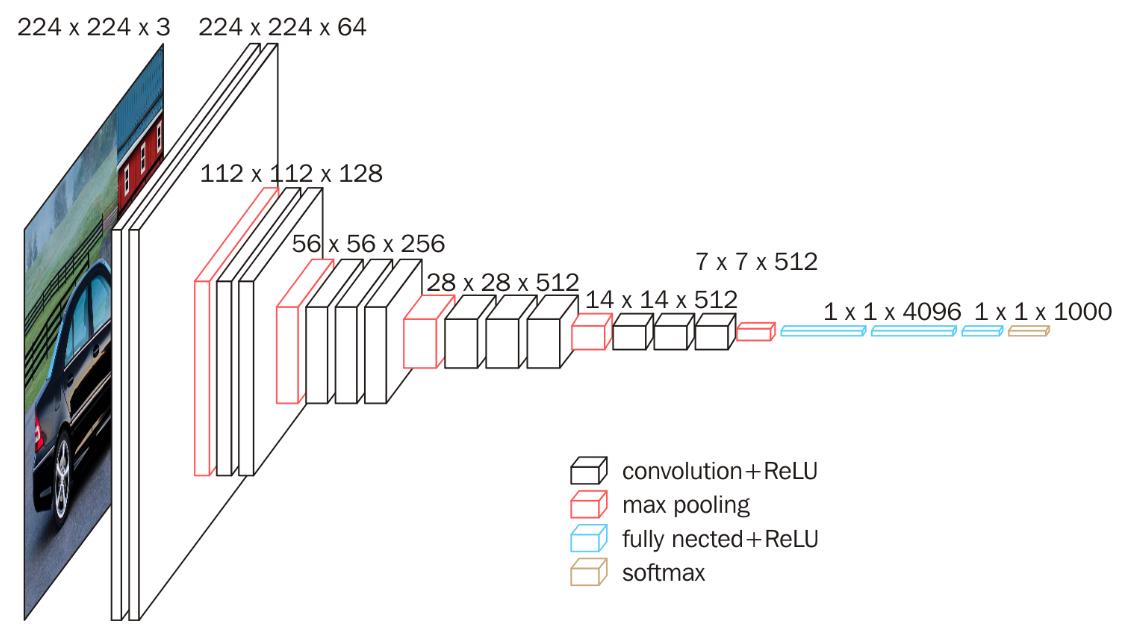
16层网络的结节信息如下:
- 01:Convolution using 64 filters
- 02: Convolution using 64 filters + Max pooling
- 03: Convolution using 128 filters
- 04: Convolution using 128 filters + Max pooling
- 05: Convolution using 256 filters
- 06: Convolution using 256 filters
- 07: Convolution using 256 filters + Max pooling
- 08: Convolution using 512 filters
- 09: Convolution using 512 filters
- 10: Convolution using 512 filters + Max pooling
- 11: Convolution using 512 filters
- 12: Convolution using 512 filters
- 13: Convolution using 512 filters + Max pooling
- 14: Fully connected with 4096 nodes
- 15: Fully connected with 4096 nodes
- 16: Softmax
定义dataloader
需要注意,这里的transform,dataloader和之前定义的不同。
为什么要在深度训练中要将图片进行随机裁剪呢?
# 使用GPU训练,可以在菜单 "代码执行工具" -> "更改运行时类型" 里进行设置
device = torch.device("cuda:0" if torch.cuda.is_available() else "cpu")

transform_train = transforms.Compose([
    # 随机裁剪
    transforms.RandomCrop(32, padding=4),
    transforms.RandomHorizontalFlip(),
    transforms.ToTensor(),
    transforms.Normalize((0.4914, 0.4822, 0.4465), (0.2023, 0.1994, 0.2010))])

transform_test = transforms.Compose([
    transforms.ToTensor(),
    transforms.Normalize((0.4914, 0.4822, 0.4465), (0.2023, 0.1994, 0.2010))])

trainset = torchvision.datasets.CIFAR10(root='./data', train=True,  download=True, transform=transform_train)
testset  = torchvision.datasets.CIFAR10(root='./data', train=False, download=True, transform=transform_test)

trainloader = torch.utils.data.DataLoader(trainset, batch_size=128, shuffle=True, num_workers=2)
testloader = torch.utils.data.DataLoader(testset, batch_size=128, shuffle=False, num_workers=2)
VGG网络定义
下面定义VGG网络,由于参数太多,老师手动改简单了些
现在的结构基本上是:
64 conv, maxpooling,
128 conv, maxpooling,
256 conv, 256 conv, maxpooling,
512 conv, 512 conv, maxpooling,
512 conv, 512 conv, maxpooling,
softmax
class VGG(nn.Module):
  def __init__(self):
    super(VGG, self).__init__()
    self.cfg = [64, 'M', 128, 'M', 256, 256, 'M', 512, 512, 'M', 512, 512, 'M']
    self.features = self._make_layers(self.cfg)
    # 输出200个类
    self.classifier = nn.Linear(512, 200)

  def forward(self, x):
    out = self.features(x)
    # 展平操作
    out = out.view(out.size(0), -1)
    out = self.classifier(out)
    return out

  def _make_layers(self, cfg):
    layers = []
    in_channels = 3
    for x in cfg:
      if x == 'M':
        layers += [nn.MaxPool2d(kernel_size=2, stride=2)]
      else:
        layers += [nn.Conv2d(in_channels, x, kernel_size=3, padding=1)]
        in_channels = x
    layers += [nn.AvgPool2d(kernel_size=1, stride=1)]
    return nn.Sequential(*layers)

# 网络放到GPU上
net = VGG().to(device)
criterion = nn.CrossEntropyLoss()
optimizer = optim.Adam(net.parameters(), lr=0.001)
网络训练
与之前一样
测试验证准确率
与之前一样

 浙公网安备 33010602011771号