观察者/订阅-发布模式/事件监听机制
观察者/订阅-发布模式/事件监听机制
观察者模式
观察者模式定义了对象间的一种一对多的依赖关系,当一个对象的状态发生改变时,所有依赖于它的对象都将得到通知,并自动更新。
我们可以通过一个例子来学习观察者模式的好处。
假设在一个系统中,用户注册成功后,我们会给用户发送邮件、赠送礼品。代码大致是下面这样的:
public class UserController {
  private UserService userService; // 依赖注入
  private EmailService emailService; // 依赖注入
  private GiftService giftService; // 依赖注入

  public Long register(String telephone, String password) {
    // 注册
    long userId = userService.register(telephone, password);
    // 发送邮件
    emailService.send(userId);
    // 赠送礼品
    giftService.issueNewUserGift(userId);
    return userId;
  }
}
如果没有扩展和修改的需求,上面的代码实现是可以接受的。相反,如果需求频繁变动,比如,用户注册成功之后,不再发放礼品,而是改为发放优惠券,并且还要给用户发送一封“欢迎注册成功”的站内信。这种情况下,我们就需要频繁地修改register()函数中的代码,违反开闭原则。而且,如果注册成功之后需要执行的后续操作越来越多,那register()函数的逻辑会变得越来越复杂,也就影响到代码的可读性和可维护性。
这个时候,观察者模式就能派上用场了。利用观察者模式,对上面的代码进行了重构。重构之后的代码如下所示:
public interface RegObserver {
  void handleRegSuccess(long userId);
}

public class RegNotificationObserver implements RegObserver {
  private NotificationService notificationService; // 依赖注入

  @Override
  public void handleRegSuccess(long userId) {
    notificationService.sendInboxMessage(userId, "Welcome...");
  }
}

public class RegCouponObserver implements RegObserver {
  private CouponService couponService; // 依赖注入

  @Override
  public void handleRegSuccess(long userId) {
    couponService.issueNewUserCoupon(userId);
  }
}

public interface Subject {
    void registerObserver(RegObserver observer);
    void removeObserver(RegObserver observer);
    void notifyObservers(String message);
}

@Component
public class UserRegisterSubject implements Subject {

    List<RegObserver> observers; // 依赖注入

    @Override
    public void registerObserver(RegObserver observer) {
        observers.add(observer);
    }

    @Override
    public void removeObserver(RegObserver observer) {
        observers.remove(observer);
    }

    @Override
    public void notifyObservers(String message) {
        for (RegObserver observer : observers) {
            observer.update(message);
        }
    }
}


public class UserController {
  private UserService userService; // 依赖注入
  private UserRegisterSubject userRegisterSubject; // 依赖注入

  public Long register(String telephone, String password) {
    long userId = userService.register(telephone, password);
    userRegisterSubject.notifyObservers(userId);
    return userId;
  }
}
Java 提供接口 java.util.Observable 和 java.util.Observer 来实现观察者模式,但感觉好难用....
package com.example.demo;

import java.util.Observable;
import java.util.Observer;

/**
 * @author Lin = ̄ω ̄=
 */
public class ObservableDemo {

	public static void main(String[] args) {

		MyObservable myObservable = new MyObservable();

		myObservable.addObserver((observable, value) -> {
			System.out.println(value);
		});
		myObservable.setChanged();
		myObservable.notifyObservers("hello, world");
	}

	public static class MyObservable extends Observable {
		public void setChanged() {
			super.setChanged();
		}
	}
}
订阅-发布模式
订阅-发布模式 和 观察者模式 很像,但两者还是有些区别。
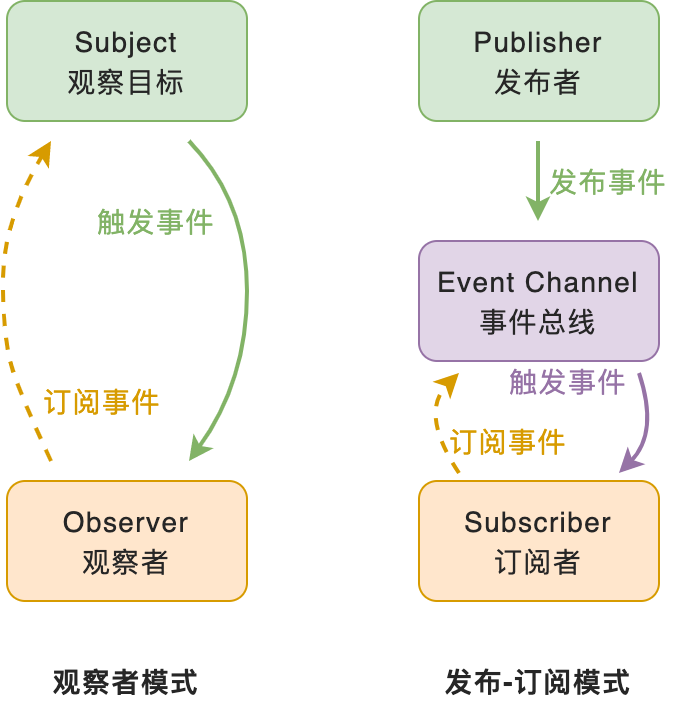
可以看出,发布订阅模式相比观察者模式多了个事件通道,事件通道作为调度中心,管理事件的订阅和发布工作,彻底隔绝了订阅者和发布者的依赖关系。即订阅者在订阅事件的时候,只关注事件本身,而不关心谁会发布这个事件;发布者在发布事件的时候,只关注事件本身,而不关心谁订阅了这个事件。
就像我们在社交平台上关注某个人,我们就可以通过社交平台的推送获得对方的动态。这里社交平台就扮演了调度中心的作用,我们和对方没有直接的消息往来。
事件/监听模式
Java 的事件/监听
Java的事件监听机制主要包括:事件源(触发事件的对象),事件对象(java.util.EventObject),事件监听器(java.util.EventListener)
Spring 的事件/监听
事件类:ApplicationEvent 继承 java.util.EventObject
事件监听器: ApplicationListener 继承 java.util.EventObject
事件广播器:ApplicationEventMulticaster
SimpleApplicationEventMulticaster(唯一实现类)
事件发送器:ApplicationEventPublisher
Spring Boot 的事件/监听
示例:
import org.springframework.boot.autoconfigure.SpringBootApplication;
import org.springframework.context.ApplicationListener;
import org.springframework.context.event.ContextClosedEvent;
import org.springframework.context.support.GenericApplicationContext;

/**
 * @author Lin = ̄ω ̄=
 * @date 2021/5/10
 */
@SpringBootApplication
public class Application {

	public static void main(String[] args) {
        GenericApplicationContext context = new GenericApplicationContext();
        // 添加事件监听
		context.addApplicationListener(event -> {
            // err 突出显示
			System.err.println(event.getClass().getSimpleName());
		});
		// 启动 Spring 应用上下文
		context.refresh();
		context.publishEvent("hello,world");

		// ContextClosedEvent
		context.close();
	}

}
输出:
ContextRefreshedEvent
PayloadApplicationEvent
ContextClosedEvent
添加自定义监听器 - ApplicationListener
import org.springframework.boot.autoconfigure.SpringBootApplication;
import org.springframework.context.ApplicationListener;
import org.springframework.context.event.ContextClosedEvent;
import org.springframework.context.support.GenericApplicationContext;

/**
 * @author Lin = ̄ω ̄=
 * @date 2021/5/10
 */
@SpringBootApplication
public class Application {

	public static void main(String[] args) {
        GenericApplicationContext context = new GenericApplicationContext();
        // 添加自定义监听器
		context.addApplicationListener(new ClosedListener());
		// 启动 Spring 应用上下文
		context.refresh();
		context.publishEvent("hello,world");

		// ContextClosedEvent
		context.close();
	}

    private static class ClosedListener implements ApplicationListener<ContextClosedEvent> {

		@Override
		public void onApplicationEvent(ContextClosedEvent event) {
			System.out.println("关闭上下文: " + event);
		}
	}
}
输出:
关闭上下文: org.springframework.context.event.ContextClosedEvent[source=org.springframework.context.support.GenericApplicationContext@4c75cab9
事件的发布最终都是通过 publishEvent(xxx) 主动调用
例如上下文关闭事件,通过查看源码可知调用链为: context.close() --> doClose() --> publishEvent(new ContextClosedEvent(this)); --> getApplicationEventMulticaster#multicastEvent(applicationEvent, eventType);,通过 multicastEvent 发送事件
那么和我们自定义的事件发布有什么区别?通过查看源码可知由于我们传入的是字符串,所以会被自动包装为事件 PayloadApplicationEvent:
context.publishEvent("hello,world"); -->
protected void publishEvent(Object event, @Nullable ResolvableType eventType) {
		Assert.notNull(event, "Event must not be null");

		// Decorate event as an ApplicationEvent if necessary
		ApplicationEvent applicationEvent;
		if (event instanceof ApplicationEvent) {
			applicationEvent = (ApplicationEvent) event;
		}
		else {
			applicationEvent = new PayloadApplicationEvent<>(this, event);
			if (eventType == null) {
				eventType = ((PayloadApplicationEvent<?>) applicationEvent).getResolvableType();
			}
		}
    // ...
}
由源码代码可知,如果我们想换成其他自定义事件,可以这么做:
import org.springframework.boot.autoconfigure.SpringBootApplication;
import org.springframework.context.ApplicationListener;
import org.springframework.context.event.ContextClosedEvent;
import org.springframework.context.support.GenericApplicationContext;

/**
 * @author Lin = ̄ω ̄=
 * @date 2021/5/10
 */
@SpringBootApplication
public class Application {

	public static void main(String[] args) {
        GenericApplicationContext context = new GenericApplicationContext();
        // 添加事件监听
		context.addApplicationListener(event -> {
			System.err.println(event.getClass().getSimpleName());
		});
		// 启动 Spring 应用上下文
		context.refresh();
		// context.publishEvent("hello,world");
        context.publishEvent(new MyEvent("hello,world"));

		// ContextClosedEvent
		context.close();
	}

}

private static class MyEvent extends ApplicationEvent {

    public MyEvent(Object source) {
        super(source);
    }
}
输出:
ContextRefreshedEvent
MyEvent
ContextClosedEvent
广播事件 multicaster
import org.springframework.boot.autoconfigure.SpringBootApplication;
import org.springframework.context.ApplicationListener;
import org.springframework.context.event.ContextClosedEvent;
import org.springframework.context.support.GenericApplicationContext;

/**
 * @author Lin = ̄ω ̄=
 * @date 2021/5/10
 */
@SpringBootApplication
public class Application {

	public static void main(String[] args) {
        ApplicationEventMulticaster multicaster = new SimpleApplicationEventMulticaster();
		multicaster.addApplicationListener(event -> {
			System.out.println("加收到的事件:" + event);
		});
		multicaster.multicastEvent(new PayloadApplicationEvent<Object>("", "hello,world"));
	}

}
输出:
加收到的事件:org.springframework.context.PayloadApplicationEvent[source=]
查看 Spring Boot 的事件监听
Spring Boot "/META-INF/spring.factories" (Spring SPI)
org.springframework.context.ApplicationListener=\
org.springframework.boot.ClearCachesApplicationListener,\
org.springframework.boot.builder.ParentContextCloserApplicationListener,\
org.springframework.boot.context.FileEncodingApplicationListener,\
org.springframework.boot.context.config.AnsiOutputApplicationListener,\
org.springframework.boot.context.config.ConfigFileApplicationListener,\
org.springframework.boot.context.config.DelegatingApplicationListener,\
org.springframework.boot.liquibase.LiquibaseServiceLocatorApplicationListener,\
org.springframework.boot.logging.ClasspathLoggingApplicationListener,\
org.springframework.boot.logging.LoggingApplicationListener
事件的作用
ConfigFileApplicationListener
例如 ConfigFileApplicationListener 通过监听 ApplicationEnvironmentPreparedEvent 事件,从而加载 application.properties 或 application.yml 配置文件
这个称为 Spring Boot 的事件驱动模型
另外,Spring Boot 的事件都是源于 Spring 事件,通过继承 SpringApplicationEvent 等 Spring 事件接口实现功能
Spring Cloud 的事件/监听
Spring Cloud "/META-INF/spring.factories"
# Application Listeners
org.springframework.context.ApplicationListener=\
org.springframework.cloud.bootstrap.BootstrapApplicationListener,\
org.springframework.cloud.bootstrap.LoggingSystemShutdownListener,\
org.springframework.cloud.context.restart.RestartListener
BootstrapApplicationListener
因为 Spring Cloud 的 BootstrapApplicationListener 的优先级高于 Spring Boot 的 ConfigFileApplicationListener ,所以 application.properties 文件即使定义也配置不到
原因是 BootstrapApplicationListener 的优先级是 6,ConfigFileApplicationListener 优先级是 11:
public class BootstrapApplicationListener
		implements ApplicationListener<ApplicationEnvironmentPreparedEvent>, Ordered {

	/**
	 * Property source name for bootstrap.
	 */
	public static final String BOOTSTRAP_PROPERTY_SOURCE_NAME = "bootstrap";

	/**
	 * The default order for this listener.
	 */
	public static final int DEFAULT_ORDER = Ordered.HIGHEST_PRECEDENCE + 5;

    // ...
}
public class ConfigFileApplicationListener implements EnvironmentPostProcessor, SmartApplicationListener, Ordered {
	private static final String DEFAULT_NAMES = "application";

    /**
	 * The default order for the processor.
	 */
	public static final int DEFAULT_ORDER = Ordered.HIGHEST_PRECEDENCE + 10;
}
