Zabbix监控平台(三)生产环境案例
一,Zabbix生产环境监测案例概述
1.1 项目规划
-
主机分组
- 交换机
- Nginx
- Tomcat
- MySQL
- Apache
- PHP-fpm
- redis(也有状态页,自己研究)
- memcache(也有状态页,自己研究)
-
监控对象识别:
- 使用SNMP监控交换(监控交换机或路由器)
- 使用IPMI监控服务器硬件
- 使用Agent监控服务器(监控操作系统和软件服务)
- 使用JMX监控JAVA(监控tomcat等java服务)
- 监控MySQL
- 监控Web状态
- 监控Nginx状态
- 监控Apache状态
- 监控Tomcat状态
1.2 SNMP监控流程(监控交换机或路由器)
- 交换机上开启snmp
- 在zabbix上添加监控(设置SNMP interfaces)
- 关联监控模版
1.3 IPMI(监控服务器硬件)
建议使用自定义item监控服务器硬件,在本地执行ipmitool命令来获取数据(虚拟机上没有远程控制卡,所以无法测试)
可以在本地执行ipmitool命令获取数据(命令需要安装)
1.4 JMX(使用Zabbix Java Gateway代理)
用来获取java数据,本次的实战内容
1.5 实战监控Nginx,Apache,MySQL,PHP-fpm
今天的实战内容,注意总结过程
1.6 Zabbix的Web监测
今天的实战内容,注意总结过程
所有zabbix模板包和源码包
链接:https://pan.baidu.com/s/1aezlSsXlfn5A-_CJnTUUhw
提取码:ndhs ---模板包链接:https://pan.baidu.com/s/1YwwtmnWATM9DxAQmZCDG4Q
提取码:0nmk ---源码包
二,Zabbix监控MySQL数据库操作实战
我们需要部署一个MySQL服务和一个zabbix-agentd客户端
2.1 编写监控mysql脚本
在nginx服务器(192.168.200.69)上安装一个MySQL
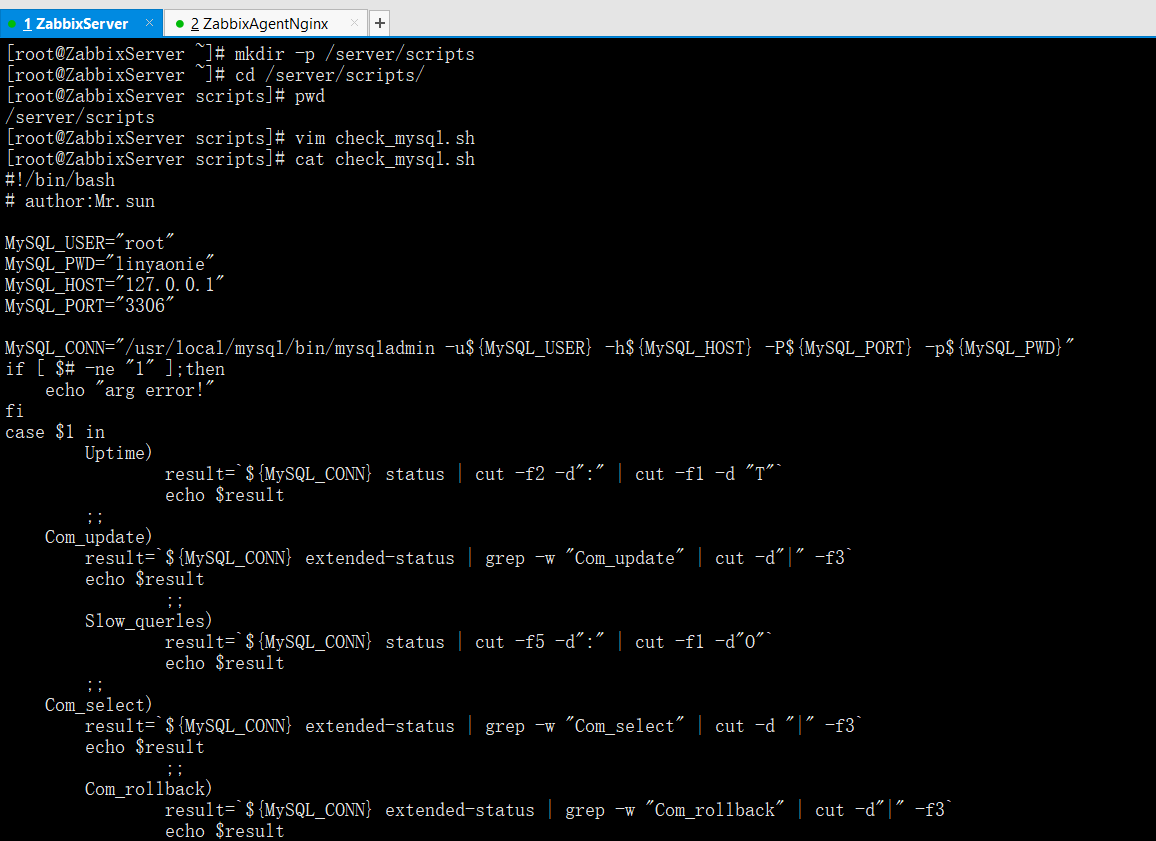
下面是监控mysql状态的一个shell脚本,内容如下:mkdir -p /server/scripts
cd /server/scripts
vim check_mysql.sh
cat check_mysql.sh
#!/bin/bash# author:Mr.sunMySQL_USER="root"MySQL_PWD="linyaonie"MySQL_HOST="127.0.0.1"MySQL_PORT="3306"MySQL_CONN="/usr/local/mysql/bin/mysqladmin -u${MySQL_USER} -h${MySQL_HOST} -P${MySQL_PORT} -p${MySQL_PWD}"if [ $# -ne "1" ];thenecho "arg error!"ficase $1 inUptime)result=`${MySQL_CONN} status | cut -f2 -d":" | cut -f1 -d "T"`echo $result;;Com_update)result=`${MySQL_CONN} extended-status | grep -w "Com_update" | cut -d"|" -f3`echo $result;;Slow_querles)result=`${MySQL_CONN} status | cut -f5 -d":" | cut -f1 -d"O"`echo $result;;Com_select)result=`${MySQL_CONN} extended-status | grep -w "Com_select" | cut -d "|" -f3`echo $result;;Com_rollback)result=`${MySQL_CONN} extended-status | grep -w "Com_rollback" | cut -d"|" -f3`echo $result;;Questions)result=`${MySQL_CONN} status | cut -f4 -d":" | cut -f1 -d"S"`echo $result;;Com_insert)result=`${MySQL_CONN} extended-status | grep -w "Com_insert" | cut -d"|" -f3`echo $result;;Com_delete)result=`${MySQL_CONN} extended-status | grep -w "Com_delete" | cut -d"|" -f3`echo $result;;Com_commit)result=`${MySQL_CONN} extended-status | grep -w "Com_commit" | cut -d"|" -f3`echo $result;;Bytes_sent)result=`${MySQL_CONN} extended-status | grep -w "Bytes_sent" | cut -d"|" -f3`echo $result;;Bytes_received)result=`${MySQL_CONN} extended-status | grep -w "Bytes_received" | cut -d"|" -f3`echo $result;;Com_begin)result=`${MySQL_CONN} extended-status | grep -w "Com_begin" | cut -d"|" -f3`echo $result;;*)echo "Usage:$0(Uptime|Com_update|Slow_querles|Com_rollback|Questions|Com_insert|Com_delete|Com_commit|Bytes_sent|Bytes_received|Com_begin)";;esac
2.2在zabbix-agent端创建自定义键值配置文件
创建mysql.status的键值
chmod +x check_mysql.sh
chown zabbix.zabbix check_mysql.sh
cd /etc/zabbix/zabbix_agentd.d/
vim mysql_status.conf
cat mysql_status.conf
UserParameter=mysql.status[*],/server/scripts/check_mysql.sh $1

删除旧键值模版
rm -rf userparameter_mysql.conf

创建mysql.ping和mysql.version的键值
vim mysql_status.conf
cat mysql_status.conf
UserParameter=mysql.status[*],/server/scripts/check_mysql.sh $1UserParameter=mysql.ping,/usr/bin/mysqladmin -uroot -plinyaonie ping | grep -c aliveUserParameter=mysql.version,/usr/bin/mysql -V


重启zabbix-agentd服务
/etc/init.d/zabbix-agent restart

2.3 在zabbix-server端测试键值
zabbix_get -s 192.168.200.69 -p 10050 -k "mysql.status[Uptime]"
zabbix_get -s 192.168.200.69 -p 10050 -k "mysql.status[Com_commit]"
zabbix_get -s 192.168.200.69 -p 10050 -k "mysql.status[Bytes_sent]"
zabbix_get -s 192.168.200.69 -p 10050 -k "mysql.status[Bytes_received]"
zabbix_get -s 192.168.200.69 -p 10050 -k "mysql.ping"
zabbix_get -s 192.168.200.69 -p 10050 -k "mysql.version"

2.4 在zabbix-server端Web前台引入zabbix监控MySQL的模版
zabbix自带监控MySQL的模版,我们只需要将模版引入到主机即可
配置-->主机-->选择主机-->模板,然后将MySQL模版连接到此主机即可


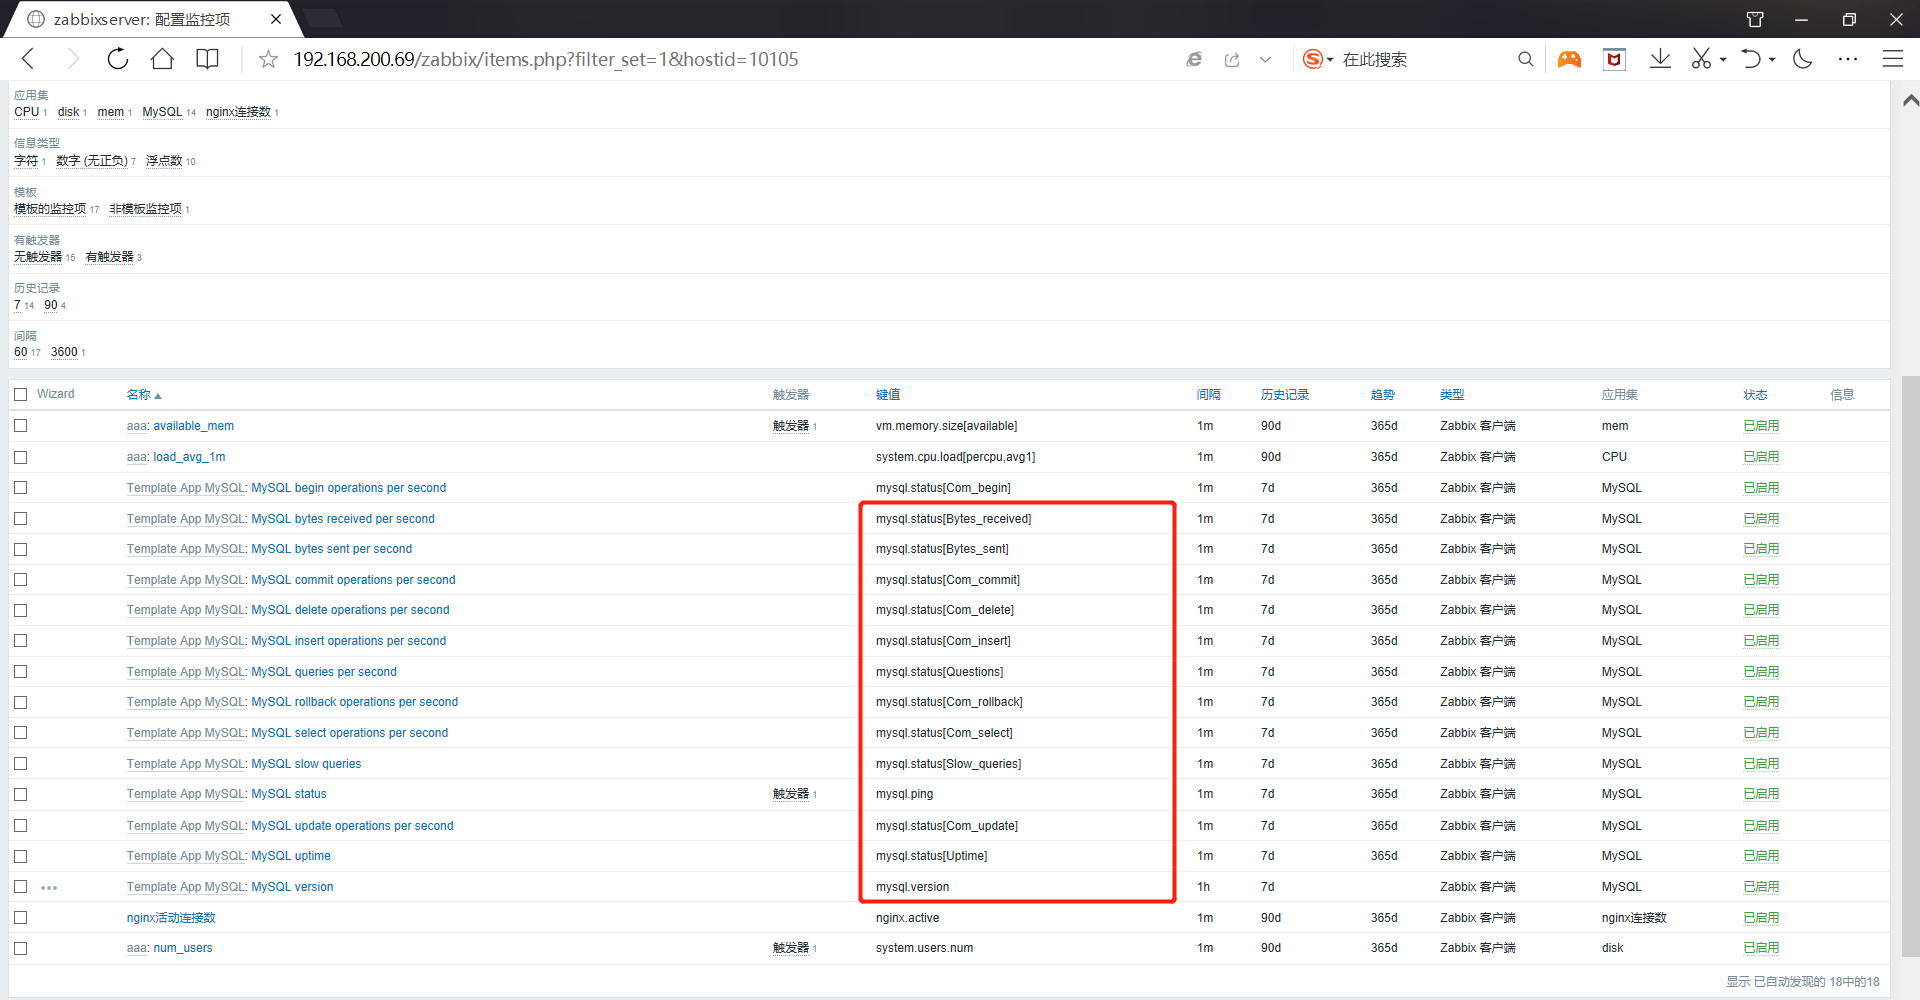
从图中可以发现模版里的键值都是我们之前已经定义好了的键值
三,Zabbix监控Apache、Nginx操作实战
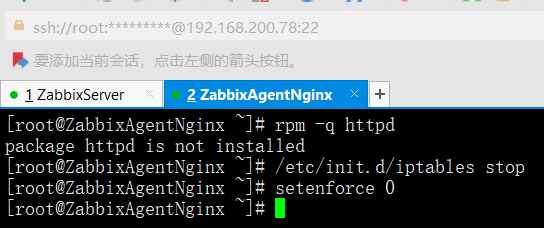
为了避免冲突,若系统中已经安装httpd服务,务必删除
rpm -q httpd
/etc/init.d/iptables stop
setenforce 0
源码构建apache
tar xf httpd-2.2.17.tar.gz -C /usr/src/
cd /usr/src/httpd-2.2.17/
./configure --prefix=/usr/local/httpd --enable-so --enable-rewrite --enable-charset-lite --enable-cgi && make && make install
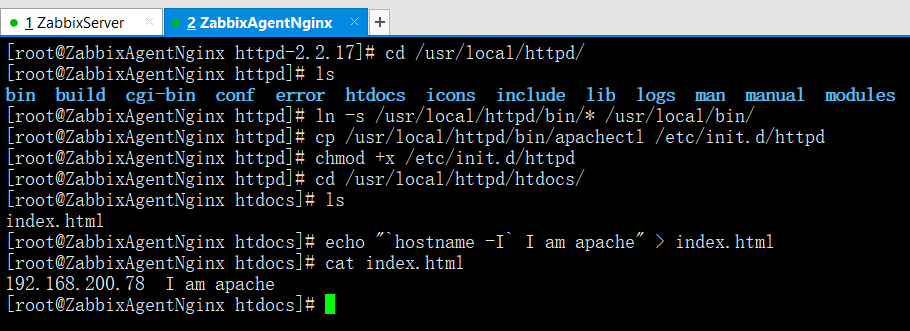
cd /usr/local/httpd/
ls
ln -s /usr/local/httpd/bin/* /usr/local/bin/
cp /usr/local/httpd/bin/apachectl /etc/init.d/httpd
chmod +x /etc/init.d/httpd
cd /usr/local/httpd/htdocs/
echo "`hostname -I` I am apache" > index.htmlcat index.html
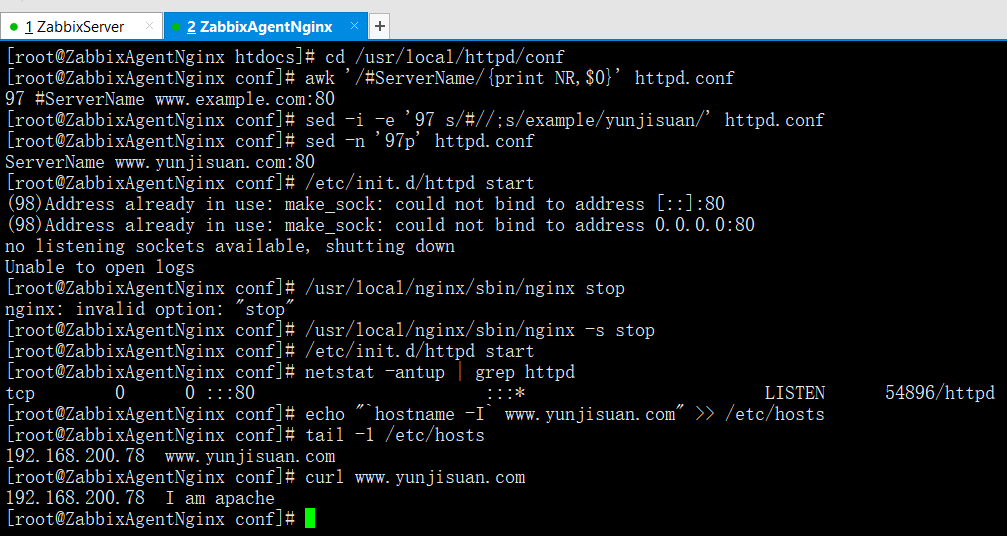
cd /usr/local/httpd/conf
awk '/#ServerName/{print NR,$0}' httpd.conf
sed -i -e '97 s/#//;s/example/yunjisuan/' httpd.conf
sed -n '97p' httpd.conf
/etc/init.d/httpd start
netstat -antup | grep httpd
echo "`hostname -I` www.yunjisuan.com" >> /etc/hoststail -1 /etc/hosts
curl www.yunjisuan.com

3.1.2 开启apache状态页
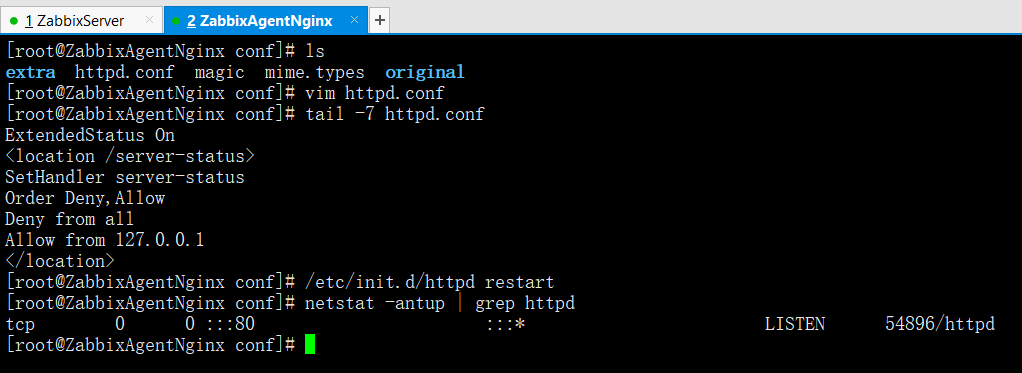
要打开apache的ServerStatus页面,需要在httpd.conf文件最下边加入代码段
ExtendedStatus On<location /server-status>SetHandler server-statusOrder Deny,AllowDeny from allAllow from 127.0.0.1</location>
最后,重启动apache即可
3.1.3 下载apache zabbix模版并解压
从如下地址下载apache zabbix模版(上边有下载链接)
解压zip格式压缩文件
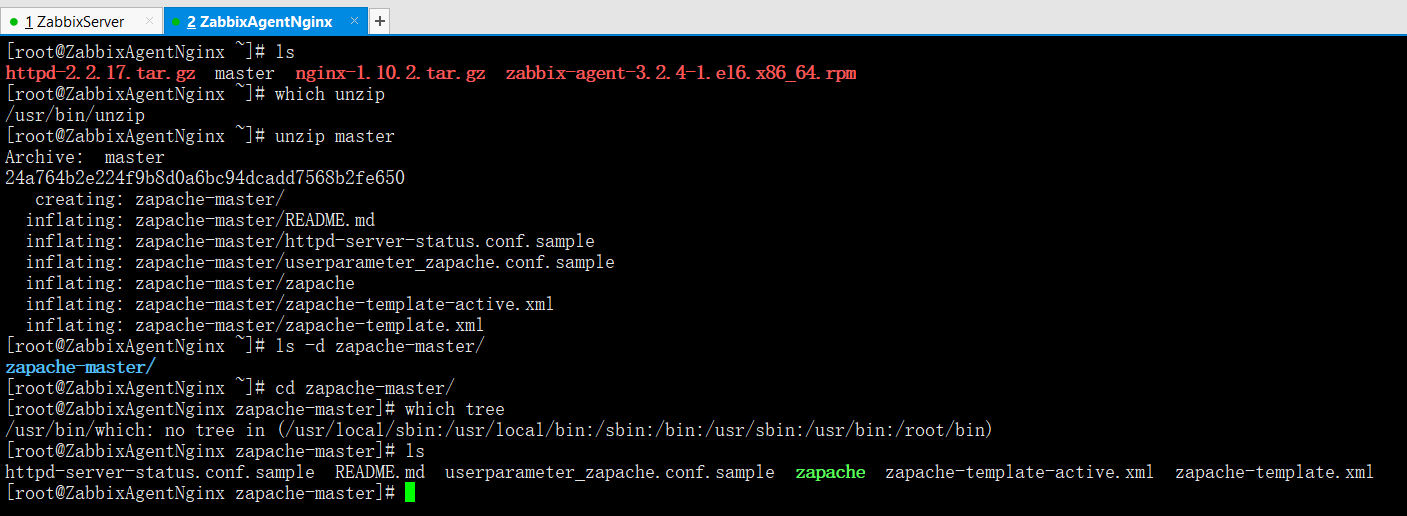
unzip master
ls -d zapache-master
cd zapache-master/
ls
此模版文件中包含了监控apache的脚本文件,zabbix的apache模版文件,还有客户端zabbix自定义传key文件。
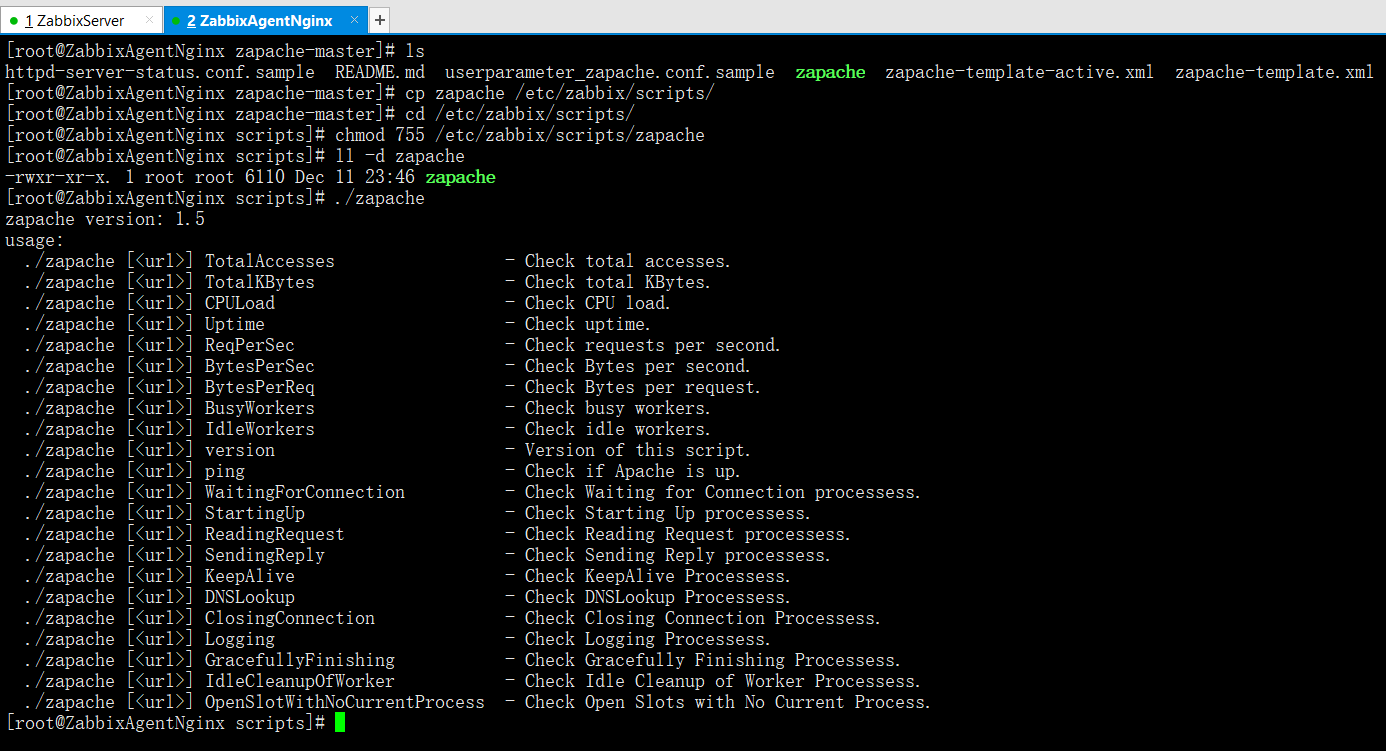
首先将zapache放到需要监控的apache服务器上的/etc/zabbix/scripts目录下,如果没有scripts目录,自行创建一个即可。然后执行授权:
cp zapache /etc/zabbix/scripts/
cd /etc/zabbix/scripts/
chmod 755 /etc/zabbix/scripts/zapache
./zapache
zapache version: 1.5usage:./zapache [<url>] TotalAccesses - Check total accesses../zapache [<url>] TotalKBytes - Check total KBytes../zapache [<url>] CPULoad - Check CPU load../zapache [<url>] Uptime - Check uptime../zapache [<url>] ReqPerSec - Check requests per second../zapache [<url>] BytesPerSec - Check Bytes per second../zapache [<url>] BytesPerReq - Check Bytes per request../zapache [<url>] BusyWorkers - Check busy workers../zapache [<url>] IdleWorkers - Check idle workers../zapache [<url>] version - Version of this script../zapache [<url>] ping - Check if Apache is up../zapache [<url>] WaitingForConnection - Check Waiting for Connection processess../zapache [<url>] StartingUp - Check Starting Up processess../zapache [<url>] ReadingRequest - Check Reading Request processess../zapache [<url>] SendingReply - Check Sending Reply processess../zapache [<url>] KeepAlive - Check KeepAlive Processess../zapache [<url>] DNSLookup - Check DNSLookup Processess../zapache [<url>] ClosingConnection - Check Closing Connection Processess../zapache [<url>] Logging - Check Logging Processess../zapache [<url>] GracefullyFinishing - Check Gracefully Finishing Processess../zapache [<url>] IdleCleanupOfWorker - Check Idle Cleanup of Worker Processess../zapache [<url>] OpenSlotWithNoCurrentProcess - Check Open Slots with No Current Process.
接着将userparameter_zapache.conf.sample文件放到/etc/zabbix/zabbix_agentd.d目录下,并重命名为userparameter_zapache.conf文件,然后修改键值命令的路径。
最后,重启zabbix-agent服务
cd /root/zapache-master/
cp userparameter_zapache.conf.sample /etc/zabbix/zabbix_agentd.d/userparameter_zapache.conf
cd /etc/zabbix/zabbix_agentd.d/
vim userparameter_zapache.conf
tail -1 userparameter_zapache.conf
UserParameter=zapache[*],/etc/zabbix/scripts/zapache \$1 #本行要修改
/etc/init.d/zabbix-agent restart

3.1.4 测试键值
在zabbix-agent端查看脚本用法
cd /etc/zabbix/scripts/
./zapache
zapache version: 1.5usage:./zapache [<url>] TotalAccesses - Check total accesses../zapache [<url>] TotalKBytes - Check total KBytes../zapache [<url>] CPULoad - Check CPU load../zapache [<url>] Uptime - Check uptime../zapache [<url>] ReqPerSec - Check requests per second../zapache [<url>] BytesPerSec - Check Bytes per second../zapache [<url>] BytesPerReq - Check Bytes per request../zapache [<url>] BusyWorkers - Check busy workers../zapache [<url>] IdleWorkers - Check idle workers../zapache [<url>] version - Version of this script../zapache [<url>] ping - Check if Apache is up../zapache [<url>] WaitingForConnection - Check Waiting for Connection processess../zapache [<url>] StartingUp - Check Starting Up processess../zapache [<url>] ReadingRequest - Check Reading Request processess../zapache [<url>] SendingReply - Check Sending Reply processess../zapache [<url>] KeepAlive - Check KeepAlive Processess../zapache [<url>] DNSLookup - Check DNSLookup Processess../zapache [<url>] ClosingConnection - Check Closing Connection Processess../zapache [<url>] Logging - Check Logging Processess../zapache [<url>] GracefullyFinishing - Check Gracefully Finishing Processess../zapache [<url>] IdleCleanupOfWorker - Check Idle Cleanup of Worker Processess../zapache [<url>] OpenSlotWithNoCurrentProcess - Check Open Slots with No Current Process.
我们发现脚本需要传递两个参数,即url和选项,然后我们在zabbix-server端进行键值测试
zabbix_get -s 192.168.200.78 -p 10050 -k "zapache[127.0.0.1 TotalAccesses]"
zabbix_get -s 192.168.200.78 -p 10050 -k "zapache[www.yunjisuan.com version]"
zabbix_get -s 192.168.200.78 -p 10050 -k "zapache[www.yunjisuan.com ping]"

3.1.5 在zabbix-server的Web页面上监控apache
(1)创建一个监控apache的主机

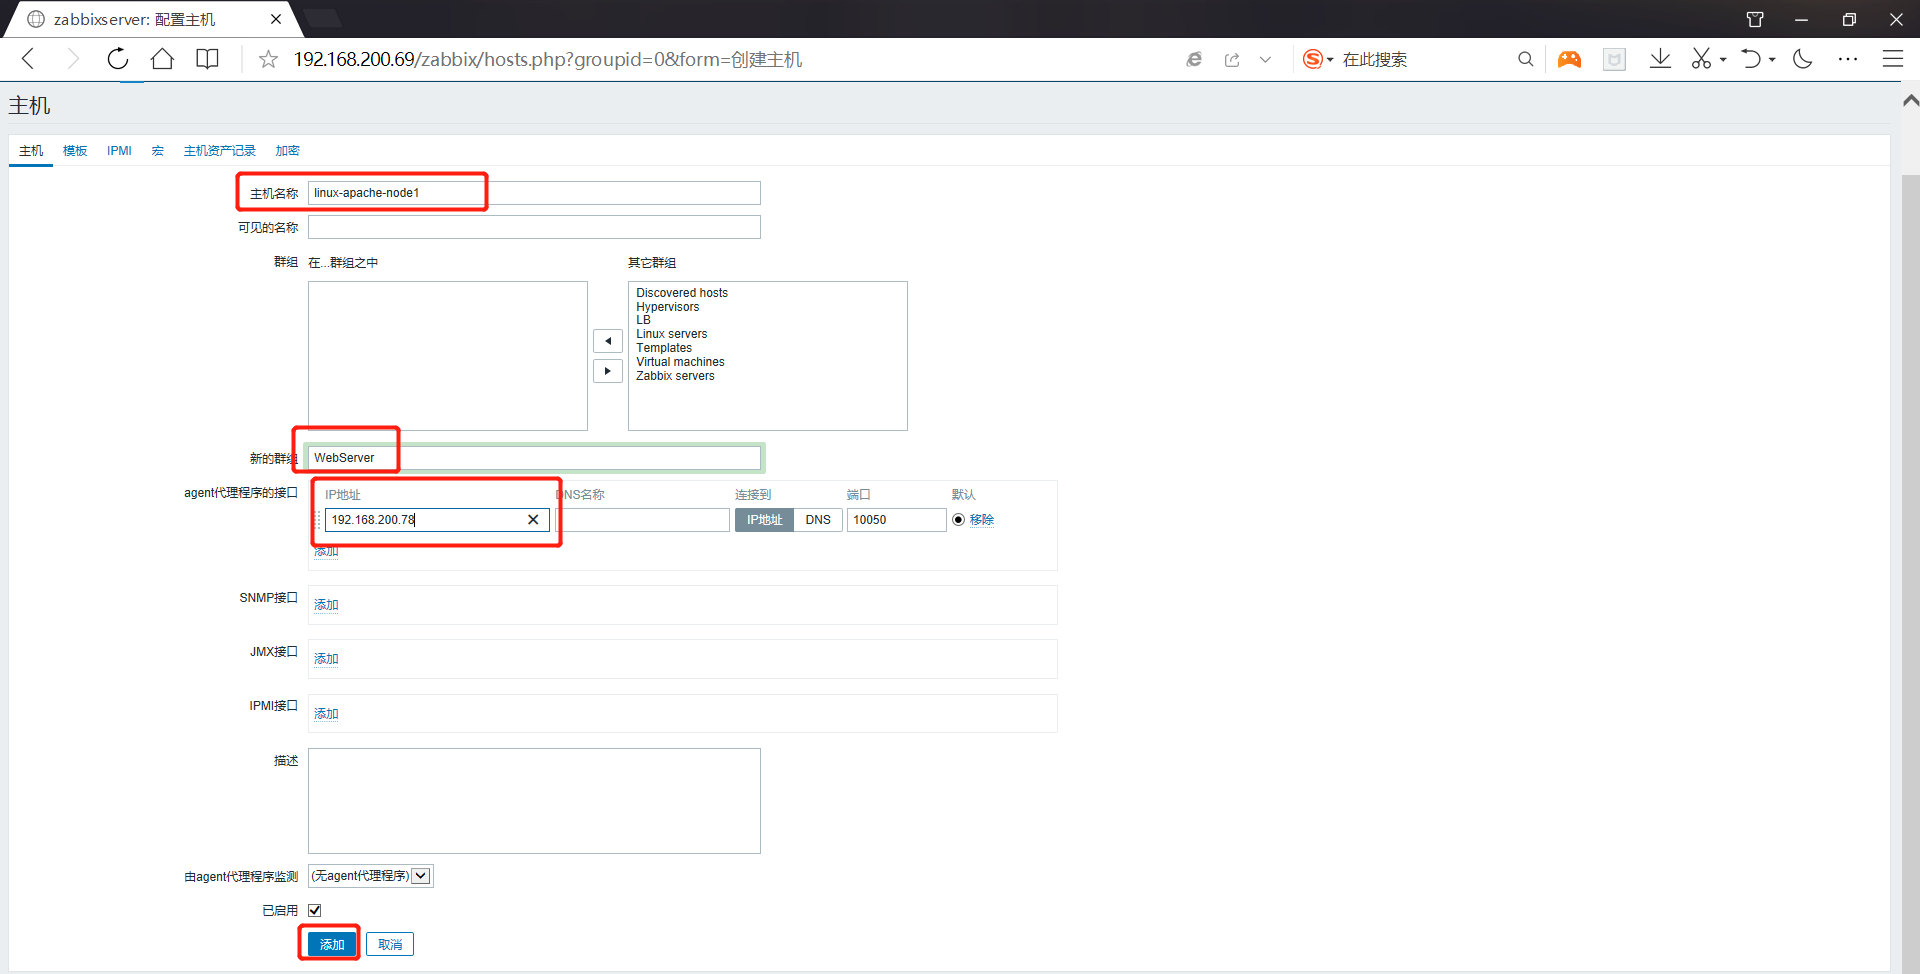
(2)导入apache监控项的模版(上边有模板下载链接)
zabbix默认并没有监控apache的监控项模版。我们需要将它导入到apache中。在之前解压出来的目录中,有待导入的web模版
[root@apache ~]# tree zapache-master/zapache-master/├── httpd-server-status.conf.sample├── README.md├── zapache-template-active.xml #Web模版└── zapache-template.xml #Web模版0 directories, 4 files
我们将这两个.xml后缀的拷贝到windows上,然后从Web界面导入进去


导入以后Web端就有监控apache的监控项模版了
(3)将模版链接到apache主机


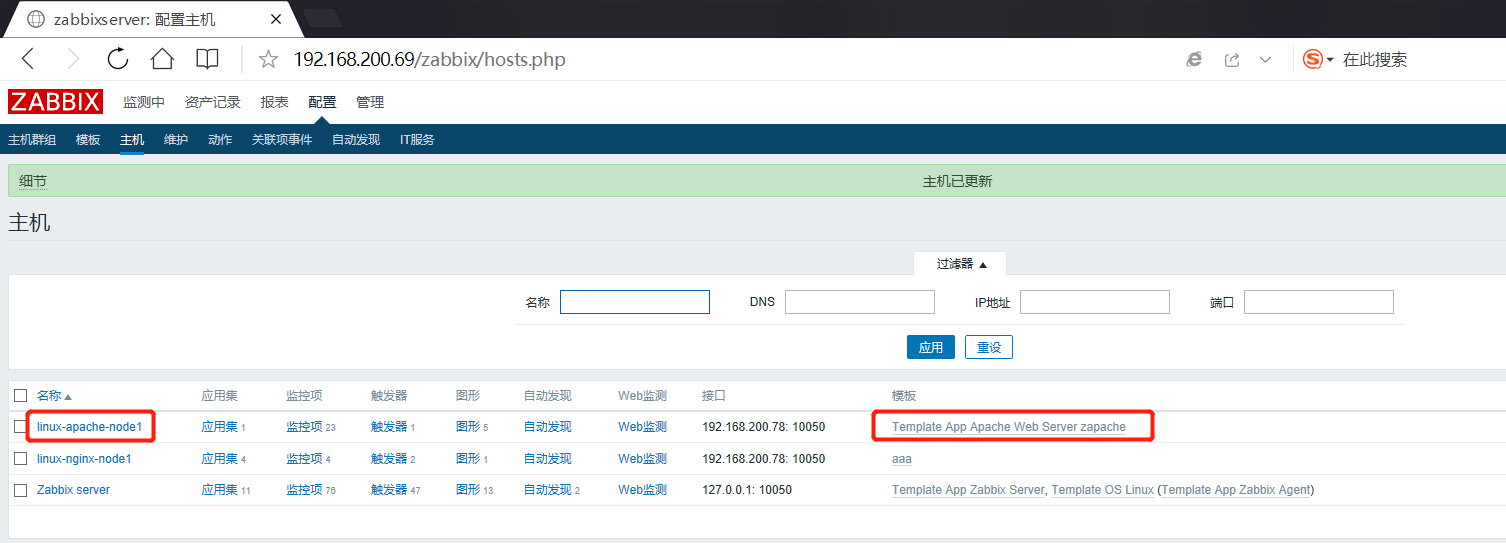
3.2 实战监控nginx
3.2.1 开启nginx状态页
vim /usr/local/nginx/conf/nginx.conf
/usr/local/nginx/sbin/nginx -t
/usr/local/nginx/sbin/nginx
#在nginx的配置文件中,添加status配置location = /nginx-status {stub_status on;access_log off;allow 127.0.0.1;allow 192.168.200.78; #zabbix服务器地址一般是内网地址deny all;}

3.2.2 访问设置好的nginx-status链接
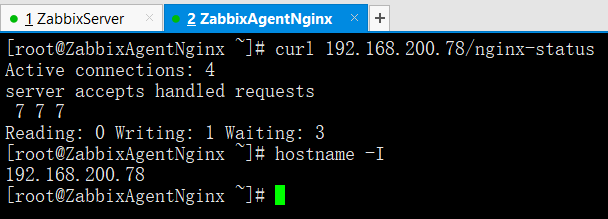
curl 192.168.200.78/nginx-status
nginx status详细说明如下:Active connections:对后端发起的活动连接数;accepts:nginx总共处理了多少个连接;handled:nginx成功创建了几次握手;requests:nginx总共处理了多少请求。Reading:nginx读取客户端的header数;Writing:nginx返回给客户端的header数;Waiting:nginx请求处理完成,正在等待下一请求指令的连接
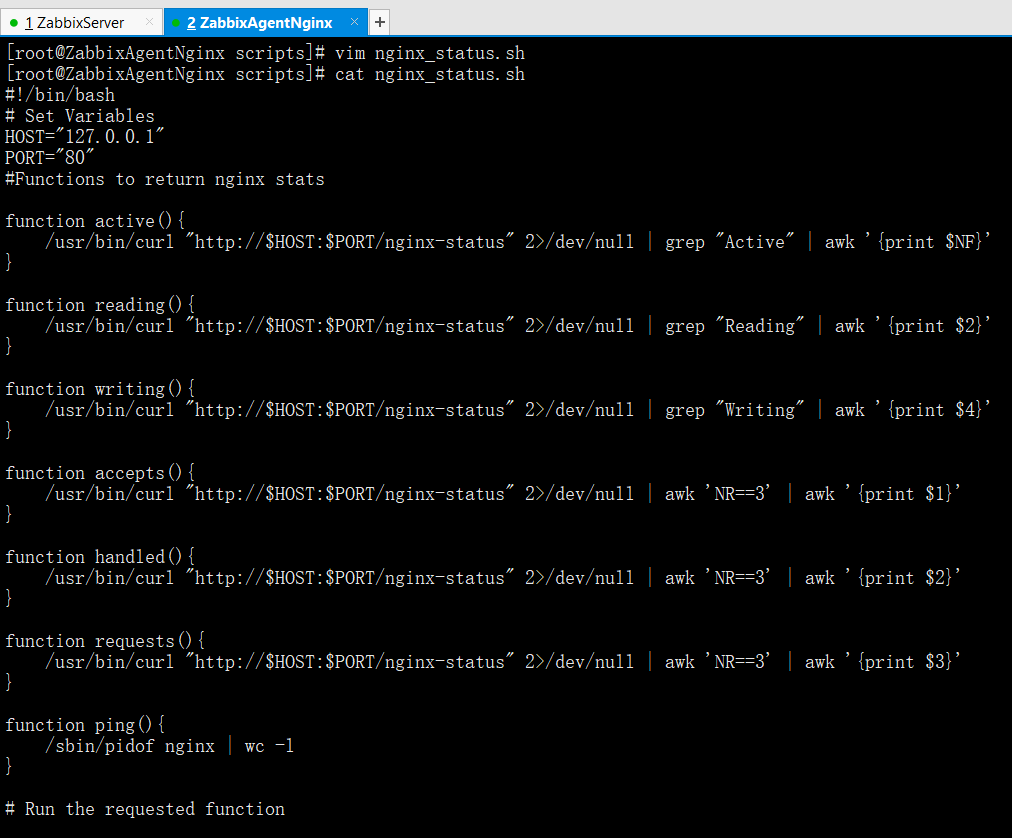
3.2.3 编写nginx状态监控脚本
vim nginx_status.sh
cat nginx_status.sh
#!/bin/bash# Set VariablesHOST="127.0.0.1"PORT="80"#Functions to return nginx statsfunction active(){/usr/bin/curl "http://$HOST:$PORT/nginx-status" 2>/dev/null | grep "Active" | awk '{print $NF}'}function reading(){/usr/bin/curl "http://$HOST:$PORT/nginx-status" 2>/dev/null | grep "Reading" | awk '{print $2}'}function writing(){/usr/bin/curl "http://$HOST:$PORT/nginx-status" 2>/dev/null | grep "Writing" | awk '{print $4}'}function accepts(){/usr/bin/curl "http://$HOST:$PORT/nginx-status" 2>/dev/null | awk 'NR==3' | awk '{print $1}'}function handled(){/usr/bin/curl "http://$HOST:$PORT/nginx-status" 2>/dev/null | awk 'NR==3' | awk '{print $2}'}function requests(){/usr/bin/curl "http://$HOST:$PORT/nginx-status" 2>/dev/null | awk 'NR==3' | awk '{print $3}'}function ping(){/sbin/pidof nginx | wc -l}# Run the requested function$1
3.2.4 给脚本可执行权限并且授权
chmod +x nginx_status.sh
chown zabbix.zabbix nginx_status.sh

3.2.5 在zabbix-agent端配置nginx键值配置文件并重启agent客户端
cd /etc/zabbix/zabbix_agentd.d
vim nginx.conf
cat nginx.conf
UserParameter=nginx.active,/usr/bin/curl -s "http://127.0.0.1:80/nginx-status" | grep "Active" | awk '{print $NF}'UserParameter=nginx.status[*],/etc/zabbix/scripts/nginx_status.sh $1
/etc/init.d/zabbix-agent restart

3.2.6 在zabbix-server端测试键值
zabbix_get -s 192.168.200.78 -k "nginx.status[reading]" -p 10050
zabbix_get -s 192.168.200.78 -k "nginx.status[active]" -p 10050
zabbix_get -s 192.168.200.78 -k "nginx.status[reading]" -p 10050
zabbix_get -s 192.168.200.78 -k "nginx.status[writing]" -p 10050
zabbix_get -s 192.168.200.78 -k "nginx.status[ping]" -p 10050

3.2.7 接下来我们需要在Web端导入nginx监控模版(上文有模板下载链接)


3.2.8 异常调试
如果Zabbix图形界面一直没有获取到数据,可以通过在zabbix server上执行zabbix_get手动测试:
/usr/local/zabbix/bin/zabbix_get -s 192.168.200.78 -p 10050 -k "nginx.status[active]"
如果获取数据有问题,会给出相应提示,如果能够获取到数据,那就没问题了。
四,Zabbix监控Tomcat操作实战
zabbix监控tomcat,需要zabbix_server开启java poller,zabbix_java开启javaGateway,端口10052,Tomcat JMX开启12345端口,提供性能数据。
数据获取流程为:java poller<-->javaGateway:10052<-->Tomcat:12345
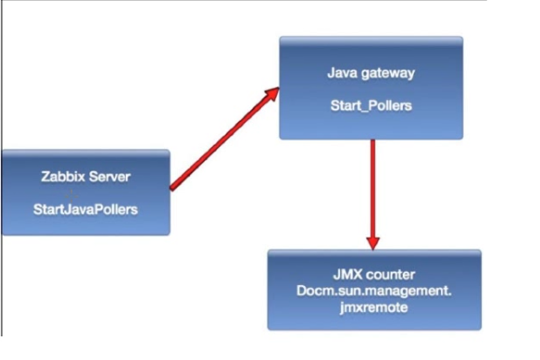
4.1 配置Tomcat JMX(安装Tomcat步骤省略)
配置jmx,在需要监控的tomcat服务器上,编辑catalina.sh,加入如下配置
vim /usr/local/tomcat/bin/catalina.sh
sed -n '249p' /usr/local/tomcat/bin/catalina.sh
CATALINA_OPTS="-server -Xms256m -Xmx512m -XX:PermSize=64M -XX:MaxPermSize=128m -Dcom.sun.management.jmxremote -Dcom.sun.management.jmxremote.authenticate=false -Dcom.sun.management.jmxremote.ssl=false -Djava.rmi.server.hostname=192.168.200.78 -Dcom.sun.management.jmxremote.port=12345"
这里需要注意,必须增加-Djava.rmi.server.hostname选项,并且后面的IP就是tomcat服务器的IP

4.2 重启Tomcat
/usr/local/tomcat/bin/shutdown.sh
/usr/local/tomcat/bin/startup.sh
netstat -antup | grep java
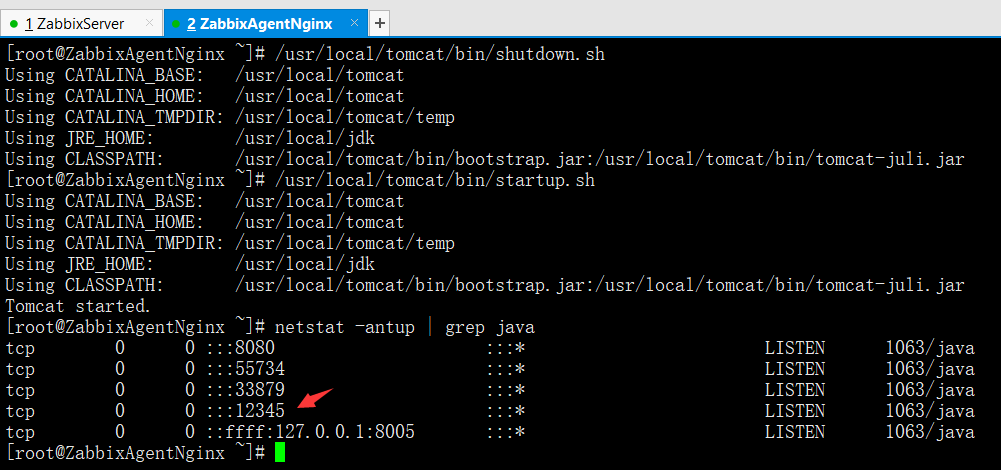
4.3 编译zabbix,加入java支持(需要先安装JDK)
在zabbix server服务器上,编译安装zabbix-server,需要加上--enable-java,以支持jmx监控,如果之前的zabbix server没加此选项,那么需要重新编译安装,编译参数如下:
./configure --prefix=/usr/local/zabbix --with-mysql --with-net-snmp --with-libcurl --enable-server --enable-agent --enable-proxy --enable-java --with-libxml2
特别提示
在启用--enable-java编译zabbix之前,zabbix server服务器上需要安装JDK,并需要设置JAVA_HOME,以让系统能够识别到jdk的路径
4.3.1 在zabbix-server端安装JDK
tar xf jdk-8u60-linux-x64.tar.gz -C /usr/local/
ln -s /usr/local/jdk1.8.0_60/ /usr/local/jdk
sed -i.ori '$a export JAVA_HOME=/usr/local/jdk\nexport PATH=$JAVA_HOME/bin:$JAVA_HOME/jre/bin:$PATH\nexport CLASSPATH=.$CLASSPATH:$JAVA_HOME/lib:$JAVA_HOME/lib/tools.jar' /etc/profiletail -3 /etc/profile
source /etc/profile
which java
java -version

4.3.2 重新编译zabbix-server服务器端
重新编译zabbix-server服务器端之前
cd /usr/local/zabbix/sbin
ls

开始重新编译zabbix-server服务器端
/etc/init.d/zabbix_server stop
cd /usr/src/zabbix-3.2.4/
./configure --prefix=/usr/local/zabbix --with-mysql --with-net-snmp --with-libcurl --enable-server --enable-agent --enable-proxy --enable-java --with-libxml2 && make && make install

重新编译zabbix-server服务器端之后
cd /usr/local/zabbix/sbin/
ll
-rwxr-xr-x 1 root root 1165774 Jan 25 22:22 zabbix_agentddrwxr-xr-x 4 root root 4096 Jan 25 22:22 zabbix_java #多了一个目录-rwxr-xr-x 1 root root 3672055 Jan 25 22:22 zabbix_proxy-rwxr-xr-x 1 root root 3966037 Jan 25 22:22 zabbix_server
cd zabbix_java/
ll
drwxr-xr-x 2 root root 4096 Jan 25 22:22 bindrwxr-xr-x 2 root root 4096 Jan 25 22:22 lib-rw-r--r-- 1 root root 791 Jan 25 22:22 settings.sh #java gateway配置脚本-rwxr-xr-x 1 root root 545 Jan 25 22:22 shutdown.sh #停止java gateway服务-rwxr-xr-x 1 root root 2025 Jan 25 22:22 startup.sh #启动java gateway服务
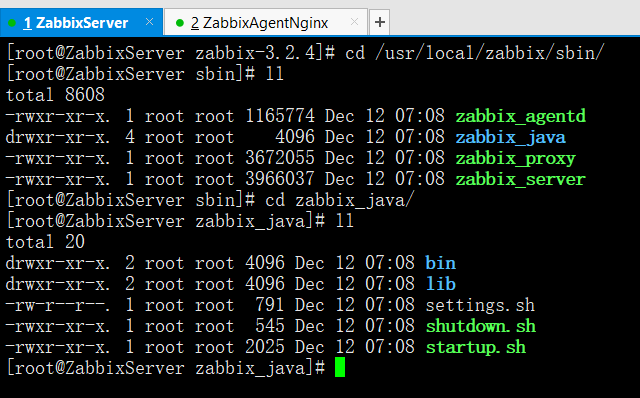
提示:
java gateway服务的配置脚本settings.sh不需要修改任何配置。
4.3.3 启动java Gateway服务
/usr/local/zabbix/sbin/zabbix_java/startup.sh
netstat -antup | grep 10052

4.4 修改zabbix server配置
默认的情况下,zabbix server未启用javaPollers,需要修改zabbix_server.conf的如下配置
修改以下配置文件的内容
cd /usr/local/zabbix/etc/
cat -n zabbix_server.conf | sed -n '215p;223p;231p'
215 # JavaGateway=223 # JavaGatewayPort=10052231 # StartJavaPollers=0

将上述配置文件内容修改成如下
vim zabbix_server.conf
cat -n zabbix_server.conf | sed -n '215p;223p;231p'
215 JavaGateway=127.0.0.1 #JavaGateway的地址223 JavaGatewayPort=10052231 StartJavaPollers=5

启动zabbix_server服务并查看已经打开的java poller进程
/etc/init.d/zabbix_server start
ps -ef | grep "java poller" | grep -v grep

4.6 Zabbix图形界面配置
4.6.1 创建一个主机利用JMX接口监控tomcat被监控端

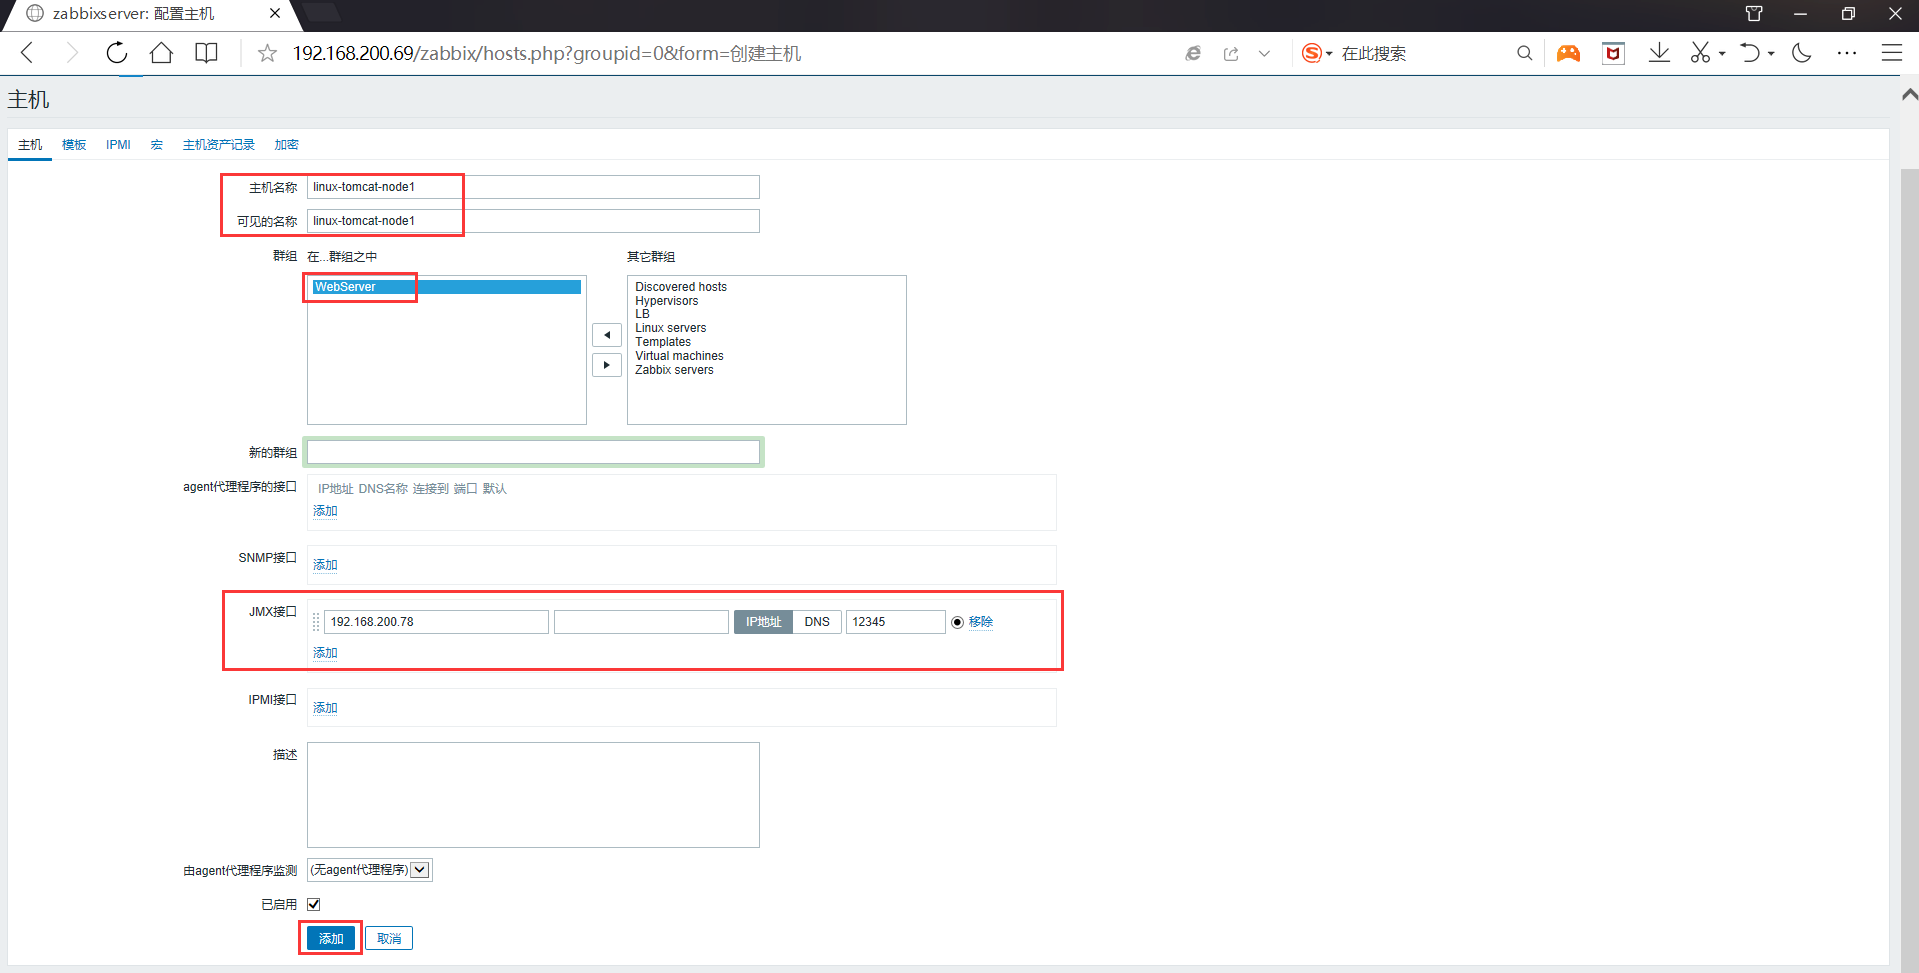
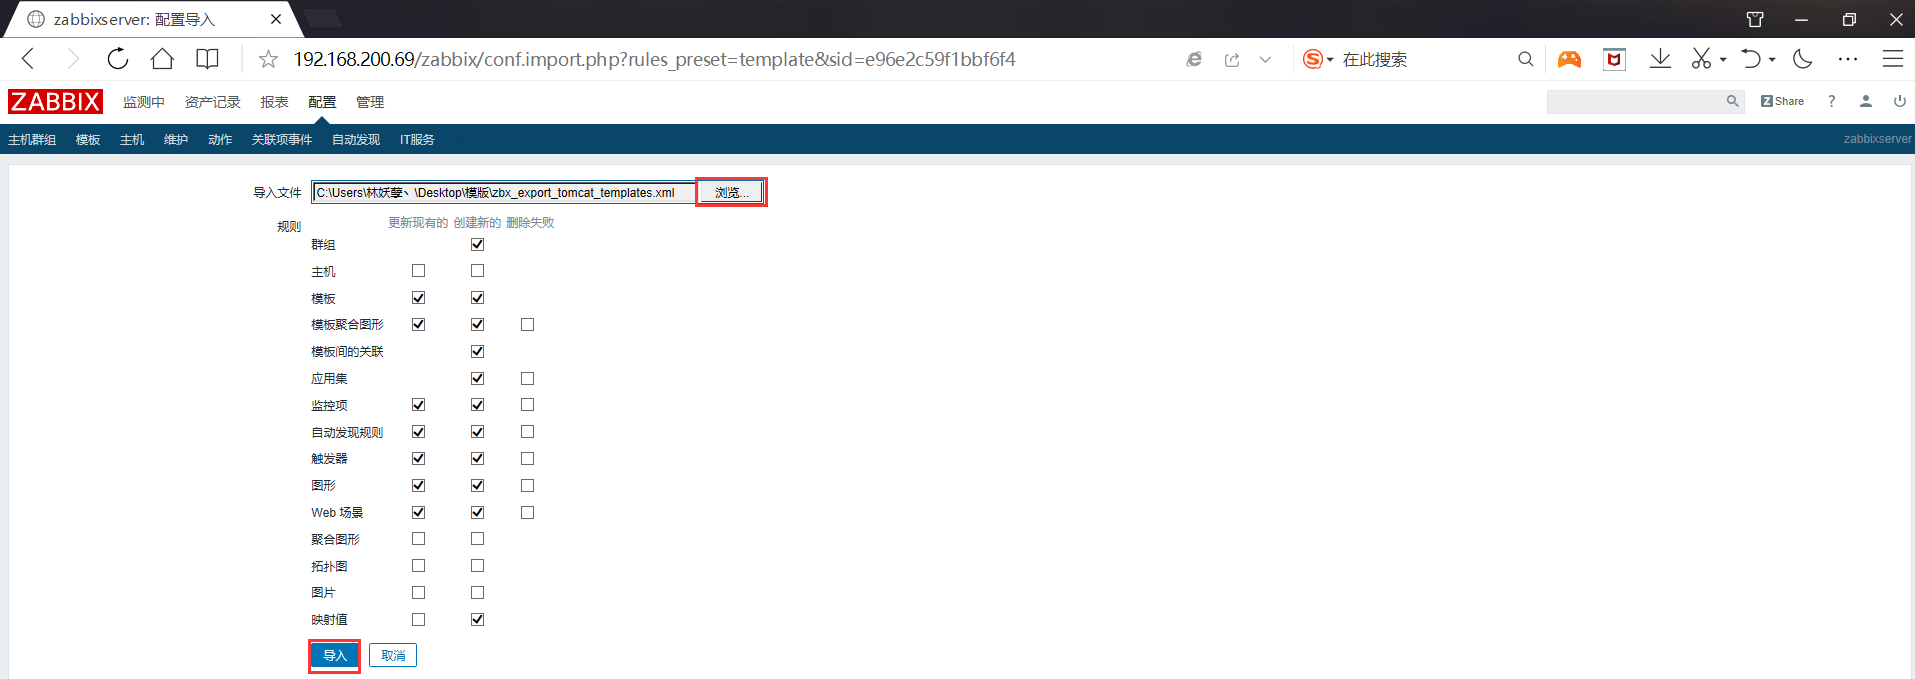
4.6.2 导入zabbix监控tomcat的模版(上边有模板下载链接)
因为Zabbix自带的Tomcat模版有兼容性问题,并不好用,因此,我们导入自己制作的监控项模版



五,Zabbix监控PHP-FPM操作实战
php-fpm和nginx一样内建了一个状态页,对于想了解php-fpm的状态以及监控php-fpm非常有帮助
5.1 启用php-fpm状态功能
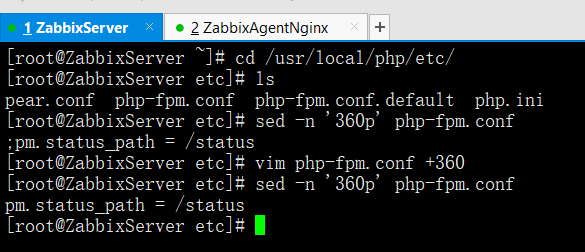
修改php-fpm配置文件,确保如下配置是打开状态
pm.status_path = /status,具体操作如下
在Zabbix-server端操作如下
cd /usr/local/php/etc
ls
sed -n '360p' php-fpm.conf
vim php-fpm.conf +360
sed -n '360p' php-fpm.conf
重启php-fpm服务
netstat -antup | grep php-fpm
pkill php-fpm
netstat -antup | grep php-fpm
/usr/local/php/sbin/php-fpm
netstat -antup | grep php-fpm

5.2 nginx配置php-fpm状态页面
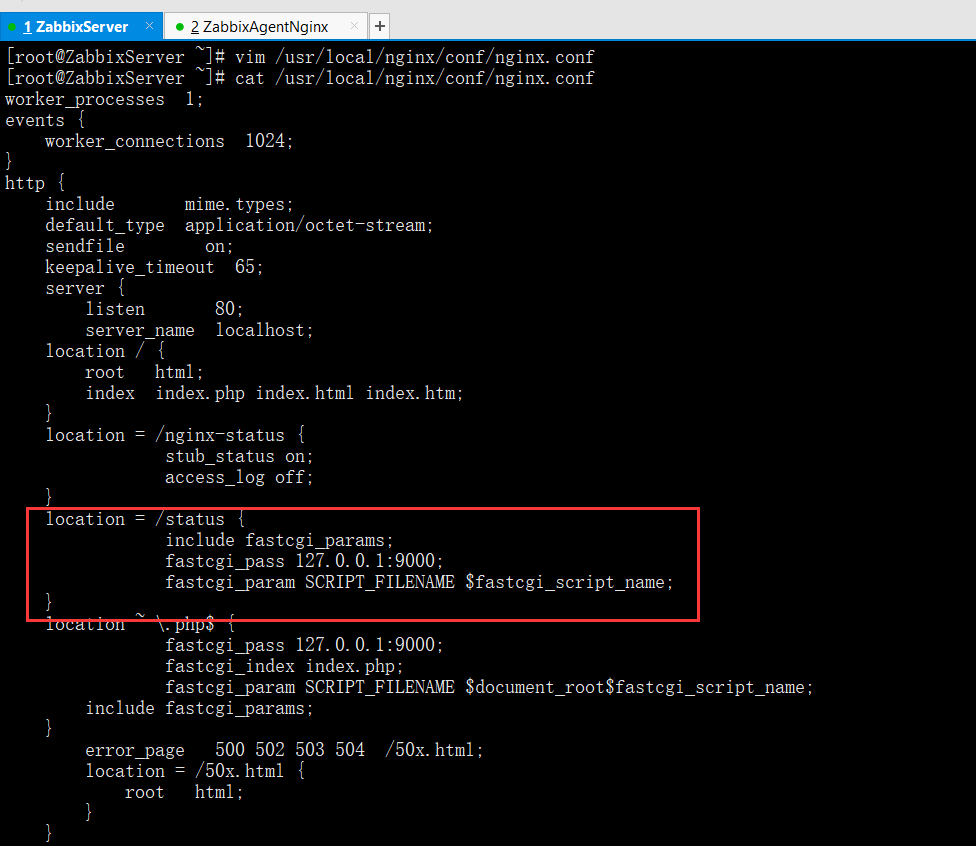
配置php-fpm状态页面
vim /usr/local/nginx/conf/nginx.conf
cat /usr/local/nginx/conf/nginx.conf
worker_processes 1;events {worker_connections 1024;}http {include mime.types;default_type application/octet-stream;sendfile on;keepalive_timeout 65;server {listen 80;server_name localhost;location / {root html;index index.php index.html index.htm;}location = /nginx-status {stub_status on;access_log off;}location = /status { #添加此locationinclude fastcgi_params;fastcgi_pass 127.0.0.1:9000;fastcgi_param SCRIPT_FILENAME $fastcgi_script_name;}location ~ \.php$ {fastcgi_pass 127.0.0.1:9000;fastcgi_index index.php;fastcgi_param SCRIPT_FILENAME $document_root$fastcgi_script_name;include fastcgi_params;}}}
重启动nginx服务
/usr/local/nginx/sbin/nginx -t
/usr/local/nginx/sbin/nginx -s reload

5.3 状态页浏览器访问测试
php-fpm状态页比较个性化的一个地方是它可以带参数,可以带的参数有json、xml、html,使用zabbix或者nagios监控可以考虑使用xml或者默认方式。
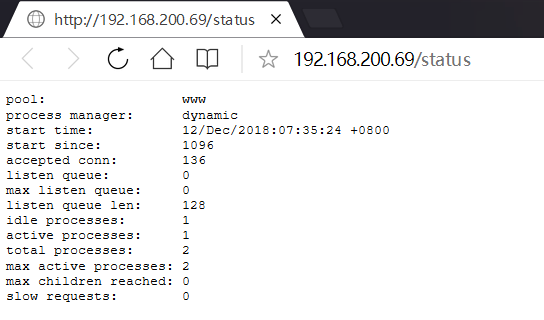
具体含义说明如下
curl 127.0.0.1/status
pool: www #fpm进程池名称,大多数为wwwprocess manager: dynamic #进程管理方式(static,dynamic or nodemand.dynamic)start time: 12/Dec/2018:07:35:24 +0800 #启动日期start since: 1137 #运行时长accepted conn: 142 #当前FPM进程池接受的请求数listen queue: 0 #请求等待队列,如果值不是0,那么要增加FPM的进程数max listen queue: 0 #请求等待队列最高的数量listen queue len: 128 #socket等待队列长度idle processes: 1 #空闲进程数量active processes: 1 #活跃进程数量total processes: 2 #总进程数量max active processes: 2 #最大的活跃进程数量(FPM启动开始算)max children reached: 0 #达到最大子进程的次数,如果值不为0,那么需要调高最大进程数slow requests: 0 #当启用了php-fpm的slow-log功能时,如果出现php-fpm慢请求这个计数器会增加,一般不当的MySQL查询会触发这个值

其他状态参数显示形式的数据(json,xml,html)
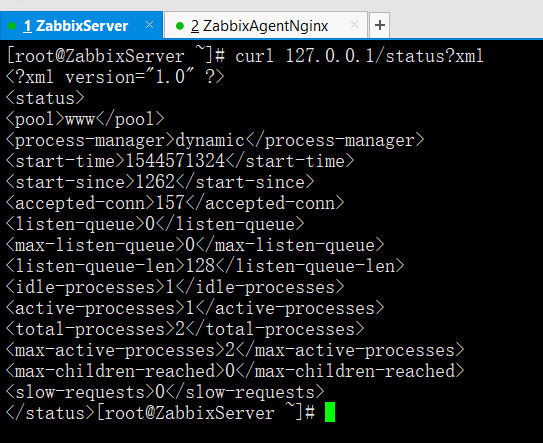
以xml的格式输出PHP-fpm状态页
curl 127.0.0.1/status?xml
<?xml version="1.0" ?><status><pool>www</pool><process-manager>dynamic</process-manager><start-time>1516953418</start-time><start-since>3731</start-since><accepted-conn>647</accepted-conn><listen-queue>0</listen-queue><max-listen-queue>4</max-listen-queue><listen-queue-len>128</listen-queue-len><idle-processes>2</idle-processes><active-processes>1</active-processes><total-processes>3</total-processes><max-active-processes>3</max-active-processes><max-children-reached>0</max-children-reached><slow-requests>0</slow-requests>
以json的格式输出PHP-fpm的状态页
curl 127.0.0.1/status?json
{"pool":"www","process manager":"dynamic","start time":1516953418,"start since":3736,"accepted conn":648,"listen queue":0,"max listen queue":4,"listen queue len":128,"idle processes":2,"active processes":1,"total processes":3,"max active processes":3,"max children reached":0,"slow requests":0}[root@Zabbix_Server nginx]#

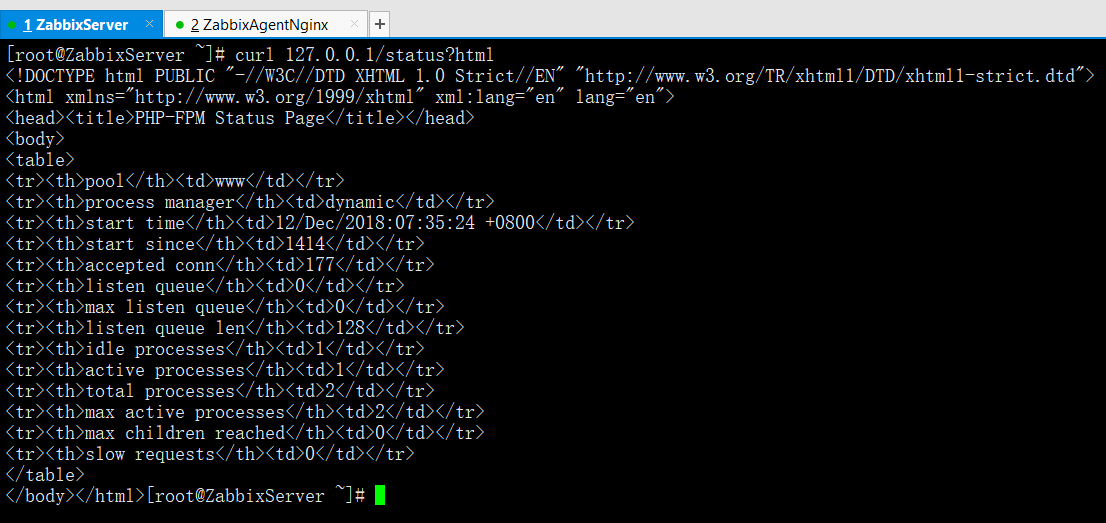
以html的格式输出PHP-fpm的状态页
curl 127.0.0.1/status?html
<!DOCTYPE html PUBLIC "-//W3C//DTD XHTML 1.0 Strict//EN" "http://www.w3.org/TR/xhtml1/DTD/xhtml1-strict.dtd"><html xmlns="http://www.w3.org/1999/xhtml" xml:lang="en" lang="en"><head><title>PHP-FPM Status Page</title></head><body><table><tr><th>pool</th><td>www</td></tr><tr><th>process manager</th><td>dynamic</td></tr><tr><th>start time</th><td>26/Jan/2018:02:56:58 -0500</td></tr><tr><th>start since</th><td>3748</td></tr><tr><th>accepted conn</th><td>650</td></tr><tr><th>listen queue</th><td>0</td></tr><tr><th>max listen queue</th><td>4</td></tr><tr><th>listen queue len</th><td>128</td></tr><tr><th>idle processes</th><td>2</td></tr><tr><th>active processes</th><td>1</td></tr><tr><th>total processes</th><td>3</td></tr><tr><th>max active processes</th><td>3</td></tr><tr><th>max children reached</th><td>0</td></tr><tr><th>slow requests</th><td>0</td></tr></table></body></html>
5.4 在Zabbix agent端修改配置
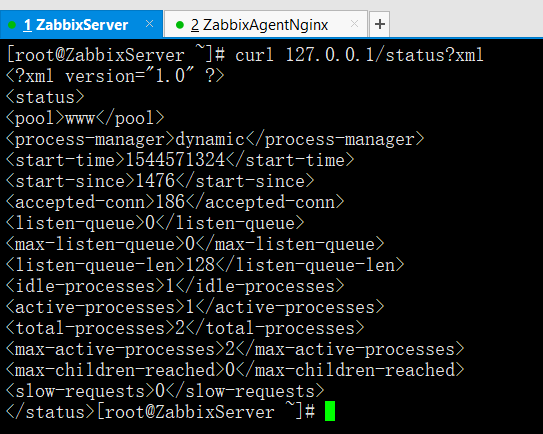
在创建Zabbix的agent端键值配置文件的时候,我们可以考虑利用PHP-fpm状态页的不同输出格式来抓取数据。例如我们利用xml格式获取数据,操作如下:
查看xml格式PHP-fpm状态页数据
curl 127.0.0.1/status?xml
<?xml version="1.0" ?><status><pool>www</pool><process-manager>dynamic</process-manager><start-time>1516953418</start-time><start-since>3731</start-since><accepted-conn>647</accepted-conn><listen-queue>0</listen-queue><max-listen-queue>4</max-listen-queue><listen-queue-len>128</listen-queue-len><idle-processes>2</idle-processes><active-processes>1</active-processes><total-processes>3</total-processes><max-active-processes>3</max-active-processes><max-children-reached>0</max-children-reached><slow-requests>0</slow-requests>
创建zabbix监控的agent端键值配置文件
cd /etc/zabbix/zabbix_agentd.d/
vim userparameter_php-fpm.conf
cat userparameter_php-fpm.conf
UserParameter=php-fpm.status[*],/usr/bin/curl -s "http://127.0.0.1/status?xml" | grep "<$1>" | awk -F "[>|<]" '{print $$3}'这里需要注意在脚本里如果写成$3的话,脚本会认识是一个变量,因此我们需要用$$3

重启动agent客户端
/etc/init.d/zabbix-agent restart

5.5 进行键值配置文件测试
zabbix_get -s 192.168.200.69 -p 10050 -k "php-fpm.status[process-manager]"
zabbix_get -s 192.168.200.69 -p 10050 -k "php-fpm.status[start-since]"
zabbix_get -s 192.168.200.69 -p 10050 -k "php-fpm.status[active-processes]"

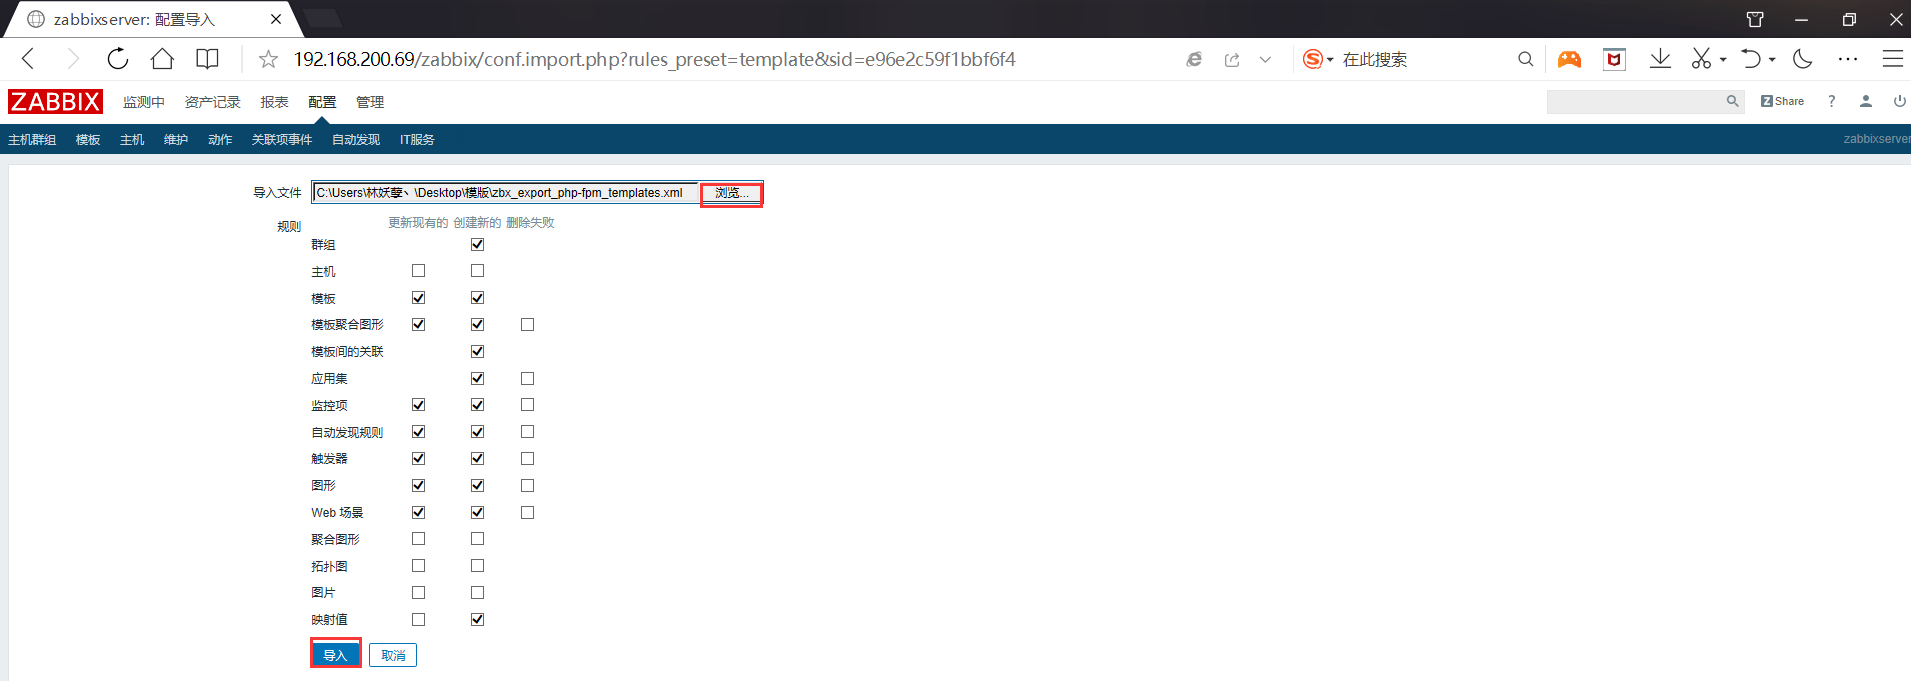
5.6 Zabbix图形界面导入我们的监控模版(上边有模板下载链接)



六,Zabbix的Web监测功能
Zabbix的Web监测功能,没有任何依赖,不需要agent端,全部依赖于Server的主动监测
利用Web监测,监测Server端的nginx首页





到这里Web监测我们就创建好了,最后再看一下监控结果


