Vue中使用Cropper.js裁剪图片
Cropper.js是一款很好用的图片裁剪工具,可以对图片的尺寸、宽高比进行裁剪,满足诸如裁剪头像上传、商品图片编辑之类的需求。
github: https://github.com/fengyuanchen/cropperjs
网站: https://fengyuanchen.github.io/cropperjs/
简单使用
使用很简单,首先需要一个image或者canvas元素:
1 2 3 4 | <!-- Wrap the image or canvas element with a block element (container) --><div> <img id="image" src="picture.jpg"></div> |
1 2 3 4 | /* Limit image width to avoid overflow the container */img { max-width: 100%; /* This rule is very important, please do not ignore this! */} |
然后使用此元素创建Cropper:
1 2 3 4 5 6 7 8 9 10 11 12 13 14 15 16 | // import 'cropperjs/dist/cropper.css';import Cropper from 'cropperjs';const image = document.getElementById('image');const cropper = new Cropper(image, { aspectRatio: 16 / 9, crop(event) { console.log(event.detail.x); console.log(event.detail.y); console.log(event.detail.width); console.log(event.detail.height); console.log(event.detail.rotate); console.log(event.detail.scaleX); console.log(event.detail.scaleY); },}); |
vue代码:
1 2 3 4 5 6 7 8 9 10 11 12 13 14 15 16 17 18 19 20 21 22 23 24 25 26 27 28 29 30 31 32 33 34 35 | <template> <div> <div style="width: 750px; height: 500px; margin: 20px; border: dashed #cacaca 1px; text-align: center;"> <img :src="cropperImg" style="max-width: 100%" ref="img"> </div> </div></template><script>import Cropper from 'cropperjs'// import 'cropperjs/dist/cropper.min.css'export default { name: "ImgCropper", data () { return { cropperImg: '', cropper: '', imgName: '' } }, mounted () { this.initCropper() }, methods: { initCropper () { let cropper = new Cropper(this.$refs.img, { viewMode: 1, aspectRatio: 16/9, }) this.cropper = cropper }, }}</script> |
因为img元素的src属性为空,裁剪区域显示空白。一般的需求是上传图片裁剪,添加上传图片功能:
1 | <input type="file" @change="uploadImg" /> |
1 2 3 4 5 | uploadImg (event) { const img = event.target.files[0] this.cropperImg = URL.createObjectURL(img) this.imgName = img.name}, |
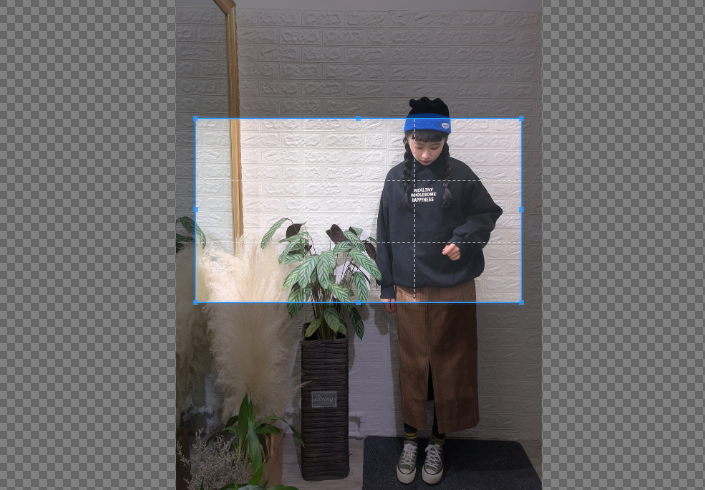
点击上传图片后就可以裁剪了:
将裁剪的图片保存或者上传:
1 2 3 4 5 6 7 8 | uploadCropImg () { const _this = this this.cropper.getCroppedCanvas().toBlob(async function(blob) { const params = new FormData() params.append('upload_file', blob, _this.imgName) $.ajax(...) }, 'image/jpeg')}, |
canvas转换为Blob时注意第二个参数默认是image/png的,接口上传有大小限制的情况下,可以设置为image/jpeg。
保存图片:
1 2 3 4 5 6 7 8 9 10 11 12 13 | saveCropImg () { const _this = this this.cropper.getCroppedCanvas().toBlob(function(blob) { const href = window.URL.createObjectURL(blob); const downloadElement = document.createElement('a'); downloadElement.href = href; downloadElement.download = _this.imgName document.body.appendChild(downloadElement); downloadElement.click(); document.body.removeChild(downloadElement); window.URL.revokeObjectURL(href); }, 'image/jpeg')}, |
这样简单的上传、裁剪、保存功能就实现了。
Options
Cropper还有很多有用的选项,比较重要的:
viewMode
Number,默认值0,可选值0,1,2,3
Cropper容器基本有4个部分,官网示例:
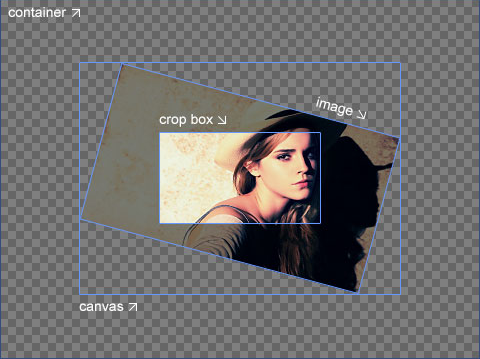
mode为0的情况下,crop box部分可以超出canvans的范围,mode为1,2,3时crop box被限制在canvas范围之内,mode为2,3时会将canvas限制在container之内。
image与crop box都是可以移动的,双击可以切换move mode与crop mode。
aspectRatio
Number,croper box的宽高比,可以为裁剪设置固定的宽高比,值为NaN时,可自由裁剪。可以使用Shift键来切换或者固定宽高比。
data
Object,可以用来预设crop box,初始化的时候提供给SetData()使用。
checkCrossOrigin
Boolean,默认值true。检查图片是否跨域,图片跨域时会为图片添加crossOrigin属性,并为图片地址添加一个随机时间戳避免缓存。
1 | <img crossorigin="anonymous" src="https://fengyuanchen.github.io/cropperjs/images/picture.jpg?timestamp=1547879277777" class="cropper-hide" style="width: 752px; height: 423px; transform: none;"> |
Methods
crop()
显示crop box
1 2 3 4 5 6 7 8 9 10 | new Cropper(image, { autoCrop: false, ready() { // Do something here // ... // And then this.cropper.crop(); },}); |
reset()
将crop box置于初始的状态,宽高比,大小等。
clear()
清除crop box
destroy()
destroy Cropper实例。
replace(url[, hasSameSize])
替换img的url地址。
move(offsetX[, offsetY]),moveTo(x[, y])
移动canvas
zoom(ratio),zoomTo(ratio[, pivot])
放大或者缩小canvas
rotate(degree),rotateTo(degree)
旋转image
scale(scaleX[, scaleY]),scaleX(scaleX),scaleY(scaleY)
改变image的宽高比,拉伸等。
getData([rounded]),setData(data)
获取,设置croper box的实际位置,大小数据
getContainerData()
获取container的大小数据
getImageData()
获取image的位置,大小等相关信息。
getCanvasData(),setCanvasData(data)
获取canvas的位置,大小信息。
getCropBoxData(),setCropBoxData(data)
获取crop box的位置,大小信息等,与getData()的区别是,getData()是获取的实际大小,getCropBoxData()获取的是显示大小,因为image一般是缩小显示的。
getCroppedCanvas([options])
比较重要的方法,获取一个HTMLCanvasElement元素,绘制了整个crop box。
可以在options中设置宽高,也可以取默认值:
1 2 3 4 5 6 7 8 9 10 11 | cropper.getCroppedCanvas({ width: 160, height: 90, minWidth: 256, minHeight: 256, maxWidth: 4096, maxHeight: 4096, fillColor: '#fff', imageSmoothingEnabled: false, imageSmoothingQuality: 'high',}); |
转为Blob:
1 2 3 4 5 6 7 8 9 10 11 12 13 14 15 16 17 18 19 20 | // Upload cropped image to server if the browser supports `HTMLCanvasElement.toBlob`cropper.getCroppedCanvas().toBlob((blob) => { const formData = new FormData(); formData.append('croppedImage', blob); // Use `jQuery.ajax` method $.ajax('/path/to/upload', { method: "POST", data: formData, processData: false, contentType: false, success() { console.log('Upload success'); }, error() { console.log('Upload error'); }, });}); |
转为base64 url:
1 | cropper.getCroppedCanvas().toDataURL('image/png') |
如果手机上不支持toBlob(),有个polyfill JavaScript-Canvas-to-Blob 。
setAspectRatio(aspectRatio)
设置crop box的宽高比。
Events
Cropper实例是挂在img上的,可以为目标img添加事件
ready
img已加载好,Cropper实例可以被操作了:
1 2 3 4 5 6 7 8 | let cropper;image.addEventListener('ready', function () { console.log(this.cropper === cropper); // > true});cropper = new Cropper(image); |
cropstart
开始裁剪
cropmove
裁剪时事件
cropend
裁剪结束事件
crop
crop box发生变化时的事件。
这些事件都可以放在Cropper的options之中。
比如,限定裁剪时的宽高比:
1 2 3 4 5 6 7 8 9 10 11 12 13 14 15 16 17 18 19 20 21 22 | initCropper () { let cropper = new Cropper(this.$refs.img, { viewMode: 1, cropmove () { const cropper = this.cropper; const minAspectRatio = 0.5 const maxAspectRatio = 1.5 const cropBoxData = cropper.getCropBoxData(); const aspectRatio = cropBoxData.width / cropBoxData.height; if (aspectRatio < minAspectRatio) { cropper.setCropBoxData({ width: cropBoxData.height * minAspectRatio }); } else if (aspectRatio > maxAspectRatio) { cropper.setCropBoxData({ width: cropBoxData.height * maxAspectRatio }); } } }) this.cropper = cropper}, |


【推荐】国内首个AI IDE,深度理解中文开发场景,立即下载体验Trae
【推荐】编程新体验,更懂你的AI,立即体验豆包MarsCode编程助手
【推荐】抖音旗下AI助手豆包,你的智能百科全书,全免费不限次数
【推荐】轻量又高性能的 SSH 工具 IShell:AI 加持,快人一步
· 从 HTTP 原因短语缺失研究 HTTP/2 和 HTTP/3 的设计差异
· AI与.NET技术实操系列:向量存储与相似性搜索在 .NET 中的实现
· 基于Microsoft.Extensions.AI核心库实现RAG应用
· Linux系列:如何用heaptrack跟踪.NET程序的非托管内存泄露
· 开发者必知的日志记录最佳实践
· winform 绘制太阳,地球,月球 运作规律
· TypeScript + Deepseek 打造卜卦网站:技术与玄学的结合
· AI 智能体引爆开源社区「GitHub 热点速览」
· 写一个简单的SQL生成工具
· Manus的开源复刻OpenManus初探