安装OpenSsh8.1+LibreSSL 3.0.2(ssh升级)
zlib下载地址:  http://www.zlib.net/
LibreSSL下载地址: https://ftp.openbsd.org/pub/OpenBSD/LibreSSL/
OpenSSH下载地址:  http://mirror.aarnet.edu.au/pub/OpenBSD/OpenSSH/portable/
rpm -ivh mpfr-2.4.1-6.el6.x86_64.rpm
rpm -ivh gmp-devel-4.3.1-7.el6_2.2.x86_64.rpm
rpm -ivh mpfr-devel-2.4.1-6.el6.x86_64.rpm
1、安装zlib
tar -xzvf zlib-1.2.11.tar.gz
cd zlib-1.2.11
 ./configure --prefix=/usr/local/zlib-1.2.11
 make && make install
如果需要升级ntp的话,一定要再升级ssl前升级ntp,否则会报如下错误:
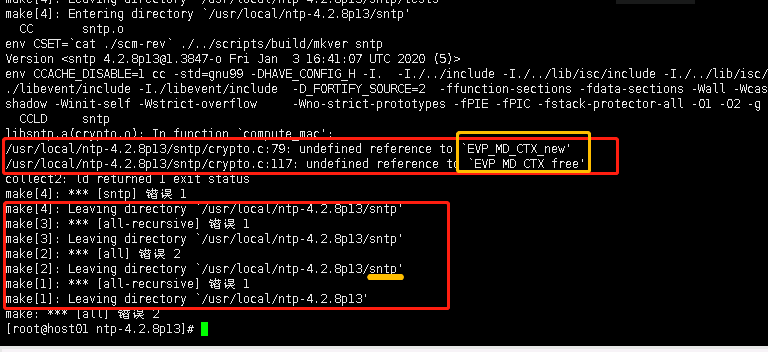
libsntp.a(crypto.o): In function `compute_mac':
/usr/local/ntp-4.2.8p13/sntp/crypto.c:79: undefined reference to `EVP_MD_CTX_new'
/usr/local/ntp-4.2.8p13/sntp/crypto.c:117: undefined reference to `EVP_MD_CTX_free'
collect2: ld returned 1 exit status
make[4]: *** [sntp] 错误 1
make[4]: Leaving directory `/usr/local/ntp-4.2.8p13/sntp'
make[3]: *** [all-recursive] 错误 1
make[3]: Leaving directory `/usr/local/ntp-4.2.8p13/sntp'
make[2]: *** [all] 错误 2
make[2]: Leaving directory `/usr/local/ntp-4.2.8p13/sntp'
make[1]: *** [all-recursive] 错误 1
make[1]: Leaving directory `/usr/local/ntp-4.2.8p13'
make: *** [all] 错误 2
2、安装libressl
千万不要删除旧版本的openssl,有可能导致yum无法正常使用。
cd libressl-3.0.2
./configure --prefix=/usr/local
make
make install
libressl代替openssl
vim /etc/ld.so.conf.d/local.conf  #新建local.conf文件,添加下面一行
     /usr/local/lib   # 将 /usr/local/lib 目录加入到模块加载目录。

ldconfig -v   #重新加载共享模块:
openssl version #查看版本
安装openssh
#--with-ssl-dir  指定ssl的安装目录
#--with-zlib  指定zlib的安装目录
./configure --prefix=/usr/local/openssh-8.1p1 --sysconfdir=/etc/ssh --with-ssl-dir=/usr/local --with-zlib=/usr/local/zlib-1.2.11 --with-md5-passwords
make
make  install

cd /etc/init.d/
mv sshd sshd.bak
cd /usr/local/openssh-8.1p1/contrib/redhat/
cp -p sshd.init /etc/init.d/sshd
vi /etc/init.d/sshd
SSHD=/usr/local/openssh-8.1p1/sbin/sshd     #25行   SSHD=/usr/sbin/sshd
/usr/local/openssh-8.1p1/bin/ssh-keygen -A  #41行 /usr/bin/ssh-keygen -A
chkconfig --add sshd
chkconfig sshd on
chkconfig --list sshd
service sshd restart

vim /etc/profile
export PATH=/usr/local/openssh-8.1p1/bin:$PATH
CentOS7(RedHat7)需要再做以下操作。
将systemctl下的原ssh相关文件移走,将不然升级后的openssh不兼容。
mv /usr/lib/systemd/system/ssh* /opt
vi /etc/ssh/sshd_config //增加下一行
PermitRootLogin yes
service sshd restart
vi /etc/profile 或者 ~/.bash_profile 设置PATH变量
export PATH=/usr/local/openssh-8.1p1/sbin:/usr/local/openssh-8.1p1/bin:$PATH
source /etc/profile
验证:
ssh -V
openssl  version

 浙公网安备 33010602011771号