springboot线程池超级详解
springboot线程池超级详解
#本文先否定网上部分人的一个观点:不能使用spring boot默认线程池
	其实他们之所以有这样的结论是把spring和springboot混淆了;不推荐使用spring默认线程池,是因为spring默认是使用SimpleAsyncTaskExecutor这个线程池,但此线程不是真正意义上的线程池,因为线程不重用,每次调用都会创建一个新的线程。默认线程数最大值为Integer.MAX_VALUE,因此万一线程启动过多会引发OOM,所以不推荐使用
	但是spring boot已经对spring默认线程池进行了自动装配,设置了默认值8,所以不会因为创建线程数太多引发OOM

## 本文主要包含以下内容
1、线程和线程池的基本概念
2、spring默认线程池基础及原理
3、springboot默认线程池
4、如何调整springboot默认线程池
5、如果使用springboot线程池
6、自定义线程池

# 异步方法建议尽量处理耗时的任务,或者是处理不希望阻断主流程的任务(比如异步记录操作日志)

##  感谢:本文是整理了互联网上数十篇相关文章整理所得,已经记不清涉及哪些链接了,感谢之前整理的IT从业者,本人只是一个搬运工
程序、线程和线程池
进程是资源分配最小单位,线程是程序执行的最小单位。 计算机在执行程序时,会为程序创建相应的进程,进行资源分配时,是以进程为单位进行相应的分配。每个进程都有相应的线程,在执行程序时,实际上是执行相应的一系列线程。
总结:进程是资源分配最小单位,线程是程序执行的最小单位
一、什么是线程
线程,程序执行流的最小执行单位,是行程中的实际运作单位,经常容易和进程这个概念混淆。那么,线程和进程究竟有什么区别呢?首先,进程是一个动态的过程,是一个活动的实体。简单来说,一个应用程序的运行就可以被看做是一个进程,而线程,是运行中的实际的任务执行者。可以说,进程中包含了多个可以同时运行的线程。
二、线程的生命周期
线程的生命周期可以利用以下的图解来更好的理解:
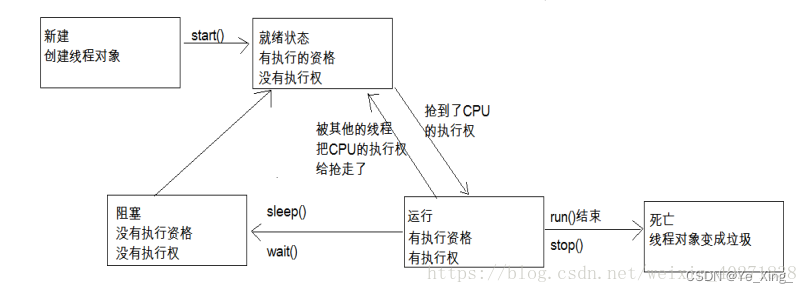
第一步,是用new Thread()的方法新建一个线程,在线程创建完成之后,线程就进入了就绪(Runnable)状态,此时创建出来的线程进入抢占CPU资源的状态,当线程抢到了CPU的执行权之后,线程就进入了运行状态(Running),当该线程的任务执行完成之后或者是非常态的调用的stop()方法之后,线程就进入了死亡状态。而我们在图解中可以看出,线程还具有一个则色的过程,这是怎么回事呢?当面对以下几种情况的时候,容易造成线程阻塞,第一种,当线程主动调用了sleep()方法时,线程会进入则阻塞状态,除此之外,当线程中主动调用了阻塞时的IO方法时,这个方法有一个返回参数,当参数返回之前,线程也会进入阻塞状态,还有一种情况,当线程进入正在等待某个通知时,会进入阻塞状态。那么,为什么会有阻塞状态出现呢?我们都知道,CPU的资源是十分宝贵的,所以,当线程正在进行某种不确定时长的任务时,Java就会收回CPU的执行权,从而合理应用CPU的资源。我们根据图可以看出,线程在阻塞过程结束之后,会重新进入就绪状态,重新抢夺CPU资源。这时候,我们可能会产生一个疑问,如何跳出阻塞过程呢?又以上几种可能造成线程阻塞的情况来看,都是存在一个时间限制的,当sleep()方法的睡眠时长过去后,线程就自动跳出了阻塞状态,第二种则是在返回了一个参数之后,在获取到了等待的通知时,就自动跳出了线程的阻塞过程
三、什么是单线程和多线程?
单线程,顾名思义即是只有一条线程在执行任务。
多线程,创建多条线程同时执行任务,这种方式在我们的日常生活中比较常见。但是,在多线程的使用过程中,还有许多需要我们了解的概念。比如,在理解上并行和并发的区别,以及在实际应用的过程中多线程的安全问题,对此,我们需要进行详细的了解。
并行和并发:在我们看来,都是可以同时执行多种任务,那么,到底他们二者有什么区别呢?
并发,从宏观方面来说,并发就是同时进行多种时间,实际上,这几种时间,并不是同时进行的,而是交替进行的,而由于CPU的运算速度非常的快,会造成我们的一种错觉,就是在同一时间内进行了多种事情,而并发,则是真正意义上的同时进行多种事情。这种只可以在多核CPU的基础下完成。
还有就是多线程的安全问题?为什么会造成多线程的安全问题呢?我们可以想象一下,如果多个线程同时执行一个任务,那么意味着他们共享同一种资源,由于线程CPU的资源不一定可以被谁抢占到,这是,第一条线程先抢占到CPU资源,他刚刚进行了第一次操作,而此时第二条线程抢占到了CPU的资源,那么共享资源还来不及发生变化,就同时有两条数据使用了同一条资源,具体请参考多线程买票问题。这个问题我们应该如何解决那?
有造成问题的原因我们可以看出,这个问题主要的矛盾在于,CPU的使用权抢占和资源的共享发生了冲突,解决时,我们只需要让一条线程占用了CPU的资源时,阻止第二条线程同时抢占CPU的执行权,在代码中,我们只需要在方法中使用同步代码块即可。在这里,同步代码块不多进行赘述,可以自行了解。
四、线程池
在一个应用程序中,我们需要多次使用线程,也就意味着,我们需要多次创建并销毁线程。而创建并销毁线程的过程势必会消耗内存。而在Java中,内存资源是及其宝贵的,所以,我们就提出了线程池的概念。
线程池:Java中开辟出了一种管理线程的概念,这个概念叫做线程池,从概念以及应用场景中,我们可以看出,线程池的好处,就是可以方便的管理线程,也可以减少内存的消耗。
五、线程池的执行流程
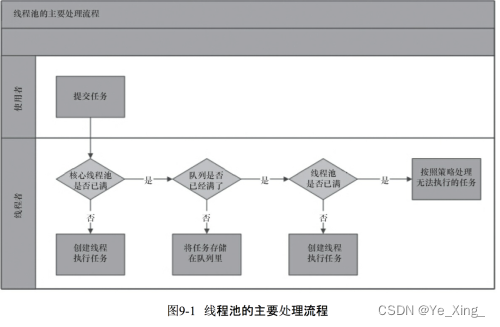
有图我们可以看出,任务进来时,首先执行判断,判断核心线程是否处于空闲状态,如果不是,核心线程就先就执行任务,如果核心线程已满,则判断任务队列是否有地方存放该任务,若果有,就将任务保存在任务队列中,等待执行,如果满了,在判断最大可容纳的线程数,如果没有超出这个数量,就开创非核心线程执行任务,如果超出了,就调用handler实现拒绝策略。
handler的拒绝策略:
有四种:第一种AbortPolicy:不执行新任务,直接抛出异常,提示线程池已满
第二种DisCardPolicy:不执行新任务,也不抛出异常
第三种DisCardOldSetPolicy:将消息队列中的第一个任务替换为当前新进来的任务执行
第四种CallerRunsPolicy:直接调用execute来执行当前任务
六、四种常见的线程池:
CachedThreadPool:可缓存的线程池,该线程池中没有核心线程,非核心线程的数量为Integer.max_value,就是无限大,当有需要时创建线程来执行任务,没有需要时回收线程,适用于耗时少,任务量大的情况。
SecudleThreadPool:周期性执行任务的线程池,按照某种特定的计划执行线程中的任务,有核心线程,但也有非核心线程,非核心线程的大小也为无限大。适用于执行周期性的任务。
SingleThreadPool:只有一条线程来执行任务,适用于有顺序的任务的应用场景。
FixedThreadPool:定长的线程池,有核心线程,核心线程的即为最大的线程数量,没有非核心线程
Spring原理之@Async--Spring Framework提供的,而非SpringBoot
前言-Demo
在开发过程中,我们会遇到很多使用线程池的业务场景,例如异步短信通知、异步记录操作日志。大多数使用线程池的场景,就是会将一些可以进行异步操作的业务放在线程池中去完成。
例如在生成订单的时候给用户发送短信,生成订单的结果不应该被发送短信的成功与否所左右,也就是说生成订单这个主操作是不依赖于发送短信这个操作,所以我们就可以把发送短信这个操作置为异步操作。
那么本文就是来看看Spring中提供的优雅的异步处理方案:在Spring3中,Spring中引入了一个新的注解@Async,这个注解让我们在使用Spring完成异步操作变得非常方便
需要注意的是这些功能都是Spring Framework提供的,而非SpringBoot。因此下文的讲解都是基于Spring Framework的工程
Spring中用@Async注解标记的方法,称为异步方法,它会在调用方的当前线程之外的独立的线程中执行,其实就相当于我们自己new Thread(()-> System.out.println(“hello world !”))这样在另一个线程中去执行相应的业务逻辑。
Demo
// @Async 若把注解放在类上或者接口上,那么他所有的方法都会异步执行了~~~~(包括私有方法)
public interface HelloService {
    Object hello();
}

@Service
public class HelloServiceImpl implements HelloService {

    @Async // 注意此处加上了此注解
    @Override
    public Object hello() {
        System.out.println("当前线程:" + Thread.currentThread().getName());
        return "service hello";
    }
}
然后只需要在配置里,开启对异步的支持即可:(也许直接加在这里无效,因为bean没有注入,可以直接加在@Service旁边)
@Configuration
@EnableAsync // 开启异步注解的支持
public class RootConfig {

}
输出如下(当前线程名):(亲测Alan:for循环调用100次,创建SimpleAsyncTaskExecutor-1-100)
当前线程:SimpleAsyncTaskExecutor-1
可以很明显的发现,它使用的是线程池SimpleAsyncTaskExecutor,这也是Spring默认给我们提供的线程池(其实它不是一个真正的线程池,后面会有讲述)。下面原理部分讲解后,你就能知道怎么让它使用我们自定义的线程池了~~~
@Async注解使用细节
1、@Async注解一般用在方法上,如果用在类上,那么这个类所有的方法都是异步执行的;
2、@Async可以放在任何方法上,哪怕你是private的(若是同类调用,请务必注意注解失效的情况~~~)
3、所使用的@Async注解方法的类对象应该是Spring容器管理的bean对象
4、@Async可以放在接口处(或者接口方法上)。但是只有使用的是JDK的动态代理时才有效,CGLIB会失效。因此建议:统一写在实现类的方法上
5、需要注解@EnableAsync来开启异步注解的支持
6、若你希望得到异步调用的返回值,请你的返回值用Futrue变量包装起来
需要额外导入哪些Jar包?
它的依赖包非常简单,只依赖一些Spring的核心包外加spring-aop,但是如果你已经导入了spring-webmvc这个jar,那就什么不需要额外导入了,因为都有了:
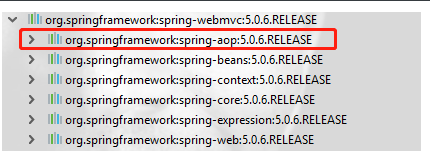
备注:它虽然依赖于Spring AOP,但是它并不需要导入aspectjweaver,因为它和AspectJ没有半毛钱关系
原理、源码解析(有兴趣的可以仔细研读,否则了解结论,跳过阅读即可)
@EnableAsync
它位于的包名为org.springframework.scheduling.annotation,jar名为:spring-context
@EnableXXX这种设计模式之前有分析过多次,这个注解就是它的入口,因此本文也一样,从入口处一层一层的剖析:
@Target(ElementType.TYPE)
@Retention(RetentionPolicy.RUNTIME)
@Documented
@Import(AsyncConfigurationSelector.class)
public @interface EnableAsync {
    //默认情况下,要开启异步操作,要在相应的方法或者类上加上@Async注解或者EJB3.1规范下的@Asynchronous注解。
     //这个属性使得开发人员可以自己设置开启异步操作的注解(可谓非常的人性化了,但是大多情况下用Spring的就足够了)
    Class<? extends Annotation> annotation() default Annotation.class;
    // true表示启用CGLIB代理
    boolean proxyTargetClass() default false;

    // 代理方式:默认是PROXY  采用Spring的动态代理(含JDK动态代理和CGLIB)
    // 若改为:AdviceMode.ASPECTJ表示使用AspectJ静态代理方式。
    // 它能够解决同类内方法调用不走代理对象的问题,但是一般情况下都不建议这么去做,不要修改这个参数值
    AdviceMode mode() default AdviceMode.PROXY;
    // 直接定义:它的执行顺序(因为可能有多个@EnableXXX)
    int order() default Ordered.LOWEST_PRECEDENCE;
}
@Target({ElementType.METHOD, ElementType.TYPE})
@Retention(RetentionPolicy.RUNTIME)
@Documented
public @interface Async {
    // May be used to determine the target executor to be used when executing this method
    // 意思是这个value值是用来指定执行器的(写入执行器BeanName即可采用特定的执行器去执行此方法)
    String value() default "";
}
最重要的,还是上面的@Import注解导入的类:AsyncConfigurationSelector
AsyncConfigurationSelector
public class AsyncConfigurationSelector extends AdviceModeImportSelector<EnableAsync> {
    // 这类 我也不知道在哪?是用于支持AspectJ这种静态代理Mode的,忽略吧~~~~
    private static final String ASYNC_EXECUTION_ASPECT_CONFIGURATION_CLASS_NAME =
            "org.springframework.scheduling.aspectj.AspectJAsyncConfiguration";

    @Override
    @Nullable
    public String[] selectImports(AdviceMode adviceMode) {
        // 这里AdviceMode 进行不同的处理,从而向Spring容器注入了不同的Bean~~~
        switch (adviceMode) {
            // 大多数情况下都走这里,ProxyAsyncConfiguration会被注入到Bean容器里面~~~
            case PROXY:
                return new String[] { ProxyAsyncConfiguration.class.getName() };
            case ASPECTJ:
                return new String[] { ASYNC_EXECUTION_ASPECT_CONFIGURATION_CLASS_NAME };
            default:
                return null;
        }
    }
}
AdviceModeImportSelector父类的这个抽象更加的重要。它的实现类至少有如下两个:

备注:TransactionManagementConfigurationSelector需要额外导入jar包:spring-tx
这个父类抽象得非常的好,它的作用:抽象实现支持了AdviceMode,并且支持通用的@EnableXXX模式。
//@since 3.1  它是一个`ImportSelector`
public abstract class AdviceModeImportSelector<A extends Annotation> implements ImportSelector {
    // 默认都叫mode
    public static final String DEFAULT_ADVICE_MODE_ATTRIBUTE_NAME = "mode";
    // 显然也允许子类覆盖此方法
    protected String getAdviceModeAttributeName() {
        return DEFAULT_ADVICE_MODE_ATTRIBUTE_NAME;
    }

    // importingClassMetadata:注解的信息
    @Override
    public final String[] selectImports(AnnotationMetadata importingClassMetadata) {
        // 这里泛型,拿到泛型类型~~~
        Class<?> annType = GenericTypeResolver.resolveTypeArgument(getClass(), AdviceModeImportSelector.class);
        Assert.state(annType != null, "Unresolvable type argument for AdviceModeImportSelector");

        // 根据类型,拿到该类型的这个注解,然后转换为AnnotationAttributes
        AnnotationAttributes attributes = AnnotationConfigUtils.attributesFor(importingClassMetadata, annType);
        if (attributes == null) {
            throw new IllegalArgumentException(String.format( "@%s is not present annType.getSimpleName(), importingClassMetadata.getClassName()));
        }

        // 拿到AdviceMode,最终交给子类,让她自己去实现  决定导入哪个Bean吧
        AdviceMode adviceMode = attributes.getEnum(this.getAdviceModeAttributeName());
        String[] imports = selectImports(adviceMode);
        if (imports == null) {
            throw new IllegalArgumentException(String.format("Unknown AdviceMode: '%s'", adviceMode));
        }
        return imports;
    }

    // 子类去实现  具体导入哪个Bean
    @Nullable
    protected abstract String[] selectImports(AdviceMode adviceMode);
}
改抽象提供了支持AdviceMode的较为通用的实现,若我们自己想自定义,可以考虑实现此类。
由此可议看出,@EnableAsync最终是向容器内注入了ProxyAsyncConfiguration这个Bean。由名字可议看出,它是一个配置类。
ProxyAsyncConfiguration
// 它是一个配置类,角色为ROLE_INFRASTRUCTURE  框架自用的Bean类型
@Configuration
@Role(BeanDefinition.ROLE_INFRASTRUCTURE)
public class ProxyAsyncConfiguration extends AbstractAsyncConfiguration {
    // 它的作用就是诸如了一个AsyncAnnotationBeanPostProcessor,它是个BeanPostProcessor
    @Bean(name = TaskManagementConfigUtils.ASYNC_ANNOTATION_PROCESSOR_BEAN_NAME)
    @Role(BeanDefinition.ROLE_INFRASTRUCTURE)
    public AsyncAnnotationBeanPostProcessor asyncAdvisor() {
        Assert.notNull(this.enableAsync, "@EnableAsync annotation metadata was not injected");
        AsyncAnnotationBeanPostProcessor bpp = new AsyncAnnotationBeanPostProcessor();

        // customAsyncAnnotation:自定义的注解类型
        // AnnotationUtils.getDefaultValue(EnableAsync.class, "annotation") 为拿到该注解该字段的默认值
        Class<? extends Annotation> customAsyncAnnotation = this.enableAsync.getClass("annotation");

        // 相当于如果你指定了AsyncAnnotationType,那就set进去吧
        if (customAsyncAnnotation != AnnotationUtils.getDefaultValue(EnableAsync.class, "annotation")) {
            bpp.setAsyncAnnotationType(customAsyncAnnotation);
        }

        // 只有自定义了AsyncConfigurer的实现类,自定义了一个线程执行器,这里才会有值
        if (this.executor != null) {
            bpp.setExecutor(this.executor);
        }
        // 同上,异步线程异常的处理器~~~~~
        if (this.exceptionHandler != null) {
            bpp.setExceptionHandler(this.exceptionHandler);
        }

        // 这两个参数,就不多说了。
        // 可以看到,order属性值,最终决定的是BeanProcessor的执行顺序的
        bpp.setProxyTargetClass(this.enableAsync.getBoolean("proxyTargetClass"));
        bpp.setOrder(this.enableAsync.<Integer>getNumber("order"));
        return bpp;
	}
}
// 它的父类:
@Configuration
public abstract class AbstractAsyncConfiguration implements ImportAware {
        // 此注解@EnableAsync的元信息
    protected AnnotationAttributes enableAsync;
    // 异步线程池
    protected Executor executor;
    // 异步异常的处理器
    protected AsyncUncaughtExceptionHandler exceptionHandler;

    @Override
    public void setImportMetadata(AnnotationMetadata importMetadata) {
        // 拿到@EnableAsync注解的元数据信息~~~
        this.enableAsync = AnnotationAttributes.fromMap(importMetadata.getAnnotationAttributes(EnableAsync.class.getName(), false));
        if (this.enableAsync == null) {
            throw new IllegalArgumentException("@EnableAsync is not present on importing class " + importMetadata.getClassName());
        }
    }

    /**
     * Collect any {@link AsyncConfigurer} beans through autowiring.
     */
     // doc说得很明白。它会把所有的`AsyncConfigurer`的实现类都搜集进来,然后进行类似属性的合并
     // 备注  虽然这里用的是Collection 但是AsyncConfigurer的实现类只允许有一个
    @Autowired(required = false)
    void setConfigurers(Collection<AsyncConfigurer> configurers) {

        if (CollectionUtils.isEmpty(configurers)) {
            return;
        }
        //AsyncConfigurer用来配置线程池配置以及异常处理器,而且在Spring环境中最多只能有一个
        //在这里我们知道了,如果想要自己去配置线程池,只需要实现AsyncConfigurer接口,并且不可以在Spring环境中有多个实现AsyncConfigurer的类。
        if (configurers.size() > 1) {
            throw new IllegalStateException("Only one AsyncConfigurer may exist");
        }
        // 拿到唯一的AsyncConfigurer ,然后赋值~~~~   默认的请参照这个类:AsyncConfigurerSupport(它并不会被加入进Spring容器里)
        AsyncConfigurer configurer = configurers.iterator().next();
        this.executor = configurer.getAsyncExecutor();
        this.exceptionHandler = configurer.getAsyncUncaughtExceptionHandler();
    }
}
从上可知,真正做文章的最终还是AsyncAnnotationBeanPostProcessor这个后置处理器,下面我们来重点看看它
AsyncAnnotationBeanPostProcessor
AsyncAnnotationBeanPostProcessor这个BeanPostBeanPostProcessor很显然会对带有能够引发异步操作的注解(比如@Async)的Bean进行处理
从该类的继承体系可以看出,大部分功能都是在抽象类里完成的,它不关乎于@Async,而是这一类技术都是这样子处理的。
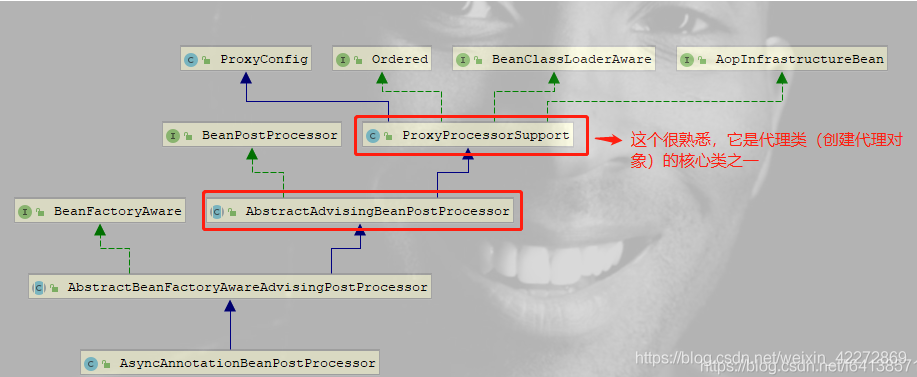
首先,ProxyProcessorSupport这里就不用多说了,在讲解自动代理创建器的时候有说过。
AbstractAdvisingBeanPostProcessor
从这个名字也能看出来。它主要处理AdvisingBean,也就是处理Advisor和Bean的关系的
// 它继承自,ProxyProcessorSupport,说明它也拥有AOp的通用配置
public abstract class AbstractAdvisingBeanPostProcessor extends ProxyProcessorSupport implements BeanPostProcessor {
    @Nullable
    protected Advisor advisor;
    protected boolean beforeExistingAdvisors = false;

    // 缓存合格的Bean们
    private final Map<Class<?>, Boolean> eligibleBeans = new ConcurrentHashMap<>(256);

    // 当遇到一个pre-object的时候,是否把该processor所持有得advisor放在现有的增强器们之前执行
    // 默认是false,会放在最后一个位置上的
    public void setBeforeExistingAdvisors(boolean beforeExistingAdvisors) {
        this.beforeExistingAdvisors = beforeExistingAdvisors;
    }

    // 不处理
    @Override
    public Object postProcessBeforeInitialization(Object bean, String beanName) {
        return bean;
    }

    // Bean已经实例化、初始化完成之后执行。
    @Override
    public Object postProcessAfterInitialization(Object bean, String beanName) {
        // 忽略AopInfrastructureBean的Bean,并且如果没有advisor也会忽略不处理~~~~~
        if (bean instanceof AopInfrastructureBean || this.advisor == null) {
            // Ignore AOP infrastructure such as scoped proxies.
            return bean;
        }

        // 如果这个Bean已经被代理过了(比如已经被AOP切中了),那本处就无需再重复创建代理了嘛
        // 直接向里面添加advisor就成了
        if (bean instanceof Advised) {
            Advised advised = (Advised) bean;
            // 注意此advised不能是已经被冻结了的。且源对象必须是Eligible合格的
            if (!advised.isFrozen() && isEligible(AopUtils.getTargetClass(bean))) {
                // Add our local Advisor to the existing proxy's Advisor chain...
                // 把自己持有的这个advisor放在首位(如果beforeExistingAdvisors=true)
                if (this.beforeExistingAdvisors) {
                    advised.addAdvisor(0, this.advisor);
                }
                // 否则就是尾部位置
                else {
                    advised.addAdvisor(this.advisor);
                }
                // 最终直接返回即可,因为已经没有必要再创建一次代理对象了
                return bean;
            }
        }

        // 如果这个Bean事合格的(此方法下面有解释)   这个时候是没有被代理过的
        if (isEligible(bean, beanName)) {
            // 以当前的配置,创建一个ProxyFactory
            ProxyFactory proxyFactory = prepareProxyFactory(bean, beanName);
            // 如果不是使用CGLIB常见代理,那就去分析出它所实现的接口们  然后放进ProxyFactory 里去
            if (!proxyFactory.isProxyTargetClass()) {
                evaluateProxyInterfaces(bean.getClass(), proxyFactory);
            }

            // 切面就是当前持有得advisor
            proxyFactory.addAdvisor(this.advisor);
            // 留给子类,自己还可以对proxyFactory进行自定义~~~~~
            customizeProxyFactory(proxyFactory);
            // 最终返回这个代理对象~~~~~
            return proxyFactory.getProxy(getProxyClassLoader());
        }

        // No async proxy needed.(相当于没有做任何的代理处理,返回原对象)
        return bean;
    }

    // 检查这个Bean是否是合格的
    protected boolean isEligible(Object bean, String beanName) {
        return isEligible(bean.getClass());
    }
    protected boolean isEligible(Class<?> targetClass) {
        // 如果已经被缓存着了,那肯定靠谱啊
        Boolean eligible = this.eligibleBeans.get(targetClass);
        if (eligible != null) {
            return eligible;
        }
        // 如果没有切面(就相当于没有给配置增强器,那铁定是不合格的)
        if (this.advisor == null) {
            return false;
        }

        // 这个重要了:看看这个advisor是否能够切入进targetClass这个类,能够切入进取的也是合格的
        eligible = AopUtils.canApply(this.advisor, targetClass);
        this.eligibleBeans.put(targetClass, eligible);
        return eligible;
    }

    // 子类可以复写。比如`AbstractBeanFactoryAwareAdvisingPostProcessor`就复写了这个方法~~~
    protected ProxyFactory prepareProxyFactory(Object bean, String beanName) {
        ProxyFactory proxyFactory = new ProxyFactory();
        proxyFactory.copyFrom(this);
        proxyFactory.setTarget(bean);
        return proxyFactory;
    }

    // 子类复写~
    protected void customizeProxyFactory(ProxyFactory proxyFactory) {
    }
}
看看它的继承图:

MethodValidationPostProcessor属于JSR-303校验方面的范畴
AbstractBeanFactoryAwareAdvisingPostProcessor
从名字可以看出,它相较于父类,就和BeanFactory有关了,也就是和Bean容器相关了~~~
public abstract class AbstractBeanFactoryAwareAdvisingPostProcessor extends AbstractAdvisingBeanPostProcessor
		implements BeanFactoryAware {
    // Bean工厂
    @Nullable
    private ConfigurableListableBeanFactory beanFactory;

    // 如果这个Bean工厂不是ConfigurableListableBeanFactory ,那就set一个null
    // 我们的`DefaultListableBeanFactory`显然就是它的子类~~~~~
    @Override
    public void setBeanFactory(BeanFactory beanFactory) {
        this.beanFactory = (beanFactory instanceof ConfigurableListableBeanFactory ?
                (ConfigurableListableBeanFactory) beanFactory : null);
    }
    @Override
    protected ProxyFactory prepareProxyFactory(Object bean, String beanName) {
        // 如果Bean工厂是正常的,那就把这个Bean  expose一个特殊的Bean,记录下它的类型
        if (this.beanFactory != null) {
            AutoProxyUtils.exposeTargetClass(this.beanFactory, beanName, bean.getClass());
        }

        ProxyFactory proxyFactory = super.prepareProxyFactory(bean, beanName);

        // 这里创建代理也是和`AbstractAutoProxyCreator`差不多的逻辑。
        // 如果没有显示的设置为CGLIB,并且toProxyUtils.shouldProxyTargetClass还被暴露过时一个特殊的Bean,那就强制使用CGLIB代理吧    这里一般和Scope无关的话,都返回false了
        if (!proxyFactory.isProxyTargetClass() && this.beanFactory != null &&
                AutoProxyUtils.shouldProxyTargetClass(this.beanFactory, beanName)) {
            proxyFactory.setProxyTargetClass(true);
        }
        return proxyFactory;
    }
}
下面就可以看看具体的两个实现类了:
AsyncAnnotationBeanPostProcessor
该实现类就是具体和@Async相关的一个类了~~~
public class AsyncAnnotationBeanPostProcessor extends AbstractBeanFactoryAwareAdvisingPostProcessor {
    // 建议换成AsyncExecutionAspectSupport.DEFAULT_TASK_EXECUTOR_BEAN_NAME  这样语意更加的清晰些
    public static final String DEFAULT_TASK_EXECUTOR_BEAN_NAME = AnnotationAsyncExecutionInterceptor.DEFAULT_TASK_EXECUTOR_BEAN_NAME;

    // 注解类型
    @Nullable
    private Class<? extends Annotation> asyncAnnotationType;
    // 异步的执行器
    @Nullable
    private Executor executor;
    // 异步异常处理器
    @Nullable
    private AsyncUncaughtExceptionHandler exceptionHandler;

    // 此处特别注意:这里设置为true,也就是说@Async的Advisor会放在首位
    public AsyncAnnotationBeanPostProcessor() {
        setBeforeExistingAdvisors(true);
    }

    // 可以设定需要扫描哪些注解类型。默认只扫描@Async以及`javax.ejb.Asynchronous`这个注解
    public void setAsyncAnnotationType(Class<? extends Annotation> asyncAnnotationType) {
        Assert.notNull(asyncAnnotationType, "'asyncAnnotationType' must not be null");
        this.asyncAnnotationType = asyncAnnotationType;
    }

    // 如果没有指定。那就将执行全局得默认查找。在上下文中查找唯一的`TaskExecutor`类型的Bean,或者一个名称为`taskExecutor`的Executor
    // 当然,如果上面途径都没找到。那就会采用一个默认的任务池
    public void setExecutor(Executor executor) {
        this.executor = executor;
    }
    public void setExceptionHandler(AsyncUncaughtExceptionHandler exceptionHandler) {
        this.exceptionHandler = exceptionHandler;
    }
    // 重写了父类的方法。然后下面:自己new了一个AsyncAnnotationAdvisor ,传入executor和exceptionHandler
    // 并且最终this.advisor = advisor
    // 因此可议看出:AsyncAnnotationAdvisor 才是重点了。它定义了它的匹配情况~~~~
    @Override
    public void setBeanFactory(BeanFactory beanFactory) {
        super.setBeanFactory(beanFactory);

        AsyncAnnotationAdvisor advisor = new AsyncAnnotationAdvisor(this.executor, this.exceptionHandler);
        if (this.asyncAnnotationType != null) {
            advisor.setAsyncAnnotationType(this.asyncAnnotationType);
        }
        advisor.setBeanFactory(beanFactory);
        this.advisor = advisor;
    }
}
AsyncAnnotationAdvisor
可以看出,它是一个PointcutAdvisor,并且Pointcut是一个AnnotationMatchingPointcut,因此是为注解来匹配的
public class AsyncAnnotationAdvisor extends AbstractPointcutAdvisor implements BeanFactoryAware {
    private AsyncUncaughtExceptionHandler exceptionHandler;
    // 增强器
    private Advice advice;
    // 切点
    private Pointcut pointcut;

    // 两个都为null,那就是都会采用默认的方案
    public AsyncAnnotationAdvisor() {
        this(null, null);
    }

    // 创建一个AsyncAnnotationAdvisor实例,可以自己指定Executor 和 AsyncUncaughtExceptionHandler
    @SuppressWarnings("unchecked")
    public AsyncAnnotationAdvisor(@Nullable Executor executor, @Nullable AsyncUncaughtExceptionHandler exceptionHandler) {
        // 这里List长度选择2,应为绝大部分情况下只会支持这两种@Async和@Asynchronous
        Set<Class<? extends Annotation>> asyncAnnotationTypes = new LinkedHashSet<>(2);
        asyncAnnotationTypes.add(Async.class);
        try {
            asyncAnnotationTypes.add((Class<? extends Annotation>)
                    ClassUtils.forName("javax.ejb.Asynchronous", AsyncAnnotationAdvisor.class.getClassLoader()));
        }
        catch (ClassNotFoundException ex) {
            // If EJB 3.1 API not present, simply ignore.
        }

        if (exceptionHandler != null) {
            this.exceptionHandler = exceptionHandler;
        }
        // 若没指定,那就使用默认的SimpleAsyncUncaughtExceptionHandler(它仅仅是输出了一句日志而已)
        else {
            this.exceptionHandler = new SimpleAsyncUncaughtExceptionHandler();
        }

        // 这两个方法是重点,下面会重点介绍
        this.advice = buildAdvice(executor, this.exceptionHandler);
        this.pointcut = buildPointcut(asyncAnnotationTypes);
    }
    // 如果set了Executor,advice会重新构建。
    public void setTaskExecutor(Executor executor) {
        this.advice = buildAdvice(executor, this.exceptionHandler);
    }

    // 这里注意:如果你自己指定了注解类型。那么将不再扫描其余两个默认的注解,因此pointcut也就需要重新构建了
    public void setAsyncAnnotationType(Class<? extends Annotation> asyncAnnotationType) {
        Assert.notNull(asyncAnnotationType, "'asyncAnnotationType' must not be null");
        Set<Class<? extends Annotation>> asyncAnnotationTypes = new HashSet<>();
        asyncAnnotationTypes.add(asyncAnnotationType);
        this.pointcut = buildPointcut(asyncAnnotationTypes);
    }

    // 如果这个advice也实现了BeanFactoryAware,那就也把BeanFactory放进去
    @Override
    public void setBeanFactory(BeanFactory beanFactory) {
        if (this.advice instanceof BeanFactoryAware) {
            ((BeanFactoryAware) this.advice).setBeanFactory(beanFactory);
        }
    }

    @Override
    public Advice getAdvice() {
        return this.advice;
    }
    @Override
    public Pointcut getPointcut() {
        return this.pointcut;
    }

    // 这个最终又是委托给`AnnotationAsyncExecutionInterceptor`,它是一个具体的增强器,有着核心内容
    protected Advice buildAdvice(@Nullable Executor executor, AsyncUncaughtExceptionHandler exceptionHandler) {
        return new AnnotationAsyncExecutionInterceptor(executor, exceptionHandler);
    }

    // Calculate a pointcut for the given async annotation types, if any
    protected Pointcut buildPointcut(Set<Class<? extends Annotation>> asyncAnnotationTypes) {
        // 采用一个组合切面:ComposablePointcut (因为可能需要支持多个注解嘛)
        ComposablePointcut result = null;
        for (Class<? extends Annotation> asyncAnnotationType : asyncAnnotationTypes) {
            // 这里为何new出来两个AnnotationMatchingPointcut??????
            // 第一个:类匹配(只需要类上面有这个注解,所有的方法都匹配)this.methodMatcher = MethodMatcher.TRUE;
            // 第二个:方法匹配。所有的类都可议。但是只有方法上有这个注解才会匹配上
            Pointcut cpc = new AnnotationMatchingPointcut(asyncAnnotationType, true);
            Pointcut mpc = new AnnotationMatchingPointcut(null, asyncAnnotationType, true);
            if (result == null) {
                result = new ComposablePointcut(cpc);
            }
            else {
                result.union(cpc);
            }
            // 最终的结果都是取值为并集的~~~~~~~
            result = result.union(mpc);
        }
        //  最后一个处理厉害了:也就是说你啥类型都木有的情况下,是匹配所有类的所有方法~~~
        return (result != null ? result : Pointcut.TRUE);
    }
}
从上的源码可议看出,默认是支持@Asycn以及EJB的那个异步注解的。但是最终的增强行为,委托给了AnnotationAsyncExecutionInterceptor
AnnotationAsyncExecutionInterceptor:@Async拦截器
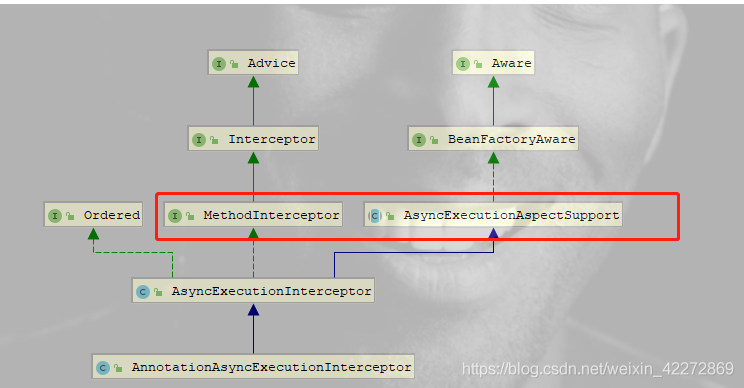
可知,它是一个MethodInterceptor,并且继承自AsyncExecutionAspectSupport
AsyncExecutionAspectSupport
从类名就可以看出,它是用来支持处理异步线程执行器的,若没有指定,靠它提供一个默认的异步执行器。
public abstract class AsyncExecutionAspectSupport implements BeanFactoryAware {
    // 这是备选的。如果找到多个类型为TaskExecutor的Bean,才会备选的再用这个名称去找的~~~
    public static final String DEFAULT_TASK_EXECUTOR_BEAN_NAME = "taskExecutor";
    // 缓存~~~AsyncTaskExecutor是TaskExecutor的子接口
    // 从这可以看出:不同的方法,对应的异步执行器还不一样咯~~~~~~
    private final Map<Method, AsyncTaskExecutor> executors = new ConcurrentHashMap<>(16);
    // 默认的线程执行器
    @Nullable
    private volatile Executor defaultExecutor;
    // 异步异常处理器
    private AsyncUncaughtExceptionHandler exceptionHandler;
    // Bean工厂
    @Nullable
    private BeanFactory beanFactory;

    public AsyncExecutionAspectSupport(@Nullable Executor defaultExecutor) {
        this(defaultExecutor, new SimpleAsyncUncaughtExceptionHandler());
    }
    public AsyncExecutionAspectSupport(@Nullable Executor defaultExecutor, AsyncUncaughtExceptionHandler exceptionHandler) {
        this.defaultExecutor = defaultExecutor;
        this.exceptionHandler = exceptionHandler;
    }
    public void setExecutor(Executor defaultExecutor) {
        this.defaultExecutor = defaultExecutor;
    }
    public void setExceptionHandler(AsyncUncaughtExceptionHandler exceptionHandler) {
        this.exceptionHandler = exceptionHandler;
    }
    @Override
    public void setBeanFactory(BeanFactory beanFactory) {
        this.beanFactory = beanFactory;
    }

    // 该方法是找到一个异步执行器,去执行这个方法~~~~~~
    @Nullable
    protected AsyncTaskExecutor determineAsyncExecutor(Method method) {
        // 如果缓存中能够找到该方法对应的执行器,就立马返回了
        AsyncTaskExecutor executor = this.executors.get(method);
        if (executor == null) {
            Executor targetExecutor;

            // 抽象方法:`AnnotationAsyncExecutionInterceptor`有实现。就是@Async注解的value值
            String qualifier = getExecutorQualifier(method);
            // 现在知道@Async直接的value值的作用了吧。就是制定执行此方法的执行器的(容器内执行器的Bean的名称)
            // 当然有可能为null。注意此处是支持@Qualified注解标注在类上来区分Bean的
            // 注意:此处targetExecutor仍然可能为null
            if (StringUtils.hasLength(qualifier)) {
                targetExecutor = findQualifiedExecutor(this.beanFactory, qualifier);
            }

            // 注解没有指定value值,那就去找默认的执行器
            else {
                targetExecutor = this.defaultExecutor;
                if (targetExecutor == null) {
                    // 去找getDefaultExecutor()~~~
                    synchronized (this.executors) {
                        if (this.defaultExecutor == null) {
                            this.defaultExecutor = getDefaultExecutor(this.beanFactory);
                        }
                        targetExecutor = this.defaultExecutor;
                    }
                }
            }

            // 若还未null,那就返回null吧
            if (targetExecutor == null) {
                return null;
            }

            // 把targetExecutor 包装成一个AsyncTaskExecutor返回,并且缓存起来。
            // TaskExecutorAdapter就是AsyncListenableTaskExecutor的一个实现类
            executor = (targetExecutor instanceof AsyncListenableTaskExecutor ?
                    (AsyncListenableTaskExecutor) targetExecutor : new TaskExecutorAdapter(targetExecutor));
            this.executors.put(method, executor);
        }
        return executor;
    }

    // 子类去复写此方法。也就是拿到对应的key,从而方便找bean吧(执行器)
    @Nullable
    protected abstract String getExecutorQualifier(Method method);

    // @since 4.2.6  也就是根据
    @Nullable
    protected Executor findQualifiedExecutor(@Nullable BeanFactory beanFactory, String qualifier) {
        if (beanFactory == null) {
            throw new IllegalStateException("BeanFactory must be set on " + getClass().getSimpleName() +
                    " to access qualified executor '" + qualifier + "'");
        }
        return BeanFactoryAnnotationUtils.qualifiedBeanOfType(beanFactory, Executor.class, qualifier);
    }

    // @since 4.2.6
    // Retrieve or build a default executor for this advice instance  检索或者创建一个默认的executor
    @Nullable
    protected Executor getDefaultExecutor(@Nullable BeanFactory beanFactory) {
        if (beanFactory != null) {
            // 这个处理很有意思,它是用用的try catch的技巧去处理的
            try {
                // 如果容器内存在唯一的TaskExecutor(子类),就直接返回了
                return beanFactory.getBean(TaskExecutor.class);
            }
            catch (NoUniqueBeanDefinitionException ex) {
                // 这是出现了多个TaskExecutor类型的话,那就按照名字去拿  `taskExecutor`且是Executor类型
                try {
                    return beanFactory.getBean(DEFAULT_TASK_EXECUTOR_BEAN_NAME, Executor.class);
                }
                // 如果再没有找到,也不要报错,而是接下来创建一个默认的处理器
                // 这里输出一个info信息
                catch (NoSuchBeanDefinitionException ex2) {
                }
            }
            catch (NoSuchBeanDefinitionException ex) {
                try {
                    return beanFactory.getBean(DEFAULT_TASK_EXECUTOR_BEAN_NAME, Executor.class);
                }
                catch (NoSuchBeanDefinitionException ex2) {
                }
                // 这里还没有获取到,就放弃。 用本地默认的executor吧~~~
                // 子类可以去复写此方法,发现为null的话可议给一个默认值~~~~比如`AsyncExecutionInterceptor`默认给的就是`SimpleAsyncTaskExecutor`作为执行器的
                // Giving up -> either using local default executor or none at all...
            }
        }
        return null;
    }

    //Delegate for actually executing the given task with the chosen executor
    // 用选定的执行者实际执行给定任务的委托
    @Nullable
    protected Object doSubmit(Callable<Object> task, AsyncTaskExecutor executor, Class<?> returnType) {
        // 根据不同的返回值类型,来采用不同的方案去异步执行,但是执行器都是executor
        if (CompletableFuture.class.isAssignableFrom(returnType)) {
            return CompletableFuture.supplyAsync(() -> {
                try {
                    return task.call();
                }
                catch (Throwable ex) {
                    throw new CompletionException(ex);
                }
            }, executor);
        }
        // ListenableFuture接口继承自Future  是Spring自己扩展的一个接口。
        // 同样的AsyncListenableTaskExecutor也是Spring扩展自AsyncTaskExecutor的
        else if (ListenableFuture.class.isAssignableFrom(returnType)) {
            return ((AsyncListenableTaskExecutor) executor).submitListenable(task);
        }

        // 普通的submit
        else if (Future.class.isAssignableFrom(returnType)) {
            return executor.submit(task);
        }
        // 没有返回值的情况下  也用sumitt提交,按时返回null
        else {
            executor.submit(task);
            return null;
        }
    }

    // 处理错误
    protected void handleError(Throwable ex, Method method, Object... params) throws Exception {
        // 如果方法的返回值类型是Future,就rethrowException,表示直接throw出去
        if (Future.class.isAssignableFrom(method.getReturnType())) {
            ReflectionUtils.rethrowException(ex);
        } else {
            // Could not transmit the exception to the caller with default executor
            try {
                this.exceptionHandler.handleUncaughtException(ex, method, params);
            } catch (Throwable ex2) {
                logger.error("Exception handler for async method '" + method.toGenericString() +
                        "' threw unexpected exception itself", ex2);
            }
        }
    }
}
这个类相当于已经做了大部分的工作了,接下来继续看子类:
AsyncExecutionInterceptor
终于,从此处开始。可议看出它是一个MethodInterceptor,是一个增强器了。但是从命名中也可以看出,它已经能够处理异步的执行了(比如基于XML方式的),但是还和注解无关
// 他继承自AsyncExecutionAspectSupport 来处理异步方法的处理,同时是个MethodInterceptor,来增强复合条件的方法
public class AsyncExecutionInterceptor extends AsyncExecutionAspectSupport implements MethodInterceptor, Ordered {
	...
	// 显然这个方法它直接返回null,因为XML配置嘛~~~~
	@Override
	@Nullable
	protected String getExecutorQualifier(Method method) {
		return null;
	}
    // 这个厉害了。如果父类返回的defaultExecutor 为null,那就new一个SimpleAsyncTaskExecutor作为默认的执行器
    @Override
    @Nullable
    protected Executor getDefaultExecutor(@Nullable BeanFactory beanFactory) {
        Executor defaultExecutor = super.getDefaultExecutor(beanFactory);
        return (defaultExecutor != null ? defaultExecutor : new SimpleAsyncTaskExecutor());
    }
    // 最高优先级  希望的是最优先执行(XML配置就是这种优先级)
    @Override
    public int getOrder() {
        return Ordered.HIGHEST_PRECEDENCE;
    }
    // 最重要的当然是这个invoke方法
	@Override
	@Nullable
	public Object invoke(final MethodInvocation invocation) throws Throwable {
		Class<?> targetClass = (invocation.getThis() != null ? AopUtils.getTargetClass(invocation.getThis()) : null);
		// 注意:此处是getMostSpecificMethod  拿到最终要执行的那个方法
		Method specificMethod = ClassUtils.getMostSpecificMethod(invocation.getMethod(), targetClass);
		// 桥接方法~~~~~~~~~~~~~~
		final Method userDeclaredMethod = BridgeMethodResolver.findBridgedMethod(specificMethod);
		// determine一个用于执行此方法的异步执行器
        AsyncTaskExecutor executor = determineAsyncExecutor(userDeclaredMethod);
        if (executor == null) {
            throw new IllegalStateException(
                    "No executor specified and no default executor set on AsyncExecutionInterceptor either");
        }

        // 构造一个任务,Callable(此处不采用Runable,因为需要返回值)
        Callable<Object> task = () -> {
            try {
                // result就是返回值
                Object result = invocation.proceed();
                // 注意此处的处理~~~~  相当于如果不是Future类型,就返回null了
                if (result instanceof Future) {
                    return ((Future<?>) result).get();
                }
            }
            // 处理执行时可能产生的异常~~~~~~
            catch (ExecutionException ex) {
                handleError(ex.getCause(), userDeclaredMethod, invocation.getArguments());
            }
            catch (Throwable ex) {
                handleError(ex, userDeclaredMethod, invocation.getArguments());
            }
            return null;
        };

        // 提交任务~~~~invocation.getMethod().getReturnType()为返回值类型
        return doSubmit(task, executor, invocation.getMethod().getReturnType());
    }
}
SimpleAsyncTaskExecutor:异步执行用户任务的SimpleAsyncTaskExecutor。每次执行客户提交给它的任务时,它会启动新的线程,并允许开发者控制并发线程的上限(concurrencyLimit),从而起到一定的资源节流作用。默认时,concurrencyLimit取值为-1,即不启用资源节流
所以它不是真的线程池,这个类不重用线程,每次调用都会创建一个新的线程(因此建议我们在使用@Aysnc的时候,自己配置一个线程池,节约资源)
AnnotationAsyncExecutionInterceptor
很显然,他是在AsyncExecutionInterceptor的基础上,提供了对@Async注解的支持。所以它是继承它的。
// 它继承自AsyncExecutionInterceptor ,只复写了一个方法
public class AnnotationAsyncExecutionInterceptor extends AsyncExecutionInterceptor {
	...
	// 由此可以见它就是去拿到@Async的value值。以方法的为准,其次是类上面的
	// 备注:发现这里是不支持EJB的@Asynchronous注解的,它是不能指定执行器的
	@Override
	@Nullable
	protected String getExecutorQualifier(Method method) {
		// Maintainer's note: changes made here should also be made in
		// AnnotationAsyncExecutionAspect#getExecutorQualifier
		Async async = AnnotatedElementUtils.findMergedAnnotation(method, Async.class);
		if (async == null) {
			async = AnnotatedElementUtils.findMergedAnnotation(method.getDeclaringClass(), Async.class);
		}
		return (async != null ? async.value() : null);
	}
}
使用推荐配置
@EnableAsync //对应的@Enable注解,最好写在属于自己的配置文件上,保持内聚性
@Configuration
public class AsyncConfig implements AsyncConfigurer {
    @Override
    public Executor getAsyncExecutor() {
        ThreadPoolTaskExecutor executor = new ThreadPoolTaskExecutor();
        executor.setCorePoolSize(10); //核心线程数
        executor.setMaxPoolSize(20);  //最大线程数
        executor.setQueueCapacity(1000); //队列大小
        executor.setKeepAliveSeconds(300); //线程最大空闲时间
        executor.setThreadNamePrefix("fsx-Executor-"); 指定用于新创建的线程名称的前缀。
        executor.setRejectedExecutionHandler(new ThreadPoolExecutor.CallerRunsPolicy()); // 拒绝策略(一共四种,此处省略)

        // 这一步千万不能忘了,否则报错: java.lang.IllegalStateException: ThreadPoolTaskExecutor not initialized
        executor.initialize();
        return executor;
    }

    // 异常处理器:当然你也可以自定义的,这里我就这么简单写了~~~
    @Override
    public AsyncUncaughtExceptionHandler getAsyncUncaughtExceptionHandler() {
        return new SimpleAsyncUncaughtExceptionHandler();
    }
}
使用Spring的异步,我个人十分建议配置上自己自定义的配置器(如上配置仅供参考),这样能够更好的掌握(比如异常处理AsyncUncaughtExceptionHandler~~~)
总结
有了Spring AOP整体运行原理作为基础,再看这些基于AOP的应用,简直行云流水。
最后,使用的有两个建议:
异步方法建议尽量处理耗时的任务,或者是处理不希望阻断主流程的任务(比如异步记录操作日志)
尽量为@Async准备一个专门的线程池来提高效率减少开销,而不要用Spring默认的SimpleAsyncTaskExecutor,它不是一个真正的线程池~
spring boot默认线程池的正确使用方式
我们在Spring项目的时候,会用到异步注解 @Async 注解,从 Spring原理之@Async (上一段)我们可以知道其实他底层用到的默认的所谓的线程池并不是真的线程池,每次调用都会创建一个新的线程,那么我们如何来修改这个默认的线程池或者说使用我们自定义的线程池呢?spring boot自动装配其实已经为我们处理了上述问题,spring boot设置了默认的连接池以及默认基本配置,详见下文
spring boot自动装配
自动装配是spring boot的一大特点,自动装配其实就是spring把一些常用的bean提前注册到了容器,如redis、jdbc、activemq等,我们可以直接来使用这些bean,所有的自动装配的代码都在spring-boot-autoconfigure这个模块里。
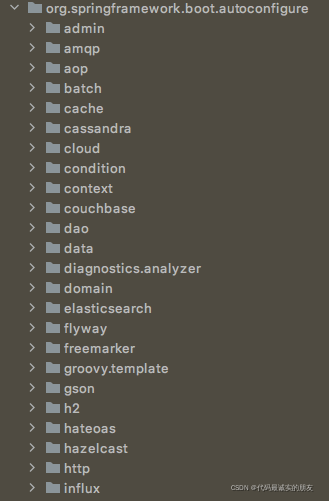
内置了很多,市面上常用的组件基本都包括了。
线程池的自动装配
线程池的自动装配代码在org.springframework.boot.autoconfigure.task.TaskExecutionAutoConfiguration这个类里面。
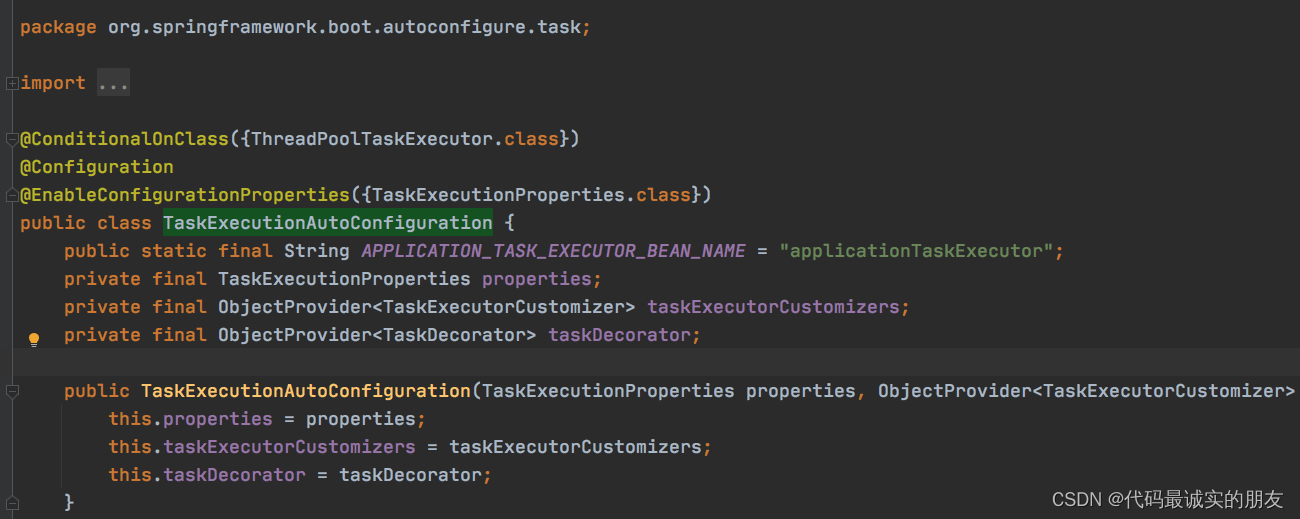
可以看到类上有一个注解:@ConditionalOnClass({ThreadPoolTaskExecutor.class}),也就是说自动装配是有条件的,前提是在类路径下有这个类, ThreadPoolTaskExecutor这个类是spring的线程池实现类,这个类在spring-context包中,如果引入了这个包,那么spring boot将会向容器注册一个默认的线程池。
默认线程池的参数,我们可以通过配置文件指定,格式如下:
spring.task.execution.pool.core-size=8
spring.task.execution.pool.max-size=Integer.MAX_VALUE
spring.task.execution.pool.queue-capacity=Integer.MAX_VALUE
spring.task.execution.pool.keep-alive=60 //单位是:秒
还有一些其他参数,都在org.springframework.boot.autoconfigure.task.TaskExecutionProperties这个类里面,如果我们不指定的话,会使用默认值。
默认线程池的修改--两种修改方式:1、修改环境变量 2、修改默认的线程池
修改环境变量方式:
## 配置线程池个数
如果是 CPU 密集型任务,那么线程池的线程个数应该尽量少一些,一般为 CPU 的个数+1条线程。
如果是 IO 密集型任务,那么线程池的线程可以放的很大,如 2*CPU 的个数。
对于混合型任务,如果可以拆分的话,通过拆分成 CPU 密集型和 IO 密集型两种来提高执行效率;如果不能拆分的的话就可以根据实际情况来调整线程池中线程的个数


# 线程池创建时的初始化线程数,默认为8
spring.task.execution.pool.core-size=5
# 线程池的最大线程数,默认为int最大值
spring.task.execution.pool.max-size=10
# 用来缓冲执行任务的队列,默认为int最大值
spring.task.execution.pool.queue-capacity=5
# 非核心线程的存活时间,线程终止前允许保持空闲的时间
spring.task.execution.pool.keep-alive=60
# 线程池的前缀名称,设置好了之后可以方便我们在日志中查看处理任务所在的线程池
spring.task.execution.thread-name-prefix=god-jiang-task-

# 是否允许核心线程超时
spring.task.execution.pool.allow-core-thread-timeout=
# 是否等待剩余任务完成后才关闭应用
spring.task.execution.shutdown.await-termination=
# 等待剩余任务完成的最大时间
spring.task.execution.shutdown.await-termination-period=
修改默认线程池方式:
关于修改 @Async默认的线程池 ,我们仅仅需要实现一个 AsyncConfigurer 类,进行**getAsyncExecutor 方法 **的重写即可,具体例子如下:
@Slf4j
@EnableAsync //对应的@Enable注解,最好写在属于自己的配置文件上,保持内聚性
@Configuration
public class AsyncConfig implements AsyncConfigurer {
    @Override
    public Executor getAsyncExecutor() {
        ThreadPoolTaskExecutor executor = new ThreadPoolTaskExecutor();
        executor.setCorePoolSize(10); //核心线程数
        executor.setMaxPoolSize(20);  //最大线程数
        executor.setQueueCapacity(1000); //队列大小
        executor.setKeepAliveSeconds(300); //线程最大空闲时间
        executor.setThreadNamePrefix("async-Executor-"); 指定用于新创建的线程名称的前缀。
        executor.setRejectedExecutionHandler(new ThreadPoolExecutor.CallerRunsPolicy()); // 拒绝策略(一共四种)

       /**
         * 拒绝处理策略
         * CallerRunsPolicy():交由调用方线程运行,比如 main 线程。
         * AbortPolicy():直接抛出异常。
         * DiscardPolicy():直接丢弃。
         * DiscardOldestPolicy():丢弃队列中最老的任务。
         */
        /**
         * 特殊说明:
         * 1. 这里演示环境,拒绝策略咱们采用抛出异常
         * 2.真实业务场景会把缓存队列的大小会设置大一些,
         * 如果,提交的任务数量超过最大线程数量或将任务环缓存到本地、redis、mysql中,保证消息不丢失
         * 3.如果项目比较大的话,异步通知种类很多的话,建议采用MQ做异步通知方案
         */

        // 这一步千万不能忘了,否则报错: java.lang.IllegalStateException: ThreadPoolTaskExecutor not initialized
        // 线程初始化
      	executor.initialize();
        return executor;
    }

    // 异常处理器:当然你也可以自定义的,这里我就这么简单写了~~~
    @Override
    public AsyncUncaughtExceptionHandler getAsyncUncaughtExceptionHandler() {
        return return new AsyncUncaughtExceptionHandler() {

            @Override
            public void handleUncaughtException(Throwable arg0, Method arg1, Object... arg2) {
                log.error("=========================="+arg0.getMessage()+"=======================", arg0);
                log.error("exception method:"+arg1.getName());
            }
        };
    }

}
具体使用:
@Component
public class AsyncMyTask {
    protected final Logger logger = LoggerFactory.getLogger(this.getClass());
    // 直接使用该注解即可
    @Async
    public void doTask(int i) throws InterruptedException{
        logger.info("Task-Native" + i + " started.");
    }
}
默认线程池的使用
直接使用@Autowired这个注解注入即可。
@RunWith(SpringRunner.class)
@SpringBootTest(classes = TestApplication.class)
public class TestApplicationTests {

    // 注入ThreadPoolTaskExecutor
		@Autowired
    private ThreadPoolTaskExecutor threadPoolTaskExecutor;

    @Test
    public void ThreadTest(){
        System.out.println(threadPoolTaskExecutor);

        System.out.println("new Runnable()");
        // 创建并执行线程,方式一
        threadPoolTaskExecutor.execute(new Runnable() {
            @Override
            public void run() {
                for (int i = 0; i < 100; i++) {
                    System.out.println("new Runnable()"+i+"当前线程"+Thread.currentThread().getName());
                }
            }
        });

        // // 创建并执行线程,方式二
        System.out.println("lambda");
        threadPoolTaskExecutor.execute(() -> {
            for (int i = 0; i < 100; i++) {
                System.out.println("lambda"+i+"当前线程"+Thread.currentThread().getName());
            }
        });
    }
}
使用@Async和@EnableAsync注解
// 在spring boot应用中使用@Async很简单:

1、调用异步方法类上或者启动类加上注解@EnableAsync
2、在需要被异步调用的方法外加上@Async
3、所使用的@Async注解方法的类对象应该是Spring容器管理的bean对象


//#首先使用@EnableAsync注解开启异步调用功能,该注解可以放置的位置有:
//      #启动类上方
      @EnableAsync
      @SpringBootApplication
      public class MyApplication {
          public static void main(String[] args) {
                  SpringApplication.run(MyApplication.class, args);
         }
//      #调用异步的当前类上方
      @EnableAsync
      @RestController
      public class TestAsyncController(){}
 //     #在配置类上方使用
      @Configuration
      @EnableAsync
      public class AsyncTaskPoolConfig {
          @Bean(name = "taskExecutor")
          public Executor taskExecutor() {
              ThreadPoolTaskExecutor executor = new ThreadPoolTaskExecutor();
              executor.setCorePoolSize(10);
              executor.setMaxPoolSize(200);
              executor.setQueueCapacity(50);
              executor.setKeepAliveSeconds(60);
              executor.setThreadNamePrefix("taskExecutor-ws-");
              executor.setRejectedExecutionHandler(new ThreadPoolExecutor.CallerRunsPolicy());
              return executor;
          }
      }


 //#  编写异步请求				在异步执行的方法上添加注解:@Async
Component
@Log4j2
public class AsyncTask {
    //这里注入的是dubbo的服务,和异步请求没有多大关系
    @Reference(check = false)
    private AuthorFacade authorFacade;

      /**
     * 获取作者信息
     *
     * @param authorId 作者ID
     * @return 作者信息
     */
    @Async("taskExecutor")
    public Future<AuthorDTO> getAuthor(String authorId){
        try {
            System.out.println("执行线程的名字:"+Thread.currentThread().getName());
            return new AsyncResult<AuthorDTO>(authorFacade.getAuthor(authorId));
        } catch (Exception e) {
            e.printStackTrace();
            return null;
        }
    }
}

// #什么情况下会导致@Async异步方法会失效?
1.不要在本类中异步调用。即一个方法是异步方法,然后用另一个方法调用这个异步方法。
2.不要有返回值,使用void
3.不能使用本类的私有方法或者非接口化加注@Async,因为代理不到失效
4.异步方法不能使用static修饰
5.异步类需使用@Component注解,不然将导致spring无法扫描到异步类
6.SpringBoot框架必须在启动类中增加@EnableAsync注解
7.异步方法不要和事物注解同时存在。可以在事物的方法中调用另外一个类中的异步方法。在调用Async方法的方法上标注@Transactional是管理调用方法的事务的,在Async方法上标注@Transactional是管理异步方法的事务,事务因线程隔离
8.诸如以上几点的情况比如spring中的@Transactional还有cache注解也不能有以上几点情况,否则也会失效的,因为本质都是因为代理的机制导致的

// #使用@Async 注解时,需要注意一下几点:
当项目中只有一个线程池时,我们只需要写 @Async 即可将需要异步的方法进行异步;
当项目中存在多个线程池,我们在写异步时,需要注意如果只写@Async注解没有任何属性则将此方法的执行异步到带有 @Primary 注解修饰的线程池中执行。
还可以将方法异步到指定的线程池中,如 @Async(“threadPool”)则是将此方法异步到threadPool 线程池中执行。
自定义线程池
自定义线程池的创建,也非常简单,和spring boot的写法并无二致。
也是写一个配置类,在使用的时候,根据线程池的名称来使用具体的线程池
/**
 * 自定义创建线程池
 */
@Configuration
public class TaskExecutePool {
    @Bean("myTaskAsyncPool")				//也可以直接写@Bean   默认就是方法名
    public Executor myTaskAsyncPool() {
        ThreadPoolTaskExecutor executor = new ThreadPoolTaskExecutor();
        executor.setCorePoolSize(10); //核心线程数
        executor.setMaxPoolSize(20);  //最大线程数
        executor.setQueueCapacity(1000); //队列大小
        executor.setKeepAliveSeconds(300); //线程最大空闲时间
        executor.setThreadNamePrefix("async-Executor-"); 指定用于新创建的线程名称的前缀。
        executor.setRejectedExecutionHandler(new ThreadPoolExecutor.CallerRunsPolicy()); // 拒绝策略(一共四种,此处省略)
        executor.initialize();
        return executor;
    }
}
自定义线程池的使用
因为spring boot默认创建了一个,所以加上自定义的,容器中有两个线程池,如果我们使用@Autowired注解注入,看下@Autowired这个注解的逻辑:
首先在容器中查询对应类型的bean
如果查询结果刚好为一个,就将该bean装配给@Autowired指定的数据
如果查询的结果不止一个,那么@Autowired会根据名称来查找。
如果查询的结果为空,那么会抛出异常。
所以使用@Autowired这个注入的话,要保证名称和我们自定义的一致才可以,建议指定名称。
// @Async注解的使用方式
@Component
public class AsyncMyTask {
    protected final Logger logger = LoggerFactory.getLogger(this.getClass());
    // 注解中标注使用的线程池是哪一个
    // myTaskAsynPool即配置线程池的方法名,此处如果不写自定义线程池的方法名,会使用默认的线程池
    @Async("myTaskAsyncPool")
    public void doTask(int i) throws InterruptedException{
        logger.info("Task-Native" + i + " started.");
    }
}
如果想通过配置文件来对线程池中的属性进行方便修改的话
(1)配置文件中进行配置
task.pool.corePoolSize=20
task.pool.maxPoolSize=40
task.pool.keepAliveSeconds=300
task.pool.queueCapacity=50
(2)编写获取配置属性的配置类
/**
* 线程池配置属性类
*/
@ConfigurationProperties(prefix = "task.pool")
@Data
public class ThreadPoolConfig {
    private int corePoolSize;

    private int maxPoolSize;

    private int keepAliveSeconds;

    private int queueCapacity;
}
(3)使用线程池配置属性类
/**
 * 创建线程池
*/
   @Configuration
   public class TaskExecutePool {
       @Autowired
       private ThreadPoolConfig config;

       @Bean
       public Executor myTaskAsyncPool() {
           ThreadPoolTaskExecutor executor = new ThreadPoolTaskExecutor();
           //核心线程池大小
           executor.setCorePoolSize(config.getCorePoolSize());
           //最大线程数
           executor.setMaxPoolSize(config.getMaxPoolSize());
           //队列容量
           executor.setQueueCapacity(config.getQueueCapacity());
           //活跃时间
           executor.setKeepAliveSeconds(config.getKeepAliveSeconds());
           //线程名字前缀
           executor.setThreadNamePrefix("async-Executor-");
           // 拒绝策略
           executor.setRejectedExecutionHandler(new ThreadPoolExecutor.CallerRunsPolicy());
           executor.initialize();
           return executor;
       }
   }
带条件的自定义线程池
@Configuration
public class MyThreadPool {
    @Bean("myThreadPool")
    @Conditional(CacheCondition.class)
    public ThreadPoolTaskExecutor myThreadPool(ThreadProperties threadProperties) {

        ThreadPoolTaskExecutor threadPool = new ThreadPoolTaskExecutor();
        threadPool.setCorePoolSize(threadProperties.getSize());//核心线程数量
        threadPool.setMaxPoolSize(threadProperties.getMax());//最大线程数
        threadPool.setQueueCapacity(threadProperties.getQueue());//队列数量
        threadPool.setKeepAliveSeconds(threadProperties.getKeep());//线程所允许的空闲时间
        threadPool.setThreadNamePrefix("myThread-");
        threadPool.setRejectedExecutionHandler((r, executor) -> r.run());
        threadPool.initialize();

        return threadPool;
    }
}
这个多了一个条件注解@Conditional(CacheCondition.class),需要满足这个条件,才会创建。如果条件不满足,将不会创建这个线程池,如果自定义的只有这一个的话,使用@Autowired这个注入的话,这个时候将会使用默认的线程池,这个一定要注意,如果不想使用默认的,在使用的时候,最好指定名称。

 浙公网安备 33010602011771号