
MySQL的主从复制进阶
上节回顾:
1. 主从复制前提
(1) 两台节点
(2) 二进制日志
(3) server_id不同,uuid
(4) 复制用户
(5) 备份恢复数据到从
(6) 复制信息提供(change master to)
(7) 开线程(start slave)
2. 主从复制的原理
(1) 从库,change master to(ip port user password binlog pos),存master.info
(2) 从库,start slave,开启 IO和SQL
(3) 从库IO,读master.info,连接主库,主库开启binlog_dump_T
(4) 从库IO,读master.info,根据记录的位置号,请求最新的.
(5) 主库dump进行TP,最新的binlog,给从库IO
(6) 从库IO接收,存储到TCP/IP缓存,在TCP/IP层面返回ACK给主库
(7) 从库IO,将缓存数据,落地到relay-log中,并更新master.info 二进制日志信息
(8) 从库SQL,读取relay.info ,获取上次已经执行 到的relay-log的信息,继续回放最新的relay
(9) SQL更新relay.info为最新状态
(10) 补充1: relay-log会自动被定时清理
(11) 补充2: 主库一旦有新的binlog更新,dump会有信号通知,告知IO线程来取新的,来保证复制实时性.
1. 主从复制的监控
从库
show slave status \G
oldguo[(none)]>
oldguo[(none)]>show slave status \G
*************************** 1. row ***************************
               Slave_IO_State: Waiting for master to send event
                  Master_Host: 10.0.0.51
                  Master_User: repl
                  Master_Port: 3307
                Connect_Retry: 10
              Master_Log_File: mysql-bin.000012
          Read_Master_Log_Pos: 154
               Relay_Log_File: db01-relay-bin.000005
                Relay_Log_Pos: 367
        Relay_Master_Log_File: mysql-bin.000012
             Slave_IO_Running: Yes
            Slave_SQL_Running: Yes
              Replicate_Do_DB:
          Replicate_Ignore_DB:
           Replicate_Do_Table:
       Replicate_Ignore_Table:
      Replicate_Wild_Do_Table:
  Replicate_Wild_Ignore_Table:
                   Last_Errno: 0
                   Last_Error:
                 Skip_Counter: 0
          Exec_Master_Log_Pos: 154
              Relay_Log_Space: 739
              Until_Condition: None
               Until_Log_File:
                Until_Log_Pos: 0
           Master_SSL_Allowed: No
           Master_SSL_CA_File:
           Master_SSL_CA_Path:
              Master_SSL_Cert:
            Master_SSL_Cipher:
               Master_SSL_Key:
        Seconds_Behind_Master: 0
Master_SSL_Verify_Server_Cert: No
                Last_IO_Errno: 0
                Last_IO_Error:
               Last_SQL_Errno: 0
               Last_SQL_Error:
  Replicate_Ignore_Server_Ids:
             Master_Server_Id: 7
                  Master_UUID: c4af0dce-b834-11e9-9e5f-000c2980e248
             Master_Info_File: /data/3308/data/master.info
                    SQL_Delay: 0
          SQL_Remaining_Delay: NULL
      Slave_SQL_Running_State: Slave has read all relay log; waiting for more updates
           Master_Retry_Count: 86400
                  Master_Bind:
      Last_IO_Error_Timestamp:
     Last_SQL_Error_Timestamp:
               Master_SSL_Crl:
           Master_SSL_Crlpath:
           Retrieved_Gtid_Set:
            Executed_Gtid_Set:
                Auto_Position: 0
         Replicate_Rewrite_DB:
                 Channel_Name:
           Master_TLS_Version:
1 row in set (0.00 sec)

oldguo[(none)]>
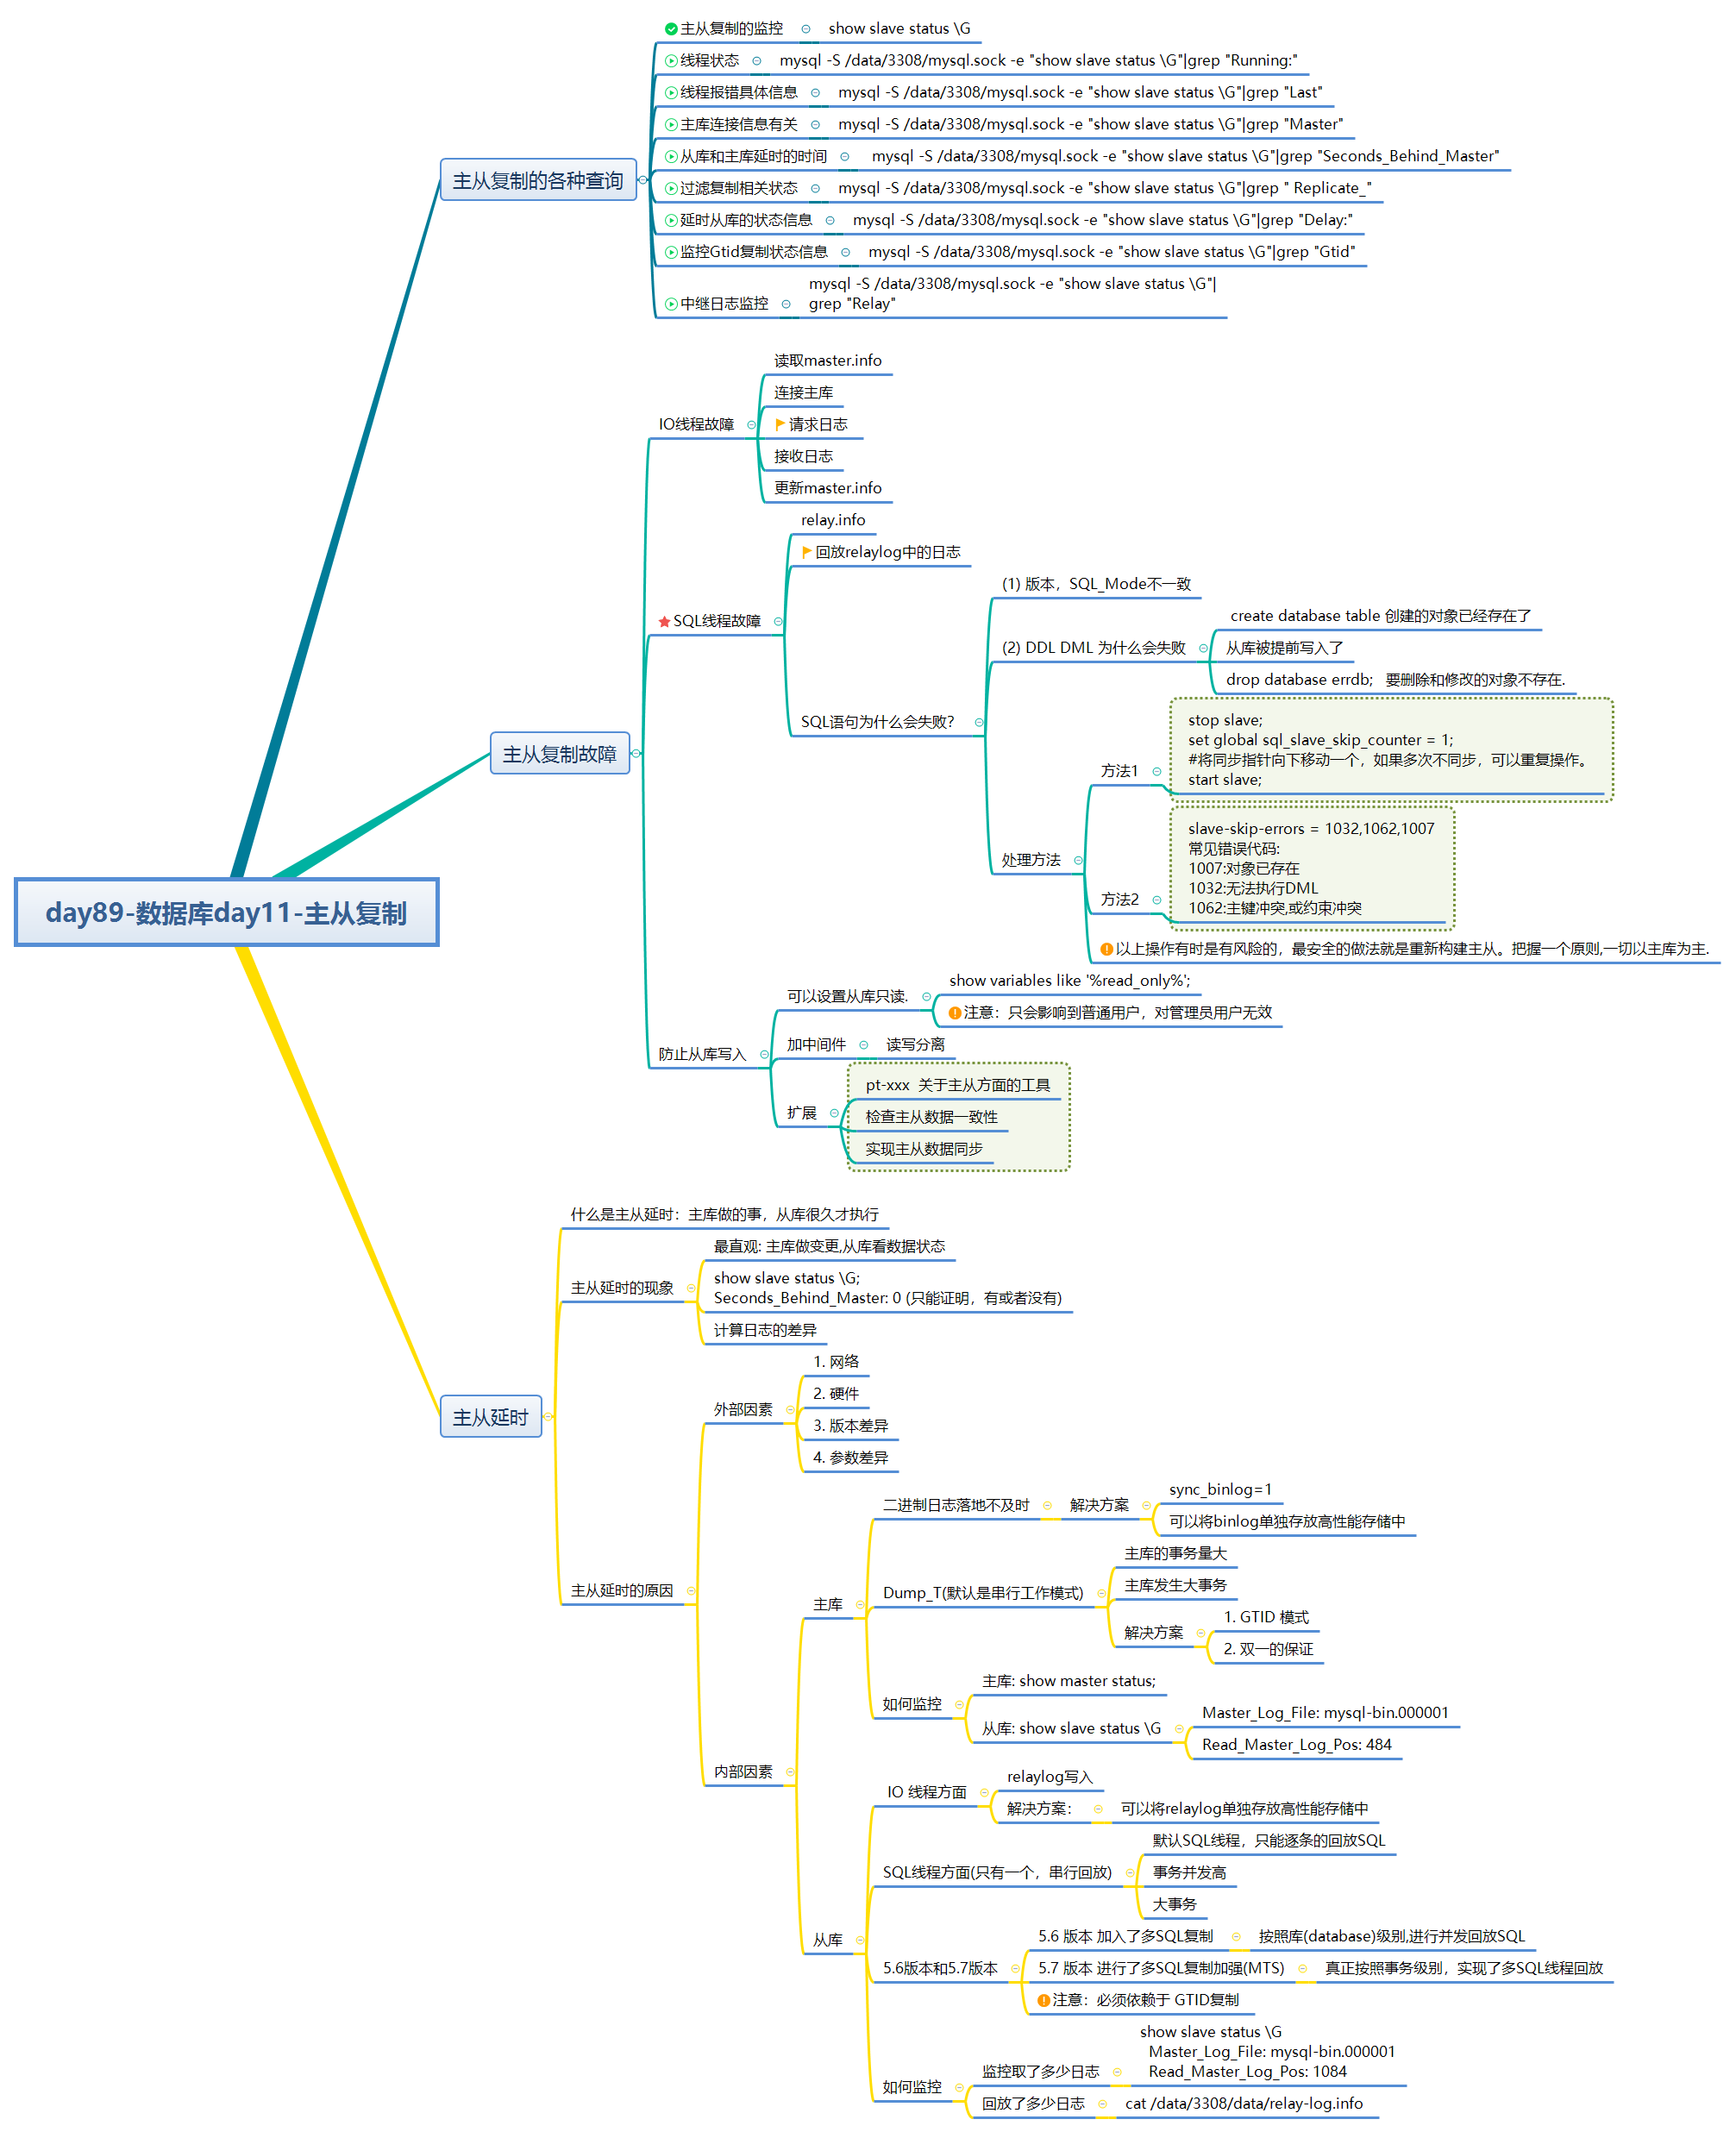
1. 主从复制的各种查询
1.1 线程状态
[root@db01 ~]# mysql -S /data/3308/mysql.sock -e "show slave status \G"|grep "Running:"
Slave_IO_Running: Yes
Slave_SQL_Running: Yes
1.2 线程报错具体信息
[root@db01 ~]# mysql -S /data/3308/mysql.sock -e "show slave status \G"|grep "Last"
Last_Errno: 0
Last_Error:
Last_IO_Errno: 0
Last_IO_Error:
Last_SQL_Errno: 0
Last_SQL_Error:
Last_IO_Error_Timestamp:
Last_SQL_Error_Timestamp:
[root@db01 ~]#
1.3 查看主库连接信息有关
[root@db01 ~]# mysql -S /data/3308/mysql.sock -e "show slave status \G"|grep "Master"
Master_Host: 10.0.0.51
Master_User: repl
Master_Port: 3307
Master_Log_File: mysql-bin.000012
Read_Master_Log_Pos: 154
Relay_Master_Log_File: mysql-bin.000012
Exec_Master_Log_Pos: 154
.......
[root@db01 ~]#
1.4 从库和主库延时的时间
mysql -S /data/3308/mysql.sock -e "show slave status \G"|grep "Seconds_Behind_Master"
1.5 过滤复制相关状态
[root@db01 ~]#  mysql -S /data/3308/mysql.sock -e "show slave status \G"|grep " Replicate_"
              Replicate_Do_DB:
          Replicate_Ignore_DB:
           Replicate_Do_Table:
       Replicate_Ignore_Table:
      Replicate_Wild_Do_Table:
  Replicate_Wild_Ignore_Table:
  Replicate_Ignore_Server_Ids:
         Replicate_Rewrite_DB:
[root@db01 ~]#
1.6 延时从库的状态信息
[root@db01 ~]# mysql -S /data/3308/mysql.sock -e "show slave status \G"|grep "Delay:"
                    SQL_Delay: 0
          SQL_Remaining_Delay: NULL
1.7 监控Gtid复制状态信息
[root@db01 ~]# mysql -S /data/3308/mysql.sock -e "show slave status \G"|grep "Gtid"
           Retrieved_Gtid_Set:
            Executed_Gtid_Set:
[root@db01 ~]#
1.8 中继日志监控
[root@db01 ~]# mysql -S /data/3308/mysql.sock -e "show slave status \G"|grep "Relay"
               Relay_Log_File: db01-relay-bin.000005
                Relay_Log_Pos: 367
        Relay_Master_Log_File: mysql-bin.000012
              Relay_Log_Space: 739
[root@db01 ~]#
2. 主从复制故障
2.1 IO线程故障
1.读取master.info
    损坏
    信息错误 change master to 信息错误

2.连接主库
    网络
    防火墙
    主库没启
    连接数上限了(默认151个)

以上问题:
  Slave_IO_Running: Connecting
  Last_IO_Error:  xxxxxx
排查方法:
  通过复制用户,手工连接主库,看报错信息.
修复方法:
  stop slave
  reset slave all
  change master to
  start slave

3.请求日志 ☆☆☆
    master.info 复制起点
    主库: 损坏,误删除等操作

4.接收日志
relaylog损坏
  stop slave
  reset slave all
  change master to
  start slave

5.更新master.info
2.2 SQL线程故障 ☆☆☆☆☆
1. relay.info

2.回放relaylog中的日志  *****

SQL语句为什么会失败?
  (1) 版本,SQL_Mode不一致
  (2) DDL DML 为什么会失败
    create database table 创建的对象已经存在了
    从库被提前写入了,删除掉异常库,重启主从
    drop database errdb;   要删除和修改的对象不存在.
    alter
    insert
    update
    delete

处理方法(以从库为核心的处理方案):
方法一:
stop slave;
set global sql_slave_skip_counter = 1;
#将同步指针向下移动一个,如果多次不同步,可以重复操作。
start slave;

方法二:
/etc/my.cnf
slave-skip-errors = 1032,1062,1007
常见错误代码:
1007:对象已存在
1032:无法执行DML
1062:主键冲突,或约束冲突

但是,以上操作有时是有风险的,最安全的做法就是重新构建主从。把握一个原则,一切以主库为主.
2.3 防止从库写入
(1) 可以设置从库只读.
mysql [(none)]>show variables like '%read_only%';
+-----------------------+-------+
| Variable_name         | Value |
+-----------------------+-------+
| innodb_read_only      | OFF   |
| read_only             | OFF   |
| super_read_only       | OFF   |
| transaction_read_only | OFF   |
| tx_read_only          | OFF   |
+-----------------------+-------+
5 rows in set (0.01 sec)

注意:
只会影响到普通用户,对管理员用户无效。


(2)加中间件
读写分离。
2.4 扩展项
pt-xxx  关于主从方面的工具
检查主从数据一致性
实现主从数据同步
3. 主从延时
3.1 什么是主从延时
主库做的事,从库很久才执行
3.2 主从延时的现象
(1) 最直观: 主库做变更,从库看数据状态
(2) show slave status \G;
    Seconds_Behind_Master: 0 (只能证明,有或者没有)
(3) 计算日志的差异
3.3 主从延时的原因
3.3.1 外部因素
1. 网络
2. 硬件
3. 版本差异
4. 参数差异
3.3.2 内部因素
主库:
(1) 二进制日志方面
    二进制日志落地不及时
    解决方案:
    sync_binlog=1
    可以将binlog单独存放高性能存储中

(2) Dump_T(默认是串行工作模式)
    主库的事务量大
    主库发生大事务

    解决方案:
    1. GTID 模式
    2. 双一的保证

如何监控:
	主库: show master status;

	从库: show slave status \G
	Master_Log_File: mysql-bin.000001
	Read_Master_Log_Pos: 484
从库:
(1) IO 线程方面
    relaylog写入
    解决方案:
    可以将relaylog单独存放高性能存储中
	| relay_log_basename        | /data/3308/data/db01-relay-bin       |
	| relay_log_index           | /data/3308/data/db01-relay-bin.index |

(2) SQL线程方面(只有一个,串行回放)
    默认SQL线程,只能逐条的回放SQL
    事务并发高
    大事务

5.6 版本 加入了多SQL复制
  按照库(database)级别,进行并发回放SQL
  slave_parallel_workers=16
  slave_parallel_type=DATABASE

5.7 版本 进行了多SQL复制加强(MTS)
  真正按照事务级别,实现了多SQL线程回放
  slave_parallel_workers=16
  slave_parallel_type=logical_clock

注意:必须依赖于 GTID复制

如何监控 :
(1) 监控取了多少日志
	show slave status \G
	Master_Log_File: mysql-bin.000001
    Read_Master_Log_Pos: 1084

(2) 回放了多少日志
[root@db01 /data/3308/data]# cat relay-log.info
  7
  ./db01-relay-bin.000003
  920
  mysql-bin.000001
  1084
4. 主从基础小结
4.1 主从前提
4.2 主从原理
4.3 主从监控
    show master status;
	show processlist;
	show slave status\G
	master.info
	relay.info
4.4 主从故障
IO
	连接
	binlog
SQL
	从库写入
	DML,insert ,update ,delete
4.5 主从延时
主
	dump 串行 : GTID,双一 并行
	show slave status\G
	Master_Log_File: mysql-bin.000001
    Read_Master_Log_Pos: 1084

	show master status \G

从
SQL 并行  : MTS
已经拿过来的日志:
	show slave status\G
	Master_Log_File: mysql-bin.000001
    Read_Master_Log_Pos: 1084
	已经执行过的:
	./db01-relay-bin.000003
	920
	mysql-bin.000001
	800
======================================
主从复制-高级进阶→ → →↓ ↓
======================================
1. 延时从库
1.1 作用
处理逻辑损坏
1.2 如何实现
SQL线程延时:数据已经写入relaylog中了,SQL线程"慢点"运行
一般企业建议3-6小时,具体看公司运维人员对于故障的反应时间

mysql>stop slave;
mysql>CHANGE MASTER TO MASTER_DELAY = 300;
mysql>start slave;

mysql> show slave status \G
SQL_Delay: 300
SQL_Remaining_Delay: NULL
1.3 怎么处理逻辑损坏
drop 操作;
(1) 感知到故障
(2) 停相关业务,挂维护页.
(3) 停延时从库SQL线程.
(4)  手工模拟SQL线程恢复后续的relaylog
    起点:  relayloginfo
    终点: drop
(5) 直接解除从库替代主库工作
	或者,导出故障数据库,倒回到生产.
1.4 演练
(1) 模拟数据
create database oldboy charset utf8mb4;
use oldboy ;
create table t1 (id int);
insert into t1 values(1);
insert into t1 values(11);
insert into t1 values(111);
insert into t1 values(1111);
insert into t1 values(11111);

(2) 模拟误操作
drop database oldboy;

(3) 停从库线程
stop slave ;

(4) 截取relaylog日志
起点:
  show slave status \G;
  Relay_Log_File: db01-relay-bin.000002
  Relay_Log_Pos: 320
终点:
  show relaylog events in 'db01-relay-bin.000002';
  | db01-relay-bin.000002 | 2172 | Query          |         7 |        3849 | drop database oldboy

320—2172
[root@db01 ~]# mysqlbinlog --start-position=320 --stop-position=2172 /data/3308/data/db01-relay-bin.000002 >/tmp/relay.sql

(5) 恢复数据
mysql [(none)]>source /tmp//relay.sql;
mysql [oldboy]>select * from t1;
+-------+
| id    |
+-------+
|     1 |
|    11 |
|   111 |
|  1111 |
| 11111 |
+-------+

(6) 将备份的数据恢复到主库中
mysql -S /data/3307/mysql.sock </tmp/relay.sql
use oldboy;
mysql [oldboy]>select * from t1;
+-------+
| id    |
+-------+
|     1 |
|    11 |
|   111 |
|  1111 |
| 11111 |
+-------+

(7) 开启从库线程
start slave ;
show slave status \G
             Slave_IO_Running: Yes
            Slave_SQL_Running: Yes
2. 过滤复制
2.1 主库方面实现
binlog_do_db      白名单
binlog_ignore_db  黑名单
2.2 从库参数
Replicate_Do_DB:
Replicate_Ignore_DB:

Replicate_Do_Table:
Replicate_Ignore_Table:

Replicate_Wild_Do_Table:
Replicate_Wild_Ignore_Table:
2.3 过滤复制实现(从库)
例子: 只复制mysql库的数据

vim /data/3308/my.cnf
replicate_do_db=oldguo

systemctl restart mysqld3308  重启从库
show slave status \G;
3. GTID复制
3.1 GTID介绍
GTID(Global Transaction ID)是对于一个已提交事务的唯一编号,并且是一个全局(主从复制)唯一的编号。
它的官方定义如下:
GTID = source_id :transaction_id
7E11FA47-31CA-19E1-9E56-C43AA21293967:29

什么是sever_uuid,和Server-id 区别?
核心特性: 全局唯一,具备幂等性
3.2 GTID核心参数
重要参数:
gtid-mode=on
enforce-gtid-consistency=true
log-slave-updates=1

gtid-mode=on                        --启用gtid类型,否则就是普通的复制架构
enforce-gtid-consistency=true       --强制GTID的一致性
log-slave-updates=1                 --slave更新是否记入日志
3.3 GTID复制配置过程:

3.3.1 清理环境
pkill mysqld
 \rm -rf /data/mysql/data/*
 \rm -rf /data/binlog/*
mkdir -p /data/mysql/data
chown -R mysql.mysql /data/*
3.3.2 准备配置文件
# 主库 db01:
cat > /etc/my.cnf <<EOF
[mysqld]
basedir=/data/mysql/
datadir=/data/mysql/data
socket=/tmp/mysql.sock
server_id=51
port=3306
secure-file-priv=/tmp
autocommit=0
log_bin=/data/binlog/mysql-bin
binlog_format=row
gtid-mode=on
enforce-gtid-consistency=true
log-slave-updates=1
[mysql]
prompt=db01 [\\d]>
EOF


# slave1(db02):

cat > /etc/my.cnf <<EOF
[mysqld]
basedir=/data/mysql
datadir=/data/mysql/data
socket=/tmp/mysql.sock
server_id=52
port=3306
secure-file-priv=/tmp
autocommit=0
log_bin=/data/binlog/mysql-bin
binlog_format=row
gtid-mode=on
enforce-gtid-consistency=true
log-slave-updates=1
[mysql]
prompt=db02 [\\d]>
EOF

# slave2(db03):

cat > /etc/my.cnf <<EOF
[mysqld]
basedir=/data/mysql
datadir=/data/mysql/data
socket=/tmp/mysql.sock
server_id=53
port=3306
secure-file-priv=/tmp
autocommit=0
log_bin=/data/binlog/mysql-bin
binlog_format=row
gtid-mode=on
enforce-gtid-consistency=true
log-slave-updates=1
[mysql]
prompt=db03 [\\d]>
EOF
3.3.3 初始化数据
mysqld --initialize-insecure --user=mysql --basedir=/data/mysql --datadir=/data/mysql/data
3.3.4 启动数据库
/etc/init.d/mysqld start
3.3.5 构建主从:
master:51
slave:52,53

10.0.0.51主库上创建用户:
mysql -e "grant replication slave  on *.* to repl@'10.0.0.%' identified by '123';"

10.0.0.52\53从库上创建用户:
mysql -e "change master to master_host='10.0.0.51',master_user='repl',master_password='123' ,MASTER_AUTO_POSITION=1;"
mysql -e  "start slave;"
3.3.6 查看主从状态
10.0.0.52\53 :
[root@db02 ~]# mysql -e  "show slave status \G"|grep "Running:"
             Slave_IO_Running: Yes
            Slave_SQL_Running: Yes

[root@db03 ~]# mysql -e  "show slave status \G"|grep "Running:"
             Slave_IO_Running: Yes
            Slave_SQL_Running: Yes
3.4 GTID 复制和普通复制的区别
CHANGE MASTER TO
MASTER_HOST='10.0.0.51',
MASTER_USER='repl',
MASTER_PASSWORD='123',
MASTER_PORT=3307,
MASTER_LOG_FILE='mysql-bin.000001',
MASTER_LOG_POS=444,
MASTER_CONNECT_RETRY=10;

change master to
master_host='10.0.0.51',
master_user='repl',
master_password='123' ,
MASTER_AUTO_POSITION=1;
start slave;
(0)在主从复制环境中,主库发生过的事务,在全局都是由唯一GTID记录的,更方便Failover
(1)额外功能参数(3个)
(2)change master to 的时候不再需要binlog 文件名和position号,MASTER_AUTO_POSITION=1;
(3)在复制过程中,从库不再依赖master.info文件,而是直接读取最后一个relaylog的 GTID号
(4) mysqldump备份时,默认会将备份中包含的事务操作,以以下方式
    SET @@GLOBAL.GTID_PURGED='8c49d7ec-7e78-11e8-9638-000c29ca725d:1';
    告诉从库,我的备份中已经有以上事务,你就不用运行了,直接从下一个GTID开始请求binlog就行。
此环境为后续的高可用环境使用,记得拍摄快照
4. 半同步复制(了解)
主从数据一致性
ACK
ACK_Receiver

自己扩展了解下:
MGR
PXC
5. MHA搭建
5.1 配置关键程序软连接
10.0.0.51/52/53:

ln -s /application/mysql/bin/mysqlbinlog    /usr/bin/mysqlbinlog
ln -s /application/mysql/bin/mysql          /usr/bin/mysql
5.2 配置各节点互信(SSH协议)
在db01上创建秘钥:
rm -rf /root/.ssh
ssh-keygen  #生成秘钥 一直回车
cd /root/.ssh
mv id_rsa.pub authorized_keys
scp  -r  /root/.ssh  10.0.0.52:/root
scp  -r  /root/.ssh  10.0.0.53:/root


#第二种方法在各节点都分发秘钥
cat /server/scripts/ssh.sh
#!/bin/bash
rm -rf ~/.ssh/*
#make key pair
ssh-keygen -t dsa -f ~/.ssh/id_dsa -P ''
#fenfa public key
for ip in 51 52 53
do
 sshpass -p123456 ssh-copy-id -o StrictHostKeyChecking=no 10.0.0.$ip;
done

#各节点验证
db01:
ssh 10.0.0.51 date
ssh 10.0.0.52 date
ssh 10.0.0.53 date
db02:
ssh 10.0.0.51 date
ssh 10.0.0.52 date
ssh 10.0.0.53 date
db03:
ssh 10.0.0.51 date
ssh 10.0.0.52 date
ssh 10.0.0.53 date
5.3. 安装软件
下载mha软件
mha官网:https://code.google.com/archive/p/mysql-master-ha/
github下载地址:https://github.com/yoshinorim/mha4mysql-manager/wiki/Downloads
所有节点安装Node软件依赖包
yum install perl-DBD-MySQL -y
rpm -ivh mha4mysql-node-0.56-0.el6.noarch.rpm
在db01主库中创建mha需要的用户
grant all privileges on *.* to mha@'10.0.0.%' identified by 'mha';
Manager软件安装(db03)
yum install -y perl-Config-Tiny epel-release perl-Log-Dispatch perl-Parallel-ForkManager perl-Time-HiRes
rpm -ivh mha4mysql-manager-0.56-0.el6.noarch.rpm
5.4. 配置文件准备(db03)
创建配置文件目录
mkdir -p /etc/mha
创建日志目录
mkdir -p /var/log/mha/app1
编辑mha配置文件
vim /etc/mha/app1.cnf
[server default]
manager_log=/var/log/mha/app1/manager
manager_workdir=/var/log/mha/app1
master_binlog_dir=/data/binlog
user=mha
password=mha
ping_interval=2
repl_password=123
repl_user=repl
ssh_user=root
[server1]
hostname=10.0.0.51
port=3306
[server2]
hostname=10.0.0.52
port=3306
[server3]
hostname=10.0.0.53
port=3306
5.5. 状态检查
互信检查
masterha_check_ssh  --conf=/etc/mha/app1.cnf
Fri Apr 19 16:39:34 2019 - [warning] Global configuration file /etc/masterha_default.cnf not found. Skipping.
Fri Apr 19 16:39:34 2019 - [info] Reading application default configuration from /etc/mha/app1.cnf..
Fri Apr 19 16:39:34 2019 - [info] Reading server configuration from /etc/mha/app1.cnf..
Fri Apr 19 16:39:34 2019 - [info] Starting SSH connection tests..
Fri Apr 19 16:39:35 2019 - [debug]
Fri Apr 19 16:39:34 2019 - [debug]  Connecting via SSH from root@10.0.0.51(10.0.0.51:22) to root@10.0.0.52(10.0.0.52:22)..
Fri Apr 19 16:39:34 2019 - [debug]   ok.
Fri Apr 19 16:39:34 2019 - [debug]  Connecting via SSH from root@10.0.0.51(10.0.0.51:22) to root@10.0.0.53(10.0.0.53:22)..
Fri Apr 19 16:39:35 2019 - [debug]   ok.
Fri Apr 19 16:39:36 2019 - [debug]
Fri Apr 19 16:39:35 2019 - [debug]  Connecting via SSH from root@10.0.0.52(10.0.0.52:22) to root@10.0.0.51(10.0.0.51:22)..
Fri Apr 19 16:39:35 2019 - [debug]   ok.
Fri Apr 19 16:39:35 2019 - [debug]  Connecting via SSH from root@10.0.0.52(10.0.0.52:22) to root@10.0.0.53(10.0.0.53:22)..
Fri Apr 19 16:39:35 2019 - [debug]   ok.
Fri Apr 19 16:39:37 2019 - [debug]
Fri Apr 19 16:39:35 2019 - [debug]  Connecting via SSH from root@10.0.0.53(10.0.0.53:22) to root@10.0.0.51(10.0.0.51:22)..
Fri Apr 19 16:39:35 2019 - [debug]   ok.
Fri Apr 19 16:39:35 2019 - [debug]  Connecting via SSH from root@10.0.0.53(10.0.0.53:22) to root@10.0.0.52(10.0.0.52:22)..
Fri Apr 19 16:39:36 2019 - [debug]   ok.
Fri Apr 19 16:39:37 2019 - [info] All SSH connection tests passed successfully.
主从状态检查
[root@db03 ~]# masterha_check_ssh  --conf=/etc/mha/app1.cnf
Fri Apr 19 16:39:34 2019 - [warning] Global configuration file /etc/masterha_default.cnf not found. Skipping.
Fri Apr 19 16:39:34 2019 - [info] Reading application default configuration from /etc/mha/app1.cnf..
Fri Apr 19 16:39:34 2019 - [info] Reading server configuration from /etc/mha/app1.cnf..
Fri Apr 19 16:39:34 2019 - [info] Starting SSH connection tests..
Fri Apr 19 16:39:35 2019 - [debug]
Fri Apr 19 16:39:34 2019 - [debug]  Connecting via SSH from root@10.0.0.51(10.0.0.51:22) to root@10.0.0.52(10.0.0.52:22)..
Fri Apr 19 16:39:34 2019 - [debug]   ok.
Fri Apr 19 16:39:34 2019 - [debug]  Connecting via SSH from root@10.0.0.51(10.0.0.51:22) to root@10.0.0.53(10.0.0.53:22)..
Fri Apr 19 16:39:35 2019 - [debug]   ok.
Fri Apr 19 16:39:36 2019 - [debug]
Fri Apr 19 16:39:35 2019 - [debug]  Connecting via SSH from root@10.0.0.52(10.0.0.52:22) to root@10.0.0.51(10.0.0.51:22)..
Fri Apr 19 16:39:35 2019 - [debug]   ok.
Fri Apr 19 16:39:35 2019 - [debug]  Connecting via SSH from root@10.0.0.52(10.0.0.52:22) to root@10.0.0.53(10.0.0.53:22)..
Fri Apr 19 16:39:35 2019 - [debug]   ok.
Fri Apr 19 16:39:37 2019 - [debug]
Fri Apr 19 16:39:35 2019 - [debug]  Connecting via SSH from root@10.0.0.53(10.0.0.53:22) to root@10.0.0.51(10.0.0.51:22)..
Fri Apr 19 16:39:35 2019 - [debug]   ok.
Fri Apr 19 16:39:35 2019 - [debug]  Connecting via SSH from root@10.0.0.53(10.0.0.53:22) to root@10.0.0.52(10.0.0.52:22)..
Fri Apr 19 16:39:36 2019 - [debug]   ok.
Fri Apr 19 16:39:37 2019 - [info] All SSH connection tests passed successfully.
[root@db03 ~]# masterha_check_repl  --conf=/etc/mha/app1.cnf
Fri Apr 19 16:40:50 2019 - [warning] Global configuration file /etc/masterha_default.cnf not found. Skipping.
Fri Apr 19 16:40:50 2019 - [info] Reading application default configuration from /etc/mha/app1.cnf..
Fri Apr 19 16:40:50 2019 - [info] Reading server configuration from /etc/mha/app1.cnf..
Fri Apr 19 16:40:50 2019 - [info] MHA::MasterMonitor version 0.56.
Fri Apr 19 16:40:51 2019 - [info] GTID failover mode = 1
Fri Apr 19 16:40:51 2019 - [info] Dead Servers:
Fri Apr 19 16:40:51 2019 - [info] Alive Servers:
Fri Apr 19 16:40:51 2019 - [info]   10.0.0.51(10.0.0.51:3306)
Fri Apr 19 16:40:51 2019 - [info]   10.0.0.52(10.0.0.52:3306)
Fri Apr 19 16:40:51 2019 - [info]   10.0.0.53(10.0.0.53:3306)
Fri Apr 19 16:40:51 2019 - [info] Alive Slaves:
Fri Apr 19 16:40:51 2019 - [info]   10.0.0.52(10.0.0.52:3306)  Version=5.7.20-log (oldest major version between slaves) log-bin:enabled
Fri Apr 19 16:40:51 2019 - [info]     GTID ON
Fri Apr 19 16:40:51 2019 - [info]     Replicating from 10.0.0.51(10.0.0.51:3306)
Fri Apr 19 16:40:51 2019 - [info]   10.0.0.53(10.0.0.53:3306)  Version=5.7.20-log (oldest major version between slaves) log-bin:enabled
Fri Apr 19 16:40:51 2019 - [info]     GTID ON
Fri Apr 19 16:40:51 2019 - [info]     Replicating from 10.0.0.51(10.0.0.51:3306)
Fri Apr 19 16:40:51 2019 - [info] Current Alive Master: 10.0.0.51(10.0.0.51:3306)
Fri Apr 19 16:40:51 2019 - [info] Checking slave configurations..
Fri Apr 19 16:40:51 2019 - [info]  read_only=1 is not set on slave 10.0.0.52(10.0.0.52:3306).
Fri Apr 19 16:40:51 2019 - [info]  read_only=1 is not set on slave 10.0.0.53(10.0.0.53:3306).
Fri Apr 19 16:40:51 2019 - [info] Checking replication filtering settings..
Fri Apr 19 16:40:51 2019 - [info]  binlog_do_db= , binlog_ignore_db=
Fri Apr 19 16:40:51 2019 - [info]  Replication filtering check ok.
Fri Apr 19 16:40:51 2019 - [info] GTID (with auto-pos) is supported. Skipping all SSH and Node package checking.
Fri Apr 19 16:40:51 2019 - [info] Checking SSH publickey authentication settings on the current master..
Fri Apr 19 16:40:51 2019 - [info] HealthCheck: SSH to 10.0.0.51 is reachable.
Fri Apr 19 16:40:51 2019 - [info]
10.0.0.51(10.0.0.51:3306) (current master)
 +--10.0.0.52(10.0.0.52:3306)
 +--10.0.0.53(10.0.0.53:3306)

Fri Apr 19 16:40:51 2019 - [info] Checking replication health on 10.0.0.52..
Fri Apr 19 16:40:51 2019 - [info]  ok.
Fri Apr 19 16:40:51 2019 - [info] Checking replication health on 10.0.0.53..
Fri Apr 19 16:40:51 2019 - [info]  ok.
Fri Apr 19 16:40:51 2019 - [warning] master_ip_failover_script is not defined.
Fri Apr 19 16:40:51 2019 - [warning] shutdown_script is not defined.
Fri Apr 19 16:40:51 2019 - [info] Got exit code 0 (Not master dead).
MySQL Replication Health is OK.
5.6. 开启MHA(db03):
nohup masterha_manager --conf=/etc/mha/app1.cnf --remove_dead_master_conf --ignore_last_failover < /dev/null> /var/log/mha/app1/manager.log 2>&1 &
5.7. 查看MHA状态(db03):
[root@db03 ~]# masterha_check_status --conf=/etc/mha/app1.cnf
app1 (pid:4719) is running(0:PING_OK), master:10.0.0.51
相信可能就有无限可能,拒绝拖延!

 浙公网安备 33010602011771号