提效工具-python解析xmind文件及xmind用例统计
现状
每个公司都有一个维护测试case的系统,有自研的也有买的,比如QC, 禅道等等,QA往往习惯使用xmind等思维导图工具来编写测试用例,因为思路清晰,编写方便,那么这就有一个问题,大多公司要求所有的case都要导入到系统统一维护,然而系统对xmind的支持并不友好,或者根本不支持,就我们目前的情况来说,系统支持导入xmind文件导入,但是导入后所有的用例都是乱的,而且没有测试步骤,没有预期结果等等问题,因此针对这一痛点,便诞生了今天的小工具,虽然这个工具只能解决我的问题,但是里面有大家可以学习参考的地方,希望对你有帮助,那么我的目的就达到了
工具源码
  1 """
  2 ------------------------------------
  3 @Time : 2020/9/24 3:21 PM
  4 @Auth : linux超
  5 @File : handleXmind.py
  6 @IDE  : PyCharm
  7 @Motto: ABC(Always Be Coding)
  8 ------------------------------------
  9 """
 10 import tkinter as tk
 11 from tkinter import filedialog, messagebox
 12 import xmind
 13 import os
 14 from xmindparser import xmind_to_dict
 15
 16
 17 class ParseXmind(object):
 18
 19     def __init__(self, root):
 20         self.count = 0
 21         self.case_fail = 0
 22         self.case_success = 0
 23         self.case_block = 0
 24         self.case_priority = 0
 25         # total汇总用
 26         self.total_cases = 0
 27         self.total_success = 0
 28         self.total_fail = 0
 29         self.total_block = 0
 30         self.toal_case_priority = 0
 31         # GUI
 32         root.title('Xmind用例个数统计及文件解析')
 33         width = 760
 34         height = 600
 35         xscreen = root.winfo_screenwidth()
 36         yscreen = root.winfo_screenheight()
 37         xmiddle = (xscreen - width) / 2
 38         ymiddle = (yscreen - height) / 2
 39         root.geometry('%dx%d+%d+%d' % (width, height, xmiddle, ymiddle))  # 窗口默认大小
 40
 41         # 3个frame
 42         self.frm1 = tk.Frame(root)
 43         self.frm2 = tk.Frame(root)
 44         self.frm3 = tk.Frame(root)
 45         #  布局
 46         self.frm1.grid(row = 1, padx = '20', pady = '20')
 47         self.frm2.grid(row = 2, padx = '30', pady = '30')
 48         self.frm3.grid(row = 0, padx = '40', pady = '40')
 49
 50         self.lable = tk.Label(self.frm3, text = "Xmind文件完整路径")
 51         self.lable.grid(row = 0, column = 0, pady = '5')
 52         self.file_path = tk.Entry(self.frm3, bd = 2)
 53         self.file_path.grid(row = 0, column = 1, pady = '5')
 54
 55         def get_full_file_path_text():
 56             """
 57             获取xmind文件完整路径
 58             :return:
 59             """
 60             full_xmind_path = self.file_path.get()  # 获取文本框内容
 61             #  简单对输入内容做一个校验
 62             if full_xmind_path == "" or "xmind" not in full_xmind_path:
 63                 messagebox.showinfo(title = "warning", message = "xmind文件路径错误!")
 64             try:
 65                 self.create_new_xmind(full_xmind_path)
 66             except FileNotFoundError:
 67                 pass
 68             else:
 69                 xmind_file = full_xmind_path[:-6].split("/")[-1]  # xmind文件名,不带后缀
 70                 path_list = full_xmind_path[:-6].split("/")  # xmind文件用/分割后的一个列表
 71                 path_list.pop(0)
 72                 path_list.pop(-1)
 73                 path_full = "/" + "/".join(path_list)  # xmind文件的目录
 74                 new_xmind_file = "{}/{}_new.xmind".format(path_full, xmind_file)  # 新的xmind文件完整路径
 75                 messagebox.showinfo(title = "success", message = "已生成新的xmind文件:{}".format(new_xmind_file))
 76
 77         #  页面的一些空间的布局
 78         self.button = tk.Button(self.frm3, text = "提交", width = 10, command = get_full_file_path_text, bg = '#dfdfdf')
 79         self.button.grid(row = 0, column = 2, pady = '5')
 80
 81         self.but_upload = tk.Button(self.frm1, text = '上传xmind文件', command = self.upload_files, bg = '#dfdfdf')
 82         self.but_upload.grid(row = 0, column = 0, pady = '10')
 83         self.text = tk.Text(self.frm1, width = 55, height = 10, bg = '#f0f0f0')
 84         self.text.grid(row = 1, column = 0)
 85         self.but2 = tk.Button(self.frm2, text = "开始统计", command = self.new_lines, bg = '#dfdfdf')
 86         self.but2.grid(row = 0, columnspan = 6, pady = '10')
 87         self.label_file = tk.Label(self.frm2, text = "文件名", relief = 'groove', borderwidth = '2', width = 25,
 88                                    bg = '#FFD0A2')
 89         self.label_file.grid(row = 1, column = 0)
 90         self.label_case = tk.Label(self.frm2, text = "用例数", relief = 'groove', borderwidth = '2', width = 10,
 91                                    bg = '#FFD0A2').grid(row = 1, column = 1)
 92
 93         self.label_pass = tk.Label(self.frm2, text = "成功", relief = 'groove', borderwidth = '2', width = 10,
 94                                    bg = '#FFD0A2').grid(row = 1, column = 2)
 95         self.label_fail = tk.Label(self.frm2, text = "失败", relief = 'groove', borderwidth = '2', width = 10,
 96                                    bg = '#FFD0A2').grid(row = 1, column = 3)
 97         self.label_block = tk.Label(self.frm2, text = "阻塞", relief = 'groove', borderwidth = '2', width = 10,
 98                                     bg = '#FFD0A2').grid(row = 1, column = 4)
 99         self.label_case_priority = tk.Label(self.frm2, text = "p0case", relief = 'groove', borderwidth = '2',
100                                             width = 10, bg = '#FFD0A2').grid(row = 1, column = 5)
101
102     def count_case(self, li):
103         """
104         统计xmind中的用例数
105         :param li:
106         :return:
107         """
108         for i in range(len(li)):
109             if li[i].__contains__('topics'):  # 带topics标签意味着有子标题,递归执行方法
110                 self.count_case(li[i]['topics'])
111             else:  # 不带topics意味着无子标题,此级别既是用例
112                 if li[i].__contains__('makers'):  # 有标记成功或失败时会有makers标签
113                     for mark in li[i]['makers']:
114                         if mark == "symbol-right":  # 成功
115                             self.case_success += 1
116                         elif mark == "symbol-wrong":  # 失败
117                             self.case_fail += 1
118                         elif mark == "symbol-attention":  # 阻塞
119                             self.case_block += 1
120                         elif mark == "priority-1":  # 优先级
121                             self.case_priority += 1
122                 self.count += 1  # 用例总数
123
124     def new_line(self, filename, row_number):
125         """
126         用例统计表新增一行
127         :param filename:
128         :param row_number:
129         :return:
130         """
131
132         # 调用python中xmind_to_dict方法,将xmind转成字典
133         sheets = xmind_to_dict(filename)  # sheets是一个list,可包含多sheet页;
134         for sheet in sheets:
135             print(sheet)
136             my_list = sheet['topic']['topics']  # 字典的值sheet['topic']['topics']是一个list
137             # print(my_list)
138             self.count_case(my_list)
139
140         # 插入一行统计数据
141         lastname = filename.split('/')
142         self.label_file = tk.Label(self.frm2, text = lastname[-1], relief = 'groove', borderwidth = '2', width = 25)
143         self.label_file.grid(row = row_number, column = 0)
144
145         self.label_case = tk.Label(self.frm2, text = self.count, relief = 'groove', borderwidth = '2', width = 10)
146         self.label_case.grid(row = row_number, column = 1)
147         self.label_pass = tk.Label(self.frm2, text = self.case_success, relief = 'groove', borderwidth = '2',
148                                    width = 10)
149         self.label_pass.grid(row = row_number, column = 2)
150         self.label_fail = tk.Label(self.frm2, text = self.case_fail, relief = 'groove', borderwidth = '2', width = 10)
151         self.label_fail.grid(row = row_number, column = 3)
152         self.label_block = tk.Label(self.frm2, text = self.case_block, relief = 'groove', borderwidth = '2', width = 10)
153         self.label_block.grid(row = row_number, column = 4)
154         self.label_case_priority = tk.Label(self.frm2, text = self.case_priority, relief = 'groove', borderwidth = '2',
155                                             width = 10)
156         self.label_case_priority.grid(row = row_number, column = 5)
157         self.total_cases += self.count
158         self.total_success += self.case_success
159         self.total_fail += self.case_fail
160         self.total_block += self.case_block
161         self.toal_case_priority += self.case_priority
162
163     def new_lines(self):
164         """
165         用例统计表新增多行
166         :return:
167         """
168
169         lines = self.text.get(1.0, tk.END)  # 从text中获取所有行
170         row_number = 2
171         for line in lines.splitlines():  # 分隔成每行
172             if line == '':
173                 break
174             print(line)
175             self.new_line(line, row_number)
176             row_number += 1
177
178         # total汇总行
179         self.label_file = tk.Label(self.frm2, text = 'total', relief = 'groove', borderwidth = '2', width = 25)
180         self.label_file.grid(row = row_number, column = 0)
181         self.label_case = tk.Label(self.frm2, text = self.total_cases, relief = 'groove', borderwidth = '2', width = 10)
182         self.label_case.grid(row = row_number, column = 1)
183
184         self.label_pass = tk.Label(self.frm2, text = self.total_success, relief = 'groove', borderwidth = '2',
185                                    width = 10)
186         self.label_pass.grid(row = row_number, column = 2)
187         self.label_fail = tk.Label(self.frm2, text = self.total_fail, relief = 'groove', borderwidth = '2', width = 10)
188         self.label_fail.grid(row = row_number, column = 3)
189         self.label_block = tk.Label(self.frm2, text = self.total_block, relief = 'groove', borderwidth = '2',
190                                     width = 10)
191         self.label_block.grid(row = row_number, column = 4)
192
193         self.label_case_priority = tk.Label(self.frm2, text = self.toal_case_priority, relief = 'groove',
194                                             borderwidth = '2',
195                                             width = 10)
196         self.label_case_priority.grid(row = row_number, column = 5)
197
198     def upload_files(self):
199         """
200         上传多个文件,并插入text中
201         :return:
202         """
203         select_files = tk.filedialog.askopenfilenames(title = "可选择1个或多个文件")
204         for file in select_files:
205             self.text.insert(tk.END, file + '\n')
206             self.text.update()
207
208     @staticmethod
209     def parse_xmind(path):
210         """
211         xmind变为一个字典
212         :param path:
213         :return:
214         """
215         dic_xmind = xmind_to_dict(path)
216         xmind_result = dic_xmind[0]
217         return xmind_result
218
219     def create_new_xmind(self, path):
220         """
221         用原xmind内容新建一个xmind文件
222         :param path:
223         :return:
224         """
225         xmind_result = self.parse_xmind(path)
226         new_xmind_result = self.dict_result(xmind_result)
227         xmind_file = path[:-6].split("/")[-1]
228         path_list = path[:-6].split("/")
229         path_list.pop(0)
230         path_list.pop(-1)
231         path_full = "/" + "/".join(path_list)
232         new_xmind_file = "{}/{}_new.xmind".format(path_full, xmind_file)
233         print(new_xmind_file)
234         if os.path.exists(new_xmind_file):
235             os.remove(new_xmind_file)
236         xmind_wb = xmind.load(new_xmind_file)
237         new_xmind_sheet = xmind_wb.getSheets()[0]
238         new_xmind_sheet.setTitle(new_xmind_result["sheet_topic_name"])
239         root_topic = new_xmind_sheet.getRootTopic()
240         root_topic.setTitle(new_xmind_result["sheet_topic_name"])
241         for k, v in new_xmind_result["data"].items():
242             topic = root_topic.addSubTopic()
243             topic.setTitle(k)
244             for value in v:
245                 new_topic = topic.addSubTopic()
246                 new_topic.setTitle(value)
247         xmind.save(xmind_wb)
248
249     def dict_result(self, xmind_result):
250         """
251         使用原xmind数据构造new_xmind_result
252         :param xmind_result:
253         :return:
254         """
255         sheet_name = xmind_result['title']
256         sheet_topic_name = xmind_result['topic']['title']  # 中心主题名称
257         new_xmind_result = {
258             'sheet_name': sheet_name,
259             'sheet_topic_name': sheet_topic_name,
260             'data': {}
261         }
262         title_list = []
263         for i in xmind_result['topic']['topics']:
264             title_temp = i['title']
265             title_list.append(title_temp)
266             result_list = self.chain_data(i)
267             new_xmind_result['data'][title_temp] = result_list
268         return new_xmind_result
269
270     @staticmethod
271     def chain_data(data):
272         """
273         原xmind的所有topic连接成一个topic
274         :param data:
275         :return:
276         """
277         new_xmind_result = []
278
279         def calculate(s, prefix):
280             prefix += s['title'] + '->'
281             for t in s.get('topics', []):
282                 s1 = calculate(t, prefix)
283                 if s1 is not None:
284                     new_xmind_result.append(s1.strip('->'))
285             if not s.get('topics', []):
286                 return prefix
287
288         calculate(data, '')
289         return new_xmind_result
290
291
292 if __name__ == '__main__':
293     r = tk.Tk()
294     ParseXmind(r)
295     r.mainloop()
工具打包
目前我打的是mac系统的包,打完包可以放到任意一个mac电脑上使用(windows版本打包可以自行百度,很简单)
1.pip安装py2app
2.待打包文件目录下执行命令py2applet --make-setup baba.py
3.执行命令python setup.py py2app
4.生成的app在dist文件夹内,双击即可运行
工具界面
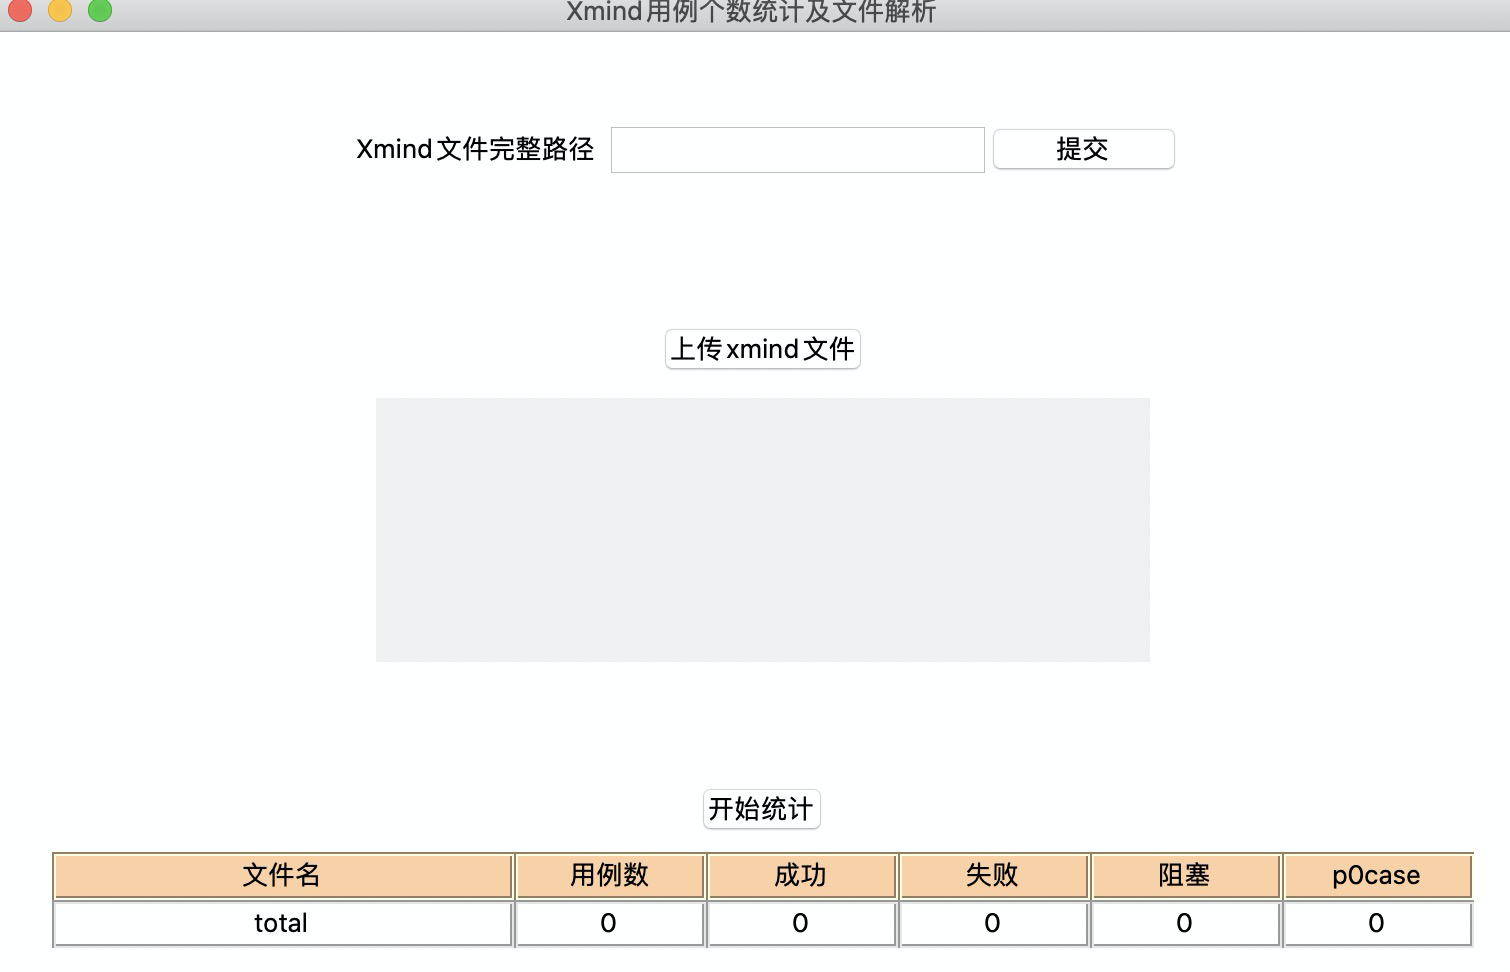
工具功能
1.格式化xmind测试case
2.统计xmind测试case通过,失败,阻塞,p0级case数量
工具使用
1.xmind格式化
输入框需要输入xmind文件的完整路径->点击[提交]->生成新的xmind文件(新文件与原始xmind在一个目录下)->新的xmind导入aone(我们目前的用例管理工具)即可
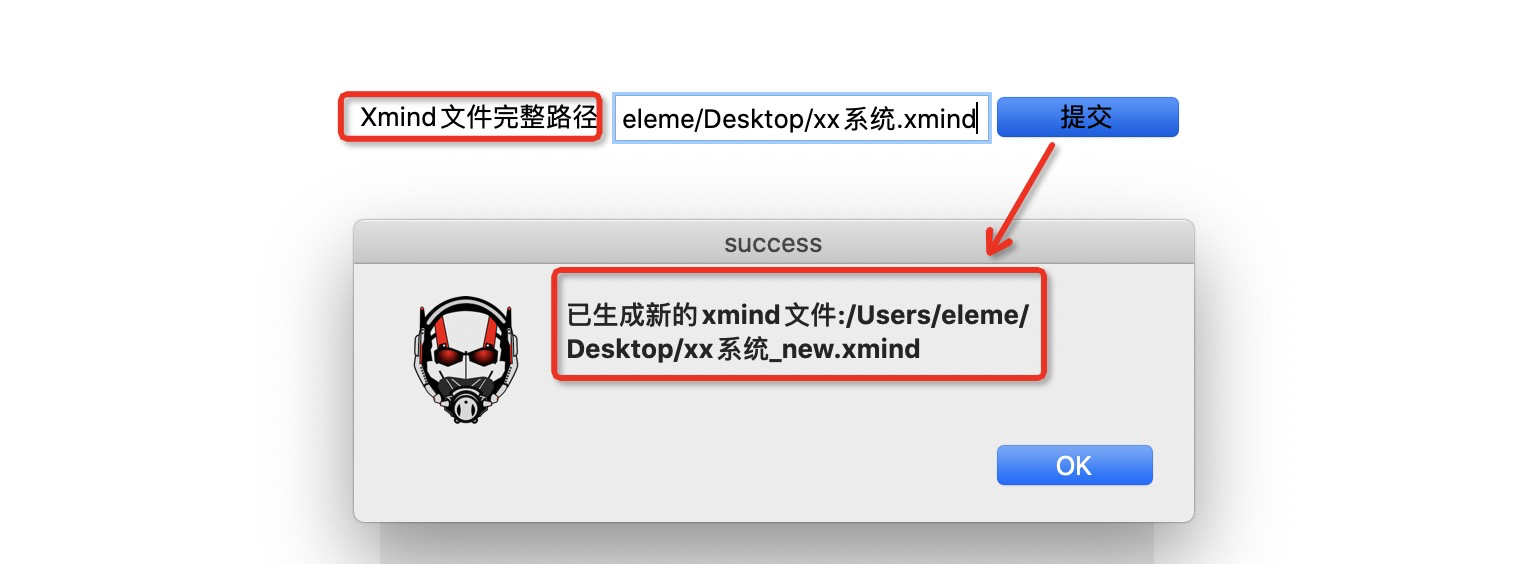
2.用例统计
xmind用例标记规则

标记表示p0级别case
 标记表示p0级别case
 标记表示执行通过case
 标记表示执行失败case
 标记表示执行阻塞case
开始统计
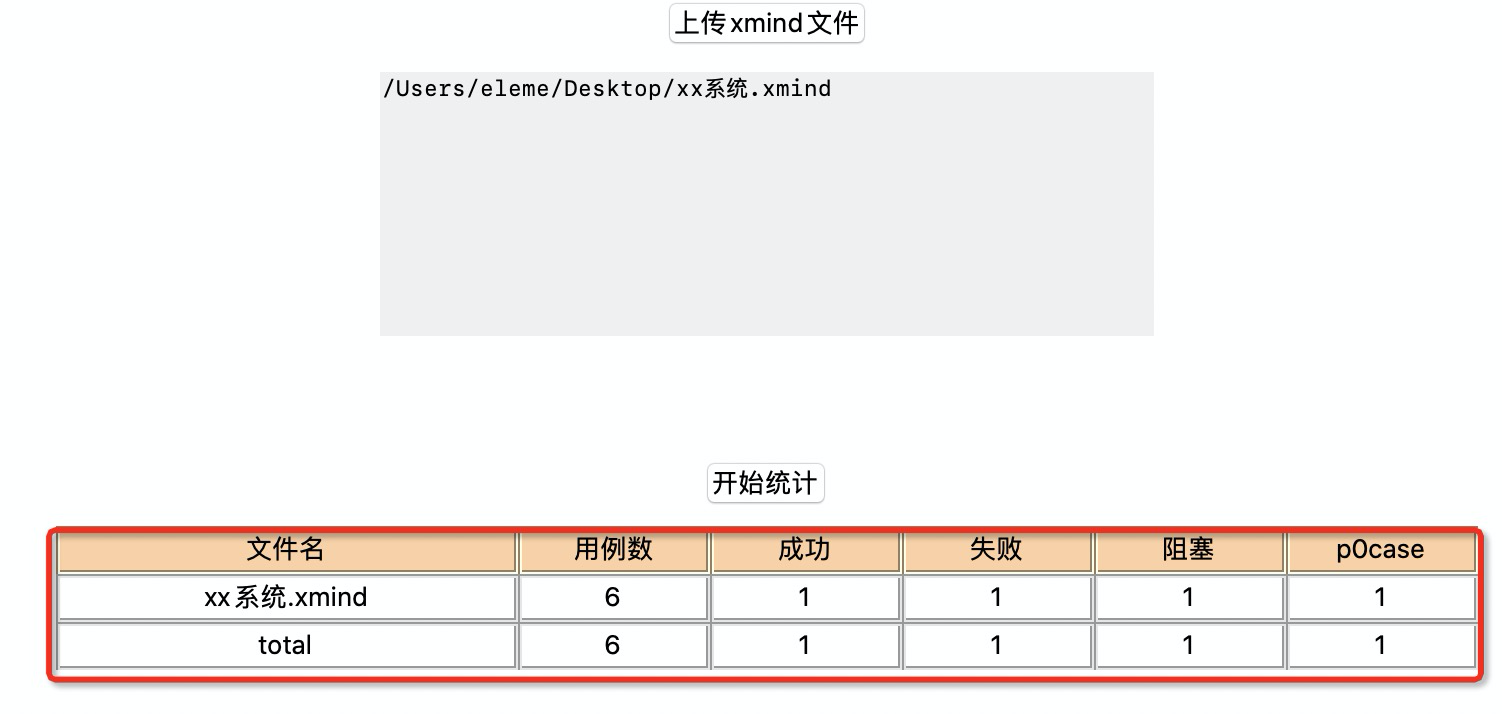
上传xmind文件(支持上传多个xmind文件)->点击[开始统计]->展示成功,失败,阻塞,p0case统计数

工具效果
1.xmind格式化及导入aone
原xmind文件测试case

导入aone效果
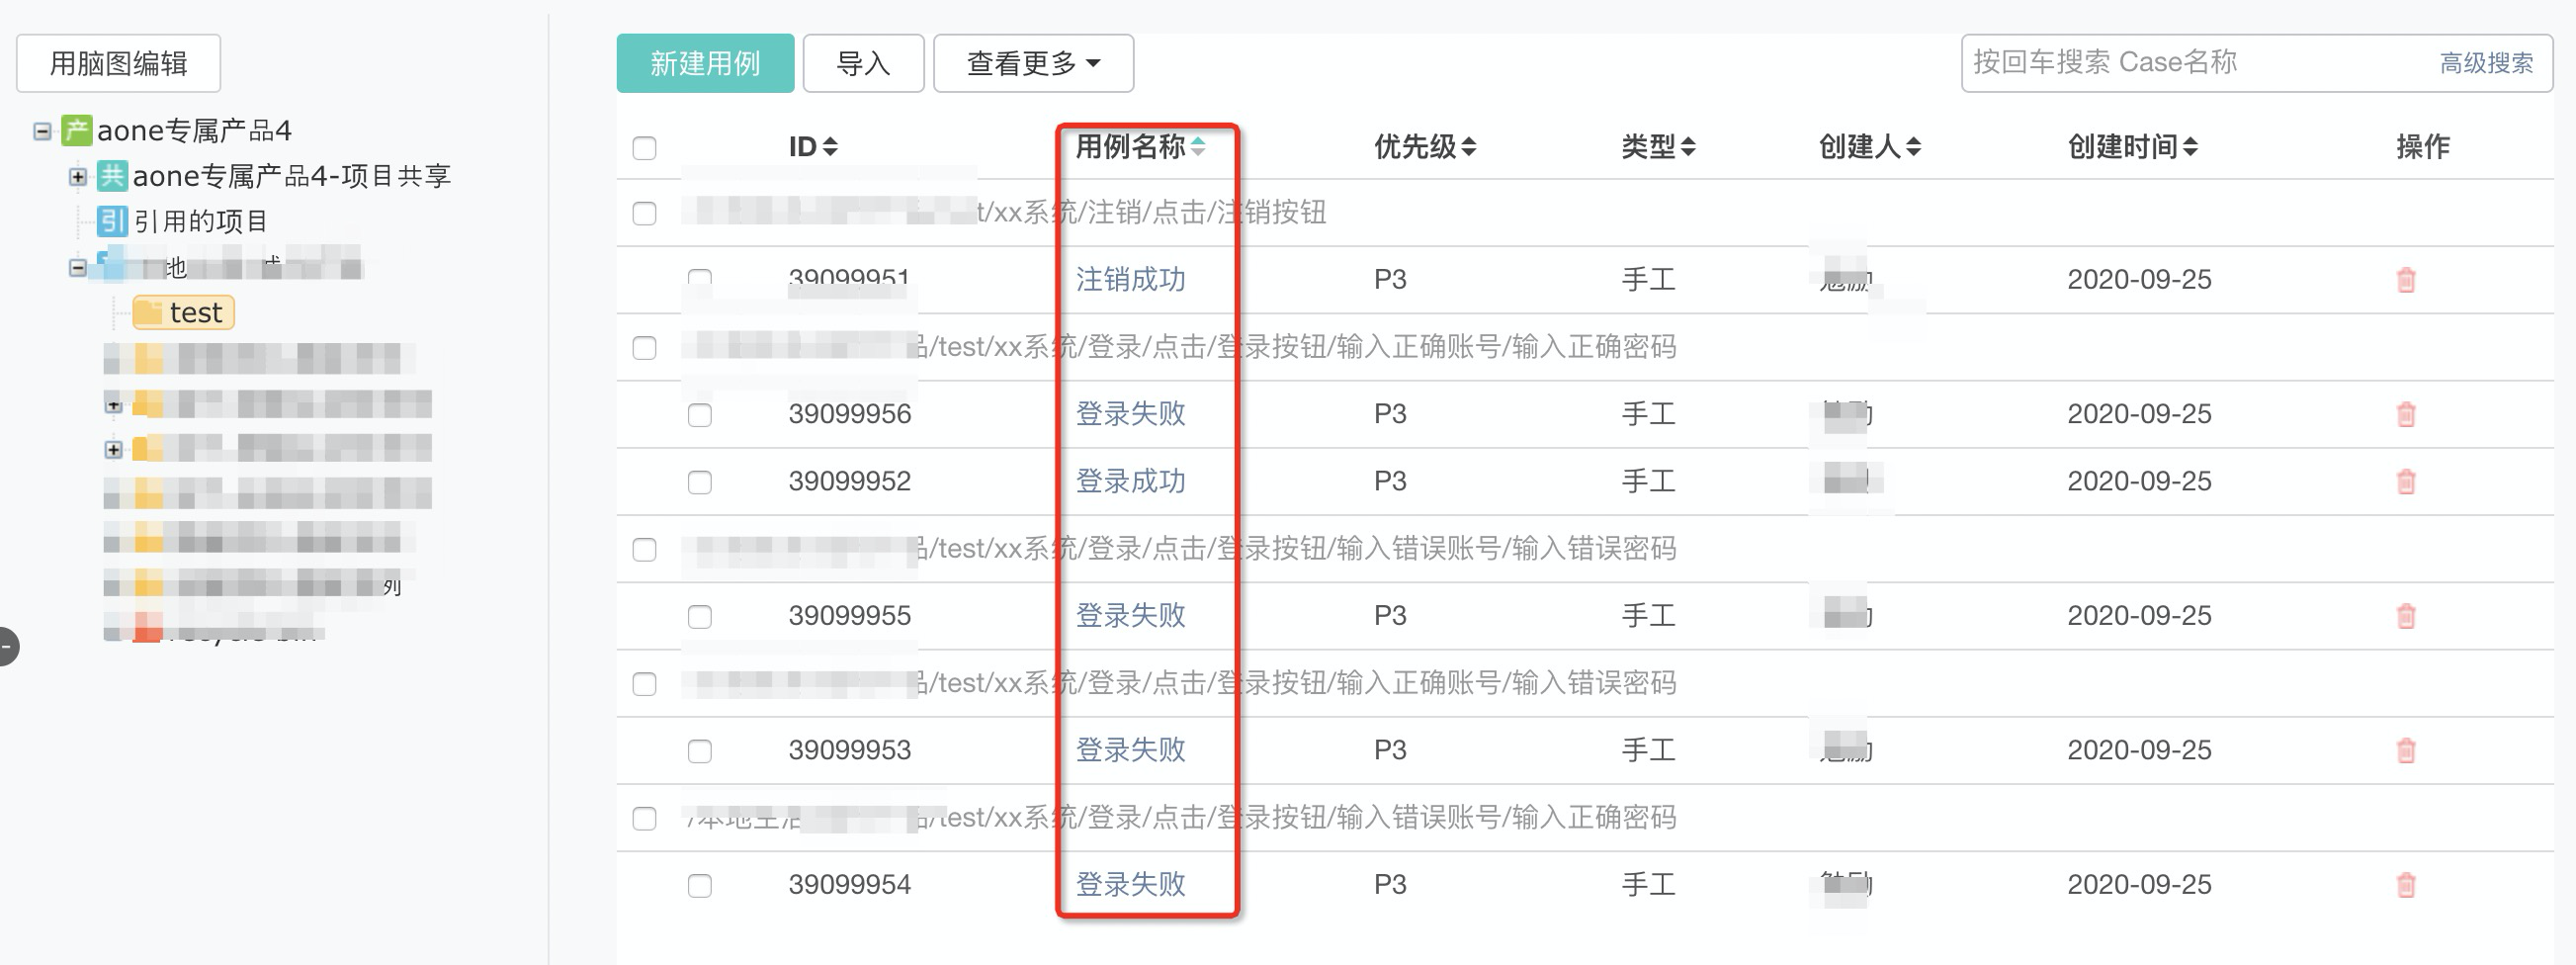
导入后的测试case名称混乱,很难按照这种格式来执行测试,如果不经过修改无法作为业务测试的沉淀,更不用说其他人用这样的测试case来进行业务测试了
格式化后的xmind测试case

工具把所有的xmind 的节点进行了一个拼接,这样看起来case的步骤也清晰很多
导入aone
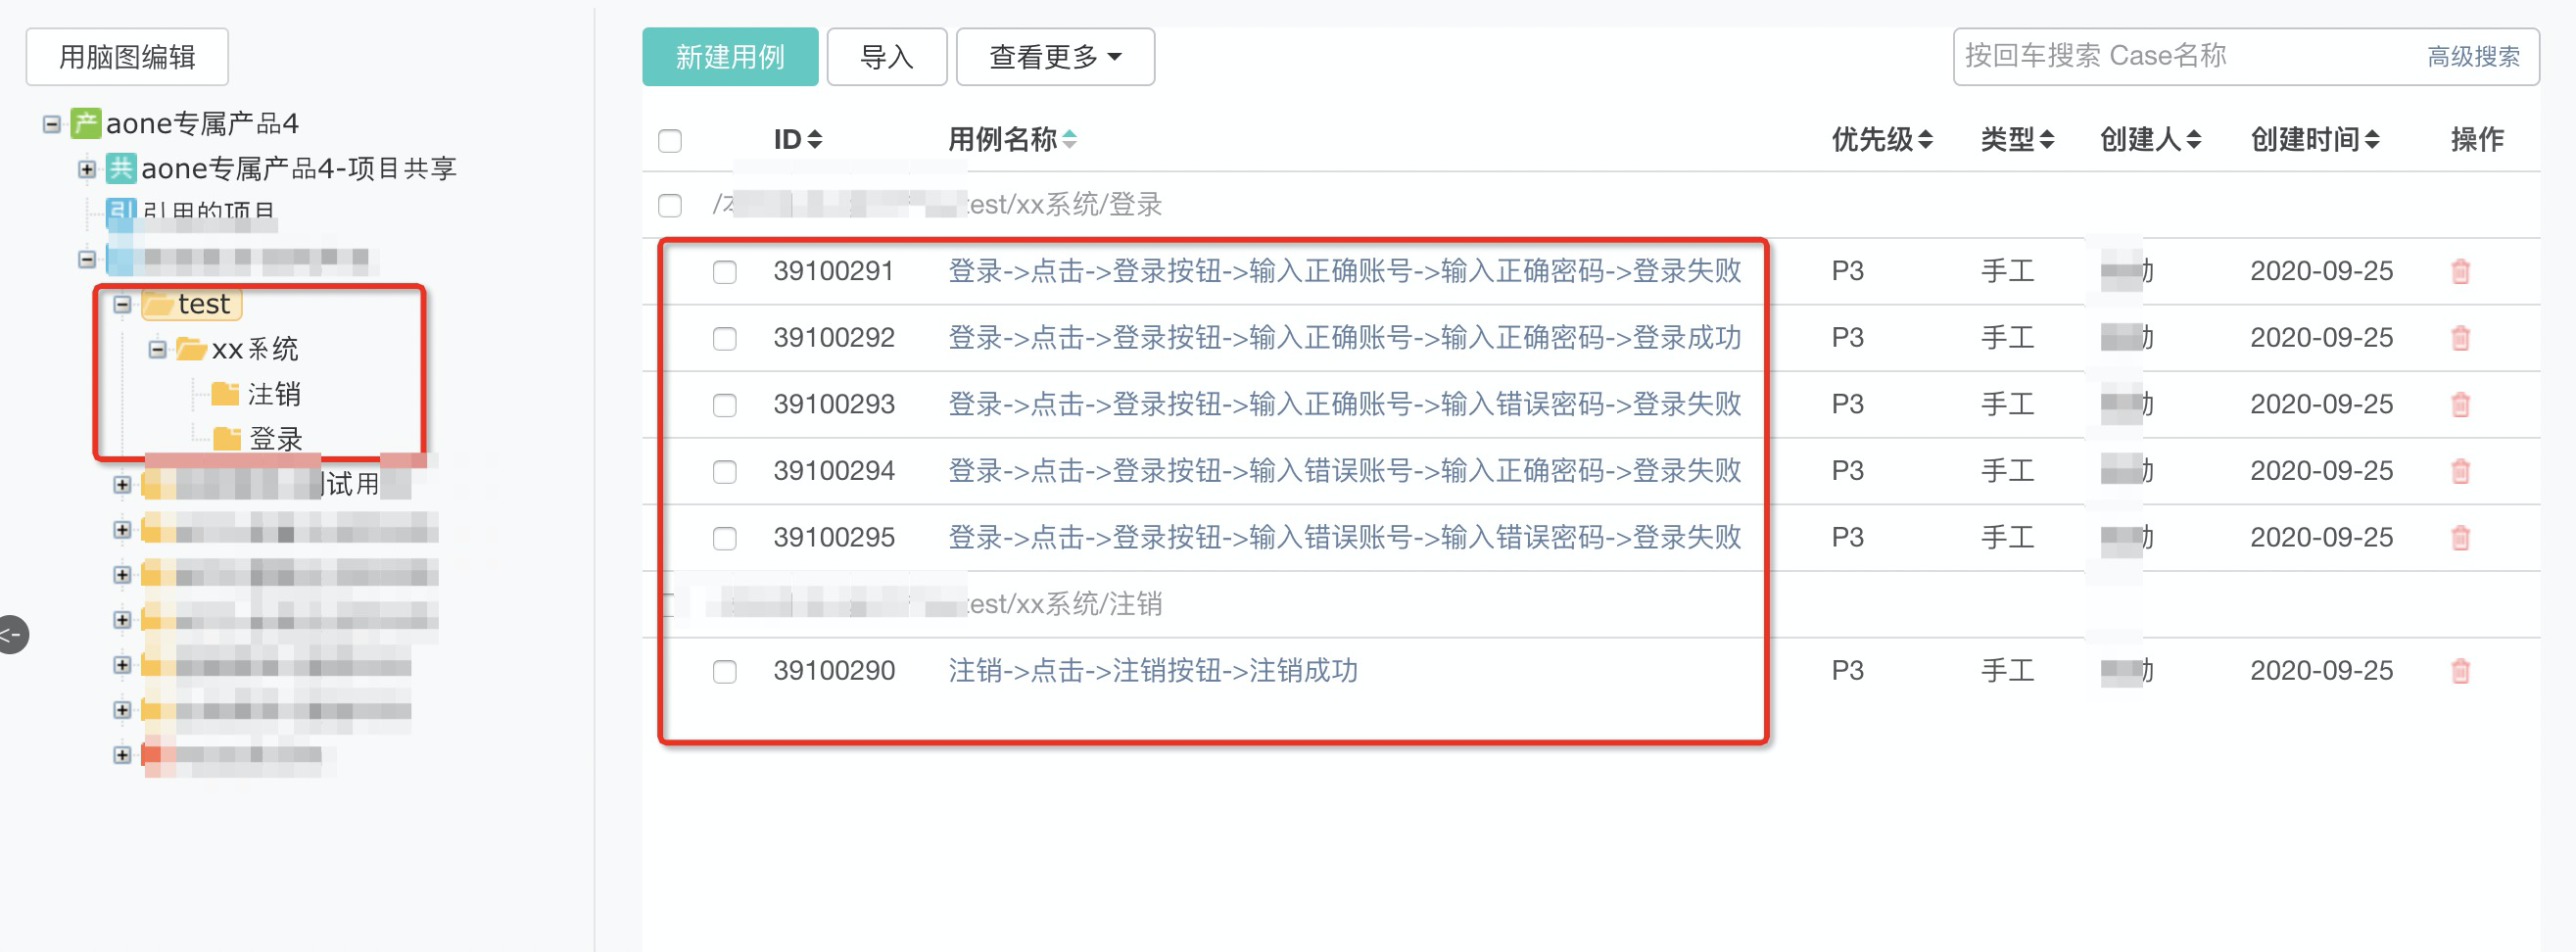
aone上展示的用例名称,可以显示完整的case的执行步骤,不需要再在case内部补充测试步骤,也不需要做多余的case维护
2.用例统计
----------------------------真正的勇士, 敢于直面惨淡的Warning、 敢于正视淋漓的Error--------------------------
版权声明
出处: 博客园Linux超的技术博客--https://www.cnblogs.com/linuxchao/
您的支持是对博主最大的鼓励,感谢您的认真阅读
本文版权归作者所有,欢迎转载,但未经作者同意必须保留此段声明, 且在文章页面明显位置给出原文连接,否则保留追究法律责任的权利。
作者: Linux超

 每个公司都有一个维护测试case的系统,有自研的也有买的,比如QC, 禅道等等,QA往往习惯使用xmind等思维导图工具来编写测试用例,因为思路清晰,编写方便,那么这就有一个问题,大多公司要求所有的case都要导入到系统统一维护,然而系统对xmind的支持并不友好,或者根本不支持,就我们目前的情况来说,系统支持导入xmind文件导入,但是导入后所有的用例都是乱的,而且没有测试步骤,没有预期结果等等问题,因此针对这一痛点,便诞生了今天的小工具,虽然这个工具只能解决我的问题,但是里面有大家可以学习参考的地方,希望对你有帮助,那么我的目的就达到了

 浙公网安备 33010602011771号