Flutter进阶(7):实现拖拽(Draggable和DragTarget)
在 Flutter 中,拖拽功能可以通过多种方式实现,具体取决于你的需求。Flutter 提供了丰富的 API 来支持拖拽操作,以下是几种常见的实现方式:
(1)Draggable 和 DragTarget
Draggable 和 DragTarget 是 Flutter 中用于实现拖拽功能的核心组件。下面做详细介绍。
- Draggable: 用于创建可以拖拽的组件。
- DragTarget: 用于接收拖拽的组件。
(2)ReorderableListView
如果你需要实现一个可以重新排序的列表,可以使用 ReorderableListView。这里不做过多介绍。
(3)GestureDetector 和 Transform
如果你需要更底层的控制,可以使用 GestureDetector 和 Transform 来实现自定义的拖拽效果。这里不做过多介绍,详情可查看这篇博客:Flutter手势组件(3):GestureDetector
一、Draggable
Draggable顾名思义,是可拖动的组件,它的主要功能是让用户通过拖动手势移动组件,并在拖动过程中触发回调。 构造方法有非常多的入参,其中必须传入的是child和feedback两个组件。
另外,还有个组件LongPressDraggable继承自Draggable,因此用法和Draggable完全一样,唯一的区别就是LongPressDraggable触发拖动的方式是长按,而Draggable触发拖动的方式是按下。
1.1 主要属性
data:拖拽的核心数据,当用户拖拽控件时会携带此数据(可以是任意类型)。child:正常显示的控件。它是拖拽对象的原始显示(例如,可以是一个文本或图像)。feedback:拖拽时展示的控件,通常是半透明的,这个控件在拖拽期间会悬浮在用户的手指上方。childWhenDragging:当控件被拖拽时,原控件的替代显示(通常是空白或一个灰色的占位符)。axis:控制拖拽的方向,值可以是Axis.horizontal(水平)或Axis.vertical(垂直),也可以为Axis.none(没有方向限制)。ignorePointer:是否忽略手势。如果为true,该控件在拖拽时将无法响应任何手势。onDragStarted:拖拽开始时的回调,通常用来更新状态或做一些准备工作。onDragEnd:拖拽结束时的回调,通常用来处理拖拽结束后的逻辑。onDraggableCanceled:当拖拽被取消时的回调,通常是当控件离开了任何DragTarget区域。
1.2 工作原理
Draggable控件主要通过data属性将需要拖拽的数据传递给其他控件,特别是DragTarget,在用户拖拽控件时,Draggable控件会自动执行以下操作:
- 拖拽开始:当用户开始拖拽时,
Draggable控件会展示指定的feedback,并且显示出原始控件的占位符(childWhenDragging)。 - 拖拽过程:拖拽过程中,用户可以将控件在屏幕上拖动,通常会通过
onDragStarted和onDragEnd回调来触发相应的逻辑。 - 拖拽结束或取消:当拖拽对象被放置到
DragTarget中,或者当用户取消拖拽时,Draggable会触发onDragEnd或onDraggableCanceled回调。
1.3 基本示例
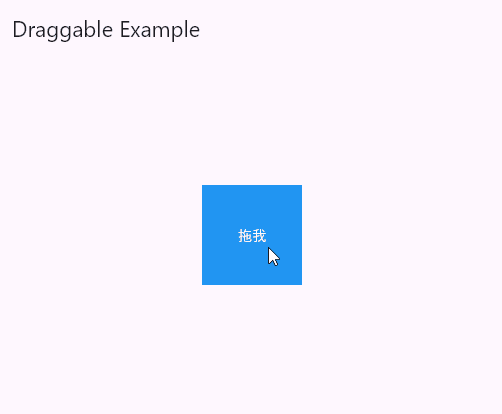
在此例中,Draggable<int>创建了一个可以拖拽的蓝色矩形,其内容是文本 “拖我”。当用户开始拖拽时,feedback使矩形变成一个半透明的版本(显示文本 “拖拽中”),同时,原始控件会被替换为一个灰色的占位符(childWhenDragging)。效果图如下所示:
import 'package:flutter/material.dart';

void main() {
  runApp(const MyApp());
}

class MyApp extends StatelessWidget {
  const MyApp({super.key});

  @override
  Widget build(BuildContext context) {
    return MaterialApp(
      debugShowCheckedModeBanner: false,
      home: Scaffold(
        appBar: AppBar(title: const Text('Draggable Example')),
        body: Center(
          child: Draggable<int>(
            data: 300,
            feedback: Material(
              color: Colors.transparent,
              child: Container(
                width: 100,
                height: 100,
                alignment: Alignment.center,
                color: Colors.blue.withOpacity(0.5),
                child: const Text('拖拽中',style: TextStyle(color: Colors.white)),
              ),
            ),
            childWhenDragging: Container(
              width: 100,
              height: 100,
              alignment: Alignment.center,
              color: Colors.grey,
              child: const Text('拖走了',style: TextStyle(color: Colors.white)),
            ),  // 拖拽的数据
            child: Container(
              width: 100,
              height: 100,
              alignment: Alignment.center,
              color: Colors.blue,
              child: const Text('拖我',style: TextStyle(color: Colors.white)),
            ),
          ),
        ),
      ),
    );
  }
}
1.4 回调事件
Draggable 组件为我们提供了 4 种拖动过程中的回调事件,用法如下:
Draggable(
  onDragStarted: (){
    debugPrint('onDragStarted');
  },
  onDragEnd: (DraggableDetails details){
    debugPrint('onDragEnd:$details');
  },
  onDraggableCanceled: (Velocity velocity, Offset offset){
    debugPrint('onDraggableCanceled velocity:$velocity,offset:$offset');
  },
  onDragCompleted: (){
    debugPrint('onDragCompleted');
  },
  // ...
)
说明如下:
onDragStarted:开始拖动时回调。onDragEnd:拖动结束时回调。onDraggableCanceled:未拖动到 DragTarget 控件上时回调。onDragCompleted:拖动到 DragTarget 控件上时回调。
1.5 设置拖动的方向: axis
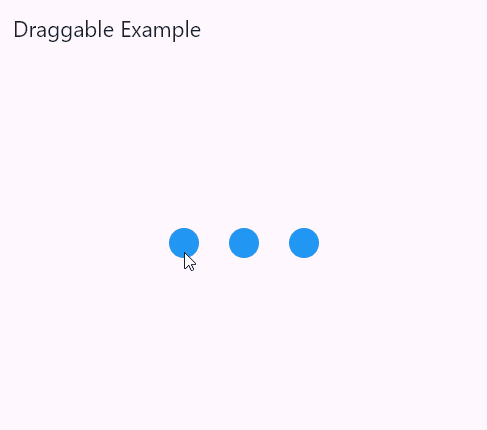
下面先通过一个小案例认识一下Draggable:下面是三个Draggable组件,其中child是蓝色小圆,feedback是红色小圆,三者的区别在于axis属性不同。左边axis为null,表示不限定轴向,可以自由拖动;中间axis为vertical,只能在竖直方向拖动;中间axis为horizontal,只能在水平方向拖动。
效果图如下所示:
import 'package:flutter/material.dart';

void main() {
  runApp(const MyApp());
}

class MyApp extends StatelessWidget {
  const MyApp({super.key});

  @override
  Widget build(BuildContext context) {
    return MaterialApp(
      debugShowCheckedModeBanner: false,
      home: Scaffold(
        appBar: AppBar(title: const Text('Draggable Example')),
        body: const Center(
          child: CustomDraggable(),
        ),
      ),
    );
  }
}

class CustomDraggable extends StatelessWidget {
  const CustomDraggable({super.key});

  @override
  Widget build(BuildContext context) {
    List<Axis?> axis = [null, Axis.vertical, Axis.horizontal];
    return Wrap(
      spacing: 30,
      children: axis
          .map((Axis? axis) => Draggable(
                axis: axis,
                feedback: buildFeedback(),
                child: buildContent(),
              ))
          .toList());
  }

  Widget buildFeedback() {
    return Container(
      width: 30,
      height: 30,
      decoration: const BoxDecoration(
        color: Colors.red,
        shape: BoxShape.circle,
      ),
    );
  }

  Widget buildContent() {
    return Container(
      width: 30,
      height: 30,
      alignment: Alignment.center,
      decoration: const BoxDecoration(
        color: Colors.blue,
        shape: BoxShape.circle,
      ),
    );
  }
}
二、DragTarget
DragTarget是一个可以接收Draggable数据的组件。它的主要功能是定义一个区域,在Draggable被释放时接收数据并触发回调。
2.1 主要属性
onWillAccept: 当拖动目标进入该区域时调用,返回true表示接受,false表示拒绝。onAcceptWithDetails: 当拖动目标在该区域释放时调用,并接收Draggable的data。onLeave: 当拖动目标离开该区域时调用。builder: 构建函数,根据拖动目标的状态更新 UI。
2.2 回调事件
DragTarget 有 3 个回调,说明如下:
onWillAccept:拖到该控件上时调用,需要返回 true 或者 false,返回 true,松手后会回调onAccept,否则回调onLeave。onAccept:onWillAccept返回 true 时,用户松手后调用。onLeave:onWillAccept返回 false 时,用户松手后调用。
当onWillAccept返回 true 时, candidateData参数的数据是 Draggable 的data数据。当onWillAccept返回 false 时, rejectedData参数的数据是 Draggable 的data数据,
2.3 Draggable 与 DragTarget 联合使用
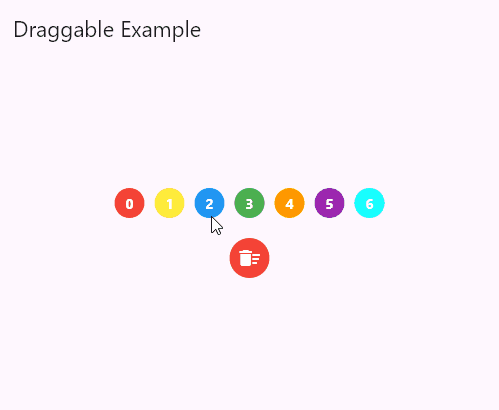
下面通过一个示例测试一下Draggable与DragTarget的联合使用。如下,上面的小球是Draggable,下面的区域是DragTarget。通过颜色数组colors生成不同颜色的Draggable,并拥有int泛型,传递的数值为可拖拽组件的索引,这样在DragTarget的onAccept中可以获取拖入进的索引数据,从而实现删除功能。效果图如下所示:
import 'package:flutter/material.dart';

void main() {
  runApp(const MyApp());
}

class MyApp extends StatelessWidget {
  const MyApp({super.key});

  @override
  Widget build(BuildContext context) {
    return MaterialApp(
      debugShowCheckedModeBanner: false,
      home: Scaffold(
        appBar: AppBar(title: const Text('Draggable Example')),
        body: const Center(
          child: DeleteDraggable(),
        ),
      ),
    );
  }
}

class DeleteDraggable extends StatefulWidget {
  const DeleteDraggable({super.key});

  @override
  _DeleteDraggableState createState() => _DeleteDraggableState();
}

class _DeleteDraggableState extends State<DeleteDraggable> {
  List<Color> colors = [
    Colors.red, Colors.yellow, Colors.blue, Colors.green,
    Colors.orange, Colors.purple, Colors.cyanAccent];

  @override
  Widget build(BuildContext context) {
    return  Column(
        mainAxisSize: MainAxisSize.min,
        children: <Widget>[
          Wrap(
            spacing: 10,
            children: _buildDraggable(),
          ),
          const SizedBox(
            height: 20,
          ),
          DragTarget<int>(
              onAcceptWithDetails: _onAccept,
              onWillAcceptWithDetails: (data) => data != null,
              builder: buildTarget
          )
        ],
    );
  }

  Widget buildTarget(context, candidateData, rejectedData) => Container(
      width: 40.0,
      height: 40.0,
      decoration: const BoxDecoration(color: Colors.red, shape: BoxShape.circle),
      child: const Center(
        child: Icon(Icons.delete_sweep, color: Colors.white),
      ));

  List<Widget> _buildDraggable() => colors
      .map((Color color) => Draggable<int>(
            data: colors.indexOf(color),
            childWhenDragging: buildWhenDragging(),
            feedback: buildFeedback(color),
            child: buildContent(color)),
      ).toList();

  Widget buildContent(Color color) {
    return Container(
      width: 30,
      height: 30,
      alignment: Alignment.center,
      decoration: BoxDecoration(color: color, shape: BoxShape.circle),
      child: Text(
        colors.indexOf(color).toString(),
        style: const TextStyle(color: Colors.white, fontWeight: FontWeight.bold),
      ),
    );
  }

  Widget buildFeedback(Color color) {
    return Container(
      width: 25,
      height: 25,
      decoration:
          BoxDecoration(color: color.withAlpha(100), shape: BoxShape.circle),
    );
  }

  Widget buildWhenDragging() {
    return Container(
      width: 30,
      height: 30,
      decoration: const BoxDecoration(color: Colors.red, shape: BoxShape.circle),
      child: const Icon(Icons.delete_outline, size: 20, color: Colors.white,
      ),
    );
  }

  void _onAccept(DragTargetDetails details) {
    setState(() {
      colors.removeAt(details.data);
    });
  }
}
参考:

 浙公网安备 33010602011771号