
Flutter容器(5):变换(Transform)
一、Transform的作用
使用 Transform,你可以实现如下功能:
平移:让部件在 x、y 轴上移动指定的距离。平移可以用于创建滑动效果、拖拽操作等。旋转:让部件进行旋转,旋转角度可以自由设置。旋转可以用于创建旋转动画、改变部件的方向等。缩放:让部件在 x、y 轴上进行缩放,缩放比例可以自由设置。缩放可以用于创建缩放动画、调整部件的大小等。
二、Transform的属性详解
Transform 的主要属性如下:
| 属性 | 作用 | 示例代码 |
|---|---|---|
transform |
变换的矩阵 | Matrix4.rotationZ(0.1) |
origin |
变换的基点 | Offset(50, 50) |
alignment |
变换的对齐方式 | Alignment.center |
child |
子部件 | Text('Hello World') |
transform属性是一个 4x4 的矩阵,它定义了部件的变换方式。可以使用 Matrix4 类提供的方法来创建不同类型的变换矩阵。origin属性定义了变换的基点,用于旋转和缩放操作。alignment属性定义了变换后的部件在父容器中的对齐方式。
三、Transform代码示例
让我们通过一些实际的代码示例来了解如何使用 Transform:
3.1 平移
平移可以通过Transform.translate()方法来实现,通过设置 offset 参数来指定平移的距离。以下是几个具有代表性的平移效果:
import 'package:flutter/material.dart';

void main() {
  runApp(const MyApp());
}

class MyApp extends StatelessWidget {
  const MyApp({super.key});
  @override
  Widget build(BuildContext context) {
    return MaterialApp(
      debugShowCheckedModeBanner: false,
      home: Scaffold(
        backgroundColor: Colors.grey[300],
        body: Center(
          child: Column(
            mainAxisAlignment: MainAxisAlignment.spaceEvenly,
            children: [
              Container(
                color: Colors.grey[400],
                child: Transform.translate(
                  offset: Offset(50, 0),
                  child: Container(
                    width: 100,
                    height: 100,
                    color: Colors.blue,
                    child: const Center(
                      child: Text(
                        '平移效果1: 向右平移50个逻辑像素',
                        style: TextStyle(color: Colors.white),
                      ),
                    ),
                  ),
                ),
              ),
              Container(
                color: Colors.grey[500],
                child: Transform.translate(
                  offset: const Offset(0, 50),
                  child: Container(
                    width: 100,
                    height: 100,
                    color: Colors.red,
                    child: const Center(
                      child: Text(
                        '平移效果2: 向下平移50个逻辑像素',
                        style: TextStyle(color: Colors.white),
                      ),
                    ),
                  ),
                ),
              ),
            ],
          ),
        ),
      ),
    );
  }
}
效果图如下所示:
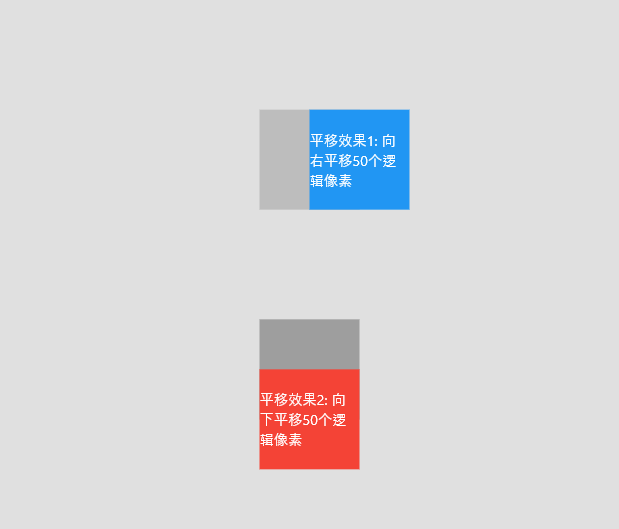
上述代码中,我们通过设置不同的平移偏移量,分别在x轴和y轴方向上进行平移,创建了两个具有不同效果的平移效果。
3.2 旋转
旋转可以通过Transform.rotate()方法来实现,通过设置 angle 参数来指定旋转的角度。以下是几个具有代表性的旋转效果:
import 'package:flutter/material.dart';

void main() {
  runApp(const MyApp());
}

class MyApp extends StatelessWidget {
  const MyApp({super.key});
  @override
  Widget build(BuildContext context) {
    return MaterialApp(
      debugShowCheckedModeBanner: false,
      home: Scaffold(
        backgroundColor: Colors.grey[300],
        body: Center(
          child: Column(
            mainAxisAlignment: MainAxisAlignment.spaceEvenly,
            children: [
              Container(
                color: Colors.grey[400],
                child: Transform.rotate(
                  angle: 0.5,
                  child: Container(
                    width: 100,
                    height: 100,
                    color: Colors.green,
                    child: const Center(
                      child: Text(
                        '旋转效果1: 顺时针旋转0.5弧度',
                        style: TextStyle(color: Colors.white),
                      ),
                    ),
                  ),
                ),
              ),
              Container(
                color: Colors.grey[500],
                child: Transform.rotate(
                  angle: 1.0,
                  child: Container(
                    width: 100,
                    height: 100,
                    color: Colors.orange,
                    child: const Center(
                      child: Text(
                        '旋转效果2: 顺时针旋转1.0弧度',
                        style: TextStyle(color: Colors.white),
                      ),
                    ),
                  ),
                ),
              ),
            ],
          ),
        ),
      ),
    );
  }
}
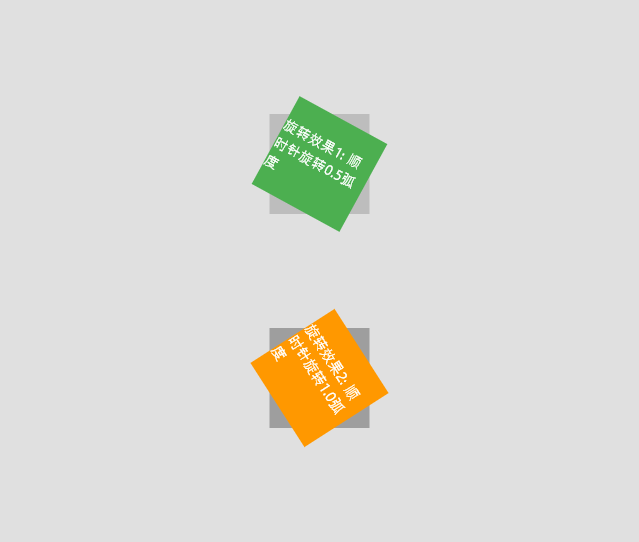
上述代码中,我们通过设置不同的旋转角度,创建了两个具有不同旋转效果的部件。效果图如下所示:
3.3 缩放
缩放可以通过Transform.scale()方法来实现,通过设置 scale 参数来指定缩放比例。以下是几个具有代表性的缩放效果:
import 'package:flutter/material.dart';

void main() {
  runApp(const MyApp());
}

class MyApp extends StatelessWidget {
  const MyApp({super.key});
  @override
  Widget build(BuildContext context) {
    return MaterialApp(
      debugShowCheckedModeBanner: false,
      home: Scaffold(
        backgroundColor: Colors.grey[300],
        body: Center(
          child: Column(
            mainAxisAlignment: MainAxisAlignment.spaceEvenly,
            children: [
              Container(
                color: Colors.grey[400],
                child: Transform.scale(
                  scale: 0.5,
                  child: Container(
                    width: 100,
                    height: 100,
                    color: Colors.yellow,
                    child: const Center(
                      child: Text(
                        '缩放效果1: 在x和y轴上缩小为原来的一半',
                        style: TextStyle(color: Colors.white),
                      ),
                    ),
                  ),
                ),
              ),
              Container(
                color: Colors.grey[500],
                child: Transform.scale(
                  scale: 1.5,
                  child: Container(
                    width: 100,
                    height: 100,
                    color: Colors.purple,
                    child: const Center(
                      child: Text(
                        '缩放效果2: 在x和y轴上放大为原来的1.5倍',
                        style: TextStyle(color: Colors.white),
                      ),
                    ),
                  ),
                ),
              ),
            ],
          ),
        ),
      ),
    );
  }
}
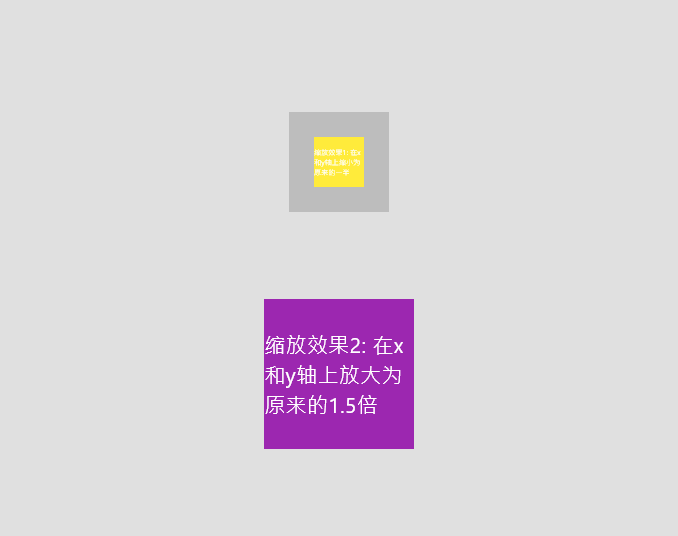
上述代码中,我们通过设置不同的缩放比例,创建了两个具有不同缩放效果的部件。
四、Transform使用注意事项
在使用 Transform 时,需要注意以下几点:
- Transform 的变换是发生在绘制阶段,并不会影响布局。也就是说,无论如何变换,对其他部件的位置和大小都不会有任何影响。
- 如果需要在布局阶段就进行变换,可以使用 RotatedBox 部件。与 Transform 不同,RotatedBox 会在布局阶段就进行旋转,从而影响布局结果。
- 变换矩阵是一个 4x4 的矩阵,通过组合不同的变换操作可以实现复杂的变换效果。常见的变换方法包括平移(translation)、旋转(rotation)、缩放(scale)等。

 浙公网安备 33010602011771号