[数据结构 - 第3章] 线性表之单链表(C++实现)
一、类定义
单链表类的定义如下:
#ifndef SIGNALLIST_H
#define SIGNALLIST_H

typedef int  ElemType; /* "ElemType类型根据实际情况而定, 这里假设为int */

/* 线性表的单链表存储结构 */
typedef struct node
{
	ElemType data; // 数据域
	struct node *next; // 指针域
}Node, LinkList;

class SignalList
{
public:
	SignalList(int size = 0); // 构造函数
	~SignalList(); // 析构函数

	void clearList(); // 清空顺序表操作
	bool isEmpty(); // 判断是否为空操作
	int getLength(); // 获取顺序表长度操作
	bool insertList(int i, const ElemType e); // 插入元素操作
	bool deleteList(int i, ElemType *e); // 删除元素操作
	bool getElem(int i, ElemType *e); // 获取元素操作
	bool insertListHead(const ElemType e); // 头部后插入元素操作
	bool insertListTail(const ElemType e); // 尾部后插入元素操作
	void traverseList(); // 遍历顺序表
	int locateElem(const ElemType e); // 查找元素位置操作

private:
	LinkList *m_pList; // 单链表指针
};

#endif
二、构造函数
为头结点m_pList申请内存,数据域置为 0,指针域指向空。
// 构造函数
SignalList::SignalList(int size)
{
	// 初始化单链表
	m_pList = new Node;
	m_pList->data = 0;
	m_pList->next = NULL;
}
三、析构函数
调用清空单链表方法,并且销毁头结点。
// 析构函数
SignalList::~SignalList()
{
	clearList(); // 清空单链表
	delete m_pList;
	m_pList = NULL;
}
四、清空链表操作
循环销毁除头结点外的各结点。
// 清空链表操作
void SignalList::clearList()
{
	Node *cur; // 当前结点
	Node *temp; // 事先保存下一结点,防止释放当前结点后导致“掉链”

	cur = m_pList->next; //指向第一个结点
	while (cur)
	{
		temp = cur->next; // 事先保存下一结点,防止释放当前结点后导致“掉链”
		delete cur; // 释放当前结点
		cur = temp; // 将下一结点赋给当前结点
	}

	cur->next = NULL; // 注意还要将头结点的指针域指向空
}
清空链表和析构函数的区别:清空链表是循环销毁除头结点外的各结点,析构函数是销毁所有结点,包括头结点。
五、判空和获取顺序表长度操作
// 判断是否为空操作
bool SignalList::isEmpty()
{
	return m_pList->next == NULL ? true : false;
}

// 获取链表长度操作
int SignalList::getLength()
{
	Node *cur = m_pList;
	int length = 0;

	while (cur->next)
	{
		cur = cur->next;
		length++;
	}

	return length;
}
六、插入元素操作
注意这里是有头结点,头结点作为位置 0,所以只能在位置 1 以及后面插入,所以 i 至少为1。
// 插入元素操作
bool SignalList::insertList(int i, const ElemType e)
{
	// 判断链表是否存在
	if (!m_pList)
	{
		cout << "list not exist!" << endl;
		return false;
	}
	// 只能在位置1以及后面插入,所以i至少为1
	if (i < 1)
	{
		cout << "i is invalid!" << endl;
		return false;
	}

	// 找到i位置所在的前一个结点
	Node *front = m_pList; // 这里是让front与i不同步,始终指向j对应的前一个结点
	for (int j = 1; j < i; j++) // j为计数器,赋值为1,对应front指向的下一个结点,即插入位置结点
	{
		front = front->next;
		if (front == NULL)
		{
			printf("dont find front!\n");
			return false;
		}
	}

	// 创建一个空节点,存放要插入的新元素
	Node *temp = new Node;
	temp->data = e;
	temp->next = NULL;

	// 插入结点s
	temp->next = front->next;
	front->next = temp;

	return true;
}
七、删除元素操作
注意提前保存要删除的结点,避免删除结点后丢失。
// 删除元素操作
bool SignalList::deleteList(int i, ElemType *e)
{
	// 判断链表是否存在
	if (!m_pList)
	{
		cout << "list not exist!" << endl;
		return false;
	}
	// 只能删除位置1以及后面的结点
	if (i < 1)
	{
		cout << "i is invalid!" << endl;
		return false;
	}

	// 找到i位置所在的前一个结点
	Node *front = m_pList; // 这里是让front与i不同步,始终指向j对应的前一个结点
	for (int j = 1; j < i; j++) // j为计数器,赋值为1,对应front指向的下一个结点,即插入位置结点
	{
		front = front->next;
		if (front->next == NULL)
		{
			printf("dont find front!\n");
			return false;
		}
	}

	// 提前保存要删除的结点
	Node *temp = front->next;
	*e = temp->data; // 将要删除结点的数据赋给e

	// 删除结点
	front->next = front->next->next;

	// 销毁结点
	delete temp;
	temp = NULL;

	return true;
}
八、遍历操作
遍历前需要判断链表是否存在。
// 遍历链表
void SignalList::traverseList()
{
	// 判断链表是否存在
	if (!m_pList)
	{
		cout << "list not exist!" << endl;
		return;
	}

	Node *cur = m_pList->next;
	while (cur)
	{
		cout << cur->data << " ";
		cur = cur->next;
	}
}
九、主函数执行
在主函数中执行的代码如下:
#include <stdio.h>
#include <stdlib.h>
#include <iostream>
#include "signalList.h"

using namespace std;

int main()
{
	// 初始化链表
	SignalList signleList(20);

	cout << "插入元素0-2到链表!" << endl;
	for (int i = 0; i<3; i++)
	{
		signleList.insertList(i+1, i);
	}
	cout << endl;

	// 在位置2插入元素9到链表
	cout << "在位置2插入元素9到链表!" << endl << endl;
	signleList.insertList(2, 9);

	// 在位置3删除元素
	int value1;
	if (signleList.deleteList(3, &value1) == false)
	{
		cout << "delete error!" << endl;
		return -1;
	}
	else
	{
		cout << "在位置3删除元素,删除的元素为:" << value1 << endl << endl;
	}

	// 查找元素位置
	int index = signleList.locateElem(9);
	if (index == -1)
	{
		cout << "locate error!" << endl;
		return -1;
	}
	else
	{
		cout << "查找到元素9的位置为:" << index << endl << endl;
	}

	// 遍历链表
	cout << "遍历链表: ";
	signleList.traverseList();
	cout << endl << endl;

	// 清空链表
	cout << "清空链表!" << endl << endl;
	signleList.clearList();

	return 0;
}
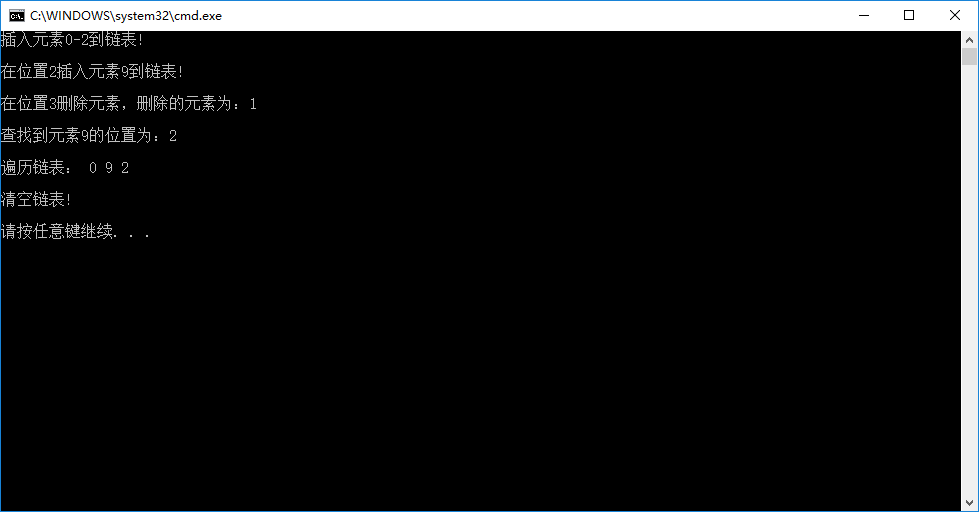
输出结果如下图所示(编译器为VS2013):


【推荐】编程新体验,更懂你的AI,立即体验豆包MarsCode编程助手
【推荐】凌霞软件回馈社区,博客园 & 1Panel & Halo 联合会员上线
【推荐】抖音旗下AI助手豆包,你的智能百科全书,全免费不限次数
【推荐】博客园社区专享云产品让利特惠,阿里云新客6.5折上折
【推荐】轻量又高性能的 SSH 工具 IShell:AI 加持,快人一步
· 没有源码,如何修改代码逻辑?
· 一个奇形怪状的面试题:Bean中的CHM要不要加volatile?
· [.NET]调用本地 Deepseek 模型
· 一个费力不讨好的项目,让我损失了近一半的绩效!
· .NET Core 托管堆内存泄露/CPU异常的常见思路
· 微软正式发布.NET 10 Preview 1:开启下一代开发框架新篇章
· 没有源码,如何修改代码逻辑?
· NetPad:一个.NET开源、跨平台的C#编辑器
· PowerShell开发游戏 · 打蜜蜂
· 凌晨三点救火实录:Java内存泄漏的七个神坑,你至少踩过三个!