Nginx安装及配置
Nginx安装
方式一:编译安装(选择稳定版本)
源码编译安装Nginx可以定制自己需要的模块,更方便业务的上的使用,这里采用CentOS7系统。
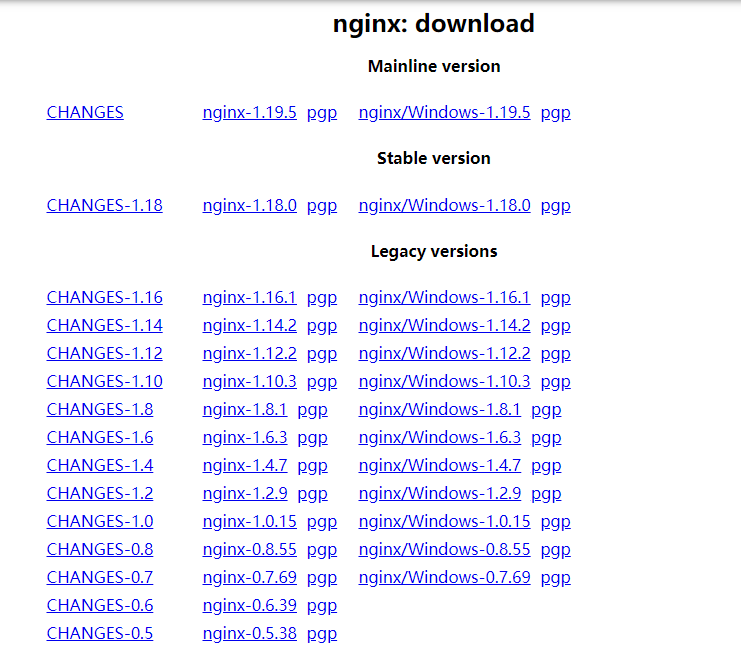
Nginx的安装版本分为开发版、稳定版和过期版。 Nginx官方源码包路径 http://nginx.org/en/download.html
一、源码安装需要提前准备以下环境
1.GCC 标准的编译器 全称是(GNU Compiler collection),由GNU开发并以GPL许可,是自由的类UNIX操作系统的标准编译器,
  可以处理C++,Fortran,pascal,objective-C,java以及Ada等其他语言。

2.gcc-c++也能编译C源代码,只不过把会把它当成C++源代码。后缀为.c的,gcc把它当作是C程序,而g++当作是c++程序;后缀为.cpp的。

3.还需要Automake工具,以完成自动创建Makefile的工作
 (make和automake什么关系-->autoconf/automake用来生成Makefile的-->然后用 make调用Makefile的规则,执行编译命令。
  可以把automake看作生成Makefile的Tools,使用autoconf 和automake构建Makefile  make命令用来执行Makefile。)

4.Nginx的一些模块需要依赖第三方库,比如pcre(支持rewrite),zlib(支持gzip模块)和openssl(支持ssl模块)等。
  pcre pcre-devel:在Nginx编译需要 PCRE(Perl Compatible Regular Expression),
                  因为Nginx的Rewrite模块和HTTP 核心模块会使用到PCRE正则表达式语法。
  zlib zlib-devel:nginx启用压缩功能的时候,需要此模块的支持。
  openssl openssl-devel:开启SSL的时候需要此模块的支持


[root@Nginx_Server ~]#  yum -y install gcc gcc-c++ make libtool zlib zlib-devel openssl openssl-devel pcre pcre-devel
二、 常用编译选项说明


--prefix=PATH  #指定nginx的安装目录。默认 /usr/local/nginx
--conf-path=PATH  #设置nginx.conf配置文件的路径。nginx允许使用不同的配置文件启动,通过命令行中的-c选项。默认为prefix/conf/nginx.conf
--user=name #设置nginx工作进程的用户。安装完成后,可以随时在nginx.conf配置文件更改user指令。默认的用户名是nobody。
--group=name #类似
--with-http_ssl_module #使用https协议模块,支持ssl功能。 默认情况下该模块没有被构建。前提是openssl与openssl-devel已安装
--with-http_v2_module            #支持http2功能
--with-http_realip_module        #做反向代理时可以转发真实的IP地址(通过这个模块允许我们改变客户端请求头中客户端IP地址值(例如X-Real-IP 或 X-Forwarded-For),意义在于能够使得后台服务器记录原始客户端的IP地址)
--with-http_stub_status_module   #开启状态页,用来监控 Nginx 的当前状态
--with-http_gzip_static_module   #开启静态压缩功能
--with-pcre            #支持正则,设置PCRE库的源码路径,使用--with-pcre自动找到库文件。使用--with-pcre=PATH时,需要从PCRE网站下载pcre库的源码(版本4.4 – 8.30)并解压,剩下的就交给Nginx的./configure和make来完成。perl正则表达式使用在location指令和 ngx_http_rewrite_module模块中。
--with-stream           #支持TCP代理的方式
--with-stream_ssl_module
--with-stream_realip_module

--sbin-path=/usr/sbin/nginx
--conf-path=/etc/nginx/nginx.conf
--error-log-path=/var/log/nginx/error.log
--http-log-path=/var/log/nginx/access.log
--pid-path=/var/run/nginx/nginx.pid
--lock-path=/var/lock/nginx.lock
--with-zlib=PATH : 指定 zlib(版本1.1.3 – 1.2.5)的源码解压目录。在默认就启用的网络传输压缩模块ngx_http_gzip_module时需要使用zlib 。
--add-module=PATH : 添加第三方外部模块,如nginx-sticky-module-ng或缓存模块。每次添加新的模块都要重新编译(Tengine可以在新加入module时无需重新编译)
[root@Nginx_server ~]# cd /usr/local/src/
[root@Nginx_server src]# ll
总用量 1016
-rw-r--r-- 1 root root 1039530 12月  5 16:41 nginx-1.18.0.tar.gz
[root@Nginx_server src]# tar -xf nginx-1.18.0.tar.gz
[root@Nginx_server src]# ll
总用量 1016
drwxr-xr-x 8 1001 1001     158 4月  21 2020 nginx-1.18.0
-rw-r--r-- 1 root root 1039530 12月  5 16:41 nginx-1.18.0.tar.gz
[root@Nginx_server src]# cd nginx-1.18.0
[root@Nginx_server nginx-1.18.0]# ls
auto  CHANGES  CHANGES.ru  conf  configure  contrib  html  LICENSE  man  README  src
[root@Nginx_server nginx-1.18.0]#
参考网址:https://jingyan.baidu.com/article/454316ab354edcf7a7c03a81.html
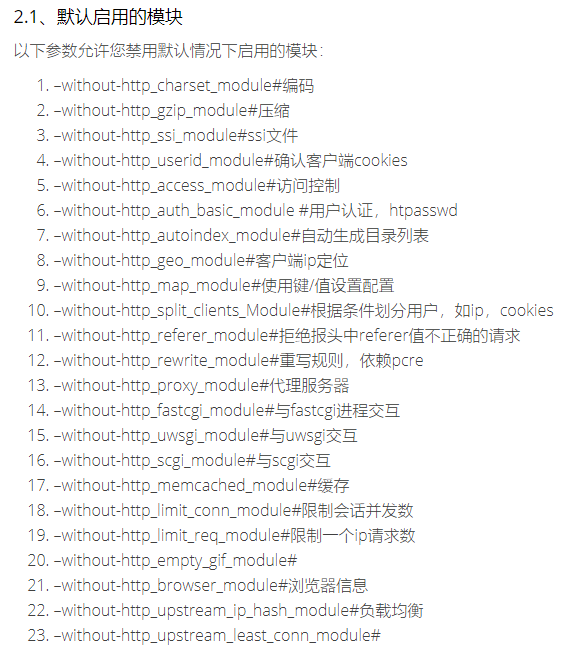
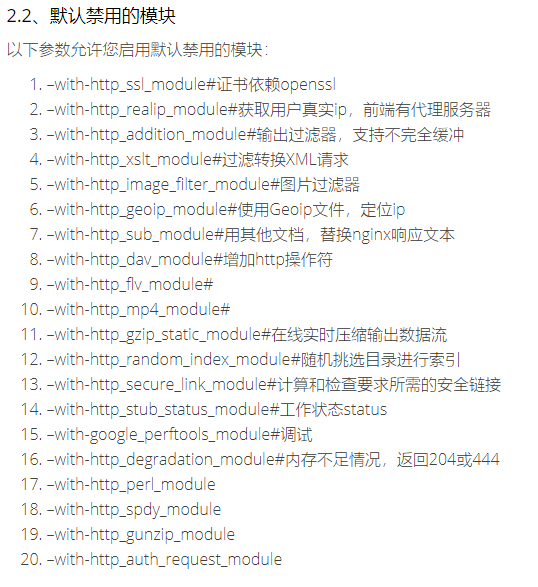
[root@Nginx_server nginx-1.18.0]# cat auto/options | grep YES
HTTP=YES
HTTP_CACHE=YES
HTTP_CHARSET=YES
HTTP_GZIP=YES
HTTP_SSI=YES
HTTP_ACCESS=YES
HTTP_AUTH_BASIC=YES
HTTP_MIRROR=YES
HTTP_USERID=YES
HTTP_AUTOINDEX=YES
HTTP_GEO=YES
HTTP_MAP=YES
HTTP_SPLIT_CLIENTS=YES
HTTP_REFERER=YES
HTTP_REWRITE=YES
HTTP_PROXY=YES
HTTP_FASTCGI=YES
HTTP_UWSGI=YES
HTTP_SCGI=YES
HTTP_GRPC=YES
HTTP_MEMCACHED=YES
HTTP_LIMIT_CONN=YES
HTTP_LIMIT_REQ=YES
HTTP_EMPTY_GIF=YES
HTTP_BROWSER=YES
HTTP_UPSTREAM_HASH=YES
HTTP_UPSTREAM_IP_HASH=YES
HTTP_UPSTREAM_LEAST_CONN=YES
HTTP_UPSTREAM_RANDOM=YES
HTTP_UPSTREAM_KEEPALIVE=YES
HTTP_UPSTREAM_ZONE=YES
MAIL_POP3=YES
MAIL_IMAP=YES
MAIL_SMTP=YES
STREAM_LIMIT_CONN=YES
STREAM_ACCESS=YES
STREAM_GEO=YES
STREAM_MAP=YES
STREAM_SPLIT_CLIENTS=YES
STREAM_RETURN=YES
STREAM_UPSTREAM_HASH=YES
STREAM_UPSTREAM_LEAST_CONN=YES
STREAM_UPSTREAM_RANDOM=YES
STREAM_UPSTREAM_ZONE=YES
        --with-select_module)            EVENT_SELECT=YES           ;;
        --with-poll_module)              EVENT_POLL=YES             ;;
        --with-threads)                  USE_THREADS=YES            ;;
        --with-file-aio)                 NGX_FILE_AIO=YES           ;;
        --with-http_ssl_module)          HTTP_SSL=YES               ;;
        --with-http_v2_module)           HTTP_V2=YES                ;;
        --with-http_realip_module)       HTTP_REALIP=YES            ;;
        --with-http_addition_module)     HTTP_ADDITION=YES          ;;
        --with-http_xslt_module)         HTTP_XSLT=YES              ;;
        --with-http_image_filter_module) HTTP_IMAGE_FILTER=YES      ;;
        --with-http_geoip_module)        HTTP_GEOIP=YES             ;;
        --with-http_sub_module)          HTTP_SUB=YES               ;;
        --with-http_dav_module)          HTTP_DAV=YES               ;;
        --with-http_flv_module)          HTTP_FLV=YES               ;;
        --with-http_mp4_module)          HTTP_MP4=YES               ;;
        --with-http_gunzip_module)       HTTP_GUNZIP=YES            ;;
        --with-http_gzip_static_module)  HTTP_GZIP_STATIC=YES       ;;
        --with-http_auth_request_module) HTTP_AUTH_REQUEST=YES      ;;
        --with-http_random_index_module) HTTP_RANDOM_INDEX=YES      ;;
        --with-http_secure_link_module)  HTTP_SECURE_LINK=YES       ;;
        --with-http_degradation_module)  HTTP_DEGRADATION=YES       ;;
        --with-http_slice_module)        HTTP_SLICE=YES             ;;
        --with-http_perl_module)         HTTP_PERL=YES              ;;
        --with-http_stub_status_module)  HTTP_STUB_STATUS=YES       ;;
        --with-mail)                     MAIL=YES                   ;;
        --with-mail_ssl_module)          MAIL_SSL=YES               ;;
            MAIL=YES
            MAIL_SSL=YES
        --with-stream)                   STREAM=YES                 ;;
        --with-stream_ssl_module)        STREAM_SSL=YES             ;;
        --with-stream_realip_module)     STREAM_REALIP=YES          ;;
        --with-stream_geoip_module)      STREAM_GEOIP=YES           ;;
                                         STREAM_SSL_PREREAD=YES     ;;
        --with-google_perftools_module)  NGX_GOOGLE_PERFTOOLS=YES   ;;
        --with-cpp_test_module)          NGX_CPP_TEST=YES           ;;
        --with-compat)                   NGX_COMPAT=YES             ;;
        --with-debug)                    NGX_DEBUG=YES              ;;
        --with-pcre)                     USE_PCRE=YES               ;;
        --with-pcre-jit)                 PCRE_JIT=YES               ;;
        --with-libatomic)                NGX_LIBATOMIC=YES          ;;
        --test-build-devpoll)            NGX_TEST_BUILD_DEVPOLL=YES ;;
        --test-build-eventport)          NGX_TEST_BUILD_EVENTPORT=YES ;;
        --test-build-epoll)              NGX_TEST_BUILD_EPOLL=YES   ;;
        --test-build-solaris-sendfilev)  NGX_TEST_BUILD_SOLARIS_SENDFILEV=YES ;;
注意2:编译时./configure --help 以--without开头的都默认启动了,--with开头的都默认关闭了。
三、 安装
程序默认是使用 nobody 身份运行的,我们建议使用 nginx 用户来运行,首先添加Nginx组和用户,不创建家目录,不允许登陆系统
[root@Nginx_server nginx-1.18.0]#  groupadd nginx
[root@Nginx_server nginx-1.18.0]#  useradd -M -s /sbin/nologin -g nginx nginx


[root@Nginx_server nginx-1.18.0]# ./configure --prefix=/usr/local/nginx --user=nginx --group=nginx --with-http_ssl_module --with-http_v2_module
\ --with-http_realip_module --with-http_stub_status_module --with-http_gzip_static_module --with-pcre --with-stream --with-stream_ssl_module --with-stream_realip_module

#注意,"./configure"这个步骤会有两个操作,第一是检查编译安装需要依赖的软件包等环境,如果缺少依赖包则配置不成功;第二是会生成Makefile的配置文件哟~
[root@Nginx_server nginx-1.18.0]# ll Makefile
-rw-r--r-- 1 root root 376 12月  5 18:15 Makefile
[root@Nginx_server nginx-1.18.0]#  date
2020年 12月 05日 星期六 18:17:13 CST
[root@Nginx_server nginx-1.18.0]#
default:    build

clean:
    rm -rf Makefile objs

build:
    $(MAKE) -f objs/Makefile

install:
    $(MAKE) -f objs/Makefile install

modules:
    $(MAKE) -f objs/Makefile modules

upgrade:
    /usr/local/nginx/sbin/nginx -t

    kill -USR2 `cat /usr/local/nginx/logs/nginx.pid`
    sleep 1
    test -f /usr/local/nginx/logs/nginx.pid.oldbin

    kill -QUIT `cat /usr/local/nginx/logs/nginx.pid.oldbin`
[root@Nginx_server nginx-1.18.0]#
Architecture:          x86_64
CPU op-mode(s):        32-bit, 64-bit
Byte Order:            Little Endian
CPU(s):                4
On-line CPU(s) list:   0-3
Thread(s) per core:    1
Core(s) per socket:    2
座:                 2
NUMA 节点:         1
厂商 ID:           GenuineIntel
CPU 系列:          6
型号:              126
型号名称:        Intel(R) Core(TM) i5-1035G1 CPU @ 1.00GHz
步进:              5
CPU MHz:             1190.402
CPU max MHz:           0.0000
CPU min MHz:           0.0000
BogoMIPS:            2380.80
超管理器厂商:  VMware
虚拟化类型:     完全
L1d 缓存:          48K
L1i 缓存:          32K
L2 缓存:           512K
L3 缓存:           6144K
NUMA 节点0 CPU:    0-3
Flags:                 fpu vme de pse tsc msr pae mce cx8 apic sep mtrr pge mca cmov pat pse36 clflush dts mmx fxsr sse sse2 ss ht syscall nx pdpe1gb rdtscp lm constant_tsc arch_perfmon pebs bts nopl xtopology tsc_reliable nonstop_tsc aperfmperf eagerfpu pni pclmulqdq ssse3 fma cx16 pcid sse4_1 sse4_2 x2apic movbe popcnt tsc_deadline_timer aes xsave avx f16c rdrand hypervisor lahf_lm abm 3dnowprefetch epb fsgsbase tsc_adjust bmi1 avx2 smep bmi2 invpcid rdseed adx smap xsaveopt dtherm ida arat pln pts hwp hwp_notify hwp_act_window hwp_epp hwp_pkg_req
[root@Nginx_server nginx-1.18.0]#
[root@Nginx_server nginx-1.18.0]# make -j 4
[root@Nginx_server nginx-1.18.0]# echo $?
0
[root@Nginx_server nginx-1.18.0]#

[root@Nginx_server nginx-1.18.0]# make install
[root@Nginx_server nginx-1.18.0]# echo $?
0
[root@Nginx_server nginx-1.18.0]#

[root@Nginx_server nginx-1.18.0]# ll /usr/local/nginx/
总用量 0
#保存nginx所有的配置文件,其中nginx.conf是nginx服务器的最核心最主要的配置文件,其他的.conf则是用来配置nginx相关的功能的,
例如fastcgi功能使用的是fastcgi.conf和fastcgi_params两个文件,
配置文件一般都有个样板配置文件,是文件名.default结尾,使用的使用将其复制为并将default去掉即可。
drwxr-xr-x 2 root root 333 12月  5 18:20 conf

 #保存了nginx服务器的web文件,但是可以更改为其他目录保存web文件,另外还有一个50x的web文件是默认的错误页面提示页面
drwxr-xr-x 2 root root  40 12月  5 18:20 html

#用来保存nginx服务器的访问日志错误日志等日志,logs目录可以放在其他路径,比如/var/logs/nginx里面。
drwxr-xr-x 2 root root   6 12月  5 18:20 logs

#保存nginx二进制启动脚本,可以接受不同的参数以实现不同的功能。
drwxr-xr-x 2 root root  19 12月  5 18:20 sbin
[root@Nginx_server nginx-1.18.0]#

[root@Nginx_server nginx-1.18.0]# chown nginx:nginx -R /usr/local/nginx/
[root@Nginx_server nginx-1.18.0]#
[root@Nginx_server nginx-1.18.0]# ss -ntl
State       Recv-Q Send-Q        Local Address:Port                   Peer Address:Port
LISTEN      0      128                   *:22                                     *:*
LISTEN      0      100           127.0.0.1:25                                     *:*
LISTEN      0      128                  :::22                                    :::*
LISTEN      0      100                 ::1:25                                    :::*
[root@Nginx_server nginx-1.18.0]#

#检查nginx的配置文件语法是否正确
[root@Nginx_server nginx-1.18.0]# /usr/local/nginx/sbin/nginx -t
nginx: the configuration file /usr/local/nginx/conf/nginx.conf syntax is ok
nginx: configuration file /usr/local/nginx/conf/nginx.conf test is successful
[root@Nginx_server nginx-1.18.0]# /usr/local/nginx/sbin/nginx
[root@Nginx_server nginx-1.18.0]# ss -ntl

State       Recv-Q Send-Q        Local Address:Port                   Peer Address:Port
LISTEN      0      128                   *:80                                     *:*
LISTEN      0      128                   *:22                                     *:*
LISTEN      0      100           127.0.0.1:25                                     *:*
LISTEN      0      128                  :::22                                    :::*
LISTEN      0      100                 ::1:25                                    :::*
编写nginx启动脚本
[root@Nginx_server ~]# vim /usr/lib/systemd/system/nginx.service
[Unit]
Description=mxxl_nginx
Documentation=http://nginx.org/en/docs/
After=network-online.target remote-fs.target nss-lookup.target
Wants=network-online.target

[Service]
Type=forking
PIDFile=/usr/local/nginx/logs/nginx.pid
ExecStart=/usr/local/nginx/sbin/nginx -c /usr/local/nginx/conf/nginx.conf
ExecReload=/bin/kill -s HUP $MAINPID
ExecStop=/bin/kill -s TERM $MAINPID

[Install]
WantedBy=multi-user.target
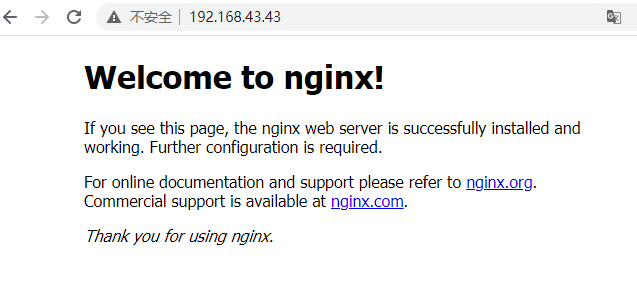
访问http://192.168.43.43/ 防火墙关闭
四、/usr/local/nginx/sbin/nginx 常用选项
查看帮助
[root@Nginx_server ~]# /usr/local/nginx/sbin/nginx -h
nginx version: nginx/1.18.0
Usage: nginx [-?hvVtTq] [-s signal] [-c filename] [-p prefix] [-g directives]

Options:
  -?,-h         : this help
  -v            : show version and exit
  -V            : show version and configure options then exit
  -t            : test configuration and exit
  -T            : test configuration, dump it and exit
  -q            : suppress non-error messages during configuration testing
  -s signal     : send signal to a master process: stop, quit, reopen, reload
  -p prefix     : set prefix path (default: /usr/local/nginx/)
  -c filename   : set configuration file (default: conf/nginx.conf)
  -g directives : set global directives out of configuration file

[root@Nginx_server ~]#
#会列出nginx版本以及配置选项,升级安装时,我们得参考这些配置选项,升级时别忘记把列出的所有参数都带上,这样升级也做到了向下兼容

nginx version: nginx/1.18.0
built by gcc 4.8.5 20150623 (Red Hat 4.8.5-44) (GCC)
built with OpenSSL 1.0.2k-fips  26 Jan 2017
TLS SNI support enabled
configure arguments: --prefix=/usr/local/nginx --user=nginx --group=nginx --with-http_ssl_module --with-http_v2_module --with-http_realip_module --with-http_stub_status_module --with-http_gzip_static_module --with-pcre --with-stream --with-stream_ssl_module --with-stream_realip_module
[root@Nginx_server ~]#
#查看nginx的版本简要信息
[root@Nginx_server ~]# /usr/local/nginx/sbin/nginx -v
nginx version: nginx/1.18.0
[root@Nginx_server ~]#
nginx: the configuration file /usr/local/nginx/conf/nginx.conf syntax is ok
nginx: configuration file /usr/local/nginx/conf/nginx.conf test is successful
# configuration file /usr/local/nginx/conf/nginx.conf:

#user  nobody;
worker_processes  1;

#error_log  logs/error.log;
#error_log  logs/error.log  notice;
#error_log  logs/error.log  info;

#pid        logs/nginx.pid;


events {
    worker_connections  1024;
}


http {
    include       mime.types;
    default_type  application/octet-stream;

    #log_format  main  '$remote_addr - $remote_user [$time_local] "$request" '
    #                  '$status $body_bytes_sent "$http_referer" '
    #                  '"$http_user_agent" "$http_x_forwarded_for"';

    #access_log  logs/access.log  main;

    sendfile        on;
    #tcp_nopush     on;

    #keepalive_timeout  0;
    keepalive_timeout  65;

    #gzip  on;

    server {
        listen       80;
        server_name  Nginx_server;

        #charset koi8-r;

        #access_log  logs/host.access.log  main;

        location / {
            root   html;
            index  index.html index.htm;
        }

        #error_page  404              /404.html;

        # redirect server error pages to the static page /50x.html
        #
        error_page   500 502 503 504  /50x.html;
        location = /50x.html {
            root   html;
        }

        # proxy the PHP scripts to Apache listening on 127.0.0.1:80
        #
        #location ~ \.php$ {
        #    proxy_pass   http://127.0.0.1;
        #}

        # pass the PHP scripts to FastCGI server listening on 127.0.0.1:9000
        #
        #location ~ \.php$ {
        #    root           html;
        #    fastcgi_pass   127.0.0.1:9000;
        #    fastcgi_index  index.php;
        #    fastcgi_param  SCRIPT_FILENAME  /scripts$fastcgi_script_name;
        #    include        fastcgi_params;
        #}

        # deny access to .htaccess files, if Apache's document root
        # concurs with nginx's one
        #
        #location ~ /\.ht {
        #    deny  all;
        #}
    }


    # another virtual host using mix of IP-, name-, and port-based configuration
    #
    #server {
    #    listen       8000;
    #    listen       somename:8080;
    #    server_name  somename  alias  another.alias;

    #    location / {
    #        root   html;
    #        index  index.html index.htm;
    #    }
    #}


    # HTTPS server
    #
    #server {
    #    listen       443 ssl;
    #    server_name  Nginx_server;

    #    ssl_certificate      cert.pem;
    #    ssl_certificate_key  cert.key;

    #    ssl_session_cache    shared:SSL:1m;
    #    ssl_session_timeout  5m;

    #    ssl_ciphers  HIGH:!aNULL:!MD5;
    #    ssl_prefer_server_ciphers  on;

    #    location / {
    #        root   html;
    #        index  index.html index.htm;
    #    }
    #}

}

# configuration file /usr/local/nginx/conf/mime.types:

types {
    text/html                                        html htm shtml;
    text/css                                         css;
    text/xml                                         xml;
    image/gif                                        gif;
    image/jpeg                                       jpeg jpg;
    application/javascript                           js;
    application/atom+xml                             atom;
    application/rss+xml                              rss;

    text/mathml                                      mml;
    text/plain                                       txt;
    text/vnd.sun.j2me.app-descriptor                 jad;
    text/vnd.wap.wml                                 wml;
    text/x-component                                 htc;

    image/png                                        png;
    image/svg+xml                                    svg svgz;
    image/tiff                                       tif tiff;
    image/vnd.wap.wbmp                               wbmp;
    image/webp                                       webp;
    image/x-icon                                     ico;
    image/x-jng                                      jng;
    image/x-ms-bmp                                   bmp;

    font/woff                                        woff;
    font/woff2                                       woff2;

    application/java-archive                         jar war ear;
    application/json                                 json;
    application/mac-binhex40                         hqx;
    application/msword                               doc;
    application/pdf                                  pdf;
    application/postscript                           ps eps ai;
    application/rtf                                  rtf;
    application/vnd.apple.mpegurl                    m3u8;
    application/vnd.google-earth.kml+xml             kml;
    application/vnd.google-earth.kmz                 kmz;
    application/vnd.ms-excel                         xls;
    application/vnd.ms-fontobject                    eot;
    application/vnd.ms-powerpoint                    ppt;
    application/vnd.oasis.opendocument.graphics      odg;
    application/vnd.oasis.opendocument.presentation  odp;
    application/vnd.oasis.opendocument.spreadsheet   ods;
    application/vnd.oasis.opendocument.text          odt;
    application/vnd.openxmlformats-officedocument.presentationml.presentation
                                                     pptx;
    application/vnd.openxmlformats-officedocument.spreadsheetml.sheet
                                                     xlsx;
    application/vnd.openxmlformats-officedocument.wordprocessingml.document
                                                     docx;
    application/vnd.wap.wmlc                         wmlc;
    application/x-7z-compressed                      7z;
    application/x-cocoa                              cco;
    application/x-java-archive-diff                  jardiff;
    application/x-java-jnlp-file                     jnlp;
    application/x-makeself                           run;
    application/x-perl                               pl pm;
    application/x-pilot                              prc pdb;
    application/x-rar-compressed                     rar;
    application/x-redhat-package-manager             rpm;
    application/x-sea                                sea;
    application/x-shockwave-flash                    swf;
    application/x-stuffit                            sit;
    application/x-tcl                                tcl tk;
    application/x-x509-ca-cert                       der pem crt;
    application/x-xpinstall                          xpi;
    application/xhtml+xml                            xhtml;
    application/xspf+xml                             xspf;
    application/zip                                  zip;

    application/octet-stream                         bin exe dll;
    application/octet-stream                         deb;
    application/octet-stream                         dmg;
    application/octet-stream                         iso img;
    application/octet-stream                         msi msp msm;

    audio/midi                                       mid midi kar;
    audio/mpeg                                       mp3;
    audio/ogg                                        ogg;
    audio/x-m4a                                      m4a;
    audio/x-realaudio                                ra;

    video/3gpp                                       3gpp 3gp;
    video/mp2t                                       ts;
    video/mp4                                        mp4;
    video/mpeg                                       mpeg mpg;
    video/quicktime                                  mov;
    video/webm                                       webm;
    video/x-flv                                      flv;
    video/x-m4v                                      m4v;
    video/x-mng                                      mng;
    video/x-ms-asf                                   asx asf;
    video/x-ms-wmv                                   wmv;
    video/x-msvideo                                  avi;
}

[root@Nginx_server ~]#
#检查nginx的配置文件语法是否正确
[root@Nginx_server nginx-1.18.0]# /usr/local/nginx/sbin/nginx -t
nginx: the configuration file /usr/local/nginx/conf/nginx.conf syntax is ok
nginx: configuration file /usr/local/nginx/conf/nginx.conf test is successful
[root@Nginx_server nginx-1.18.0]# /usr/local/nginx/sbin/nginx
[root@Nginx_server ~]#
#在配置测试期间禁止显示非错误消息,也就是说如果没有输出就没有错误,即没有输出就是最好的结果啦~
[root@Nginx_server ~]# /usr/local/nginx/sbin/nginx -q
#第一次执行时若配置文件无问题,则会启用nginx服务,但第二次在执行的话,又一次启动nginx服务会导致地址的端口冲突的,因此会抛出端口被占用的错误提示哟,错误提示如下所示。
[root@Nginx_server ~]# /usr/local/nginx/sbin/nginx -q
nginx: [emerg] bind() to 0.0.0.0:80 failed (98: Address already in use)
nginx: [emerg] bind() to 0.0.0.0:80 failed (98: Address already in use)
nginx: [emerg] bind() to 0.0.0.0:80 failed (98: Address already in use)
nginx: [emerg] bind() to 0.0.0.0:80 failed (98: Address already in use)
nginx: [emerg] bind() to 0.0.0.0:80 failed (98: Address already in use)
#停止nginx服务
[root@Nginx_server ~]# /usr/local/nginx/sbin/nginx -s stop
[root@Nginx_server ~]# /usr/local/nginx/sbin/nginx -s reload

#指定nginx的配置文件启动
[root@Nginx_server ~]# /usr/local/nginx/sbin/nginx -c /usr/local/nginx/conf/nginx.conf
方式二:YUM安装
http://nginx.org/en/linux_packages.html
以下是官方文档
RHEL/CentOS
Install the prerequisites:

sudo yum install yum-utils
To set up the yum repository, create the file named /etc/yum.repos.d/nginx.repo with the following contents:

[nginx-stable]
name=nginx stable repo
baseurl=http://nginx.org/packages/centos/$releasever/$basearch/
gpgcheck=1
enabled=1
gpgkey=https://nginx.org/keys/nginx_signing.key
module_hotfixes=true

[nginx-mainline]
name=nginx mainline repo
baseurl=http://nginx.org/packages/mainline/centos/$releasever/$basearch/
gpgcheck=1
enabled=0
gpgkey=https://nginx.org/keys/nginx_signing.key
module_hotfixes=true
By default, the repository for stable nginx packages is used. If you would like to use mainline nginx packages, run the following command:

sudo yum-config-manager --enable nginx-mainline
To install nginx, run the following command:

sudo yum install nginx
When prompted to accept the GPG key, verify that the fingerprint matches 573B FD6B 3D8F BC64 1079 A6AB ABF5 BD82 7BD9 BF62, and if so, accept it.
yum安装rpm包会比编译安装简单很多,默认会安装许多模块,但缺点是如果你想以后安装第三方模块那就没办法了。
|
1
2
3
4
5
6
|
# vi /etc/yum.repo.d/nginx.repo[nginx]name=nginx repobaseurl=http://nginx.org/packages/centos/$releasever/$basearch/gpgcheck=0enabled=1 |
剩下的就yum install nginx搞定,也可以yum install nginx-1.18.0安装指定版本(前提是你去packages里看到有对应的版本,默认是最新版稳定版)。
Nginx配置
主配置文件nginx.conf
Nginx配置文件主要分成四部分:main(全局设置)、server(主机设置)、upstream(上游服务器设置,主要为反向代理、负载均衡相关配置)和 location(URL匹配特定位置后的设置),每部分包含若干个指令。
main部分设置的指令将影响其它所有部分的设置;server部分的指令主要用于指定虚拟主机域名、IP和端口;
upstream的指令用于设置一系列的后端服务器,设置反向代理及后端服务器的负载均衡;location部分用于匹配网页位置(比如,根目录“/”,“/images”,等等)。
他们之间的关系式:server继承main,location继承server;upstream既不会继承指令也不会被继承。它有自己的特殊指令,不需要在其他地方的应用。
nginx服务配置文件
    /etc/nginx/nginx.conf           --- 主配置文件
    第一个部分: 配置文件主区域配置
    user  www;                    --- 定义worker进程管理的用户
    补充: nginx的进程
    master process:  主进程        ---管理服务是否能够正常运行   boss
    worker process:  工作进程    ---处理用户的访问请求         员工
    worker_processes  2;        ---定义有几个worker进程  == CPU核数 / 核数的2倍
    error_log  /var/log/nginx/error.log warn;   --- 定义错误日志路径信息
    pid        /var/run/nginx.pid;              --- 定义pid文件路径信息

    第二个部分: 配置文件事件区域
    events {
        worker_connections  1024;   --- 一个worker进程可以同时接收1024访问请求
    }

    第三个部分: 配置http区域
    http {
        include       /etc/nginx/mime.types;      --- 加载一个配置文件
        default_type  application/octet-stream;   --- 指定默认识别文件类型
        log_format  mxxl  '$remote_addr - $remote_user [$time_local] "$request" '
                            '$status $body_bytes_sent "$http_referer" '
                            '"$http_user_agent" "$http_x_forwarded_for"';
                          --- 定义日志的格式
        access_log  /var/log/nginx/access.log  mxxl;
                          --- 指定日志路径
        sendfile        on;   ???
        #tcp_nopush     on;   ???
        keepalive_timeout  65;   --- 超时时间
        #gzip  on;
        include /etc/nginx/conf.d/*.conf;        --- 加载一个配置文件
    }


    /etc/nginx/nginx.d/default  --- 扩展配置(虚拟主机配置文件)
    第四个部分: server区域信息(配置一个网站 www/bbs/blog -- 一个虚拟主机)
    server {
        listen       8080;                --- 指定监听的端口
        server_name  www.mxxl.com;      --- 指定网站域名
        root   /usr/share/nginx/html;     --- 定义站点目录的位置
        index  index.html index.htm;      --- 定义首页文件
        error_page   500 502 503 504  /50x.html;   --- 优雅显示页面信息
        location = /50x.html {
            root   /usr/share/nginx/html;
        }
    }
2.1 通用
下面的nginx.conf简单的实现nginx在前端做反向代理服务器的例子,处理js、png等静态文件,jsp等动态请求转发到其它服务器tomcat:
|
1
2
3
4
5
6
7
8
9
10
11
12
13
14
15
16
17
18
19
20
21
22
23
24
25
26
27
28
29
30
31
32
33
34
35
36
37
38
39
40
41
42
43
44
45
46
47
48
49
50
51
52
53
54
55
56
57
58
59
60
61
62
63
64
65
66
67
68
69
70
71
72
73
74
75
76
77
78
79
80
81
82
83
84
85
86
87
88
89
90
91
92
93
94
95
96
97
98
99
100
101
102
103
104
105
106
107
108
109
110
111
112
113
114
115
|
user www www;worker_processes 2; error_log logs/error.log;#error_log logs/error.log notice;#error_log logs/error.log info; pid logs/nginx.pid; events {use epoll;worker_connections 2048;} http {include mime.types;default_type application/octet-stream; #log_format main '$remote_addr - $remote_user [$time_local] "$request" '# '$status $body_bytes_sent "$http_referer" '# '"$http_user_agent" "$http_x_forwarded_for"'; #access_log logs/access.log main; sendfile on;# tcp_nopush on;server_tokens off #隐藏nginx的版本号keepalive_timeout 65; # gzip压缩功能设置gzip on;gzip_min_length 1k;gzip_buffers 4 16k;gzip_http_version 1.0;gzip_comp_level 6;gzip_types text/html text/plain text/css text/javascript application/json application/javascript application/x-javascript application/xml;gzip_vary on; # http_proxy 设置client_max_body_size 10m;client_body_buffer_size 128k;proxy_connect_timeout 75;proxy_send_timeout 75;proxy_read_timeout 75;proxy_buffer_size 4k;proxy_buffers 4 32k;proxy_busy_buffers_size 64k;proxy_temp_file_write_size 64k;proxy_temp_path /usr/local/nginx/proxy_temp 1 2; # 设定负载均衡后台服务器列表upstream backend {#ip_hash;server 192.168.10.100:8080 max_fails=2 fail_timeout=30s ;server 192.168.10.101:8080 max_fails=2 fail_timeout=30s ;} # 很重要的虚拟主机配置server {listen 80;server_name itoatest.example.com;root /apps/oaapp; charset utf-8;access_log logs/host.access.log main; #对 / 所有做负载均衡+反向代理location / {root /apps/oaapp;index index.jsp index.html index.htm; proxy_pass http://backend;proxy_redirect off;# 后端的Web服务器可以通过X-Forwarded-For获取用户真实IPproxy_set_header Host $host;proxy_set_header X-Real-IP $remote_addr;proxy_set_header X-Forwarded-For $proxy_add_x_forwarded_for;proxy_next_upstream error timeout invalid_header http_500 http_502 http_503 http_504; } #静态文件,nginx自己处理,不去backend请求tomcatlocation ~* /download/ {root /apps/oa/fs; }location ~ .*\.(gif|jpg|jpeg|bmp|png|ico|txt|js|css)${root /apps/oaapp;expires 7d;}location /nginx_status {stub_status on;access_log off;allow 192.168.10.0/24;deny all;} location ~ ^/(WEB-INF)/ {deny all;}#error_page 404 /404.html; # redirect server error pages to the static page /50x.html#error_page 500 502 503 504 /50x.html;location = /50x.html {root html;}} ## 其它虚拟主机,server 指令开始} |
2.2 常用指令说明
worker_processes  1;
events {
    worker_connections  1024;
}
http {
    include       mime.types;
    default_type  application/octet-stream;
    sendfile        on;
    keepalive_timeout  65;
    server {
        listen       80;
        server_name  localhost;
        location / {
            root   html;
            index  index.html index.htm;
        }
        error_page   500 502 503 504  /50x.html;
        location = /50x.html {
            root   html;
        }
    }
}
2.2.1 main全局配置
nginx在运行时与具体业务功能(比如http服务或者email服务代理)无关的一些参数,比如工作进程数,运行的身份等。
woker_processes 2
在配置文件的顶级main部分,worker角色的工作进程的个数,master进程是接收并分配请求给worker处理。这个数值简单一点可以设置为cpu的核数grep ^processor /proc/cpuinfo | wc -l,也是 auto 值,如果开启了ssl和gzip更应该设置成与逻辑CPU数量一样甚至为2倍,可以减少I/O操作。如果nginx服务器还有其它服务,可以考虑适当减少。worker_cpu_affinity
也是写在main部分。在高并发情况下,通过设置cpu粘性来降低由于多CPU核切换造成的寄存器等现场重建带来的性能损耗。如worker_cpu_affinity 0001 0010 0100 1000;(四核)。worker_connections 2048
写在events部分。每一个worker进程能并发处理(发起)的最大连接数(包含与客户端或后端被代理服务器间等所有连接数)。nginx作为反向代理服务器,计算公式最大连接数 = worker_processes * worker_connections/4,所以这里客户端最大连接数是1024,这个可以增到到8192都没关系,看情况而定,但不能超过后面的worker_rlimit_nofile。当nginx作为http服务器时,计算公式里面是除以2。worker_rlimit_nofile 10240
写在main部分。默认是没有设置,可以限制为操作系统最大的限制65535。use epoll
写在events部分。在Linux操作系统下,nginx默认使用epoll事件模型,得益于此,nginx在Linux操作系统下效率相当高。同时Nginx在OpenBSD或FreeBSD操作系统上采用类似于epoll的高效事件模型kqueue。在操作系统不支持这些高效模型时才使用select。
2.2.2 http服务器
与提供http服务相关的一些配置参数。例如:是否使用keepalive啊,是否使用gzip进行压缩等。
sendfile on
开启高效文件传输模式,sendfile指令指定nginx是否调用sendfile函数来输出文件,减少用户空间到内核空间的上下文切换。对于普通应用设为 on,如果用来进行下载等应用磁盘IO重负载应用,可设置为off,以平衡磁盘与网络I/O处理速度,降低系统的负载。keepalive_timeout 65: 长连接超时时间,单位是秒,这个参数很敏感,涉及浏览器的种类、后端服务器的超时设置、操作系统的设置,可以另外起一片文章了。长连接请求大量小文件的时候,可以减少重建连接的开销,但假如有大文件上传,65s内没上传完成会导致失败。如果设置时间过长,用户又多,长时间保持连接会占用大量资源。send_timeout: 用于指定响应客户端的超时时间。这个超时仅限于两个连接活动之间的时间,如果超过这个时间,客户端没有任何活动,Nginx将会关闭连接。client_max_body_size 10m
允许客户端请求的最大单文件字节数。如果有上传较大文件,请设置它的限制值client_body_buffer_size 128k
缓冲区代理缓冲用户端请求的最大字节数-
安全优化-隐藏版本号 server_tokens off
Syntax: server_tokens on | off | build | string;
Default: server_tokens on;
Context: http, server, location
在主配置文件nginx.conf、虚拟主机的配置文件中配置,选一个配置即可
官方文档地址:http://nginx.org/en/docs/http/ngx_http_core_module.html#server_tokens
模块http_proxy:
这个模块实现的是nginx作为反向代理服务器的功能,包括缓存功能(另见文章)
proxy_connect_timeout 60
nginx跟后端服务器连接超时时间(代理连接超时)
proxy_read_timeout 60
连接成功后,与后端服务器两个成功的响应操作之间超时时间(代理接收超时)
proxy_buffer_size 4k
设置代理服务器(nginx)从后端realserver读取并保存用户头信息的缓冲区大小,默认与proxy_buffers大小相同,其实可以将这个指令值设的小一点
proxy_buffers 4 32k
proxy_buffers缓冲区,nginx针对单个连接缓存来自后端realserver的响应,网页平均在32k以下的话,这样设置
proxy_busy_buffers_size 64k
高负荷下缓冲大小(proxy_buffers*2)
proxy_max_temp_file_size
当 proxy_buffers 放不下后端服务器的响应内容时,会将一部分保存到硬盘的临时文件中,这个值用来设置最大临时文件大小,默认1024M,它与 proxy_cache 没有关系。大于这个值,将从upstream服务器传回。设置为0禁用。
proxy_temp_file_write_size 64k
当缓存被代理的服务器响应到临时文件时,这个选项限制每次写临时文件的大小。proxy_temp_path(可以在编译的时候)指定写到哪那个目录。
proxy_pass,proxy_redirect见 location 部分。
模块http_gzip:
gzip on : 开启gzip压缩输出,减少网络传输。
gzip_min_length 1k : 设置允许压缩的页面最小字节数,页面字节数从header头得content-length中进行获取。默认值是20。建议设置成大于1k的字节数,小于1k可能会越压越大。
gzip_buffers 4 16k : 设置系统获取几个单位的缓存用于存储gzip的压缩结果数据流。4 16k代表以16k为单位,安装原始数据大小以16k为单位的4倍申请内存。
gzip_http_version 1.0 : 用于识别 http 协议的版本,早期的浏览器不支持 Gzip 压缩,用户就会看到乱码,所以为了支持前期版本加上了这个选项,如果你用了 Nginx 的反向代理并期望也启用 Gzip 压缩的话,由于末端通信是 http/1.0,故请设置为 1.0。
gzip_comp_level 6 : gzip压缩比,1压缩比最小处理速度最快,9压缩比最大但处理速度最慢(传输快但比较消耗cpu)
gzip_types :匹配mime类型进行压缩,无论是否指定,”text/html”类型总是会被压缩的。
gzip_proxied any : Nginx作为反向代理的时候启用,决定开启或者关闭后端服务器返回的结果是否压缩,匹配的前提是后端服务器必须要返回包含”Via”的 header头。
gzip_vary on : 和http头有关系,会在响应头加个 Vary: Accept-Encoding ,可以让前端的缓存服务器缓存经过gzip压缩的页面,例如,用Squid缓存经过Nginx压缩的数据。
2.2.3 server虚拟主机
http服务上支持若干虚拟主机。每个虚拟主机一个对应的server配置项,配置项里面包含该虚拟主机相关的配置。在提供mail服务的代理时,也可以建立若干server。每个server通过监听地址或端口来区分。
listen
监听端口,默认80,小于1024的要以root启动。可以为listen *:80、listen 127.0.0.1:80等形式。server_name
服务器名,如localhost、www.example.com,可以通过正则匹配。
模块http_stream
这个模块通过一个简单的调度算法来实现客户端IP到后端服务器的负载均衡,upstream后接负载均衡器的名字,后端realserver以 host:port options; 方式组织在 {} 中。如果后端被代理的只有一台,也可以直接写在 proxy_pass 。
2.2.4 location
http服务中,某些特定的URL对应的一系列配置项。
root /var/www/html
定义服务器的默认网站根目录位置。如果locationURL匹配的是子目录或文件,root没什么作用,一般放在server指令里面或/下。index index.jsp index.html index.htm
定义路径下默认访问的文件名,一般跟着root放proxy_pass http:/backend
请求转向backend定义的服务器列表,即反向代理,对应upstream负载均衡器。也可以proxy_pass http://ip:port。proxy_redirect off;proxy_set_header Host $host;proxy_set_header X-Real-IP $remote_addr;proxy_set_header X-Forwarded-For $proxy_add_x_forwarded_for;
这四个暂且这样设,如果深究的话,每一个都涉及到很复杂的内容,也将通过另一篇文章来解读。
关于location匹配规则的写法,可以说尤为关键且基础的,参考文章 nginx配置location总结及rewrite规则写法;
2.3 其它
2.3.1 访问控制 allow/deny
Nginx 的访问控制模块默认就会安装,而且写法也非常简单,可以分别有多个allow,deny,允许或禁止某个ip或ip段访问,依次满足任何一个规则就停止往下匹配。如:
|
1
2
3
4
5
6
7
8
9
10
|
location /nginx-status {stub_status on;access_log off;# auth_basic "NginxStatus";# auth_basic_user_file /usr/local/nginx-1.6/htpasswd; allow 192.168.10.100;allow 172.29.73.0/24;deny all;} |
我们也常用 httpd-devel 工具的 htpasswd 来为访问的路径设置登录密码:
|
1
2
3
4
5
6
7
|
# htpasswd -c htpasswd adminNew passwd:Re-type new password:Adding password for user admin # htpasswd htpasswd admin //修改admin密码# htpasswd htpasswd sean //多添加一个认证用户 |
这样就生成了默认使用CRYPT加密的密码文件。打开上面nginx-status的两行注释,重启nginx生效。
2.3.2 列出目录 autoindex
Nginx默认是不允许列出整个目录的。如需此功能,打开nginx.conf文件,在location,server 或 http段中加入autoindex on;,另外两个参数最好也加上去:
autoindex_exact_size off;默认为on,显示出文件的确切大小,单位是bytes。改为off后,显示出文件的大概大小,单位是kB或者MB或者GBautoindex_localtime on;
默认为off,显示的文件时间为GMT时间。改为on后,显示的文件时间为文件的服务器时间
|
1
2
3
4
5
6
|
location /images {root /var/www/nginx-default/images;autoindex on;autoindex_exact_size off;autoindex_localtime on;} |
nginx在工作中已经有好几个环境在使用了,每次都是重新去网上扒博客,各种编译配置,今天自己也整理一份安装文档和nginx.conf配置选项的说明,留作以后参考。像负载均衡配置(包括健康检查)、缓存(包括清空缓存)配置实例,请参考 http://seanlook.com/2015/05/17/nginx-install-and-config ,ssl加密请参考 http://seanlook.com/2015/05/28/nginx-ssl/
参考

 浙公网安备 33010602011771号