at91系列1:bootstrap的编译
AT91Bootstrap是Atmel AT91 SoC的第二级引导加载程序,主要进行硬件的初始化,如时钟配置、GPIO设置、DRAM初始化,从指定的启动区(NAND FLASH、串行FLASH(与AT25兼容的Data-Flash)、EEPROM、SD卡等)下载代码到主存储器并启动它。
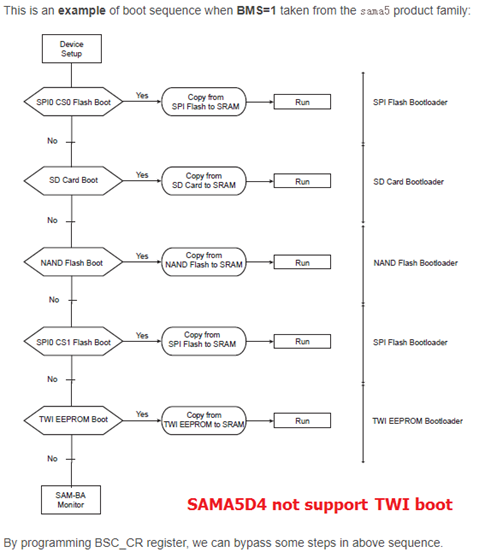
Boot策略
AT91集成了一个支持映射的基于ROM的Bootloader。系统复位时,根据BMS(Boot Mode Select)引脚状态使能。Boot ROM Code依次扫描如下外设:
- Data-Flash (SPI0_CS0)
- SD Card
- NAND Flash
- Data-Flash (SPI0_CS1)
- EEPROM
如果外设存在有效的启动程序,那么将代码拷贝到内部的SRAM并运行。Boot Code通过检查8个中断向量来确定代码是否有效。
如果没有有效的应用程序,则启动SAM-BA监视器。它等待USB、DBGU串行端口上的数据,可以使用SAM-BA工具烧录目标板上的FALSH、EEPROM。
BMS=1,ROM Code启动流程:
Build AT91Bootstrap from sources:
创建ARM编译工具链:
Ubuntu系统,可以通过下述操作创建交叉编译环境(从3.9.3开始, AT91bootstrap需要系统支持Python3.)
•    sudo apt-get install gcc-arm-linux-gnueabi
•    export CROSS_COMPILE=arm-linux-gnueabi-
Build AT91Bootstrap:
1. 下载官方AT91Bootstrap源码
可以从如下链接下载源码:https://github.com/linux4sam/at91bootstrap
2. Configure AT91Bootstrap(9260为例)
在board/sam9x60ek文件夹下包含如下文件:
1 sam9x60ekdf_qspi_uboot_defconfig
2 sam9x60eksd_uboot_defconfig
3 sam9x60eknf_uboot_defconfig
注: qspi指的是 quad-SPI serial flash, sd 指的是SD/MMC卡, nf指的是NAND-Flash。
假如配置一个基于NAND-Flash的U-Boot:
$ make mrproper
$ make sam9x60eknf_uboot_defconfig
$ make mrproper执行结果:
1   CLEAN        obj and misc files!
2   CLEAN        configuration files!
3   CLEAN        binary files!
make sam9x60eknf_uboot_defconfig执行结果
#
# configuration written to .config
#
#
# make dependencies written to .auto.deps
# See top of this file before playing with this auto-preprequisites!
#
make mrproper clean掉生成的obj以及其他配置文件。
make sam9x60eksd_uboot_defconfig会生成一个.config的配置文件。
3. 定制AT91Bootstrap
可以使用make menuconfig配置目标板(无法运行可以apt-get install ncurses-dev,安装ncurses)。
4.Build AT91Bootstrap
最后,make!

 浙公网安备 33010602011771号