
S5PV210刷机
一. 刷机初识
1.1. 什么是刷机
a. 刷机就是通过各种手段把相应镜像烧录到设备中,让设备可以运行起来。常见的刷机如:安卓刷机,QT刷机
1.2. S5PV210刷机镜像
1.2.1. 刷安卓所需要的镜像
a. uboot镜像: uboot.bin
b. linux kernel镜像:zImage-android
c. android rom镜像: x210.img
1.2.2. 刷QT4.8 所需要的镜像
a. uboot镜像: uboot.bin
b. linux kernel镜像: zImage-qt
c. rootfs镜像:rootfs_qt4.ext3
1.3. 刷机过程使用到的工具
1.3.1. 烧录uboot所需要的工具
1.3.1. 使用SD卡烧录ubbot
a. 方式一:在windows中用刷卡工具去制作启动SD卡,刷卡工具 x210_Fusing_Tool
b. 方式二:在linux中用dd命令烧录uboot
1.3.1. 使用USB烧录uboot
a. 方式一:在window下使用dnw软件进行下载uboot.bin
b. 方式二:在linux下使用dnw工具进行下载uboot.bin
1.3.2. uboot启动后烧录全部镜像到flash中
1.3.1. 使用fastboot烧录
1.3.1.1. 使用fastboot烧录android4.0.4镜像
a. fastboot flash bootloader android4.0\uboot.bin 烧uboot
b. fastboot flash kernel android4.0\zImage-android 烧linux kernel
c. fastboot flash system android4.0\x210.img 烧android rom
1.3.1.2. 使用fastboot烧录linux+QT镜像
a. fastboot flash bootloader linuxQT\uboot.bin 烧uboot
b. fastboot flash kernel linuxQT\zImage-qt 烧linux kernel
c. fastboot flash system linuxQT\rootfs_qt4.ext3 烧rootfs
二. 烧录实践
2.1. 烧录uboot
2.1.1. 使用x210_Fusing_Tool烧录uboot
a. 最好使用管理员启动软件
b. 烧录效果如下:

2.2. 在linux中用dd命令烧录uboot
2.2.1. 将uboot_sd_fusing相关文件放到uboot源码下
2.2.1. 制作过程如下


root@ubuntu:~/x210_porting/uboot-jiuding/sd_fusing# ls
C110-EVT1-mkbl1.c   Makefile    sd_fusing2.sh
c110.signedBL1_bin  sd_fdisk.c  sd_fusing.sh
root@ubuntu:~/x210_porting/uboot-jiuding/sd_fusing# make
gcc -o    mkbl1 C110-EVT1-mkbl1.c
gcc -o    sd_fdisk sd_fdisk.c
root@ubuntu:~/x210_porting/uboot-jiuding/sd_fusing# ./sd_fusing.sh /dev/sdb
/dev/sdb reader is identified.
make sd card partition
./sd_fdisk /dev/sdb
1+0 records in
1+0 records out
512 bytes (512 B) copied, 0.00835414 s, 61.3 kB/s
mkfs.vfat -F 32 /dev/sdb1
mkfs.fat 3.0.26 (2014-03-07)
BL1 fusing
16+0 records in
16+0 records out
8192 bytes (8.2 kB) copied, 0.195566 s, 41.9 kB/s
u-boot fusing
dd: writing to ‘/dev/sdb’: Input/output error
64+0 records in
63+0 records out
32256 bytes (32 kB) copied, 30.7411 s, 1.0 kB/s
U-boot image is fused successfully.
Eject SD card and insert it again.
root@ubuntu:~/x210_porting/uboot-jiuding/sd_fusing#
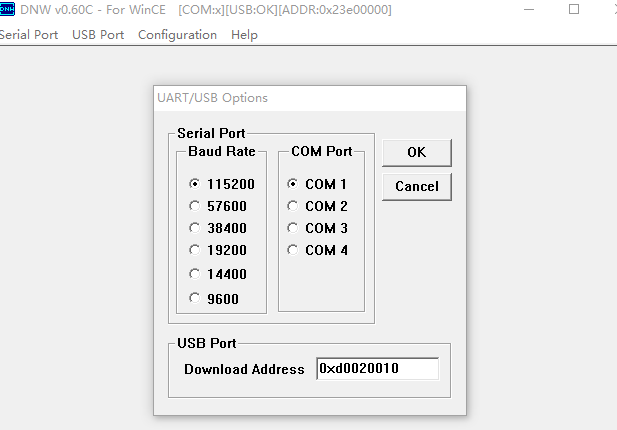
2.3. 在window下使用dnw烧录
2.3.1. 刷机分2步:
a. 第一步刷x210_usb.bin,地址是0xd0020010;
b. 第二步刷uboot.bin,刷机地址是0x23e00000
2.4. linux 使用dnw工具烧录uboot
2.4.1. 源码包获取,编译和安装
2.4.2. 成功连接后现象:
a. Windows下设备管理器没了;
b. ls /dev/secbulk0 设备节点自动出现
2.4.3. dnw进行下载uboot.bin
a. dnw -a 0xd0020010 x210_usb.bin
b. dnw -a 0x23e00000 uboot.bin
三. 使用fastboot烧录镜像到flash
3.1. 在uboot中对flash进行分区
3.1.1. 分区命令fdisk -c 0
x210 #
x210 # fdisk -c 0
fdisk is completed

partion #    size(MB)     block start #    block count    partition_Id
   1           258            22374          529518          0x83
   2           258           551892          529518          0x83
   3           101          1081410          208824          0x83
   4          3084          1290234         6316926          0x83
x210 #
3.2. uboot的参数中bootcmd和bootargs
x210 # print
baudrate=115200
ethaddr=00:40:5c:26:0a:5b
gatewayip=192.168.1.1
ipaddr=192.168.1.20
netmask=255.255.255.0
serverip=192.168.1.141
bootdelay=3
bootcmd=tftp 0x30008000 zImage;bootm 0x30008000
bootargs=root=/dev/nfs nfsroot=192.168.1.141:/root/x210_porting/rootfs/rootfs ip=192.168.1.20:192.168.1.141:192.168.1.1:0

Environment size: 370/16380 bytes
x210 # set bootcmd 'movi read kernel 30008000; bootm 30008000'
x210 # set bootargs console=ttySAC2,115200 root=/dev/mmcblk0p2 rw init=/linuxrc rootfstype=ext3
x210 # saveenv
Saving Environment to SMDK bootable device...
done
x210 # print
baudrate=115200
ethaddr=00:40:5c:26:0a:5b
gatewayip=192.168.1.1
ipaddr=192.168.1.20
netmask=255.255.255.0
serverip=192.168.1.141
bootdelay=3
bootcmd=movi read kernel 30008000; bootm 30008000
bootargs=console=ttySAC2,115200 root=/dev/mmcblk0p2 rw init=/linuxrc rootfstype=ext3

Environment size: 276/16380 bytes
x210 #
3.3. uboot进入fastboot
x210 # fastboot
[Partition table on MoviNAND]
ptn 0 name='bootloader' start=0x0 len=N/A (use hard-coded info. (cmd: movi))
ptn 1 name='kernel' start=N/A len=N/A (use hard-coded info. (cmd: movi))
ptn 2 name='ramdisk' start=N/A len=0x300000(~3072KB) (use hard-coded info. (cmd: movi))
ptn 3 name='config' start=0xAECC00 len=0x1028DC00(~264759KB)
ptn 4 name='system' start=0x10D7A800 len=0x1028DC00(~264759KB)
ptn 5 name='cache' start=0x21008400 len=0x65F7000(~104412KB)
ptn 6 name='userdata' start=0x275FF400 len=0xC0C6FC00(~3158463KB)
3.4. windown fastboot软件使用
3.4.1. 相关命令使用
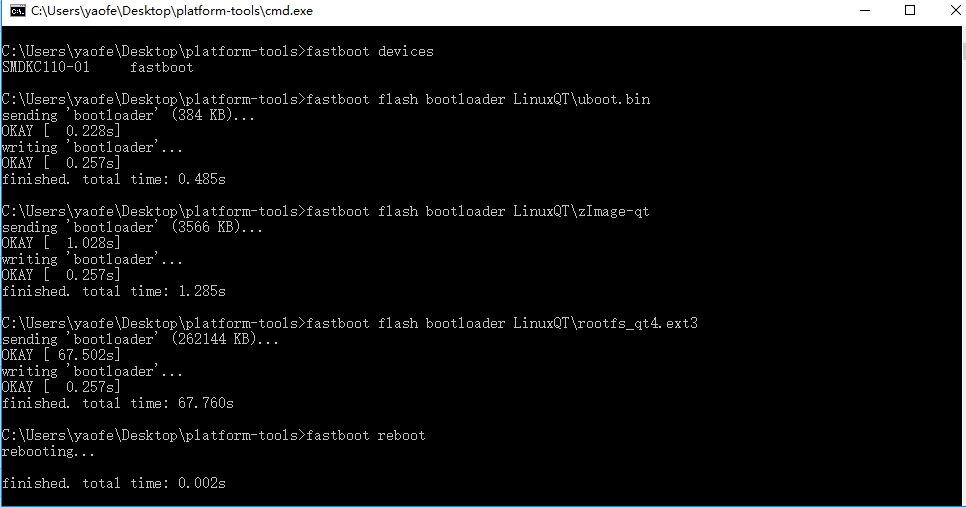
3.4.1.1. fastboot devices 命令用来查看当前连接的设备。(我们开发板看到的是:SMDKC110-01)
C:\Users\yaofe\Desktop\platform-tools>fastboot devices
SMDKC110-01     fastboot

C:\Users\yaofe\Desktop\platform-tools>
3.4.1.2. fastboot flash xxx 命令用来烧录的
a. fastboot flash bootloader LinuxQT\uboot.bin 烧uboot
b. fastboot flash kernel LinuxQT\zImage-qt 烧linux kernel
c. fastboot flash system LinuxQT\rootfs_qt4.ext3 烧rootfs
C:\Users\yaofe\Desktop\platform-tools>fastboot flash bootloader LinuxQT\uboot.bin
sending 'bootloader' (384 KB)...
OKAY [  0.228s]
writing 'bootloader'...
OKAY [  0.257s]
finished. total time: 0.485s

C:\Users\yaofe\Desktop\platform-tools>fastboot flash bootloader LinuxQT\zImage-qt
sending 'bootloader' (3566 KB)...
OKAY [  1.028s]
writing 'bootloader'...
OKAY [  0.257s]
finished. total time: 1.285s

C:\Users\yaofe\Desktop\platform-tools>fastboot flash bootloader LinuxQT\rootfs_qt4.ext3
sending 'bootloader' (262144 KB)...
OKAY [ 67.502s]
writing 'bootloader'...
OKAY [  0.257s]
finished. total time: 67.760s
3.4.1.3. fastboot reboot 命令用来重启系统
C:\Users\yaofe\Desktop\platform-tools>fastboot reboot
rebooting...

finished. total time: 0.002s

 浙公网安备 33010602011771号