

一、压缩和解压
压缩
把 mongodb-linux-x86_64-rhel62-3.2.10/ 下面的文件压缩为 mongodb.zip
zip -r mongodb.zip mongodb-linux-x86_64-rhel62-3.2.10/
解压
直接解压该文件,解压后即为mongodb-linux-x86_64-rhel62-3.2.10
unzip mongodb.zip
/usr/bin/unzip /opt/nginx_caojin_2019_4_13.zip -d /opt/ 解压到指定目录
tar 压缩
tar -czvf auth-manager.tar.gz tomcat/ --exclude tomcat/logs
二、基于ssh传输文件
scp -rp zabbix-sender-3.2.5-1.el6.x86_64.rpm root@10.0.5.11:/root/tools/zabbix/ 推
加端口
scp -P 3022 -rp zabbix-sender-3.2.5-1.el6.x86_64.rpm root@10.0.5.11:/root/tools/zabbix/
指定连接密钥
scp -P 22 -i id_rsa installer.log root@172.31.239.15:/
[root@master ~]# scp -r root@192.168.1.6:/opt/files ./ 拉
[root@master ~]# scp -r root@192.168.1.6:/opt/files root@192.168.1.7:/opt/
master机器从192.168.1.6数据拷贝到另一台 192.168.1.7机器上
mongo --host <host>:<port> -u <username> -p --authenticationDatabase <database>
mongo --host mongodb.rds.aliyuncs.com:3717 -u root -p --authenticationDatabase admin
三、过滤,过滤注释,和空行
egrep -v "^#|^$" redis_common.conf
四、创建mysql数据库
mysql> CREATE DATABASE mytest CHARACTER SET utf8 COLLATE utf8_bin;
mysql> GRANT ALL PRIVILEGES ON mytest.* TO user@"%" IDENTIFIED BY '123456';
mysql> flush privileges;
五、压缩,解压
zip -r wwwroot_2019_1_16.zip wwwroot        压缩
unzip wwwroot_2019_1_16.zip    解压
六、挂载
https://cloud.tencent.com/document/product/213/17487   腾讯云平台磁盘挂载
mount /dev/vdb /opt   挂载
umount /opt                取消挂载
七、数据库查询表文件导出
echo "select * from serverlist_oppo.t_recharge where identification != '' ;" | mysql -h192.168.2.5 -uroot -psbsbsbsb > /data/sort.xls
mysqldump  -h 192.168.2.5 -uroot -p123456 ios_164 < ios_164.sql        从现有的表导出没有数据的sql语句
mysql   -h 192.168.2.5 -uroot -p123456 ios_164   >   ios_164.sql    从sql语句生成表
进入mysql
source ios_164.sql  从sql语句生成表

导出整个数据库结构和数据
mysqldump -h localhost -uroot -p123456 database > dump.sql

导出单个数据表结构和数据
mysqldump -h localhost -uroot -p123456  database table > dump.sql

导出整个数据库结构(不包含数据)
mysqldump -h localhost -uroot -p123456  -d database > dump.sql

导出单个数据表结构(不包含数据)
mysqldump -h localhost -uroot -p123456  -d database table > dump.sql

只导出某个库的表结构
mysqldump --opt -d test -hmysql-energy0001 -uroot -p'si0n4321!' > qrtz.sql
杀死一个类型的任务 ps -ef|grep partition |awk '{print $2}'|xargs kill
ansible allhost -m shell -a "sudo ip a show dev eth0|grep -w inet|awk '{print $2}'|sed 's/\/.*//'" -i /home/supper-user/tmp/hosts > host_ip.text
grep 10.65 host_ip.text |awk '{print $2}'
yum -y install epel-release
yum -y install python-pip
mqtt抓包操作
nohup tcpdump -i eth0 tcp port 11883 and host 84.169.188.127 -w 84.169.188.127.cap &>/dev/null &
eth0根据实际服务器网口修改,port端口为mqtt端口 host为远程主机的 ip地址 -w参数指定输出的文件
域名解析
nslookup www.baidu.com
时间戳换算
[supper-user@iotansible0001 ~]$ date -d @1585052669073 时间戳应该减3位
Fri Apr 27 08:04:33 CST 52198
[supper-user@iotansible0001 ~]$
[supper-user@iotansible0001 ~]$ date -d @1585052669
Tue Mar 24 20:24:29 CST 2020
wget 认证下载
wget http://fileserver.apaas-zyd1.eniot.io/dir/apollo_s-solaralarm__tag_hotfix__20200515.tar.gz --http-user=dl --http-passwd=Envisi0ndl#1
curl -u dl:Envisi0ndl#1 -F file=@report_xhpd1 http://fileserver.apaas-xhpd1.eniot.io/upload
pip install --upgrade setuptools
pip install kubernetes -i "https://pypi.doubanio.com/simple/"
pip install kubernetes -i "https://pypi.doubanio.com/simple/" --ignore-installed PyYAML
检测端口
nc -vz -w 2 notice.eniot.io 80
nc -vz -w 2 10.21.1.109 80
nc -vz -w 2 notice.envisioniot.com 443
过滤日志文件,备份文件
mkdir monitor_20200702
cd monitor
cp -r `ls |grep -v logs|xargs` ../monitor_20200702
筛选nginx日志
[root@nginx-internal0001 ~]# awk '{print $7}' /var/log/nginx/access.log | sort | uniq -c | sort -nr | head -n 10
501121 /public-rest/v1/cluster/callbackWithResponse
299405 /tsdb-service/v2.1/latest?orgId=o16021383932361
一次性kill多个进程号
ps -aux | grep watchdog.sh | grep -v grep | awk '{print$2}' | xargs kill -9
部分ansible机器小文件太多的清理方法
cd /var/spool/postfix/maildrop && ls | xargs rm -f
sudo su - root -s /bin/bash
-------------------
ps 过滤进程进阶
[root@python ~]# ps -ef|grep missionplan
root      74960  64373  1 00:36 pts/1    00:00:00 missionplan start
root      75195  64373  0 00:37 pts/1    00:00:00 grep --color=auto missionplan
[root@python ~]# ps --no-headers|grep missionplan
 74960 pts/1    00:00:00 missionplan
[root@python ~]# ps --no-headers -fC missionplan
root      74960  64373  0 00:36 pts/1    00:00:00 missionplan start
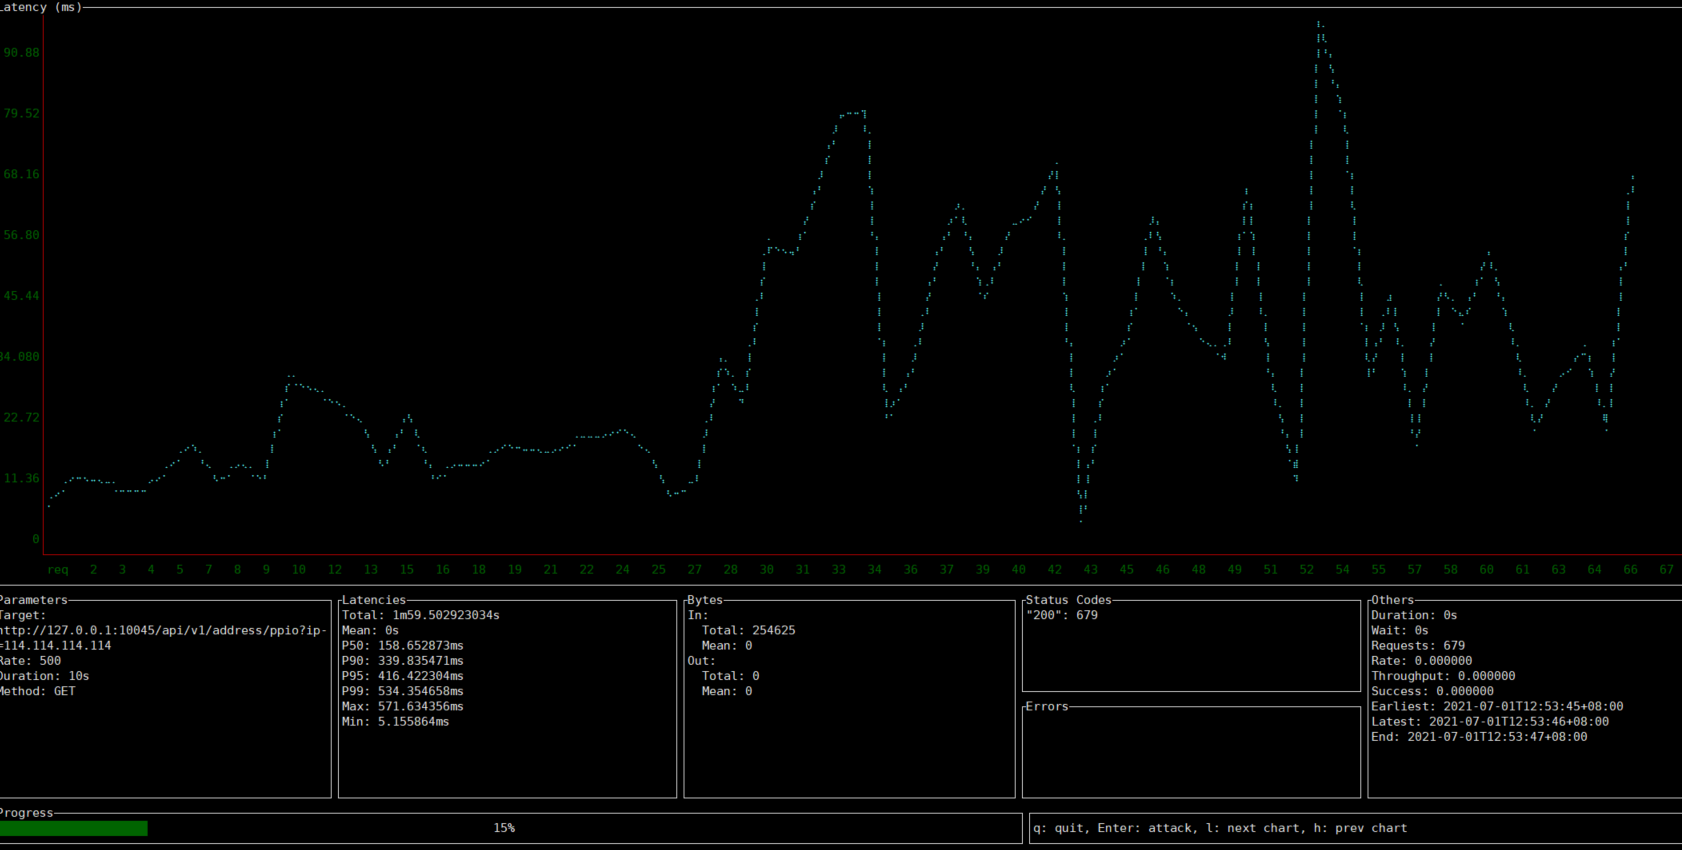
高端压测工具
下载
https://github.com/nakabonne/ali
https://github.com/nakabonne/ali/releases/download/v0.7.2/ali_0.7.2_linux_amd64.tar.gz
压测命令使用
./ali -c 200 -r 500 -H "Authorization: eyJmytoeknagaegagagggewg" "http://127.0.0.1:10045/api/v1/address/ppio?ip=114.114.114.114"
docker-compose安装
https://pi-ops.oss-cn-hangzhou.aliyuncs.com/salt_source/docker-compose/docker-compose-Linux-x86_64-v1.29.2
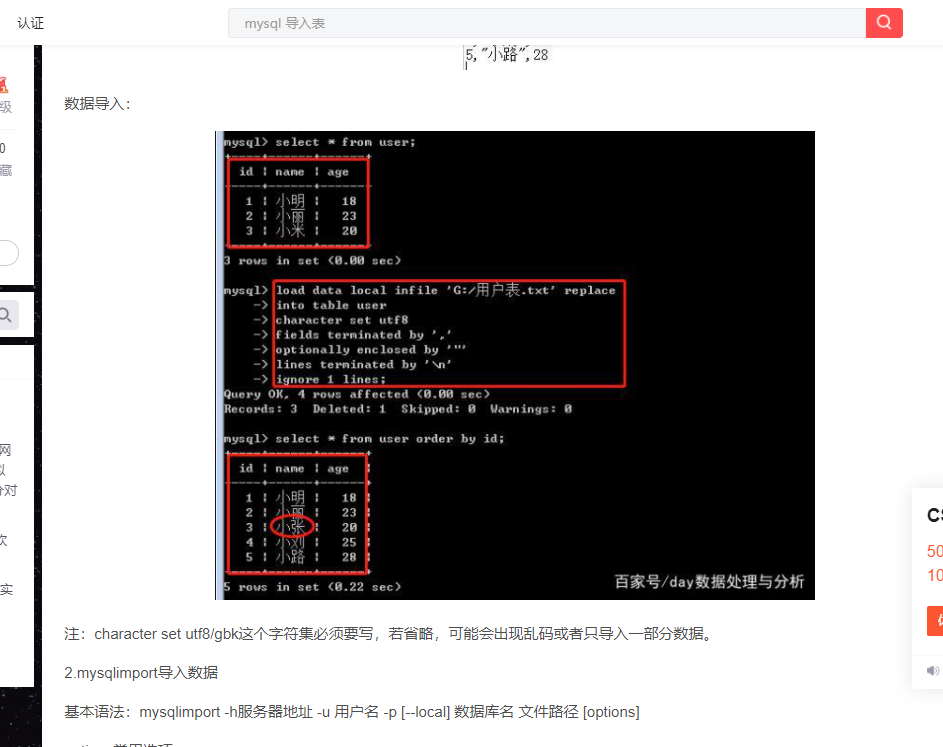
文本txt导入mysql
任务执行判断
* * * * * root if ! ps -aux | grep -v grep | grep -q 'python eniot_monitor_active_alerts.py' ;then cd /data1/monitor/ && python eniot_monitor_active_alerts.py ; fi
文件锁,防止文件被删除
加锁
chattr +i file.txt

去掉锁
chattr -i file.txt
nginx日志
统计一下/var/log/nginx/access.log 日志中访问量最多的前十个IP地址
cat nginx.log |unic -q |sort -nr | head -n 10
systemctl enable docker
systemctl start docker
====等同于
systemctl enable --now docker
docker run -d -p 80:80 /opt/someweb:/usr/share/nginx/html:ro

 浙公网安备 33010602011771号