
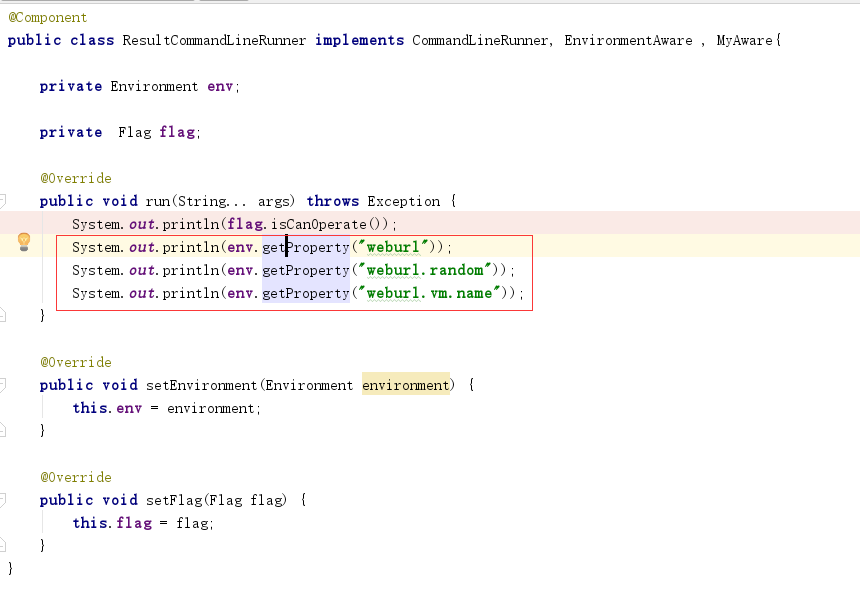
在上一篇中,我们的类加载器使用environment获取一些属性,如下图
下面我们介绍下environment的使用
1、进入启动方法run,定位到prepareEnvironment方法
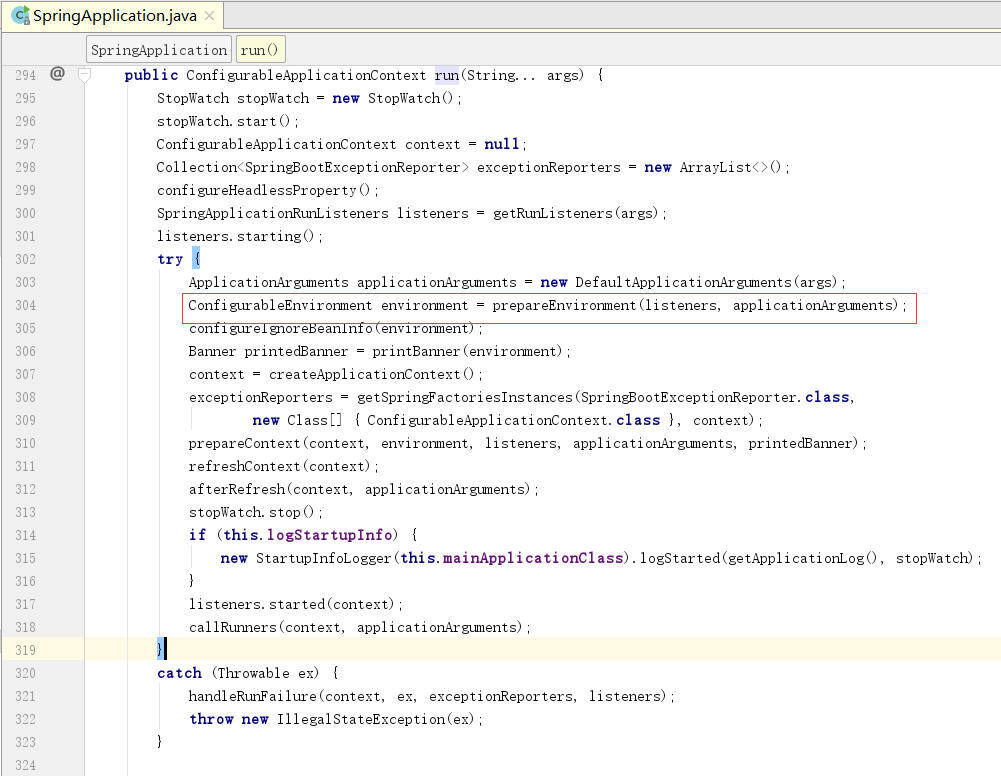
2、进到prepareEnvironment方法
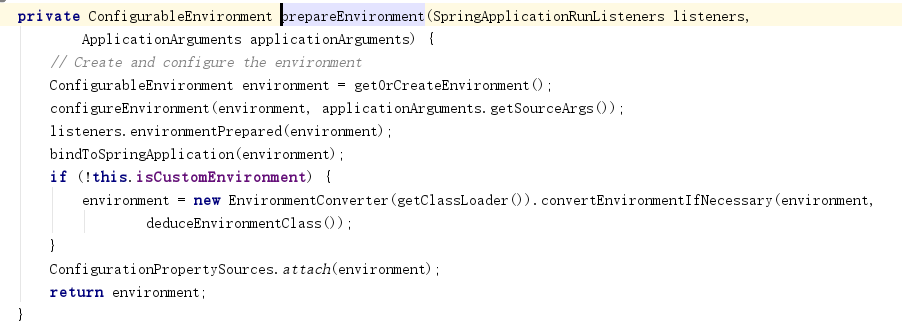
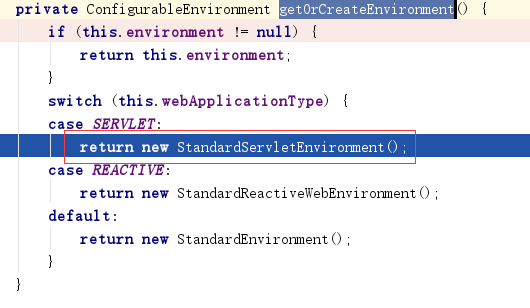
3、进入getOrCreateEnvironment方法。实例化了StandardServletEnvironment
进入父类AbstractEnvironment的构造函数
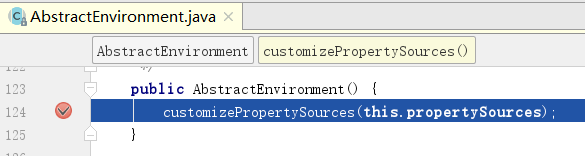
1)、进入customizePropertySources方法。
增加servletConfigInitParams属性源和servletContextInitParams属性源,添加jndi属性源
然后调用父类的super.customizePropertySources(propertySources);
    protected void customizePropertySources(MutablePropertySources propertySources) {
        propertySources.addLast(new StubPropertySource("servletConfigInitParams"));
        propertySources.addLast(new StubPropertySource("servletContextInitParams"));
        if(JndiLocatorDelegate.isDefaultJndiEnvironmentAvailable()) {
            propertySources.addLast(new JndiPropertySource("jndiProperties"));
        }

        super.customizePropertySources(propertySources);
    }
2)、进入customizePropertySources,增加两个属性源(系统属性源和系统环境属性源)
	protected void customizePropertySources(MutablePropertySources propertySources) {
		propertySources.addLast(
				new PropertiesPropertySource(SYSTEM_PROPERTIES_PROPERTY_SOURCE_NAME, getSystemProperties()));
		propertySources.addLast(
				new SystemEnvironmentPropertySource(SYSTEM_ENVIRONMENT_PROPERTY_SOURCE_NAME, getSystemEnvironment()));
	}
里面getSystemProperties方法,主要有Java的版本号,Java虚拟机名称等

4、然后回到configureEnvironment方法
	protected void configureEnvironment(ConfigurableEnvironment environment, String[] args) {
		if (this.addConversionService) {
			ConversionService conversionService = ApplicationConversionService.getSharedInstance();
			environment.setConversionService((ConfigurableConversionService) conversionService);
		}
		configurePropertySources(environment, args);
		configureProfiles(environment, args);
	}
1) 进入configurePropertySources(environment, args);
	protected void configurePropertySources(ConfigurableEnvironment environment, String[] args) {
		MutablePropertySources sources = environment.getPropertySources();
		if (this.defaultProperties != null && !this.defaultProperties.isEmpty()) {
			sources.addLast(new MapPropertySource("defaultProperties", this.defaultProperties));
		}
		if (this.addCommandLineProperties && args.length > 0) {
			String name = CommandLinePropertySource.COMMAND_LINE_PROPERTY_SOURCE_NAME;
			if (sources.contains(name)) {
				PropertySource<?> source = sources.get(name);
				CompositePropertySource composite = new CompositePropertySource(name);
				composite.addPropertySource(
						new SimpleCommandLinePropertySource("springApplicationCommandLineArgs", args));
				composite.addPropertySource(source);
				sources.replace(name, composite);
			}
			else {
				sources.addFirst(new SimpleCommandLinePropertySource(args));
			}
		}
	}
这个方法主要是添加defaultProperties默认属性源(sources.addLast(new MapPropertySource("defaultProperties", this.defaultProperties));
)和命令属性源sources.addFirst(new SimpleCommandLinePropertySource(args));
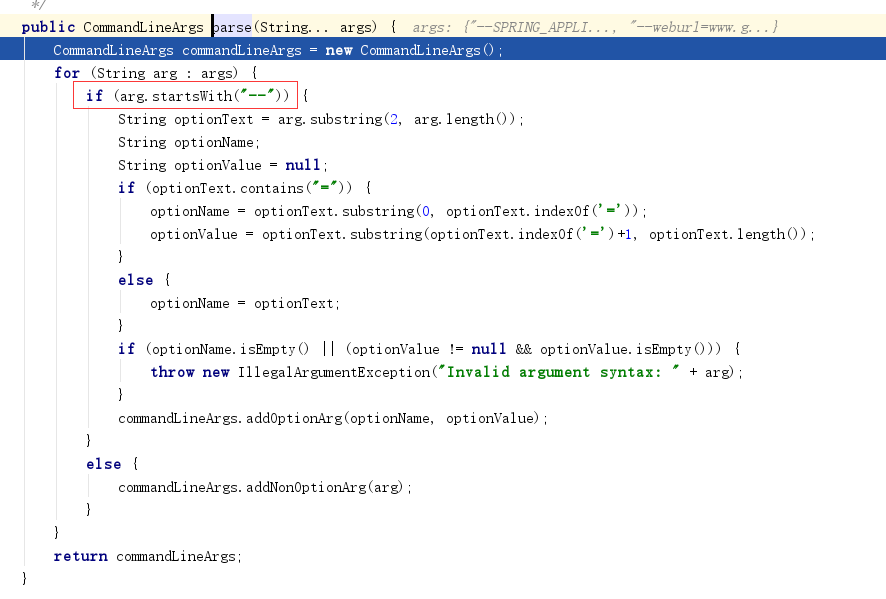
进入SimpleCommandLinePropertySource的构造函数
	public SimpleCommandLinePropertySource(String... args) {
		super(new SimpleCommandLineArgsParser().parse(args));
	}
里面调用了parse函数。命令的定义是我们前面介绍过的。解析命令的时候,判断是否以“--”开头
2) 进入configureProfiles。profile我们后面在进行介绍 SpringBoot Profile源码介绍
	protected void configureProfiles(ConfigurableEnvironment environment, String[] args) {
		environment.getActiveProfiles(); // ensure they are initialized
		// But these ones should go first (last wins in a property key ***)
		Set<String> profiles = new LinkedHashSet<>(this.additionalProfiles);
		profiles.addAll(Arrays.asList(environment.getActiveProfiles()));
		environment.setActiveProfiles(StringUtils.toStringArray(profiles));
	}
3、 listeners.environmentPrepared(environment)
发布environmentPrepared事件,这里就是监听器的实现。进入environmentPrepared方法
	public void environmentPrepared(ConfigurableEnvironment environment) {
		for (SpringApplicationRunListener listener : this.listeners) {
			listener.environmentPrepared(environment);
		}
	}
进入listener.environmentPrepared(environment);里面调用广播器广播一个事件
	@Override
	public void environmentPrepared(ConfigurableEnvironment environment) {
		this.initialMulticaster
				.multicastEvent(new ApplicationEnvironmentPreparedEvent(this.application, this.args, environment));
	}
进入广播事件方法。
	public void multicastEvent(final ApplicationEvent event, @Nullable ResolvableType eventType) {
		ResolvableType type = (eventType != null ? eventType : resolveDefaultEventType(event));
		Executor executor = getTaskExecutor();
		for (ApplicationListener<?> listener : getApplicationListeners(event, type)) {
			if (executor != null) {
				executor.execute(() -> invokeListener(listener, event));
			}
			else {
				invokeListener(listener, event);
			}
		}
	}
在此方法中,获得对该事件感兴趣的监听器,遍历监听器,调用invokeListener方法。
监听器的部分在前面已经介绍过了,这里我们主要看下监听器都做了什么?
进入doInvokeListener方法
	private void doInvokeListener(ApplicationListener listener, ApplicationEvent event) {
		try {
			listener.onApplicationEvent(event);
		}
		catch (ClassCastException ex) {
			String msg = ex.getMessage();
			if (msg == null || matchesClassCastMessage(msg, event.getClass())) {
				// Possibly a lambda-defined listener which we could not resolve the generic event type for
				// -> let's suppress the exception and just log a debug message.
				Log logger = LogFactory.getLog(getClass());
				if (logger.isTraceEnabled()) {
					logger.trace("Non-matching event type for listener: " + listener, ex);
				}
			}
			else {
				throw ex;
			}
		}
	}
然后进入listener.onApplicationEvent(event);方法
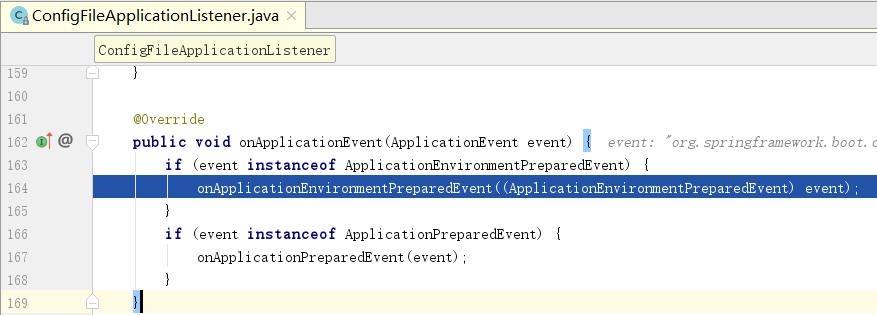
然后进入onApplicationEnvironmentPreparedEvent方法
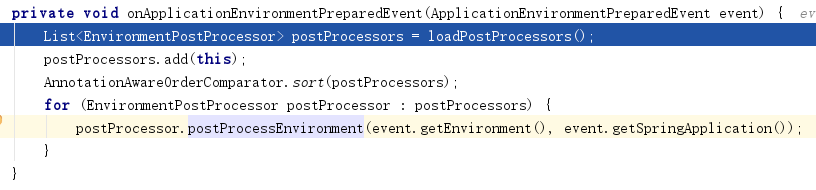
方法loadPostProcessors是获得属性文件中对该监听器的实现类有哪些。
	List<EnvironmentPostProcessor> loadPostProcessors() {
		return SpringFactoriesLoader.loadFactories(EnvironmentPostProcessor.class, getClass().getClassLoader());
	}
该配置文件配置如下:
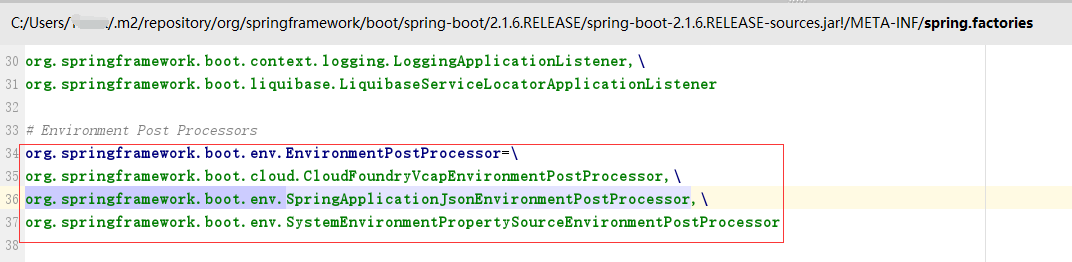
配置文件由三个EnvironmentPostProcessor,在把当前的添加进去postProcessors.add(this);就有四个了。然后依次遍历这四个EnvironmentPostProcessor

我们进入其中一个EnvironmentPostProcessor,如ConfigFileApplicationListener。里面调用了addPropertySources(environment, application.getResourceLoader());
	@Override
	public void postProcessEnvironment(ConfigurableEnvironment environment, SpringApplication application) {
		addPropertySources(environment, application.getResourceLoader());
	}
然后进入addPropertySources方法
	protected void addPropertySources(ConfigurableEnvironment environment, ResourceLoader resourceLoader) {
		RandomValuePropertySource.addToEnvironment(environment);
		new Loader(environment, resourceLoader).load();
	}
RandomValuePropertySource.addToEnvironment(environment);这个方法添加了一个随机的属性源
	public static void addToEnvironment(ConfigurableEnvironment environment) {
		environment.getPropertySources().addAfter(StandardEnvironment.SYSTEM_ENVIRONMENT_PROPERTY_SOURCE_NAME,
				new RandomValuePropertySource(RANDOM_PROPERTY_SOURCE_NAME));
		logger.trace("RandomValuePropertySource add to Environment");
	}
然后进入new Loader(environment, resourceLoader).load();的load方法。添加application-profile.(properties|yml)属性集
		public void load() {
			this.profiles = new LinkedList<>();
			this.processedProfiles = new LinkedList<>();
			this.activatedProfiles = false;
			this.loaded = new LinkedHashMap<>();
			initializeProfiles();
			while (!this.profiles.isEmpty()) {
				Profile profile = this.profiles.poll();
				if (profile != null && !profile.isDefaultProfile()) {
					addProfileToEnvironment(profile.getName());
				}
				load(profile, this::getPositiveProfileFilter, addToLoaded(MutablePropertySources::addLast, false));
				this.processedProfiles.add(profile);
			}
			resetEnvironmentProfiles(this.processedProfiles);
			load(null, this::getNegativeProfileFilter, addToLoaded(MutablePropertySources::addFirst, true));
			addLoadedPropertySources();
		}
关于profile留在后面介绍。 SpringBoot Profile源码介绍
4、bindToSpringApplication(environment);
进入bindToSpringApplication方法
	protected void bindToSpringApplication(ConfigurableEnvironment environment) {
		try {
			Binder.get(environment).bind("spring.main", Bindable.ofInstance(this));
		}
		catch (Exception ex) {
			throw new IllegalStateException("Cannot bind to SpringApplication", ex);
		}
	}
5、environment = new EnvironmentConverter(getClassLoader()).convertEnvironmentIfNecessary(environment, deduceEnvironmentClass());
使用判断convertEnvironmentIfNecessary当前环境是否是指定类型,是的话就返回。否的话再new一个环境,把值赋值到新的实例化的环境中
	StandardEnvironment convertEnvironmentIfNecessary(ConfigurableEnvironment environment,
			Class<? extends StandardEnvironment> type) {
		if (type.equals(environment.getClass())) {
			return (StandardEnvironment) environment;
		}
		return convertEnvironment(environment, type);
	}

	private StandardEnvironment convertEnvironment(ConfigurableEnvironment environment,
			Class<? extends StandardEnvironment> type) {
		StandardEnvironment result = createEnvironment(type);
		result.setActiveProfiles(environment.getActiveProfiles());
		result.setConversionService(environment.getConversionService());
		copyPropertySources(environment, result);
		return result;
	}
6、ConfigurationPropertySources.attach(environment); 增加configurationProperties属性源

作者:Work Hard Work Smart
出处:http://www.cnblogs.com/linlf03/
欢迎任何形式的转载,未经作者同意,请保留此段声明!

 浙公网安备 33010602011771号