EasyUI 的常见标签
1. Resizable 属性
- 原理: 页面加载完毕后,EasyUI主文件会扫描页面上的每个标签,判断这些标签的class值是否以"easyui-"开头,
如果是,则拿到之后的部分"resizable",EasyUI主文件会将当前的标签处理(渲染)为"resizable"这种效果; - EasyUI 组件包括: 属性,事件和方法;
// 以标签的形式,实现resizable
// 其中,data-options 表示的是属性值
<body>
    <div class="easyui-resizable" data-options="maxWidth:800,maxHeight:600"
                            style="width:300px;height:300px;border:1px solid red">
    </div>
</body>

// js 代码实现resizable
<div id="rr" stype="width:100px;height:100px;border:1px solid red"></div>

$('#rr').resizable({
    <!-- 属性 --
    maxWidth:800,
    maxHeight:600
});


// 调用 EasyUI 组件的方法
$("#rr").resizable("方法名"); // 调用无参数的方法
$("#rr").resizable("方法名",参数1,参数2,...); // 调用有参数的方法

2. linkbutton 属性
// 需要引入 easyui/themes/icon.css 样式文件
<body>
<a class="easyui-linkbutton" data-options="iconCls:'icon-add'">点击这里</a>
</body>

3. Messager 组件
<head>
    <script type="text/javascript">
        $(function(){
            $("#btn2").click(function(){
                $.messager.alert("严重错误","系统崩溃","error");
            });
            $("#btn3").click(function(){
                $.messager.prompt("标题","输入姓名");
            });
            $("#btn4").click(function(){
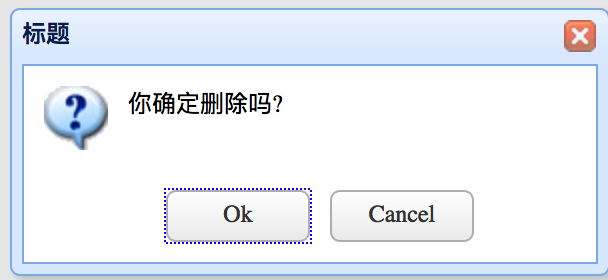
                $.messager.confirm("标题","你确定删除吗?",function(data){
                    alert(data);
                });
            });
        });
    </script>
</head>
<body>
    <button id="btn2">点击这里</button>
    <button id="btn3">点击这里</button>
    <button id="btn4">点击这里</button>
</body>


4. Dialog 组件
<head>
    <script type="text/javascript">
        $(function(){
            $("#rr").dialog({
                title:'标题',
                width:300,
                height:150,
                collapsible:true, // 是否显示折叠按钮
                minimizable:true, // 是否显示最小化按钮
                maximizable:true,  // 是否显示最大化按钮
                closed:true,  // 是否在初始化的时候,关闭面板
                // content:"显示内容"
                href:"test.jsp", // 加载远程的内容
                loadigMessage:"正在努力加载...",
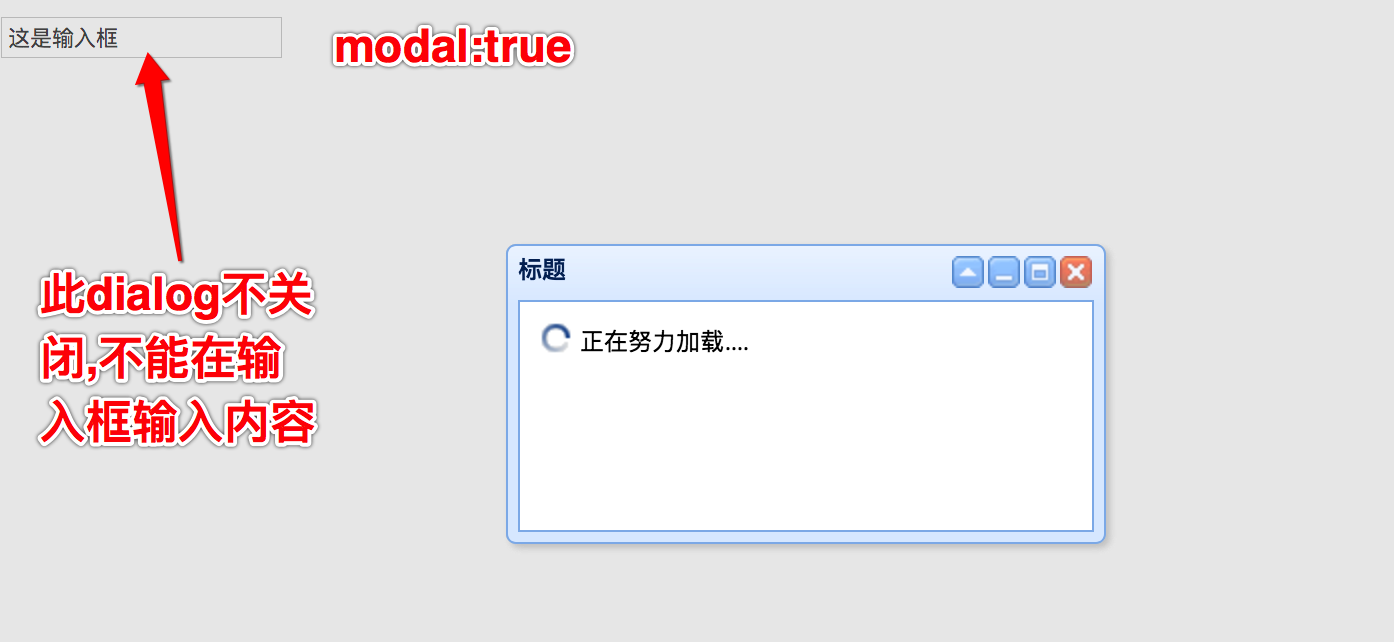
                modal:true,   // 模态窗口,即必须处理完当前的工作,才能做页面上的其他工作

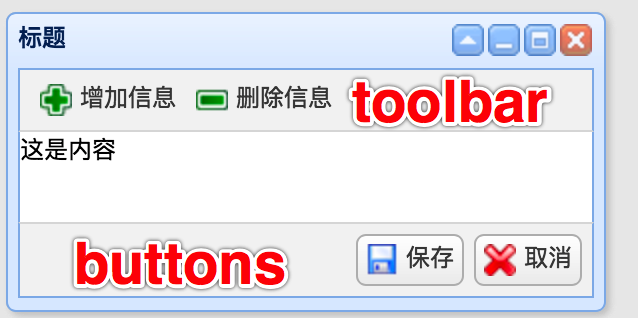
                // 顶部工具栏 toolbar
                toolbar:[
                    {
                        text:'增加信息',
                        iconCls:'icon-add',
                        handler:function(){alert("add...")}
                    },{
                        text:'删除信息',
                        iconCls:'icon-remove',
                        handler:function(){alert("delete...")}
                }],

                // 底部工具栏 buttons
                buttons:[
                    {
                        text:'保存',
                        iconCls:'icon-save',
                        handler:function(){alert("save...")}
                    },{
                        text:'取消',
                        iconCls:'icon-cancel',
                        handler:function(){alert("cancel...")}
                }]
            });
        });
    </script>
</head>
<body>
    <div id="rr"></div>
    <input type="text" name="username" value="这是输入框"/>
</body>


// 第二种方式: 使用顶部工具栏和底部工具栏
<head>
    <script type="text/javascript">
        $(function(){
            $("#rr").dialog({
                title:'标题',
                width:300,
                height:150,
                collapsible:true, // 是否显示折叠按钮
                minimizable:true, // 是否显示最小化按钮
                maximizable:true,  // 是否显示最大化按钮
                closed:true,  // 是否在初始化的时候,关闭面板
                // content:"显示内容"
                href:"test.jsp", // 加载远程的内容
                loadigMessage:"正在努力加载...",
                modal:true,   // 模态窗口,即必须处理完当前的工作,才能做页面上的其他工作

                // 顶部工具栏 toolbar
                toolbar:"#top",

                // 底部工具栏 buttons
                buttons:"#btn"
            });
        });
    </script>
</head>
<body>
    <div id="rr"></div>
    <div id="top">
        <a href="#" class="easyui-linkbutton" data-options="iconCls:'icon-add'">增加</a>
        <a href="#" class="easyui-linkbutton" data-options="iconCls:'icon-remove'">删除</a>
    </div>
    <div id="btn">
        <a href="#" class="easyui-linkbutton" data-options="iconCls:'icon-save'">保存</a>
        <a href="#" class="easyui-linkbutton" data-options="iconCls:'icon-cancel'">取消</a>
    </div>
</body>


4.1 Panel 组件
- Dialog 组件扩展(继承)自 Window 组件,window组件扩展自 Panel 组件
// 自适应 fit:true
<div style="height:500px;width:500px;backaground:red">
    <div class="easyui-panel" style="height:100px;width:100px;background:#abcdef"
                              data-options="fit:true"></div>
</div>
5. ProgressBar 组件
<head>
<script type="text/javascript">
    $(function(){
        $("#rr").progressbar({
            width:400,
            height:30,
            value:30,
            text:"正在上传中..."
        });
    });

    function fn2(){
        // 调用getValue方法,获取进度条的值
        var v =$("#rr").progressbar("getValue");
        alert(v);
    }
    function fn3(){
        $("#rr").progressbar("setValue",80);
    }
</script>
</head>
<body>
    <div id="rr"></div>
    <button onclick="fn2()">点击这里</button>
    <button onclick="fn3()">点击这里</button>
</body>

6. Tabs 组件
<head>
    <script type="text/javascript">
        $(function(){
            $("#rr").tabs({
                width:300,
                height:150
            });
        });
    </script>

    function fn2(){
        // 切换到"首页"选项卡, 使用索引
        $("#rr").tabs("select",0);

        // 修改"首页"的属性
        $("#rr").tabs("getTab",0).panel({href:'test.jsp'});
    }

    function fn3(){
        // 判断选项卡"标题2"是否存在
        var f = $("#rr").tabs("exists","标题2");
        if(f){
            // 如果存在,则切换到"标题2"
            $("#rr").tabs("select","标题2");
        }else{
            // 如果不存在,则创建
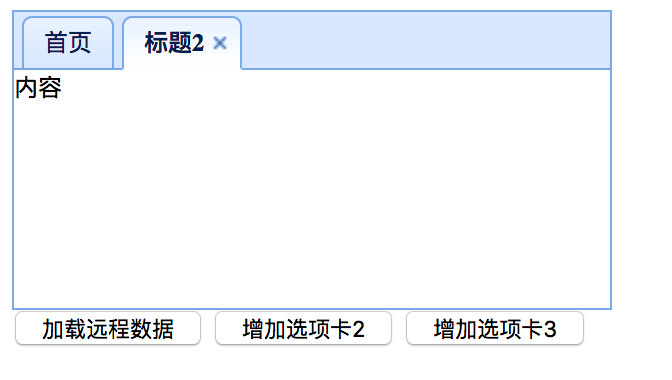
            $("#rr").tabs("add",{
                title:"标题2",
                content:"内容",
                closable:true
            })
        }
    }
</head>
<body>
    <div id="rr">
        <div title="首页"></div>
    </div>
</body>
<button onclick="fn2()">加载远程选项数据</button>
<button onclick="fn3()">增加选项卡2</button>

7. Form 组件
<head>
    function fn2(){
        var obj = {"username":"张三","userpass":"1234"};
        $("#fm").form("load",obj);
    }
    function fn3(){
        $("#fm").form("clear");
    }
    function fn4(){
        $("#fm").form("submit",{
            url:"test.jsp",
            // 表单校验
            onSubmit:function(){

            },
            // 处理返回数据
            success:function(data){
                alert(data);
            }
        })
    }
</head>
<body>
    <button onclick="fn2()">加载数据</button>
    <button onclick="fn3()">清除数据</button>
    <button onclick="fn4()">发送数据</button>
    <form id="fm" method="post">
        username:<input type="text" name="username"/><br/>
        password:<input type="password" name="userpass"/><br/>
    </form>
</body>
8. Datagrid 组件
// datagrid_data2.json
// total 和 rows 两个必须属性
{
  "total":10000,
  "rows":
     [
        {"code":"101","name":"tom","price":"111"},
        {"code":"102","name":"mary","price":"112"},
        {"code":"103","name":"lucy","price":"113"},
        {"code":"104","name":"jack","price":"114"},
        {"code":"105","name":"piter","price":"115"},
        {"code":"106","name":"smith","price":"116"},
		{"code":"106","name":"smith","price":"116"},
		{"code":"106","name":"smith","price":"116"},
		{"code":"106","name":"smith","price":"116"},
		{"code":"106","name":"smith","price":"116"},
        {"code":"107","name":"saro","price":"117"}
     ]
}


// datagrid.html
<body>
    // pagination 设置为true,表示在数据表格底部显示分页工具栏
    <table class="easyui-datagrid" style="width:700px;height:350px"
        data-options="url:'datagrid_data2.json',fitColumns:true,
                                            singleSelect:true,pagination:true">
        <thead>
    		<tr>
    			<th data-options="field:'code',width:100">Code</th>
    			<th data-options="field:'name',width:100">Name</th>
    			<th data-options="field:'price',width:100,align:'right'">Price</th>
    		</tr>
        </thead>
    </table>
</body>
参考资料


 浙公网安备 33010602011771号