

SpringMVC 运行流程以及与Spring 整合
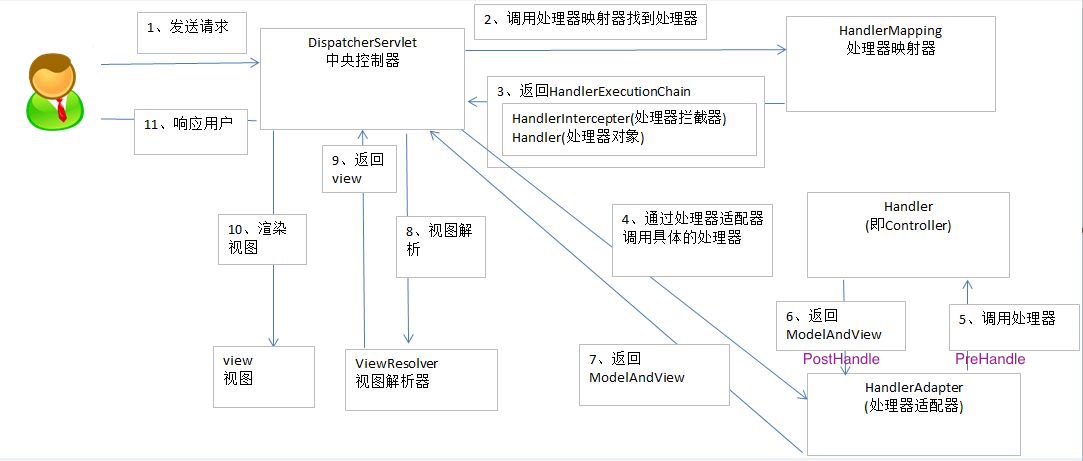
1. 运行流程
2. Spring 和 SpringMVC 整合
// 1. 导入 jar 包
// 2. 配置 web.xml

<!-- 配置 Spring 的核心监听器 -->
<listener>
    <listener-class>org.springframework.web.context.ContextLoaderListener</listener-class>
</listener>

<!-- 配置 Spring 配置文件 -->
<context-param>
    <param-name>contextConfigLocation</param-name>
    <param-value>classpath:applicationContext.xml</param-value>
</context-param>

    <!-- 配置SpringMVC配置文件路径 -->
    <init-param>
        <param-name>contextConfigLocation</param-name>
        <param-value>classpath:springmvc.xml</param-value>
    </init-param>

<!-- 配置过滤器,解决 POST 乱码问题 -->
<filter>
    <filter-name>encoding</filter-name>
    <filter-class>org.springframework.web.filter.CharacterEncodingFilter</filter-class>
    <init-param>
        <param-name>encoding</param-name>
        <param-value>UTF-8</param-value>
    </init-param>
</filter>
<filter-mapping>
    <filter-name>encoding</filter-name>
    <url-pattern>/*</url-pattern>
</filter-mapping>

<!-- 配置SpringMVC框架入口 -->
<servlet>
    <servlet-name>springDispatcherServlet</servlet-name>
    <servlet-class>org.springframework.web.servlet.DispatcherServlet</servlet-class>

    <!-- 配置SpringMVC 什么时候启动,参数必须为整数 -->
    <!-- 如果为0 或者 大于0, 则SpringMVC随着容器启动而启动 -->
    <!-- 如果小于0, 则在第一次请求进来的时候启动 -->
    <load-on-startup>1</load-on-startup>

</servlet>
<servlet-mapping>
    <servlet-name>springDispatcherServlet</servlet-name>
    <!--
          可用:  *.xxx,  /,  /xxx/*
          不可用: /*
    -->
    <url-pattern>/</url-pattern>
</servlet-mapping>

// 3. 在 src 目录下创建 springmvc.xml

<!-- 配置自动扫描包路径 -->
<context:component-scan base-package="cn.itcast.springmvc"></context:component-scan>

<!-- 配置通用的视图解析器 -->
<bean id="internalResourceViewResolver"
                        class="org.springframework.web.servlet.view.internalResourceViewResolver">
    <property name="prefix" value="/WEB-INF/views/"/>
    <property name="suffix" value=".jsp"/>
</bean>

<!-- 处理静态资源导入 -->
<mvc:default-servlet-handler/>
<!-- 如果只有 mvc:default-servlet-handler, 注解类失效, 还需要配置 annotation-driven -->
<mvc:annotation-driven></mvc:annotation-driven>

<!-- 对静态资源放行
        mapping: 只页面中url路径中包含的, /** 表示可以包含多级目录
    <mvc:resources location="/css/" mapping="/css/**"/>
    <mvc:resources location="/js/" mapping="/js/*"/>
    <mvc:resources location="/fonts/" mapping="/fonts/*"/>
-->

// 4. 在 src 目录下创建 applicationContext.xml
<!-- 配置自动扫描包路径 -->
<context:component-scan base-package="cn.itcast.springmvc"/>


// cn.itcast.springmvc.HelloController.java
@Controller
public class HelloController{
    // 无参构造函数
    public HelloController(){
        System.out.println("====HelloController");
    }
}

// cn.itcast.springmvc.UserService.java
@Service
public class UserService{
    // 无参构造函数
    public UserService(){
        System.out.println("====UserService");
    }
}
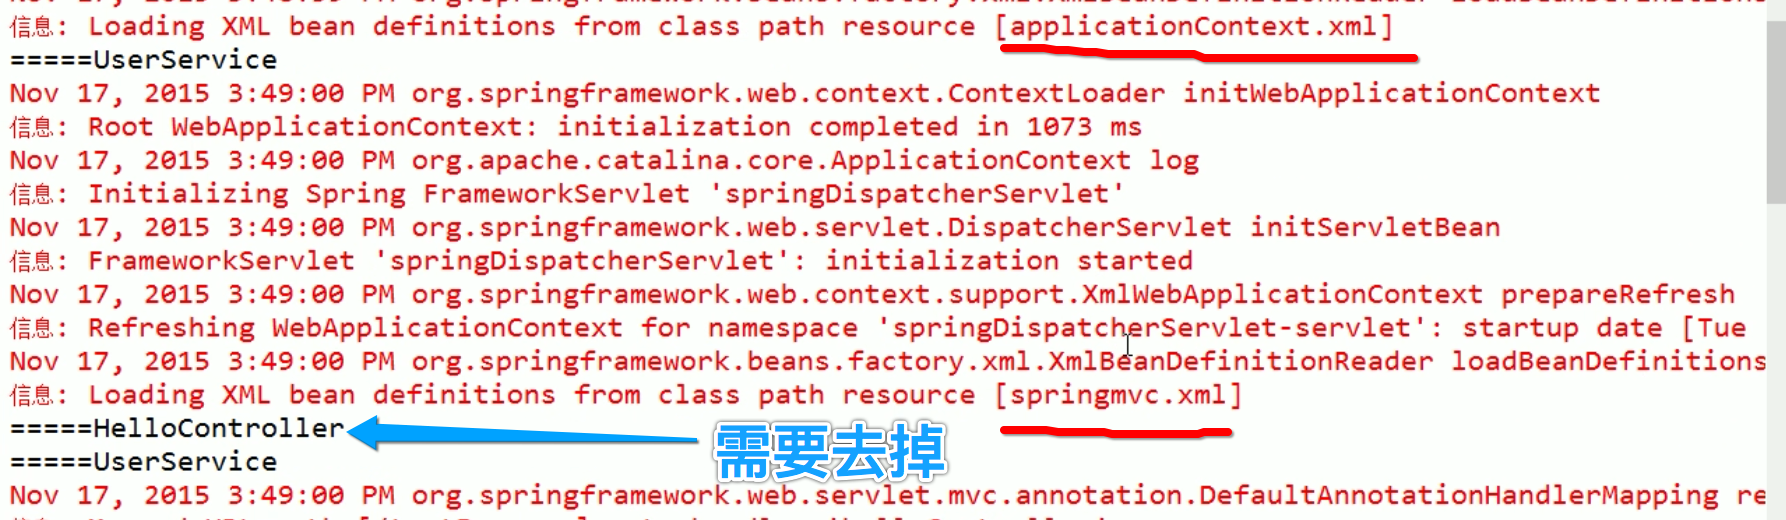
2.1 存在问题一: Bean 创建两次

// 改进方式:
// springmvc.xml
<context:component-scan base-package="cn.itcast.springmvc">

    <!-- 只扫描 @Controller 和 @ControllerAdvice 注解标注的类 -->
    <context:include-filter type="annotation" expression="org.springframework.stereotype.Controller"/>
    <context:include-filter type="annotation"
                                expression="org.springframework.web.bind.annotation.ControllerAdvice"/>
</context:component-scan>

// applicationContext.xml
<context:component-scan base-package="cn.itcast.springmvc">

    <!-- 不扫描 @Controller 和 @ControllerAdvice 注解标注的类 -->
    <context:exclude-filter type="annotation" expression="org.springframework.stereotype.Controller"/>
    <context:exclude-filter type="annotation"
                                expression="org.springframework.web.bind.annotation.ControllerAdvice"/>
</context:component-scan>
2.2 存在问题二:
// 改进方式: use-default-filters="false"
// springmvc.xml
<context:component-scan base-package="cn.itcast.springmvc" use-default-filters="false">

    <!-- 只扫描 @Controller 和 @ControllerAdvice 注解标注的类 -->
    <context:include-filter type="annotation" expression="org.springframework.stereotype.Controller"/>
    <context:include-filter type="annotation"
                                expression="org.springframework.web.bind.annotation.ControllerAdvice"/>
</context:component-scan>
2.3 最终效果:

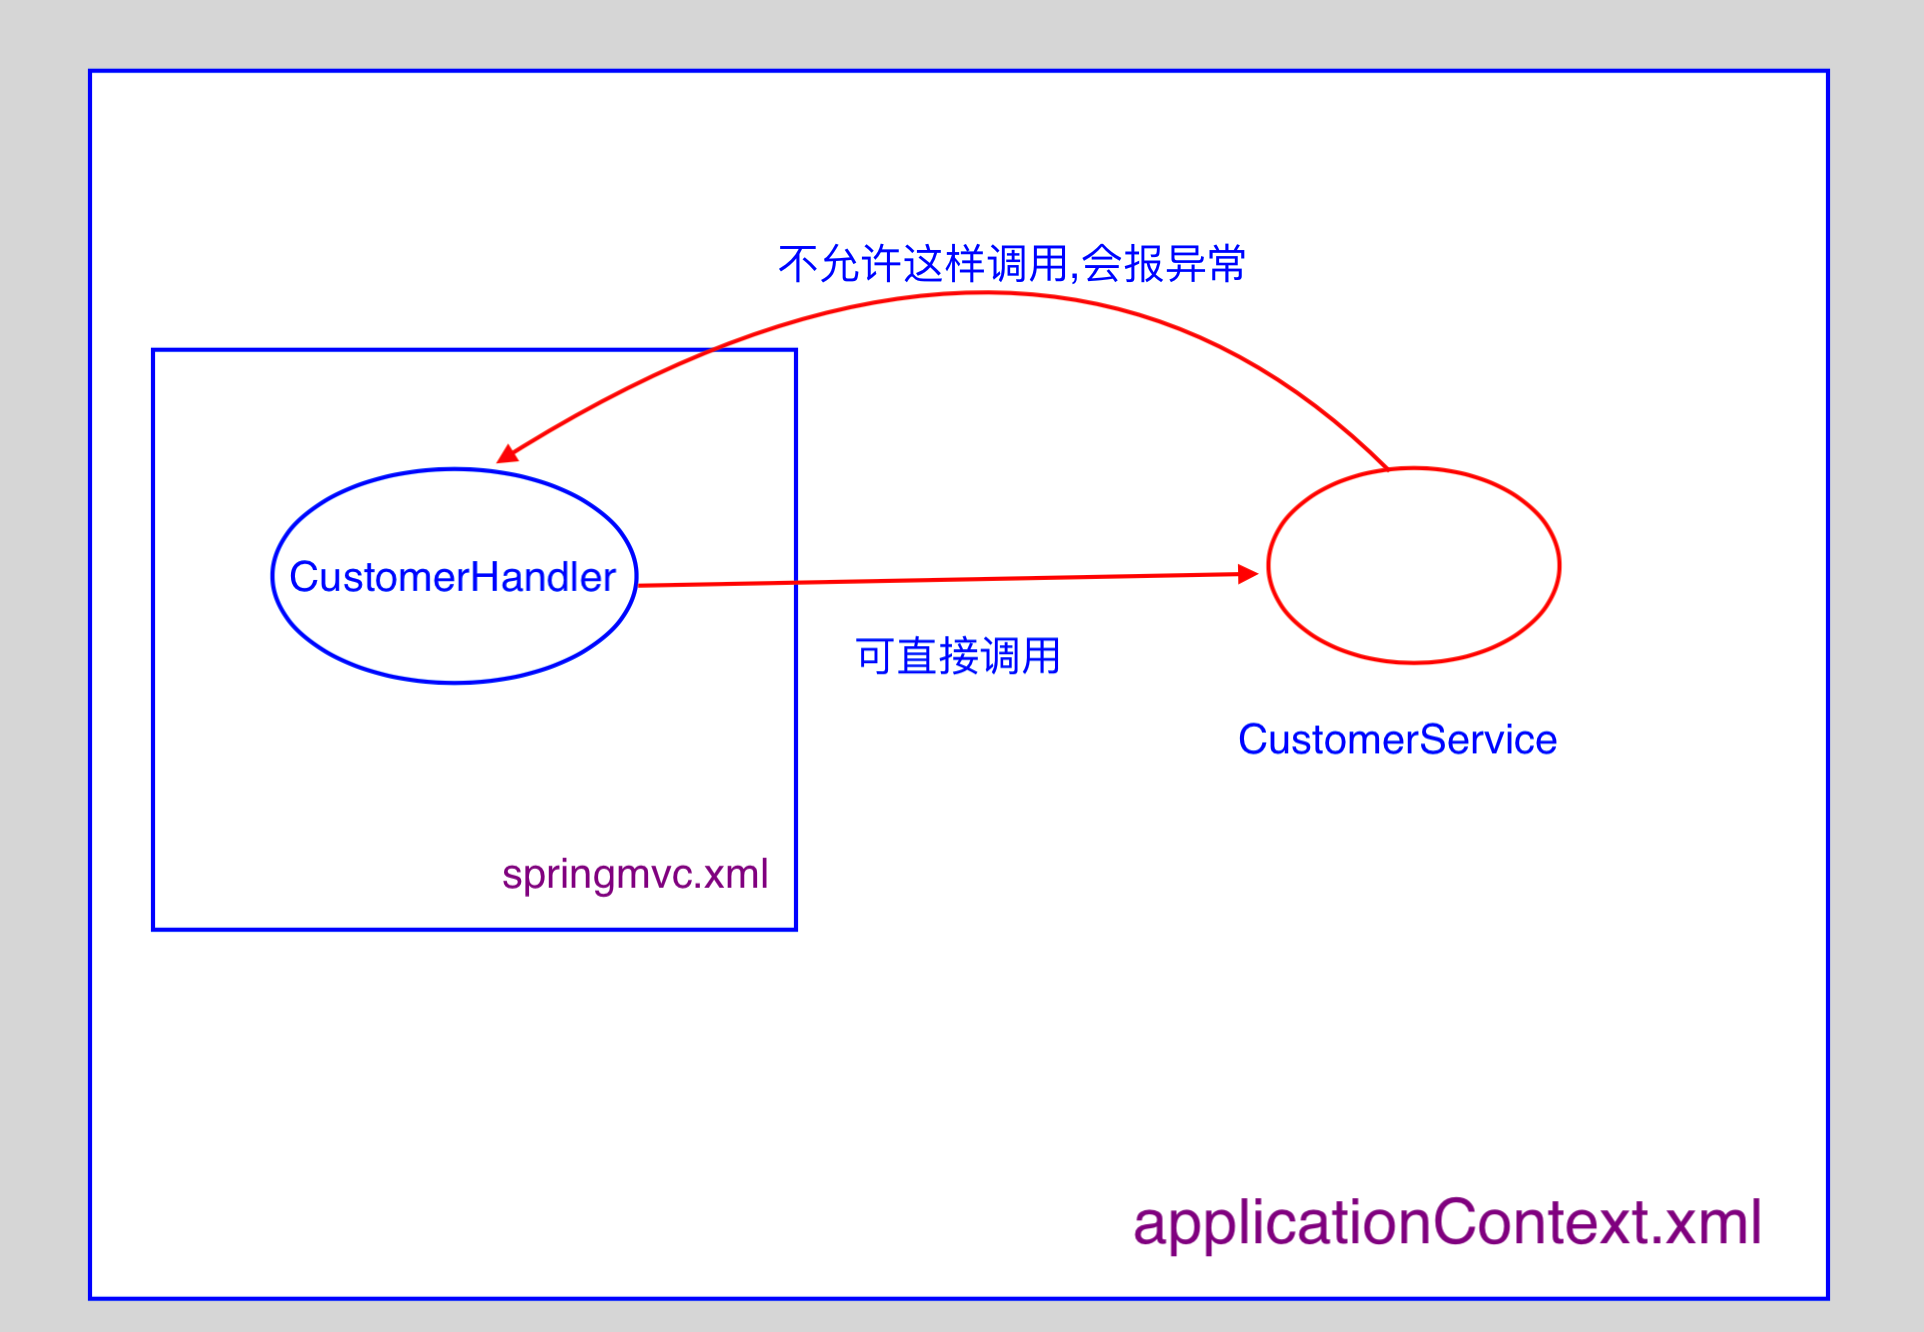
3. SpringMVC 配置文件中引用业务层的 Bean
- 多个 SpringIOC 容器之间可以设置为父子关系,以实现更好的解耦;
- SpringMVC Web层容器可以作为"业务层"Spring容器的子容器:即 Web 层容器可以引用业务层容器的Bean,
而业务层容器却访问不到Web层容器;

// Web 层
@Controller
public class CustomerHandler{
    @Autowired
    public CustomerService customerService;

    @RequestMapping(value="/test",method=RequestMethod.GET)
    public String test(){
        // 可以这样调用
        System.out.println("=====test:  "+customerService.getClass().getName());
        return "ok";
    }
}

// 业务层
@Service
public class CustomerService{

    // 业务层不可以调用 Web 层
    // 这样,会出现异常
    @Autowired
    private CustomerHandler customerHandler;

    public CustomerService(){
        System.out.println("====CustomerService:"+customerHandler.test());
    }
}
3. SpringMVC 与 Struts2 比较
- SpringMVC 的入口是 Servlet, Struts2 是 Filter;
- SpringMVC 会稍微比 Struts2 快些, SpringMVC 是基于方法涉及的,而 Struts2 是基于类,每发一次请求
都会实例一个Action; - SpringMVC 使用更加简洁,开发效率高, 支持JSR303, 处理 ajax 的请求更方便;
- Struts2 的 OGNL 表达式使页面的开发效率相比 SpringMVC 更高些;
参考资料

 浙公网安备 33010602011771号