

CXF 框架
1. 搭建服务端(查询天气)
// 1. 引入cxf的 jar 包;
// 2. 创建 SEI 接口, 需要加入注解: @WebService
    @WebService
    public interface WeatherInterface{
        public String queryWeather(String cityName);
    }

// 3. 创建 SEI 实现类
    public class WeatherImpl implements WeatherInterface{

        System.out.println("from client..."+cityName);

        if("北京".equals(cityName)){
            return "冷且霾";
        }else{
            return "晴空万里";
        }
    }

// 4. 发布服务, 即服务端
    public class WeatherServer{
        public static void main(String[] args){
            // 创建发布服务类 JaxWsServerFactoryBean
            JaxWsServerFactoryBean jwsf = new JaxWsServerFactoryBean();

            // 设置服务接口
            // 设置服务接口或服务实现类,二者选其一即可;
            jwsf.setServiceClass(WeatherInterface.class);

            // 设置服务实现类
            jwsf.setServiceBean(new WeatherImpl());

            // 设置服务地址
            jwsf.setAddress("http://127.0.0.1:12345/weather");

            // 发布服务
            jwsf.create();
        }
    }

// 5. 测试服务是否发布成功
    // 访问: http://127.0.0.1:12345/weather?wsdl
    // 阅读使用说明书,确定客户端调用的接口,方法,参数和返回值


// 发布 SOAP1.2 的服务端
// 需要在接口上加入如下注解: @BindingType(SOAPBinding.SOAP12HTTP_BINDING)
@WebService
@BindingType(SOAPBinding.SOAP12HTTP_BINDING)
public interface WeatherInterface{
    public String queryWeather(String cityName);
}
2. 生成客户端(接收天气)
Wsdl2java命令是CXF提供的生成客户端工具,与wsimport类似,可以根据 WSDL 生成客户端代码;- 常用参数:
-d: 指定输出目录;-p: 指定包名,如果不指定该参数,默认包名是 WSDL 的命名空间倒序;
- Wsdl2java 支持 SOAP1.1 和 SOAP1.2;
// 1. 使用 wsdl2java 命令生成客户端代码
//    注意: 此处需要配置 apache-cxf-3.2.0 中的 bin 目录到 PATH

// 2. 使用说明书,使用生成代码调用服务端
    public class WeatherClient{
        public static void main(String[] args){
            // JaxWsProxyFactoryBean 调用服务端
            JaxWsProxyFactoryBean jwpf = new JaxWsProxyFactoryBean();

            // 设置服务接口
            jwpf.setServiceClass(WeatherInterface.class);

            // 设置服务地址
            jwpf.setAddress("http://127.0.0.1:12345/weather");

            // 获取服务接口实例
            WeatherInterface wif = (WeatherInterface)jwpf.create();

            // 调用查询方法
            String weather = wif.queryWeather("北京");
            System.out.println(weather);
        }
    }
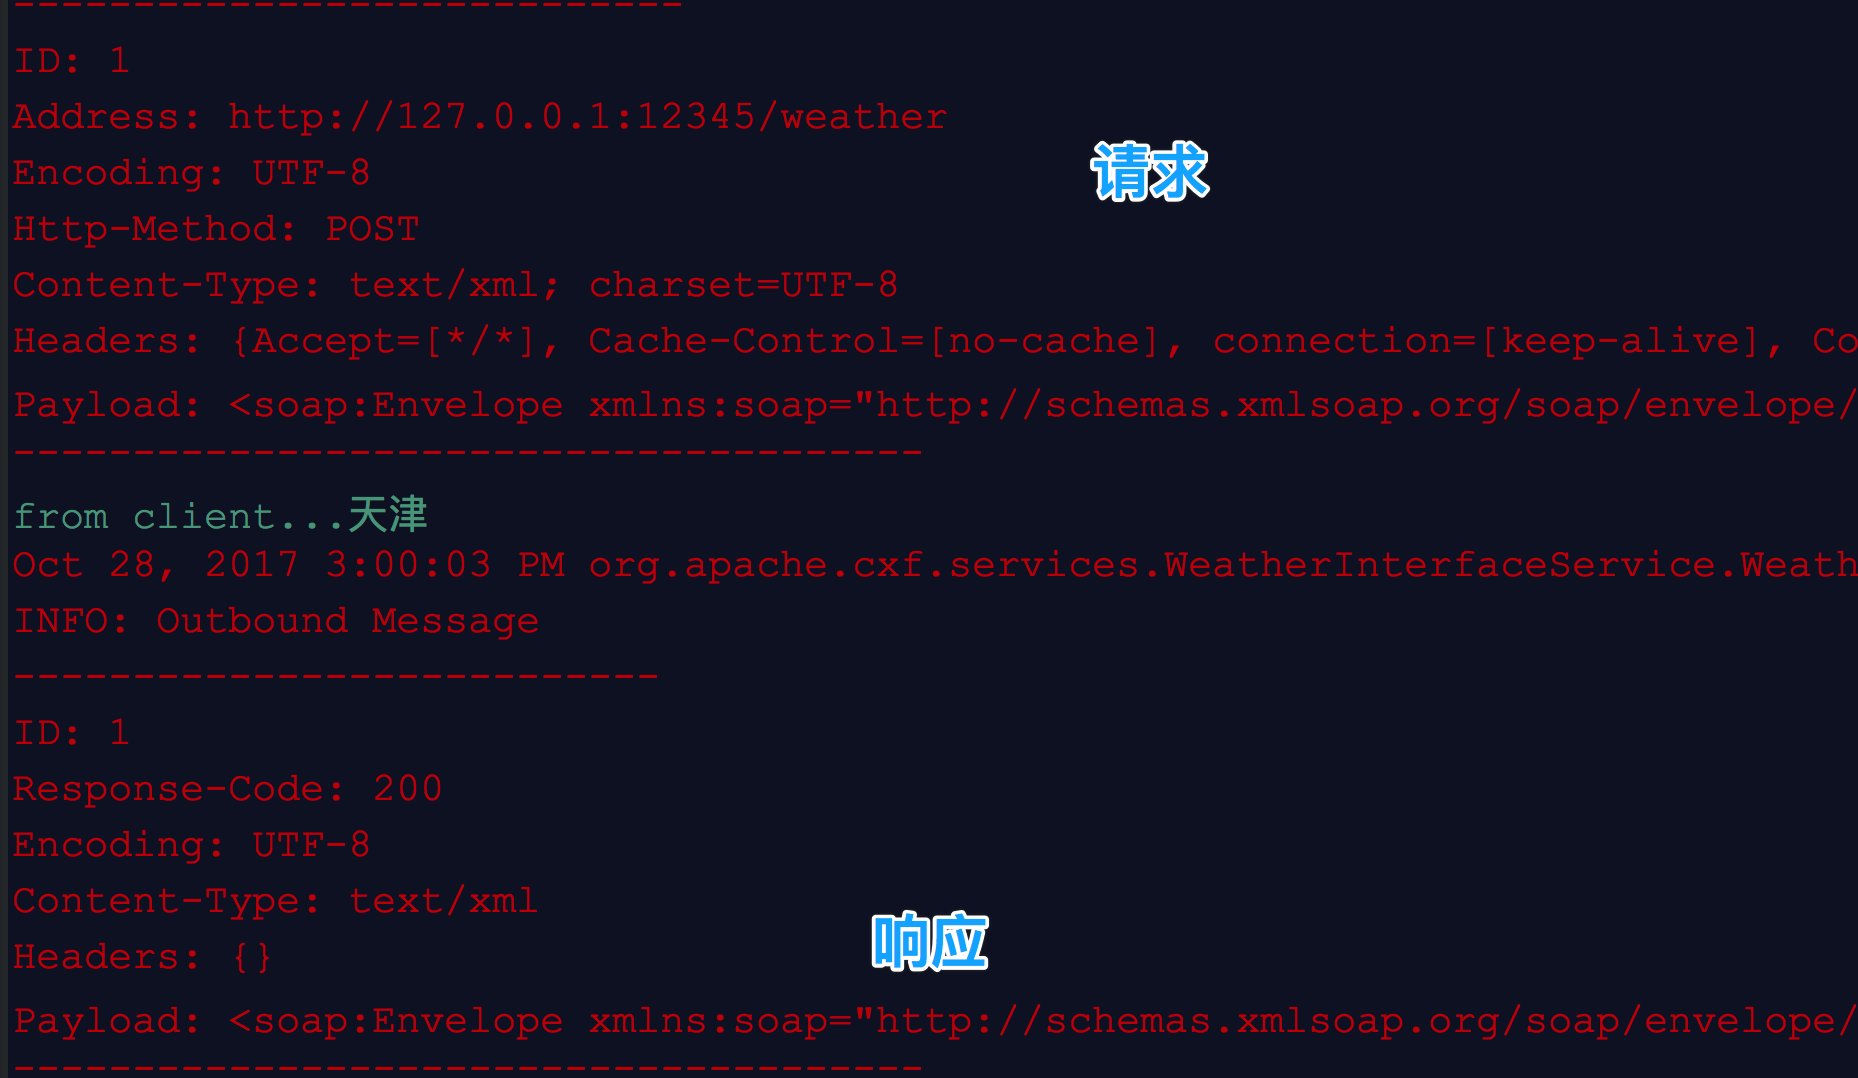
3. CXF 拦截器
- 特点: 拦截可以拦截请求和响应,从而可以获取请求和响应的信息;
- 使用:
- 拦截器必须加入到服务端,并且是在服务端发布之前;
- 获取拦截器列表,将自定义的拦截器加入到列表中;
//  服务端
    public class WeatherServer{
        public static void main(String[] args){

            .....同上

            // 设置服务地址
            jwsf.setAddress("http://127.0.0.1:12345/weather");

            // 加入拦截器
            jwsf.getInInterceptors().add(new LoggingInInterceptor());
            jwsf.getOutInterceptors().add(new LoggingOutInterceptor());

            // 发布服务
            jwsf.create();
        }
    }
4. CXF+Spring 整合发布SOAP协议的服务
// 1. 创建web 项目,引入 jar 包

// 2. 创建 SEI 接口, 需要加入注解: @WebService
    @WebService
    @BindingType(SOAPBinding.SOAP12HTTP_BINDING)
    public interface WeatherInterface{
        public String queryWeather(String cityName);
    }

// 3. 创建 SEI 实现类
    public class WeatherImpl implements WeatherInterface{

        System.out.println("from client..."+cityName);

        if("北京".equals(cityName)){
            return "冷且霾";
        }else{
            return "晴空万里";
        }
    }

// 4. 配置 applicationContext.xml
<?xml version="1.0" encoding="UTF-8"?>
<beans xmlns="http://www.springframework.org/schema/beans"
    xmlns:xsi="http://www.w3.org/2001/XMLSchema-instance"
    xmlns:cxf="http://cxf.apache.org/core"
    xmlns:jaxws="http://cxf.apache.org/jaxws"
    xmlns:jaxrs="http://cxf.apache.org/jaxrs"
    xsi:schemaLocation="
        http://www.springframework.org/schema/beans
        http://www.springframework.org/schema/beans/spring-beans.xsd
        http://cxf.apache.org/core
        http://cxf.apache.org/schemas/core.xsd
        http://cxf.apache.org/jaxws
        http://cxf.apache.org/schemas/jaxws.xsd
        http://cxf.apache.org/jaxrs
        http://cxf.apache.org/schemas/jaxrs.xsd">

	<!-- jaxws:server 发布SOAP 协议的服务, 对 JaxWsServerFactoryBean 类封装 -->
    <!-- 配置服务地址和服务接口 -->
	<jaxws:server address="/weather" serviceClass="com.itcast.service.WeatherInterface">
		<jaxws:serviceBean>
			<ref bean="weatherInterface"/>
		</jaxws:serviceBean>

        <!-- 配置拦截器 -->
        <jaxws:inInterceptors>
            <ref bean="inInterceptor"/>
        </jaxws:inInterceptors>
        <jaxws:outInterceptors>
            <ref bean="outInterceptor"/>
        </jaxws:outInterceptors>
	</jaxws:server>

	<!-- 配置服务实现类  -->
	<bean name="weatherInterface" class="com.itcast.service.WeatherImpl"/>

    <!-- 配置拦截器的Bean -->
    <bean name="inInterceptor" class="org.apache.cxf.interceptor.LoggingInInterceptor"/>
    <bean name="outInterceptor" class="org.apache.cxf.interceptor.LoggingOutInterceptor"/>
</beans>

// 5. 配置 web.xml
<?xml version="1.0" encoding="UTF-8"?>
<web-app xmlns:xsi="http://www.w3.org/2001/XMLSchema-instance"
        xmlns="http://java.sun.com/xml/ns/javaee"
        xsi:schemaLocation="http://java.sun.com/xml/ns/javaee
                        http://java.sun.com/xml/ns/javaee/web-app_2_5.xsd"
                        id="WebApp_ID" version="2.5">

  <!-- 配置Spring 框架整合WEB监听器 -->
  <listener>
	<listener-class>org.springframework.web.context.ContextLoaderListener</listener-class>
  </listener>

	<!-- 加载方式:默认只能加载 WEB-INF 目录下的配置文件; 自定义配置方式,加载 src 目录下配置文件 -->
	<context-param>
		<param-name>contextConfigLocation</param-name>
		<param-value>classpath:applicationContext.xml</param-value>
	</context-param>

  	<!-- 配置CXF的 Servlet -->
  	<servlet>
  		<servlet-name>CXF</servlet-name>
  		<servlet-class>org.apache.cxf.transport.servlet.CXFServlet</servlet-class>
  	</servlet>
  	<servlet-mapping>
  		<servlet-name>CXF</servlet-name>
  		<url-pattern>/ws/*</url-pattern>
  	</servlet-mapping>
</web-app>


// 6. 测试服务,阅读使用说明书
//    访问:http://localhost:8080/项目名/ws/weather?wsdl
4.1 EndPoint 方式发布服务
// 不需要接口,只需要提供类即可
@WebService
public class HelloWorld{
    public String sayHello(String name){
        return "hello, "+ name;
    }
}

// applicationContext.xml 配置
<!-- jaxws:endpoint 发布SOAP协议服务, 对Endpoint类封装 -->
<jaxws:endpoint address="/hello" implementor="cn.itcast.demo.HelloWorld"/>
4.2 生成客户端
// applicationContext.xml 配置
<!-- jaxws:client 实现客户端,其实就是对 JaxWsProxyFactoryBean 的封装 -->
<jaxws:client id="weatherClient" address="http://localhost:8080/项目名/ws/weather"
                                serviceClass="cn.itcast.demo.WeatherInterface"/>

// 客户端代码
public class WeatherClient{
    public static void main(String[] args){
        // 初始化 spring 的上下文
    ApplicationContext context =
                new ClassPathXmlApplicationContext("classpath:applicationContext.xml");
        WeatherInterface wif = (WeatherInterface)context.getBean("weatherClient");

        // 调用查询方法
        wif.queryWeather("北京");
    }
}
5.CXF发布REST服务
5.1 REST概述
- REST 是一种软件架构模式,可以对资源进行更加准确的定位;
- 非REST方式:
http://localhost:8080/queryUser.action?username=123&id=001; - REST方式:
http://localhost:8080/user/name/query/001; - REST 支持数据格式: XML,JSON;
- REST 支持发送方式: GET,POST;
// 需求:
    // 查询单个学生
    // 查询多个学生

// 搭建服务端
    /*
     * 1. 导入 jar 包;
     * 2. 创建学生实体类;
     * 3. 创建SEI接口;
     * 4. 创建SEI实现类;
     * 5. 发布服务;
     * 6. 测试服务;
     */

     // 2. 创建学生实体类
     // @XmlRootElement 可以实现对象和XML数据之间的转换
     @XmlRootElement(name="student")
     public class Student{
        private Long id;
        private String name;
        private Date birthday;

        get 和 set 方法;
    }

    // 3. 创建 SEI 接口
    // @Path("/student") 就是将请求路径中的"/student"映射到接口
    @WebService
    @Path("/student")
    public interface Studentinteface(){

        // 查询单个学生
        // @Path("/query/{id}") 就是将"/query"映射到方法上, "{id}"映射到参数上
        // 如果有多个参数: @Path("/query/{参数1}/{参数2}/...")
        // @GET 指定请求方式; 如果服务端指定的是 GET(POST),那么客户端访问时,必须使用GET(POST)
        @GET
        @Produces(MediaType.APPLICATION_XML) // 指定服务数据类型
        @Path("/query/{id}")
        public Student query(@PathParam("id")Long id);

        // 查询多个学生
        @GET
        @Produces("application/json;charset=utf-8") // json格式,需要解决乱码问题
        @Path("querylist/{name}")
        public List<Student> queryList(@PathParam("name")String name);
    }

    // 4. 创建 SEI 实现类
    public class StudentImpl implements StudentInterface{

        public Student query(Long id){
            Student stu = new Student();
            stu.setId((long)110);
            stu.setName("张三");
            stu.setBirthday(new Date());

            return stu;
        }

        public List<Student> queryList(String name){
            Student stu = new Student();
            stu.setId((long)110);
            stu.setName("张三");
            stu.setBirthday(new Date());

            Student stu2 = new Student();
            stu2.setId((long)120);
            stu.setName("李四");
            stu.setBirthday(new Date());

            List<Student> list = new ArrayList<Student>();

            list.add(stu1);
            list.add(stu2);
            return list;
        }
    }

    // 5. 发布服务
    public class StudentServer{
        public static void main(String[] args){
            // JAXRSServerFactoryBean 发布REST服务
            JAXRSServerFatoryBean jrfb = new JAXRSServerFatoryBean();

            // 设置服务实现类
            jrfb.setServiceBean(new StudentImpl());

            // 设置资源类
            jrfb.setResourceClasses(StudnetImpl.class);

            // 设置服务地址
            jrfb.setAddress("http://127.0.0.1:12345/user");

            // 发布服务
            jrfb.create();
        }
    }

    // 6. 测试服务
    // 查询单个学生, 访问: http://127.0.0.1:12345/user/student/query/110
    // 查询多个学生, 访问: http://127.0.0.1:12345/user/student/querylist/lisi

// 备注:
//  如果在同一方法上,同时指定XML和JSON媒体类型,在GET请求下,默认返回XML, 在POST请求下,默认返回JSON
//  另外,可以使用如下方式,访问指定格式的数据
//   http://127.0.0.1:12345/user/student/querylist/lisi?_type=xml(或?_type=json)
6. CXF+Spring整合发布REST服务
// 服务端
    // 1. 导入 jar 包
    // 2. 创建 Student 实体类(同上)
    // 3. 创建 SEI 接口(同上)
    // 4. 创建 SEI 实现类(同上)
    // 5. 配置 applicationContext.xml
    <!-- jaxrs:server 发布REST服务 -->
    <jaxrs:server address="/user">
        <jaxrs:serviceBeans>
            <ref bean="studentInterface"/>
        </jaxrs:serviceBeans>
    </jaxrs:server>

    <!-- 配置服务实现类 -->
    <bean name="studentInterface" class="cn.itcast.server.StudentImpl"/>

    // 6. web.xml 配置(同CXF+Spring发布SOAP服务)
    // 7. 测试服务
    //  REST 服务的说明书地址: http://localhost:8080/项目名/ws/user?_wadl
    // 访问: http://localhost:8080/项目名/ws/user/student/query/110
参考资料

 浙公网安备 33010602011771号