

Spring Cloud Consul使用——服务注册与发现(注册中心)
一、Consul 服务端
接下来我们开发 Consul 的服务端,创建一个 spring-cloud-consul-producer 项目
1、添加依赖包
<dependencies>
    <dependency>
        <groupId>org.springframework.boot</groupId>
        <artifactId>spring-boot-starter-actuator</artifactId>
    </dependency>
    <dependency>
        <groupId>org.springframework.cloud</groupId>
        <artifactId>spring-cloud-starter-consul-discovery</artifactId>
    </dependency>
    <dependency>
        <groupId>org.springframework.boot</groupId>
        <artifactId>spring-boot-starter-web</artifactId>
    </dependency>
    <dependency>
        <groupId>org.springframework.boot</groupId>
        <artifactId>spring-boot-starter-test</artifactId>
        <scope>test</scope>
    </dependency>
</dependencies>
spring-boot-starter-actuator 健康检查依赖于此包
spring-cloud-starter-consul-discovery Spring Cloud Consul 的支持。
Spring Boot 版本使用的是 2.0.3.RELEASE,Spring Cloud 最新版本是 Finchley.RELEASE 依赖于 Spring Boot 2.x.
<parent>
    <groupId>org.springframework.boot</groupId>
    <artifactId>spring-boot-starter-parent</artifactId>
    <version>2.0.3.RELEASE</version>
    <relativePath/> <!-- lookup parent from repository -->
</parent>

<dependencyManagement>
    <dependencies>
        <dependency>
            <groupId>org.springframework.cloud</groupId>
            <artifactId>spring-cloud-dependencies</artifactId>
            <version>${spring-cloud.version}</version>
            <type>pom</type>
            <scope>import</scope>
        </dependency>
    </dependencies>
</dependencyManagement>
2、application.properties配置文件
spring.application.name=spring-cloud-consul-producer
server.port=8501
spring.cloud.consul.host=localhost
spring.cloud.consul.port=8500
#注册到consul的服务名称
spring.cloud.consul.discovery.serviceName=service-producer
Consul的地址和端口号默认是 localhost:8500 ,如果不是这个地址可以自行配置。
spring.cloud.consul.discovery.serviceName 是指注册到 Consul 的服务名称,消费端会根据这个名称来进行服务调用。
3、启动类
@SpringBootApplication
@EnableDiscoveryClient
public class ConsulProducerApplication {

    public static void main(String[] args) {
        SpringApplication.run(ConsulProducerApplication.class, args);
    }
}
添加了 @EnableDiscoveryClient 注解表示支持服务发现。
4、提供服务
我们创建一个 Controller,提供 hello 服务。
@RestController
public class HelloController {

    @RequestMapping("/hello")
    public String hello() {
        return "helle consul";
    }
}
启动spring-cloud-consul-producer 项目,访问 http://localhost:8500,显示如下:
发现页面多了 service-producer 服务,点击进去后可以看到页面的服务提供者: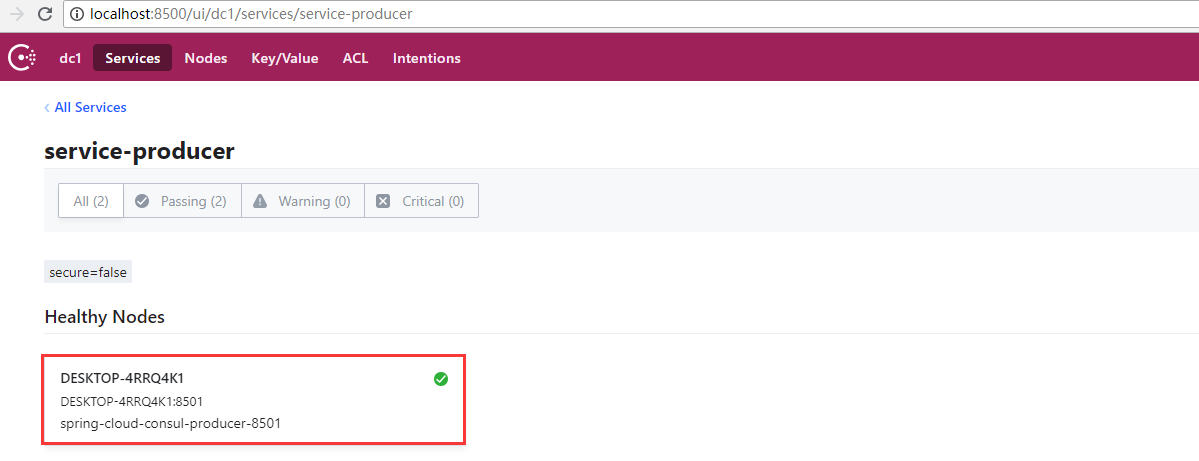
这样服务提供者就准备好了。
二、Consul 消费端
创建一个 spring-cloud-consul-consumer 项目,pom 文件和上面示例保持一致。
1、application.properties配置文件
spring.application.name=spring-cloud-consul-consumer
server.port=8503
spring.cloud.consul.host=127.0.0.1
spring.cloud.consul.port=8500
#设置不需要注册到consul中
spring.cloud.consul.discovery.register=false
客户端可以设置注册到 Consul 中,也可以不注册到 Consul 注册中心中,根据我们的业务来选择,只需要在使用服务时通过 Consul 对外提供的接口获取服务信息即可。
2、启动类
@SpringBootApplication
public class ConsulConsumerApplication {

    public static void main(String[] args) {
        SpringApplication.run(ConsulConsumerApplication.class, args);
    }
}
3、进行测试
我们先来创建一个 ServiceController,试试如何去获取 Consul 中的服务。
@RestController
public class ServiceController {

    @Autowired
    private LoadBalancerClient loadBalancer;
    @Autowired
    private DiscoveryClient discoveryClient;

    /**
     * 获取所有服务
     */
    @RequestMapping("/services")
    public Object services() {
        return discoveryClient.getInstances("service-producer");
    }

    /**
     * 从所有服务中选择一个服务(轮询)
     */
    @RequestMapping("/discover")
    public Object discover() {
        return loadBalancer.choose("service-producer").getUri().toString();
    }

}
Controller 中有俩个方法,一个是获取所有服务名为service-producer的服务信息并返回到页面,一个是随机从服务名为service-producer的服务中获取一个并返回到页面。
添加完 ServiceController 之后我们启动项目,访问地址:http://localhost:8503/services,返回:
[{"serviceId":"service-producer","host":"DESKTOP-4RRQ4K1","port":8501,"secure":false,"metadata":{"secure":"false"},"uri":"http://DESKTOP-4RRQ4K1:8501","scheme":null}]
访问地址:http://localhost:8503/discover,返回:
http://DESKTOP-4RRQ4K1:8501
4、模拟调用服务端提供的 hello 方法
@RestController
public class CallHelloController {

    @Autowired
    private LoadBalancerClient loadBalancer;

    @RequestMapping("/call")
    public String call() {
        ServiceInstance serviceInstance = loadBalancer.choose("service-producer");
        System.out.println("服务地址:" + serviceInstance.getUri());
        System.out.println("服务名称:" + serviceInstance.getServiceId());

        String callServiceResult = new RestTemplate().getForObject(serviceInstance.getUri().toString() + "/hello", String.class);
        System.out.println(callServiceResult);
        return callServiceResult;
    }

}
使用 RestTemplate 进行远程调用。添加完之后重启 spring-cloud-consul-consumer 项目。在浏览器中访问地址:http://localhost:8503/call,依次返回结果如下:
helle consul
说明我们已经成功的调用了 Consul 服务端提供的服务,并且实现了服务端的均衡负载功能。通过今天的实践我们发现 Consul 提供的服务发现易用、强大。

 浙公网安备 33010602011771号