Spring Boot自定义Start组件开发
自定义starter
SpringBoot中的starter是一种非常重要的机制,能够抛弃以前繁杂的配置,将其统一集成进 starter,应用者只需要在maven中引入starter依赖,SpringBoot就能自动扫描到要加载的信息并启 动相应的默认配置。starter让我们摆脱了各种依赖库的处理,需要配置各种信息的困扰。 SpringBoot会自动通过classpath路径下的类发现需要的Bean,并注册进IOC容器。SpringBoot提供 了针对日常企业应用研发各种场景的spring-boot-starter依赖模块。所有这些依赖模块都遵循着约定 成俗的默认配置,并允许我们调整这些配置,即遵循“约定大于配置”的理念。
为什么要自定义starter
在我们的日常开发工作中,经常会有一些独立于业务之外的配置模块,我们经常将其放到一个特定的 包下,然后如果另一个工程需要复用这块功能的时候,需要将代码硬拷贝到另一个工程,重新集成一 遍,麻烦至极。如果我们将这些可独立于业务代码之外的功能配置模块封装成一个个starter,复用的时 候只需要将其在pom中引用依赖即可,SpringBoot为我们完成自动装配,简直不要太爽。
自定义starter的命名规则
SpringBoot提供的starter以spring-boot-starter-xxx的方式命名的。官方建议自定义的starter使用 xxx-spring-boot-starter命名规则。以区分SpringBoot生态提供的starter。
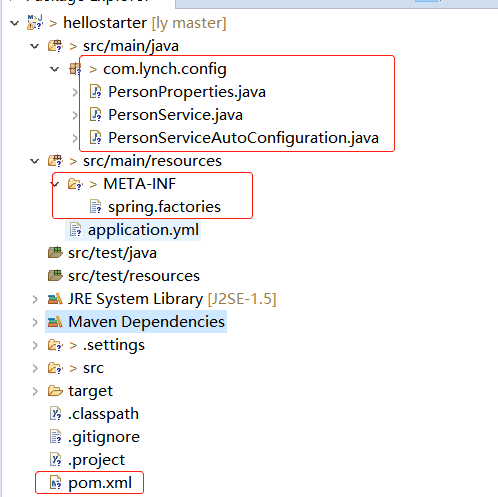
有了以上的了解后,来创建 Maven 项目,目录结构如下:
1、添加pom.xml依赖(根据组件功能添加)
    <dependencies>
        <dependency>
            <groupId>org.springframework.boot</groupId>
            <artifactId>spring-boot-autoconfigure</artifactId>
            <version>2.0.0.RELEASE</version>
        </dependency>
        <dependency>
            <groupId>org.springframework.boot</groupId>
            <artifactId>spring-boot-configuration-processor</artifactId>
            <version>2.0.0.RELEASE</version>
            <optional>true</optional>
        </dependency>
    </dependencies>
2、PersonProperties.java——属性配置类
在使用Spring官方的Starter时通常可以在application.properties中来配置参数覆盖掉默认的值。即sex的值会被配置文件中的值替换掉。
package com.lynch.config;

import java.io.Serializable;

import org.springframework.boot.context.properties.ConfigurationProperties;

@SuppressWarnings("serial")
@ConfigurationProperties(prefix = "lynch.person")
public class PersonProperties implements Serializable {
    // 姓名
    private String name;
    // 年龄
    private int age;
    // 性别
    private String sex = "M";

    public PersonProperties() {

    }

    public String getName() {
        return name;
    }

    public void setName(String name) {
        this.name = name;
    }

    public int getAge() {
        return age;
    }

    public void setAge(int age) {
        this.age = age;
    }

    public String getSex() {
        return sex;
    }

    public void setSex(String sex) {
        this.sex = sex;
    }

}
3、PersonService.java——业务操作类
package com.lynch.config;

public class PersonService {
    private PersonProperties properties;

    public PersonService() {
    }

    public PersonService(PersonProperties properties) {
        this.properties = properties;
    }

    public void sayHello() {
        String message = String.format("大家好,我叫: %s, 今年 %s岁, 性别: %s",
                properties.getName(), properties.getAge(), properties.getSex());
        System.out.println(message);
    }
}
4、PersonServiceAutoConfiguration.java类
package com.lynch.config;

import org.springframework.beans.factory.annotation.Autowired;
import org.springframework.boot.autoconfigure.condition.ConditionalOnClass;
import org.springframework.boot.autoconfigure.condition.ConditionalOnMissingBean;
import org.springframework.boot.autoconfigure.condition.ConditionalOnProperty;
import org.springframework.boot.context.properties.EnableConfigurationProperties;
import org.springframework.context.annotation.Bean;
import org.springframework.context.annotation.Configuration;

@Configuration
@EnableConfigurationProperties(PersonProperties.class)
//当类路径下有指定的类为true
@ConditionalOnClass(PersonService.class)
@ConditionalOnProperty(prefix = "lynch.person", value = "enabled", matchIfMissing = true)
public class PersonServiceAutoConfiguration {

    @Autowired
    private PersonProperties properties;

    // 当容器中没有指定Bean的情况下,自动配置PersonService类
    @Bean
    @ConditionalOnMissingBean(PersonService.class)
    public PersonService personService(){
        PersonService personService = new PersonService(properties);
        return personService;
    }
}
5、spring.factories文件
/META-INF/spring.factories文件放在/src/main/resources目录下
注意:META-INF是自己手动创建的目录,spring.factories也是自己手动创建的文件,在该文件中配置自己的自动配置类。
org.springframework.boot.autoconfigure.EnableAutoConfiguration=com.lynch.config.PersonServiceAutoConfiguration
6、最后,将项目打包 mvn clean install
7、在另一个项目中添加引用
7.1、添加依赖
<dependency>
    <groupId>com.lynch</groupId>
    <artifactId>hellostarter</artifactId>
    <version>1.0</version>
</dependency>
7.2、配置application.properties
lynch.person.age=23
lynch.person.name=Lynch
lynch.person.sex=F
7.3、启动单元测试类
package com.lynch.service;

import org.junit.Test;
import org.junit.runner.RunWith;
import org.springframework.beans.factory.annotation.Autowired;
import org.springframework.boot.test.context.SpringBootTest;
import org.springframework.test.context.junit4.SpringRunner;

import com.lynch.config.PersonService;

@RunWith(SpringRunner.class)
@SpringBootTest
public class PersonServiceTest {
    @Autowired
    private PersonService personService;

    @Test
    public void testHelloWorld() {
        personService.sayHello();
    }
}
2020-08-04 21:37:26.699 INFO 14468 --- [ main] o.s.s.concurrent.ThreadPoolTaskExecutor : Initializing ExecutorService 'applicationTaskExecutor'
2020-08-04 21:37:27.521 INFO 14468 --- [ main] com.lynch.service.PersonServiceTest : Started PersonServiceTest in 2.983 seconds (JVM running for 4.071)
大家好,我叫: Lynch, 今年 23岁, 性别: F


【推荐】国内首个AI IDE,深度理解中文开发场景,立即下载体验Trae
【推荐】编程新体验,更懂你的AI,立即体验豆包MarsCode编程助手
【推荐】抖音旗下AI助手豆包,你的智能百科全书,全免费不限次数
【推荐】轻量又高性能的 SSH 工具 IShell:AI 加持,快人一步
· 从 HTTP 原因短语缺失研究 HTTP/2 和 HTTP/3 的设计差异
· AI与.NET技术实操系列:向量存储与相似性搜索在 .NET 中的实现
· 基于Microsoft.Extensions.AI核心库实现RAG应用
· Linux系列:如何用heaptrack跟踪.NET程序的非托管内存泄露
· 开发者必知的日志记录最佳实践
· TypeScript + Deepseek 打造卜卦网站:技术与玄学的结合
· Manus的开源复刻OpenManus初探
· 写一个简单的SQL生成工具
· AI 智能体引爆开源社区「GitHub 热点速览」
· C#/.NET/.NET Core技术前沿周刊 | 第 29 期(2025年3.1-3.9)