

vue3 与vue2的区别-cnblog
vue3 与vue2的区别
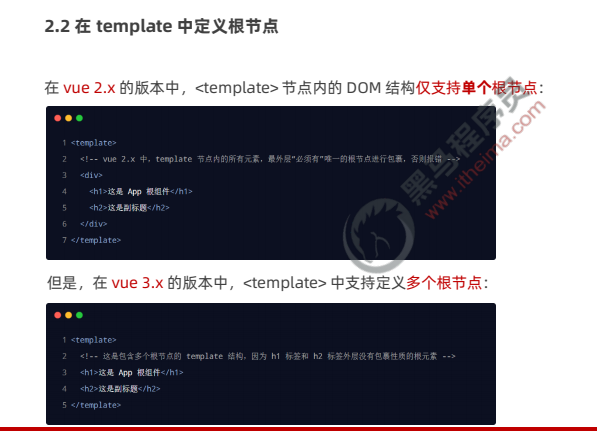
1. template节点
- vue2只允许一个根节点
- vue3允许多个根节点
2. 创建工具
-
vue3:使用vite,也可使用vue-cli
-
vue2:使用vue-cli
-
vite创建
3. 调试工具
- vue-2:标准版
- vue3:bate版本
4. 使用vite的注意点
- style节点下的less语法支持
需要安装less的包
- 项目的组成结构不同
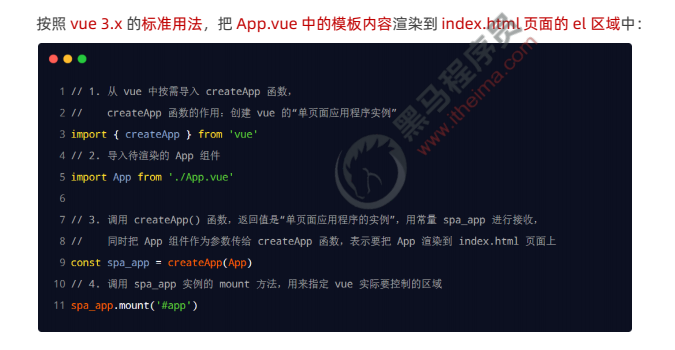
5. vue3在main.js中的配置
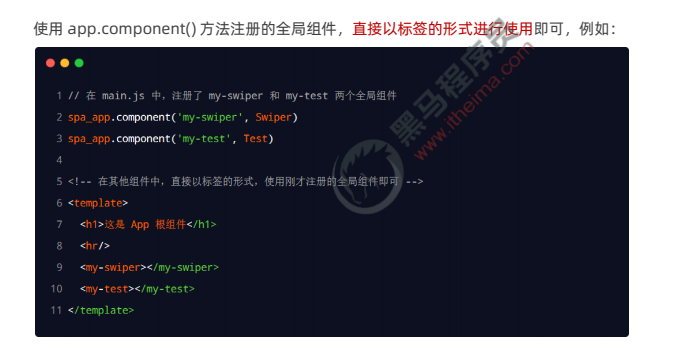
6.vue3的全局注册组件
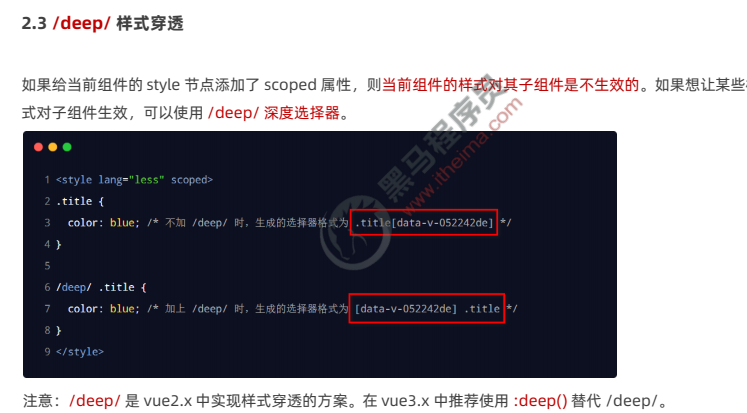
7.样式穿透
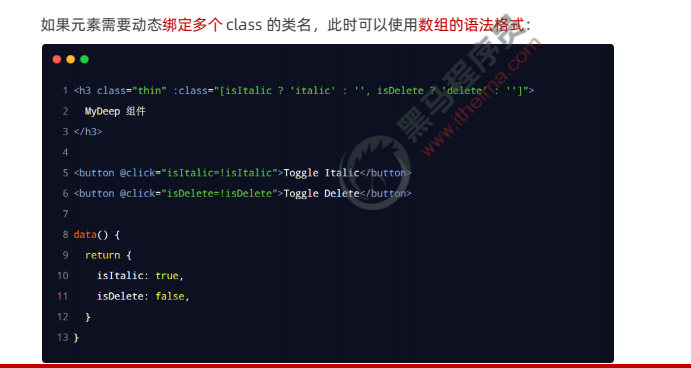
8.动态绑定html的class
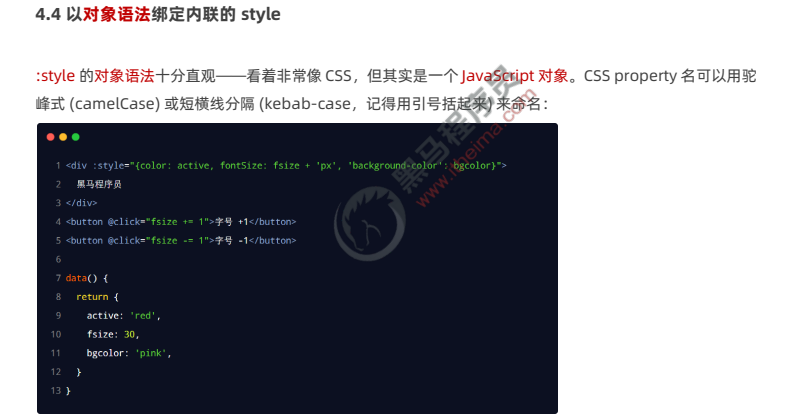
9.绑定style行内样式
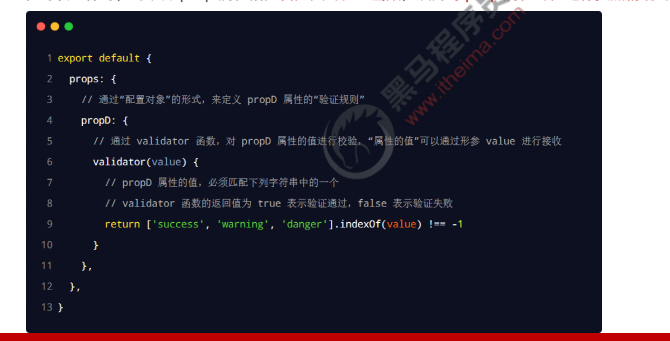
10.自定义属性的验证函数
- 对父组件传过来的值进行验证
color:{ type:String, default:'white', // value为属性值 // validator为自定义的验证函数,返回值为true时验证正确,false错误 validator(value){ return value==='red' } }
11. 自定义事件的emit节点
- Counter组件作为子组件,(this.$emit())
<template> <div class="Counter-container"> <h3>Counter组件</h3> <button @click='change'>+1</button> </div> </template> <script> export default { // 定义emits节点,存储自定义事件 emits:['add'], methods: { change(){ // 按钮按下触发add事件 this.$emit('add'); } } } </script> <style> </style>
- app作为父组件(监听自定义事件)
<template> <h1>app根组件</h1> <Myheader title="黑马图书馆" bgcolor="blue" color="black"></Myheader> <Counter @add="fatherAdd"></Counter> <hr> <!-- 父组件值变化 ---值来自于子组件 --> <h3>count的值-----{{count}}</h3> </template> <script> import Myheader from './components/myCpment/Myheader.vue' // 导入Counter组件 import Counter from './components/myCpment/Counter.vue' export default { data(){ return { count:0 } }, name: 'App', components: { Myheader, Counter }, methods: { fatherAdd(){ this.count++; } } } </script>
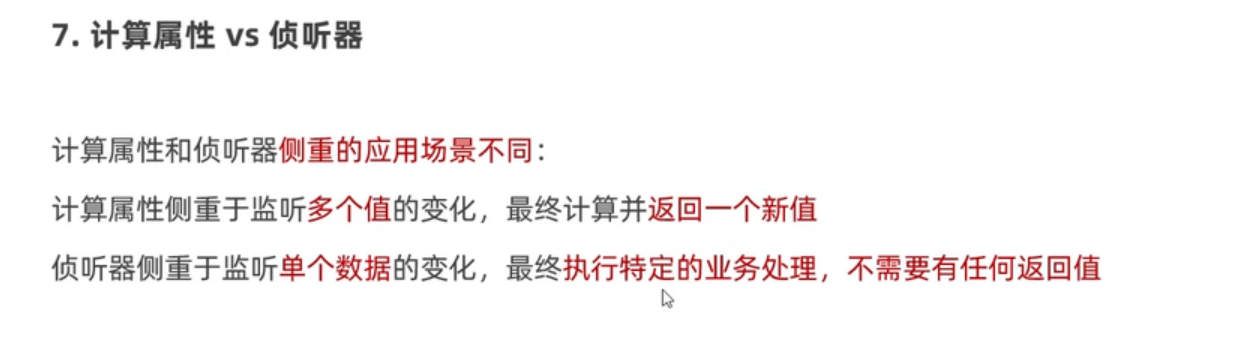
12. 计算属性于侦听器的区别

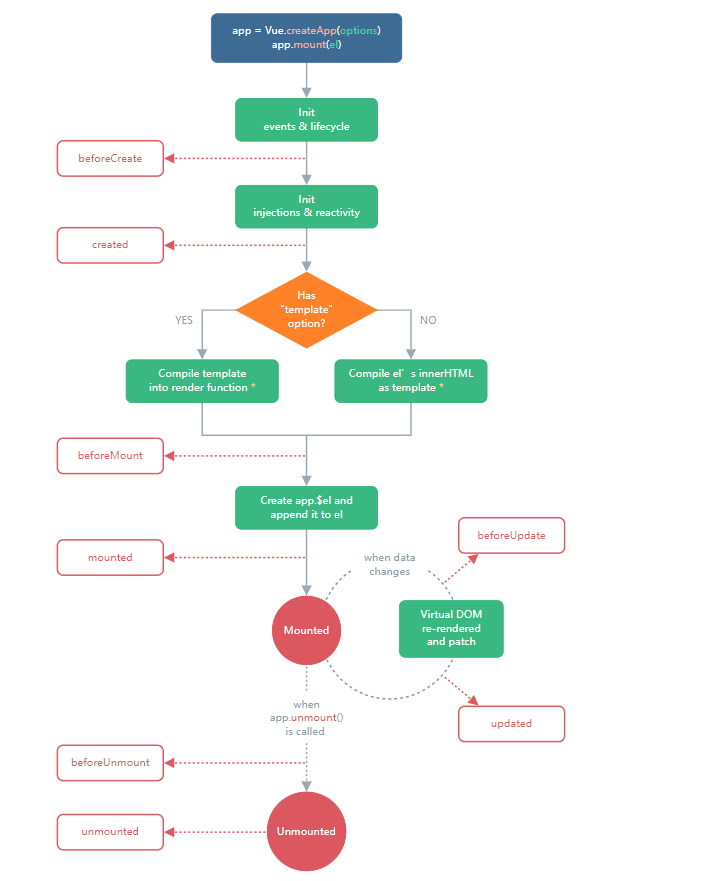
13 vue3中生命周期的变化
- 组件在内存中被创建之后,调用created函数(vue2、3)
- 组件成功渲染到页面上,调用mounted函数(vue2,3)
- 但组件销毁完毕,调用unmounted函数(vue3)
vue3生命周期图示
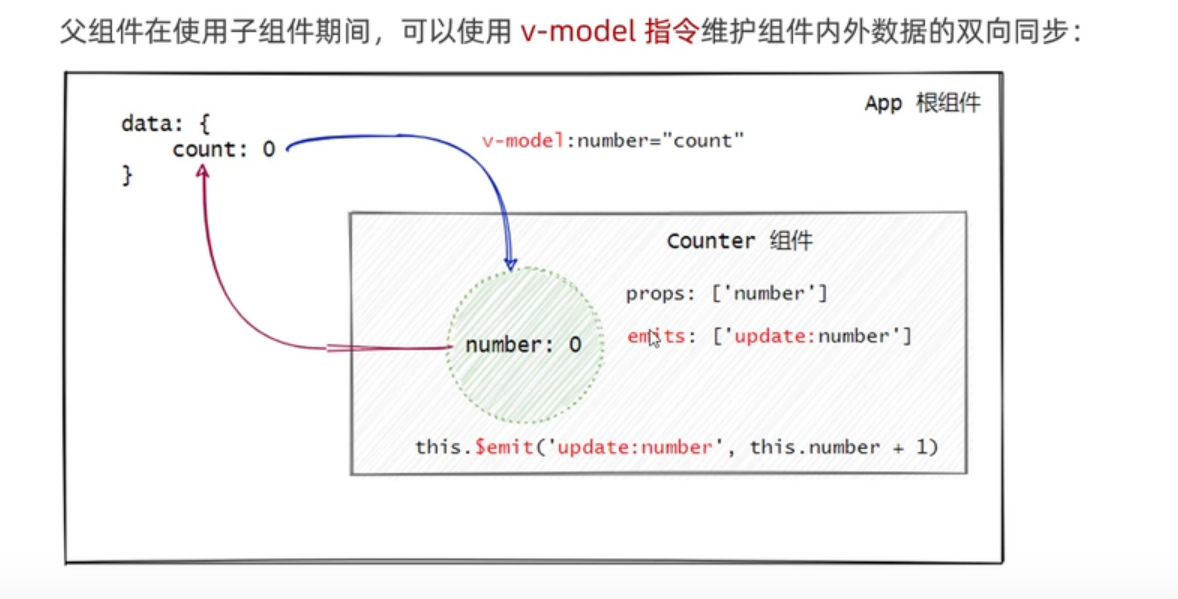
14. vue3使用v-model实现父子组件双向数据绑定
15.使用mitt第三方包实现兄弟组件信息传递
- mitt包的安装
npm i mitt -S
- 创建eventBus .js
// 导入mitt包 import mitt from "mitt"; // 创建bus对象 const bus =mitt() // 默认到处 export default bus
- left组件(数据发送方)
<template> <div class="Left-container"> <h3>left组件------{{count}}</h3> <!-- 数据发送方 --> <button @click="send"></button> </div> </template> <script> // 导入eventBus import busEvent from './busEvent.js' export default { data(){ return { count:0 } }, methods: { send(){ this.count++; // 触发发送事件 busEvent.emit('countChange',this.count) } } } </script> <style lang='less' scoped> .Left-container{ flex: 1; height: 200px; background-color: pink; } </style>
- 数据接收方
<template> <div class="Left-container"> <h3>right组件-----{{count}}</h3> </div> </template> <script> // 数据接收方 // 导入eventbus import busEvent from './busEvent.js' export default { data(){ return{ count:0 } }, // 在组件被创建时就监听eventBus事件 created () { busEvent.on('countChange',(count)=>{ this.count=count }) } } </script> <style lang='less' scoped> .Left-container{ flex: 1; height: 200px; background-color: skyblue; } </style>
16 vue3中向子孙节点共享数据
-
父组件使用provide函数来提供要共享的数据
数据如果为响应式(实时更新),需要使用computed函数
-
子孙节点使用inject节点来接收父组件来的数据
接收响应式数据,需要使用(属性名).value来获取
-
爷组件(app.vue)
<template> <div class="box"> <h1>app根组件(爷)---------------{{count}}</h1> <button @click="count+=1">+1</button> <LeftOne></LeftOne> </div> </template> <script> import { provide } from '@vue/runtime-core' // 导入LeftOne组件 import LeftOne from './components/LeftOne.vue' // 导入vue中的computed函数 import {computed} from 'vue' export default { name: 'App', components: { LeftOne }, data(){ return { count:10 } }, // provide方法用于向子组件传递值 provide(){ return { countFather:computed(()=>this.count) } } } </script>
- 子组件
<template> <div class="LeftOne-container"> <h3>leftone组件----------</h3> <!-- 使用LeftTwo组件 --> <LeftTwo></LeftTwo> </div> </template> <script> // 导入lefttwo组件 import LeftTwo from './LeftTwo.vue' export default { name:'LeftOne', components:{ LeftTwo } } </script> <style> </style>
- 孙组件
<template> <div class="LeftOne-container"> <h3>lefttwo组件(孙子)----------{{countFather.value}}</h3> </div> </template> <script> export default { name:'LeftOne', data(){ return { count:0 } }, //使用inject节点来接收爷发过来的值 inject:['countFather'] } </script> <style> </style>
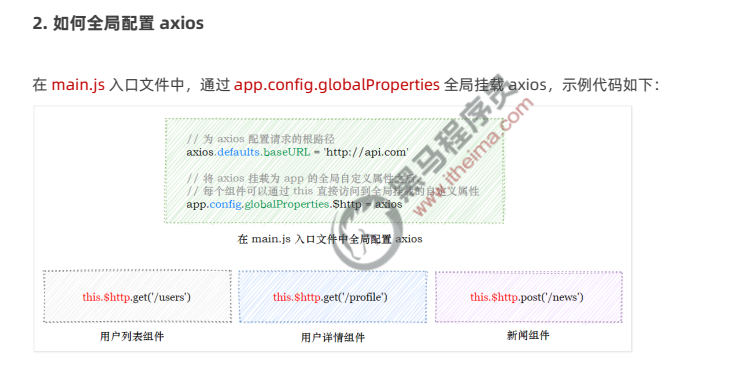
17.vue3.0挂载全局axios
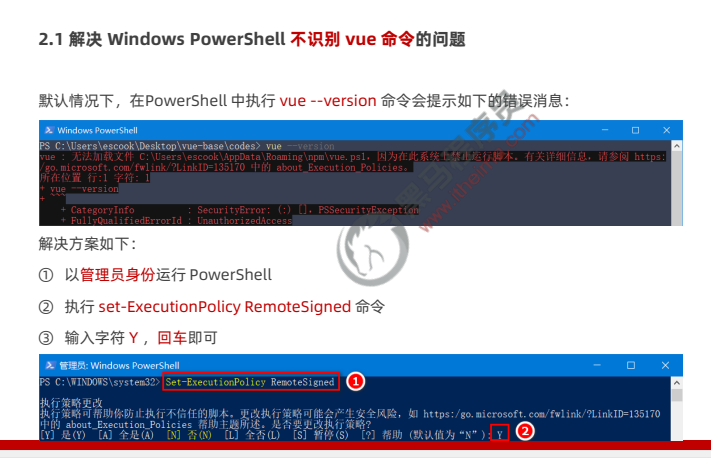
18 解决powershell窗口不识别vue命令的问题
19 axios拦截器
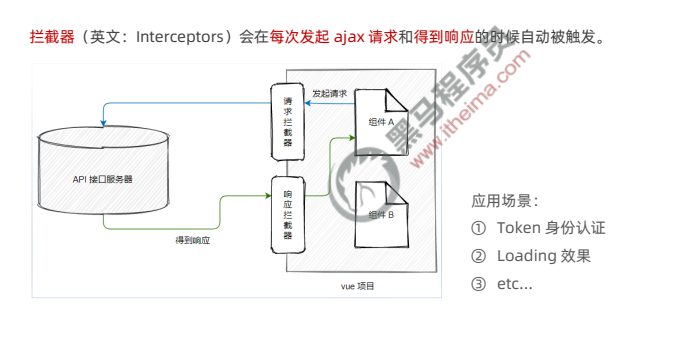
1. 配置请求拦截器
axios.interceptors.request.use(成功的回调函数,失败的回调函数)
2. 配置响应拦截器
axios.interceptors.response.use(成功的回调函数,失败的回调函数)
3.一个示例
import Vue from 'vue' import App from './App.vue' import router from './router' // 导入element-ui import ElementUI, { Loading } from 'element-ui' import 'element-ui/lib/theme-chalk/index.css' // 导入axios import axios from 'axios' Vue.config.productionTip = false // 请求的根地址 axios.defaults.baseURL = 'https://www.escook.cn' // element的加载效果实例 let loadingInstance = null // axios请求拦截器 axios.interceptors.request.use(config => { // 配置token字段 config.headers.Authorization = 'barere xxx' console.log(config) // 加载效果 loadingInstance = Loading.service({ fullscreen: true }) // 在发起请求时加载element-ui的加载效果 return config }) // axios响应拦截器 axios.interceptors.response.use(response => { // 关闭loading加载效果 loadingInstance.close() return response }) Vue.prototype.$http = axios // 挂载element-ui Vue.use(ElementUI) new Vue({ router, render: h => h(App) }).$mount('#app')
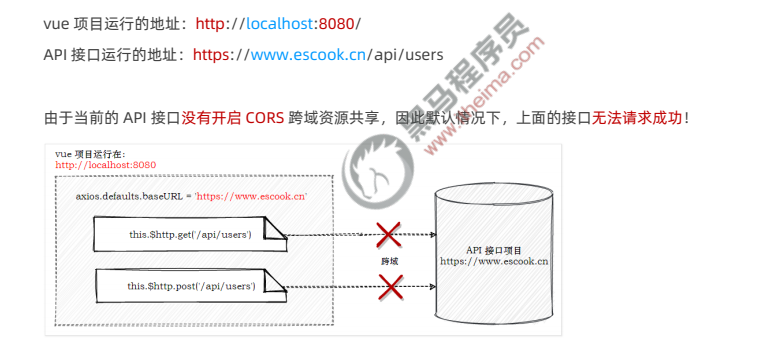
20 proxy跨域代理
- 原理
proxy代理不存在跨域的问题

- main.js
import Vue from 'vue' import App from './App.vue' import router from './router' // 导入element-ui import ElementUI, { Loading } from 'element-ui' import 'element-ui/lib/theme-chalk/index.css' // 导入axios import axios from 'axios' Vue.config.productionTip = false // 请求的根地址 // 配置跨域代理 axios.defaults.baseURL = 'http://localhost:8080/' // axios.defaults.baseURL = 'https://www.escook.cn' // element的加载效果实例 let loadingInstance = null // axios请求拦截器 axios.interceptors.request.use(config => { // 配置token字段 config.headers.Authorization = 'barere xxx' console.log(config) // 加载效果 loadingInstance = Loading.service({ fullscreen: true }) // 在发起请求时加载element-ui的加载效果 return config }) // axios响应拦截器 axios.interceptors.response.use(response => { // 关闭loading加载效果 loadingInstance.close() return response }) Vue.prototype.$http = axios // 挂载element-ui Vue.use(ElementUI) new Vue({ router, render: h => h(App) }).$mount('#app')
- vue.config.js
const { defineConfig } = require('@vue/cli-service') module.exports = defineConfig({ transpileDependencies: true, devServer: { // 配置跨域代理 proxy: 'https://www.escook.cn' } })
- app.vue发起请求
<template> <div id="app"> <h1>app组件</h1> <hr /> <el-row> <el-button>默认按钮</el-button> <el-button type="primary" @click='getinfo'>主要按钮</el-button> <el-button type="success" @click='getUser'>成功按钮</el-button> <el-button type="info">信息按钮</el-button> <el-button type="warning">警告按钮</el-button> <el-button type="danger">危险按钮</el-button> </el-row> </div> </template> <script> export default { name: 'App', methods: { async getinfo () { const { data: res } = await this.$http.get('/api/get', { params: { name: 'zs', age: 18 } }) console.log(res) }, async getUser () { const { data: res } = await this.$http.get('/api/users') console.log(res) } } } </script> <style lang="less"></style>


【推荐】国内首个AI IDE,深度理解中文开发场景,立即下载体验Trae
【推荐】编程新体验,更懂你的AI,立即体验豆包MarsCode编程助手
【推荐】抖音旗下AI助手豆包,你的智能百科全书,全免费不限次数
【推荐】轻量又高性能的 SSH 工具 IShell:AI 加持,快人一步
· 被坑几百块钱后,我竟然真的恢复了删除的微信聊天记录!
· 没有Manus邀请码?试试免邀请码的MGX或者开源的OpenManus吧
· 【自荐】一款简洁、开源的在线白板工具 Drawnix
· 园子的第一款AI主题卫衣上架——"HELLO! HOW CAN I ASSIST YOU TODAY
· Docker 太简单,K8s 太复杂?w7panel 让容器管理更轻松!