

Vue(四)-cnblog
Vue(四)
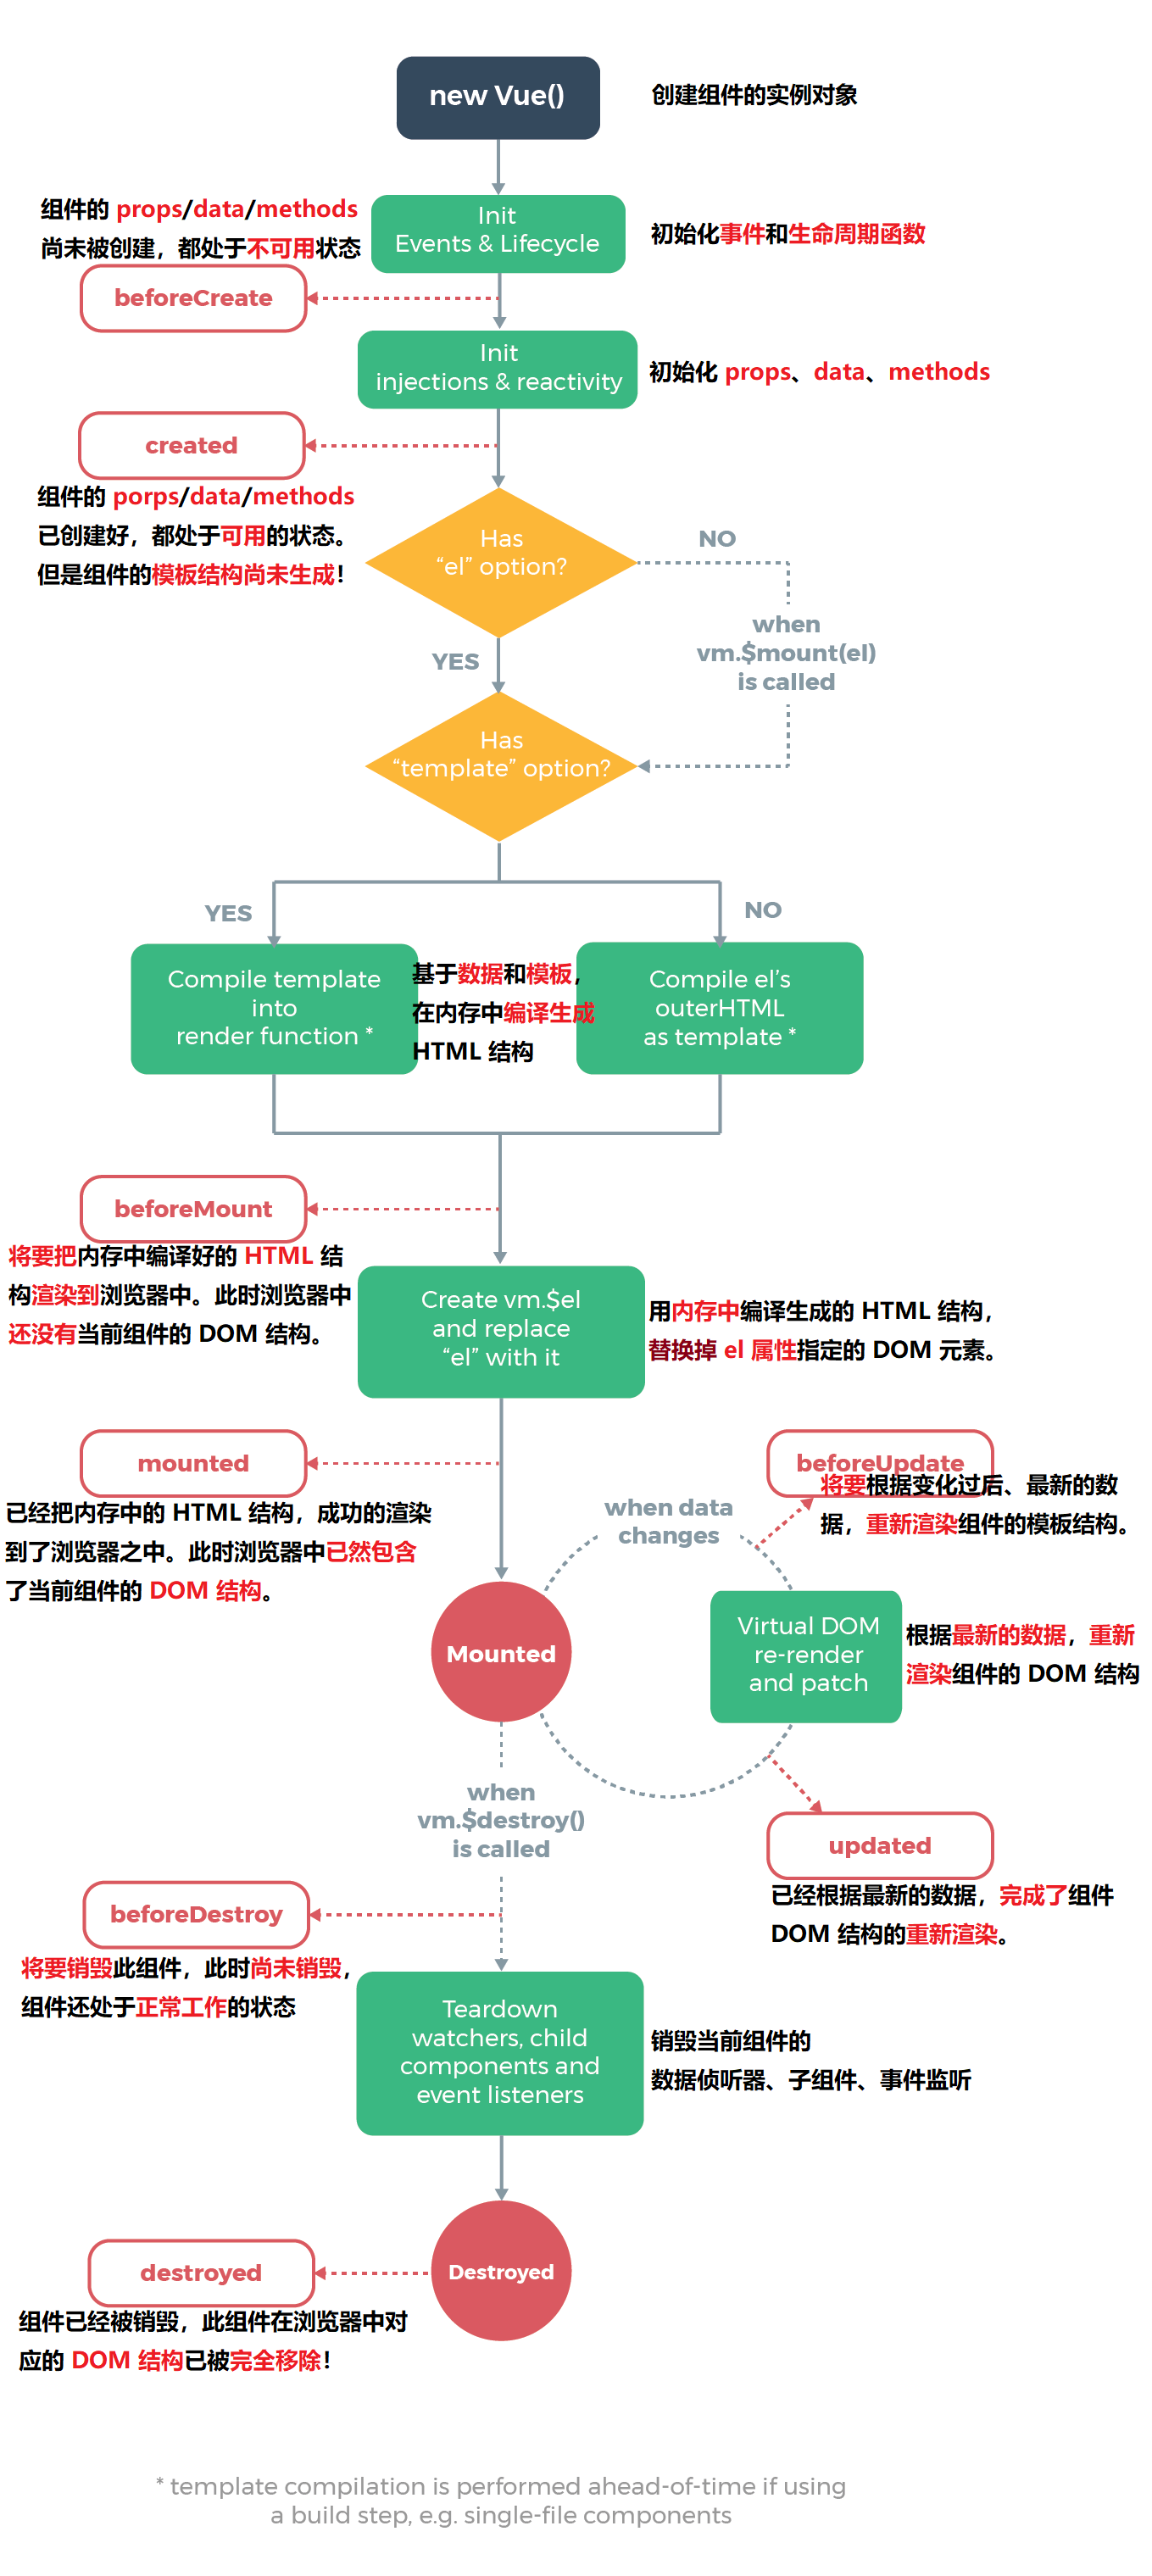
1. 生命周期
-
一个组件从(创建->运行->销毁的整个阶段)
-
生命周期函数:vue框架的内置函数,会随着组件的生命周期,自动按次序执行
-
注意点
生命周期强调整个时间段
生命周期函数指时间点
1.1 示例:Test组件的生命周期函数
<template> <div> <h3 class="myh3">Test 组件 {{username}}</h3> <button @click="username+='-'"></button> </div> </template> <script> export default { props:{ init:{ default :0 } }, data(){ return { username:'zhangsan', age:18 } }, methods: { show(){ console.log(666); }, getBooks(){ // 创建xhr对象 var xhr = new XMLHttpRequest(); // 调用xhr对象的open函数,指定请求方式和url地址 xhr.open("GET", "http://www.liulongbin.top:3006/api/getbooks"); // 调用xhr的send函数 xhr.send(); //监听onreadystatechange // 使用箭头函数来使this指向为vue实例,而非xhr对象 xhr.onreadystatechange = ()=> { // 判断xhr的请求状态(readyState)和服务器的响应状态(status), // 固定写法,与返回信息里面的status不是同一个值 if (xhr.readyState === 4 && xhr.status === 200) { // 打印返回的信息 console.log(xhr.responseText); console.log(this); } } } }, // 生命周期函数beforeCreate(在创建之前,methods,data,props都不可用) beforeCreate () { // console.log(this.init); // console.log(this.username); // this.show(); }, // 生命周期函数created() 此时初始化了methods,data,props,这些都可用了 // 这个阶段非常重要,通常在这个阶段发起ajax请求来获得数据,渲染页面 created () { console.log(this.username); this.show(); console.log(this.init); this.getBooks(); }, // 此时在内存中已经创建好了ui结构,但还没有渲染到页面中(没有替换掉el控制的区域) beforeMount(){ console.log("beforeMount"); let dom=document.querySelector(".myh3"); console.log(dom); }, // 此时内存的ui结构已经发生了替换,可以操作dom了 mounted () { console.log("mounted"); let dom=document.querySelector(".myh3"); console.log(dom); }, /** * 组件创建阶段已经完成 * 开始进入运行阶段 */ // 当数据发生变化时,会更新数据,当ui结构还来不及渲染 beforeUpdate(){ // console.log('beforeUpdate'); // console.log(this.username); // let user=document.querySelector(".myh3"); // console.log(user.innerHTML); }, // 此时数据的值与dom的值都是最新的状态,如果想要操作最新的dom,在这阶段 updated(){ console.log('updated'); console.log(this.username); let user=document.querySelector(".myh3"); console.log(user.innerHTML); } } </script> <style lang="less" scoped> div{ background-color: blue; } h3{ background-color: pink; } </style>
2.组件之间的信息传递
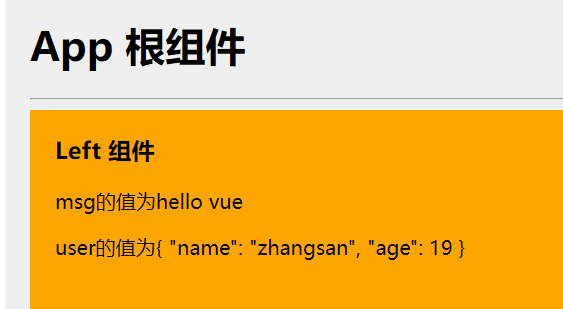
2.1 父向子传递数据
- 原理
使用自定义属性,子组件使用自定义属性,父组件使用v-bind来创建数据
- 子组件(Left)
<template> <div class="left-container"> <h3>Left 组件</h3> <p>msg的值为{{msg}}</p> <p>user的值为{{user}}</p> </div> </template> <script> export default { // 定义自定义组件来接收 父组件传递过来的值 props:['msg','user'] } </script> <style lang="less"> .left-container { padding: 0 20px 20px; background-color: orange; min-height: 250px; flex: 1; } </style>
- 父组件
<template> <div class="app-container"> <h1>App 根组件</h1> <hr /> <div class="box"> <!-- 渲染 Left 组件和 Right 组件 --> <!-- 将父组件的值传递给子组件 --> <Left :msg="message" :user="userinfo"></Left> </div> </div> </template> <script> // 引入子组件 left import Left from '@/components/Left.vue' export default { data(){ return { message:'hello vue', userinfo:{ name:'zhangsan', age:19 } } }, components: { // 注册子组件 Left } } </script> <style lang="less"> .app-container { padding: 1px 20px 20px; background-color: #efefef; } .box { display: flex; } </style>
- 效果图
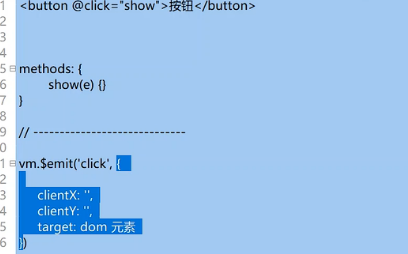
2.2 子组件向父组件传递信息
- 原理
使用自定义的事件
- 子组件
<template> <div class="right-container"> <h3>Right 组件</h3> <button @click="add"></button> </div> </template> <script> export default { // 子组件向父组件传递值 data(){ return { count:0 } }, methods: { // 使用自定义事件 add(){ this.count+=1; // 数据变化触发自定义事件 // emit 方法用于调用自定义事件 // 参数说明:第一个参数:自定义的事件,第二个参数触发该事件传递的参数 this.$emit('numchange', this.count); } } } </script> <style lang="less"> .right-container { padding: 0 20px 20px; background-color: lightskyblue; min-height: 250px; flex: 1; } </style>
- 父组件
<template> <div class="app-container"> <h1>App 根组件</h1> <hr /> <p>{{count}}</p> <div class="box"> <!-- 渲染 Left 组件和 Right 组件 --> <!-- 将父组件的值传递给子组件 --> <Left :msg="message" :user="userinfo"></Left> <!-- 将子组件的值获取到 --> <!-- 绑定自定义事件来获取元素 --> <!-- numchange触发时(Right组件emit传递了一个参数),getCount回调函数 --> <Right @numchange="getCount"></Right> </div> </div> </template> <script> // 引入子组件 left import Left from '@/components/Left.vue' // 引入子组件 right import Right from '@/components/Right.vue' export default { data(){ return { message:'hello vue', userinfo:{ name:'zhangsan', age:19 }, count:0 } }, components: { // 注册子组件 Left, Right }, methods: { getCount(val){ this.count=val; } } } </script> <style lang="less"> .app-container { padding: 1px 20px 20px; background-color: #efefef; } .box { display: flex; } </style>
- 图解
2.3 兄弟组件之间的数据共享
-
vue2.x中,兄弟组件之间的数据共享方案是EventBus
-
图解
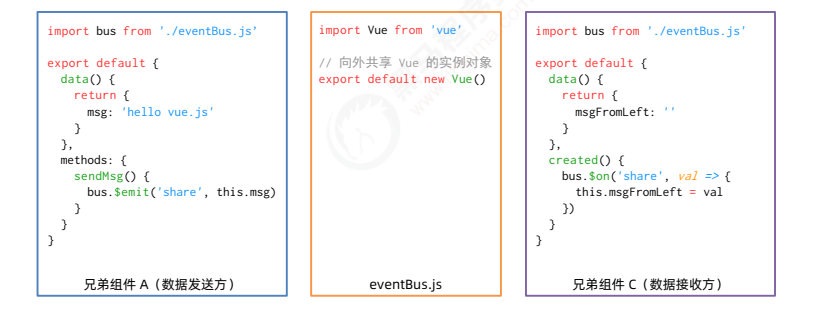
2.4 EventBus使用步骤
- 创建eventBus.js模块,向外共享一个Vue实例对象
- 数据发送方:调用bus.$emit('事件名称',要发送的数据)方法触发自定义事件
- 数据接收方:调用bus.$on('事件名称',事件处理函数)方法注册一个自定义事件
- left组件
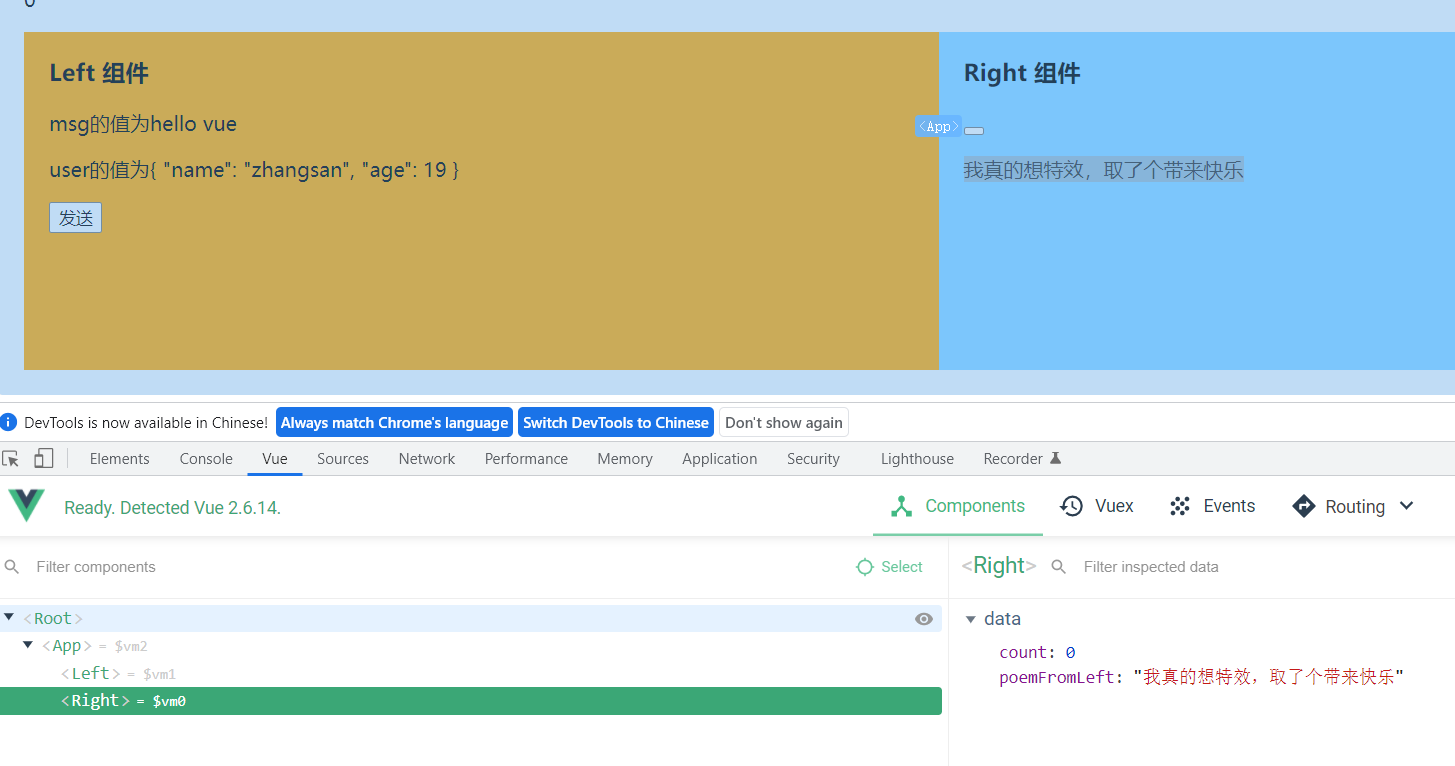
<template> <div class="left-container"> <h3>Left 组件</h3> <p>msg的值为{{msg}}</p> <p>user的值为{{user}}</p> <!-- 定义一个发送数据的按钮 --> <button @click="send">发送</button> </div> </template> <script> //发送方:导入eventBus.js import bus from '@/components/eventBus.js' export default { // 定义自定义组件来接收 父组件传递过来的值 props:['msg','user'], // 定义要发送的数据 data(){ return { poem:'我真的想特效,取了个带来快乐' } }, methods: { send(){ // 发送数据 bus.$emit('share', this.poem); } } } </script> <style lang="less"> .left-container { padding: 0 20px 20px; background-color: orange; min-height: 250px; flex: 1; } </style>
- eventBus.js
// 导入vue框架 import Vue from 'vue' // 向外暴露 export default new Vue()
- right组件
<template> <div class="right-container"> <h3>Right 组件</h3> <button @click="add"></button> <p>{{ poemFromLeft}}</p> </div> </template> <script> // 导入 eventBus.js import bus from "@/components/eventBus.js" export default { // 子组件向父组件传递值 data(){ return { count:0, // 从left发来的数据 poemFromLeft:'' } }, methods: { // 使用自定义事件 add(){ this.count+=1; // 数据变化触发自定义事件 // emit 方法用于调用自定义事件 // 参数说明:第一个参数:自定义的事件,第二个参数触发该事件传递的参数 this.$emit('numchange', this.count); } }, // 在created生命周期函数中绑定bus created () { bus.$on('share',(val)=>{ // left的值给poemFromLeft this.poemFromLeft=val }) } } </script> <style lang="less"> .right-container { padding: 0 20px 20px; background-color: lightskyblue; min-height: 250px; flex: 1; } </style>
- 效果图

3. ref的使用
- ref引用
在不依赖jQuery的情况下,获取DOM元素或组件的引用
每个vue组件实例上,都包含$refs内置对象,存储默认引用,默认为空对象
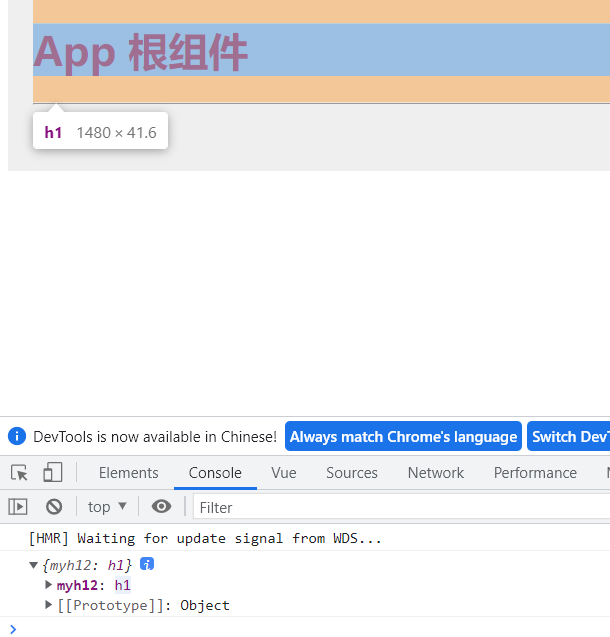
示例:组件修改样式
<template> <div class="app-container"> <h1 ref="myh12">App 根组件</h1> <hr /> <button @click="changeRed"> 变红</button> <div class="box"> <!-- 渲染 Left 组件和 Right 组件 --> </div> </div> </template> <script> export default { methods: { changeRed(){ // 获取ref引用的,来修改样式 console.log(this.$refs); this.$refs.myh12.style.color='red'; } } } </script> <style lang="less"> .app-container { padding: 1px 20px 20px; background-color: #efefef; } .box { display: flex; } </style>
- 效果图
示例:操作组件标签
- left组件
<template> <div class="left-container"> <h3>Left 组件-----{{count}}</h3> <!-- 加一按钮 --> <button @click="count+=1">加一按钮</button> <button @click="reset">重置</button> </div> </template> <script> export default { data(){ return { count:0 } }, methods:{ reset(){ this.count=0 } } } </script> <style lang="less"> .left-container { padding: 0 20px 20px; background-color: orange; min-height: 250px; flex: 1; } </style>
- App组件(使用了left组件)
<template> <div class="app-container"> <h1 ref="myh12">App 根组件</h1> <hr /> <button @click="changeRed"> 变红</button> <button @click="resetLeft">重置子组件的count值</button> <div class="box"> <!-- 渲染 Left 组件和 Right 组件 --> <!-- 给left添加ref属性 --> <Left ref="myleft"></Left> </div> </div> </template> <script> // 引用left组件 import Left from "@/components/Left.vue" export default { components:{ // 注册left组件 Left, }, methods: { changeRed(){ // 获取ref引用的,来修改样式 console.log(this.$refs); this.$refs.myh12.style.color='red'; }, // 重置子组件的count值 resetLeft(){ // 获取到left组件实例,操作refs this.$refs.myleft.reset() } } } </script> <style lang="less"> .app-container { padding: 1px 20px 20px; background-color: #efefef; } .box { display: flex; } </style>
- 效果图
示例:按需展示输入框
<template> <div class="app-container"> <h1 ref="myh12">App 根组件</h1> <hr /> <button @click="changeRed"> 变红</button> <button @click="resetLeft">重置子组件的count值</button> <hr> <!-- 按需展示按钮和输入框 --> <input type="text" v-if="inputVisible" @blur="toggleIpt2" ref="iptRef"> <button @click="toggleIpt" v-else>展示输入框</button> <div class="box"> <!-- 渲染 Left 组件和 Right 组件 --> <!-- 给left添加ref属性 --> <Left ref="myleft"></Left> </div> </div> </template> <script> // 引用left组件 import Left from "@/components/Left.vue" export default { components:{ // 注册left组件 Left, }, methods: { changeRed(){ // 获取ref引用的,来修改样式 console.log(this.$refs); this.$refs.myh12.style.color='red'; }, // 重置子组件的count值 resetLeft(){ // 获取到left组件实例,操作refs this.$refs.myleft.reset() }, toggleIpt(){ // 点击展示按钮,显示输入框 this.inputVisible=true // 并获得焦点 // 因为这个为单线程执行,根据生命周期,数据虽然更新了,但DOM结构还来不及更新,所以会报错 // this.$refs.iptRef.focus(); // 使用this.$nextTick(cb) 方法将上述语句的执行推迟到dom已经更新的时间点 this.$nextTick(()=>{ this.$refs.iptRef.focus(); }) }, toggleIpt2(){ // 失去焦点,隐藏输入框 this.inputVisible=false } }, data(){ return { inputVisible:false } } } </script> <style lang="less"> .app-container { padding: 1px 20px 20px; background-color: #efefef; } .box { display: flex; } </style>
- 效果图
注意点(this.$nextTick(cb))
- 在数据update是,数据update了,而dom结构还没有,需要使用this.$nextTick(cb)将执行的时间点推迟
4. 数组的every方法
- arr.every(function(){})
判读数组中的每个元素是否都满足同一个条件
示例
<!DOCTYPE html> <html lang="en"> <head> <meta charset="UTF-8"> <meta http-equiv="X-UA-Compatible" content="IE=edge"> <meta name="viewport" content="width=device-width, initial-scale=1.0"> <title>Document</title> </head> <body> <script> var arr = [{ id: 1, name: "zhangsan", status: true }, { id: 2, name: "lisi", status: false }, { id: 3, name: "wangwu", status: true }] // every 方法,判断数组的每个元素的值都满足条件 const result = arr.every(function(item) { return item.status }) console.log(result); </script> </body> </html>
- 判读状态(status)是否都为true
5. 数组的reduce方法(累加器)
<!DOCTYPE html> <html lang="en"> <head> <meta charset="UTF-8"> <meta http-equiv="X-UA-Compatible" content="IE=edge"> <meta name="viewport" content="width=device-width, initial-scale=1.0"> <title>Document</title> </head> <body> <script> var arr = [{ id: 1, name: "apple", status: true, count: 1, price: 5 }, { id: 2, name: "banner", status: false, count: 1, price: 10 }, { id: 3, name: "tomato", status: true, count: 2, price: 20 }] // 计算status为true的水果的总价 // 使用reduce方法,累加器 // reduce((累计的结果,累加项)=>{},累加的初始值) const result = arr.filter(item => item.status).reduce((amt, item) => { return amt += item.count * item.price; }, 0) console.log(result); </script> </body> </html>
- 效果图
6.购物车案例
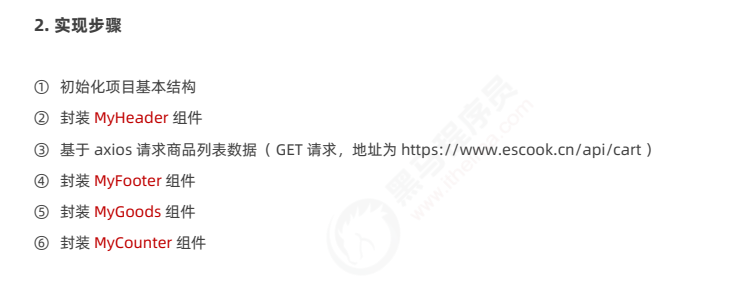
- app.vue
<template> <div class="app-container"> <Header title="购物车案例"></Header> <!-- <h1>App 根组件</h1> --> <!-- 循环渲染Goods组件 --> <!-- 父向子(goods)传递list数组的值 --> <Goods v-for="item in list" :key="item.id" :id="item.id" :goods_title="item.goods_name" :goods_price="item.goods_price" :pic="item.goods_img" :goods_status="item.goods_state" :goods_count="item.goods_count" @changeStatus="getNewStatus"></Goods> <Footer :fullS="fullS" :amountPrice="amtPrice" :allN="allNum" @full-change="getFullState"></Footer> </div> </template> <script> // 根组件中引入头部组件 import Header from '@/components/Header/Header.vue' // 导入axios import axios from 'axios' // 导入goods组件 import Goods from '@/components/Goods/Goods.vue' // 导入底部结算栏组件 import Footer from '@/components/Footer/Footer.vue' // 导入eventBus 组件 import bus from "@/components/eventBus.js" export default { data(){ return { list:[], } }, // 使用计算属性来实现全选 computed:{ // 全选状态 fullS(){ return this.list.every((item)=>item.goods_state); }, // 已经选中商品的价格 amtPrice(){ return this.list.filter((item)=>item.goods_state).reduce((total,item)=>{ return total+=item.goods_count*item.goods_price; },0) }, // 选中的所有商品数 allNum(){ return this.list.filter((item)=>item.goods_state).reduce((cnt,item)=>{ return cnt+=item.goods_count; },0) } }, // 注册组件 components:{ Header, Goods, Footer }, methods:{ // 定义发起ajax请求的函数 async initCartList(){ const {data:res}=await axios.get("https://www.escook.cn/api/cart") // console.log(res); // 将res的数据转存到data中 if(res.status===200){ this.list=res.list; } }, // 获取最新的复选框的状态 getNewStatus(val){ this.list.some((item)=>{ if(item.id===val.id){ item.goods_state=val.state } }) }, // 获取结算栏的组件信息 getFullState(val){ this.list.forEach((item)=>{ item.goods_state=val }) } }, // created生命周期函数调用axios请求 created () { this.initCartList() // 接收count组件发送过来的数据 bus.$on('share',(val)=>{ this.list.some((item)=>{ if(item.id===val.id){ item.goods_count=val.value return true } }) }) } } </script> <style lang="less" scoped> .app-container { padding-top: 45px; padding-bottom: 50px; } </style>
- goods组件
<template> <div class="goods-container"> <!-- 左侧图片 --> <div class="thumb"> <div class="custom-control custom-checkbox"> <!-- 复选框 --> <!-- 复选框绑定监听事件,change事件, --> <!-- 选中状态发生变化时,子组件向父组件传值,改变list数组中的数据 --> <!-- lable标签需要修改id,实现图片与复选框的对应 --> <input type="checkbox" class="custom-control-input" :id="'cb'+id" :checked="goods_status" @change="btn_change"/> <label class="custom-control-label" :for="'cb'+id"> <!-- 商品的缩略图 --> <img :src="pic" alt="" /> </label> </div> </div> <!-- 右侧信息区域 --> <div class="goods-info"> <!-- 商品标题 --> <h6 class="goods-title">{{goods_title}}</h6> <div class="goods-info-bottom"> <!-- 商品价格 --> <span class="goods-price">¥{{goods_price}}</span> <!-- 商品的数量 --> <Counter :cnt="goods_count" :id="id"></Counter> </div> </div> </div> </template> <script> // 使用count组件 import Counter from '@/components/Counter/Counter' export default { components:{ Counter }, // 自定义属性,接收父来的值 props:{ goods_title:{ type:String, default:'' }, pic:{ type:String, default:'' }, goods_price:{ type:Number, default:0 }, goods_status:{ type:Boolean, default:false }, id:{ type:Number, required:true }, goods_count:{ type:Number, default:1 } }, methods:{ // 复选框按钮状态变化,通过自定义事件来修改父的list数组中的状态 btn_change(e){ // 向父组件传值 // console.log(this.id); this.$emit('changeStatus', {state:e.target.checked,id:this.id}); } } } </script> <style lang="less" scoped> .goods-container { + .goods-container { border-top: 1px solid #efefef; } padding: 10px; display: flex; .thumb { display: flex; align-items: center; img { width: 100px; height: 100px; margin: 0 10px; } } .goods-info { display: flex; flex-direction: column; justify-content: space-between; flex: 1; .goods-title { font-weight: bold; font-size: 12px; } .goods-info-bottom { display: flex; justify-content: space-between; .goods-price { font-weight: bold; color: red; font-size: 13px; } } } } </style>
- Footer组件
<template> <div class="footer-container"> <!-- 左侧的全选 --> <div class="custom-control custom-checkbox"> <input type="checkbox" class="custom-control-input" id="cbFull" :checked="fullS" @change="fullState"/> <label class="custom-control-label" for="cbFull">全选</label> </div> <!-- 中间的合计 --> <div> <span>合计:</span> <span class="total-price">¥{{ amountPrice.toFixed(2) }}</span> </div> <!-- 结算按钮 --> <button type="button" class="btn btn-primary btn-settle">结算({{ allN }})</button> </div> </template> <script> export default { props:{ // 全选状态 fullS:{ type:Boolean, default:true }, // 总价 amountPrice:{ type:Number, default:0 }, // 总数量 allN:{ type:Number, default:1 } }, methods: { // 子向父传值,check状态 fullState(e){ this.$emit('full-change',e.target.checked) } } } </script> <style lang="less" scoped> .footer-container { font-size: 12px; height: 50px; width: 100%; border-top: 1px solid #efefef; position: fixed; bottom: 0; background-color: #fff; display: flex; justify-content: space-between; align-items: center; padding: 0 10px; } .custom-checkbox { display: flex; align-items: center; } #cbFull { margin-right: 5px; } .btn-settle { height: 80%; min-width: 110px; border-radius: 25px; font-size: 12px; } .total-price { font-weight: bold; font-size: 14px; color: red; } </style>
- Counter组件
<template> <div class="number-container d-flex justify-content-center align-items-center"> <!-- 减 1 的按钮 --> <button type="button" class="btn btn-light btn-sm" @click="sub">-</button> <!-- 购买的数量 --> <span class="number-box">{{cnt}}</span> <!-- 加 1 的按钮 --> <button type="button" class="btn btn-light btn-sm" @click="add">+</button> </div> </template> <script> // 导入eventBus import bus from "@/components/eventBus.js" export default { props:{ // goods的单个商品数量 cnt:{ type:Number, default:1 }, // 单个商品的id id:{ type:Number, required:true } }, methods: { // 商品数量加1,发送给app组件 add(){ bus.$emit('share',{value:this.cnt+1,id:this.id}) }, // 商品数量减一,发送给app组件 sub(){ if(this.cnt-1<=0){ return } bus.$emit('share',{value:this.cnt-1,id:this.id}) } } } </script> <style lang="less" scoped> .number-box { min-width: 30px; text-align: center; margin: 0 5px; font-size: 12px; } .btn-sm { width: 30px; } </style>
- Header组件
<template> <div class="header-container">{{title}}</div> </template> <script> export default { props:{ title:{ default:'标题', type:String } } } </script> <style lang="less" scoped> .header-container { font-size: 12px; height: 45px; width: 100%; background-color: #1d7bff; display: flex; justify-content: center; align-items: center; color: #fff; position: fixed; top: 0; z-index: 999; } </style>
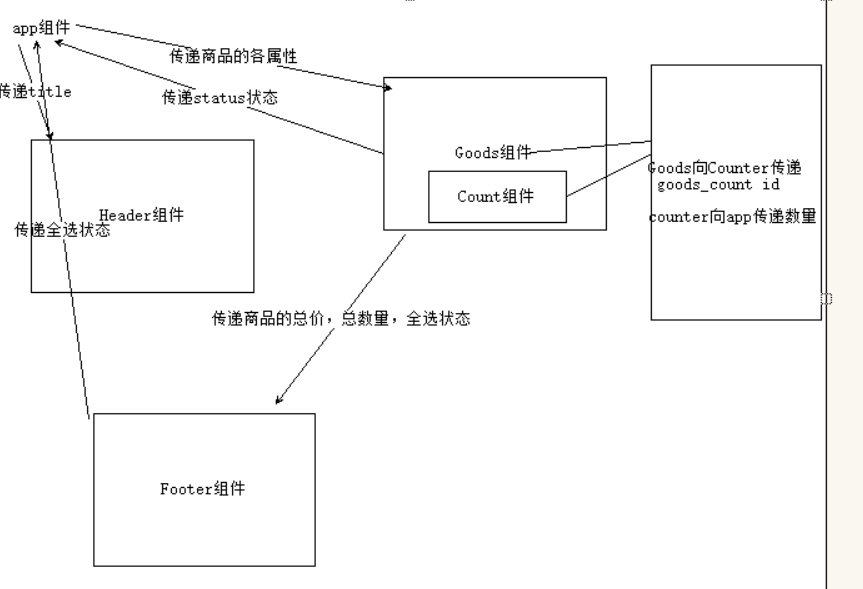
- 图解


【推荐】国内首个AI IDE,深度理解中文开发场景,立即下载体验Trae
【推荐】编程新体验,更懂你的AI,立即体验豆包MarsCode编程助手
【推荐】抖音旗下AI助手豆包,你的智能百科全书,全免费不限次数
【推荐】轻量又高性能的 SSH 工具 IShell:AI 加持,快人一步
· 被坑几百块钱后,我竟然真的恢复了删除的微信聊天记录!
· 没有Manus邀请码?试试免邀请码的MGX或者开源的OpenManus吧
· 【自荐】一款简洁、开源的在线白板工具 Drawnix
· 园子的第一款AI主题卫衣上架——"HELLO! HOW CAN I ASSIST YOU TODAY
· Docker 太简单,K8s 太复杂?w7panel 让容器管理更轻松!