

Vue(三) (Vue-cli)-cnblog
Vue(三) (Vue-cli)
1. 单页面应用程序(SPA)
- 一个web网站只有唯一的html页面
2. vue-cli
- 简化了webpack创建工程化Vue项目的全过程
- 不需要自己去配置webpack,只需专心写页面
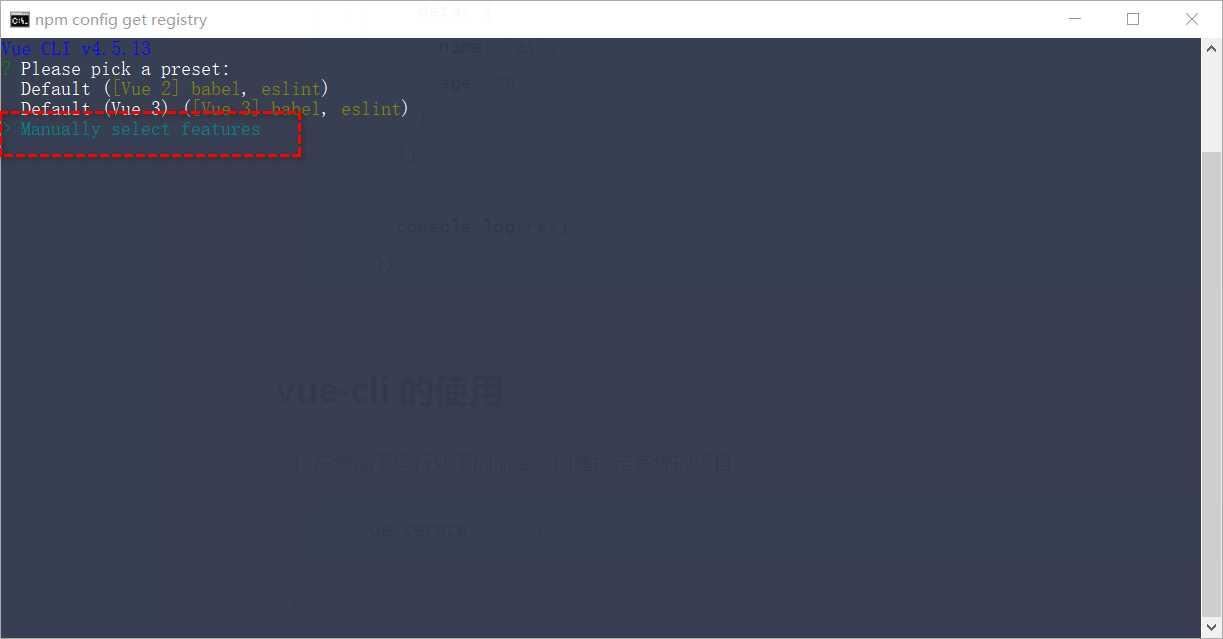
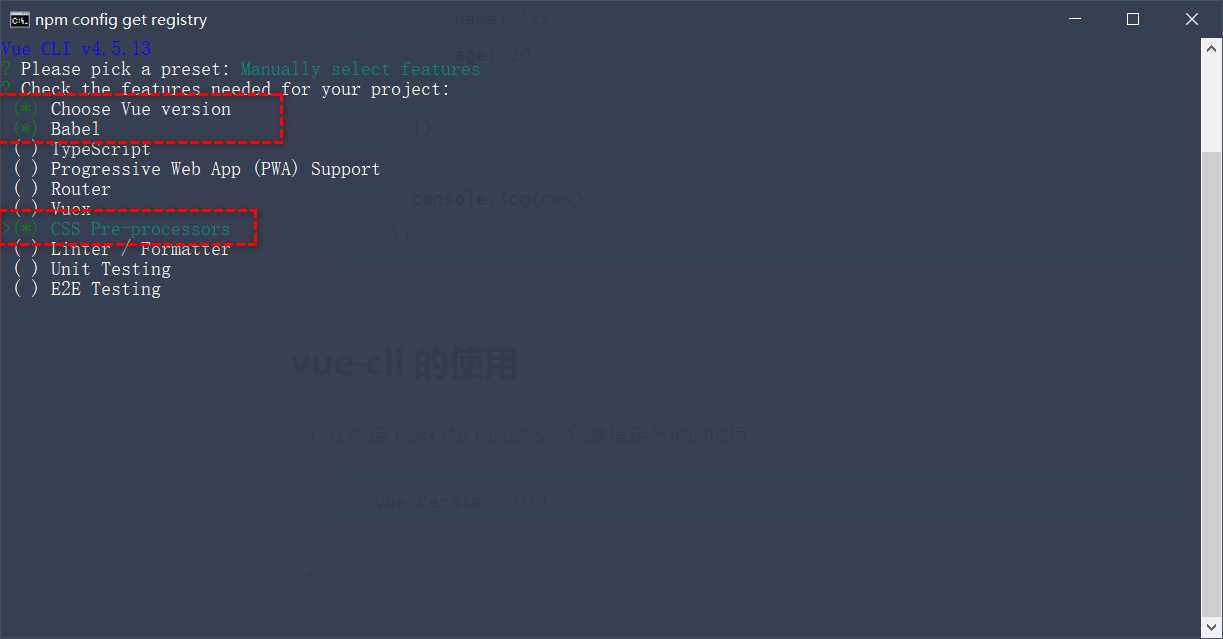
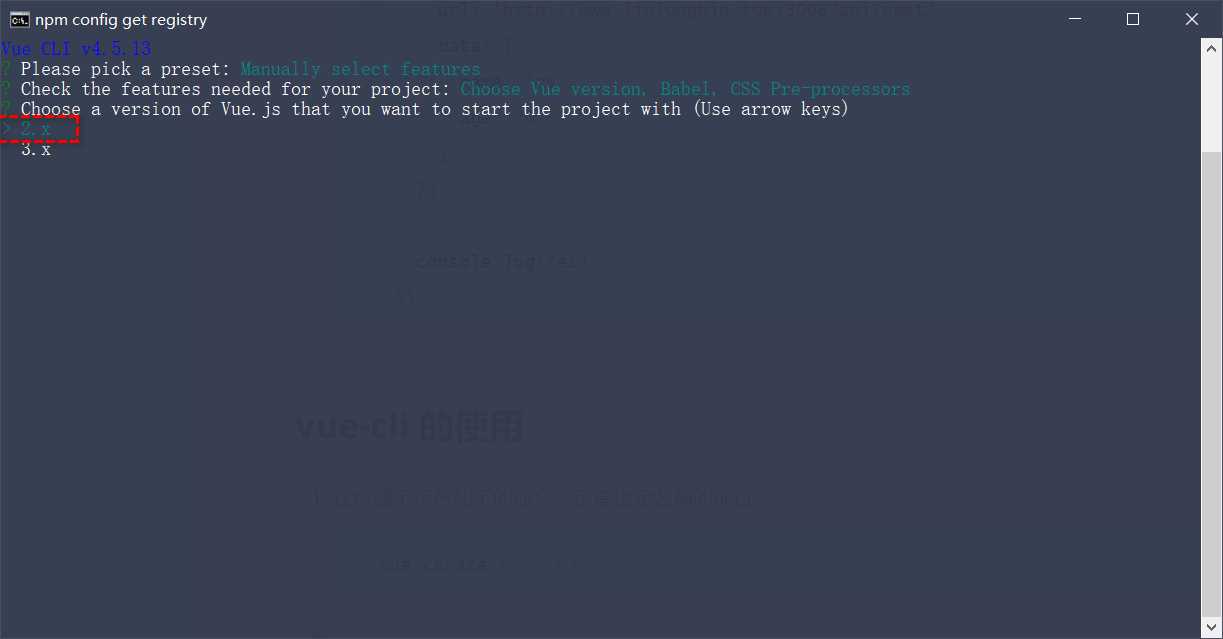
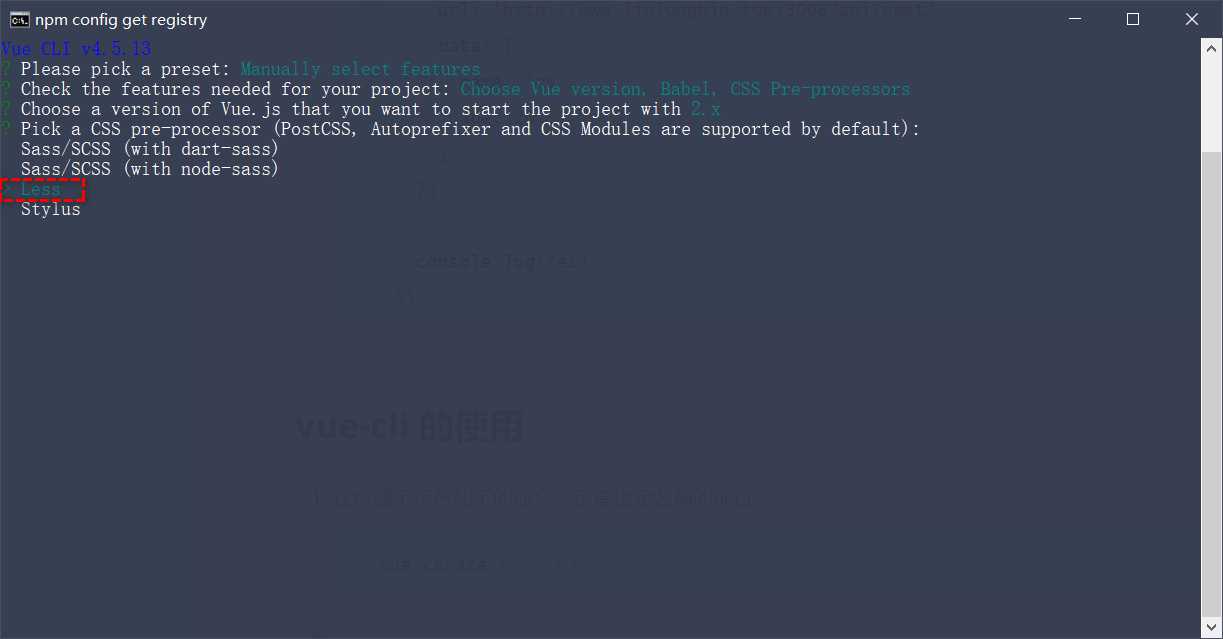
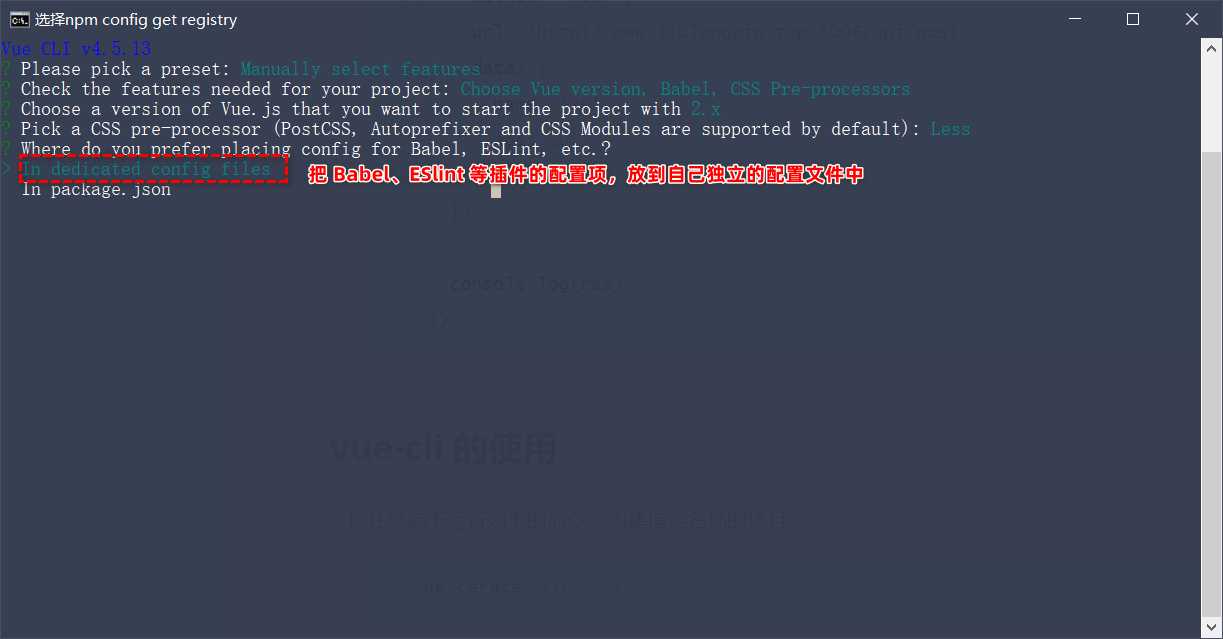
2.1 安装
- 全局包
- 代码
npm i -g @vue/cli
2.2 创建Vue项目
vue create 项目的名称
2.3 项目结构
-
public文件夹
- ico图标
- index.html(单页面)
-
src文件夹
- assert文件夹:静态资源,css,图片
- components文件夹:组件,可复用的,程序员封装的组件
- main.js:项目的入口文件,就是webpack要打包谁(打包main.js),项目运行时首先运行这个文件
- app.vue:项目的根组件:(UI结构)
3. vue项目的运行过程
- vue通过main.js把App.vue渲染到index.html的指定区域中
3.1 main.js 代码解析
// 导入vue框架 import Vue from 'vue' // 导入App.vue的UI结构 import App from './App.vue' Vue.config.productionTip = false // new 一个vue的实例 // new Vue({ // // render是一个函数,将App.vue中的结构替换到 #app的盒子中 // render: h => h(App), // }).$mount('#app') // 等价于 new Vue({ el: '#app', // render是一个函数,将App.vue中的结构替换到 #app的盒子中 render: h => h(App), })
- 注意点
Vue实例中的$mount()方法,作用与el属性完全一样
4. vue组件
-
页面可复用的UI结构封装成组件
-
vue组件的组成部分
- template:组件模板结构(html)
- script:js行为
- style:样式
一个实例
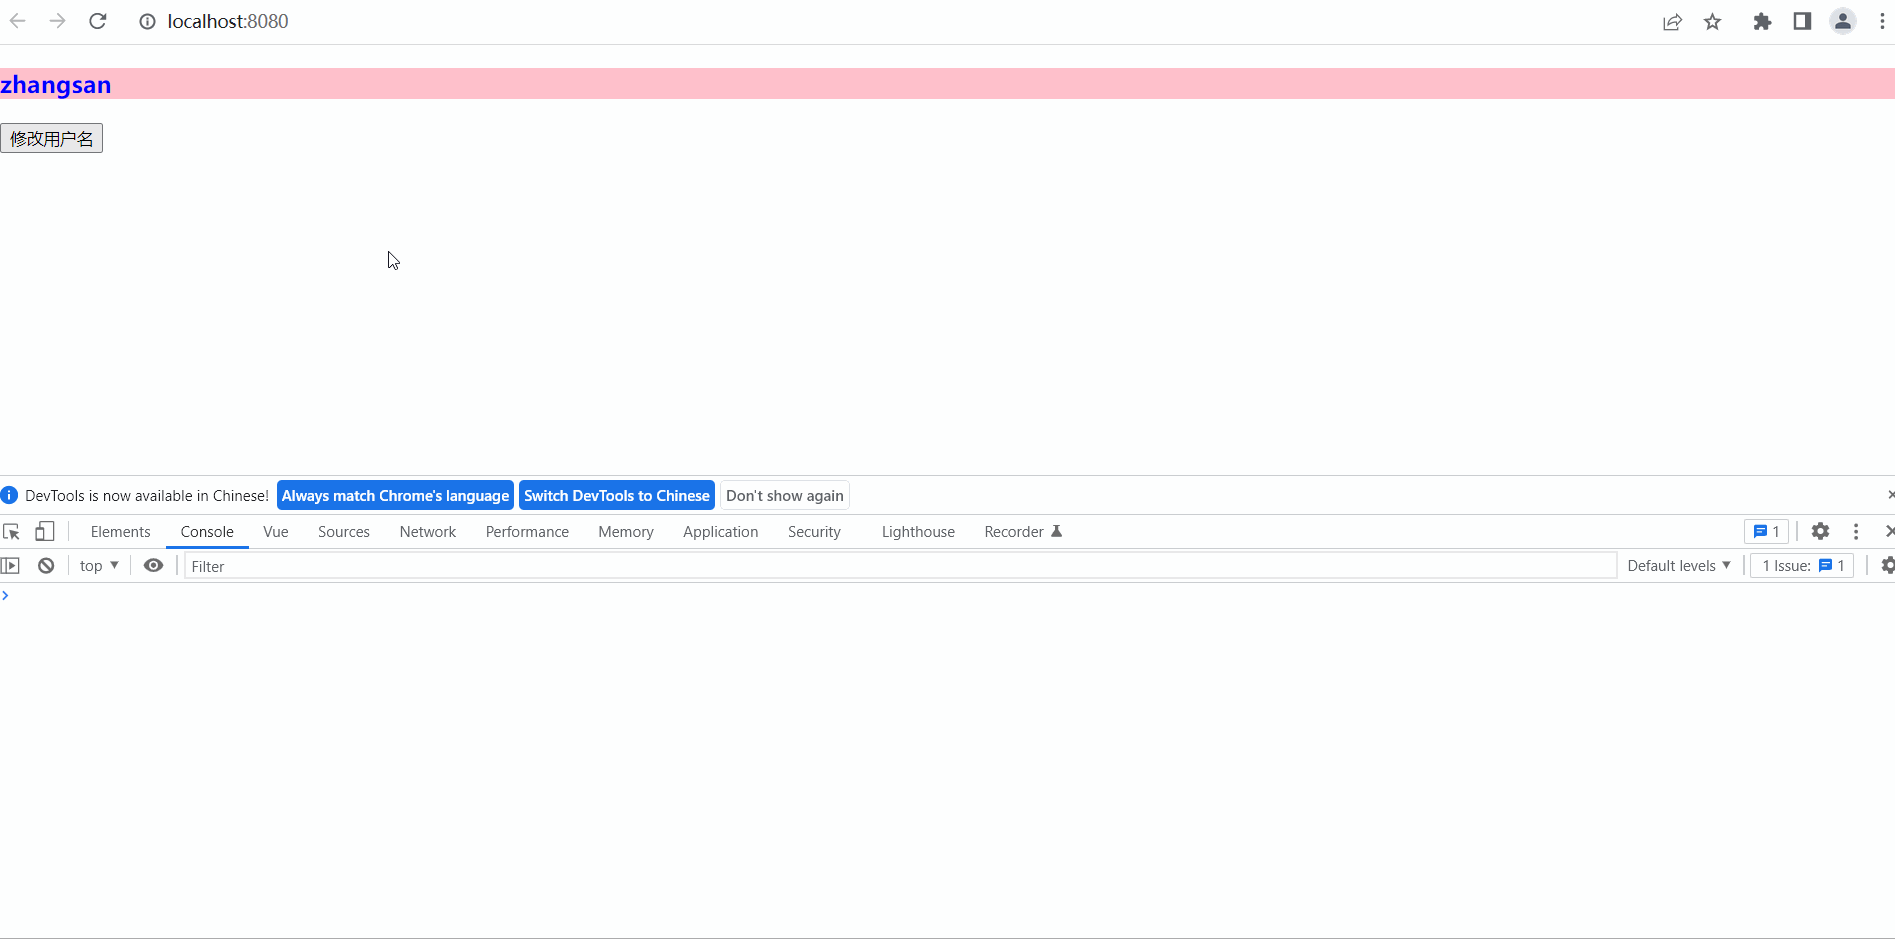
- Test.vue
<!-- 组件的模板 --> <template> <!-- 获取data数据源 --> <div class="box"> <h3>{{ username }}</h3> <!-- 调用方法 --> <button @click="changeName">修改用户名</button> </div> </template> <!-- 组件的js行为 --> <script> // 默认导出 export default ({ // 里面的data 不能指向一个对象,需要的是一个函数 // data数据源 data(){ // 通过return 来 暴露这个 {} return { username:'zhangsan' } }, // 也可用调用方法 methods: { changeName(){ // vue文件中的this代表vue组件实例 console.log(this); this.username='77999' } } }) </script> <!-- style样式 --> <style> h3{ color: blue; background-color: pink; } </style>
- main.js
// 导入vue框架 import Vue from 'vue' // 导入App.vue的UI结构 // import App from './App.vue' // 导入测试的.vue 组件 import Test from './Test.vue' Vue.config.productionTip = false // new 一个vue的实例 // new Vue({ // // render是一个函数,将App.vue中的结构替换到 #app的盒子中 // render: h => h(App), // }).$mount('#app') // 等价于 new Vue({ el: '#app', // render是一个函数,将App.vue中的结构替换到 #app的盒子中 render: h => h(Test), })
- 被替换UI结构的index页面
<!DOCTYPE html> <html lang=""> <head> <meta charset="utf-8"> <meta http-equiv="X-UA-Compatible" content="IE=edge"> <meta name="viewport" content="width=device-width,initial-scale=1.0"> <link rel="icon" href="<%= BASE_URL %>favicon.ico"> <title><%= htmlWebpackPlugin.options.title %></title> </head> <body> <noscript> <strong>We're sorry but <%= htmlWebpackPlugin.options.title %> doesn't work properly without JavaScript enabled. Please enable it to continue.</strong> </noscript> // 这里被替换 <div id="app"></div> <!-- built files will be auto injected --> </body> </html>
- 效果图
4.2 注意点
- 在template节点中,模板只能有一个大盒子
- 正确用法
<template> <!-- 获取data数据源 --> <div class="box"> <h3>{{ username }}</h3> <!-- 调用方法 --> <button @click="changeName">修改用户名</button> </div> </template>
- 错误用法(出现了两个根标签)
<template> <!-- 获取data数据源 --> <div class="box"> <h3>{{ username }}</h3> <!-- 调用方法 --> </div> <button @click="changeName">修改用户名</button> </template>
4.3 style节点中启用less语法
- lang属性设置
<style lang="less"> h3{ color: blue; background-color: pink; p{ color:pink; } } </style>
4.4 组件的使用
- 存在多个组件的情况下,如果要使组件之间产生关系,需要以下3个步骤
- 使用import语法导入需要的组件
- 使用commponent节点注册组件
- 以标签的形式使用刚才注册的组件
- 图解

示例
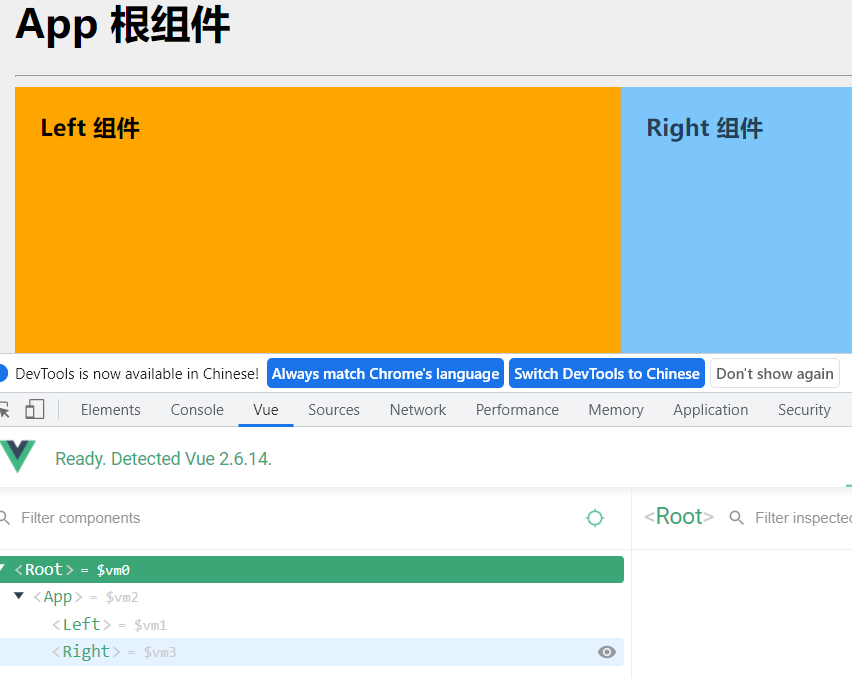
- left组件
<template> <div class="left-container"> <h3>Left 组件</h3> </div> </template> <script> export default {} </script> <style lang="less"> .left-container { padding: 0 20px 20px; background-color: orange; min-height: 250px; flex: 1; } </style>
- right组件
<template> <div class="right-container"> <h3>Right 组件</h3> </div> </template> <script> export default {} </script> <style lang="less"> .right-container { padding: 0 20px 20px; background-color: lightskyblue; min-height: 250px; flex: 1; } </style>
- App根组件(使用了left和right组件)
<template> <div class="app-container"> <h1>App 根组件</h1> <hr /> <div class="box"> <!-- 渲染 Left 组件和 Right 组件 --> <!-- 使用标签的格式来渲染left和right指令 --> <left></left> <right></right> </div> </div> </template> <script> // 导入left组件和right组件 import left from '@/components/Left.vue' import right from "@/components/Right.vue" export default { // 注册left和right组件 components: { left, right } } </script> <style lang="less"> .app-container { padding: 1px 20px 20px; background-color: #efefef; } .box { display: flex; } </style>
- 效果图
4.5 全局组件
在main.js入口文件中,使用Vue.compoent()方法,注册全局组件
- main.js
import Vue from 'vue' import App from './App.vue' // 导入全局组件 Count import Count from '@/components/Count.vue' Vue.config.productionTip = false // 注册全局组件 // 第一个参数 组件的注册名称 // 的二个参数 原来组件的名称 Vue.component("Mycount", Count); new Vue({ render: h => h(App), }).$mount('#app')
- left使用全局组件
<template> <div class="left-container"> <h3>Left 组件</h3> <!-- 使用全局组件 --> <Mycount></Mycount> </div> </template> <script> export default {} </script> <style lang="less"> .left-container { padding: 0 20px 20px; background-color: orange; min-height: 250px; flex: 1; } </style>
4.6 组件的props
-
自定义属性,用于提高代码的复用性
-
count组件使用定义自定义组件
<!-- 初始化组件 <v 快捷键 --> <template> <div> <h5>Count 全局组件</h5> <p>{{count}}</p> <p>{{count1}}</p> <button @click="count+=1">+1</button> </div> </template> <script> export default { // 设置自定义属性 props:['count1'], data(){ return { count:0 } } } </script> <style lang="less"> h5{ background-color: pink; color: blue; } </style>
- left组件设置自己的count1值
<template> <div class="left-container"> <h3>Left 组件</h3> <!-- 使用全局组件 --> <!-- 设置自定义属性 --> <Mycount count1='1'></Mycount> </div> </template>
- right组件也设置自己的count1值
<template> <div class="right-container"> <h3>Right 组件</h3> <Mycount count1='2'></Mycount> </div> </template>
- 效果图

4.7 配合v:bind来使用自定义属性
-
使用者(left,right)使用count组件时,如果不使用v-bind 设置的自定义属性值为字符串
-
使用了v-bind时,设置的值为数字
-
left
<Mycount count1='1'></Mycount>
- right
<Mycount v-bind:count1="2"></Mycount>
- 效果图


4.8 组件的props中属性是只读的
- 不要去写
- 可以将该属性的值赋给data中的某一个属性,实现可读可写
props:['count1'], data(){ return { count:this.count1 } }
4.9 设置props的默认值
- 设置count1的默认值为0
props:{ count1:{ default :0, } },
4.10 设置props的值类型
- 如果组件的使用者(left,right)设置的值不为设置的值类型,
- 则会报错
props:{ count1:{ default :0, // 设置自定义属性的值类型 type:Number, } },
4.11 props的require属性
- 设置自定义属性的值为必填项,否则报错
props:{ count1:{ default :0, // 设置自定义属性的值类型 type:Number, // 设置必填项属性 required:true, } },
5. 组件之间的样式冲突问题
- 原因
默认情况下,写在vue组件中的style样式会全局生效
- 解决原理
给每一个vue组件的html标签都加上自己特定的自定义属性(data-v-xxx),然后写样式是在嵌套上属性选择器来实现精准样式设置
- 解决方案
在style节点添加scoped属性(vue根据上述原理解决样式冲突)
<style lang="less" scoped> h5{ background-color: pink; color: blue; } </style>
5.2 deep深度选择器
-
如果在当前的vue组件的style样式中添加了scoped属性
-
如果当前vue组件使用了其他组件,则对其他组件样式不生效(其他组件上面没有自定义属性【data-v-xxx】)
-
解决方案
使用/deep/ :代表属性选择器
-
配合其他选择器实现样式穿透
-
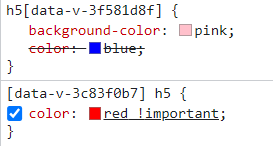
count组件样式
<style lang="less" scoped> h5{ background-color: pink; color: blue; } </style>
- left组件样式(left使用了count子组件)
/deep/ h5{ // 选择器层级b color: red !important; }
- 效果图


【推荐】国内首个AI IDE,深度理解中文开发场景,立即下载体验Trae
【推荐】编程新体验,更懂你的AI,立即体验豆包MarsCode编程助手
【推荐】抖音旗下AI助手豆包,你的智能百科全书,全免费不限次数
【推荐】轻量又高性能的 SSH 工具 IShell:AI 加持,快人一步
· 被坑几百块钱后,我竟然真的恢复了删除的微信聊天记录!
· 没有Manus邀请码?试试免邀请码的MGX或者开源的OpenManus吧
· 【自荐】一款简洁、开源的在线白板工具 Drawnix
· 园子的第一款AI主题卫衣上架——"HELLO! HOW CAN I ASSIST YOU TODAY
· Docker 太简单,K8s 太复杂?w7panel 让容器管理更轻松!