

JSBOM和DOM学习第三天
JS DOM 和 BOM 学习第三天
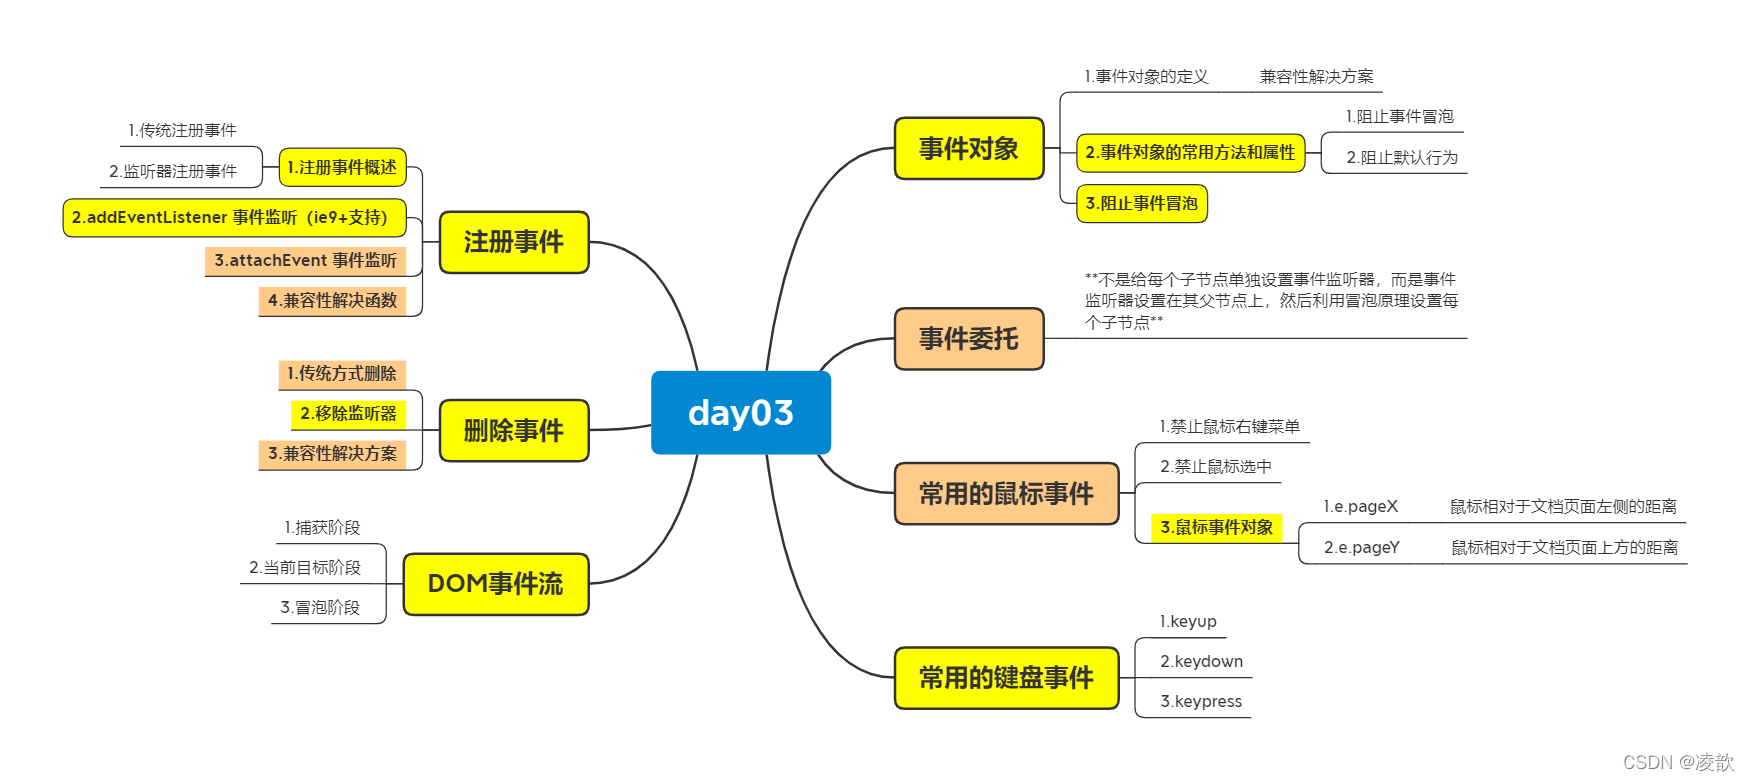
1. 注册事件
1.1 注册事件概述
-
给元素添加事件,称为注册事件或者绑定事件
-
注册事件两种方式:传统方式和方法监听注册方式
-
图解

传统方法注册事件的唯一性
<!DOCTYPE html> <html lang="en"> <head> <meta charset="UTF-8"> <meta http-equiv="X-UA-Compatible" content="IE=edge"> <meta name="viewport" content="width=device-width, initial-scale=1.0"> <title>Document</title> </head> <body> <button>按钮</button> <script> // 后面的事件处理程序会覆盖之前的 var btn=document.querySelector('button'); btn.onclick=function(){ alert('111'); } btn.onclick=function(){ alert('666'); } </script> </body> </html>
- 效果图

1.2 addEventListener 事件监听方式
eventTarget.addEventLister(type,listener[,useCapture])
-
将指定的监听器(事件处理程序)注册到eventTarget(目标对象)上(ie9+支持)
-
参数说明
- type:事件类型字符串,比如click、mouseover,不要带on
- listener:事件处理函数
- useCapture:可选参数,默认false
示例
<!DOCTYPE html> <html lang="en"> <head> <meta charset="UTF-8"> <meta http-equiv="X-UA-Compatible" content="IE=edge"> <meta name="viewport" content="width=device-width, initial-scale=1.0"> <title>Document</title> </head> <body> <button>事件监听</button> <script> // 事件监听注册事件,可以注册多个监听器(事件处理程序) var btn=document.querySelector('button'); btn.addEventListener('click',function(){ alert('123'); }); btn.addEventListener('click',function(){ alert('666'); }); </script> </body> </html>
- 效果图

1.3 attachEvent 事件监听方式
eventTarget.attachEvent(eventNameWithon,callback)
-
将指定的监听器(callback)注册到eventTarget(目标对象)上
-
参数说明
- eventNameWithOn:事件类型字符串,比如onclick,这里要带on
- callback:事件处理函数
-
注意点
- ie8及早期版本支持
示例
<!DOCTYPE html> <html lang="en"> <head> <meta charset="UTF-8"> <meta http-equiv="X-UA-Compatible" content="IE=edge"> <meta name="viewport" content="width=device-width, initial-scale=1.0"> <title>Document</title> </head> <body> <button>attachEvent</button> <script> var btn=document.querySelector('button'); console.log(btn); btn.attachEvent('onclick',function(){ alert('666') }); </script> </body> </html>
- 效果图

1.4 兼容性解决函数
<!DOCTYPE html> <html lang="en"> <head> <meta charset="UTF-8"> <meta http-equiv="X-UA-Compatible" content="IE=edge"> <meta name="viewport" content="width=device-width, initial-scale=1.0"> <title>Document</title> </head> <body> <script> function solution(ele,eleType,eleFn){ if(ele.addEventListener){ ele.addEventListener(eleType,eleFn); }else if(ele.attachEvent){ ele.attachEvent('on'+eleType,eleFn); }else{ ele['on'+eleType]=ele.Fn; } } </script> </body> </html>
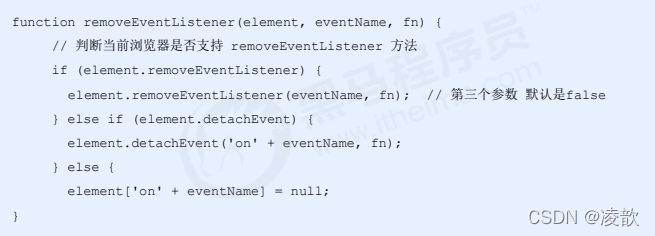
2. 删除事件
2.1 删除事件的方式
- 传统删除方式
eventTarget.οnclick=null;
- 方法监听删除方式
eventTarget.removeEventListener(type,listener[,useCapture])
eventTarget.detachEvent(eventNameWithOn,callback)
示例
<!DOCTYPE html> <html lang="en"> <head> <meta charset="UTF-8"> <meta http-equiv="X-UA-Compatible" content="IE=edge"> <meta name="viewport" content="width=device-width, initial-scale=1.0"> <title>Document</title> <style> div{ width: 100px; height: 100px; background-color:pink; } </style> </head> <body> <div>1</div> <div>2</div> <div>3</div> <script> // 1.传统方式解绑 var divs=document.querySelectorAll('div'); divs[0].onclick=function(){ alert('111'); // 解绑事件 divs[0].onclick=null; } // 2.监听事件解绑 // 不能使用匿名函数了,函数和事件分开写 divs[1].addEventListener('click',fn); function fn(){ alert('111'); // 解绑事件 divs[1].removeEventListener('click',fn); } // 3.老版本监听事件解绑 divs[2].attachEvent('onclick',fn1); function fn1(){ alert('111'); // 解绑事件 divs[2].detachEvent('onclick',fn1); } </script> </body> </html>
- 效果图

2.2 兼容性解决方案
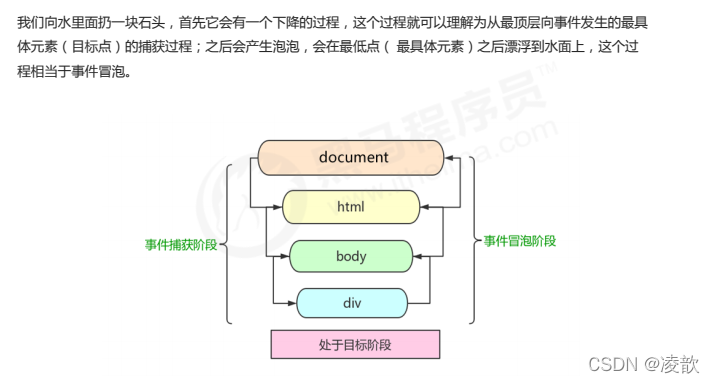
3. DOM事件流
-
事件流描述的是从页面中接收事件的顺序
-
事件发生时会在元素节点之间按照特定的顺序传播,这个传播过程即DOM事件流
-
DOM事件流分为三个阶段
- 捕获阶段
- 当前目标阶段
- 冒泡阶段
-
事件冒泡:ie最早提出,事件开始时由最具体的元素接收,然后逐级向上传播到最顶层节点的过程
-
事件捕获:网景最早提出,由DOM的顶层节点开始,然后逐级向下传播到具体元素的接收过程

注意点
- js代码只能执行捕获或者执行冒泡其中的一个阶段
- onclick和attachEvent只能得到冒泡阶段
- addEventListener如果第3个参数为true,表示在事件捕获阶段调用事件处理函数,如果是false,表示事件在冒泡阶段调用事件处理程序
- 实际开发很少有事件捕获,更关注事件冒泡
- 有些事件没有冒泡,比如onblur,onfocus,onmouseover,ommouseenter,onmouseleave
捕获示例
<!DOCTYPE html> <html lang="en"> <head> <meta charset="UTF-8"> <meta http-equiv="X-UA-Compatible" content="IE=edge"> <meta name="viewport" content="width=device-width, initial-scale=1.0"> <title>Document</title> <style> .father{ width: 400px; height: 400px; background-color: skyblue; margin: 100px auto; overflow: hidden; } .son{ margin-top: 50px; margin-left: 50px; width: 200px; height: 200px; background-color: pink; } </style> </head> <body> <div class="father"> <div class="son"></div> </div> <script> var father=document.querySelector('.father'); var son=document.querySelector('.son'); // 捕获阶段,注册事件第3个参数为true son.addEventListener('click',function(){ alert('son'); },true); father.addEventListener('click',function(){ alert('father'); },true); </script> </body> </html>
- 效果图

冒泡示例
<!DOCTYPE html> <html lang="en"> <head> <meta charset="UTF-8"> <meta http-equiv="X-UA-Compatible" content="IE=edge"> <meta name="viewport" content="width=device-width, initial-scale=1.0"> <title>Document</title> <style> .father{ width: 400px; height: 400px; background-color: skyblue; margin: 100px auto; overflow: hidden; } .son{ margin-top: 50px; margin-left: 50px; width: 200px; height: 200px; background-color: pink; } </style> </head> <body> <div class="father"> <div class="son"></div> </div> <script> var father=document.querySelector('.father'); var son=document.querySelector('.son'); // 冒泡阶段,注册事件第3个参数为false son.addEventListener('click',function(){ alert('son'); },false); father.addEventListener('click',function(){ alert('father'); },false); </script> </body> </html>
- 效果图

4. 事件对象
4.1 事件对象的定义
eventTarget.onclik=function(event){}; eventTarget.addEventListener=function(event){}
- event就是事件对象,代表事件的状态
- 事件发生后,跟事件相关的一系列信息数据的集合都放在这个对象里面,这个对象就是事件对象event,它由许多属性和方法
示例
<!DOCTYPE html> <html lang="en"> <head> <meta charset="UTF-8"> <meta http-equiv="X-UA-Compatible" content="IE=edge"> <meta name="viewport" content="width=device-width, initial-scale=1.0"> <title>Document</title> <style> div{ height: 200px; width: 200px; background-color: pink; } </style> </head> <body> <div>1</div> <script> var div=document.querySelector('div'); div.onclick=function(event){ // 打印事件对象的相关信息 console.log(event); } </script> </body> </html>
- 效果图

兼容性问题
- 在ie9以下,事件对象要使用windows.event获取
- 解决方法
- e=e||window.event
4.2 事件对象的常用方法和属性
| 事件对象属性方法 | 说明 |
|---|---|
| e.target | 返回触发事件的对象 标准 |
| e.scrElement | 返回触发事件的对象 非标准,ie678 |
| e.type | 返回事件的类型 比如click,不带on |
| e.cancelBubble | 该属性阻止冒泡 非标准,ie678 |
| e.returnValue | 该属性组织默认事件(默认行为) 非标准,ie678,比如不然链接跳转 |
| e.preventDefault | 该方法阻止默认事件(默认行为) 标准 比如不让链接跳转 |
| e.stopPropagation | 阻止冒泡 标准 |
示例
<!DOCTYPE html> <html lang="en"> <head> <meta charset="UTF-8"> <meta http-equiv="X-UA-Compatible" content="IE=edge"> <meta name="viewport" content="width=device-width, initial-scale=1.0"> <title>Document</title> </head> <body> <ul> <li>111</li> <li>112</li> <li>113</li> </ul> <script> var ul=document.querySelector('ul'); ul.addEventListener('click',function(e){ // e.target,返回触发事件的元素,点击谁返回谁 // this 返回绑定该事件的元素 console.log(e.target); console.log(this); // 和this很像 console.log(e.currentTarget); }); // 解决兼容性问题 // ul.οnclick=function(e){ // e=e||window.event; // var target=e.target||e.scrElement; // console.log(target); // } </script> </body> </html>
- 效果图

事件对象的属性和方法示例
<!DOCTYPE html> <html lang="en"> <head> <meta charset="UTF-8"> <meta http-equiv="X-UA-Compatible" content="IE=edge"> <meta name="viewport" content="width=device-width, initial-scale=1.0"> <title>Document</title> <style> div{ width: 100px; height: 100px; background-color: pink; } </style> </head> <body> <div> 123 </div> <a href="www.baidu.com">百度</a> <script> var div=document.querySelector('div'); // 返回事件类型 div.addEventListener('click',function(e){ console.log(e.type); }); div.addEventListener('mouseover',function(e){ console.log(e.type); }); div.addEventListener('mouseout',function(e){ console.log(e.type); }); // 阻止默认行为,链接跳转,表单提交 var a=document.querySelector('a'); // a.οnclick=function(e){ // // 非标准,ie678 // // 属性值 // e.returnValue; // } // 标准的 a.addEventListener('click',function(e){ e.preventDefault(); }) // 直接return false,可防止跳转,但之后的代码不会执行,且是传统注册事件中 </script> </body> </html>
- 效果图

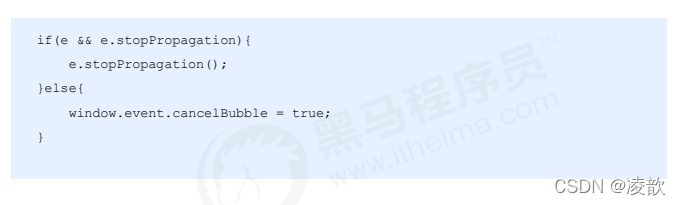
4.3 阻止事件冒泡
- 标准写法
e.stopPropagation()
- 非标准写法
e.cancelBubble=true
兼容性解决
示例
<!DOCTYPE html> <html lang="en"> <head> <meta charset="UTF-8"> <meta http-equiv="X-UA-Compatible" content="IE=edge"> <meta name="viewport" content="width=device-width, initial-scale=1.0"> <title>Document</title> <style> .father{ width: 400px; height: 400px; background-color: skyblue; margin: 100px auto; overflow: hidden; } .son{ margin-top: 50px; margin-left: 50px; width: 200px; height: 200px; background-color: pink; } </style> </head> <body> <div class="father"> <div class="son"></div> </div> <script> var father=document.querySelector('.father'); var son=document.querySelector('.son'); // 冒泡阶段,注册事件第3个参数为false son.addEventListener('click',function(e){ alert('son'); // 阻止事件冒泡 e.stopPropagation(); // e.cancelBubble(); },false); father.addEventListener('click',function(){ alert('father'); },false); </script> </body> </html>
- 效果图

注意点
- 给当前触发事件添加,从当前事件开始不冒泡
- 如果上一级触发,还是会冒泡,因为上一级没有阻止冒泡
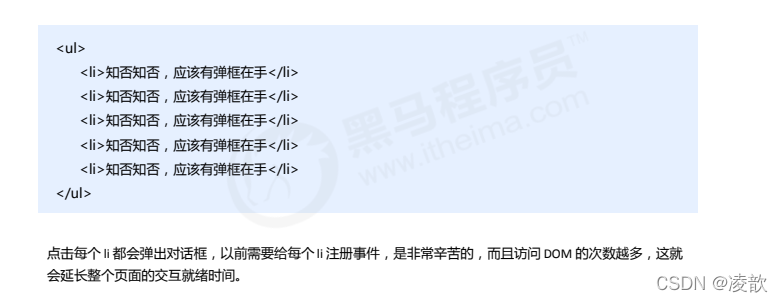
5.事件委托
- 事件委托也称事件代理,在jQuery中称为事件委派
- 事件委托的原理(重点):
- 不是给每个子节点单独设置事件监听器,而是事件监听器设置在其父节点上,然后利用冒泡原理设置每个子节点
- 示例
示例
<!DOCTYPE html> <html lang="en"> <head> <meta charset="UTF-8"> <meta http-equiv="X-UA-Compatible" content="IE=edge"> <meta name="viewport" content="width=device-width, initial-scale=1.0"> <title>Document</title> </head> <body> <ul> <li>此处应用谈款</li> <li>此处应用谈款</li> <li>此处应用谈款</li> <li>此处应用谈款</li> <li>此处应用谈款</li> </ul> <script> // 事件委托实现 每个li都有弹框 var ul=document.querySelector('ul'); // 给父元素设置交互效果 ul.addEventListener('click',function(e){ // 获取触发的对象 var target=e.target; // 让对象变颜色 var childs=ul.children; for(var i=0;i<childs.length;i++){ // 清除样式 childs[i].style.backgroundColor='transparent'; } target.style.backgroundColor='pink'; }); </script> </body> </html>
- 效果图

6. 常用的鼠标事件
6.1 禁止鼠标右键菜单
- contextmenu主要控制何时显示上下文菜单
<!DOCTYPE html> <html lang="en"> <head> <meta charset="UTF-8"> <meta http-equiv="X-UA-Compatible" content="IE=edge"> <meta name="viewport" content="width=device-width, initial-scale=1.0"> <title>Document</title> </head> <body> <div> 一段没有右键菜单的文字 </div> <script> // 阻止右键菜单 var div=document.querySelector('div'); div.addEventListener('contextmenu',function(e){ e.preventDefault(); }); </script> </body> </html>
- 效果图

6.2 禁止鼠标选中
- selectstart 开始选中
<!DOCTYPE html> <html lang="en"> <head> <meta charset="UTF-8"> <meta http-equiv="X-UA-Compatible" content="IE=edge"> <meta name="viewport" content="width=device-width, initial-scale=1.0"> <title>Document</title> </head> <body> <div> 一段无法选中的的文字 </div> <script> // 阻止选中文字 var div=document.querySelector('div'); div.addEventListener('selectstart',function(e){ e.preventDefault(); }); // 注意:在盒子内不可选,盒子外可选 // 全都不能选 document.addEventListener('selectstart',function(e){ e.preventDefault(); }); </script> </body> </html>
- 效果图

6.3 鼠标事件对象
- 鼠标事件对象:MouseEvent
- 键盘事件对象:KeyboardEvent
| 鼠标事件对象 | 说明 |
|---|---|
| e.clientX | 返回鼠标相对于浏览器窗口可视区的x坐标 |
| e.clientY | 返回鼠标相对于浏览器窗口可视区的y坐标 |
| e.pageX | 返回鼠标相对于文档页面的x坐标,ie9+支持 |
| e.pageY | 返回鼠标相对于文档页面的y坐标,ie9+支持 |
| e.screenX | 返回鼠标相对于电脑屏幕的X坐标 |
| e.screenY | 返回鼠标相对于电脑屏幕的Y坐标 |
示例
<!DOCTYPE html> <html lang="en"> <head> <meta charset="UTF-8"> <meta http-equiv="X-UA-Compatible" content="IE=edge"> <meta name="viewport" content="width=device-width, initial-scale=1.0"> <title>Document</title> <style> body{ height: 3000px; } </style> </head> <body> <script> document.addEventListener('click',function(e){ // 1.client 相对于浏览器窗口 console.log(e.clientX); console.log(e.clientY); console.log('--------------------------'); // 2.相对于page,页面文档 console.log(e.pageX); console.log(e.pageY); console.log('--------------------------'); // 相对于桌面窗口 console.log(e.screenX); console.log(e.screenY); }) </script> </body> </html>
- 效果图

跟随鼠标移动的小天使案例
<!DOCTYPE html> <html lang="en"> <head> <meta charset="UTF-8"> <meta http-equiv="X-UA-Compatible" content="IE=edge"> <meta name="viewport" content="width=device-width, initial-scale=1.0"> <title>Document</title> <style> img{ position: absolute; } </style> </head> <body> <img src="./images/angel.gif" alt=""> <script> // 获取图片 var img=document.querySelector('img'); // 鼠标在页面中移动 document.addEventListener('mousemove',function(e){ var x=e.pageX; var y=e.pageY; // 注意带上单位 img.style.left=x-48+'px'; img.style.top=y-40+'px'; }) </script> </body> </html>
- 效果图

7.常用的键盘事件
| 键盘事件 | 触发条件 |
|---|---|
| onkeyup(传统注册写法) | 某个键盘按键被松开时触发 |
| onkeydown(传统) | 某个键盘按键被按下时触发 |
| onkeypress(传统) | 某个键盘按键被按下时触发,不识别功能键:ctrl,shift,左右箭头 |
注意点
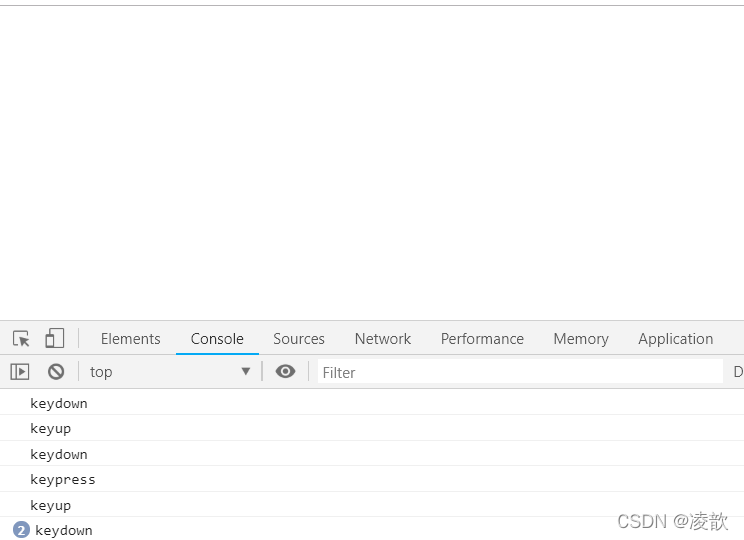
- 三个事件执行顺序:keydown–keypress-keyup
示例
<!DOCTYPE html> <html lang="en"> <head> <meta charset="UTF-8"> <meta http-equiv="X-UA-Compatible" content="IE=edge"> <meta name="viewport" content="width=device-width, initial-scale=1.0"> <title>Document</title> </head> <body> <script> // 1.keydown,键按下 document.addEventListener('keydown',function(){ console.log('keydown'); }); // 2.keypress 键按下,不识别功能键 document.addEventListener('keypress',function(){ console.log('keypress'); }); // 3.keyup 键弹起 document.addEventListener('keyup',function(){ console.log('keyup'); }); </script> </body> </html>
- 效果图
7.1 键盘事件属性
| 键盘事件属性 | 说明 |
|---|---|
| keycode | 返回按下键盘的ascall码 |
示例
<!DOCTYPE html> <html lang="en"> <head> <meta charset="UTF-8"> <meta http-equiv="X-UA-Compatible" content="IE=edge"> <meta name="viewport" content="width=device-width, initial-scale=1.0"> <title>Document</title> </head> <body> <script> document.addEventListener('keyup',function(e){ // keyup和keydown不区分大小写,得到的是大写的a console.log('up:'+e.keyCode); }) // keypress区分大小写 document.addEventListener('keypress',function(e){ console.log('press:'+e.keyCode); }) </script> </body> </html>
- 效果图

注意点
- keyup和keydown不区分大小写,keypress区分大小写
- keyup和keydown识别所有功能键,keypress不识别功能键
仿京东搜索框按下s获得焦点
<!DOCTYPE html> <html lang="en"> <head> <meta charset="UTF-8"> <meta http-equiv="X-UA-Compatible" content="IE=edge"> <meta name="viewport" content="width=device-width, initial-scale=1.0"> <title>Document</title> </head> <body> <input type="text"> <script> var input=document.querySelector('input'); document.addEventListener('keyup',function(e){ // 按下s后 if(e.keyCode===83){ // input获得焦点 input.focus(); } }) </script> </body> </html>
- 效果图

综合案例
<!DOCTYPE html> <html lang="en"> <head> <meta charset="UTF-8"> <meta http-equiv="X-UA-Compatible" content="IE=edge"> <meta name="viewport" content="width=device-width, initial-scale=1.0"> <title>Document</title> <style> /* ul{ list-style: none; } */ </style> </head> <body> 美女:<input type="text"> <ul> </ul> <button>按钮</button> <script> var input=document.querySelector('input'); var ul=input.nextElementSibling; var btn=ul.nextElementSibling; // console.log(ul); // console.log(btn); btn.addEventListener('click',function(e){ if(input.value!==''){ // console.log(ul); var li=document.createElement('li'); li.innerHTML=input.value; ul.insertBefore(li,ul.children[0]); } }) ul.addEventListener('click',function(e){ // 获取单击的元素 var target=e.target; for(var i=0;i<ul.children.length;i++){ ul.children[i].style.backgroundColor='transparent'; } target.style.backgroundColor='pink'; }) </script> </body> </html>
- 效果图

京东快递单号查询案例
<!DOCTYPE html> <html lang="en"> <head> <meta charset="UTF-8"> <meta name="viewport" content="width=device-width, initial-scale=1.0"> <meta http-equiv="X-UA-Compatible" content="ie=edge"> <title>Document</title> <style> * { margin: 0; padding: 0; } .search { position: relative; width: 178px; margin: 100px; } .con { display: none; position: absolute; top: -40px; width: 171px; border: 1px solid rgba(0, 0, 0, .2); box-shadow: 0 2px 4px rgba(0, 0, 0, .2); padding: 5px 0; font-size: 18px; line-height: 20px; color: #333; } .con::before { content: ''; width: 0; height: 0; position: absolute; top: 28px; left: 18px; border: 8px solid #000; border-style: solid dashed dashed; border-color: #fff transparent transparent; } </style> </head> <body> <div class="search"> <div class="con">123</div> <input type="text" placeholder="请输入您的快递单号" class="jd"> </div> <script> // 快递单号输入内容时, 上面的大号字体盒子(con)显示(这里面的字号更大) // 表单检测用户输入: 给表单添加键盘事件 // 同时把快递单号里面的值(value)获取过来赋值给 con盒子(innerText)做为内容 // 如果快递单号里面内容为空,则隐藏大号字体盒子(con)盒子 var con = document.querySelector('.con'); var jd_input = document.querySelector('.jd'); jd_input.addEventListener('keyup', function() { // console.log('输入内容啦'); if (this.value == '') { con.style.display = 'none'; } else { con.style.display = 'block'; con.innerText = this.value; } }) // 当我们失去焦点,就隐藏这个con盒子 jd_input.addEventListener('blur', function() { con.style.display = 'none'; }) // 当我们获得焦点,就显示这个con盒子 jd_input.addEventListener('focus', function() { if (this.value !== '') { con.style.display = 'block'; } }) </script> </body>
- 效果图


【推荐】国内首个AI IDE,深度理解中文开发场景,立即下载体验Trae
【推荐】编程新体验,更懂你的AI,立即体验豆包MarsCode编程助手
【推荐】抖音旗下AI助手豆包,你的智能百科全书,全免费不限次数
【推荐】轻量又高性能的 SSH 工具 IShell:AI 加持,快人一步
· 阿里最新开源QwQ-32B,效果媲美deepseek-r1满血版,部署成本又又又降低了!
· SQL Server 2025 AI相关能力初探
· AI编程工具终极对决:字节Trae VS Cursor,谁才是开发者新宠?
· 开源Multi-agent AI智能体框架aevatar.ai,欢迎大家贡献代码
· Manus重磅发布:全球首款通用AI代理技术深度解析与实战指南