Vue—组件传值及vuex的使用
一、父子组件之间的传值
1.父组件向子组件传值:
- 子组件在props中创建一个属性,用以接收父组件传来的值
- 父组件中注册子组件
- 在子组件标签中添加子组件props中创建的属性
- 把需要传给子组件的值赋给该属性
在子组件中创建props,然后创建一个名为 ‘img-src’ 的数据名
//子组件BigImg.vue
<template>
  <!-- 过渡动画 -->
  <transition name="fade">
    <div class="img-view" @click="bigImg">
      <!-- 遮罩层 -->
      <div class="img-layer"></div>
      <div class="img">
        <img :src="img-src">
      </div>
    </div>
  </transition>
</template>
<script>
  export default {
    props: ['img-src'],
    methods: {

    }
  }
</script>
在父组件中注册子组件,并在template中加入子组件标签,标签中添加img-src属性并赋值
<template>
  <div class="">
    <v-head></v-head>
    <big-img v-if="showImg" :img-src="imgSrc"></big-img>
</template>
<script>
  import vHead from '../components/Header'
  import BigImg from '../components/BigImg'
  export default {
    name: 'Home',
    components: {
      vHead,BigImg
    },
    data() {
      return {
        showImg:false,
        imgSrc: ''
      }
    }
</script>
2.子组件向父组件传值
- 子组件中需要以某种方式例如点击事件的方法来触发一个自定义事件
- 将需要传的值作为$emit的第二个参数,该值将作为实参传给响应自定义事件的方法
- 在父组件中注册子组件并在子组件标签上绑定对自定义事件的监听
在子组件中创建一个按钮,给按钮绑定一个点击事件
在响应该点击事件的函数中使用$emit来触发一个自定义事件,并传递一个参数
// 发送事件
this.$emit('clickit')
在父组件中的子标签中监听该自定义事件并添加一个响应该事件的处理方法
<big-img @clickit="viewImg"></big-img>
clickImg(e) {
    this.showImg = true;
    // 获取当前图片地址
    console.log(e);
    this.imgSrc = e.currentTarget.src;
}
在通信中,无论是子组件向父组件传值还是父组件向子组件传值,他们都有一个共同点就是有中间介质,子向父的介质是自定义事件,父向子的介质是props中的属性。抓准这两点对于父子通信就好理解了
https://www.cnblogs.com/daiwenru/p/6694530.html
二、通过路由带参数传值
两个组件 A和B,A组件通过query把orderId传递给B组件(触发事件可以是点击事件、钩子函数等)
this.$router.push({ path: '/conponentsB', query: { orderId: 123 } }) // 跳转到B
在B组件中获取A组件传递过来的参数、
this.$route.query.orderId
三、安装、使用 vuex
安装vuex
npm install vuex --save
1.在src目录下新建store文件夹并在该文件夹下新建index.js文件。 在 store/index.js写入:
import Vue from 'vue'
import Vuex from 'vuex'

Vue.use(Vuex)

const store = new Vuex.Store({
  strict:true,  // 开启严格模式  确保state 中的数据只能 mutations 修改
  state:{
    count:0
  }
})

export default store;
在main.js中引入:
import store from './store'
new Vue({
  el: '#app',
  router,
  store,
  components: { App },
  template: '<App/>'
})
此时可以在组件中使用 this.$store.state.count 获取store中state的值。如:
// 在组件的computed中使用
  computed:{
     count(){
      return this.$store.state.count;
     }
  }
<template>
  <div class="hello">
    <h2>{{count}}</h2>
  </div>
</template>

<script>
export default {
  name: 'HelloWorld',
  computed:{
     count(){
       return this.$store.state.count;
     }
  }
}
</script>
很多时候咱们要对state里的值进行操作,在vuex提供了一个方法mutations
mutations用法(使用mutations可以修改state的值)
在store/index.js中写入:
//
...
  state:{
    count:0
  },
  mutations:{ // 更改数据的方法
    add(state){
      state.count++
    },
    //提交载荷用法
//     add(state,n){
//      state.count += n
//    },
    sub(state){
      state.count--
    }
  }
...
//
在组件中使用mutations中对应的方法
<template>
  <div class="hello">
    <button @click="add">+</button>
    <h2>{{count}}</h2>
    <button @click="sub">-</button>
  </div>
</template>

<script>
export default {
  name: 'HelloWorld',
  computed:{
     count(){
       return this.$store.state.count;
     }
  },
    methods:{
    add(){
      this.$store.commit('add');
    },

    //提交载荷用法
   // add(){
   //    this.$store.commit('add',10);
   // },

   //对象风格的提交方式
   //   store.commit({
   //     type: 'add',
   //     n: 10
   //     })

    sub(){
      this.$store.commit('sub');
    }
  }
}
</script>
此时就可以对count进行修改了。
补充1:mutation接收单个参数和多个参数
利用$store.commit 里面 写参数相当于 mutation的函数名字
在组件里面:
    第一种方式: this.$store.commit("addIncrement",{name:'stark',age:18,n:5})
    第二种方式:
    this.$store.commit({
        type:"addIncrement",
        n:5,
        age:18,
        name:'stark.wang'
    })
在vuex里面接收:接收第二个参数相当于前面传过来的参数,如果多个这个就是对象,如果是一个参数,这个第二个参数payload就是前面的参数,例如
let store = new Vuex.Store({
    state: {
        num: 100
    },
    mutations: {
        // 任何时候改变state的状态都通过提交 mutation 来改变
        // 里面可以定义多个函数,当触发这个函数就会改变state状态
        addIncrement(state, stark) {
            console.log(stark);
            // 接收一个state作为参数, 相当于上面的state
             // 在vuex里面接收:接收第二个参数相当于前面传过来的参数,如果多个这个就是对象,如果是一个参数,这个第二个参数payload就是前面的参数。
            // mutations设计原则是同步的
            //state.num += stark;
            state.num += stark.n;


        },
        minIncrement(state) {
            state.num -= 5;
        }
    }

})
补充2:遇到在组件input中直接修改state中数据的问题
在组件中写入
<div class="form-control amis-control">
  <input name="name" placeholder="" type="text" autocomplete="off" :value="activeFormData.title" @input="updataMessage($event,'t1.title')">
</div>

<script>
...
computed:{
  activeFormData(){
    return this.$store.state.formData.t1
  }
},
methods:{
  updataMessage(e,dataposition){
    let newposition = dataposition.split('.);
    this.$store.commit('updataMessage',{newval:e.target.value,curposition:newposition})
  }
}
</script>
在store.js中写入
mutations:{
  ...
  updataMessage(state, stark) {
      if (stark.curposition.length == 2) {
        state.formData[stark.curposition[0]][stark.curposition[1]] = stark.newval
      } else if (stark.curposition.length == 3) {
        state.formData[stark.curposition[0]][stark.curposition[1]][stark.curposition[2]] = stark.newval
      }

    },
}
当你想异步操作的时候,由于mutation必须是同步的这一点,此时不能采用mutation对state 进行修改。action派上用场了,action就是一个函数集合,在里面怎么操作都可以,只要最后触发mutation 就可以了。
注解mutation不能异步操作的原因:

 mutations: {
   add (state) {
     api.callAsyncMethod(() => {
    state.count++
   })
  }
}
Action 用法
在store/index.js中写入
mutations:{ // 更改数据的方法
add(state){
state.count++
},
sub(state){
state.count--
}
},
++++
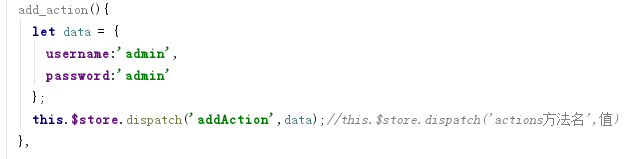
actions:{
addAction(context){ // context 与 store 实例具有相同方法和属性(但不是store 实例)
setTimeout(()=>{
context.commit('add');
},1000)
}
}
++++
组件中使用getters里对应的方法:
<template>
  <div class="hello">
    <button @click="add">+</button>
    ++++
    <button @click="add_action">action +</button>
    ++++
    <h2>{{count}}</h2>
    <button @click="sub">-</button>
    <div>
      test: {{doneTodos[0].text}} <br>
      length: {{doneTodosLength}}
    </div>
  </div>
</template>
export default {
  methods:{
    add(){
      this.$store.commit('add');
      // console.log(this);
    },
    sub(){
      this.$store.commit('sub');
    },
    ++++
    add_action(){
      this.$store.dispatch('addAction');
    }
    ++++
  }
}
实际异步操作
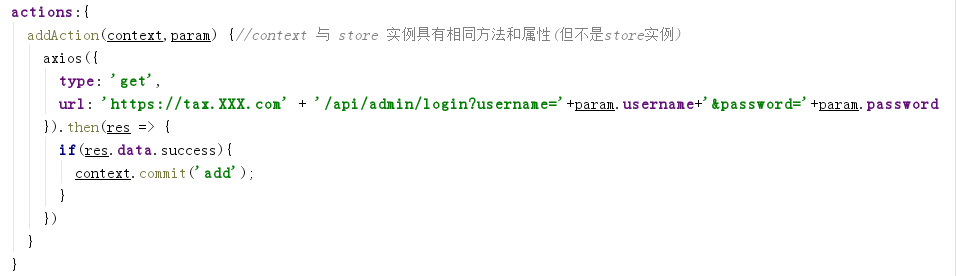
组件methods中:
在store/index.js中引入axios :
import axios from 'axios'
看到这里有没有想过当我们使用state中某一个数据时,我们只想用该数据中符合条件的数据。比如:
state:{
    count:0,
    todos: [
      { id: 1, text: 'text1--true', done: true },
      { id: 2, text: 'text2--false', done: false }
    ]
  }
可能会有以下两种方案:
1.每个在组件中首先获取todos,然后使用filter方法过滤;
2.写一个公共函数在每个组件中调用以下;
如果用到todos中done为true的组件很多,这两种方法都是很不理想的。Vuex为此为我们引入了一个方法Getter。
Getter 用法
官方解释:Vuex 允许我们在 store 中定义“getter”(可以认为是 store 的计算属性)。就像计算属性一样,getter 的返回值会根据它的依赖被缓存起来,且只有当它的依赖值发生了改变才会被重新计算。
  mutations:{ // 更改数据的方法
    add(state){
      state.count++
    },
    sub(state){
      state.count--
    }
  },
  +++
  getters:{  // 用法类似组件中的 computed, 可以认为是store的计算属性
    doneTodos:state => { // Getter 接受 state 作为其第一个参数:
      return state.todos.filter(todo => todo.done)  // -> [{ id: 1, text: 'text1--true', done: true }]
    },
    // Getter 也可以接受其他 getter 作为第二个参数
    doneTodosLength:(state,getters) => {
      return getters.doneTodos.length // -> 1
    },
  +++
  }
在组件中使用getter对应的方法:
<template>
  <div class="hello">

    <button @click="add">+</button>
    <h2>{{count}}</h2>
    <button @click="sub">-</button>

+++
    <div>
      test: {{doneTodos[0].text}} <br>
      length: {{doneTodosLength}}
    </div>
+++
  </div>
</template>
<script>
export default {
  //...
    computed:{
    +++
        doneTodos(){
          return this.$store.getters.doneTodos // -> [{ id: 1, text: 'text1--true', done: true }]
        },
        doneTodosLength(){
          return this.$store.getters.doneTodosLength // -> 1
        }
    +++
  }
}
</script>
作者:朴树-
链接:https://juejin.im/post/5bf7c4375188254b9d0935c9
来源:掘金
著作权归作者所有。商业转载请联系作者获得授权,非商业转载请注明出处。
四、provide/inject
1. 简介
Vue2.2.0 新增 API,这对选项需要一起使用,以允许一个祖先组件向其所有子孙后代注入一个依赖,不论组件层次有多深,并在起上下游关系成立的时间里始终生效。一言而蔽之:祖先组件中通过 provider 来提供变量,然后在子孙组件中通过 inject 来注入变量。
provide / inject API 主要解决了跨级组件间的通信问题,不过它的使用场景,主要是子组件获取上级组件的状态,跨级组件间建立了一种主动提供与依赖注入的关系。
2. 举个例子
假设有两个组件: A.vue 和 B.vue,B 是 A 的子组件
// A.vue
export default {
  provide: {
    name: '浪里行舟'
  }
}

// B.vue
export default {
  inject: ['name'],
  mounted () {
    console.log(this.name);  // 浪里行舟
  }
}
可以看到,在 A.vue 里,我们设置了一个 provide: name,值为 浪里行舟,它的作用就是将 name 这个变量提供给它的所有子组件。而在 B.vue 中,通过 inject 注入了从 A 组件中提供的 name 变量,那么在组件 B 中,就可以直接通过 this.name 访问这个变量了,它的值也是 浪里行舟。这就是 provide / inject API 最核心的用法。
需要注意的是:provide 和 inject 绑定并不是可响应的。这是刻意为之的。然而,如果你传入了一个可监听的对象,那么其对象的属性还是可响应的----vue 官方文档
所以,上面 A.vue 的 name 如果改变了,B.vue 的 this.name 是不会改变的,仍然是 浪里行舟。
3. provide 与 inject 怎么实现数据响应式
一般来说,有两种办法:
- provide 祖先组件的实例,然后在子孙组件中注入依赖,这样就可以在子孙组件中直接修改祖先组件的实例的属性,不过这种方法有个缺点就是这个实例上挂载很多没有必要的东西比如 props,methods
- 使用 2.6 最新 API Vue.observable 优化响应式 provide(推荐)
我们来看个例子:孙组件 D、E 和 F 获取 A 组件传递过来的 color 值,并能实现数据响应式变化,即 A 组件的 color 变化后,组件 D、E、F 不会跟着变(核心代码如下:)
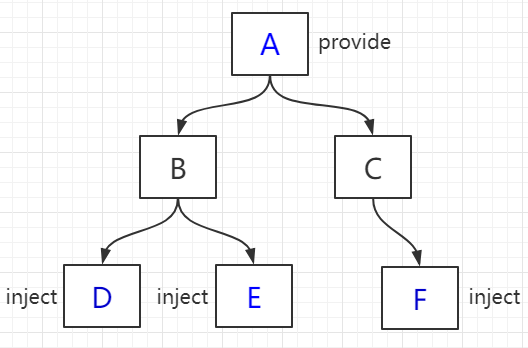
// A 组件
<div>
      <h1>A 组件</h1>
      <button @click="() => changeColor()">改变color</button>
      <ChildrenB />
      <ChildrenC />
</div>
......
  data() {
    return {
      color: "blue"
    };
  },
  // provide() {
  //   return {
  //     theme: {
  //       color: this.color //这种方式绑定的数据并不是可响应的
  //     } // 即A组件的color变化后,组件D、E、F不会跟着变
  //   };
  // },
  provide() {
    return {
      theme: this//方法一:提供祖先组件的实例
    };
  },
  methods: {
    changeColor(color) {
      if (color) {
        this.color = color;
      } else {
        this.color = this.color === "blue" ? "red" : "blue";
      }
    }
  }
  // 方法二:使用2.6最新API Vue.observable 优化响应式 provide
  // provide() {
  //   this.theme = Vue.observable({
  //     color: "blue"
  //   });
  //   return {
  //     theme: this.theme
  //   };
  // },
  // methods: {
  //   changeColor(color) {
  //     if (color) {
  //       this.theme.color = color;
  //     } else {
  //       this.theme.color = this.theme.color === "blue" ? "red" : "blue";
  //     }
  //   }
  // }
// F 组件
<template functional>
  <div class="border2">
    <h3 :style="{ color: injections.theme.color }">F 组件</h3>
  </div>
</template>
<script>
export default {
  inject: {
    theme: {
      //函数式组件取值不一样
      default: () => ({})
    }
  }
};
</script>
五、$attrs/$listeners
1. 简介
多级组件嵌套需要传递数据时,通常使用的方法是通过 vuex。但如果仅仅是传递数据,而不做中间处理,使用 vuex 处理,未免有点大材小用。为此 Vue2.4 版本提供了另一种方法----$attrs/$listeners
$attrs:包含了父作用域中不被 prop 所识别 (且获取) 的特性绑定 (class 和 style 除外)。当一个组件没有声明任何 prop 时,这里会包含所有父作用域的绑定 (class 和 style 除外),并且可以通过 v-bind="$attrs" 传入内部组件。通常配合 interitAttrs 选项一起使用。$listeners:包含了父作用域中的 (不含 .native 修饰器的) v-on 事件监听器。它可以通过 v-on="$listeners" 传入内部组件
接下来我们看个跨级通信的例子:
// index.vue
<template>
  <div>
    <h2>浪里行舟</h2>
    <child-com1
      :foo="foo"
      :boo="boo"
      :coo="coo"
      :doo="doo"
      title="前端工匠"
    ></child-com1>
  </div>
</template>
<script>
const childCom1 = () => import("./childCom1.vue");
export default {
  components: { childCom1 },
  data() {
    return {
      foo: "Javascript",
      boo: "Html",
      coo: "CSS",
      doo: "Vue"
    };
  }
};
</script>
// childCom1.vue
<template class="border">
  <div>
    <p>foo: {{ foo }}</p>
    <p>childCom1的$attrs: {{ $attrs }}</p>
    <child-com2 v-bind="$attrs"></child-com2>
  </div>
</template>
<script>
const childCom2 = () => import("./childCom2.vue");
export default {
  components: {
    childCom2
  },
  inheritAttrs: false, // 可以关闭自动挂载到组件根元素上的没有在props声明的属性
  props: {
    foo: String // foo作为props属性绑定
  },
  created() {
    console.log(this.$attrs); // { "boo": "Html", "coo": "CSS", "doo": "Vue", "title": "前端工匠" }
  }
};
</script>
// childCom2.vue
<template>
  <div class="border">
    <p>boo: {{ boo }}</p>
    <p>childCom2: {{ $attrs }}</p>
    <child-com3 v-bind="$attrs"></child-com3>
  </div>
</template>
<script>
const childCom3 = () => import("./childCom3.vue");
export default {
  components: {
    childCom3
  },
  inheritAttrs: false,
  props: {
    boo: String
  },
  created() {
    console.log(this.$attrs); // { "boo": "Html", "coo": "CSS", "doo": "Vue", "title": "前端工匠" }
  }
};
</script>
// childCom3.vue
<template>
  <div class="border">
    <p>childCom3: {{ $attrs }}</p>
  </div>
</template>
<script>
export default {
  props: {
    coo: String,
    title: String
  }
};
</script>
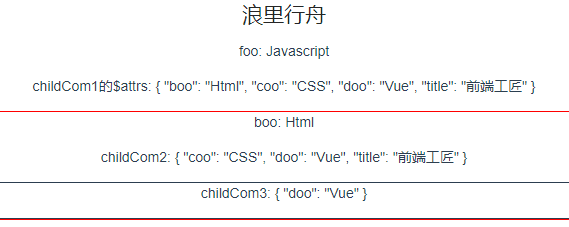
如上图所示$attrs表示没有继承数据的对象,格式为{属性名:属性值}。Vue2.4 提供了$attrs , $listeners 来传递数据与事件,跨级组件之间的通讯变得更简单。
简单来说:$attrs与$listeners 是两个对象,$attrs 里存放的是父组件中绑定的非 Props 属性,$listeners里存放的是父组件中绑定的非原生事件。
六、Bus $emit/$on
这种方法通过一个空的 Vue 实例作为中央事件总线(事件中心),用它来触发事件和监听事件,巧妙而轻量地实现了任何组件间的通信,包括父子、兄弟、跨级。当我们的项目比较大时,可以选择更好的状态管理解决方案 vuex。
1.具体实现方式:
var Event=new Vue();
    Event.$emit(事件名,数据);
    Event.$on(事件名,data => {});
2.举个例子
假设兄弟组件有三个,分别是 A、B、C 组件,C 组件如何获取 A 或者 B 组件的数据
<div id="itany">
    <my-a></my-a>
    <my-b></my-b>
    <my-c></my-c>
</div>
<template id="a">
  <div>
    <h3>A组件:{{name}}</h3>
    <button @click="send">将数据发送给C组件</button>
  </div>
</template>
<template id="b">
  <div>
    <h3>B组件:{{age}}</h3>
    <button @click="send">将数组发送给C组件</button>
  </div>
</template>
<template id="c">
  <div>
    <h3>C组件:{{name}},{{age}}</h3>
  </div>
</template>
<script>
var Event = new Vue();//定义一个空的Vue实例
var A = {
    template: '#a',
    data() {
      return {
        name: 'tom'
      }
    },
    methods: {
      send() {
        Event.$emit('data-a', this.name);
      }
    }
}
var B = {
    template: '#b',
    data() {
      return {
        age: 20
      }
    },
    methods: {
      send() {
        Event.$emit('data-b', this.age);
      }
    }
}
var C = {
    template: '#c',
    data() {
      return {
        name: '',
        age: ""
      }
    },
    mounted() {//在模板编译完成后执行
     Event.$on('data-a',name => {
         this.name = name;//箭头函数内部不会产生新的this,这边如果不用=>,this指代Event
     })
     Event.$on('data-b',age => {
         this.age = age;
     })
    }
}
var vm = new Vue({
    el: '#itany',
    components: {
      'my-a': A,
      'my-b': B,
      'my-c': C
    }
});
</script>
$on 监听了自定义事件 data-a 和 data-b,因为有时不确定何时会触发事件,一般会在 mounted 或 created 钩子中来监听。
七、$parent / $children与 ref
ref:如果在普通的 DOM 元素上使用,引用指向的就是 DOM 元素;如果用在子组件上,引用就指向组件实例$parent/$children:访问父 / 子实例
需要注意的是:这两种都是直接得到组件实例,使用后可以直接调用组件的方法或访问数据。我们先来看个用 ref来访问组件的例子:
// component-a 子组件
export default {
  data () {
    return {
      title: 'Vue.js'
    }
  },
  methods: {
    sayHello () {
      window.alert('Hello');
    }
  }
}

// 父组件
<template>
  <component-a ref="comA"></component-a>
</template>
<script>
  export default {
    mounted () {
      const comA = this.$refs.comA;
      console.log(comA.title);  // Vue.js
      comA.sayHello();  // 弹窗
    }
  }
</script>
不过,这两种方法的弊端是,无法在跨级或兄弟间通信。
我们想在 component-a 中,访问到引用它的页面中(这里就是 parent.vue)的两个 component-b 组件,那这种情况下,就得配置额外的插件或工具了,比如 Vuex 和 Bus 的解决方案。
总结
常见使用场景可以分为三类:
- 父子通信:
父向子传递数据是通过 props,子向父是通过 events($emit);通过父链 / 子链也可以通信($parent/$children);ref 也可以访问组件实例;provide / inject API;$attrs/$listeners - 兄弟通信:
Bus;Vuex - 跨级通信:
Bus;Vuex;provide / inject API、$attrs/$listeners

 浙公网安备 33010602011771号