lvgl移植到linux开发板
1 开始前必须搭建好Linux的交叉编译环境。
2 准备lvgl源码
| 名称 | 仓库地址 | 描述 |
|---|---|---|
| lvgl | https://github.com/lvgl/lvgl.git | 包含了LVGL图形界面控件的源码以及少量例程,lvgl-8.3.5 |
| lv_drivers | https://github.com/lvgl/lv_drivers.git | 包含了驱动LVGL图形界面的驱动接口源代码,lv_drivers-6.1.1 |
| lv_port_linux_frame_buffer | https://github.com/lvgl/lv_port_linux_frame_buffer.git | 适配有frame buffer的linux系统的接口 |
注意:从仓库下载代码的时候选择Release版本

3 组织移植相关的文件
3.1 建立一个文件夹用于存放整个工程,lvgl_demo_doc
3.2 将相关文件拷贝到新建的目录中(将文件夹后面的版本号删除),其中包括:
-
lvgl文件夹 => lvgl_demo_doc
-
lv_drivers文件夹 => lvgl_demo_doc
-
lv_port_linux_frame_buffer文件夹中的main.c => lvgl_demo_doc
-
lv_port_linux_frame_buffer文件夹中的Makefile => lvgl_demo_doc
-
lvgl/lv_conf_template.h => lvgl_demo_doc/lv_conf.h(去掉template)
-
lv_drivers/lv_drv_conf_template.h => lvgl_demo_doc/lv_drv_conf.h(去掉template)
3.3 整理好的文件夹应该有如下6个文件
root@ubuntu:/mnt/hgfs/VMware/forlinx/workspace/lvgl_demo_doc# ls -l
total 49
-rwxrwxrwx 1 root root 25825 Feb  6 23:12 lv_conf.h
drwxrwxrwx 1 root root  4096 Feb 18 00:03 lv_drivers
-rwxrwxrwx 1 root root 11196 Jan  3  2020 lv_drv_conf.h
drwxrwxrwx 1 root root  4096 Feb 18 00:03 lvgl
-rwxrwxrwx 1 root root  2350 Feb 16 23:35 main.c
-rwxrwxrwx 1 root root  2000 Feb 16 23:35 Makefile
4 修改文件
4.1 修改lv_drv_conf.h
-
将文件最开始的
#if 0改为#if 1
/** * @file lv_drv_conf.h * */ /* * COPY THIS FILE AS lv_drv_conf.h */ #if 1 /*Set it to "1" to enable the content*/ #ifndef LV_DRV_CONF_H #define LV_DRV_CONF_H #include "lv_conf.h"
-
将宏
USE_FBDEV的值改为1,使能frame buffer设备
/*----------------------------------------- * Linux frame buffer device (/dev/fbx) *-----------------------------------------*/ #ifndef USE_FBDEV # define USE_FBDEV 1 #endif #if USE_FBDEV # define FBDEV_PATH "/dev/fb0" #endif
-
将宏
USE_EVDEV使能为1,并且触控输入设备的名称要根据自己的板子实际情况更改.(如果板子触摸坐标跟实际的坐标方向和比例不一样,通过EVDEV_SCALE和EVDEV_CALIBRATE这两个宏里面的参数修改)
/*------------------------------------------------- * Mouse or touchpad as evdev interface (for Linux based systems) *------------------------------------------------*/ #ifndef USE_EVDEV # define USE_EVDEV 1 #endif #if USE_EVDEV # define EVDEV_NAME "/dev/input/event1" /*You can use the "evtest" Linux tool to get the list of devices and test them*/ # define EVDEV_SWAP_AXES 0 /*Swap the x and y axes of the touchscreen*/ # define EVDEV_SCALE 1 /* Scale input, e.g. if touchscreen resolution does not match display resolution */ # if EVDEV_SCALE # define EVDEV_SCALE_HOR_RES (1024) /* Horizontal resolution of touchscreen */ # define EVDEV_SCALE_VER_RES (600) /* Vertical resolution of touchscreen */ # endif /*EVDEV_SCALE*/ # define EVDEV_CALIBRATE 1 /*Scale and offset the touchscreen coordinates by using maximum and minimum values for each axis*/ # if EVDEV_CALIBRATE # define EVDEV_HOR_MIN 800 /*If EVDEV_XXX_MIN > EVDEV_XXX_MAX the XXX axis is automatically inverted*/ # define EVDEV_HOR_MAX 0 # define EVDEV_VER_MIN 480 # define EVDEV_VER_MAX 0 # endif /*EVDEV_SCALE*/ #endif /*USE_EVDEV*/
4.2 修改lv_conf.h
-
将文件最开始的
#if 0改为#if 1
/* clang-format off */ #if 1 /*Set it to "1" to enable content*/ #ifndef LV_CONF_H #define LV_CONF_H #include <stdint.h>
-
使能宏
LV_MEM_CUSTOM为1
/*========================= MEMORY SETTINGS *=========================*/ /*1: use custom malloc/free, 0: use the built-in `lv_mem_alloc()` and `lv_mem_free()`*/ #define LV_MEM_CUSTOM 1 #if LV_MEM_CUSTOM == 0 /*Size of the memory available for `lv_mem_alloc()` in bytes (>= 2kB)*/ #define LV_MEM_SIZE (48U * 1024U) /*[bytes]*/ /*Set an address for the memory pool instead of allocating it as a normal array. Can be in external SRAM too.*/ #define LV_MEM_ADR 0 /*0: unused*/ /*Instead of an address give a memory allocator that will be called to get a memory pool for LVGL. E.g. my_malloc*/ #if LV_MEM_ADR == 0 #undef LV_MEM_POOL_INCLUDE #undef LV_MEM_POOL_ALLOC #endif #else /*LV_MEM_CUSTOM*/ #define LV_MEM_CUSTOM_INCLUDE <stdlib.h> /*Header for the dynamic memory function*/ #define LV_MEM_CUSTOM_ALLOC malloc #define LV_MEM_CUSTOM_FREE free #define LV_MEM_CUSTOM_REALLOC realloc #endif /*LV_MEM_CUSTOM*/
-
最后是比较关键的一个设置,TICK的配置,我们选择自己定义一个Tick定时器配置函数,在自己的应用程序中实现:
#if 0 //原始代码 /*Use a custom tick source that tells the elapsed time in milliseconds. *It removes the need to manually update the tick with `lv_tick_inc()`)*/ #define LV_TICK_CUSTOM 0 #if LV_TICK_CUSTOM #define LV_TICK_CUSTOM_INCLUDE "Arduino.h" /*Header for the system time function*/ #define LV_TICK_CUSTOM_SYS_TIME_EXPR (millis()) /*Expression evaluating to current system time in ms*/ /*If using lvgl as ESP32 component*/ // #define LV_TICK_CUSTOM_INCLUDE "esp_timer.h" // #define LV_TICK_CUSTOM_SYS_TIME_EXPR ((esp_timer_get_time() / 1000LL)) #endif /*LV_TICK_CUSTOM*/ #else //新代码 /*Use a custom tick source that tells the elapsed time in milliseconds. *It removes the need to manually update the tick with `lv_tick_inc()`)*/ #define LV_TICK_CUSTOM 1 #if LV_TICK_CUSTOM #define LV_TICK_CUSTOM_INCLUDE <stdint.h> /*Header for the system time function*/ #define LV_TICK_CUSTOM_SYS_TIME_EXPR (custom_tick_get()) /*Expression evaluating to current system time in ms*/ #endif /*LV_TICK_CUSTOM*/ #endif
-
使能widget例程
/*Show some widget. It might be required to increase `LV_MEM_SIZE` */
#define LV_USE_DEMO_WIDGETS 1
#if LV_USE_DEMO_WIDGETS
#define LV_DEMO_WIDGETS_SLIDESHOW 0
#endif
4.3 修改main.c
-
我们没有将lvgl的demos移植到工程文件中,所以需要将demos头文件注释掉
//#include "lvgl/demos/lv_demos.h"
-
根据自己的屏幕调整分辨率
    disp_drv.hor_res    = 1024;
    disp_drv.ver_res    = 600;
-
没有移植鼠标样式,将鼠标相关的代码屏蔽掉
    // /*Set a cursor for the mouse*/
    // LV_IMG_DECLARE(mouse_cursor_icon)
    // lv_obj_t * cursor_obj = lv_img_create(lv_scr_act()); /*Create an image object for the cursor */
    // lv_img_set_src(cursor_obj, &mouse_cursor_icon);           /*Set the image source*/
    // lv_indev_set_cursor(mouse_indev, cursor_obj);             /*Connect the image  object to the driver*/
4.4修改Makefile
-
查看自己的交叉编译器
$ echo $CROSS_COMPILE arm-poky-linux-gnueabi- -
修改Makefile中的交叉编译器为自己的编译器
#CC ?= gcc CC ?= arm-poky-linux-gnueabi-gcc -
注释掉鼠标样式相关的代码
#CSRCS +=$(LVGL_DIR)/mouse_cursor_icon.c
4.5 修改fbdev.c文件
-
修改void fbdev_init(void)函数中的 screensize 的赋值,不然会使系统崩溃(很重要)
screensize = finfo.line_length * vinfo.yres;
5 编译
5.1 make编译
-
在lvgl_demo_doc目录下输入make命令
5.2 报错处理
-
错误1,解决方案:去fbdev.h中将
#include "lvgl/lvgl.h"改为#include "../../lvgl/lvgl.h"

-
报错2,解决方案:去evdev.h中将
#include "lvgl/lvgl.h"改为#include "../../lvgl/lvgl.h"

6 运行
6.1 将程序拷贝到板子中
-
将编译出来的demo可执行文件拷贝到开发板中运行。
-
可以通过U盘拷贝也可以通过nfs挂载方式,推荐使用nfs挂载。
6.2 运行
./demo //运行
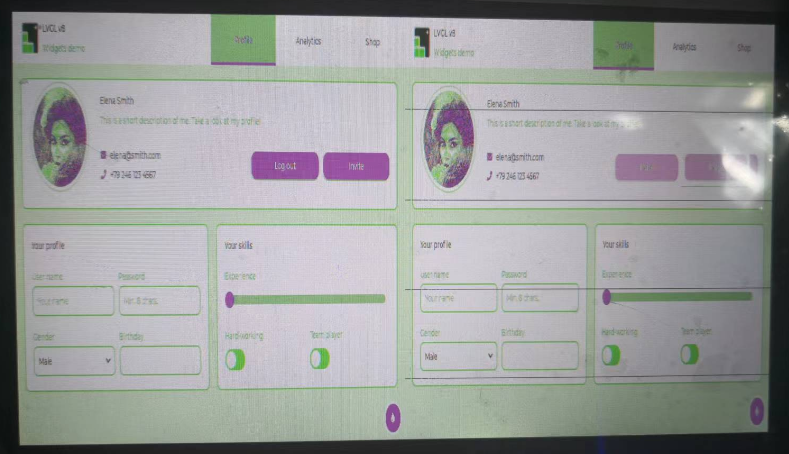
7 运行效果
7.1 显示效果如下
这是因为lv_conf.h中的LV_COLOR_DEPTH没有设置对,按照如下代码修改。
#define LV_COLOR_DEPTH 32
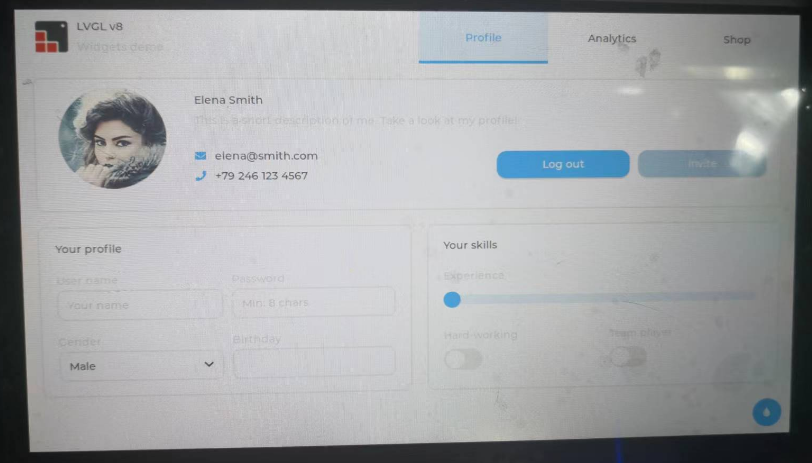
7.2 正确的显示效果

 浙公网安备 33010602011771号