Open in Excel In Dynamics 365
Open in Excel experiences in Microsoft Dynamics facilitate transaction input in several places in Dynamics 365. Out-of-the-box, the Open in Excel templates are designed with the Main Account Dimension only, as it is the only Financial Dimension common to all customers.
In most cases, however, customers employ either native Dynamics 365 or custom Financial Dimensions that must also be input into Dynamics transactions.
Before we start, is your team looking for a Dynamics 365 managed services partner? For information on our 24/7 support contact us.
Open in Excel templates must, therefore, be customized to include Financial Dimensions other than Main Account. This customization must be partly done in development and partly in Dynamics 365. To date, Microsoft has provided very helpful information about the development part, but not so much about template modification in Dynamics 365.
Open in Excel In Dynamics 365
Open the native Dynamics 365 Open in Excel template from the location of the desired update. In this example, we will be using the one for General Journals.

Click the Open Lines in Excel button on the ribbon, select the correct Template Name, then click OK.

When the following pop-up appears, click the Open button.

An Excel file will open. Click the Enable Editing button to make changes to the document.

Depending on the security enabled, such as that from some Single Sign On software, you may have to sign in with your Dynamics credentials again to activate the Data Connector on the right side of the Excel document. After the Data Connector appears, click the Design button.

Click the Pencil for the LedgerJournalLine Data Source.

The following will appear.

Select desired Available Fields from the list and add to the Selected Fields section using the Add button. You may select more than one Available Field at a time to add to the Selected Fields area by holding down the Control button while clicking your selections.

Field values in the Selected Fields section may be ordered as needed by selecting them and using the up or down arrows to move them to the desired location(s).

When all field values are in the correct order, click the Update button.

The following pop-up will appear.

Click Yes on the pop-up, then click Done on the Data Connector Design box.

After you return to the Data Connector home page, click the Refresh button.

The new fields you added will appear as new columns in the Excel template. If you would like to rename the field values, you may do so in the cell.

After redesign of the template is complete, save the file using the original template name (LedgerJournalLineEntryTemplate in this example). Then, in Dynamics, go to Common > Common > Office Integration > Document Templates.

Click the New button from the ribbon. The below will appear on the right side of the screen.

Click the Browse button, locate the file to upload, and click the Open button.

The file information will automatically transfer into the necessary fields in the Upload Template pop up. Click the OK button.

Dynamics 365 will ask that you confirm your wish to replace the existing template file with the new one. Click Yes.

The next time you access the General Journal Open in Excel experience, the revised template will appear.

Though our sample has been specific to General Journals, the same steps apply to customization of other Open in Excel experiences in Dynamics 365. Some of those are the Budget Register Entry, Fixed Asset Journal Lines, and Vendor Invoice Journal templates. Template modifications made are globally effective in Dynamics; changes will appear across Legal Entities.
… and can be used for recording accounting transactions.
(b) Create new journals
Using the general journal Excel add-in is nice. Yet, you might have noticed that all my Excel documents shown before had a link to an already existing general ledger journal. What I wanted to do though was creating new journals directly from Excel and not creating a journal in D365 that can be opened in Excel.
In the following, I will show you how creating new journals can be realized by making use of the Excel document template functionality. To make this exercise a bit more challenging, I decided to demonstrate the creation and posting of a new journal by ‘copying’ the lines from an already posted journal. For that reason, I selected one of the already posted journals and transferred all lines into my newly created template.
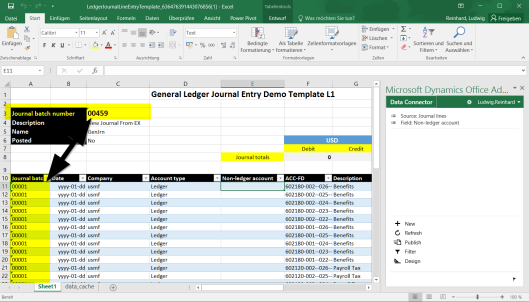
Once that export was done, I put my cursor into the header section and selected ‘New’ in the Office add-in data connector, which allowed me entering a new description and name that I could publish.
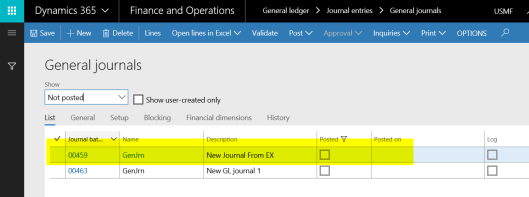
As a result a new batch number became visible (00459)…
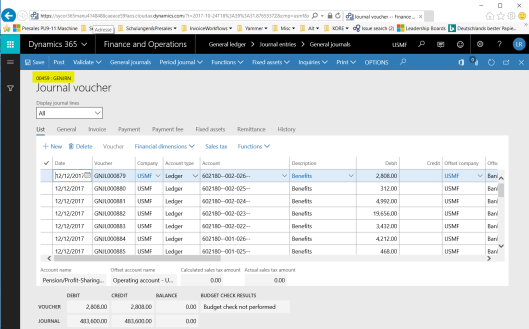
… and a new journal was created in the D365 web client.
![]() There is no lookup available for the journal name. You thus have to know and enter the name before you can create a new journal through the Excel add-in.
There is no lookup available for the journal name. You thus have to know and enter the name before you can create a new journal through the Excel add-in.
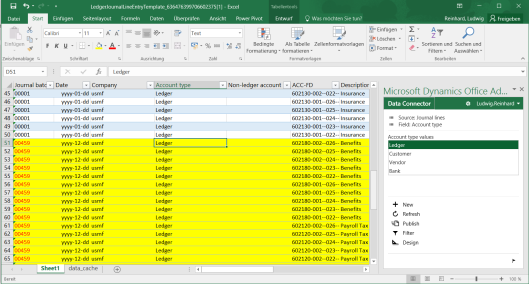
Happy about what I have achieved so far, I continued my exercise by changing the existing lines that I could still identify in the template. Trying to publish those modified lines to my newly generated general ledger journal went, however, terribly wrong and I got many error messages. After a while, I noticed that something might be wrong with the journal line association. To check this, I added the journal batch number field into my template and noticed that the existing lines still had a relationship to the old and posted journal no. 00001.
When I tried to overwrite those lines, I basically tried to tell D365 to delete already posted vouchers and replace them with some new ones. D365 did of course not allow me doing this and consequently generated the error messages. After becoming aware of this issue, I simply copied the existing lines from journal 00001 to the end of my template, entered the new journal batch number created (00459) and modified the posting date.
Those changes finally allowed me uploading and posting my journal.
I hope that this information and the experiences that I made are helpful for you and allow you circumventing those problems when using the document template in D365. Till next time.
posted on 2021-05-10 22:41 lingdanglfw 阅读(151) 评论(0) 编辑 收藏 举报


【推荐】国内首个AI IDE,深度理解中文开发场景,立即下载体验Trae
【推荐】编程新体验,更懂你的AI,立即体验豆包MarsCode编程助手
【推荐】抖音旗下AI助手豆包,你的智能百科全书,全免费不限次数
【推荐】轻量又高性能的 SSH 工具 IShell:AI 加持,快人一步
· Linux系列:如何用 C#调用 C方法造成内存泄露
· AI与.NET技术实操系列(二):开始使用ML.NET
· 记一次.NET内存居高不下排查解决与启示
· 探究高空视频全景AR技术的实现原理
· 理解Rust引用及其生命周期标识(上)
· DeepSeek 开源周回顾「GitHub 热点速览」
· 物流快递公司核心技术能力-地址解析分单基础技术分享
· .NET 10首个预览版发布:重大改进与新特性概览!
· AI与.NET技术实操系列(二):开始使用ML.NET
· 单线程的Redis速度为什么快?