
Run command in YMAL build pipeline or Release Pipeline
Azure DevOps CLI in Azure Pipeline YAML
Azure DevOps Services | Azure DevOps Server 2020
If you prefer to use YAML to provide your release pipeline configuration, you can use the following example to understand how YAML can be used to install Azure CLI and add the Azure DevOps extension.
In the example, you will learn how to add the Azure DevOps extension to Azure CLI and run the build and PR list commands on Linux, macOS and Windows hosted agents.
Create the azure-pipelines-steps.yml file
Include the content below.
For macOS: azure-pipelines-steps-mac.yml
steps:
- script: az extension add -n azure-devops
  displayName: 'Install Azure DevOps Extension'

- script: echo ${AZURE_DEVOPS_CLI_PAT} | az devops login
  env:
    AZURE_DEVOPS_CLI_PAT: $(System.AccessToken)
  displayName: 'Login Azure DevOps Extension'

- script: az devops configure --defaults organization=$(System.TeamFoundationCollectionUri) project=$(System.TeamProject) --use-git-aliases true
  displayName: 'Set default Azure DevOps organization and project'

- script: |
    az pipelines build list
    git pr list
  displayName: 'Show build list and PRs'
For Linux: azure-pipelines-steps-linux.yml
Replace https://dev.azure.com/{OrganizationName} with the URL for your Azure DevOps organization.
steps:
# Updating the python version available on the linux agent
- task: UsePythonVersion@0
  inputs:
    versionSpec: '3.x'
    architecture: 'x64'

# Updating pip to latest
- script: python -m pip install --upgrade pip
  displayName: 'Upgrade pip'

# Updating to latest Azure CLI version.
- script: pip install --pre azure-cli --extra-index-url https://azurecliprod.blob.core.windows.net/edge
  displayName: 'upgrade azure cli'

- script: az --version
  displayName: 'Show Azure CLI version'

- script: az extension add -n azure-devops
  displayName: 'Install Azure DevOps Extension'

- script: echo ${AZURE_DEVOPS_CLI_PAT} | az devops login
  env:
    AZURE_DEVOPS_CLI_PAT: $(System.AccessToken)
  displayName: 'Login Azure DevOps Extension'

- script: az devops configure --defaults organization=https://dev.azure.com/{OrganizationName} project="Movie Search Web App" --use-git-aliases true
  displayName: 'Set default Azure DevOps organization and project'

- script: |
    az pipelines build list
    git pr list
  displayName: 'Show build list and PRs'
For Windows: azure-pipelines-steps-win.yml
Replace https://dev.azure.com/{OrganizationName} with the URL for your Azure DevOps organization.
steps:
# Updating the python version available on the linux agent
- task: UsePythonVersion@0
  inputs:
    versionSpec: '3.x'
    architecture: 'x64'

# Updating pip to latest which is required by the Azure DevOps extension
- script: python -m pip install --upgrade pip
  displayName: 'Upgrade pip'

# Upgrading Azure CLI from 2.0.46 to latest; min version required for Azure DevOps is 2.0.49
- script: pip install --pre azure-cli --extra-index-url https://azurecliprod.blob.core.windows.net/edge
  displayName: 'upgrade azure cli'

- script: az --version
  displayName: 'Show Azure CLI version'

- script: az extension add -n azure-devops
  displayName: 'Install Azure DevOps Extension'

- script: echo $(System.AccessToken) | az devops login
  env:
    AZURE_DEVOPS_CLI_PAT: $(System.AccessToken)
  displayName: 'Login Azure DevOps Extension'

- script: az devops configure --defaults organization=https://dev.azure.com/{OrganizationName} project="Movie Search Web App" --use-git-aliases true
  displayName: 'Set default Azure DevOps organization and project'

- script: |
    az pipelines build list
    git pr list
  displayName: 'Show build list and PRs'
Create the azure-pipelines.yml
Include the content below.
jobs:
# Running Azure DevOps extension commands on a hosted Mac agent
- job:
  displayName: 'macOS'
  pool:
    vmImage: 'macOS-latest'
  steps:
  - template: azure-pipelines-steps-mac.yml

# Running Azure DevOps extension commands on a hosted Linux agent
- job:
  displayName: 'Linux'
  pool:
    vmImage: 'ubuntu-16.04'
  steps:
  - template: azure-pipelines-steps-linux.yml

# Running Azure DevOps extension commands on a hosted Windows agent
- job:
  displayName: 'Windows'
  pool:
    vmImage: 'vs2017-win2016'
  steps:
  - template: azure-pipelines-steps-win.yml
Azure DevOps CLI in a release pipeline
Azure DevOps Services | Azure DevOps Server 2020
To use the Azure DevOps CLI in a hosted agent using a Release Pipeline, execute the following steps:
-
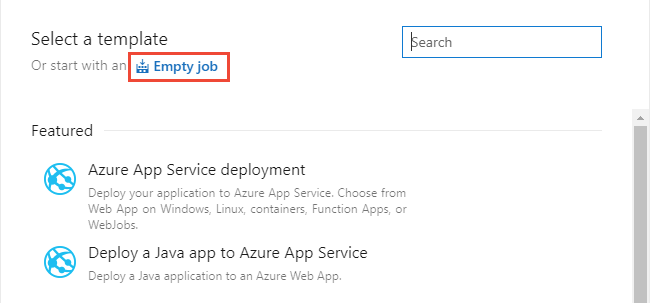
Create a release pipeline.

-
Choose Empty job.
-
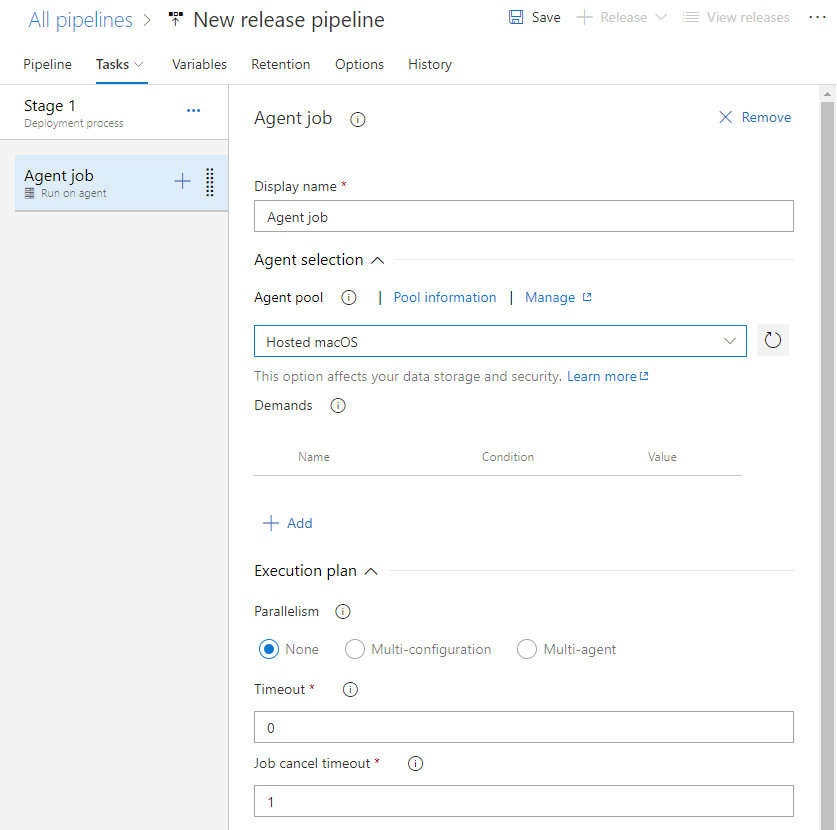
Choose Stage 1 to configure the stage.

-
Choose the Tasks page, and configure the job to use Hosted macOS in Agent Pools.
-
Choose the
 plus icon to add another task and configure it as a PowerShell task. Enter Power into the search box to filter the list.
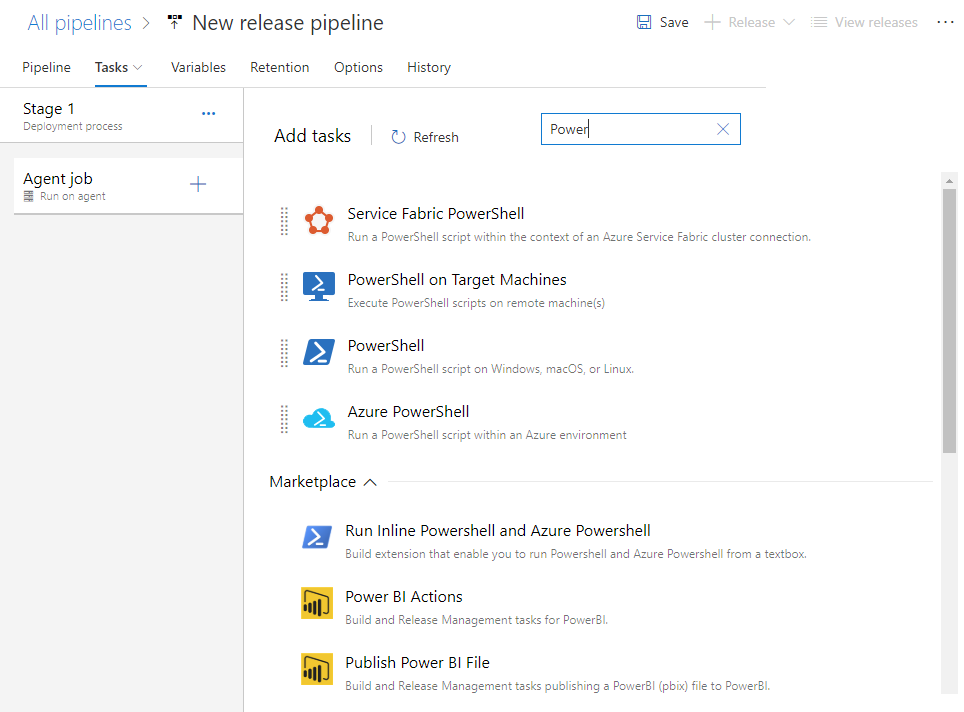
-
Add the script, either via file or inline. For the example, the script has been included inline.
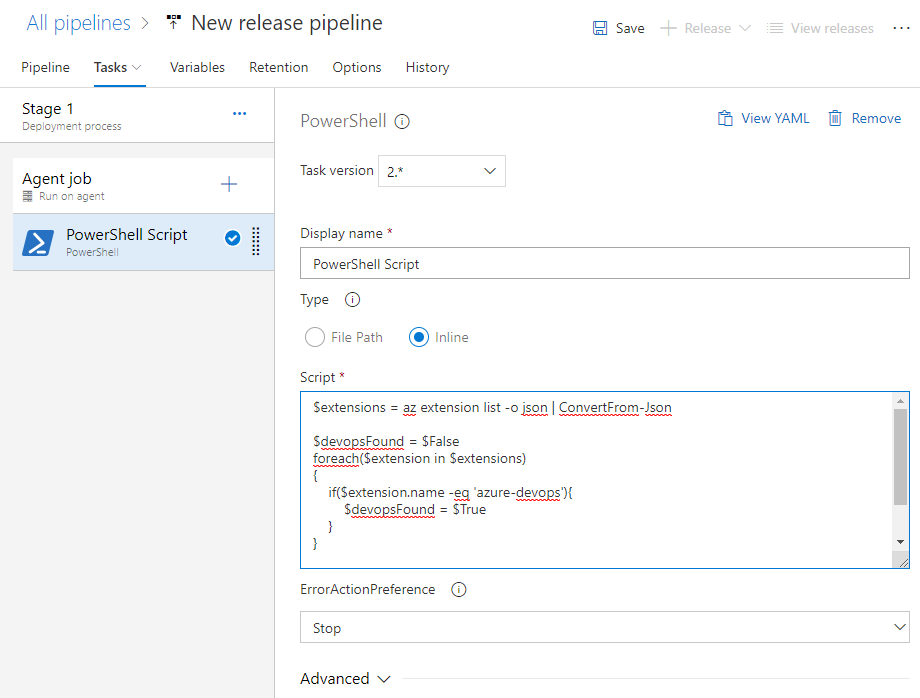
For reference, here is the inline script:
$extensions = az extension list -o json | ConvertFrom-Json

$devopsFound = $False
foreach($extension in $extensions)
{
    if($extension.name -eq 'azure-devops'){
        $devopsFound = $True
    }
}

if ($devopsFound -eq $False){
    az extension add -n azure-devops
}
posted on 2021-01-25 13:15 lingdanglfw 阅读(297) 评论(0) 收藏 举报

 浙公网安备 33010602011771号