一、FastDFS基本介绍
1、1架构图

-
Tracker Server:跟踪服务器,主要负责调度storage节点与client通信,在访问上起负载均衡的作用,和记录storage节点的运行状态,是连接client和storage节点的枢纽。
-
Storage Server:存储服务器,保存文件和文件的meta data(元数据),每个storage server会启动一个单独的线程主动向Tracker cluster中每个tracker server报告其状态信息,包括磁盘使用情况,文件同步情况及文件上传下载次数统计等信息
-
Group:文件组,多台Storage Server的集群。上传一个文件到同组内的一台机器上后,FastDFS会将该文件即时同步到同组内的其它所有机器上,起到备份的作用。不同组的服务器,保存的数据不同,而且相互独立,不进行通信。
-
Tracker Cluster:跟踪服务器的集群,有一组Tracker Server(跟踪服务器)组成。
-
Storage Cluster :存储集群,有多个Group组成。
1、2上传下载流程
1.2.1上传

-
-
Tracker server向Client返回一台可用的Storage server的IP地址和端口号。
-
Client直接通过Tracker server返回的IP地址和端口与其中一台Storage server建立连接并进行文件上传。
-
上传完成,Storage server返回Client一个文件ID,文件上传结束。
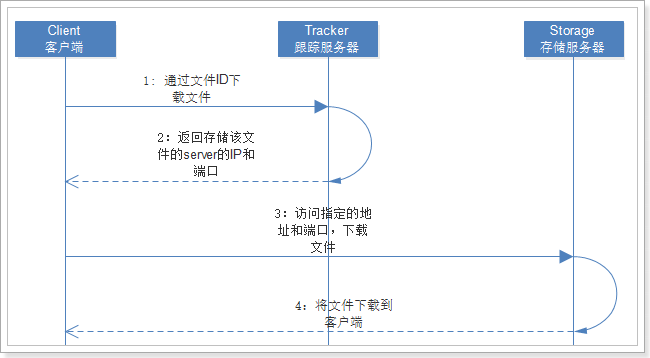
1.2.2下载

-
-
Tracker server向Client返回包含指定文件的某个Storage server的IP地址和端口号。
-
Client直接通过Tracker server返回的IP地址和端口与其中一台Storage server建立连接并指定要下载文件。
-
下载文件成功。
二、安装配置

下载地址:https://github.com/Linfinity29/-fastDFS
2.1单节点FastDFS
我们这里不打算安装多台虚拟机,因此会把tracker和storage都安装在一起。
GCC用来对C语言代码进行编译运行,使用yum命令安装:
yum -y install gcc
后面会用到解压命令(unzip),所以这里可以用yum把unzip 也装一下
yum install -y unzip zip
2.1.2.安装libevent
yum -y install libevent
2.1.3.安装libfastcommon-master
解压刚刚上传的libfastcommon-master.zip
unzip libfastcommon-master.zip
进入解压完成的目录
cd libfastcommon-master
编译并且安装:
./make.sh
./make.sh install
2.1.4.安装fastdfs
tar -zxvf FastDFS_v5.08.tar.gz cd FastDFS ./make.sh ./make.sh install
如果安装成功,会看到/etc/init.d/下看到提供的脚本文件:
ll /etc/init.d/ | grep fdfs

-
fdfs_trackerd是tracker启动脚本 -
fdfs_storaged是storage启动脚本
能够在 /etc/fdfs/ 目录下看到默认的配置文件模板:
ll /etc/fdfs/

-
tarcker.conf.sample是tracker的配置文件模板 -
storage.conf.sample是storage的配置文件模板 -
client.conf.sample是客户端的配置文件模板
FastDFS的tracker和storage在刚刚的安装过程中,都已经被安装了,因此我们安装这两种角色的方式是一样的。不同的是,两种需要不同的配置文件。
我们要启动tracker,就修改刚刚看到的tarcker.conf,并且启动fdfs_trackerd脚本即可。
1)首先将模板文件复制
cp /etc/fdfs/tracker.conf.sample /etc/fdfs/tracker.conf
2)修改复制后的配置文件:
vim /etc/fdfs/tracker.conf
# 修改的内容如下:
base_path=/leyou/tracker # 存储日志和数据的根目录
3)新建目录:
mkdir -p /leyou/tracker
注意:关闭防火墙:
chkconfig iptables off
4)启动和停止
启动tracker服务器:
/etc/init.d/fdfs_trackerd start
停止tracker服务器:
/etc/init.d/fdfs_trackerd stop
不过安装过程中,fdfs已经被设置为系统服务,我们可以采用熟悉的服务启动方式:
service fdfs_trackerd start # 启动fdfs_trackerd服务,停止用stop
检查FastDFS Tracker Server是否启动成功:
ps -ef | grep fdfs_trackerd
设置tracker服务开机启动:
chkconfig fdfs_trackerd on
2.1.6.配置并启动storage服务
1)首先将模板文件复制
cp /etc/fdfs/storage.conf.sample /etc/fdfs/storage.conf
2)修改复制后的配置文件:
vim /etc/fdfs/storage.conf
# 修改的内容如下:
base_path=/leyou/storage # 数据和日志文件存储根目录 store_path0=/leyou/storage # 第一个存储目录 tracker_server=192.168.56.101:22122 # tracker服务器IP和端口
3)新建目录:
mkdir -p /leyou/storage
注意关闭防火墙:
chkconfig iptables off
4)启动和停止
启动storage服务器:
/etc/init.d/fdfs_storaged start
停止storage服务器:
/etc/init.d/fdfs_storaged stop
推荐使用:
service fdfs_storaged start # 启动fdfs_storaged服务,停止用stop
设置storage服务开机启动:
chkconfig fdfs_storaged on
ps -ef | grep fdfs

2.2使用nginx访问FastDFS
FastDFS通过Tracker服务器,将文件放在Storage服务器存储,但是同组存储服务器之间需要进入文件复制,有同步延迟的问题。
假设Tracker服务器将文件上传到了192.168.4.125,上传成功后文件ID已经返回给客户端。此时FastDFS存储集群机制会将这个文件同步到同组存储192.168.4.126,在文件还没有复制完成的情况下,客户端如果用这个文件ID在192.168.4.126上取文件,就会出现文件无法访问的错误。
而fastdfs-nginx-module可以重定向文件连接到文件上传时的源服务器取文件,避免客户端由于复制延迟导致的文件无法访问错误
2.2.2安装fastdfs-nginx-module
2.2.2.1解压
tar -zxvf fastdfs-nginx-module_v1.16.tar.gz
2.2.2.2修改config
1)进入src目录
cd fastdfs-nginx-module/src/
2)编辑config
vim config
使用以下底行命令:
:%s+/usr/local/+/usr/+g
将所有的/usr/local替换为 /usr,这个才是正确的目录:

复制 fastdfs-nginx-module 源码中的配置文件到/etc/fdfs 目录, 并修改
cp /usr/local/leyou/fastdfs-nginx-module/src/mod_fastdfs.conf /etc/fdfs/
vi /etc/fdfs/mod_fastdfs.conf
修改以下配置:
connect_timeout=10 # 客户端访问文件连接超时时长(单位:秒) tracker_server=192.168.56.101:22122 # tracker服务IP和端口 url_have_group_name=true # 访问链接前缀加上组名 store_path0=/leyou/storage # 文件存储路径
复制 FastDFS 的部分配置文件到/etc/fdfs 目录
cd /usr/local/leyou/FastDFS/conf/
cp http.conf mime.types /etc/fdfs/
2.2.4.1如果没有安装过nginx
-
安装nginx的依赖库
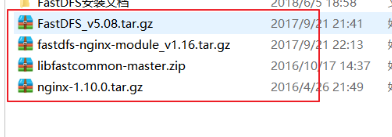
yum -y install gcc pcre pcre-devel zlib zlib-devel openssl openssl-devel
-
解压安装包
tar -zxvf nginx-1.10.0.tar.gz
-
配置nginx安装包,并指定fastdfs-nginx-model
cd nginx-1.10.0 ./configure --prefix=/opt/nginx --sbin-path=/usr/bin/nginx --add-module=/usr/local/leyou/fastdfs-nginx-module/src
注意:在执行./configure配置nginx参数的时候,需要将fastdfs-nginx-moudle源码作为模块编译进去。
-
编译并安装
make && make install
1) 进入nginx目录:
cd /usr/local/leyou/nginx-1.10.0/
2) 配置FastDFS 模块
./configure --prefix=/opt/nginx --sbin-path=/usr/bin/nginx --add-module=/usr/local/leyou/fastdfs-nginx-module/src
注意:这次配置时,要添加fastdfs-nginx-moudle模块
3) 编译,注意,这次不要安装(install)
make
4) 替换nginx二进制文件:
备份:
mv /usr/bin/nginx /usr/bin/nginx-bak
用新编译的nginx启动文件替代原来的:
cp objs/nginx /usr/bin/
配置nginx整合fastdfs-module模块
我们需要修改nginx配置文件,在/opt/nginx/config/nginx.conf文件中:
vim /opt/nginx/conf/nginx.conf
将文件中,原来的server 80{ ...} 部分代码替换为如下代码:
server { listen 80; server_name image.leyou.com; # 监听域名中带有group的,交给FastDFS模块处理 location ~/group([0-9])/ { ngx_fastdfs_module; } location / { root html; index index.html index.htm; } error_page 500 502 503 504 /50x.html; location = /50x.html { root html; } }
启动nginx:
nginx # 启动nginx nginx -s stop # 停止nginx nginx -s reload # 重新载入配置文件
# 可通过ps -ef | grep nginx查看nginx是否已启动成功

创建一个开机启动的脚本:
vim /etc/init.d/nginx
添加以下内容:

#!/bin/sh # # nginx - this script starts and stops the nginx daemon # # chkconfig: - 85 15 # description: NGINX is an HTTP(S) server, HTTP(S) reverse \ # proxy and IMAP/POP3 proxy server # processname: nginx # config: /etc/nginx/nginx.conf # config: /etc/sysconfig/nginx # pidfile: /var/run/nginx.pid # Source function library. . /etc/rc.d/init.d/functions # Source networking configuration. . /etc/sysconfig/network # Check that networking is up. [ "$NETWORKING" = "no" ] && exit 0 nginx="/usr/bin/nginx" prog=$(basename $nginx) NGINX_CONF_FILE="/opt/nginx/conf/nginx.conf" [ -f /etc/sysconfig/nginx ] && . /etc/sysconfig/nginx lockfile=/var/lock/subsys/nginx make_dirs() { # make required directories user=`$nginx -V 2>&1 | grep "configure arguments:.*--user=" | sed 's/[^*]*--user=\([^ ]*\).*/\1/g' -` if [ -n "$user" ]; then if [ -z "`grep $user /etc/passwd`" ]; then useradd -M -s /bin/nologin $user fi options=`$nginx -V 2>&1 | grep 'configure arguments:'` for opt in $options; do if [ `echo $opt | grep '.*-temp-path'` ]; then value=`echo $opt | cut -d "=" -f 2` if [ ! -d "$value" ]; then # echo "creating" $value mkdir -p $value && chown -R $user $value fi fi done fi } start() { [ -x $nginx ] || exit 5 [ -f $NGINX_CONF_FILE ] || exit 6 make_dirs echo -n $"Starting $prog: " daemon $nginx -c $NGINX_CONF_FILE retval=$? echo [ $retval -eq 0 ] && touch $lockfile return $retval } stop() { echo -n $"Stopping $prog: " killproc $prog -QUIT retval=$? echo [ $retval -eq 0 ] && rm -f $lockfile return $retval } restart() { configtest || return $? stop sleep 1 start } reload() { configtest || return $? echo -n $"Reloading $prog: " killproc $nginx -HUP RETVAL=$? echo } force_reload() { restart } configtest() { $nginx -t -c $NGINX_CONF_FILE } rh_status() { status $prog } rh_status_q() { rh_status >/dev/null 2>&1 } case "$1" in start) rh_status_q && exit 0 $1 ;; stop) rh_status_q || exit 0 $1 ;; restart|configtest) $1 ;; reload) rh_status_q || exit 7 $1 ;; force-reload) force_reload ;; status) rh_status ;; condrestart|try-restart) rh_status_q || exit 0 ;; *) echo $"Usage: $0 {start|stop|status|restart|condrestart|try-restart|reload|force-reload|configtest}" exit 2 esac
修改文件权限,并加入服务列表
# 修改权限
chmod 777 /etc/init.d/nginx
# 添加到服务列表
chkconfig --add /etc/init.d/nginx
设置开机启动
chkconfig nginx on
三、测试与使用
3.1测试
3.1.1引入依赖
在父工程中,我们已经管理了依赖,版本为:
<fastDFS.client.version>1.26.2</fastDFS.client.version>
因此,这里我们直接在taotao-upload工程的pom.xml中引入坐标即可:
<dependency>
    <groupId>com.github.tobato</groupId>
    <artifactId>fastdfs-client</artifactId>
</dependency>
3.1.2.引入配置类

纯java配置:
@Configuration
@Import(FdfsClientConfig.class)
// 解决jmx重复注册bean的问题
@EnableMBeanExport(registration = RegistrationPolicy.IGNORE_EXISTING)
public class FastClientImporter {

}
在application.yml配置文件中追加如下内容:
fdfs:
  so-timeout: 1501 # 超时时间
  connect-timeout: 601 # 连接超时时间
  thumb-image: # 缩略图
    width: 60
    height: 60
  tracker-list: # tracker地址:你的虚拟机服务器地址+端口(默认是22122)
    - 192.168.56.101:22122
3.1.4.配置hosts
将来通过域名:image.leyou.com这个域名访问fastDFS服务器上的图片资源。所以,需要代理到虚拟机地址:
配置hosts文件,使image.leyou.com可以访问fastDFS服务器

3.1.5测试
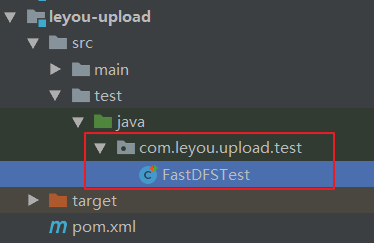
创建测试类:

@SpringBootTest @RunWith(SpringRunner.class) public class FastDFSTest { @Autowired private FastFileStorageClient storageClient; @Autowired private ThumbImageConfig thumbImageConfig; @Test public void testUpload() throws FileNotFoundException { // 要上传的文件 File file = new File("C:\\Users\\joedy\\Pictures\\xbx1.jpg"); // 上传并保存图片,参数:1-上传的文件流 2-文件的大小 3-文件的后缀 4-可以不管他 StorePath storePath = this.storageClient.uploadFile( new FileInputStream(file), file.length(), "jpg", null); // 带分组的路径 System.out.println(storePath.getFullPath()); // 不带分组的路径 System.out.println(storePath.getPath()); } @Test public void testUploadAndCreateThumb() throws FileNotFoundException { File file = new File("C:\\Users\\joedy\\Pictures\\xbx1.jpg"); // 上传并且生成缩略图 StorePath storePath = this.storageClient.uploadImageAndCrtThumbImage( new FileInputStream(file), file.length(), "png", null); // 带分组的路径 System.out.println(storePath.getFullPath()); // 不带分组的路径 System.out.println(storePath.getPath()); // 获取缩略图路径 String path = thumbImageConfig.getThumbImagePath(storePath.getPath()); System.out.println(path); } }
结果:
group1/M00/00/00/wKg4ZVsWl5eAdLNZAABAhya2V0c424.jpg
M00/00/00/wKg4ZVsWl5eAdLNZAABAhya2V0c424.jpg


group1/M00/00/00/wKg4ZVsWmD-ARnWiAABAhya2V0c772.png
M00/00/00/wKg4ZVsWmD-ARnWiAABAhya2V0c772.png
M00/00/00/wKg4ZVsWmD-ARnWiAABAhya2V0c772_60x60.png
3.2修改微服务中文件上传逻辑
只需要把原来保存文件的逻辑去掉,然后上传到FastDFS即可。
@Service
public class UploadService {

    @Autowired
    private FastFileStorageClient storageClient;

    private static final List<String> CONTENT_TYPES = Arrays.asList("image/jpeg", "image/gif");

    private static final Logger LOGGER = LoggerFactory.getLogger(UploadService.class);

    public String upload(MultipartFile file) {

        String originalFilename = file.getOriginalFilename();
        // 校验文件的类型
        String contentType = file.getContentType();
        if (!CONTENT_TYPES.contains(contentType)){
            // 文件类型不合法,直接返回null
            LOGGER.info("文件类型不合法:{}", originalFilename);
            return null;
        }

        try {
            // 校验文件的内容
            BufferedImage bufferedImage = ImageIO.read(file.getInputStream());
            if (bufferedImage == null){
                LOGGER.info("文件内容不合法:{}", originalFilename);
                return null;
            }

            // 保存到服务器
            // file.transferTo(new File("C:\\leyou\\images\\" + originalFilename));
            String ext = StringUtils.substringAfterLast(originalFilename, ".");
            StorePath storePath = this.storageClient.uploadFile(file.getInputStream(), file.getSize(), ext, null);

            // 生成url地址,返回
            return "http://image.leyou.com/" + storePath.getFullPath();
        } catch (IOException e) {
            LOGGER.info("服务器内部错误:{}", originalFilename);
            e.printStackTrace();
        }
        return null;
    }
}


 浙公网安备 33010602011771号