db + mysql yum / mysql error list / mysql error code / mysql ha high available / Orchestrator / win 10 mysql 8.0.29
s
s
问题2:Ignoring query to other database
[root@centos85 ~]# mysql -root -p -hlocalhost
mysql> show databases;
Ignoring query to other database
解决2:https://cloud.tencent.com/developer/article/1151346
连接mysql时没有"-u"参数导致的 D:\Program Files\MySQL\MySQL Server 5.6\bin>mysql -uroot 重新连接mysql 加上-u参数,OK
问题1: Lost connection to MySQL server during query
2021-04-25 17:06:24. ERROR 2013 (HY000) at line 1: Lost connection to MySQL server during query
ERROR 2006 (HY000) at line 1: MySQL server has gone away
ERROR 2006 (HY000) at line 1: MySQL server has gone away
sh: line 1: 31438 Segmentation fault (core dumped) mysql --connect_timeout=5 -h192.168.3.11 -uroot -pxxxxxx -Dtestpre --default-character-set=utf8 --show-warnings -v -v -v < ./2021-04-25/SQL2104251647025607_5904289_1_11_1_E_release.sql
解决1:MySQL笔记-turncat、drop、delete的区别
https://blog.csdn.net/weixin_30635053/article/details/99327760
drop 大表数据 > 700GB 导致数据库宕机,改为turncat 语句。
TRUNCATE
语法: TRUNCATE TABLE [schema.] table [{DROP | REUSE} STORAGE]
功能: 删除整个表的数据并释放空间
描述:
由于Truncate 是DDL 命令,所以执行过程中原数据不放在Rollback Segment 中,不产生回滚数据 ,不产生Redo Log 。
Truncate , Drop 等DDL命令都是隐含提交的。
需要drop的操作权限
相当于这样的流程:先drop table 然后 create table。
不记录日志,无法恢复
auto increatment 自增会恢复从头开始自增。
执行速度比delete快
Can't connect to local MySQL server through socket 问题解决
http://www.linuxdiyf.com/view_75335.html
Fedora8启动mysql 报错:
ERROR 2002 (HY000): Can’t connect to local MySQL server through socket ‘/var/lib/mysql/mysql.sock’ (2)
1、先查看 /etc/rc.d/init.d/mysqld status 看看m y s q l 是否已经启动.
另外看看是不是权限问题.
2、确定你的mysql.sock是不是在那个位置,
mysql -u 你的mysql用户名 -p -S /var/lib/mysql/mysql.sock
3、试试:service mysqld start
4、如果是权限问题,则先改变权限 #chown -R mysql:mysql /var/lib/mysql
[root@localhost ~]# /etc/init.d/mysqld start
启动 MySQL: [ 确定 ]
[root@localhost ~]# mysql -uroot -p
ERROR 2002 (HY000): Can't connect to local MySQL server through socket '/var/lib/mysql/mysql.sock' (2)
原因是,/var/lib/mysql 的访问权限问题。
shell> chown -R mysql:mysql /var/lib/mysql
接着启动服务器
shell> /etc/init.d/mysql start
服务器正常启动后察看 /var/lib/mysql 自动生成mysql.sock文件。
但是我的问题仍然没有得到解决。
问题终于解决:
方法: 修改/etc/my.conf:
[mysqld]
datadir=/usr/local/mysql/data
socket=/var/lib/mysql/mysql.sock
[mysql.server]
user=mysql
basedir=/usr/local/mysql
If there is not currently a section called [client], add one at the bottom of the file and copy the socket= line under the [mysqld] section such as:
[client]
socket=/var/lib/mysql/mysql.sock
发现依旧如此,运行/etc/init.d/mysql start报错:Starting MySQLCouldn't find MySQL manager or server
是mysqld服务没启,运行/usr/local/mysql/bin/mysqld_safe &
问题解决。
end
问题1:ERROR 1045 (28000): Access denied for user 'root'@'localhost' (using password: NO)
[root@centos8 usr]# locate my.cnf
/etc/my.cnf
/etc/my.cnf.d
/etc/my.cnf.d/client.cnf
[root@centos8 usr]# systemctl restart mysqld.service
[root@centos8 usr]# mysql
ERROR 1045 (28000): Access denied for user 'root'@'localhost' (using password: NO)
解决1: 文件my.cnf 添加内容skip-grant-tables,先越过权限登陆 (注意下面echo写入多行内容 )。
[root@centos8 usr]# echo -e "[mysqld]\nskip-grant-tables" >> /etc/my.cnf
[root@centos8 usr]# more /etc/my.cnf
[mysqld]
skip-grant-tables
[root@centos8 usr]# systemctl restart mysqld.service
[root@centos8 usr]# mysql

Welcome to the MySQL monitor. Commands end with ; or \g.
Your MySQL connection id is 7
Server version: 8.0.21 Source distribution
Copyright (c) 2000, 2020, Oracle and/or its affiliates. All rights reserved.
Oracle is a registered trademark of Oracle Corporation and/or its
affiliates. Other names may be trademarks of their respective
owners.
Type 'help;' or '\h' for help. Type '\c' to clear the current input statement.
mysql>
mysql 8.x 压缩包zip安装 / Windows 10 MySQL Community Server 8.0.29
https://blog.51cto.com/u_15298458/4778930
1、下载软件:https://cdn.mysql.com//Downloads/MySQL-8.0/mysql-8.0.29-winx64.zip
2、新增文件:E:\soft\winsoft\database\mysql-8.0.29-winx64\my.ini
3、新增内容:
[mysqld]
port=3306
basedir=E:\\soft\\winsoft\\database\\mysql-8.0.29-winx64
datadir=E:\\soft\\winsoft\\database\\mysql-8.0.29-winx64\\data

max_connections=200
#允许连接失败的次数,这是为了防止有人从该主机试图攻击数据库系统
max_connect_errors=10
character-set-server=utf8
default-storage-engine=INNODB

[mysql]
#设置mysql客户端默认字符集
default-character-set=utf8
[client]
#设置mysql客户端连接服务端时默认使用的端口和默认字符集
port=3306
default-character-set=utf8
4、创建文件夹
E:\soft\winsoft\database\mysql-8.0.29-winx64
E:\soft\winsoft\database\mysql-8.0.29-winx64\data
5、新增系统变量
Path=C:\Windows\system32;C:\Windows;C:\Windows\System32\Wbem;C:\Windows\System32\WindowsPowerShell\v1.0\;C:\Windows\System32\OpenSSH\;C:\Program Files (x86)\NetSarang\Xmanager 7\;C:\Program Files (x86)\NetSarang\Xshell 7\;C:\Program Files (x86)\NetSarang\Xftp 7\;C:\Program Files (x86)\NetSarang\Xlpd 7\;E:\soft\winsoft\database\mysql-8.0.29-winx64\bin\;E:\soft\winsoft\UnxUtils\bin;E:\soft\winsoft\UnxUtils\usr\local\wbin;C:\Users\07121038\AppData\Local\Microsoft\WindowsApps;
6、安装数据库服务
E:\soft\winsoft\database\mysql-8.0.29-winx64\bin> mysqld install MySQL --defaults-file="E:\soft\winsoft\database\mysql-8.0.29-winx64\my.ini"
E:\soft\winsoft\database\mysql-8.0.29-winx64\bin> mysqld --initialize-insecure
E:\soft\winsoft\database\mysql-8.0.29-winx64\bin> net start MySQL
7、进入数据库
E:\soft\winsoft\database\mysql-8.0.29-winx64\bin> mysql -u root -p
8、修改数据库root密码
mysql> use mysql;- - 切换数据库
mysql>update user set authentication_string=' ' where user='root';- -将字段置为空
mysql>alter user 'root'@'localhost' identified by 'root';- -修改密码为root
mysql> flush privileges;
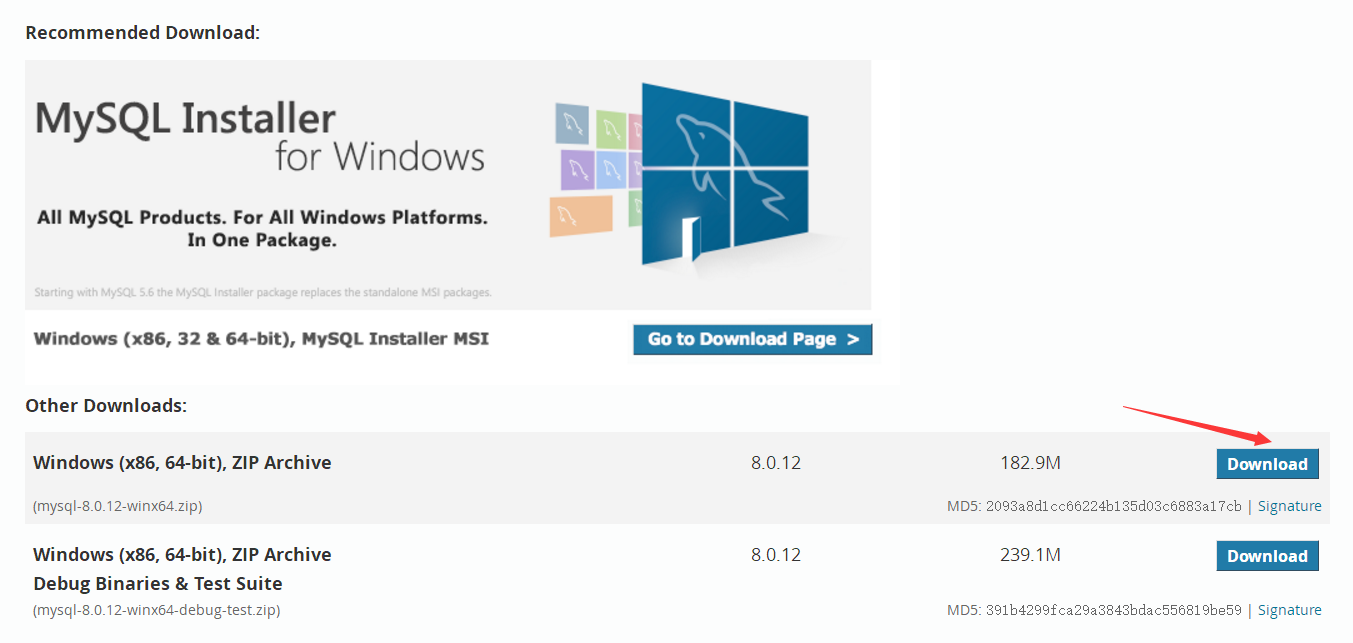
https://dev.mysql.com/downloads/
MySQL Community Server 8.0.23
https://cdn.mysql.com//Downloads/MySQL-8.0/mysql-8.0.23-1.el8.x86_64.rpm-bundle.tar
https://cdn.mysql.com//Downloads/MySQL-8.0/mysql-8.0.23-winx64-debug-test.zip
https://cdn.mysql.com//Downloads/MySQL-8.0/mysql-8.0.23-winx64.zip
CentOS 8 安装MySQL 8.0
https://www.cnblogs.com/kasnti/p/11929030.html
https://www.cnblogs.com/ttrrpp/p/12173562.html
使用rpm来安装MySQL
[root@localhost ~]# rpm -ivh mysql80-community-release-el8-1.noarch.rpm

使用yum安装mysql服务
[root@localhost ~]# yum install mysql-server

检查是否已经设置为开机启动MySQL服务
[root@localhost ~]# systemctl list-unit-files|grep mysqld
mysqld.service disabled
mysqld@.service disabled
[root@localhost ~]# systemctl enable mysqld.service   #设置开机启动
Created symlink /etc/systemd/system/multi-user.target.wants/mysqld.service → /usr/lib/systemd/system/mysqld.service.
[root@localhost ~]# systemctl list-unit-files|grep mysqld
mysqld.service enabled
mysqld@.service disabled
[root@localhost ~]# ps -ef|grep mysql # 查看是否启动MySQL服务
root 4311 32702 0 21:07 pts/4 00:00:00 grep --color=auto mysql
[root@localhost ~]# systemctl start mysqld.service #启动服务
安装MySQL8.0#
使用最新的包管理器安装MySQL
sudo dnf install @mysql
Downloading Packages:
(1/4): mecab-0.996-1.module_el8.2.0+493+63b41e36.9.x86_64.rpm 283 kB/s | 393 kB 00:01
(2/4): protobuf-lite-3.5.0-13.el8.x86_64.rpm 276 kB/s | 149 kB 00:00
(3/4): mysql-errmsg-8.0.21-1.module_el8.2.0+493+63b41e36.x86_64.rpm 296 kB/s | 581 kB 00:01
(4/4): mysql-server-8.0.21-1.module_el8.2.0+493+63b41e36.x86_64.rpm 884 kB/s | 22 MB 00:25
开启启动#
安装完成后,运行以下命令来启动MySQL服务并使它在启动时自动启动:
sudo systemctl enable --now mysqld
要检查MySQL服务器是否正在运行,请输入:
sudo systemctl status mysqld
添加密码及安全设置#
运行mysql_secure_installation脚本,该脚本执行一些与安全性相关的操作并设置MySQL根密码:
sudo mysql_secure_installation
root / S*****@12345
步骤如下:
-
要求你配置VALIDATE PASSWORD component(验证密码组件): 输入y ,回车进入该配置
- 选择密码验证策略等级, 我这里选择0 (low),回车
- 输入新密码两次
- 确认是否继续使用提供的密码?输入y ,回车
- 移除匿名用户? 输入y ,回车
- 不允许root远程登陆? 我这里需要远程登陆,所以输入n ,回车

-
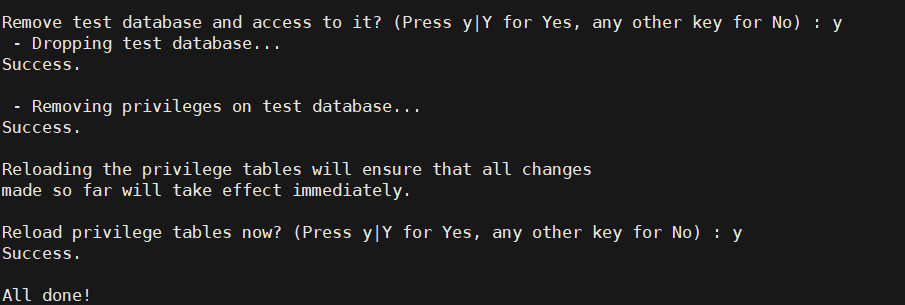
移除test数据库? 输入y ,回车
-
重新载入权限表? 输入y ,回车
配置远程登陆#
如果需要设置root账户远程登陆,上一步骤中,不允许root远程登陆?这一步需要设为n。
接下来本机登录MySQL,将root用户的host字段设为'%',意为接受root所有IP地址的登录请求:
本机登录MySQL:
mysql -uroot -p<上面步骤中设置的密码>
回车后即可登录,接下来终端变成了mysql>开头: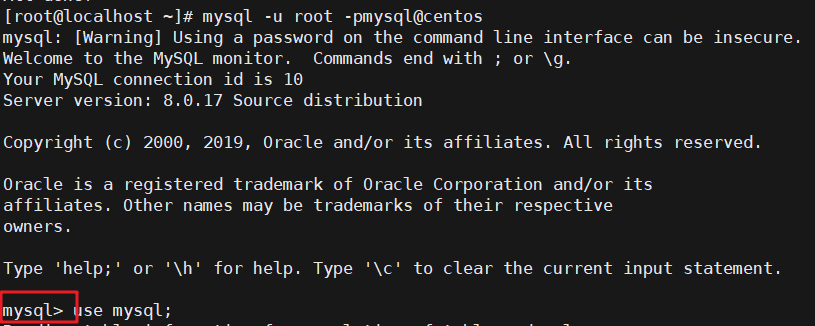
接着继续执行mysql语句,将将root用户的host字段设为'%':
use mysql; update user set host='%' where user='root'; flush privileges;
设置完成后输入exit退出mysql,回到终端shell界面,接着开启系统防火墙的3306端口:
sudo firewall-cmd --add-port=3306/tcp --permanent sudo firewall-cmd --reload
关闭MySQL主机查询dns#
MySQL会反向解析远程连接地址的dns记录,如果MySQL主机无法连接外网,则dns可能无法解析成功,导致第一次连接MySQL速度很慢,所以在配置中可以关闭该功能。
参考文档
打开/etc/my.cnf文件,添加以下配置:
[mysqld] skip-name-resolve
重启服务#
sudo systemctl restart mysqld
本机测试安装后,MySQL8.0默认已经是utf8mb4字符集,所以字符集不再修改
-
s
下载软件
https://cdn.mysql.com//Downloads/MySQL-8.0/mysql-8.0.32-winx64.zip
问题1:安装mysql Install/Remove of the Service Denied!错误
解决1:以管理员权限运行CMD进行安装。
https://www.cnblogs.com/sfencs-hcy/p/9769505.html
看了网上好多种教程,自己尝试失败了好多次,最后总算弄好了,具体如下
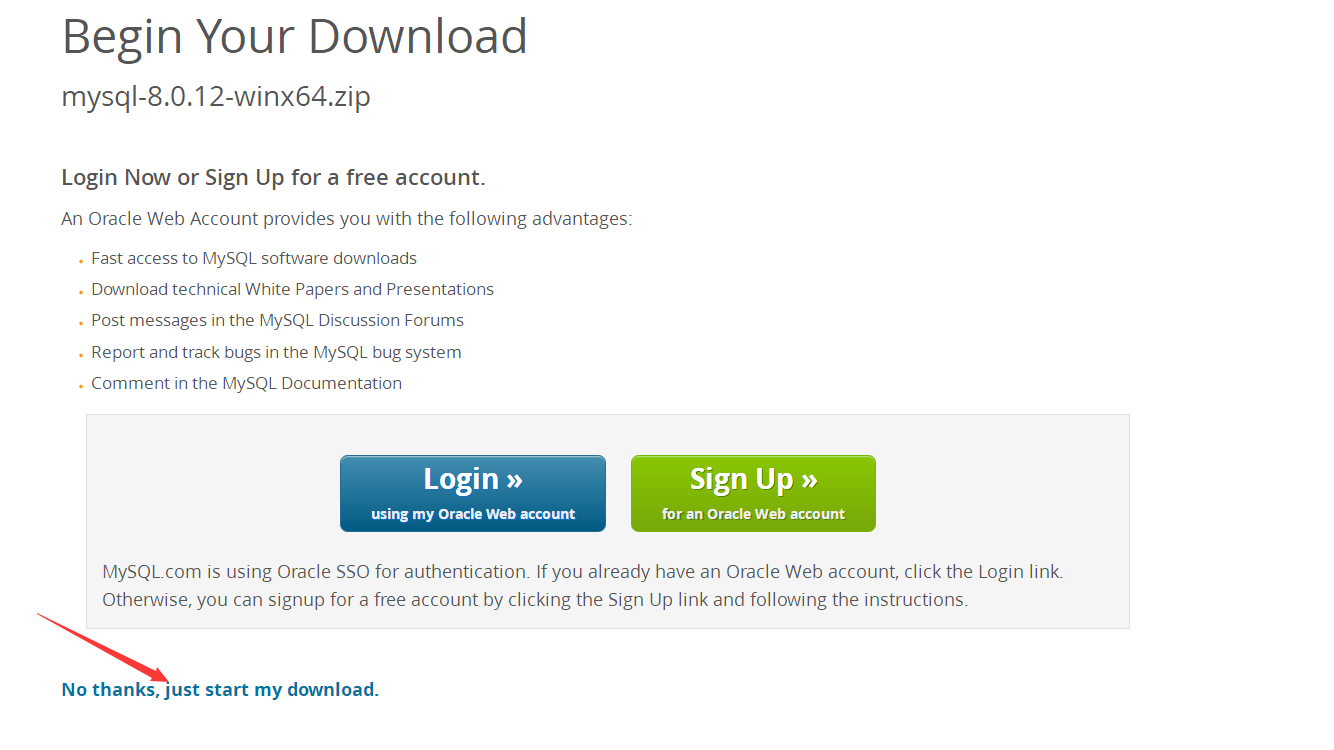
zip下载地址:https://dev.mysql.com/downloads/mysql/
之后点击No thanks, just start my download.
下载之后解压文件
然后配置环境变量,这样可以直接在cmd中输入mysql就可以运行,不用切换地址
我这里win10直接在下方搜索
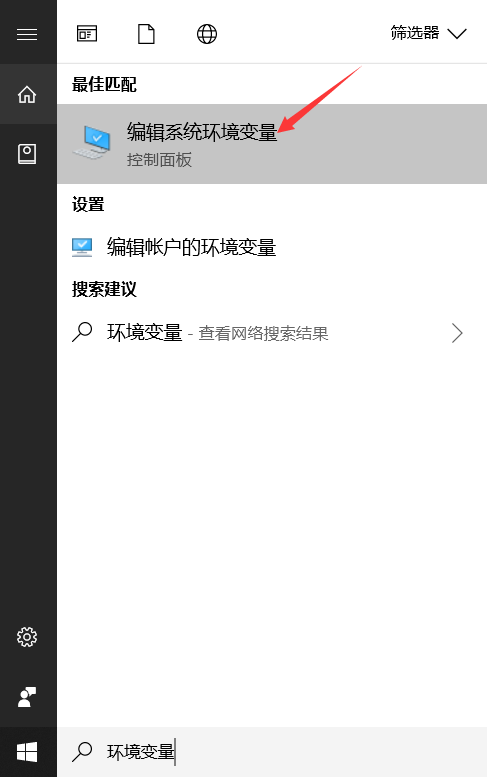
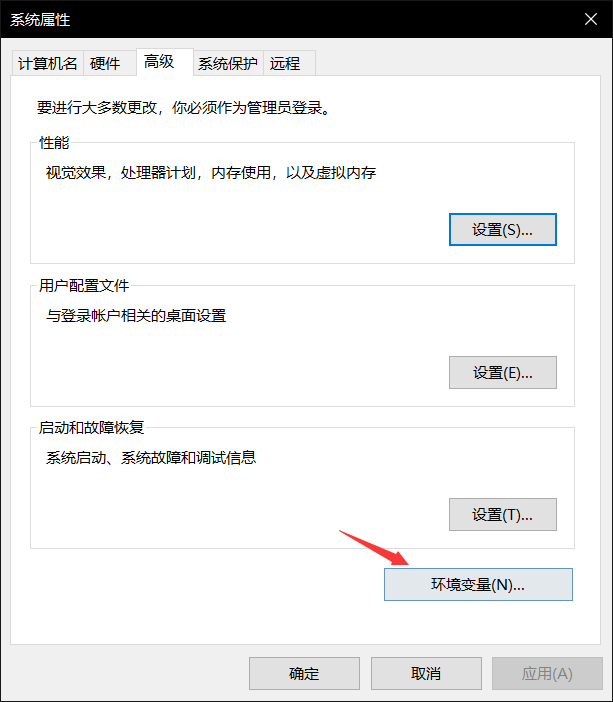
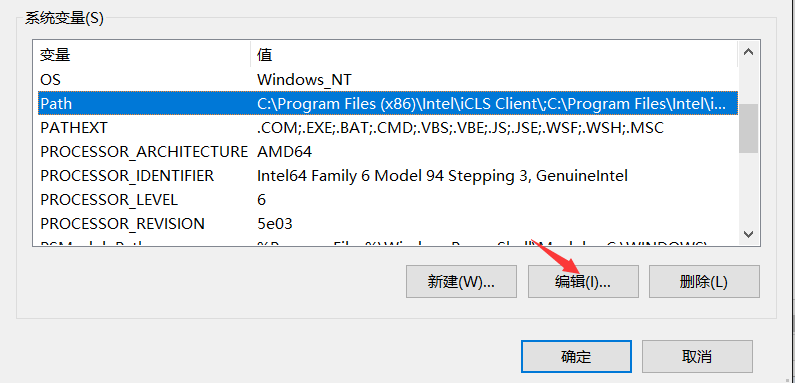
之后在里边新建一条,将你mysql解压之后的bin目录写进去

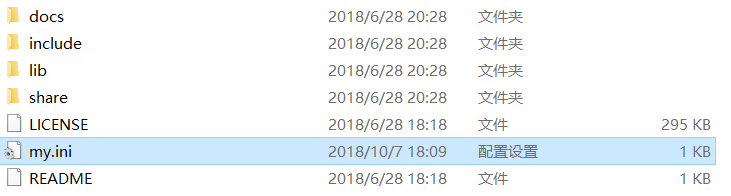
之后配置初始化的配置文件my.ini
和bin文件夹在同一目录下,新建记事本,在里边粘贴下边代码

[mysqld]
# 设置3306端口
port=3306
# 设置mysql的安装目录
basedir=E:\\software\\mysql\\mysql-8.0.11-winx64   # 切记此处一定要用双斜杠\\,单斜杠我这里会出错,不过看别人的教程,有的是单斜杠。自己尝试吧
# 设置mysql数据库的数据的存放目录
datadir=E:\\software\\mysql\\mysql-8.0.11-winx64\\Data   # 此处同上
# 允许最大连接数
max_connections=200
# 允许连接失败的次数。这是为了防止有人从该主机试图攻击数据库系统
max_connect_errors=10
# 服务端使用的字符集默认为UTF8
character-set-server=utf8
# 创建新表时将使用的默认存储引擎
default-storage-engine=INNODB
# 默认使用“mysql_native_password”插件认证
default_authentication_plugin=mysql_native_password
[mysql]
# 设置mysql客户端默认字符集
default-character-set=utf8
[client]
# 设置mysql客户端连接服务端时默认使用的端口
port=3306
default-character-set=utf8
然后保存名为my.ini
然后以管理员身份运行cmd,右键点击以管理员身份运行
直接输入mysqld --initialize --console执行
执行完成后,其中有一行话temporary password is generated for root@localhost:,
@localhost:后的就是root用户的初始密码,这个密码之后会用到
接下来安装服务
在cmd中执行mysqld --install 服务名
可以不写服务名,默认是mysql,如果需要安装多个服务,那么可以起其他的名字。
安装完成后在cmd中执行net start mysql,那么服务启动。
接下来登录mysql客户端,以root用户登录:在cmd中执行mysql -u root -p
然后输入之前记下的密码
mysql就登录成功了。
想改密码可以在mysql中输入ALTER USER 'root'@'localhost' IDENTIFIED WITH mysql_native_password BY '新密码';
至此mysql的zip安装完成。
end
s
https://github.com/github/orchestrator
MySQL高可用复制管理工具 —— Orchestrator介绍
https://www.cnblogs.com/zhoujinyi/p/10387581.html
背景
在MySQL高可用架构中,目前使用比较多的是Percona的PXC,Galera以及MySQL 5.7之后的MGR等,其他的还有的MHA,今天介绍另一个比较好用的MySQL高可用复制管理工具:Orchestrator(orch)。
Orchestrator(orch):go编写的MySQL高可用性和复制拓扑管理工具,支持复制拓扑结构的调整,自动故障转移和手动主从切换等。后端数据库用MySQL或SQLite存储元数据,并提供Web界面展示MySQL复制的拓扑关系及状态,通过Web可更改MySQL实例的复制关系和部分配置信息,同时也提供命令行和api接口,方便运维管理。相对比MHA来看最重要的是解决了管理节点的单点问题,其通过raft协议保证本身的高可用。GitHub的一部分管理也在用该工具进行管理。关于Orchestrator更详细的介绍可以看Github的介绍,大致的特点有:
① 自动发现MySQL的复制拓扑,并且在web上展示。
② 重构复制关系,可以在web进行拖图来进行复制关系变更。
③ 检测主异常,并可以自动或手动恢复,通过Hooks进行自定义脚本。
④ 支持命令行和web界面管理复制。
环境:
系统:
Ubuntu 16.04

三台主机:
test1:192.168.163.131
test2:192.168.163.132
test3:192.168.163.133

后端MySQL端口:3306
测试MySQL端口:3307
安装
根据需要下载合适的包进行安装,本文是基于Ubuntu16.04安装的,下载好deb包后,需要安装jq的依赖包(apt-get install jq)。安装完成之后,相应的目录为:
/usr/local/orchestrator
-rwxr-xr-x 1 root root  20M 1月  16 21:49 orchestrator
-rw-r--r-- 1 root root 5.1K 1月  16 21:49 orchestrator-sample.conf.json
-rw-r--r-- 1 root root 4.4K 1月  16 21:49 orchestrator-sample-sqlite.conf.json
drwxr-xr-x 7 root root 4.0K 2月  15 19:03 resources
orchestrator:应用程序
*.json:默认的配置模板
resources:orchestrator相关的文件:client、web、伪GTID等相关文件。
配置
配置的相关参数了解后,大致说明如下(可能会有偏差、后续不定时更新):
 View Code
按照本文的测试用例,定制了一个相关的模板(/etc/orchestrator.conf.json):
View Code这里列出说明几个比较重要的参数:
- ListenAddress:
web界面的http端口 - MySQLOrchestratorHost
orch后端数据库地址 - MySQLOrchestratorPort
orch后端数据库端口 - MySQLOrchestratorDatabase
orch后端数据库名 - MySQLOrchestratorUser
orch后端数据库用户名(明文) - MySQLOrchestratorPassword
orch后端数据库密码(明文) - MySQLOrchestratorCredentialsConfigFile
后端数据库用户名密码的配置文件「 "MySQLOrchestratorCredentialsConfigFile": "/etc/mysql/orchestrator-backend.cnf" 」,格式:
[client]
user=orchestrator_srv
password=${ORCHESTRATOR_PASSWORD}
后端MySQL数据库的用户权限需要是:
CREATE USER 'orchestrator_srv'@'orc_host' IDENTIFIED BY 'orc_server_password';
GRANT ALL ON orchestrator.* TO 'orchestrator_srv'@'orc_host';
- MySQLTopologyUser
被管理的MySQL的用户(明文) - MySQLTopologyPassword
被管理的MySQL的密码(密文) - MySQLTopologyCredentialsConfigFile
被管理的MySQL的用户密码配置文件「"/etc/mysql/orchestrator-topology.cnf"」,格式:
[client]
user=orchestrator_srv
password=${ORCHESTRATOR_PASSWORD}
- 被管理MySQL数据库的用户权限需要是:
CREATE USER 'orchestrator'@'orc_host' IDENTIFIED BY 'orc_topology_password';
GRANT SUPER, PROCESS, REPLICATION SLAVE, REPLICATION CLIENT, RELOAD ON *.* TO 'orchestrator'@'orc_host';
GRANT SELECT ON meta.* TO 'orchestrator'@'orc_host';
GRANT SELECT ON ndbinfo.processes TO 'orchestrator'@'orc_host'; -- Only for NDB Cluster
- InstancePollSeconds
orch探测MySQL的间隔秒数 - MySQLConnectTimeoutSeconds
orch连接MySQL的超时时间 - MySQLOrchestratorReadTimeoutSeconds
后端MySQL读超时时间 - MySQLTopologyReadTimeoutSeconds
被管理MySQL读超时时间,用于除发现查询以外的所有查询 - MySQLDiscoveryReadTimeoutSeconds
被管理MySQL读超时时间,用于发现 - DefaultInstancePort
被管理MySQL的默认端口 - DiscoverByShowSlaveHosts
通过show slave hosts 来发现拓扑结构 - UnseenInstanceForgetHours
忽略看不见的实例的小时数 - HostnameResolveMethod
解析主机名,使用主机名:default;不解析用none,直接用IP - MySQLHostnameResolveMethod
解析主机名,发出select @@hostname;发出select @@report_host(需要配置report_host)。不解析用"",直接用IP。 - InstanceBulkOperationsWaitTimeoutSeconds
进行批量操作时等待单个实例的时间 - ReasonableReplicationLagSeconds
复制延迟高于该值表示异常 - VerifyReplicationFilters
在拓扑重构之前检查复制筛选器 - ReasonableMaintenanceReplicationLagSeconds
复制延迟高于该值会上下移动调整MySQL拓扑 - CandidateInstanceExpireMinutes
该时间之后,使用实例作为候选从库(在主故障转移时提升)的建议到期 - ReplicationLagQuery(SlaveLagQuery)
使用SHOW SLAVE STATUS进行延迟判断,力度为秒。使用pt-heartbeat。这提供了亚秒级的力度,允许自己设置查询「 "select absolute_lag from meta.heartbeat_view"」 - DetectClusterAliasQuery
查询集群别名的query,信息放到每个被管理实例的meta库的cluster表中「"select ifnull(max(cluster_name), '') as cluster_alias from meta.cluster where anchor=1"」 - DetectClusterDomainQuery
查询集群Domain的query,信息放到每个被管理实例的meta库的cluster表中「select ifnull(max(cluster_domain), '') as cluster_domain from meta.cluster where anchor=1」 - DetectInstanceAliasQuery
查询实例的别名 - DetectDataCenterQuery
查询数据中心的query,信息放到每个被管理实例的meta库的cluster表中「"select substring_index(substring_index(@@hostname, '-',3), '-', -1) as dc"」 - DetachLostReplicasAfterMasterFailover(DetachLostSlavesAfterMasterFailover)
是否强制分离在主恢复中不会丢失的从库 - DetectSemiSyncEnforcedQuery
检测是否强制半同步 - AutoPseudoGTID
是否自动将Pseudo-GTID条目注入主服务器,对于没用GTID的复制推荐使用。要是使用了GTID的复制,设置“false”即可。 - RecoveryPeriodBlockSeconds
在该时间内再次出现故障,不会进行迁移,避免出现并发恢复和不稳定。 - FailureDetectionPeriodBlockMinutes
在该时间内再次出现故障,不会被多次发现。 - RecoverMasterClusterFilters
只对匹配这些正则表达式模式的集群进行主恢复(“*”模式匹配所有)。 - RecoverIntermediateMasterClusterFilters
只对匹配这些正则表达式模式的集群进行主恢复(“*”模式匹配所有)。 - OnFailureDetectionProcesses
检测故障转移时执行,属于Hooks。 - PreGracefulTakeoverProcesses
在主变为只读之前立即执行,属于Hooks。 - PreFailoverProcesses
在执行恢复操作之前立即执行,属于Hooks。 - PostMasterFailoverProcesses
在主恢复成功结束时执行,属于Hooks。 - PostFailoverProcesses
在成功恢复结束时执行,属于Hooks。 - PostUnsuccessfulFailoverProcesses
在任何不成功的恢复结束时执行,属于Hooks。 - PostIntermediateMasterFailoverProcesses
在成功的中间主恢复结束时执行,属于Hooks。 - PostGracefulTakeoverProcesses
在旧主位于新晋升的主之后执行,属于Hooks。 - CoMasterRecoveryMustPromoteOtherCoMaster
当'false'时,任何实例都可以得到提升; 当'true'时,将提升共同主人否则失败。 - ApplyMySQLPromotionAfterMasterFailover
将重置slave all并在提升的master上设置read_only = 0,默认true - PreventCrossDataCenterMasterFailover
如果为true(默认值:false),则不允许跨DC主故障转移,orchestrator将尽其所能仅在同一DC内进行故障转移,否则不进行故障转移。 - MasterFailoverDetachReplicaMasterHost(MasterFailoverDetachSlaveMasterHost)
否应该在新升级的master上发出detach-replica-master-host,这样可以确保新master不会尝试复制正常之后的旧的master。如果参数ApplyMySQLPromotionAfterMasterFailover为True,则该参数无意义。 - MasterFailoverLostInstancesDowntimeMinutes
主故障转移后丢失的任何服务器停机的分钟数(包括失败的主和丢失的从)。 0表示禁用。 - PostponeReplicaRecoveryOnLagMinutes(PostponeSlaveRecoveryOnLagMinutes)
在崩溃恢复时,延迟超过给定分钟的从库在主被选出后才复活。 值为0将禁用此功能。 - BackendDB
后端数据库类型。 - RaftEnabled
是否开启Raft,保证orch的高可用。 - RaftDataDir
Raft的数据目录。 - RaftBind
Raft 的 bind地址。 - DefaultRaftPort
Raft的端口。 - RaftNodes
Raft的节点。 - ConsulAddress
Consul的地址。 - ConsulAclToken
Consul的token。
运行部署
环境:
在三台测试机上各自安装MySQL2个实例:orch用的后端MySQL(3306)和被orch管理的MySQL(3307)。按照给出的配置模板,首先在后端数据库的实例上创建账号:
CREATE USER 'orchestrator'@'127.0.0.1' IDENTIFIED BY '123456';
GRANT ALL ON orchestrator.* TO 'orchestrator'@'127.0.0.1';
再在被管理的MySQL(3307)实例上 创建账号:
CREATE USER 'orchestrator'@'%' IDENTIFIED BY 'Aa123456';
GRANT SUPER, PROCESS, REPLICATION SLAVE, RELOAD ON *.* TO 'orchestrator'@'%';
GRANT SELECT ON mysql.slave_master_info TO 'orchestrator'@'%';
GRANT SELECT ON meta.* TO 'orchestrator'@'orc_host';
其中meta库的作用是自己的query所用到的,如:cluster、pseudo_gtid_status等,后面会有相关说明。
到此,关于orch的环境已经准备完毕,最后只需要把被管理的3台MySQL部署成一主二从即可(rep):
Master:192.168.163.131:3307
Slave  :192.168.163.132:3307
Slave  :192.168.163.133:3307
最后,因为配置文件里写的是域名(hostname),所以需要修改三台被管理MySQL的hosts。即:
192.168.163.131 test1
192.168.163.132 test2
192.168.163.133 test3
安装:
./orchestrator --debug --config=/etc/orchestrator.conf.json http
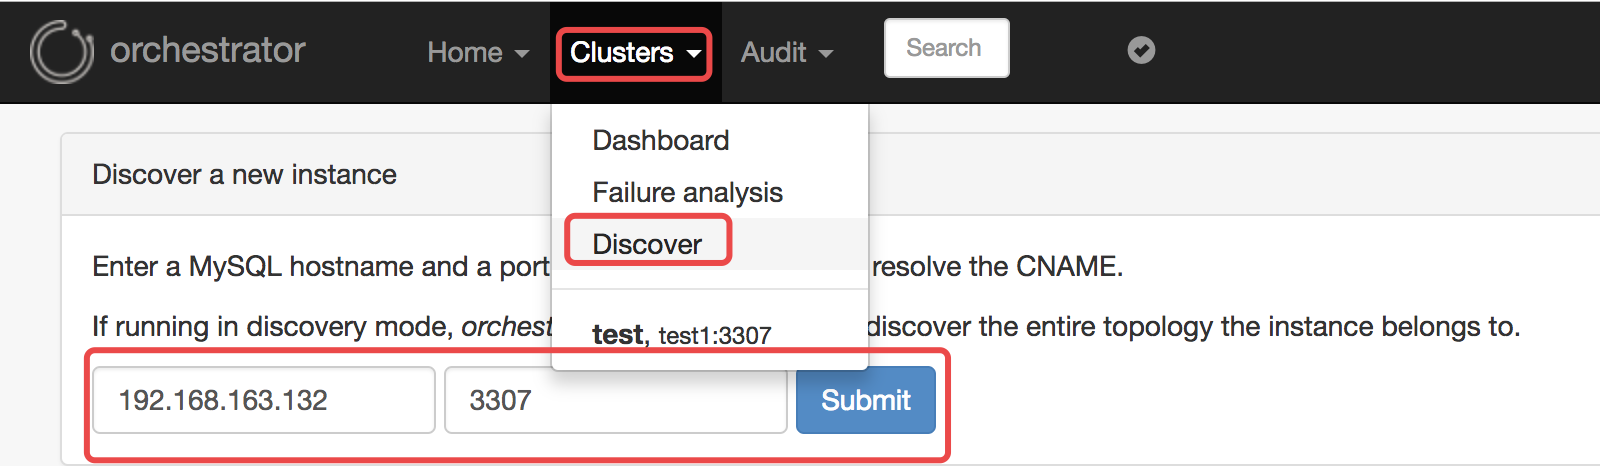
2. 把配置好的复制实例加入到orchestrator,因为orch可以自动发现整个拓扑的所有实例,所以只需要添加任意一台实例即可,如果没有发现的话可以再添加。
在web上添加(导航里的Clusters -> Discover):
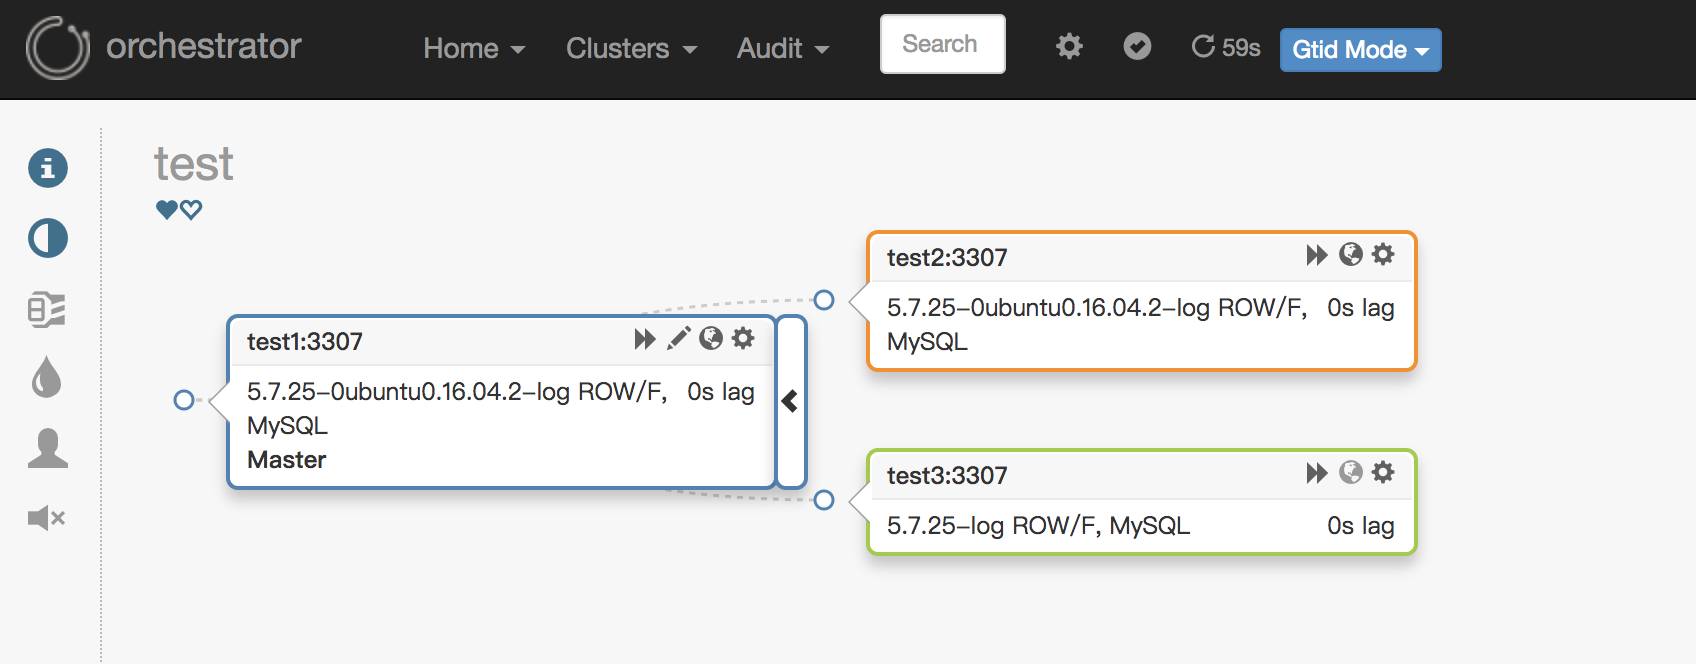
添加完成之后,最终的结构图如下:
总结:
限于篇幅的原因,本文先对orchestrator进行参数和部署做些简单的说明,对于一些Failover和HA在放在下一篇「MySQL高可用复制管理工具 —— Orchestrator使用」中进行介绍。
参考文档:
https://github.com/github/orchestrator
https://www.percona.com/blog/2016/03/08/orchestrator-mysql-replication-topology-manager/
end
end


【推荐】国内首个AI IDE,深度理解中文开发场景,立即下载体验Trae
【推荐】编程新体验,更懂你的AI,立即体验豆包MarsCode编程助手
【推荐】抖音旗下AI助手豆包,你的智能百科全书,全免费不限次数
【推荐】轻量又高性能的 SSH 工具 IShell:AI 加持,快人一步
· .NET Core 中如何实现缓存的预热?
· 从 HTTP 原因短语缺失研究 HTTP/2 和 HTTP/3 的设计差异
· AI与.NET技术实操系列:向量存储与相似性搜索在 .NET 中的实现
· 基于Microsoft.Extensions.AI核心库实现RAG应用
· Linux系列:如何用heaptrack跟踪.NET程序的非托管内存泄露
· TypeScript + Deepseek 打造卜卦网站:技术与玄学的结合
· 阿里巴巴 QwQ-32B真的超越了 DeepSeek R-1吗?
· 【译】Visual Studio 中新的强大生产力特性
· 【设计模式】告别冗长if-else语句:使用策略模式优化代码结构
· 10年+ .NET Coder 心语 ── 封装的思维:从隐藏、稳定开始理解其本质意义