WPF 使用快捷键方式制作简易的 Word 上的 Latex 输入法
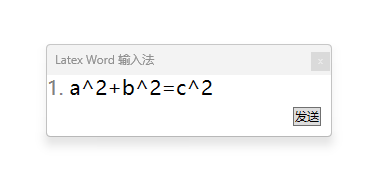
软件的界面效果如下:

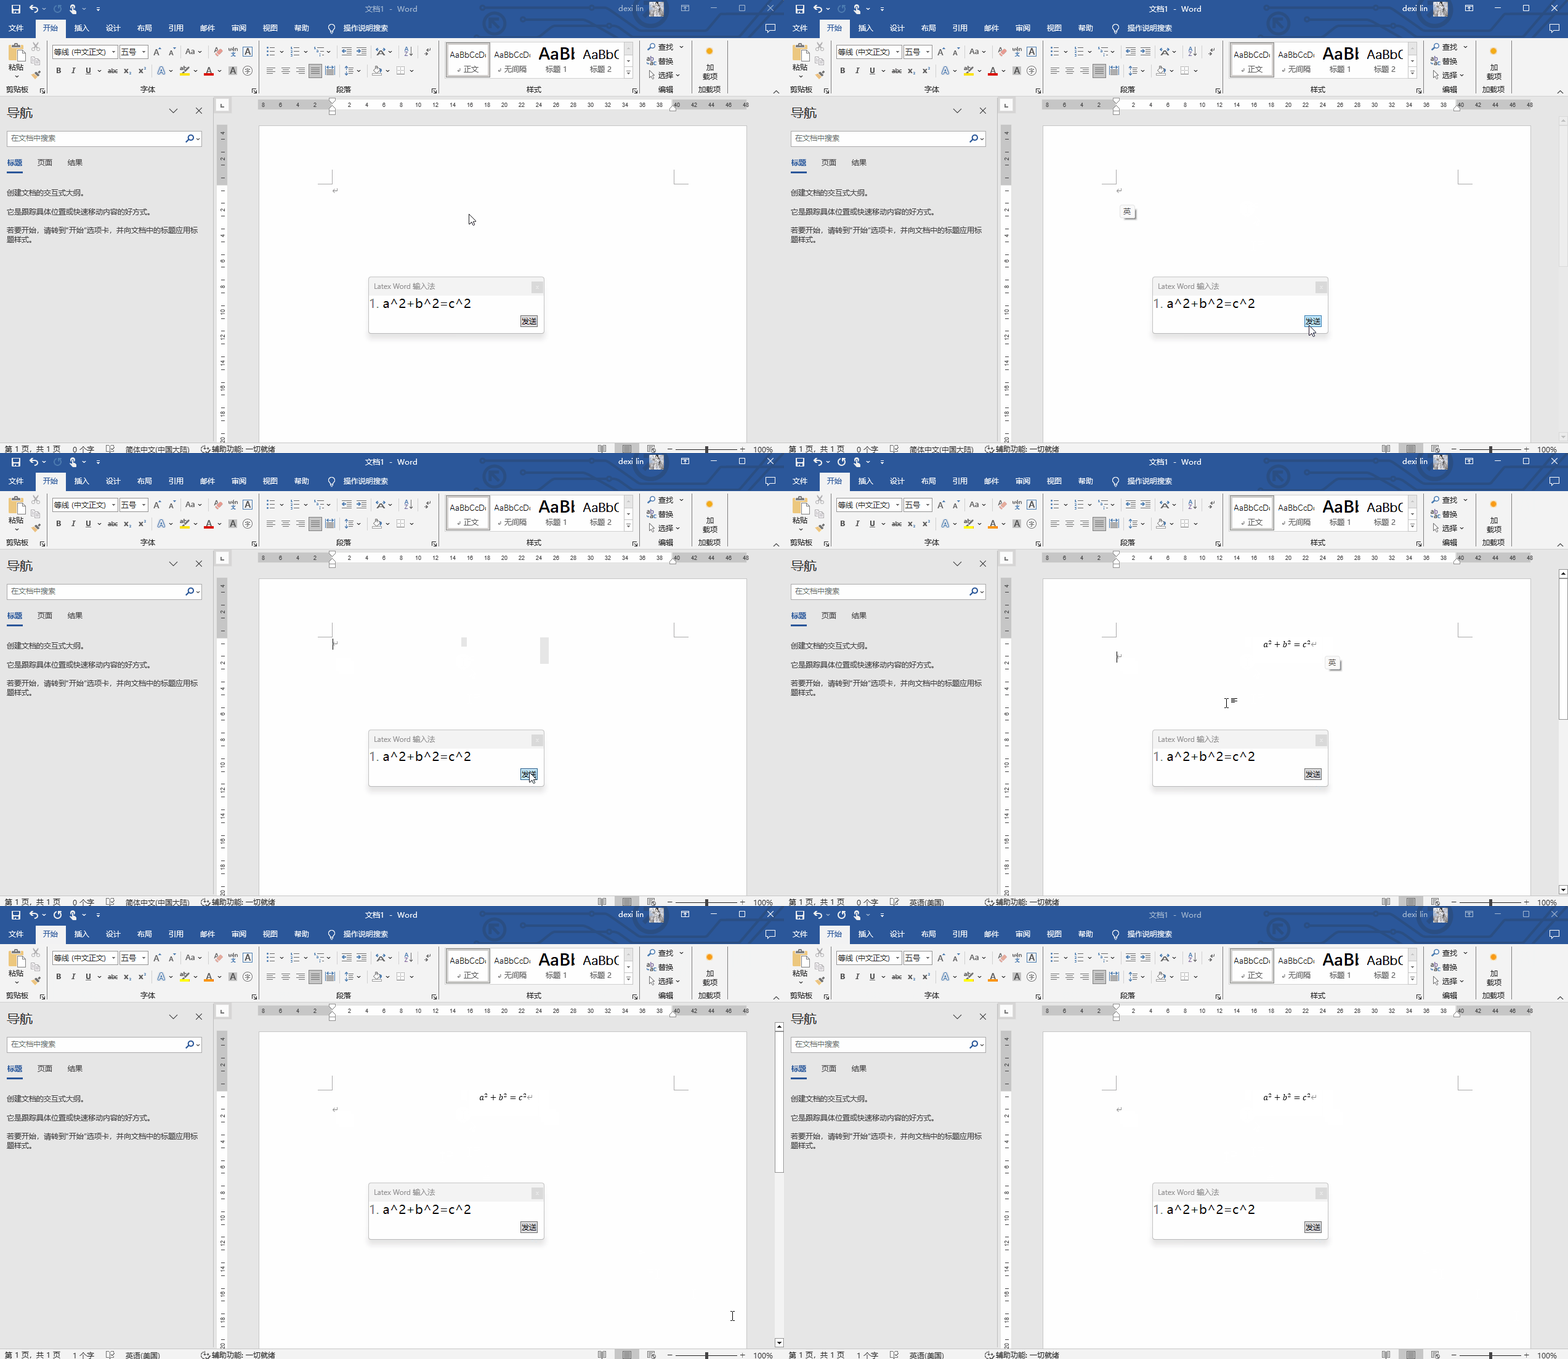
运行效果如下:

本文以下为演示应用,没有包含从用户输入生成 Latex 格式的公式,仅仅只包含核心的如何在 Word 插入公式部分
本文的核心实现逻辑是根据 WPF 拼音输入法 实现的,只是有所不同的是没有进行键盘钩子,而是代替为手动点击按钮
点击发送按钮将 Latex 公式输入到 Word 里作为 Word 公式,其核心的方法就是使用 Word 的快捷键插入公式编辑器,再通过剪贴板输入 Latex 格式的公式内容,再输入回车作为 Word 公式。按钮的点击的实现代码如下
    private void SendButton_OnClick(object sender, RoutedEventArgs e)
    {
        SendKeys.SendWait("%="); // 发送 alt+= 让Word打开公式编辑器
        Clipboard.SetText("a^2+b^2=c^2"); // 将文本放入剪贴板
        SendKeys.SendWait("^v"); // 发送 ctrl+v 粘贴文本
        SendKeys.SendWait("{Enter}"); // 发送回车键让 Latex 公式成为 Word 公式
    }
上文这里固定发送的是 a^2+b^2=c^2 公式,大家可以根据需求自行替换为其他公式
以下为整个项目的详细实现方法
先创建一个 .NET 9 的 WPF 项目,创建之后记得勾选 WinForms 引用,如不知道在哪勾选,可以双击项目文件,将 csproj 项目文件替换为如下代码
<Project Sdk="Microsoft.NET.Sdk">

  <PropertyGroup>
    <OutputType>WinExe</OutputType>
    <TargetFramework>net9.0-windows</TargetFramework>
    <Nullable>enable</Nullable>
    <ImplicitUsings>enable</ImplicitUsings>
    <UseWindowsForms>True</UseWindowsForms>
    <UseWPF>true</UseWPF>
  </PropertyGroup>

</Project>
以上代码里面的 <UseWindowsForms>True</UseWindowsForms> 就是用来添加对 WinForms 的引用。如果大家看了以上配置还是不知道如何做,可以在本文末尾找到本文所有代码的下载方法
接着打开 MainWindow.xaml 文件,写一个固定且简单的输入法界面
    <Grid>
        <TextBlock HorizontalAlignment="Left" VerticalAlignment="Top"
                   FontSize="20">
            <Run Foreground="Gray" Text="1."/>
            <Run Foreground="Black" Text="a^2+b^2=c^2"></Run>
        </TextBlock>
        <Button x:Name="SendButton"
                Margin="10 10 10 10"
                HorizontalAlignment="Right" VerticalAlignment="Bottom"
                Click="SendButton_OnClick">发送</Button>
    </Grid>
以上界面固定了一个输入法候选公式,和一个按钮
继续编辑 MainWindow.xaml 文件,设置一些窗口属性
        WindowStyle="ToolWindow"
        Topmost="True"
        Title="Latex Word 输入法" Height="100" Width="300"
按钮点击的 SendButton_OnClick 方法的实现已经在上文告诉大家
作为一个输入法,不应该让窗口获取焦点,否则将会抢走应用的焦点。按照 .NET/C# 使窗口永不激活(No Activate 永不获得焦点) - walterlv 博客提供的方法,在 MainWindow.xaml.cs 配置让窗口不获取焦点
    protected override void OnSourceInitialized(EventArgs e)
    {
        base.OnSourceInitialized(e);
        var windowInteropHelper = new WindowInteropHelper(this);
        Win32WindowHelper.SetNoActivate(windowInteropHelper.Handle);
    }

public static class Win32WindowHelper
{
    /// <summary>
    /// 使窗口永不激活
    /// </summary>
    /// <param name="hWnd"></param>
    /// [.NET/C# 使窗口永不激活(No Activate 永不获得焦点) - walterlv](https://blog.walterlv.com/post/no-activate-window.html )
    public static void SetNoActivate(IntPtr hWnd)
    {
        var exStyle = GetWindowLong(hWnd, GWL_EXSTYLE);
        SetWindowLong(hWnd, GWL_EXSTYLE, new IntPtr(exStyle.ToInt32() | WS_EX_NOACTIVATE));
    }

    private const int WS_EX_NOACTIVATE = 0x08000000;
    private const int GWL_EXSTYLE = -20;

    public static IntPtr GetWindowLong(IntPtr hWnd, int nIndex)
    {
        return Environment.Is64BitProcess
            ? GetWindowLong64(hWnd, nIndex)
            : GetWindowLong32(hWnd, nIndex);
    }

    public static IntPtr SetWindowLong(IntPtr hWnd, int nIndex, IntPtr dwNewLong)
    {
        return Environment.Is64BitProcess
            ? SetWindowLong64(hWnd, nIndex, dwNewLong)
            : SetWindowLong32(hWnd, nIndex, dwNewLong);
    }

    [DllImport("user32.dll", EntryPoint = "GetWindowLong")]
    private static extern IntPtr GetWindowLong32(IntPtr hWnd, int nIndex);

    [DllImport("user32.dll", EntryPoint = "GetWindowLongPtr")]
    private static extern IntPtr GetWindowLong64(IntPtr hWnd, int nIndex);

    [DllImport("user32.dll", EntryPoint = "SetWindowLong")]
    private static extern IntPtr SetWindowLong32(IntPtr hWnd, int nIndex, IntPtr dwNewLong);

    [DllImport("user32.dll", EntryPoint = "SetWindowLongPtr")]
    private static extern IntPtr SetWindowLong64(IntPtr hWnd, int nIndex, IntPtr dwNewLong);
}
整个 MainWindow.xaml.cs 的核心代码如下
public partial class MainWindow : Window
{
    public MainWindow()
    {
        InitializeComponent();
    }

    protected override void OnSourceInitialized(EventArgs e)
    {
        base.OnSourceInitialized(e);
        var windowInteropHelper = new WindowInteropHelper(this);
        Win32WindowHelper.SetNoActivate(windowInteropHelper.Handle);
    }

    private void SendButton_OnClick(object sender, RoutedEventArgs e)
    {
        SendKeys.SendWait("%="); // 发送 alt+= 让Word打开公式编辑器
        Clipboard.SetText("a^2+b^2=c^2"); // 将文本放入剪贴板
        SendKeys.SendWait("^v"); // 发送 ctrl+v 粘贴文本
        SendKeys.SendWait("{Enter}"); // 发送回车键让 Latex 公式成为 Word 公式
    }
}

public static class Win32WindowHelper
{
    /// <summary>
    /// 使窗口永不激活
    /// </summary>
    /// <param name="hWnd"></param>
    /// [.NET/C# 使窗口永不激活(No Activate 永不获得焦点) - walterlv](https://blog.walterlv.com/post/no-activate-window.html )
    public static void SetNoActivate(IntPtr hWnd)
    {
        var exStyle = GetWindowLong(hWnd, GWL_EXSTYLE);
        SetWindowLong(hWnd, GWL_EXSTYLE, new IntPtr(exStyle.ToInt32() | WS_EX_NOACTIVATE));
    }

    private const int WS_EX_NOACTIVATE = 0x08000000;
    private const int GWL_EXSTYLE = -20;

    public static IntPtr GetWindowLong(IntPtr hWnd, int nIndex)
    {
        return Environment.Is64BitProcess
            ? GetWindowLong64(hWnd, nIndex)
            : GetWindowLong32(hWnd, nIndex);
    }

    public static IntPtr SetWindowLong(IntPtr hWnd, int nIndex, IntPtr dwNewLong)
    {
        return Environment.Is64BitProcess
            ? SetWindowLong64(hWnd, nIndex, dwNewLong)
            : SetWindowLong32(hWnd, nIndex, dwNewLong);
    }

    [DllImport("user32.dll", EntryPoint = "GetWindowLong")]
    private static extern IntPtr GetWindowLong32(IntPtr hWnd, int nIndex);

    [DllImport("user32.dll", EntryPoint = "GetWindowLongPtr")]
    private static extern IntPtr GetWindowLong64(IntPtr hWnd, int nIndex);

    [DllImport("user32.dll", EntryPoint = "SetWindowLong")]
    private static extern IntPtr SetWindowLong32(IntPtr hWnd, int nIndex, IntPtr dwNewLong);

    [DllImport("user32.dll", EntryPoint = "SetWindowLongPtr")]
    private static extern IntPtr SetWindowLong64(IntPtr hWnd, int nIndex, IntPtr dwNewLong);
}
本文代码放在 github 和 gitee 上,可以使用如下命令行拉取代码。我整个代码仓库比较庞大,使用以下命令行可以进行部分拉取,拉取速度比较快
先创建一个空文件夹,接着使用命令行 cd 命令进入此空文件夹,在命令行里面输入以下代码,即可获取到本文的代码
git init
git remote add origin https://gitee.com/lindexi/lindexi_gd.git
git pull origin 18e21d7acfd12a55b04f554cbe5ce770e37518ef
以上使用的是国内的 gitee 的源,如果 gitee 不能访问,请替换为 github 的源。请在命令行继续输入以下代码,将 gitee 源换成 github 源进行拉取代码。如果依然拉取不到代码,可以发邮件向我要代码
git remote remove origin
git remote add origin https://github.com/lindexi/lindexi_gd.git
git pull origin 18e21d7acfd12a55b04f554cbe5ce770e37518ef
获取代码之后,进入 WPFDemo/QarchananaFeweajeka 文件夹,即可获取到源代码
打开 QarchananaFeweajeka.sln 文件,理论上就可以按下 F5 让 VisualStudio 构建且运行。试试新建一个 Word 文档,进入输入状态,然后点击运行起来的输入法程序的发送按钮。预计就可以看到在 Word 输入了一段公式
更多技术博客,请参阅 博客导航
补充:
可以使用 MathML 加粘贴的方式实现,如以下的 MathML 代码
 <?xml version="1.0"?>
 <math xmlns="http://www.w3.org/1998/Math/MathML" xmlns:m="http://schemas.openxmlformats.org/officeDocument/2006/math">
     <mrow>
         <msup><mi>a</mi><mn>2</mn></msup>
         <mo>+</mo>
         <msup><mi>b</mi><mn>2</mn></msup>
         <mo>=</mo>
         <msup><mi>c</mi><mn>2</mn></msup>
     </mrow>
 </math>
具体实现方法是在本文代码的基础上,修改写入剪贴板的内容,也不再需要 alt 快捷键。但是其核心不同点在于需要先从 Latex 转换为 MathML 格式
替换之后的 SendButton_OnClick 代码如下
    private void SendButton_OnClick(object sender, RoutedEventArgs e)
    {
        // lang=xml
        var mathML = """
                     <?xml version="1.0"?>
                     <math xmlns="http://www.w3.org/1998/Math/MathML" xmlns:m="http://schemas.openxmlformats.org/officeDocument/2006/math">
                         <mrow>
                             <msup><mi>a</mi><mn>2</mn></msup>
                             <mo>+</mo>
                             <msup><mi>b</mi><mn>2</mn></msup>
                             <mo>=</mo>
                             <msup><mi>c</mi><mn>2</mn></msup>
                         </mrow>
                     </math>
                     """;

        var dataObject = new DataObject();
        var buffer = Encoding.UTF8.GetBytes(mathML);
        var memoryStream = new MemoryStream(buffer);
        dataObject.SetData("MathML Presentation", memoryStream);
        Clipboard.SetDataObject(dataObject);

        SendKeys.SendWait("^v"); // 发送 ctrl+v 粘贴文本
    }
通过 https://dpcarlisle.blogspot.com/2007/04/xhtml-and-mathml-from-office-20007.html 博客可以知道,在 Word 2007 就已经可以支持这项功能了
本文更新之后的代码放在 github 和 gitee 上,可以使用如下命令行拉取代码。我整个代码仓库比较庞大,使用以下命令行可以进行部分拉取,拉取速度比较快
先创建一个空文件夹,接着使用命令行 cd 命令进入此空文件夹,在命令行里面输入以下代码,即可获取到本文的代码
git init
git remote add origin https://gitee.com/lindexi/lindexi_gd.git
git pull origin 80a64d10ef3f3b0ac67654c6225fc6cd7a8e07a0
以上使用的是国内的 gitee 的源,如果 gitee 不能访问,请替换为 github 的源。请在命令行继续输入以下代码,将 gitee 源换成 github 源进行拉取代码。如果依然拉取不到代码,可以发邮件向我要代码
git remote remove origin
git remote add origin https://github.com/lindexi/lindexi_gd.git
git pull origin 80a64d10ef3f3b0ac67654c6225fc6cd7a8e07a0
获取代码之后,进入 WPFDemo/HacereferehairJurchalanifacere 文件夹,即可获取到源代码
参考文档:
博客园博客只做备份,博客发布就不再更新,如果想看最新博客,请访问 https://blog.lindexi.com/
如图片看不见,请在浏览器开启不安全http内容兼容

本作品采用知识共享署名-非商业性使用-相同方式共享 4.0 国际许可协议进行许可。欢迎转载、使用、重新发布,但务必保留文章署名[林德熙](https://www.cnblogs.com/lindexi)(包含链接:https://www.cnblogs.com/lindexi ),不得用于商业目的,基于本文修改后的作品务必以相同的许可发布。如有任何疑问,请与我[联系](mailto:lindexi_gd@163.com)。


