ActiveMQ
ActiveMQ
入门概述
MQ 的产品种类和对比
kafka
编程语言:scala。
大数据领域的主流MQ。
rabbitmq
编程语言:erlang
基于erlang语言,不好修改底层,不要查找问题的原因,不建议选用。
rocketmq
编程语言:java
适用于大型项目。适用于集群。
activemq
编程语言:java
适用于中小型项目。
MQ 的产生背景
系统之间直接调用存在的问题?
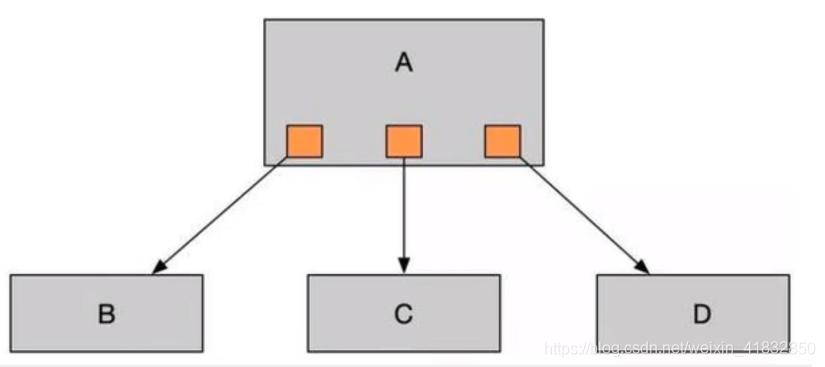
微服务架构后,链式调用是我们在写程序时候的一般流程,为了完成一个整体功能会将其拆分成多个函数(或子模块),比如模块A调用模块B,模块B调用模块C,模块C调用模块D。但在大型分布式应用中,系统间的RPC交互繁杂,一个功能背后要调用上百个接口并非不可能,从单机架构过渡到分布式微服务架构的通例。这些架构会有哪些问题?
系统之间接口耦合比较严重
每新增一个下游功能,都要对上游的相关接口进行改造;
举个例子:如果系统A要发送数据给系统B和系统C,发送给每个系统的数据可能有差异,因此系统A对要发送给每个系统的数据进行了组装,然后逐一发送;
当代码上线后又新增了一个需求:把数据也发送给D,新上了一个D系统也要接受A系统的数据,此时就需要修改A系统,让他感知到D系统的存在,同时把数据处理好再给D。在这个过程你会看到,每接入一个下游系统,都要对系统A进行代码改造,开发联调的效率很低。其整体架构如下
面对大流量并发时,容易被冲垮
每个接口模块的吞吐能力是有限的,这个上限能力如果是堤坝,当大流量(洪水)来临时,容易被冲垮。
举个例子秒杀业务:上游系统发起下单购买操作,就是下单一个操作,很快就完成。然而,下游系统要完成秒杀业务后面的所有逻辑(读取订单,库存检查,库存冻结,余额检查,余额冻结,订单生产,余额扣减,库存减少,生成流水,余额解冻,库存解冻)。
等待同步存在性能问题
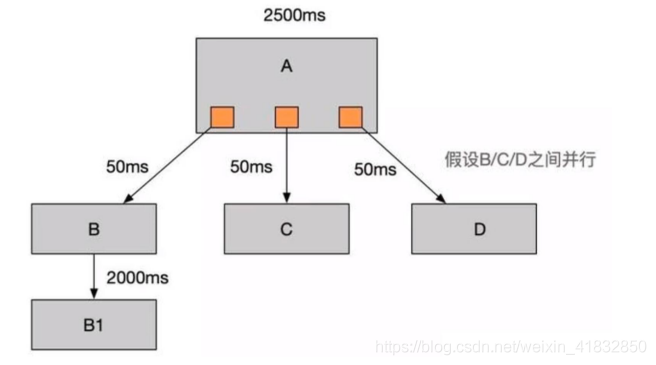
RPC接口上基本都是同步调用,**整体的服务性能遵循 [ 木桶理论 ] **,即整体系统的耗时取决于链路中最慢的那个接口。比如A调用B/C/D都是50ms,但此时B又调用了B1,花费2000ms,那么直接就拖累了整个服务性能。
根据上述的几个问题,在设计系统时可以明确要达到的目标:
1,要做到系统解耦,当新的模块接进来时,可以做到代码改动最小;能够解耦
2,设置流量缓冲池,可以让后端系统按照自身吞吐能力进行消费,不被冲垮;能削峰
3,强弱依赖梳理能将非关键调用链路的操作异步化并提升整体系统的吞吐能力;能够异步
MQ 的主要作用
- 异步。调用者无需等待。
- 解耦。解决了系统之间耦合调用的问题。
- 削峰。抵御洪峰流量,保护了主业务。
MQ 的定义
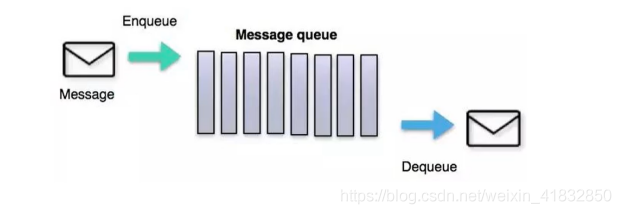
面向消息的中间件(Message-Oriented Middleware)MOM能够很好的解决以上问题。是指利用高效可靠的消息传递机制与平台无关的数据交流,并基于数据通信来进行分布式系统的集成。通过提供消息传递和消息排队模型在分布式环境下提供应用解耦,弹性伸缩,冗余存储、流量削峰,异步通信,数据同步等功能。
大致的过程是这样的:发送者把消息发送给消息服务器,消息服务器将消息存放在若干队列/主题topic中,在合适的时候,消息服务器回将消息转发给接受者。在这个过程中,发送和接收是异步的,也就是发送无需等待,而且发送者和接受者的生命周期也没有必然的关系;尤其在发布pub/订阅sub模式下,也可以完成一对多的通信,即让一个消息有多个接受者。( 类似微信公众号 )
MQ 的特点
采用异步处理模式
消息发送者可以发送一个消息而无须等待响应。消息发送者将消息发送到一条虚拟的通道(主题或者队列)上;
消息接收者则订阅或者监听该爱通道。一条消息可能最终转发给一个或者多个消息接收者,这些消息接收者都无需对消息发送者做出同步回应。整个过程都是异步的。
案例:
也就是说,一个系统跟另一个系统之间进行通信的时候,假如系统A希望发送一个消息给系统B,让他去处理。但是系统A不关注系统B到底怎么处理或者有没有处理好,所以系统A把消息发送给MQ,然后就不管这条消息的“死活了”,接着系统B从MQ里面消费出来处理即可。至于怎么处理,是否处理完毕,什么时候处理,都是系统B的事儿,与系统A无关。
应用系统之间解耦合
发送者和接受者不必了解对方,只需要确认消息。
发送者和接受者不必同时在线。
MQ的缺点
两个系统之间不能同步调用,不能实时回复,不能响应某个调用的回复。
安装 ActiveMQ
安装启动 ActiveMQ
官网下载
https://activemq.apache.org/components/classic/download/
上传压缩包
上传压缩包到 Linux 系统的 opt 目录下。
解压
tar -zxf apache-activemq-5.16.2-bin.tar.gz
创建文件夹
mkdir /usr/local/activemq
移动解压文件夹
mv apache-activemq-5.16.2 /usr/local/activemq/apache-activemq-5.16.2
启动 ActiveMQ
cd /usr/local/activemq/apache-activemq-5.16.2/bin 进入 bin mul
./activemq start 启动,默认的启动端口 61616
./activemq restart 重新启动
./activemq stop 关闭
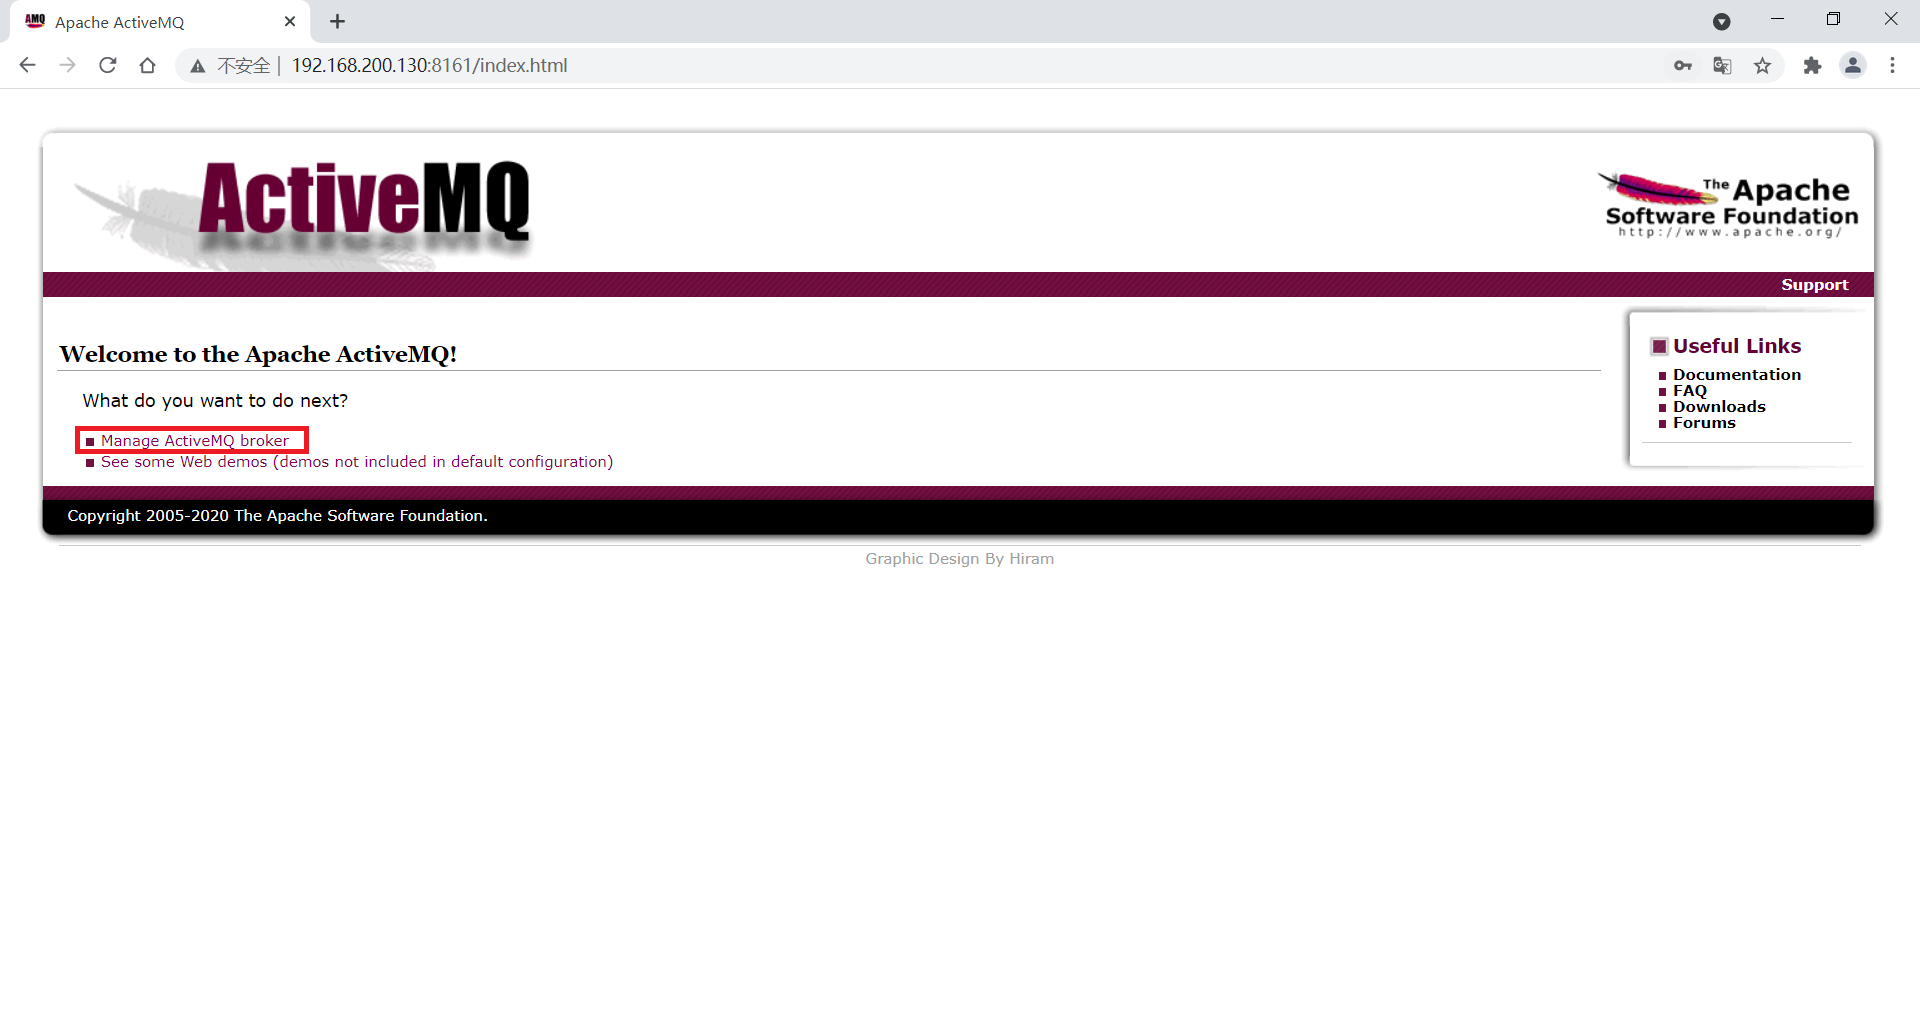
ActiveMQ 控制台
ActiveMQ 占用的端口
后台端口:61616
前台端口:8161
打开 端口
firewall-cmd --permanent --add-port=8161/tcp 开放前台端口
firewall-cmd --permanent --add-port=61616/tcp 开放后台端口
firewall-cmd --reload 重新载入
修改 conf 目录下的 jetty.xml 文件
将 host 属性从 127.0.0.1 修改为 0.0.0.0

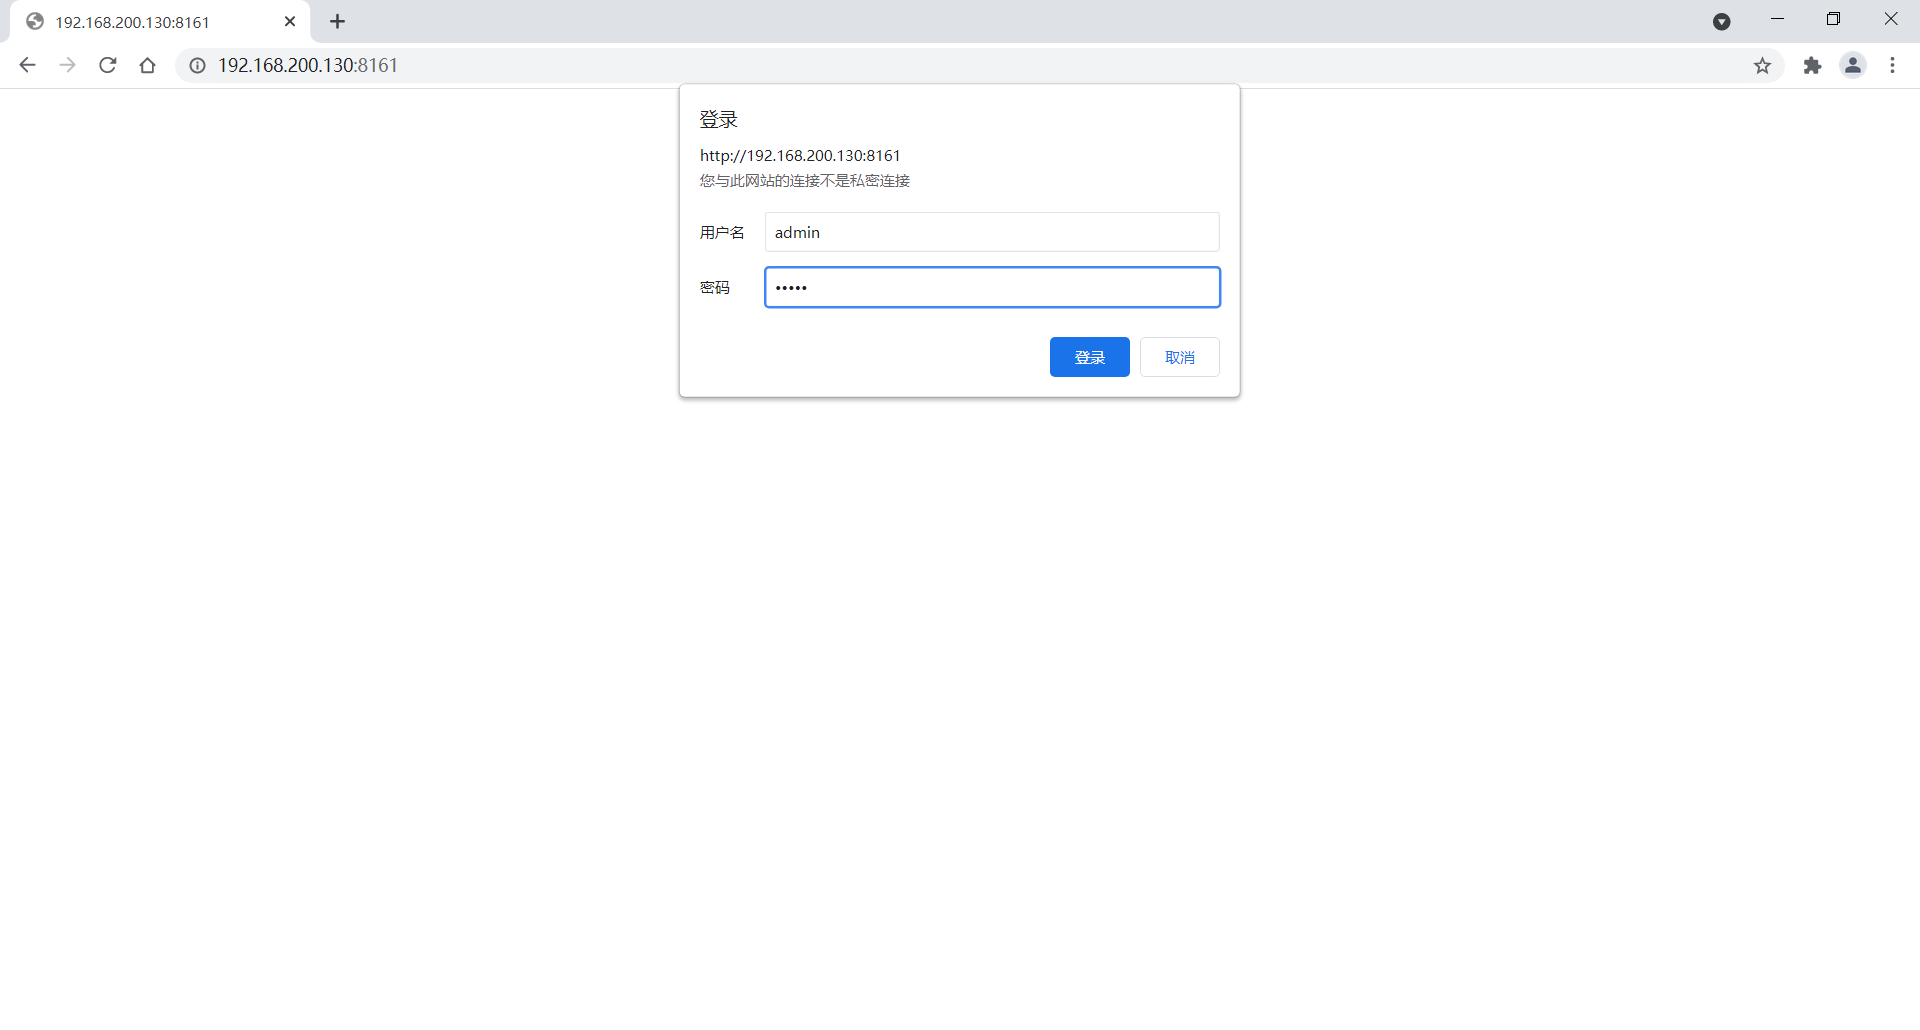
默认用户名和密码都为 amind
登录后的页面
Java 编码实现 ActiveMQ 通信
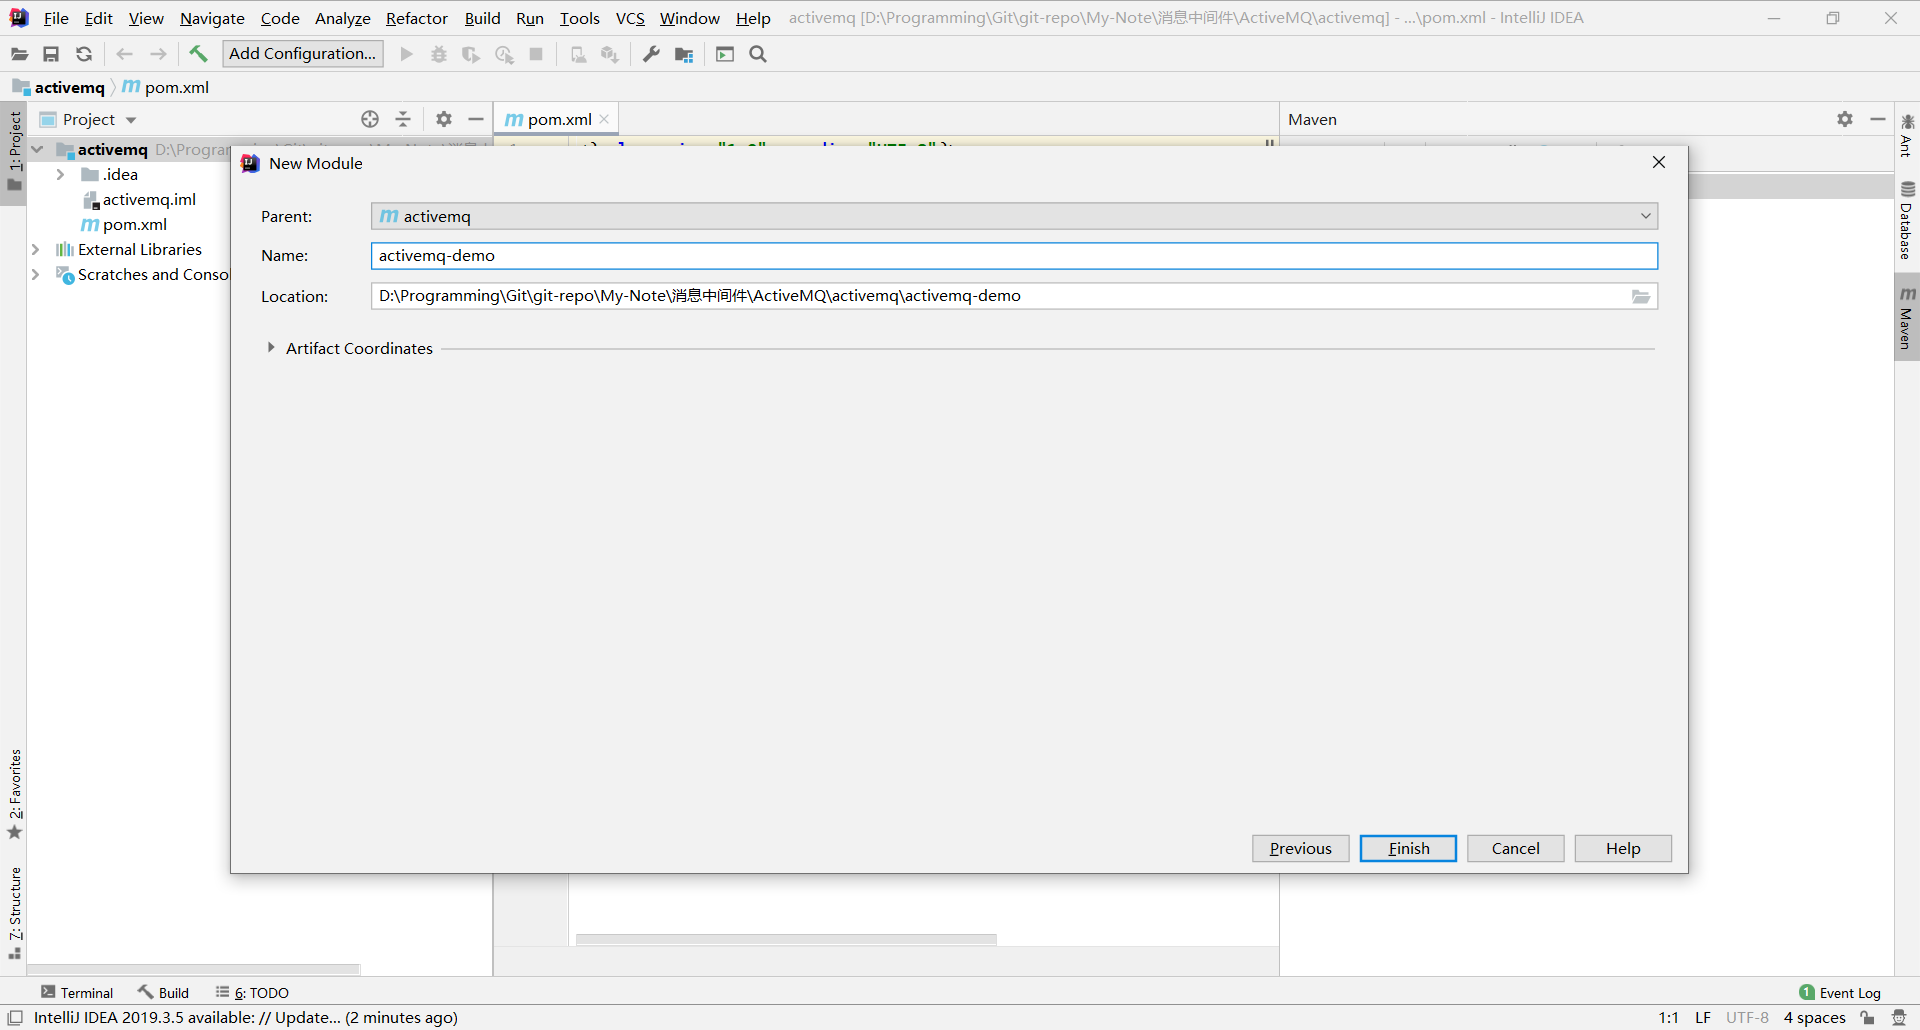
IDEA 创建 Maven 工程
POM
<?xml version="1.0" encoding="UTF-8"?>
<project xmlns="http://maven.apache.org/POM/4.0.0"
         xmlns:xsi="http://www.w3.org/2001/XMLSchema-instance"
         xsi:schemaLocation="http://maven.apache.org/POM/4.0.0 http://maven.apache.org/xsd/maven-4.0.0.xsd">
    <parent>
        <artifactId>activemq</artifactId>
        <groupId>org.hong</groupId>
        <version>1.0-SNAPSHOT</version>
    </parent>
    <modelVersion>4.0.0</modelVersion>

    <artifactId>activemq-demo</artifactId>

    <properties>
        <project.build.sourceEncoding>UTF-8</project.build.sourceEncoding>
    </properties>

    <dependencies>
        <!--  activemq  所需要的jar 包-->
        <dependency>
            <groupId>org.apache.activemq</groupId>
            <artifactId>activemq-all</artifactId>
            <version>5.16.2</version>
        </dependency>
        <!--  activemq 和 spring 整合的基础包-->
        <dependency>
            <groupId>org.apache.xbean</groupId>
            <artifactId>xbean-spring</artifactId>
            <version>4.18</version>
        </dependency>


        <dependency>
            <groupId>org.projectlombok</groupId>
            <artifactId>lombok</artifactId>
            <version>1.18.20</version>
        </dependency>
        <dependency>
            <groupId>org.slf4j</groupId>
            <artifactId>slf4j-api</artifactId>
            <version>1.7.30</version>
        </dependency>
        <dependency>
            <groupId>junit</groupId>
            <artifactId>junit</artifactId>
            <version>4.13</version>
            <scope>test</scope>
        </dependency>
        <dependency>
            <groupId>ch.qos.logback</groupId>
            <artifactId>logback-classic</artifactId>
            <version>1.2.3</version>
        </dependency>
    </dependencies>

</project>
JMS编码总体规范
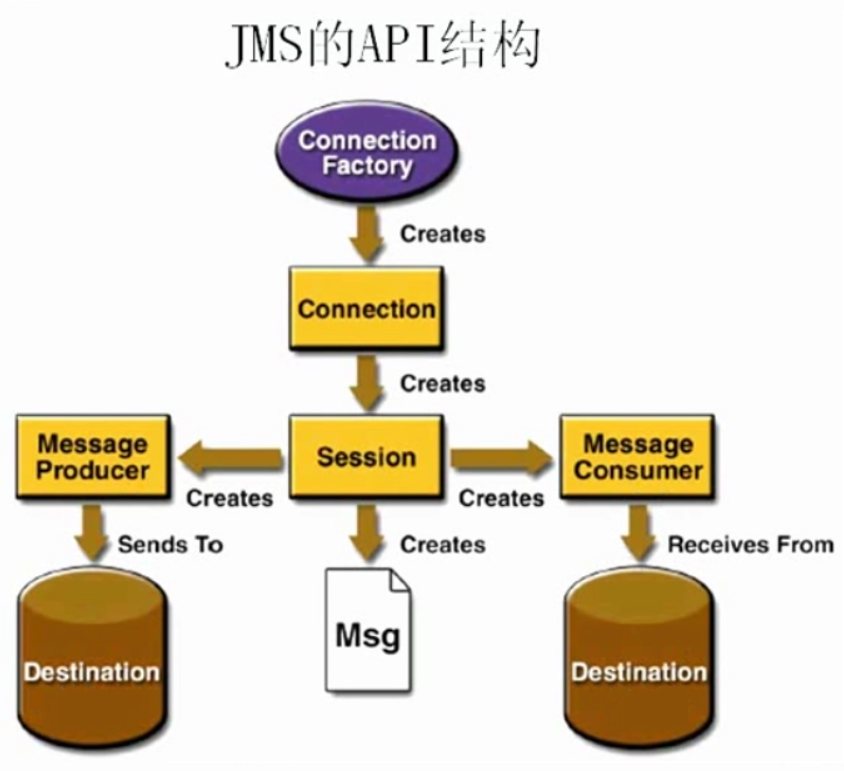
Destination是目的地。Destination分为两种:队列 ( 一对一 ) 和主题 ( 一对多 )。
队列 ( Queue ) 案例
队列消息生产者的入门案例
代码实现
package org.hong.activemq;

import org.apache.activemq.ActiveMQConnectionFactory;

import javax.jms.*;

public class JmsProduce {
    private static final String ACTIVE_URL = "tcp://192.168.200.130:61616";
    private static final String QUEUE_NAME = "queue01";

    public static void main(String[] args) throws JMSException {
        // 1.按照给定的url, 创建连接工厂, 使用默认的用户名和密码
        ActiveMQConnectionFactory activeMQConnectionFactory = new ActiveMQConnectionFactory(ACTIVE_URL);
        // 2.通过连接工厂获得连接connection并启动
        Connection connection = activeMQConnectionFactory.createConnection();
        connection.start();

        // 3.创建会话session
        // 3.1.参数一: 事务 参数二: 签收
        Session session = connection.createSession(false, Session.AUTO_ACKNOWLEDGE);

        // 4.创建目的地(具体是队列还是主题topic)
        Queue queue = session.createQueue(QUEUE_NAME);

        // 5.创建消息的生产者
        MessageProducer producer = session.createProducer(queue);

        for (int i = 0; i < 3; i++) {
            // 6.Session创建消息
            TextMessage textMessage = session.createTextMessage("msg---" + i);// 理解为一个字符串
            // 7.MessageProducer发送消息给MQ
            producer.send(textMessage);
        }

        // 8.关闭资源
        producer.close();
        session.close();
        connection.close();

        System.out.println("消息发布到MQ完成");
    }
}
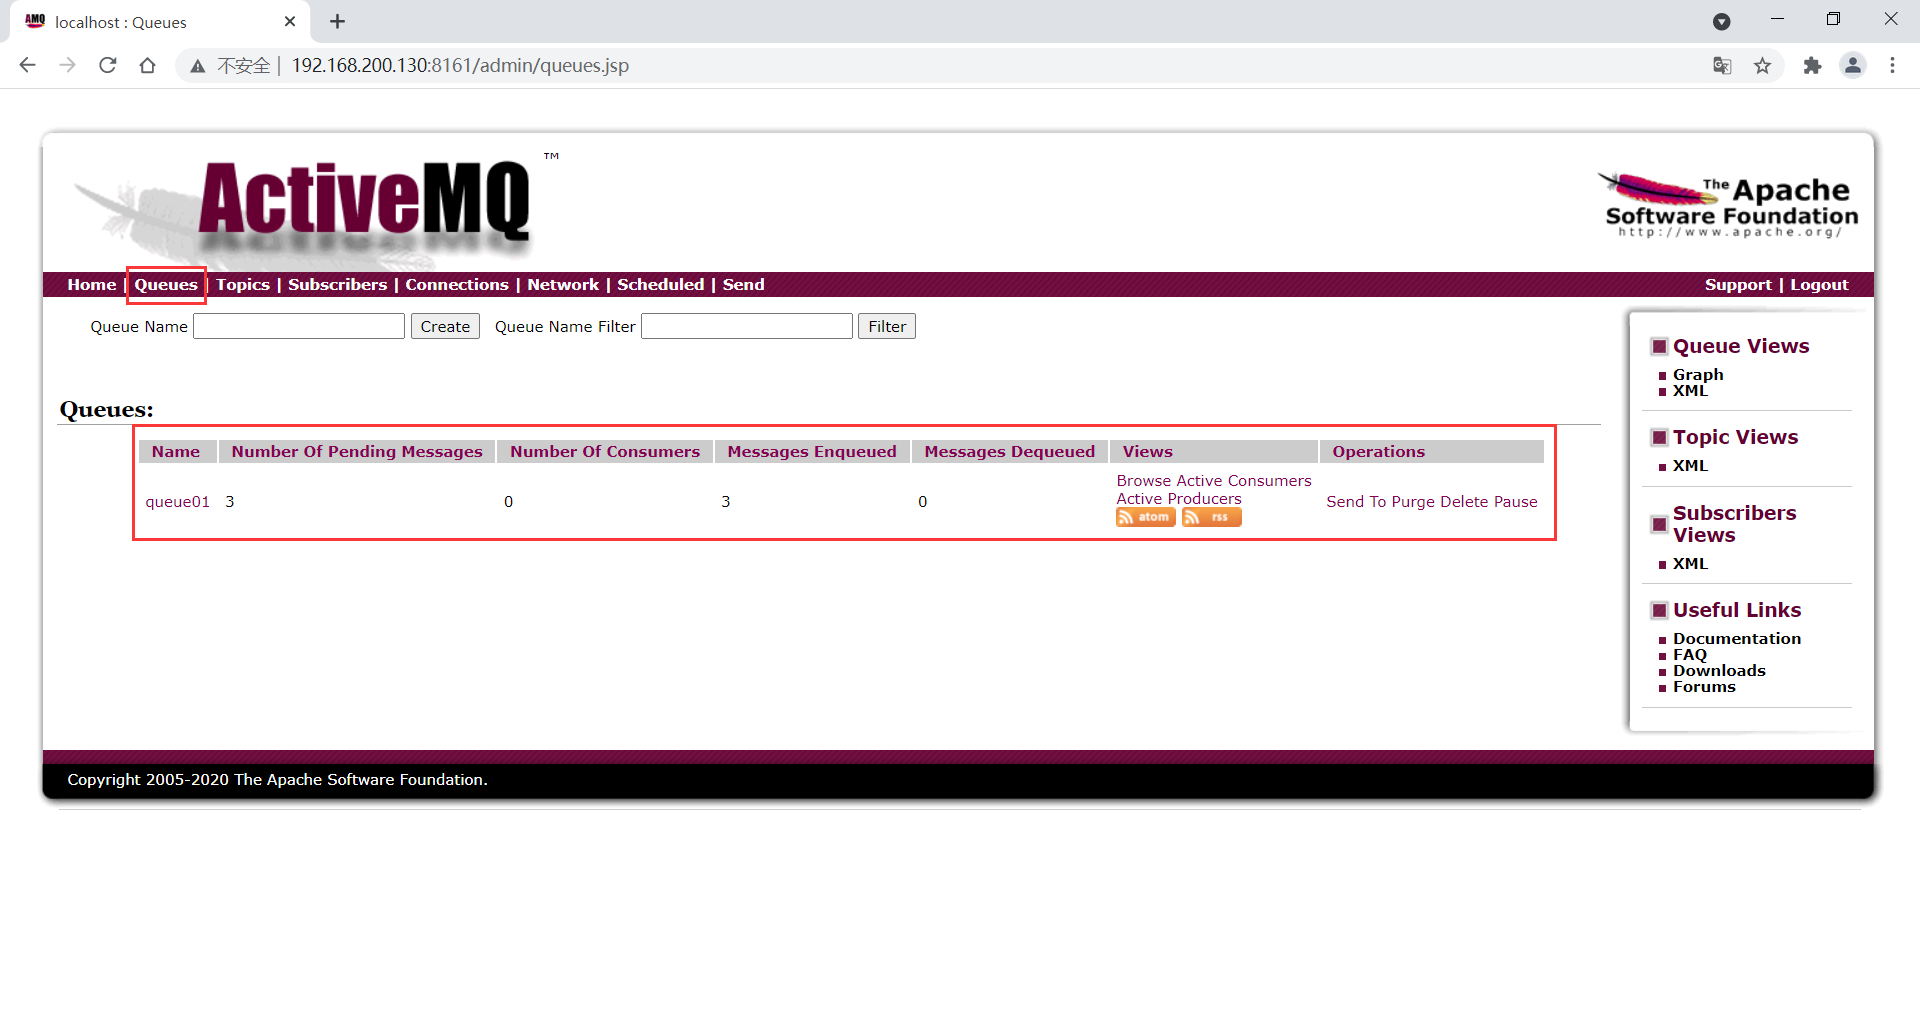
ActiveMQ 控制台
谷歌翻译:
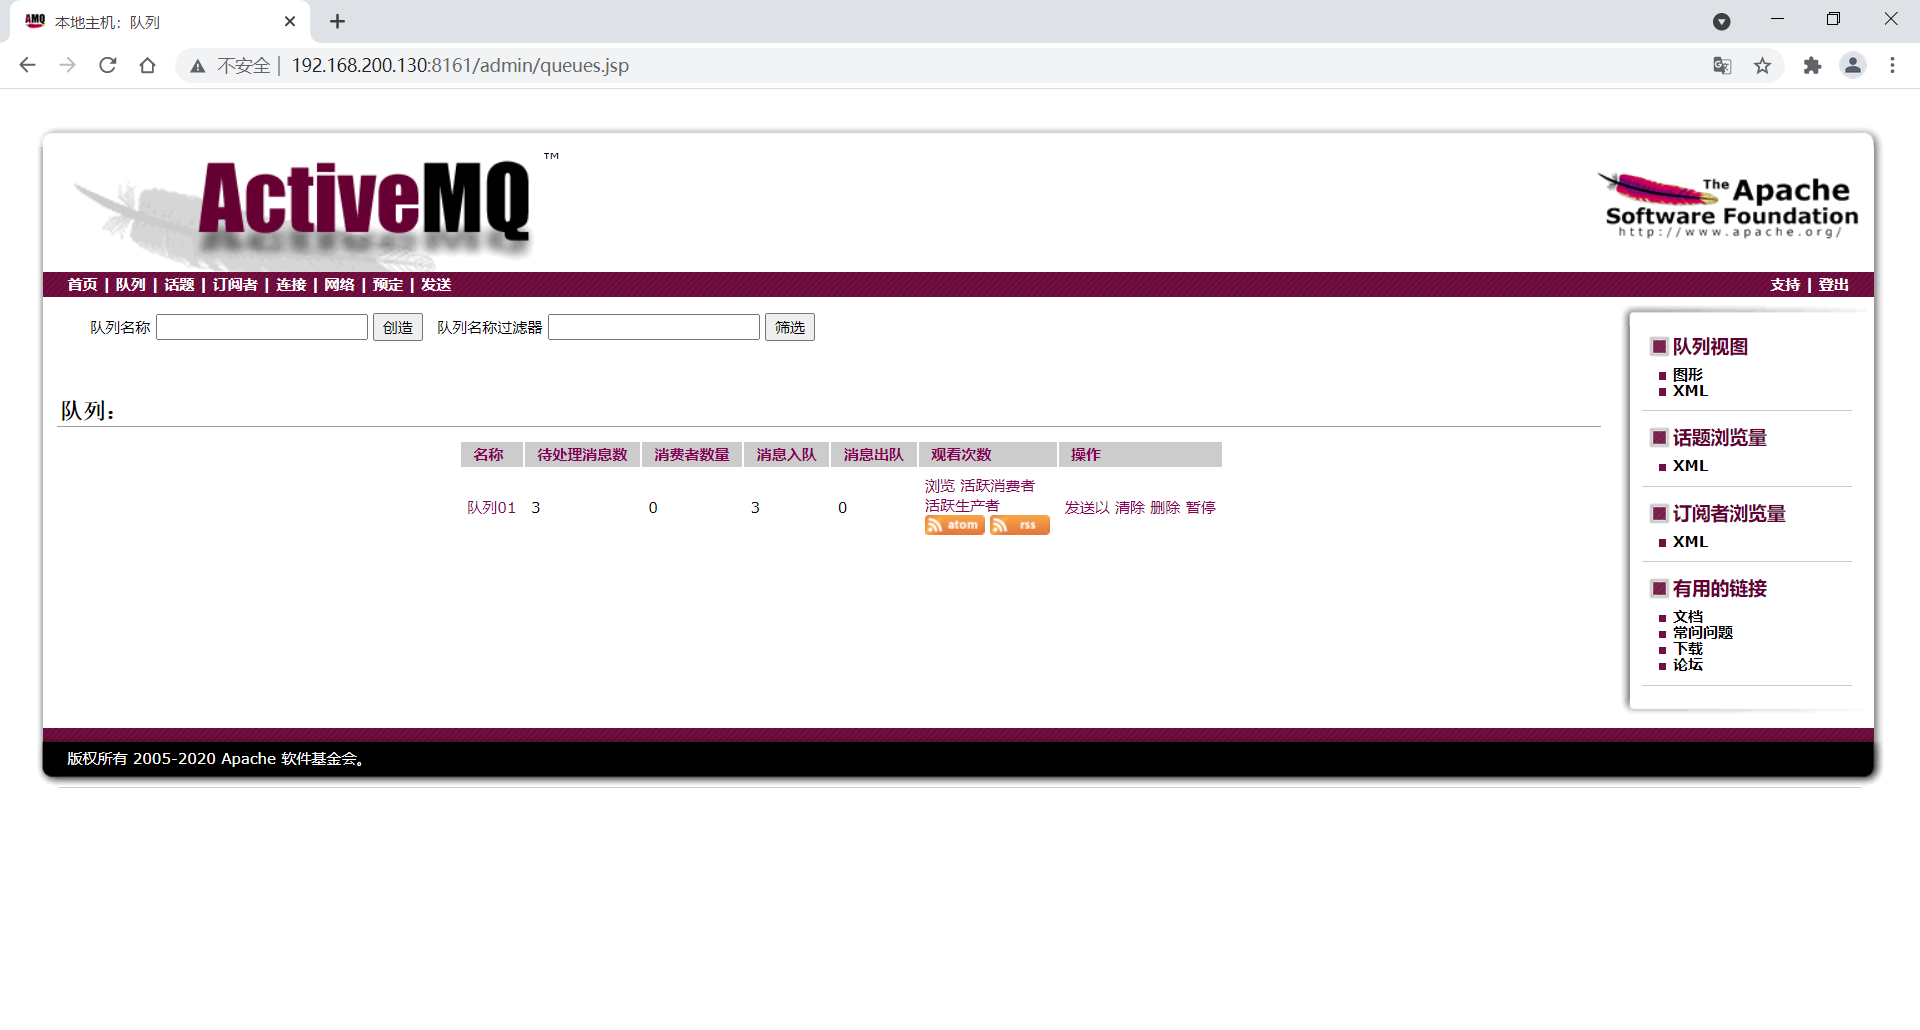
ActiveMQ 控制台列说明
| 英文 | 解释 | 详细信息 |
|---|---|---|
| Number Of Pending Messages | 等待消费的消息 | 这个是未出队列的数量,公式=总接收数-总出队列数。 |
| Number Of Consumers | 消费者数量 | 消费者端的消费者数量。只计算当前为连接状态的。 |
| Messages Enqueued | 进队列的总消息量 | 包括出队列的。这个数只增不减。 |
| Messages Dequeued | 出队消息数 | 可以理解为是消费者消费掉的数量。 |
总结:
当有一个消息进入这个队列时,等待消费的消息是1,进入队列的消息是1。
当消息消费后,等待消费的消息是0,进入队列的消息是1,出队列的消息是1。
当再来一条消息时,等待消费的消息是1,进入队列的消息就是2。
队列消息消费者的入门案例
代码实现
介绍
同步阻塞方式( receive() )。订阅者或接收者调用MessageConsumer的receive()方法来接收消息,receive方法在能够接收到消息之前 ( 或超时之前 ) 将一直阻塞。
package org.hong.activemq;

import org.apache.activemq.ActiveMQConnectionFactory;

import javax.jms.*;

public class JmsConsumer {
    private static final String ACTIVE_URL = "tcp://192.168.200.130:61616";
    private static final String QUEUE_NAME = "queue01";

    public static void main(String[] args) throws JMSException {
        // 1.按照给定的url, 创建连接工厂, 使用默认的用户名和密码
        ActiveMQConnectionFactory activeMQConnectionFactory = new ActiveMQConnectionFactory(ACTIVE_URL);
        // 2.通过连接工厂获得连接connection并启动
        Connection connection = activeMQConnectionFactory.createConnection();
        connection.start();

        // 3.创建会话session
        // 3.1.参数一: 事务 参数二: 签收
        Session session = connection.createSession(false, Session.AUTO_ACKNOWLEDGE);

        // 4.创建目的地(具体是队列还是主题topic)
        Queue queue = session.createQueue(QUEUE_NAME);

        // 5.创建消息消费者
        MessageConsumer consumer = session.createConsumer(queue);

        while (true) {
            // 6.消费消息
            TextMessage textMessage = (TextMessage) consumer.receive();
            if(textMessage != null){
                System.out.println("消费者接收到消息:" + textMessage.getText());
            }else{
                break;
            }
        }

        // 7.关闭资源
        consumer.close();
        session.close();
        connection.close();
    }
}
控制台
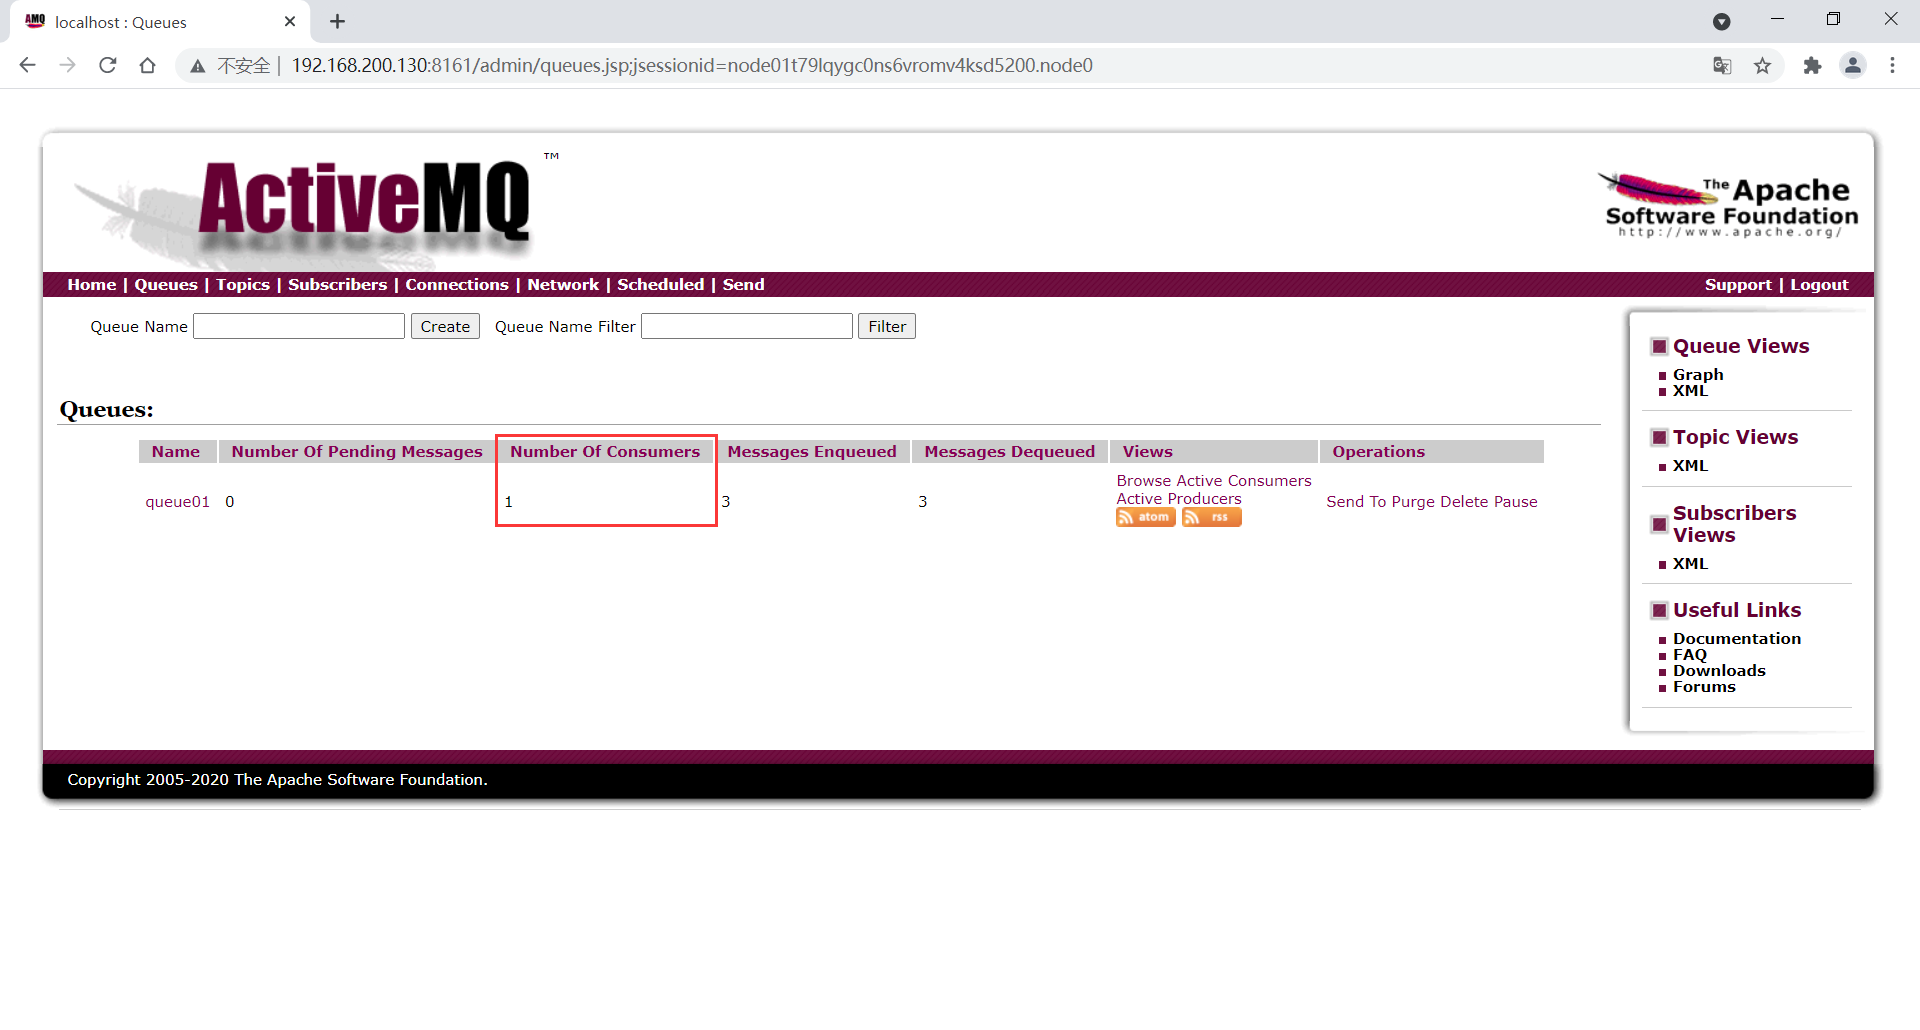
消息正常取出,但是程序并没有结束,依据在运行;由于我们调用的是 receive() 无参方法,消费者会一直等待,直到获取到消息,因此程序不会停止。

ActiveMQ 控制台
消息消费者数量为1。
receive 方法详解
receive() 空参方法
有消息取出消息;没有消息一直等待,直到有消息。
receive(long time) 带参方法
有消息取出消息;没有消息等待指定毫秒数,如果还是没有消息,返回 null。
Number Of Consumers 介绍
上面的案例:消费者端使用的是 receive() 空参方法,ActiveMQ 控制台中 Number Of Consumers 的值为1。
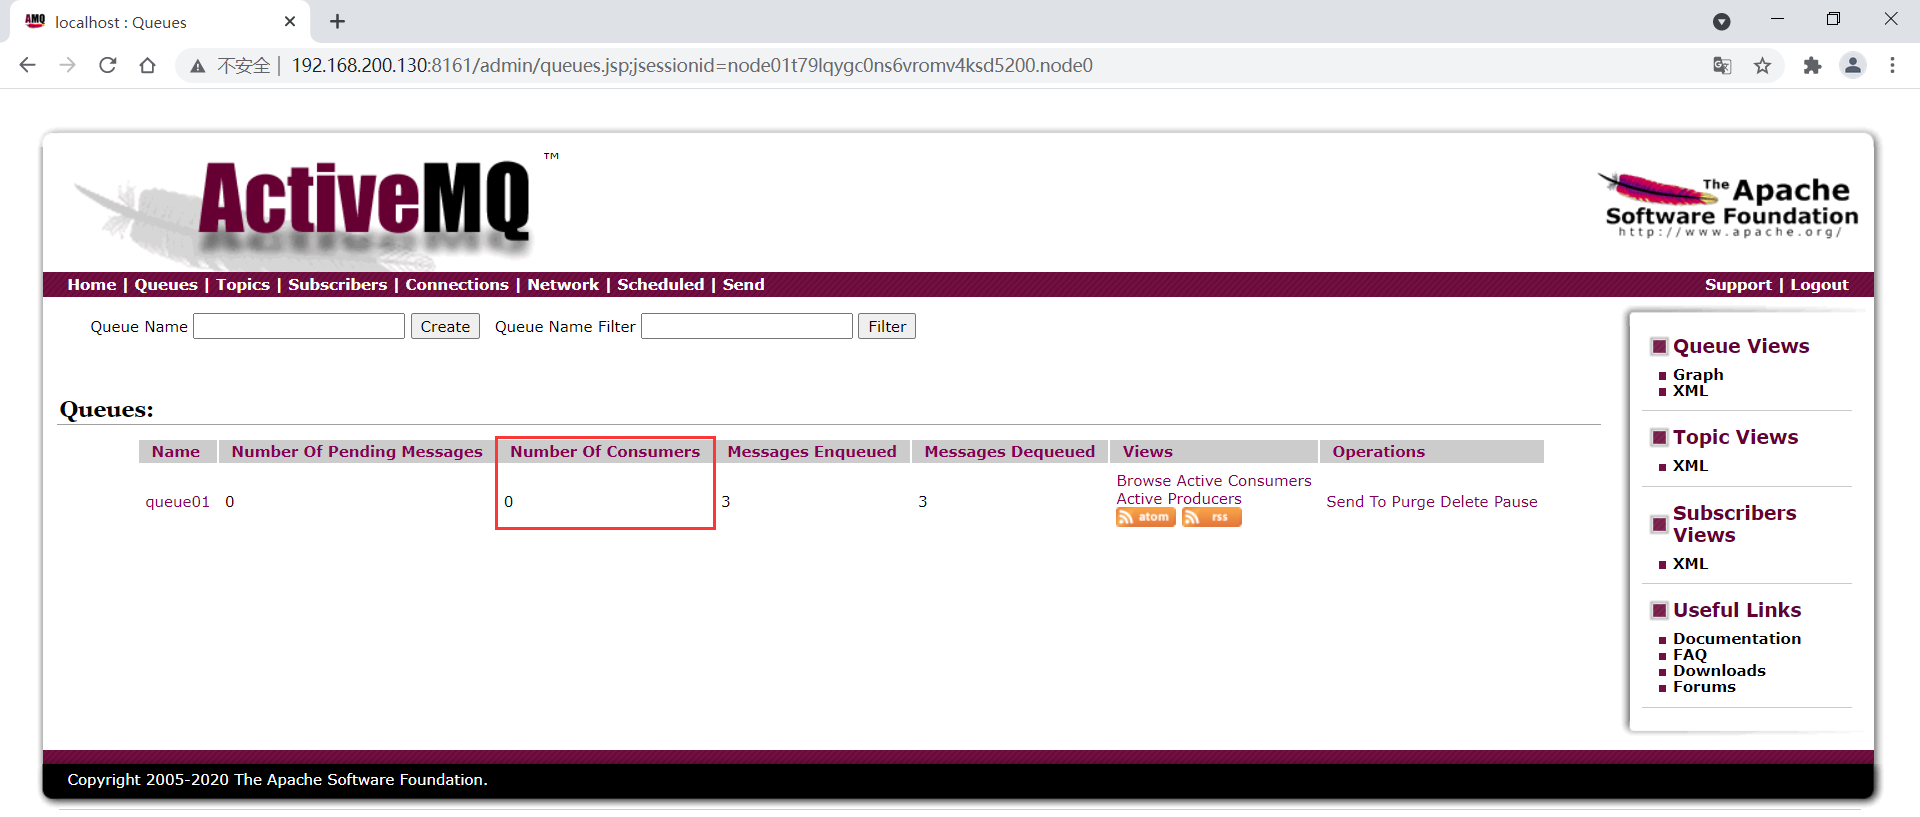
现在强制结束消费者端的程序,再次查看 ActiveMQ 控制台中 Number Of Consumers 的值变成了0。
异步监听式消费者(MessageListener)
package org.hong.activemq;

import org.apache.activemq.ActiveMQConnectionFactory;

import javax.jms.*;
import java.io.IOException;

public class JmsConsumer {
    private static final String ACTIVE_URL = "tcp://192.168.200.130:61616";
    private static final String QUEUE_NAME = "queue01";

    public static void main(String[] args) throws JMSException, IOException {
        // 1.按照给定的url, 创建连接工厂, 使用默认的用户名和密码
        ActiveMQConnectionFactory activeMQConnectionFactory = new ActiveMQConnectionFactory(ACTIVE_URL);
        // 2.通过连接工厂获得连接connection并启动
        Connection connection = activeMQConnectionFactory.createConnection();
        connection.start();

        // 3.创建会话session
        // 3.1.参数一: 事务 参数二: 签收
        Session session = connection.createSession(false, Session.AUTO_ACKNOWLEDGE);

        // 4.创建目的地(具体是队列还是主题topic)
        Queue queue = session.createQueue(QUEUE_NAME);

        // 5.创建消息消费者
        MessageConsumer consumer = session.createConsumer(queue);

        consumer.setMessageListener(message -> {
            // message就是监听器获得到的消息对象
            if(message != null && message instanceof TextMessage){
                TextMessage textMessage = (TextMessage) message;
                try {
                    System.out.println("消费者接收到消息:" + textMessage.getText());
                } catch (JMSException e) {
                    e.printStackTrace();
                }
            }
        });
        // 让主线程不要结束。因为一旦主线程结束了,其他的线程(如此处的监听消息的线程)也都会被迫结束。
        // 实际开发中,我们的程序会一直运行,这句代码都会省略。
        System.in.read();
        consumer.close();
        session.close();
        connection.close();
    }
}
队列消息(Queue)总结
两种消费方式
同步阻塞方式(receive)
订阅者或接收者抵用MessageConsumer的receive()方法来接收消息,receive方法在能接收到消息之前(或超时之前)将一直阻塞。
异步非阻塞方式(监听器onMessage())
订阅者或接收者通过MessageConsumer的setMessageListener(MessageListener listener)注册一个消息监听器,当消息到达之后,系统会自动调用监听器MessageListener的onMessage(Message message)方法。
队列的特点
- 每个消息只能有一个消费者,类似1对1的关系。好比个人快递自己领自己的。
- 消息的生产者和消费者之间没有时间上的相关性。无论消费者在生产者发送消息的时候是否处于运行状态,消费者都可以提取消息。好比我们发送短信,发送者发送后不见得接收者会即收即看。
- 消息被消费后队列中不会再存储,所以消费者不会消费到已经被消费掉的消息。
消息消费情况
情况1:只启动消费者1。
结果:消费者1会消费所有的数据。
情况2:先启动消费者1,再启动消费者2。
结果:消费者1消费所有的数据。消费者2不会消费到消息。
情况3:生产者发布6条消息,在此之前已经启动了消费者1和消费者2。
结果:消费者1和消费者2平摊了消息。各自消费3条消息。
疑问:怎么去将消费者1和消费者2不平均分摊呢?而是按照各自的消费能力去消费。我觉得,现在ActiveMQ就是这样的机制。
JMS 编码步骤
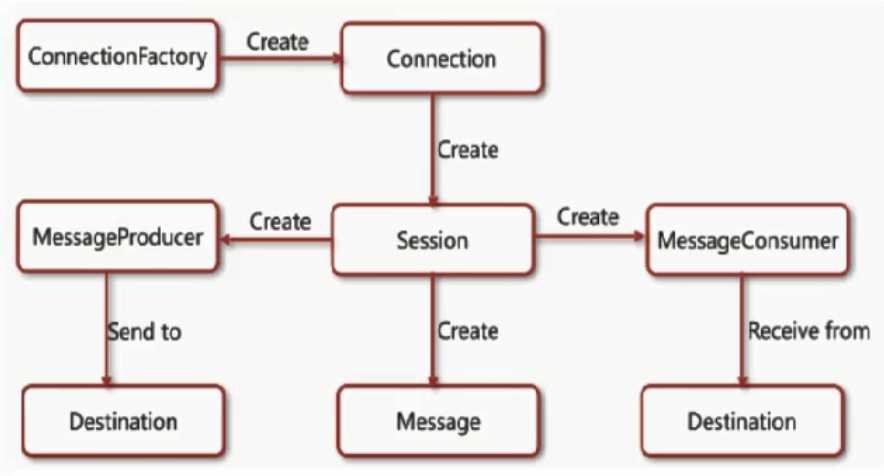
- 创建 ConnectionFacory
- 通过 ConnectionFacory 创建 JMS Connection
- 启动 JMS Connection
- 通过 Connection 创建 JMS Session
- 创建 JMS Destination
- 创建 JMS Producer 或者创建 JMS Message 并设置 Destination
- 创建 JMS Consumer 或者是注册一个 JMS Message Listener
- 发送或者接收 JMS Message
- 关闭所有的 JMS 资源 ( Connection、Session、Producer、Consumer 等 )
主题 ( Topic ) 案例
介绍
在发布订阅消息传递域中,目的地被称为主题(topic)
发布/订阅消息传递域的特点如下:
- 生产者将消息发布到topic中,每个消息可以有多个消费者,属于1:N的关系;、
- 生产者和消费者之间有时间上的相关性。订阅某一个主题的消费者只能消费自它订阅之后发布的消息。
- 生产者生产时,topic不保存消息它是无状态的不落地,假如无人订阅就去生产,那就是一条废消息,所以,一般先启动消费者再启动生产者。
默认情况下如上所述,但是JMS规范允许客户创建持久订阅,这在一定程度上放松了时间上的相关性要求。持久订阅允许消费者消费它在未处于激活状态时发送的消息。一句话,好比我们的微信公众号订阅
主题生产者入门案例
package org.hong.activemq;

import org.apache.activemq.ActiveMQConnectionFactory;

import javax.jms.*;

public class JmsProduceTopic {
    private static final String ACTIVE_URL = "tcp://192.168.200.130:61616";
    private static final String TOPIC_NAME = "topic01";

    public static void main(String[] args) throws JMSException {
        // 1.按照给定的url, 创建连接工厂, 使用默认的用户名和密码
        ActiveMQConnectionFactory activeMQConnectionFactory = new ActiveMQConnectionFactory(ACTIVE_URL);
        // 2.通过连接工厂获得连接connection并启动
        Connection connection = activeMQConnectionFactory.createConnection();
        connection.start();

        // 3.创建会话session
        // 3.1.参数一: 事务 参数二: 签收
        Session session = connection.createSession(false, Session.AUTO_ACKNOWLEDGE);

        // 4.创建目的地(具体是队列还是主题topic)
        Topic topic = session.createTopic(TOPIC_NAME);

        // 5.创建消息的生产者
        MessageProducer producer = session.createProducer(topic);

        for (int i = 0; i < 3; i++) {
            // 6.Session创建消息
            TextMessage textMessage = session.createTextMessage("topicmsg---" + i);// 理解为一个字符串
            // 7.MessageProducer发送消息给MQ
            producer.send(textMessage);
        }

        // 8.关闭资源
        producer.close();
        session.close();
        connection.close();

        System.out.println("Topic消息发布到MQ完成");
    }
}
主题消费者入门案例
package org.hong.activemq;

import org.apache.activemq.ActiveMQConnectionFactory;

import javax.jms.*;
import java.io.IOException;

public class JmsConsumerTopic {
    private static final String ACTIVE_URL = "tcp://192.168.200.130:61616";
    private static final String TOPIC_NAME = "topic01";

    public static void main(String[] args) throws JMSException, IOException {
        // 1.按照给定的url, 创建连接工厂, 使用默认的用户名和密码
        ActiveMQConnectionFactory activeMQConnectionFactory = new ActiveMQConnectionFactory(ACTIVE_URL);
        // 2.通过连接工厂获得连接connection并启动
        Connection connection = activeMQConnectionFactory.createConnection();
        connection.start();

        // 3.创建会话session
        // 3.1.参数一: 事务 参数二: 签收
        Session session = connection.createSession(false, Session.AUTO_ACKNOWLEDGE);

        // 4.创建目的地(具体是队列还是主题topic)
        Topic topic = session.createTopic(TOPIC_NAME);

        // 5.创建消息消费者
        MessageConsumer consumer = session.createConsumer(topic);

        // 6.使用监听的方式消费消息
        consumer.setMessageListener(message -> {
            // message就是监听器获得到的消息对象
            if(message != null && message instanceof TextMessage){
                TextMessage textMessage = (TextMessage) message;
                try {
                    System.out.println("消费者接收到消息:" + textMessage.getText());
                } catch (JMSException e) {
                    e.printStackTrace();
                }
            }
        });

        // 7.关闭资源
        System.in.read();
        consumer.close();
        session.close();
        connection.close();
    }
}
测试
先启动消费者,再启动生产者
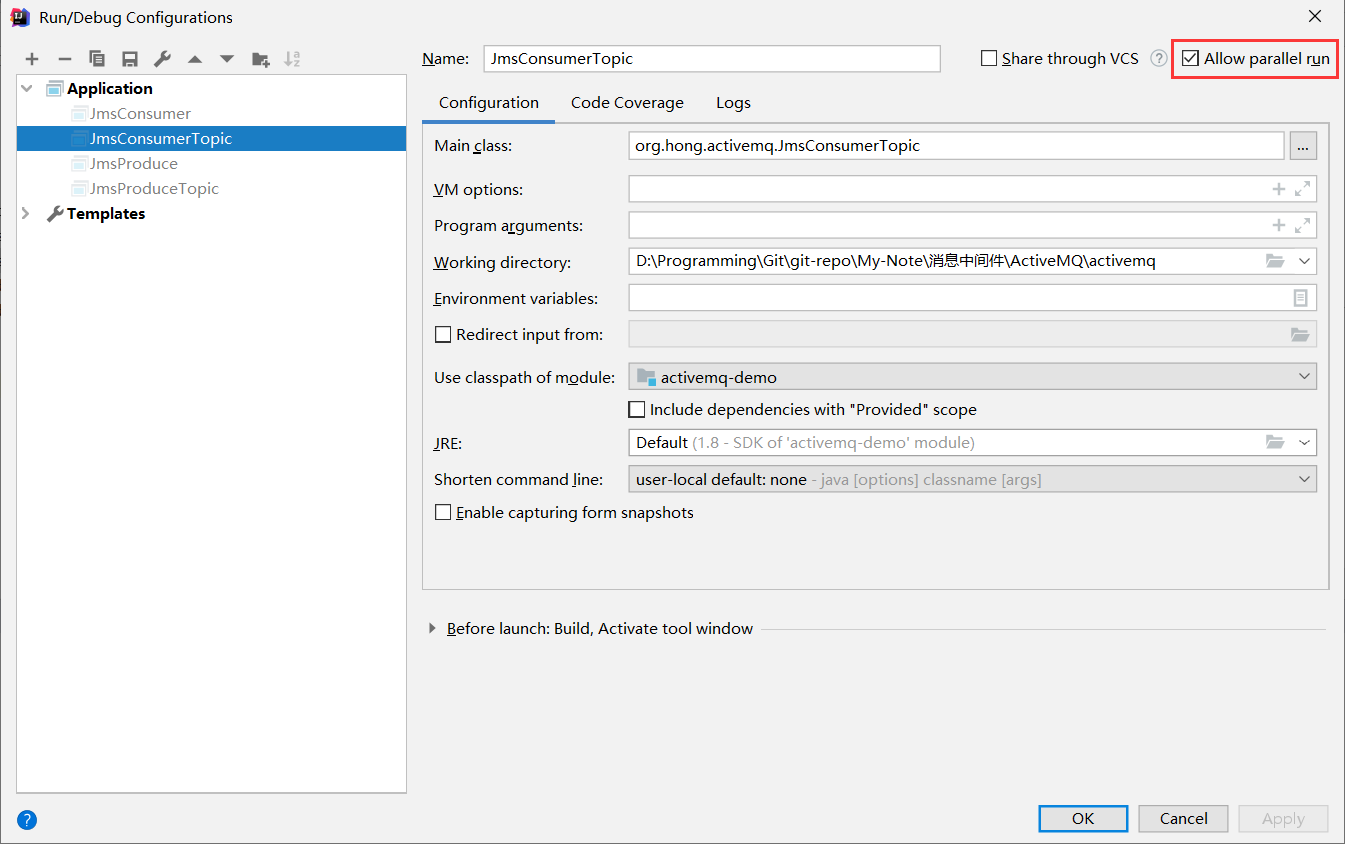
启动2个消费者
IDEA 设置一下启动项。
ActiveMQ 控制台
可以看到 topic01 现在有2个消费者,正常;其他的主题是 ActiveMQ 自动生成的,不用管,后面再说。
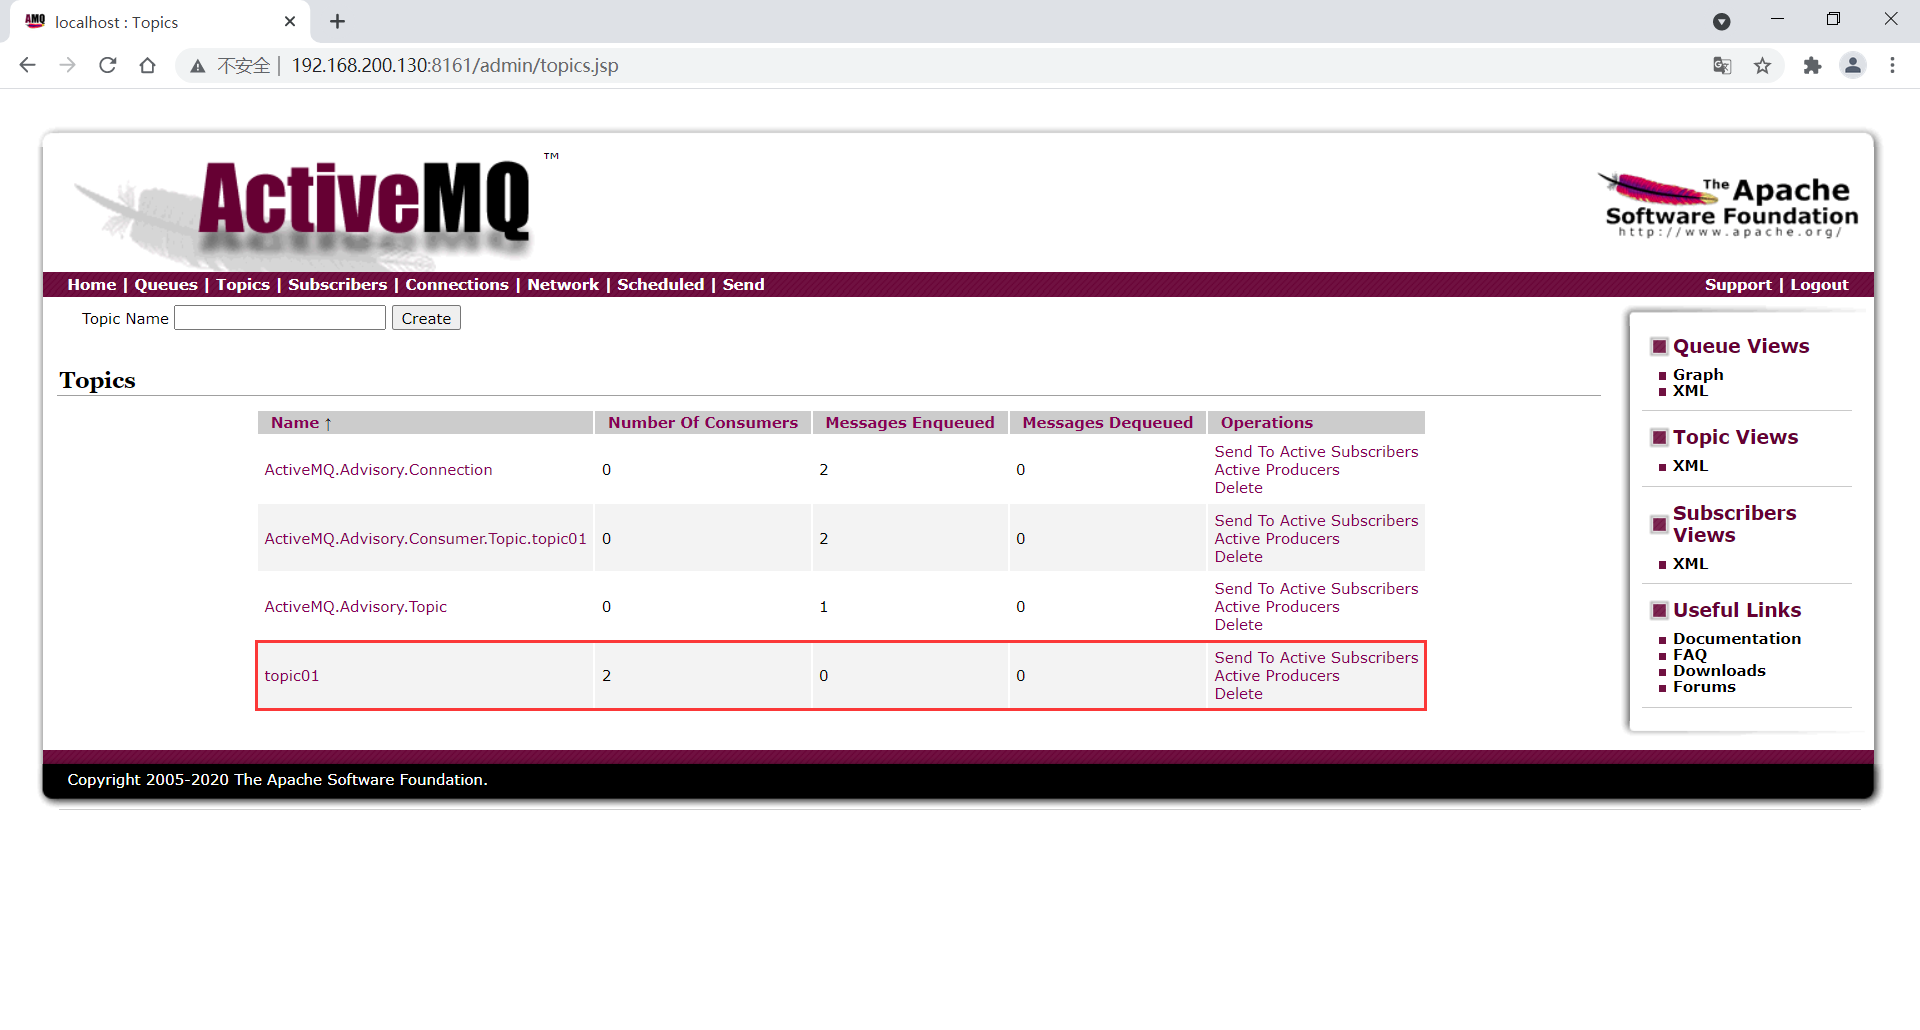
启动生产者
刚刚生成出来的消息立马被消费掉,正常。
生产者控制台打印
消息生产完成

消费者控制台打印
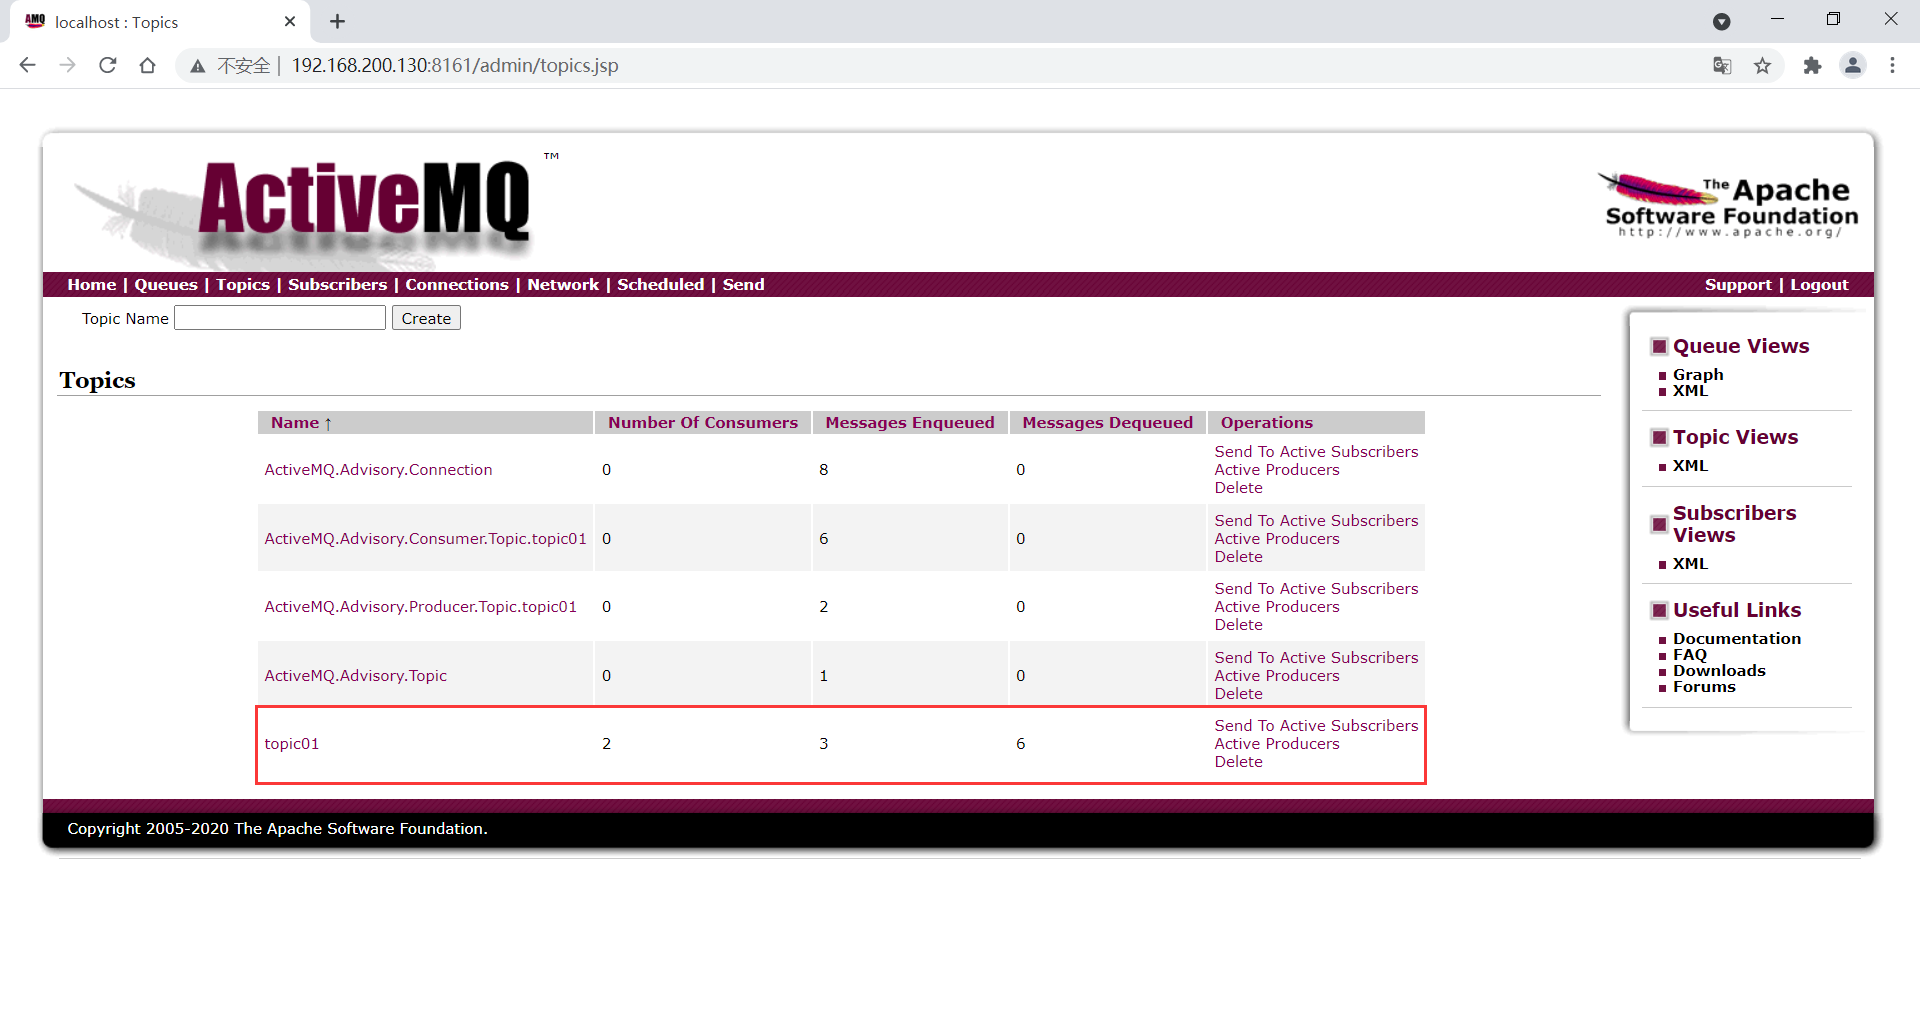
1号消费者和2号消费者都消费了3条消息


ActiveMQ 控制台
先启动生产者,再启动消费者
启动生产者
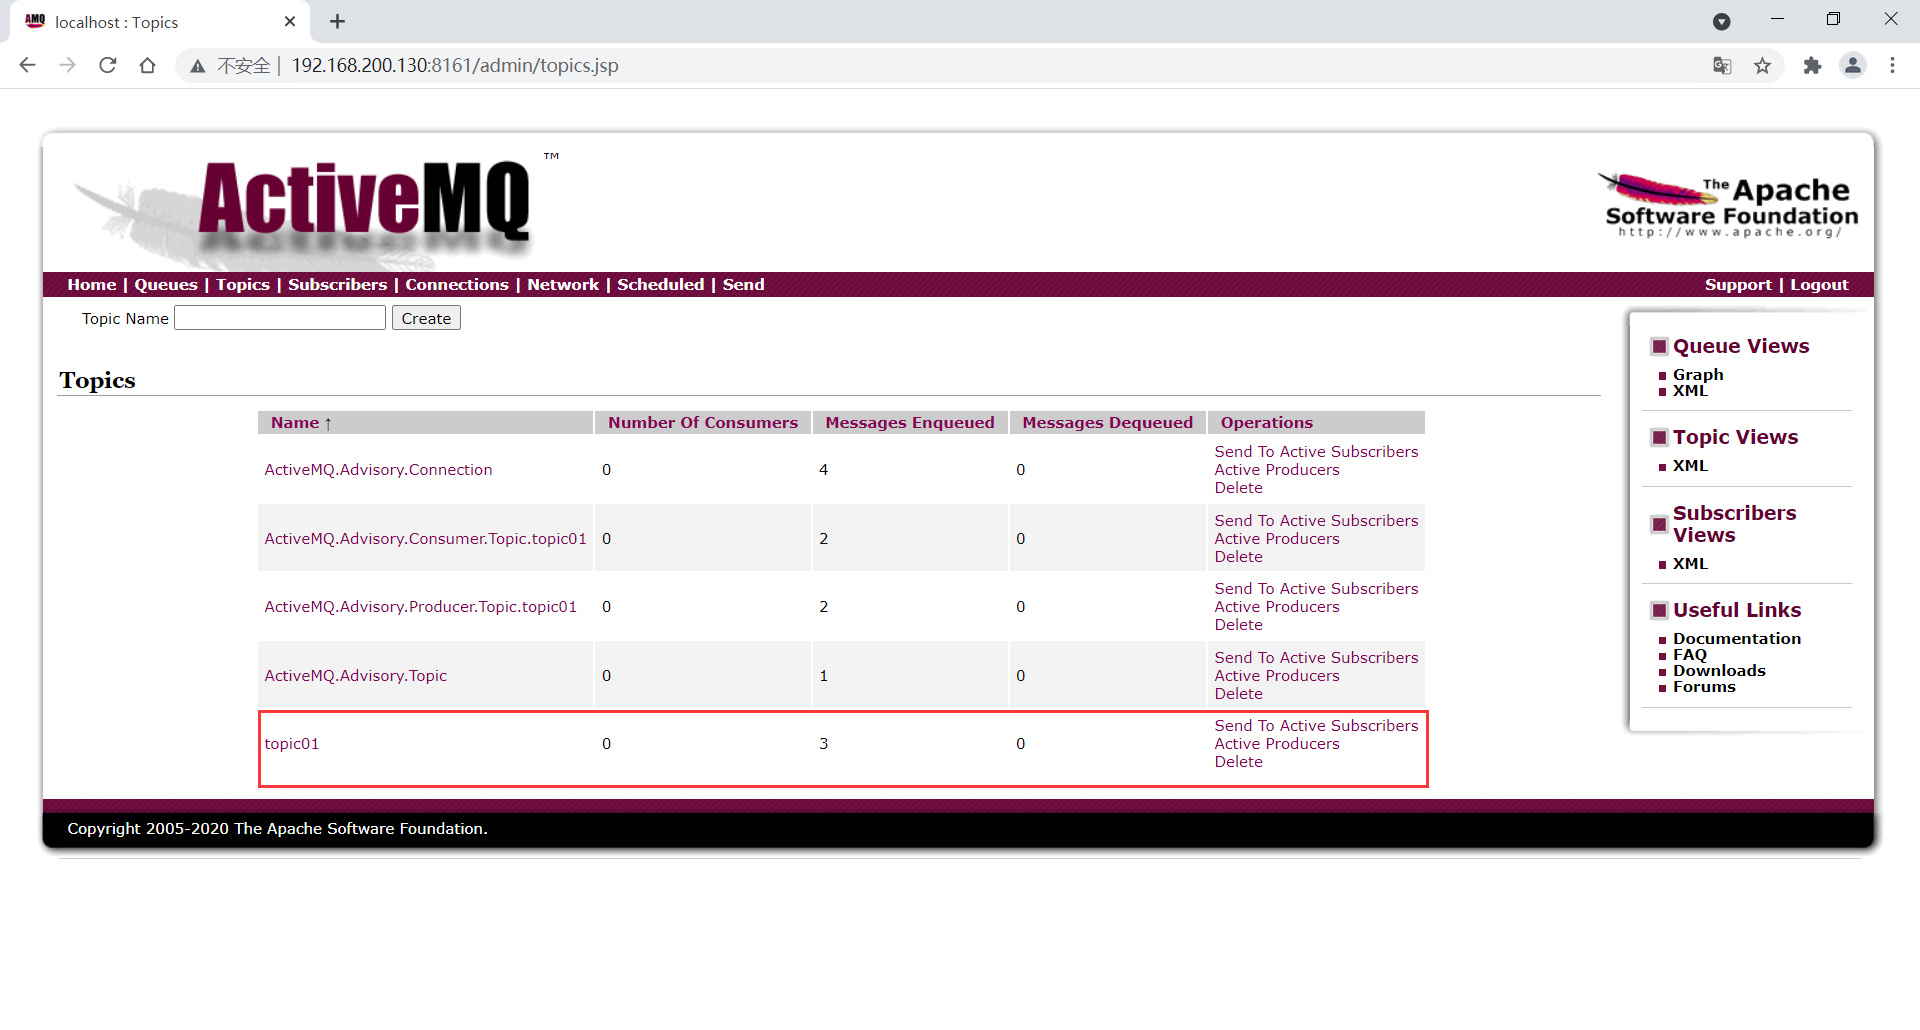
启动消费者
控制台打印
没有消费到任何消息

ActiveMQ 控制台
出队消息为0
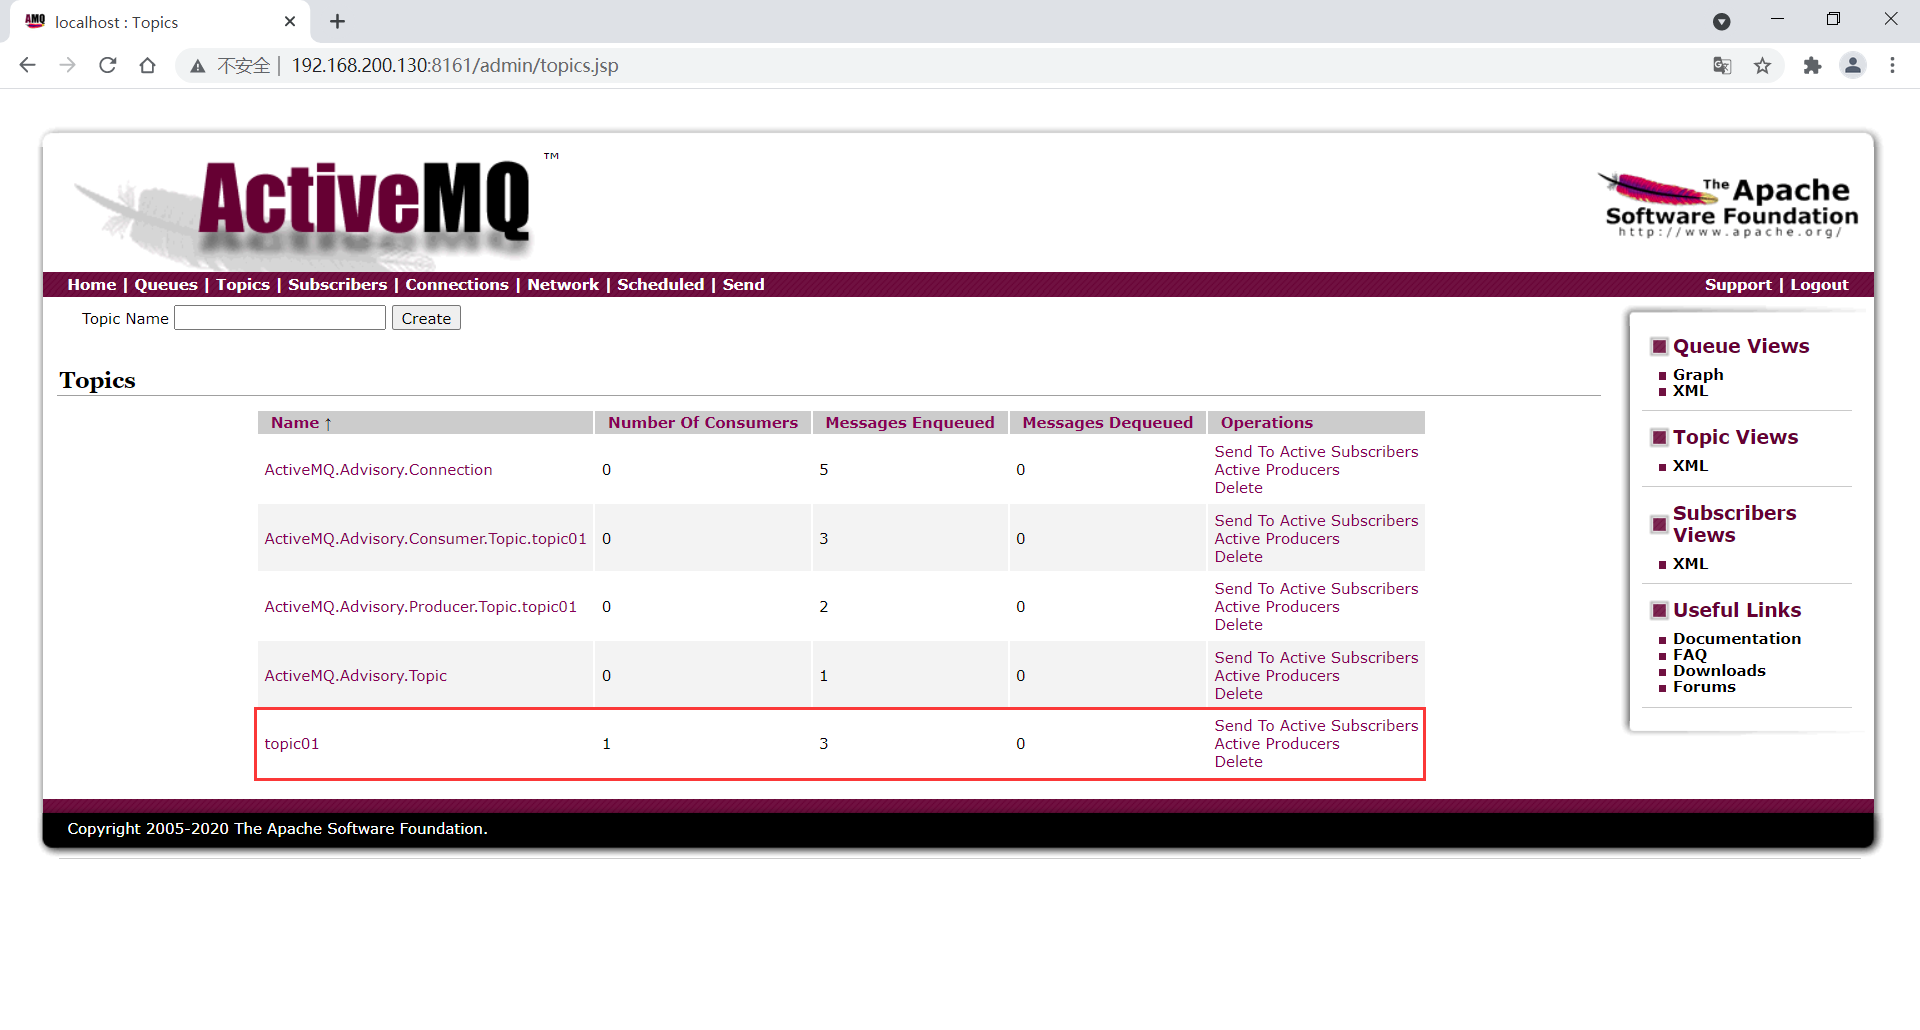
队列和主题的比较
| 比较项目 | Topic 模式队列 | Queue 模式队列 |
|---|---|---|
| 工作模式 | "订阅-发布" 模式,如果当前没有订阅者,消息将会被丢弃。如果有多个订阅者,那么这些订阅者都会收到消息 | "负载均衡" 模式,如果当前没有消费者,消息也不会丢弃;如果有多个消费者,那么一条消息也只会发送给其中一个消费者,并且要求消费者ack消息。 |
| 有无状态 | 无状态 | Queue数据默认会在MQ服务器上以文件行形式保存,比如 ActiveMQ 一般保存在 $AMQ_HOME\data\kr-store\data 下面,也可以配置成 DB 存储。 |
| 传递完整性 | 如果没有订阅者,消息会被丢弃。 | 消息不会被丢弃。 |
| 处理效率 | 由于消息要按照订阅者的数量进行复制,所以处理性能会随着订阅者的增加而明显降低,并且还要结合不同的消息协议自身的性能差异。 | 由于一条消息只发送给一个消费者,所有就算消费者再多,性能也不会有明显的降低。当然不同消息协议的具体性能也是有差异的。 |
JMS 规范
JMS 是什么
什么是Java消息服务?
Java消息服务指的是两个应用程序之间进行异步通信的API,它为标准协议和消息服务提供了一组通用接口,包括创建、发送、读取消息等,用于支持Java应用程序开发。在JavaEE中,当两个应用程序使用JMS进行通信时,它们之间不是直接相连的,而是通过一个共同的消息收发服务组件关联起来以达到解耦/异步削峰的效果。
JMS 的组成结构和特点
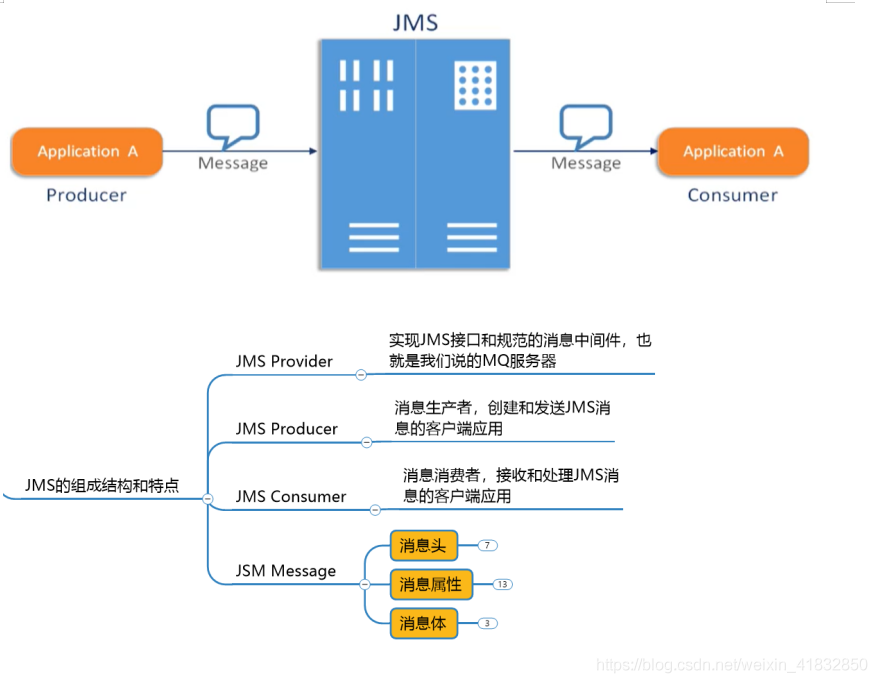
消息头
MS 的消息头有哪些属性:
- JMSDestination:消息目的地
- JMSDeliveryMode:消息持久化模式
- JMSExpiration:消息过期时间
- JMSPriority:消息的优先级
- JMSMessageID:消息的唯一标识符。后面我们会介绍如何解决幂等性。
说明: 消息的生产者可以 set 这些属性,消息的消费者可以 get 这些属性。这些属性在 send 方法里面也可以设置。
package org.hong.activemq;

import org.apache.activemq.ActiveMQConnectionFactory;

import javax.jms.*;

public class JmsProduceTopic {
    private static final String ACTIVE_URL = "tcp://192.168.200.130:61616";
    private static final String TOPIC_NAME = "topic01";

    public static void main(String[] args) throws JMSException {
        ActiveMQConnectionFactory activeMQConnectionFactory = new ActiveMQConnectionFactory(ACTIVE_URL);
        Connection connection = activeMQConnectionFactory.createConnection();
        connection.start();
        Session session = connection.createSession(false, Session.AUTO_ACKNOWLEDGE);
        Topic topic = session.createTopic(TOPIC_NAME);
        MessageProducer producer = session.createProducer(topic);

        for (int i = 0; i < 3; i++) {
            TextMessage textMessage = session.createTextMessage("topicmsg---" + i);// 理解为一个字符串
            // 这里可以指定每个消息的目的地
            textMessage.setJMSDestination(topic);
            /*
             * 持久模式和非持久模式。
             * 一条持久性的消息:应该被传送“一次仅仅一次”,这就意味着如果JMS提供者出现故障,该消息并不会丢失,它会在服务器恢复之后再次传递。
             * 一条非持久的消息:最多会传递一次,这意味着服务器出现故障,该消息将会永远丢失。
             */
            textMessage.setJMSDeliveryMode(DeliveryMode.NON_PERSISTENT);
            /*
             * 可以设置消息在一定时间后过期,默认是永不过期。
             * 消息过期时间,等于Destination的send方法中的timeToLive值加上发送时刻的GMT时间值。
             * 如果timeToLive值等于0,则JMSExpiration被设为0,表示该消息永不过期。
             * 如果发送后,在消息过期时间之后还没有被发送到目的地,则该消息被清除。
             */
            textMessage.setJMSExpiration(1000);
            /*
             * 消息优先级,从0-9十个级别,0-4是普通消息5-9是加急消息。
             * JMS不要求MQ严格按照这十个优先级发送消息但必须保证加急消息要先于普通消息到达。默认是4级。
             */
            textMessage.setJMSPriority(10);
            // 唯一标识每个消息的标识。MQ会给我们默认生成一个,我们也可以自己指定。
            textMessage.setJMSMessageID("ABCD");
            // 上面有些属性在send方法里也能设置
            producer.send(textMessage);
        }

        producer.close();
        session.close();
        connection.close();
        System.out.println("Topic消息发布到MQ完成");
    }
}
消息体
概述
消息体是具体封装的消息数据,一共有5中消息体格式;发送和接收的消息体类型必须一致。
消息体格式
- TextMessage:普通字符串消息,包含一个 String
- MapMessage:一个 Map 类型的消息,key 为 String 类型,值为 Java 的基本数据类型和 String 类型
- BytesMessage:二进制数组消息,包含一个 byte[]
- StreamMessage:Java 数据流消息,用标准流操作来顺序的填充和读取。
- ObjectMessage:对象消息,包含一个可序列化的 Java 对象
生产者代码
package org.hong.activemq;

import org.apache.activemq.ActiveMQConnectionFactory;

import javax.jms.*;

public class JmsProduce {
    private static final String ACTIVE_URL = "tcp://192.168.200.130:61616";
    private static final String QUEUE_NAME = "queue01";

    public static void main(String[] args) throws JMSException {
        ActiveMQConnectionFactory activeMQConnectionFactory = new ActiveMQConnectionFactory(ACTIVE_URL);
        Connection connection = activeMQConnectionFactory.createConnection();
        connection.start();
        Session session = connection.createSession(false, Session.AUTO_ACKNOWLEDGE);
        Queue queue = session.createQueue(QUEUE_NAME);
        MessageProducer producer = session.createProducer(queue);

        for (int i = 0; i < 3; i++) {
            // 发送TextMessage
            TextMessage textMessage = session.createTextMessage("msg---" + i);
            producer.send(textMessage);

            // 发送MapMessage
            MapMessage mapMessage = session.createMapMessage();
            mapMessage.setString("k1", "v" + i); // MQ中MapMessage中的key是可以重复的
            producer.send(mapMessage);
        }

        producer.close();
        session.close();
        connection.close();
        System.out.println("消息发布到MQ完成");
    }
}
消费者代码
package org.hong.activemq;

import org.apache.activemq.ActiveMQConnectionFactory;

import javax.jms.*;
import java.io.IOException;

public class JmsConsumer {
    private static final String ACTIVE_URL = "tcp://192.168.200.130:61616";
    private static final String QUEUE_NAME = "queue01";

    public static void main(String[] args) throws JMSException, IOException {
        ActiveMQConnectionFactory activeMQConnectionFactory = new ActiveMQConnectionFactory(ACTIVE_URL);
        Connection connection = activeMQConnectionFactory.createConnection();
        connection.start();
        Session session = connection.createSession(false, Session.AUTO_ACKNOWLEDGE);
        Queue queue = session.createQueue(QUEUE_NAME);
        MessageConsumer consumer = session.createConsumer(queue);
        consumer.setMessageListener(message -> {
            // 获取TextMessage对象
            if(message != null && message instanceof TextMessage){
                TextMessage textMessage = (TextMessage) message;
                try {
                    System.out.println("消费者接收到消息:" + textMessage.getText());
                } catch (JMSException e) {
                    e.printStackTrace();
                }
            }
            // 获取MapMessage对象
            if(message != null && message instanceof MapMessage){
                MapMessage mapMessage = (MapMessage) message;
                try {
                    System.out.println("消费者接收到消息:" + mapMessage.getString("k1"));
                } catch (JMSException e) {
                    e.printStackTrace();
                }
            }
        });
        System.in.read();
        consumer.close();
        session.close();
        connection.close();
    }
}
测试
顺序任意,查看消费者控制台打印。

虽然我们设置的键都是 k1,依旧取出了3个值,并且值没有重复。
消息属性
如果需要除消息头字段之外的值,那么可以使用消息属性。他是识别/去重/重点标注等操作,非常有用的方法。
他们是以属性名和属性值对的形式制定的。可以将属性是为消息头得扩展,属性指定一些消息头没有包括的附加信息,比如可以在属性里指定消息选择器。消息的属性就像可以分配给一条消息的附加消息头一样。它们允许开发者添加有关消息的不透明附加信息。它们还用于暴露消息选择器在消息过滤时使用的数据。
消息属性的 API:
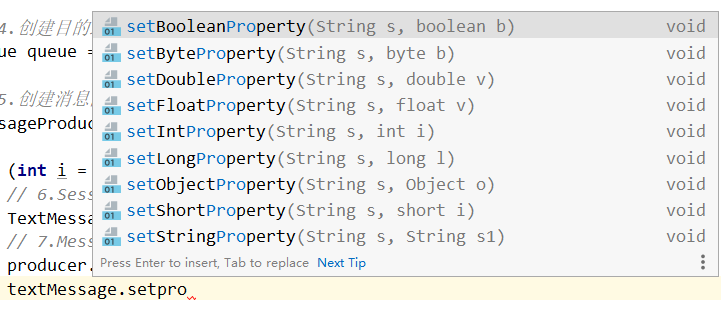
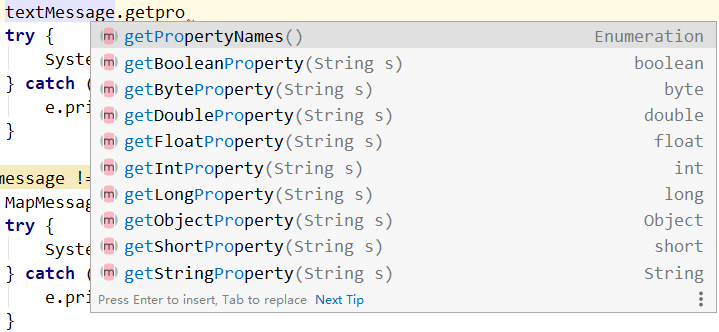
JMS 的可靠性
事务偏生产方,签收偏消费方。
PERSISTENT 持久性
参数设置说明
可以设置消息生产者生产的消息整体是否持久化,或者设置消息是否持久化 ( 使用 JMS 消息头 )。默认是持久化的。
非持久化
服务器宕机,消息不存在。
// 生产者对象设置是否持久化
messageProducer.setDeliveryMode(DeliveryMode.NON_PERSISTENT);
持久化
当服务器宕机,消息依然存在
messageProducer.setDeliveryMode(DeliveryMode.PERSISTENT);
持久的 Queue
持久化消息这是队列的默认传送模式,此模式保证这些消息只被传送一次和成功使用一次。对于这些消息,可靠性是优先考虑的因素。
可靠性的另一个重要方面是确保持久性消息传送至目标后,消息服务在向消费者传送它们之前不会丢失这些消息。
持久的 Topic
topic默认就是非持久化的,因为生产者生产消息时,消费者也要在线,这样消费者才能消费到消息。
topic消息持久化,只要消费者向MQ服务器注册过,所有生产者发布成功的消息,该消费者都能收到,不管是MQ服务器宕机还是消费者不在线。
注意:
- 一定要先运行一次消费者,等于向MQ注册,类似我订阅了这个主题。
- 然后再运行生产者发送消息。
- 之后无论消费者是否在线,都会收到消息。如果不在线的话,下次连接的时候,会把没有收过的消息都接收过来。
持久化topic生产者代码
package org.hong.activemq;

import org.apache.activemq.ActiveMQConnectionFactory;

import javax.jms.*;

public class JmsProduceTopicPersistence {
    private static final String ACTIVE_URL = "tcp://192.168.200.130:61616";
    private static final String TOPIC_NAME = "topic-Persistence";

    public static void main(String[] args) throws JMSException {
        ActiveMQConnectionFactory activeMQConnectionFactory = new ActiveMQConnectionFactory(ACTIVE_URL);
        Connection connection = activeMQConnectionFactory.createConnection();
        connection.start();

        Session session = connection.createSession(false, Session.AUTO_ACKNOWLEDGE);
        Topic topic = session.createTopic(TOPIC_NAME);
        MessageProducer producer = session.createProducer(topic);
        // 设置持久化topic
        producer.setDeliveryMode(DeliveryMode.PERSISTENT);

        for (int i = 0; i < 3; i++) {
            TextMessage textMessage = session.createTextMessage("topicmsg---" + i);
            producer.send(textMessage);
        }

        producer.close();
        session.close();
        connection.close();
        System.out.println("TopicPersistence消息发布到MQ完成");
    }
}
持久化topic消费者代码
package org.hong.activemq;

import org.apache.activemq.ActiveMQConnectionFactory;

import javax.jms.*;
import java.io.IOException;

public class JmsConsumerTopicPersistence {
    private static final String ACTIVE_URL = "tcp://192.168.200.130:61616";
    private static final String TOPIC_NAME = "topic-Persistence";

    public static void main(String[] args) throws JMSException, IOException {
        ActiveMQConnectionFactory activeMQConnectionFactory = new ActiveMQConnectionFactory(ACTIVE_URL);
        Connection connection = activeMQConnectionFactory.createConnection();
        // 设置客户端ID。向MQ服务器注册自己的名称; 先设置再启动start
        connection.setClientID("z3");
        connection.start();

        Session session = connection.createSession(false, Session.AUTO_ACKNOWLEDGE);
        Topic topic = session.createTopic(TOPIC_NAME);
        // 创建一个topic订阅者对象。参数一是topic,参数二是订阅名称
        TopicSubscriber topicSubscriber = session.createDurableSubscriber(topic, "topicTest");

        topicSubscriber.setMessageListener(message -> {
            if(message != null && message instanceof TextMessage){
                TextMessage textMessage = (TextMessage) message;
                try {
                    System.out.println("订阅者接收到消息:" + textMessage.getText());
                } catch (JMSException e) {
                    e.printStackTrace();
                }
            }
        });

        System.in.read();
        topicSubscriber.close();
        session.close();
        connection.close();
    }
}
测试
先启动一次订阅者向 ActiveMQ 注册自己
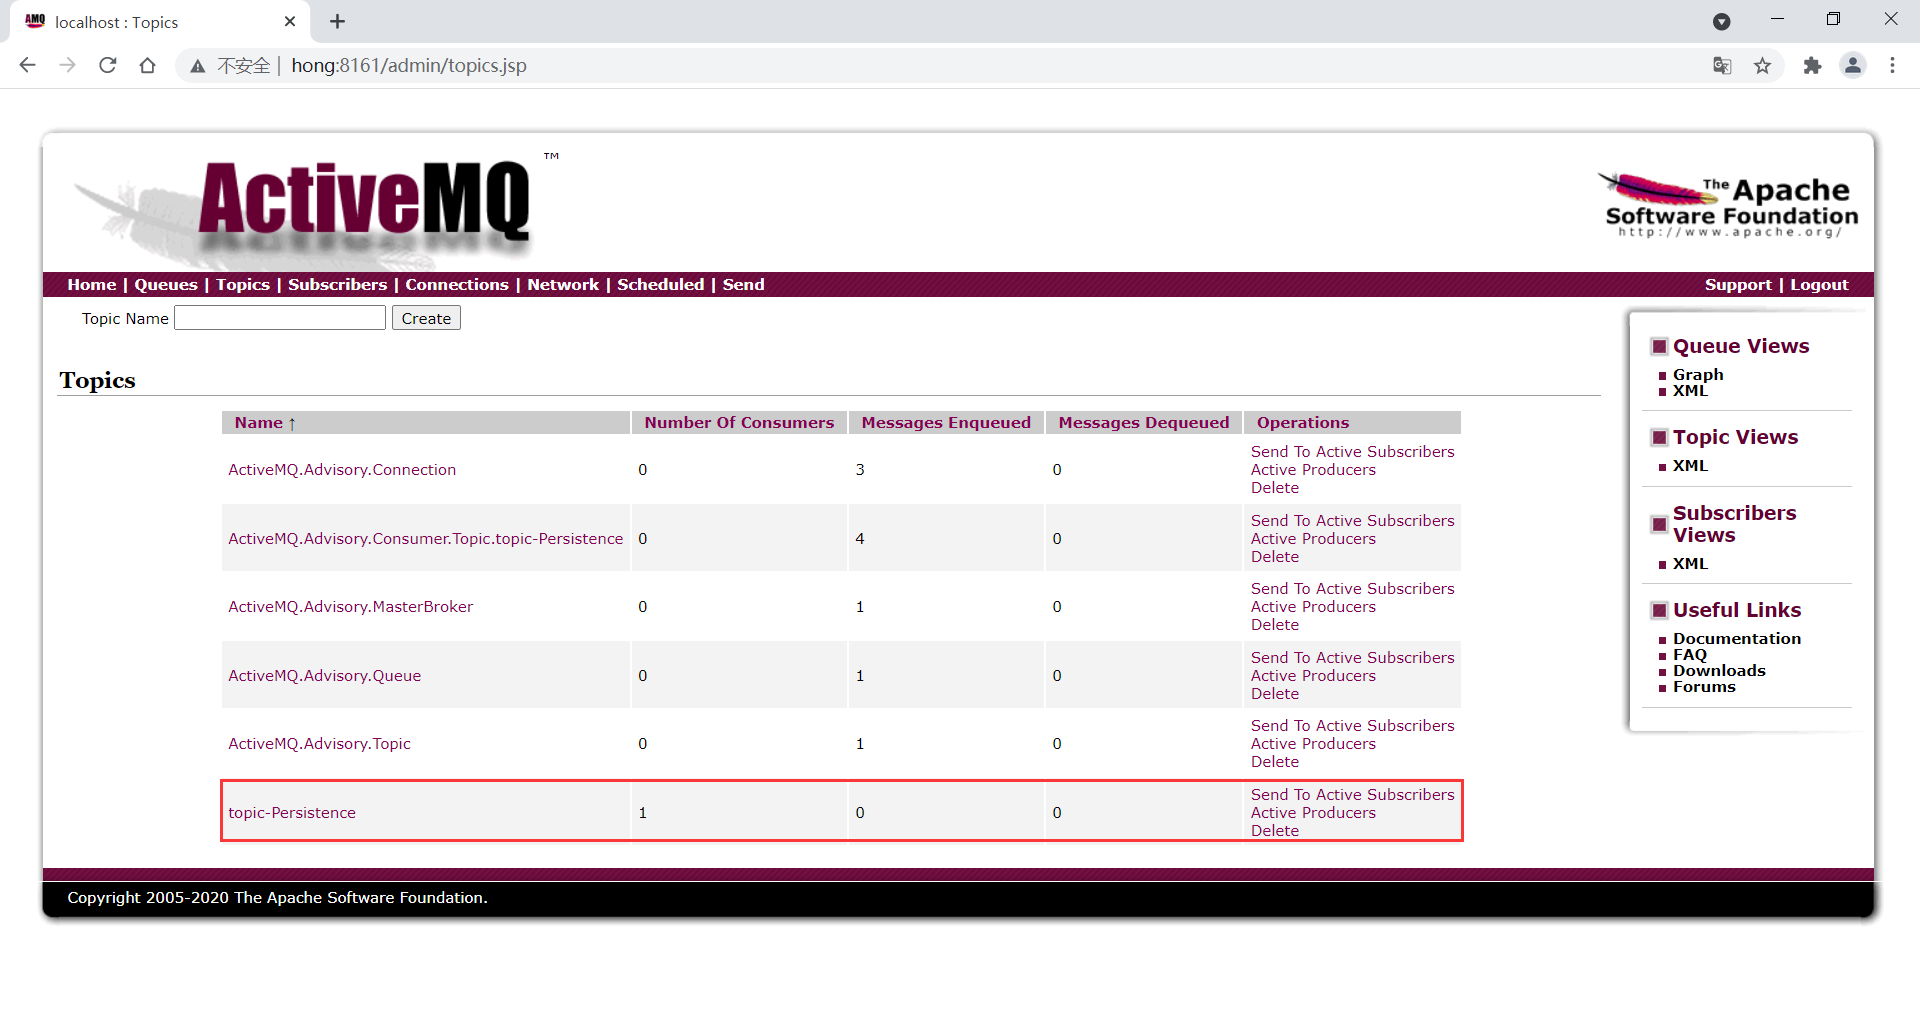
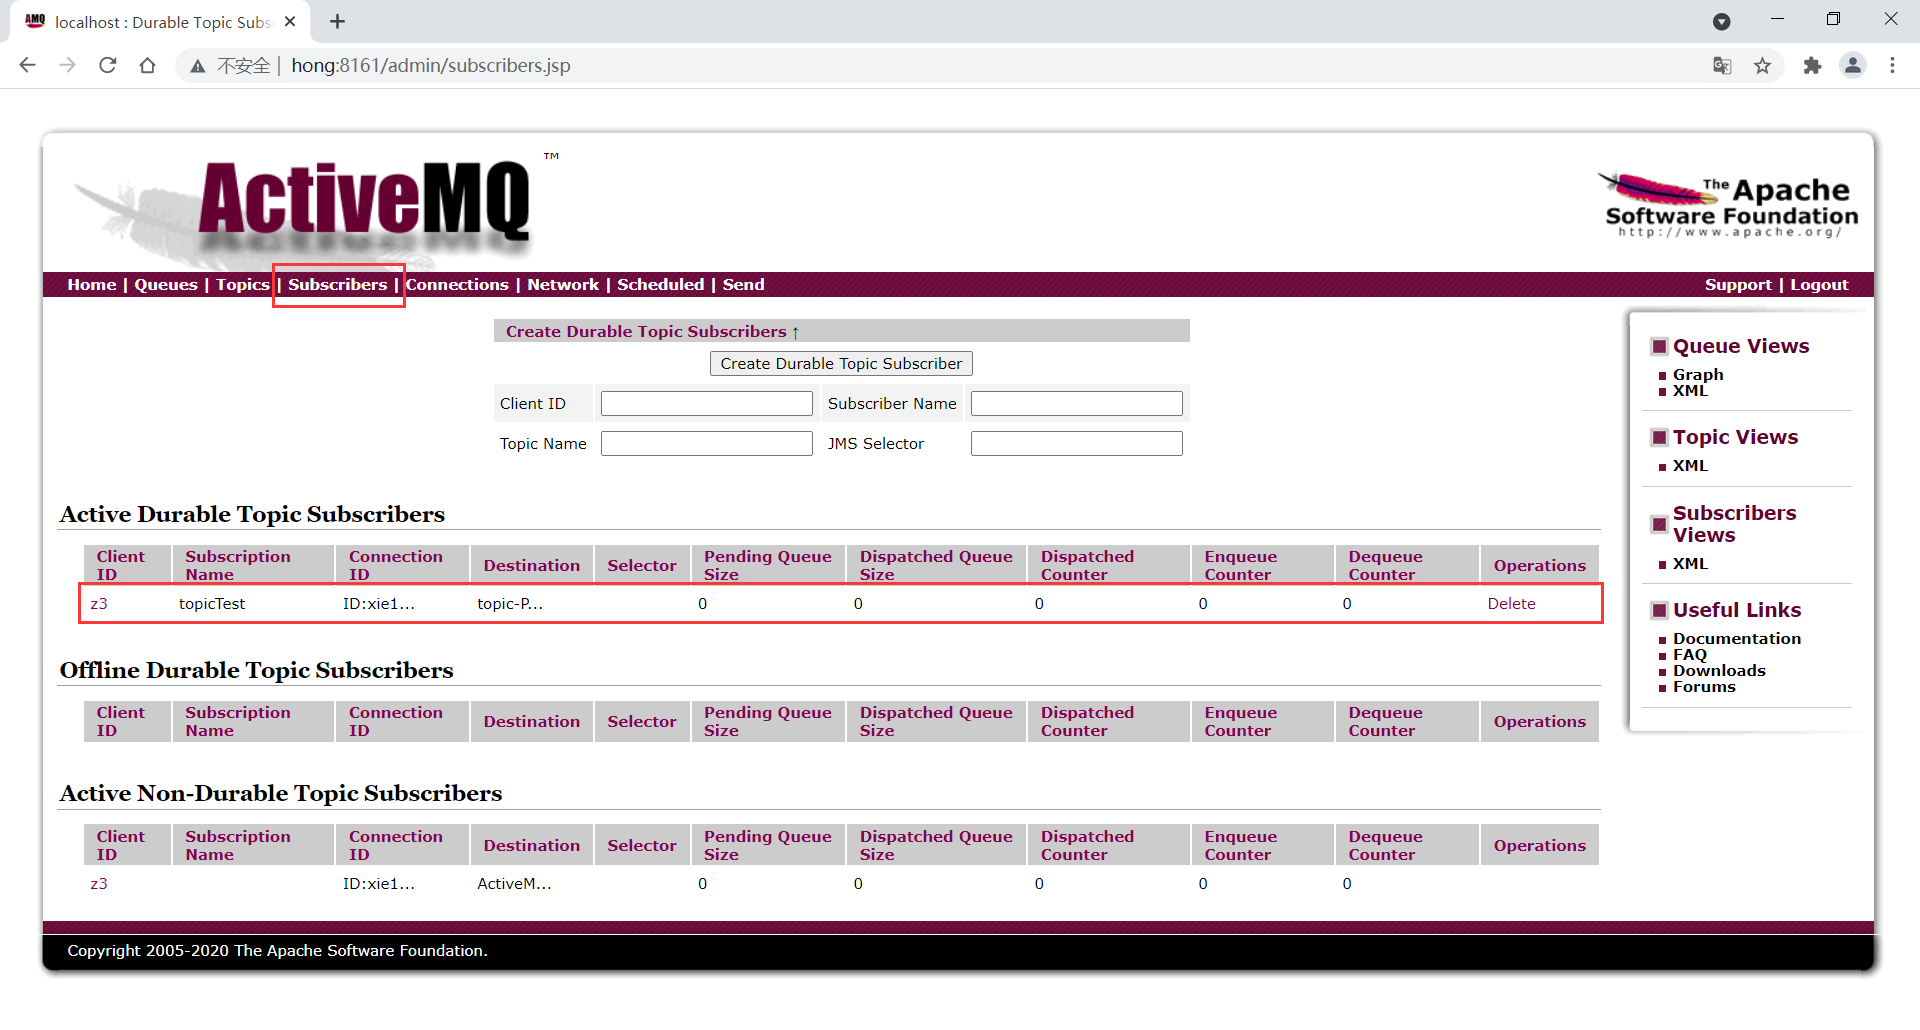
订阅者断开连接
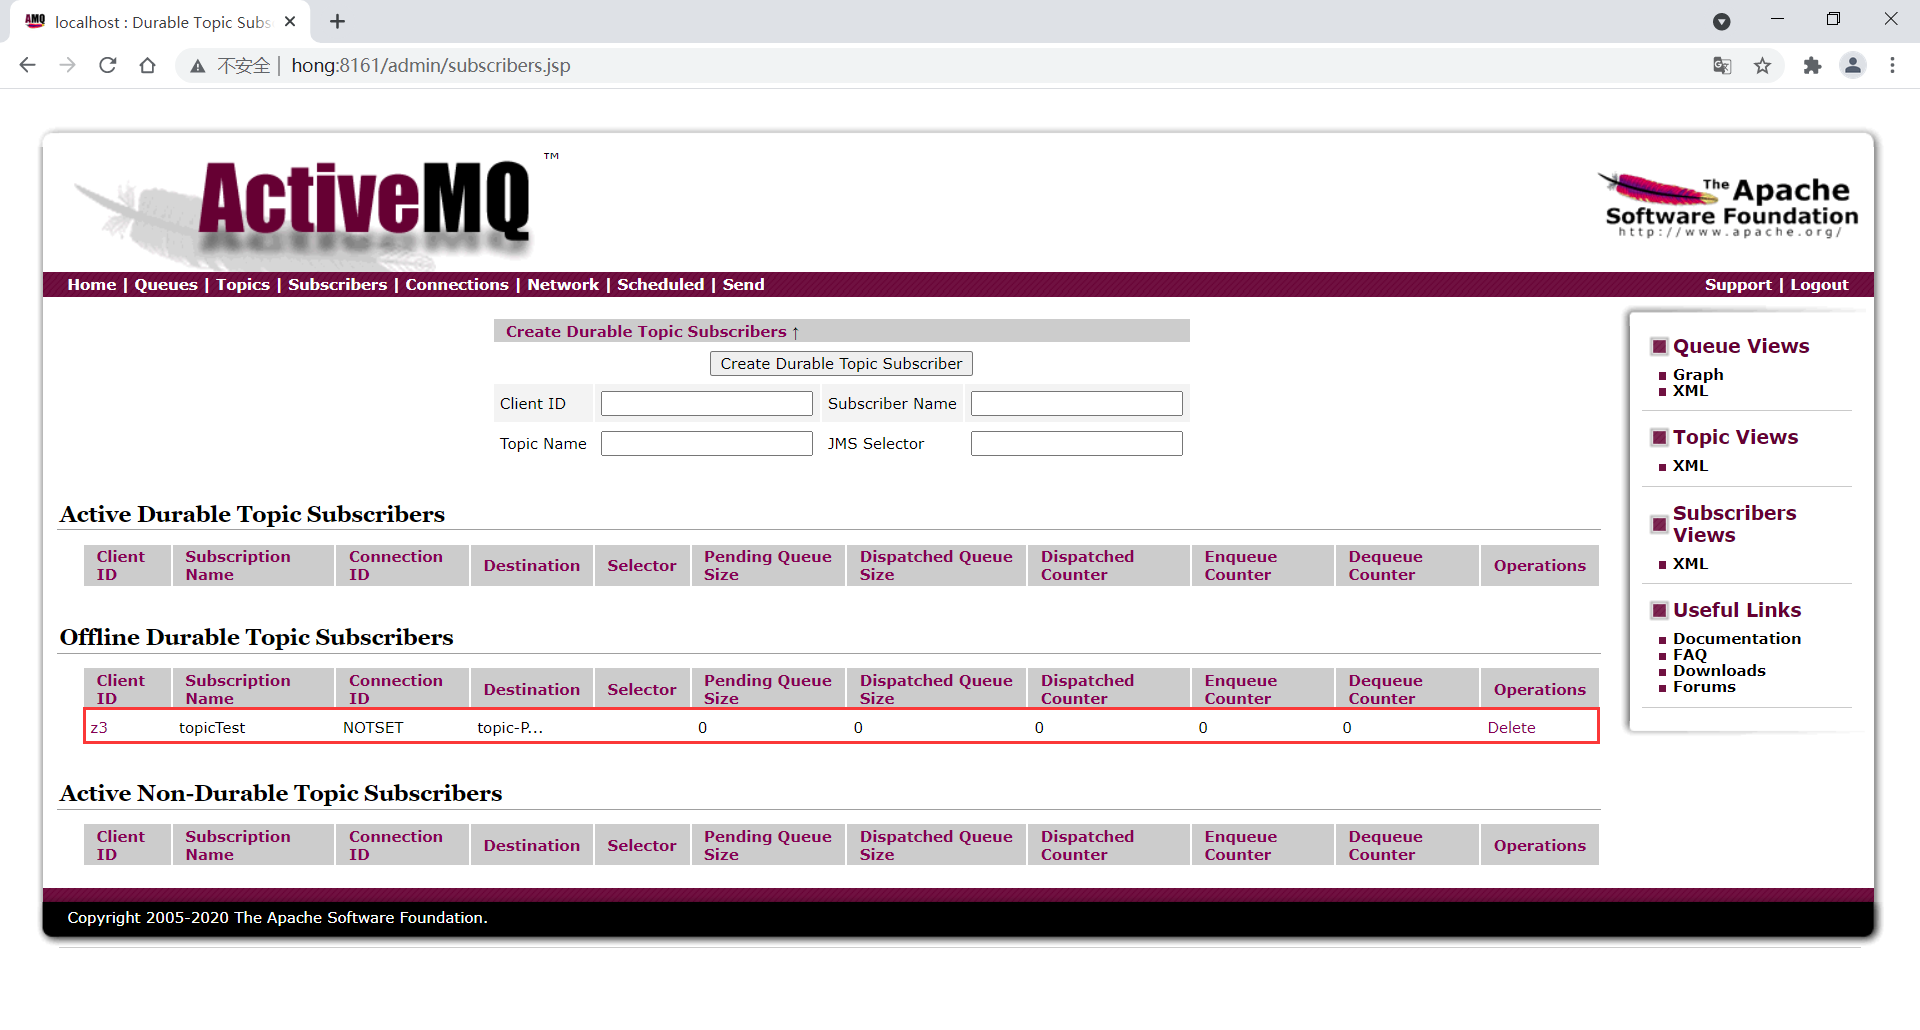
生产者生产消息
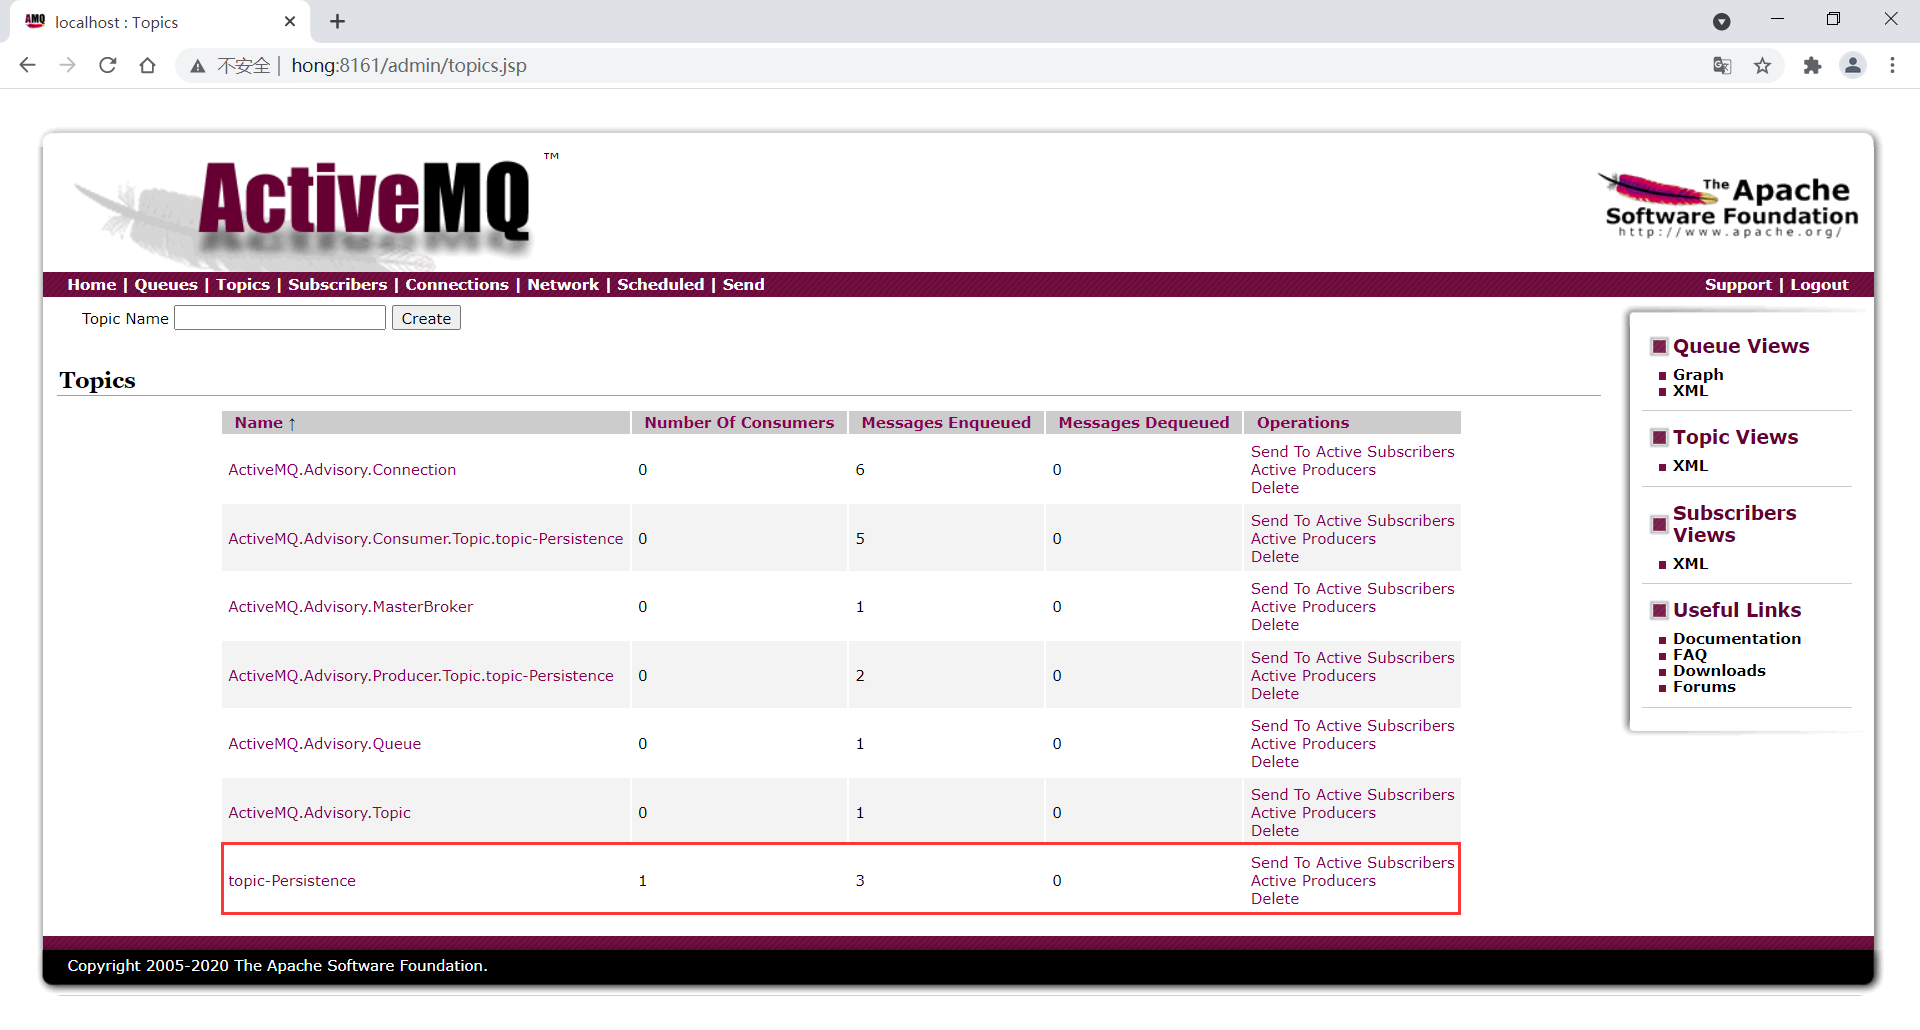
消息生产后再次启动订阅者
由于订阅者向MQ订阅了消息,虽然消息生产时订阅者不在线,但是等到订阅者再次上线后,订阅者依旧能接收到消息

Transaction 事务
关闭事务
只要执行 send,就进入队列中。关闭事务,那第二个签收参数的设置需要有效
开启事务
先执行 send 再执行 commit,消息才被真正的提交到队列中。消息需要批量发送,需要缓冲区处理。
生产者案例
开启事务不提交
package org.hong.activemq;

import org.apache.activemq.ActiveMQConnectionFactory;

import javax.jms.*;

public class JmsProduceTx {
    private static final String ACTIVE_URL = "tcp://192.168.200.130:61616";
    private static final String QUEUE_NAME = "queue01";

    public static void main(String[] args) throws JMSException {
        ActiveMQConnectionFactory activeMQConnectionFactory = new ActiveMQConnectionFactory(ACTIVE_URL);
        Connection connection = activeMQConnectionFactory.createConnection();
        connection.start();

        // 参数一设置为true, 开启事务
        Session session = connection.createSession(true, Session.AUTO_ACKNOWLEDGE);
        Queue queue = session.createQueue(QUEUE_NAME);
        MessageProducer producer = session.createProducer(queue);

        for (int i = 0; i < 3; i++) {
            TextMessage textMessage = session.createTextMessage("msg---" + i);
            producer.send(textMessage);
        }

        producer.close();
        session.close();
        connection.close();
        System.out.println("消息发布到MQ完成");
    }
}
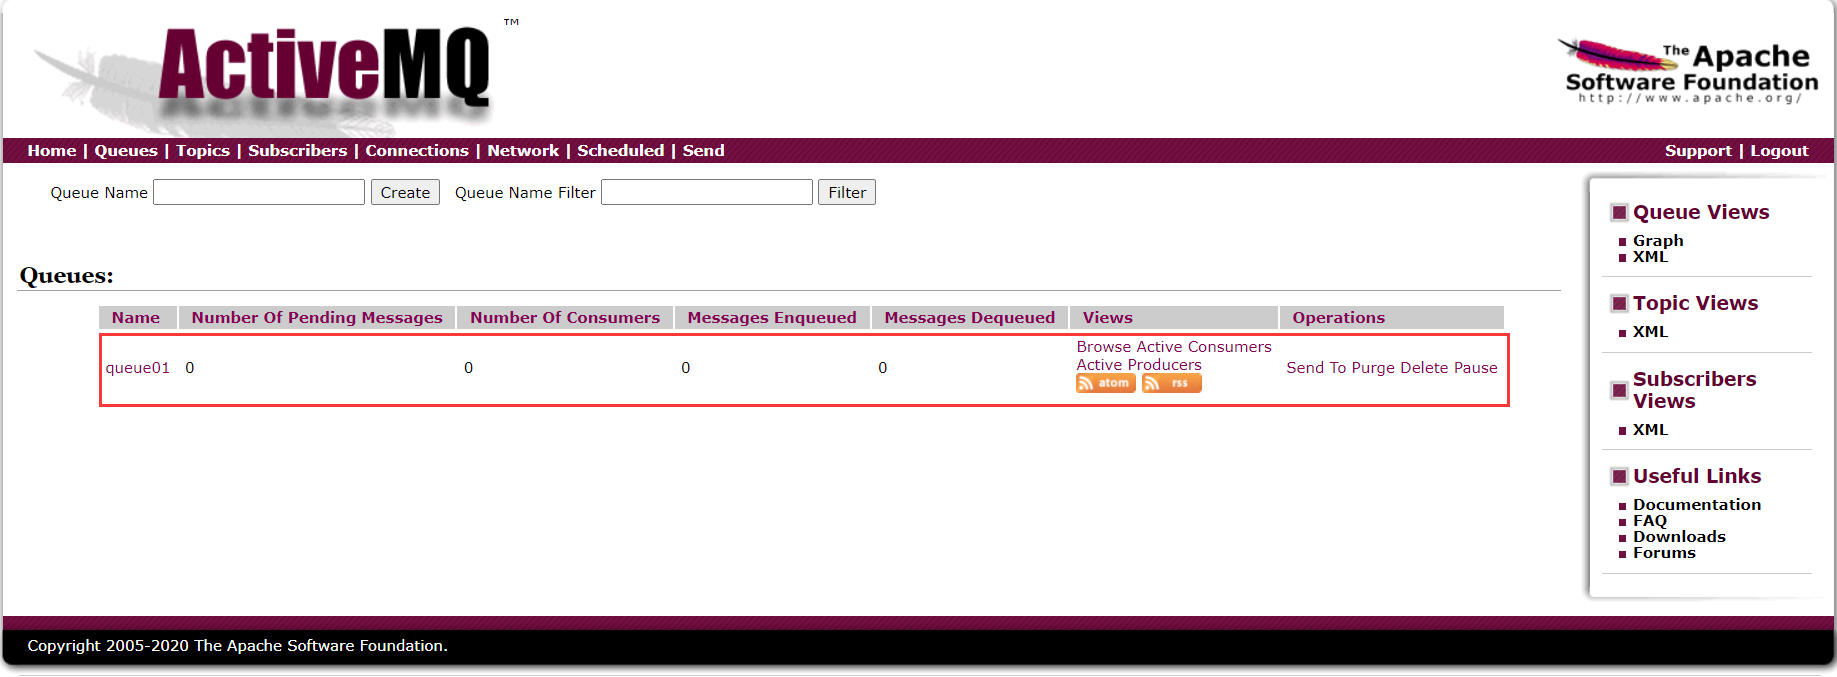
运行程序观察 ActiveMQ 控制台
消息并没有进入到队列中
开启事务回滚
package org.hong.activemq;

import org.apache.activemq.ActiveMQConnectionFactory;

import javax.jms.*;

public class JmsProduceTx {
    private static final String ACTIVE_URL = "tcp://192.168.200.130:61616";
    private static final String QUEUE_NAME = "queue01";

    public static void main(String[] args) throws JMSException {
        ActiveMQConnectionFactory activeMQConnectionFactory = new ActiveMQConnectionFactory(ACTIVE_URL);
        Connection connection = activeMQConnectionFactory.createConnection();
        connection.start();

        // 参数一设置为true, 开启事务
        Session session = connection.createSession(true, Session.AUTO_ACKNOWLEDGE);
        Queue queue = session.createQueue(QUEUE_NAME);
        MessageProducer producer = session.createProducer(queue);

        for (int i = 0; i < 3; i++) {
            TextMessage textMessage = session.createTextMessage("msg---" + i);
            producer.send(textMessage);
        }

        // 回滚事务
        session.rollback();

        producer.close();
        session.close();
        connection.close();
        System.out.println("消息发布到MQ完成");
    }
}
运行程序观察 ActiveMQ 控制台
消息并没有进入到队列中

开启事务提交
package org.hong.activemq;

import org.apache.activemq.ActiveMQConnectionFactory;

import javax.jms.*;

public class JmsProduceTx {
    private static final String ACTIVE_URL = "tcp://192.168.200.130:61616";
    private static final String QUEUE_NAME = "queue01";

    public static void main(String[] args) throws JMSException {
        ActiveMQConnectionFactory activeMQConnectionFactory = new ActiveMQConnectionFactory(ACTIVE_URL);
        Connection connection = activeMQConnectionFactory.createConnection();
        connection.start();

        // 参数一设置为true, 开启事务
        Session session = connection.createSession(true, Session.AUTO_ACKNOWLEDGE);
        Queue queue = session.createQueue(QUEUE_NAME);
        MessageProducer producer = session.createProducer(queue);

        for (int i = 0; i < 3; i++) {
            TextMessage textMessage = session.createTextMessage("msg---" + i);
            producer.send(textMessage);
        }

        // 提交事务
        session.commit();

        producer.close();
        session.close();
        connection.close();
        System.out.println("消息发布到MQ完成");
    }
}
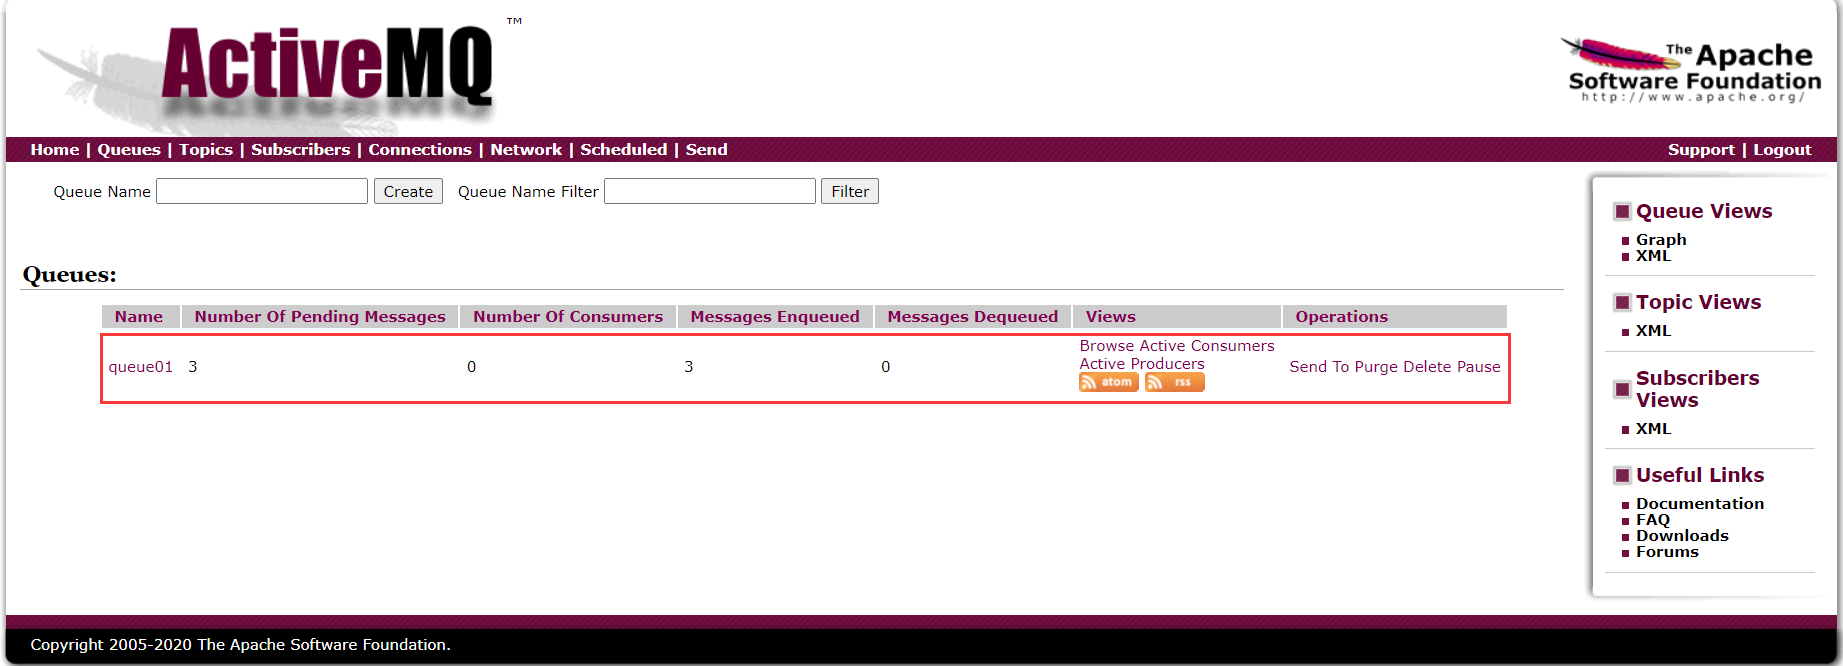
运行程序观察 ActiveMQ 控制台
消费者案例
开启事务不提交
package org.hong.activemq;

import org.apache.activemq.ActiveMQConnectionFactory;

import javax.jms.*;
import java.io.IOException;

public class JmsConsumerTx {
    private static final String ACTIVE_URL = "tcp://192.168.200.130:61616";
    private static final String QUEUE_NAME = "queue01";

    public static void main(String[] args) throws JMSException, IOException {
        ActiveMQConnectionFactory activeMQConnectionFactory = new ActiveMQConnectionFactory(ACTIVE_URL);
        Connection connection = activeMQConnectionFactory.createConnection();
        connection.start();

        // 参数一设置为true, 开启事务
        Session session = connection.createSession(true, Session.AUTO_ACKNOWLEDGE);
        Queue queue = session.createQueue(QUEUE_NAME);
        MessageConsumer consumer = session.createConsumer(queue);

        while (true) {
            TextMessage textMessage = (TextMessage) consumer.receive(4000L);
            if(textMessage != null){
                System.out.println("消费者接收到消息:" + textMessage.getText());
            }else{
                break;
            }
        }

        consumer.close();
        session.close();
        connection.close();
    }
}
运行程序,观察控制台打印和 ActiveMQ 控制台
消息被消费,但是 ActiveMQ 的队列中,消息依旧存在,会造成重复消费


开启事务回滚
package org.hong.activemq;

import org.apache.activemq.ActiveMQConnectionFactory;

import javax.jms.*;
import java.io.IOException;

public class JmsConsumerTx {
    private static final String ACTIVE_URL = "tcp://192.168.200.130:61616";
    private static final String QUEUE_NAME = "queue01";

    public static void main(String[] args) throws JMSException, IOException {
        ActiveMQConnectionFactory activeMQConnectionFactory = new ActiveMQConnectionFactory(ACTIVE_URL);
        Connection connection = activeMQConnectionFactory.createConnection();
        connection.start();

        // 参数一设置为true, 开启事务
        Session session = connection.createSession(true, Session.AUTO_ACKNOWLEDGE);
        Queue queue = session.createQueue(QUEUE_NAME);
        MessageConsumer consumer = session.createConsumer(queue);

        while (true) {
            TextMessage textMessage = (TextMessage) consumer.receive(4000L);
            if(textMessage != null){
                System.out.println("消费者接收到消息:" + textMessage.getText());
            }else{
                break;
            }
        }

        // 回滚事务
        session.rollback();

        consumer.close();
        session.close();
        connection.close();
    }
}
运行程序,观察控制台打印和 ActiveMQ 控制台
消息被消费,但是 ActiveMQ 的队列中,消息依旧存在,也会造成重复消费。


开启事务提交
package org.hong.activemq;

import org.apache.activemq.ActiveMQConnectionFactory;

import javax.jms.*;
import java.io.IOException;

public class JmsConsumerTx {
    private static final String ACTIVE_URL = "tcp://192.168.200.130:61616";
    private static final String QUEUE_NAME = "queue01";

    public static void main(String[] args) throws JMSException, IOException {
        ActiveMQConnectionFactory activeMQConnectionFactory = new ActiveMQConnectionFactory(ACTIVE_URL);
        Connection connection = activeMQConnectionFactory.createConnection();
        connection.start();

        // 参数一设置为true, 开启事务
        Session session = connection.createSession(true, Session.AUTO_ACKNOWLEDGE);
        Queue queue = session.createQueue(QUEUE_NAME);
        MessageConsumer consumer = session.createConsumer(queue);

        while (true) {
            TextMessage textMessage = (TextMessage) consumer.receive(4000L);
            if(textMessage != null){
                System.out.println("消费者接收到消息:" + textMessage.getText());
            }else{
                break;
            }
        }

        // 回滚事务
        session.commit();

        consumer.close();
        session.close();
        connection.close();
    }
}
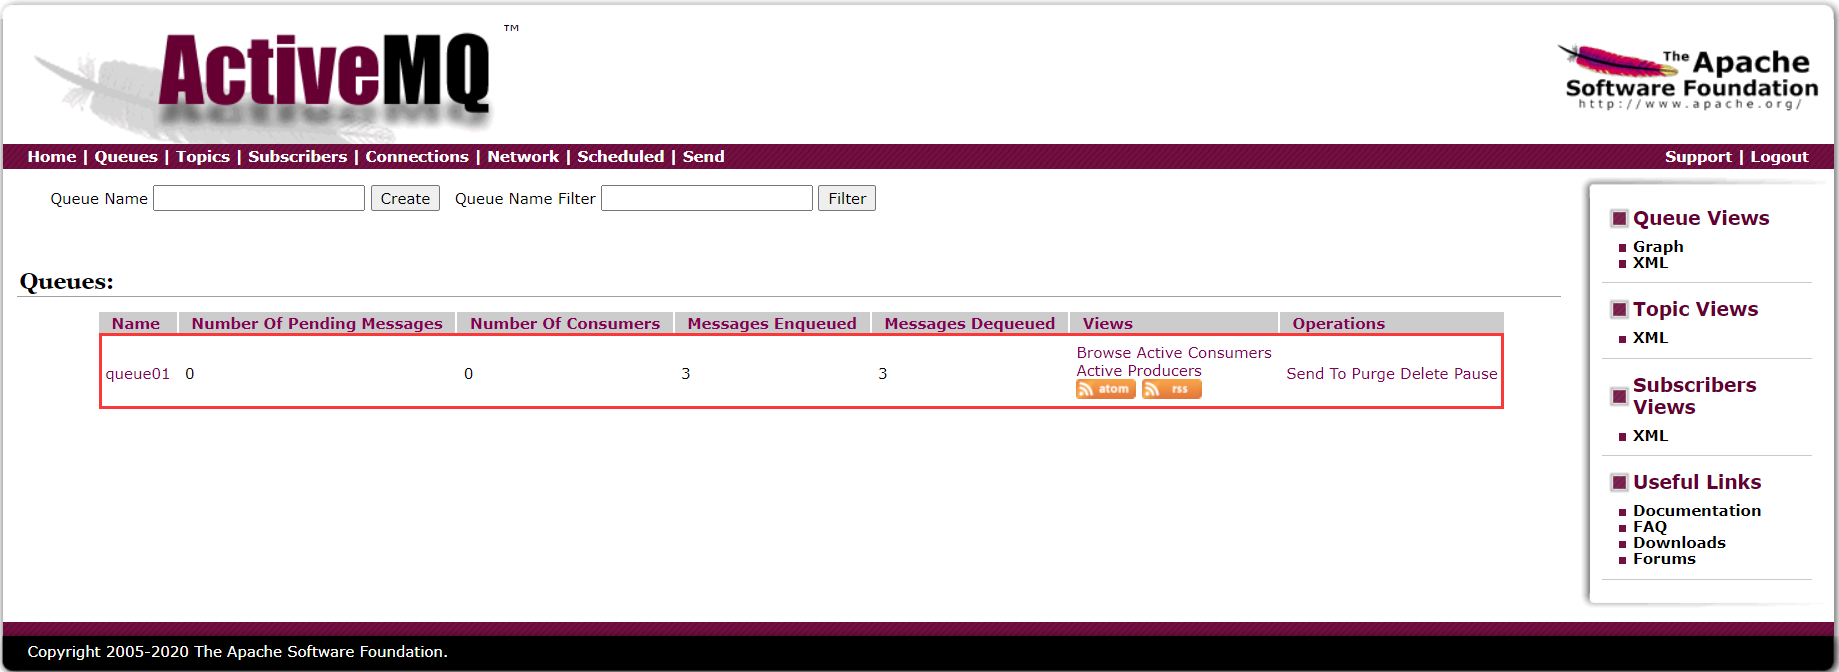
运行程序,观察控制台打印和 ActiveMQ 控制台
消息被消费,但是 ActiveMQ 的队列中,消息依旧存在,也会造成重复消费。

Acknowledge 签收
非事务
自动签收
// Session.AUTO_ACKNOWLEDGE 自动签收
Session session = connection.createSession(false, Session.AUTO_ACKNOWLEDGE);
这里就不演示了,效果就于入门案例一样。没什么好说的。
手动签收
// Session.CLIENT_ACKNOWLEDGE 手动签收
Session session = connection.createSession(false, Session.CLIENT_ACKNOWLEDGE);
实例代码
故名思意,如果不签收消息不会出队列,会造成重复消费。
package org.hong.activemq;

import org.apache.activemq.ActiveMQConnectionFactory;

import javax.jms.*;
import java.io.IOException;

public class JmsConsumerTx {
    private static final String ACTIVE_URL = "tcp://192.168.200.130:61616";
    private static final String QUEUE_NAME = "queue01";

    public static void main(String[] args) throws JMSException, IOException {
        ActiveMQConnectionFactory activeMQConnectionFactory = new ActiveMQConnectionFactory(ACTIVE_URL);
        Connection connection = activeMQConnectionFactory.createConnection();
        connection.start();

        // 参数二设置为2(Session.CLIENT_ACKNOWLEDGE), 代表手动签收
        Session session = connection.createSession(false, Session.CLIENT_ACKNOWLEDGE);
        Queue queue = session.createQueue(QUEUE_NAME);
        MessageConsumer consumer = session.createConsumer(queue);

        while (true) {
            TextMessage textMessage = (TextMessage) consumer.receive(4000L);
            if(textMessage != null){
                System.out.println("消费者接收到消息:" + textMessage.getText());
                // Message对象调用acknowledge()方法进行签收
                textMessage.acknowledge();
            }else{
                break;
            }
        }

        consumer.close();
        session.close();
        connection.close();
    }
}
允许重复消息
Session.DUPS_OK_ACKNOWLEDGE
事务
事务开启后,只有 commit 才能将全部消息变为以消费。
自己试试看把!
签收和事务的关系
- 在事务性会话中,当一个事务被成功提交则消息被自动签收。如果事务回滚,则消息会被再次传送。
- 非事务性会话中,消息何时被确认取决于创建会话时的应答模式 ( acknowledgement mode )
- 事务大于签收
ActiveMQ 的 Borker
简介
用 ActiveMQ Broker 作为独立的消息服务器来构建 JAVA 应用。ActiveMQ 也支持在 vm 中通信基于嵌入式的 broker,能够无缝的集成其他 Java 应用。
说白了,Broker 启动就是实现了用代码的形式启动 ActiveMQ 将 MQ 嵌入到 Java 代码中,一边随时用随时启动,在用的时候再去启动这样能节省资源,也保证了可靠性。
POM
<?xml version="1.0" encoding="UTF-8"?>
<project xmlns="http://maven.apache.org/POM/4.0.0"
         xmlns:xsi="http://www.w3.org/2001/XMLSchema-instance"
         xsi:schemaLocation="http://maven.apache.org/POM/4.0.0 http://maven.apache.org/xsd/maven-4.0.0.xsd">
    <parent>
        <artifactId>activemq</artifactId>
        <groupId>org.hong</groupId>
        <version>1.0-SNAPSHOT</version>
    </parent>
    <modelVersion>4.0.0</modelVersion>

    <artifactId>activemq-demo</artifactId>

    <properties>
        <project.build.sourceEncoding>UTF-8</project.build.sourceEncoding>
    </properties>

    <dependencies>
        <!--  activemq  所需要的jar 包-->
        <dependency>
            <groupId>org.apache.activemq</groupId>
            <artifactId>activemq-all</artifactId>
            <version>5.16.2</version>
        </dependency>
        <!--  activemq 和 spring 整合的基础包-->
        <dependency>
            <groupId>org.apache.xbean</groupId>
            <artifactId>xbean-spring</artifactId>
            <version>4.18</version>
        </dependency>
        <!-- 引入这个jar包是为了解决(Caused by: java.lang.ClassNotFoundException: com.fasterxml.jackson.databind.ObjectMapper)错误 -->
        <dependency>
            <groupId>com.fasterxml.jackson.core</groupId>
            <artifactId>jackson-databind</artifactId>
            <version>2.12.3</version>
        </dependency>


        <dependency>
            <groupId>org.projectlombok</groupId>
            <artifactId>lombok</artifactId>
            <version>1.18.20</version>
        </dependency>
        <dependency>
            <groupId>org.slf4j</groupId>
            <artifactId>slf4j-api</artifactId>
            <version>1.7.30</version>
        </dependency>
        <dependency>
            <groupId>junit</groupId>
            <artifactId>junit</artifactId>
            <version>4.13</version>
            <scope>test</scope>
        </dependency>
        <dependency>
            <groupId>ch.qos.logback</groupId>
            <artifactId>logback-classic</artifactId>
            <version>1.2.3</version>
        </dependency>
    </dependencies>

</project>
代码示例
启动这个程序就相当于启动了一个 ActiveMQ。
package org.hong.activemq;

import org.apache.activemq.broker.BrokerService;

public class EmbedBroker {
    public static void main(String[] args) throws Exception {
        BrokerService brokerService = new BrokerService();
        brokerService.setUseJmx(true);
        brokerService.addConnector("tcp://localhost:61616");
        brokerService.start();
        System.in.read();
    }
}
Spring 整合 ActiveMQ
Maven
<?xml version="1.0" encoding="UTF-8"?>
<project xmlns="http://maven.apache.org/POM/4.0.0"
         xmlns:xsi="http://www.w3.org/2001/XMLSchema-instance"
         xsi:schemaLocation="http://maven.apache.org/POM/4.0.0 http://maven.apache.org/xsd/maven-4.0.0.xsd">
    <parent>
        <artifactId>activemq</artifactId>
        <groupId>org.hong</groupId>
        <version>1.0-SNAPSHOT</version>
    </parent>
    <modelVersion>4.0.0</modelVersion>

    <artifactId>activemq-demo</artifactId>

    <properties>
        <project.build.sourceEncoding>UTF-8</project.build.sourceEncoding>
    </properties>

    <dependencies>
        <!--  activemq  所需要的jar 包-->
        <dependency>
            <groupId>org.apache.activemq</groupId>
            <artifactId>activemq-all</artifactId>
            <version>5.16.2</version>
        </dependency>
        <!--  activemq 和 spring 整合的基础包-->
        <dependency>
            <groupId>org.apache.xbean</groupId>
            <artifactId>xbean-spring</artifactId>
            <version>4.20</version>
        </dependency>
        <dependency>
            <groupId>com.fasterxml.jackson.core</groupId>
            <artifactId>jackson-databind</artifactId>
            <version>2.12.3</version>
        </dependency>
        <!--  activeMQ  jms 的支持  -->
        <dependency>
            <groupId>org.springframework</groupId>
            <artifactId>spring-jms</artifactId>
            <version>5.3.7</version>
        </dependency>
        <!--  pool 池化包相关的支持  -->
        <dependency>
            <groupId>org.apache.activemq</groupId>
            <artifactId>activemq-pool</artifactId>
            <version>5.16.2</version>
        </dependency>
        <!--  aop 相关的支持  -->
        <dependency>
            <groupId>org.springframework</groupId>
            <artifactId>spring-core</artifactId>
            <version>5.3.7</version>
        </dependency>
        <dependency>
            <groupId>org.springframework</groupId>
            <artifactId>spring-context</artifactId>
            <version>5.3.7</version>
        </dependency>


        <dependency>
            <groupId>org.projectlombok</groupId>
            <artifactId>lombok</artifactId>
            <version>1.18.20</version>
        </dependency>
        <dependency>
            <groupId>org.slf4j</groupId>
            <artifactId>slf4j-api</artifactId>
            <version>1.7.30</version>
        </dependency>
        <dependency>
            <groupId>junit</groupId>
            <artifactId>junit</artifactId>
            <version>4.13</version>
            <scope>test</scope>
        </dependency>
        <dependency>
            <groupId>ch.qos.logback</groupId>
            <artifactId>logback-classic</artifactId>
            <version>1.2.3</version>
        </dependency>
    </dependencies>

</project>
application.xml
<?xml version="1.0" encoding="UTF-8"?>
<beans xmlns="http://www.springframework.org/schema/beans"
       xmlns:xsi="http://www.w3.org/2001/XMLSchema-instance"
       xmlns:context="http://www.springframework.org/schema/context"
       xsi:schemaLocation="http://www.springframework.org/schema/beans
       http://www.springframework.org/schema/beans/spring-beans.xsd
       http://www.springframework.org/schema/context
       https://www.springframework.org/schema/context/spring-context.xsd">

    <context:component-scan base-package="org.hong.activemq.spring"/>
    <bean id="jmsFactory" class="org.apache.activemq.pool.PooledConnectionFactory" destroy-method="stop">
        <property name="connectionFactory">
            <bean class="org.apache.activemq.ActiveMQConnectionFactory">
                <property name="brokerURL" value="tcp://192.168.200.130:61616"></property>
            </bean>
        </property>
        <property name="maxConnections" value="100"></property>
    </bean>

    <!-- 创建一个队列目的地 -->
    <bean id="destinationQueue" class="org.apache.activemq.command.ActiveMQQueue">
        <constructor-arg index="0" value="spring-active-queue"></constructor-arg>
    </bean>


    <!-- jms 的工具类 -->
    <bean id="jmsTemplate" class="org.springframework.jms.core.JmsTemplate">
        <!-- 注入连接工厂 -->
        <property name="connectionFactory" ref="jmsFactory"/>
        <!-- 注入默认的目的地 -->
        <property name="defaultDestination" ref="destinationQueue"/>
        <property name="messageConverter">
            <bean class="org.springframework.jms.support.converter.SimpleMessageConverter"/>
        </property>
    </bean>
</beans>
队列生产者示例
代码示例
package org.hong.activemq.spring;

import org.apache.xbean.spring.context.ClassPathXmlApplicationContext;
import org.springframework.beans.factory.annotation.Autowired;
import org.springframework.jms.core.JmsTemplate;
import org.springframework.stereotype.Service;

@Service
public class SpringMQProduce {
    @Autowired
    private JmsTemplate jmsTemplate;

    public static void main(String[] args) {
        ClassPathXmlApplicationContext context = new ClassPathXmlApplicationContext("classpath:application.xml");
        SpringMQProduce produce = context.getBean(SpringMQProduce.class);
        produce.sendTextMessage("Spring 整合 ActiveMQ 案例");
        System.out.println("Send Tack Over");
    }

    public void sendTextMessage(String text){
        /*
         * 我们只需要将目的地和消息给JmsTemplate, Spring会将Session对象传递给我们, 我们根据Session创建Message对象并返回即可
         * JmsTemplate会根据目的地自动创建对于的produce并在发送结束后自动关闭produce
         * 因为我们在配置文件中给JmsTemplate注入了一个默认的目的地, 因此可以不用指定目的地, JmsTemplate会使用默认的目的地。
         */
        jmsTemplate.send(session -> session.createTextMessage(text));
    }
}
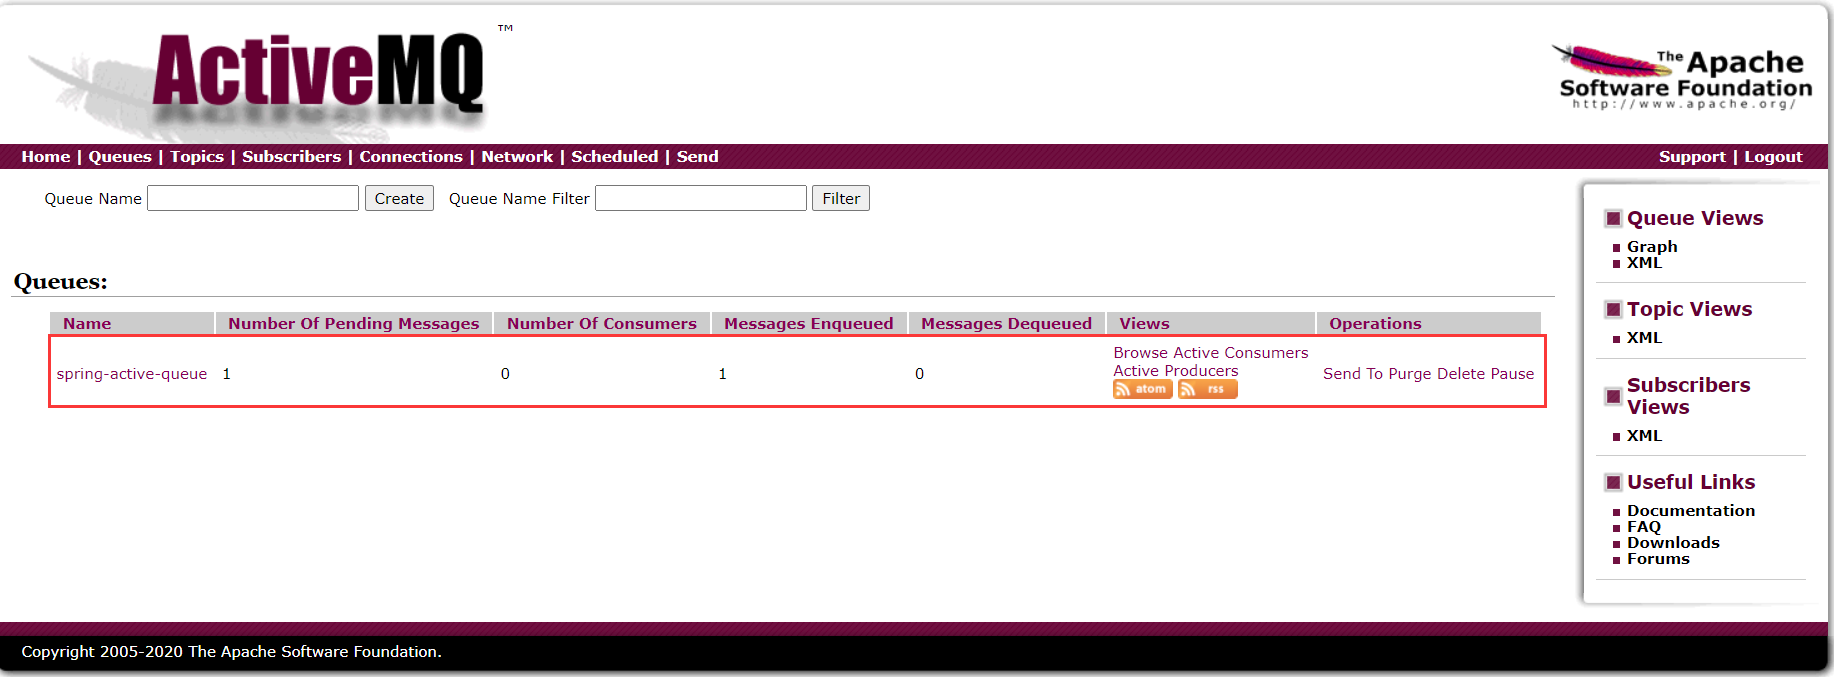
测试
运行上面的程序
队列消费者示例
代码示例
package org.hong.activemq.spring;

import org.apache.xbean.spring.context.ClassPathXmlApplicationContext;
import org.springframework.beans.factory.annotation.Autowired;
import org.springframework.jms.core.JmsTemplate;
import org.springframework.stereotype.Service;

@Service
public class SpringMQConsumer {
    @Autowired
    private JmsTemplate jmsTemplate;

    public static void main(String[] args) {
        ClassPathXmlApplicationContext context = new ClassPathXmlApplicationContext("classpath:application.xml");
        SpringMQConsumer consumer = context.getBean(SpringMQConsumer.class);
        Object messageValue = consumer.getMessageValue();
        System.out.println(messageValue);
    }

    public Object getMessageValue(){
        // 没有指定目的地, 使用默认的目的地
        return jmsTemplate.receiveAndConvert();
    }
}
测试
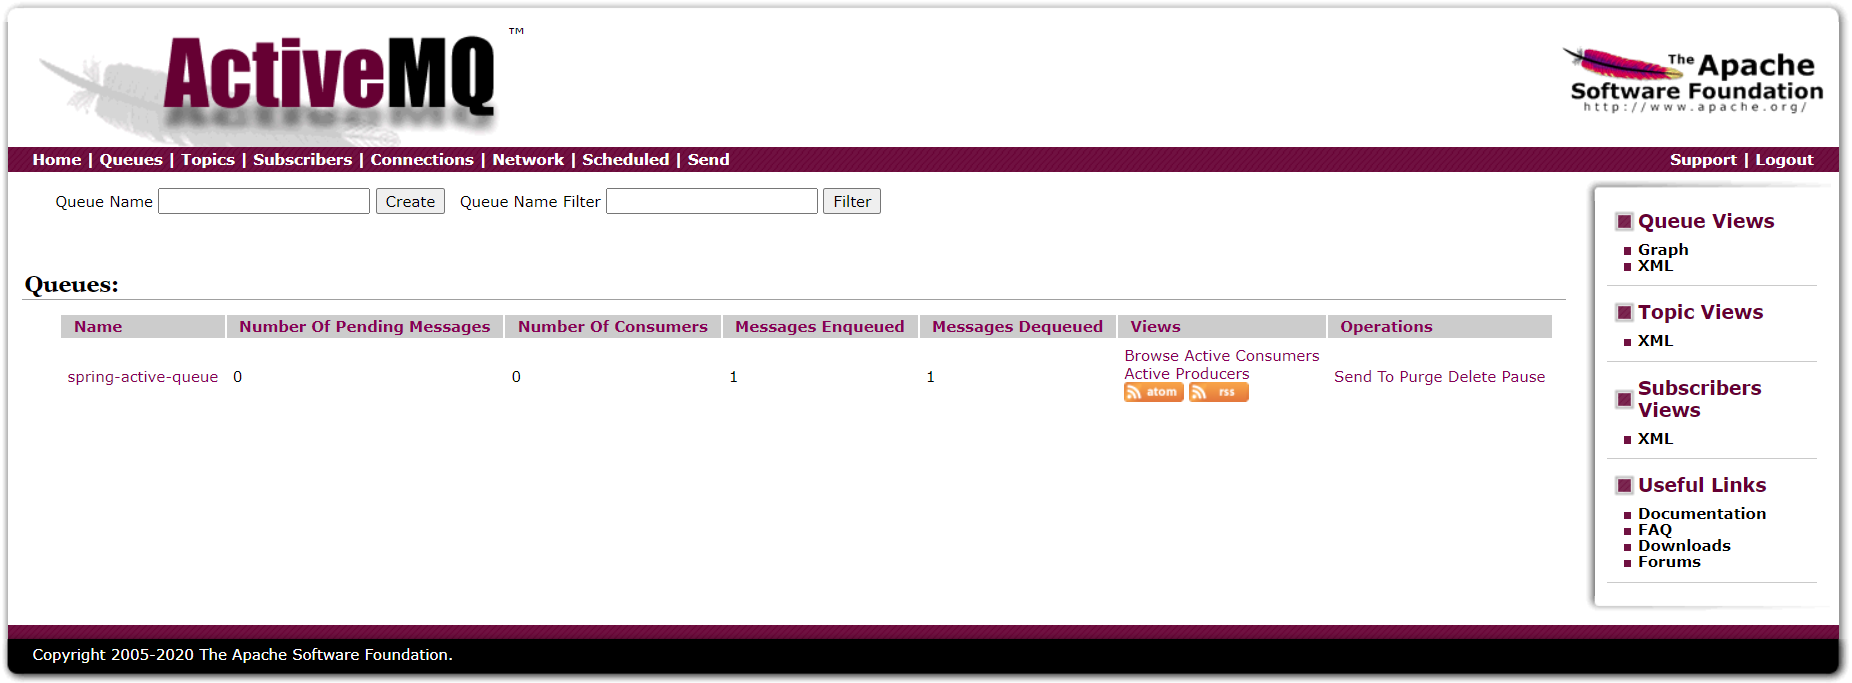
运行上面的程序
正常取出之前放入的消息,消息也被正常消费。

主题示例
修改 application.xml
<?xml version="1.0" encoding="UTF-8"?>
<beans xmlns="http://www.springframework.org/schema/beans"
       xmlns:xsi="http://www.w3.org/2001/XMLSchema-instance"
       xmlns:context="http://www.springframework.org/schema/context"
       xsi:schemaLocation="http://www.springframework.org/schema/beans
       http://www.springframework.org/schema/beans/spring-beans.xsd
       http://www.springframework.org/schema/context
       https://www.springframework.org/schema/context/spring-context.xsd">

    <context:component-scan base-package="org.hong.activemq.spring"/>
    <bean id="jmsFactory" class="org.apache.activemq.pool.PooledConnectionFactory" destroy-method="stop">
        <property name="connectionFactory">
            <bean class="org.apache.activemq.ActiveMQConnectionFactory">
                <property name="brokerURL" value="tcp://192.168.200.130:61616"></property>
            </bean>
        </property>
        <property name="maxConnections" value="100"></property>
    </bean>

    <!-- 创建一个队列目的地 -->
    <bean id="destinationQueue" class="org.apache.activemq.command.ActiveMQQueue">
        <constructor-arg index="0" value="spring-active-queue"></constructor-arg>
    </bean>

    <!-- ================== 添加了一个Topic目的地, 并修改了jmsTemplate的默认目的地 ======================== -->
    <!-- 创建一个主题目的地 -->
    <bean id="destinationTopic" class="org.apache.activemq.command.ActiveMQTopic">
        <constructor-arg index="0" value="spring-active-topic"></constructor-arg>
    </bean>


    <!-- jms 的工具类 -->
    <bean id="jmsTemplate" class="org.springframework.jms.core.JmsTemplate">
        <!-- 注入连接工厂 -->
        <property name="connectionFactory" ref="jmsFactory"/>
        <!-- 注入默认的目的地 -->
        <property name="defaultDestination" ref="destinationTopic"/>
        <property name="messageConverter">
            <bean class="org.springframework.jms.support.converter.SimpleMessageConverter"/>
        </property>
    </bean>
</beans>
代码无需修改
测试
先启动消费者再启动生产者。正常收到消息。

监听器配置
修改 application.xml
<?xml version="1.0" encoding="UTF-8"?>
<beans xmlns="http://www.springframework.org/schema/beans"
       xmlns:xsi="http://www.w3.org/2001/XMLSchema-instance"
       xmlns:context="http://www.springframework.org/schema/context"
       xsi:schemaLocation="http://www.springframework.org/schema/beans
       http://www.springframework.org/schema/beans/spring-beans.xsd
       http://www.springframework.org/schema/context
       https://www.springframework.org/schema/context/spring-context.xsd">

    <context:component-scan base-package="org.hong.activemq.spring"/>
    <bean id="jmsFactory" class="org.apache.activemq.pool.PooledConnectionFactory" destroy-method="stop">
        <property name="connectionFactory">
            <bean class="org.apache.activemq.ActiveMQConnectionFactory">
                <property name="brokerURL" value="tcp://192.168.200.130:61616"></property>
            </bean>
        </property>
        <property name="maxConnections" value="100"></property>
    </bean>

    <!-- 创建一个队列目的地 -->
    <bean id="destinationQueue" class="org.apache.activemq.command.ActiveMQQueue">
        <constructor-arg index="0" value="spring-active-queue"></constructor-arg>
    </bean>

    <!-- 创建一个主题目的地 -->
    <bean id="destinationTopic" class="org.apache.activemq.command.ActiveMQTopic">
        <constructor-arg index="0" value="spring-active-topic"></constructor-arg>
    </bean>

    <!-- 向Spring容器中注册一个MQ的监听器 -->
    <bean id="jmsContainer" class="org.springframework.jms.listener.DefaultMessageListenerContainer">
        <property name="connectionFactory" ref="jmsFactory"/>
        <property name="destination" ref="destinationTopic"/>
        <property name="messageListener" ref="myMessageListener"/>
    </bean>

    <!-- jms 的工具类 -->
    <bean id="jmsTemplate" class="org.springframework.jms.core.JmsTemplate">
        <!-- 注入连接工厂 -->
        <property name="connectionFactory" ref="jmsFactory"/>
        <!-- 注入默认的目的地 -->
        <property name="defaultDestination" ref="destinationTopic"/>
        <property name="messageConverter">
            <bean class="org.springframework.jms.support.converter.SimpleMessageConverter"/>
        </property>
    </bean>
</beans>
自定义监听器
package org.hong.activemq.spring;

import org.springframework.stereotype.Component;

import javax.jms.JMSException;
import javax.jms.Message;
import javax.jms.MessageListener;
import javax.jms.TextMessage;

@Component
public class MyMessageListener implements MessageListener {
    @Override
    public void onMessage(Message message) {
        if(message instanceof TextMessage){
            TextMessage textMessage = (TextMessage)message;
            try {
                System.out.println(textMessage.getText());
            } catch (JMSException e) {
                e.printStackTrace();
            }
        }
    }
}
测试
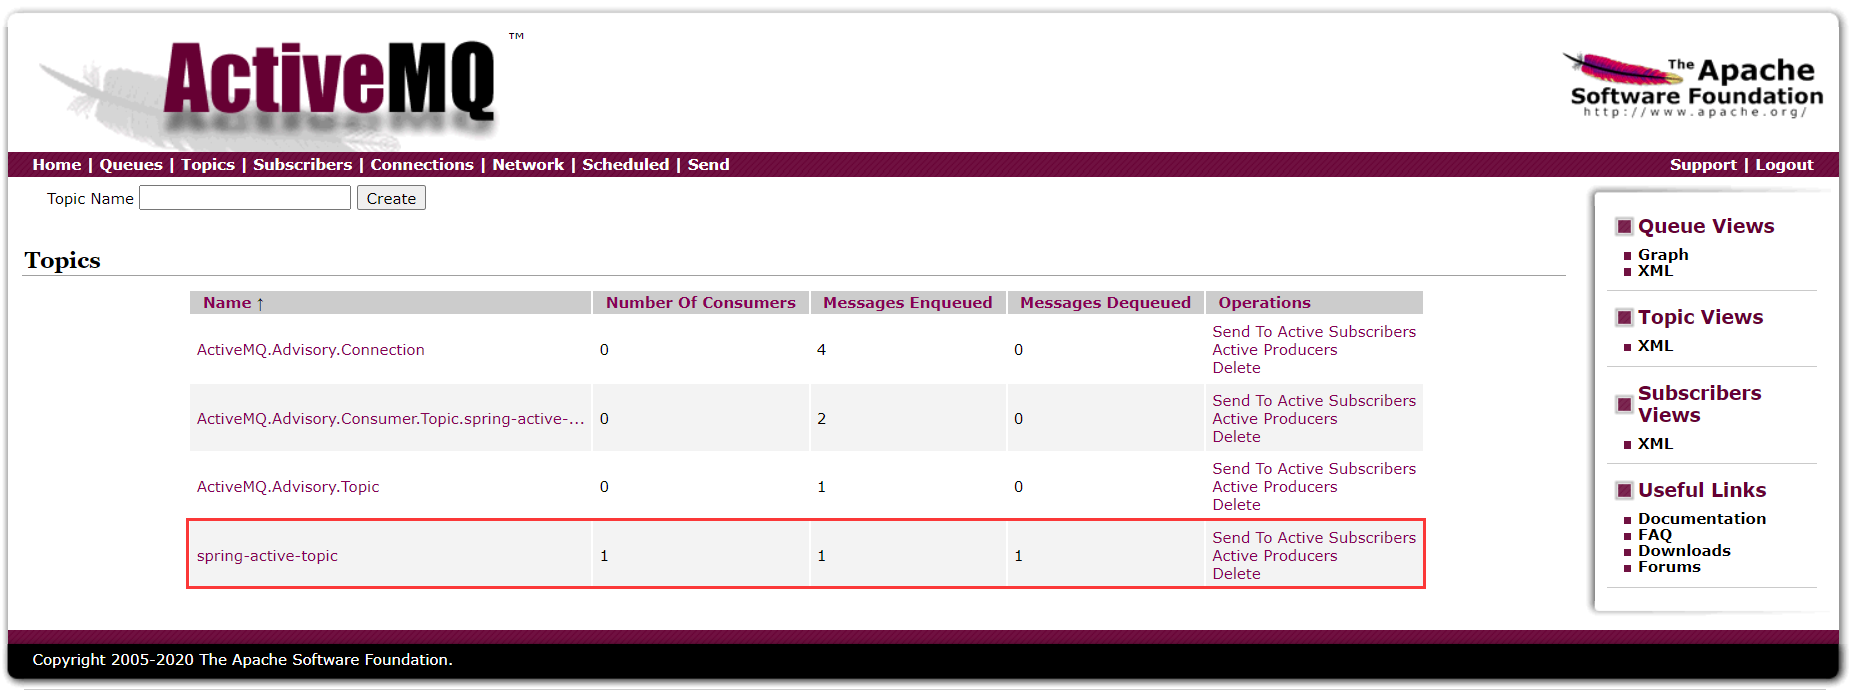
直接启动生产者
当我们向 MQ 中放入消息时,我们注册的监听器立刻就感知到了新的消息,并取出来进行消费。

SpringBoot 整合 ActiveMQ
队列
队列生产者
新建 Maven 工程
工程名:boot-mq-produce
包名:org.hong.boot.activemq
POM
<?xml version="1.0" encoding="UTF-8"?>
<project xmlns="http://maven.apache.org/POM/4.0.0"
         xmlns:xsi="http://www.w3.org/2001/XMLSchema-instance"
         xsi:schemaLocation="http://maven.apache.org/POM/4.0.0 http://maven.apache.org/xsd/maven-4.0.0.xsd">
    <parent>
        <artifactId>spring-boot-parent</artifactId>
        <groupId>org.springframework.boot</groupId>
        <version>2.2.2.RELEASE</version>
    </parent>
    <modelVersion>4.0.0</modelVersion>

    <groupId>org.hong</groupId>
    <artifactId>boot-mq-produce</artifactId>
    <version>1.0-SNAPSHOT</version>

    <properties>
        <project.build.sourceEncoding>UTF-8</project.build.sourceEncoding>
        <maven.compiler.source>1.8</maven.compiler.source>
        <maven.compiler.target>1.8</maven.compiler.target>
    </properties>

    <dependencies>
        <dependency>
            <groupId>org.springframework.boot</groupId>
            <artifactId>spring-boot-starter</artifactId>
        </dependency>
        <dependency>
            <groupId>org.springframework.boot</groupId>
            <artifactId>spring-boot-starter-web</artifactId>
        </dependency>
        <dependency>
            <groupId>org.springframework.boot</groupId>
            <artifactId>spring-boot-starter-test</artifactId>
            <scope>test</scope>
        </dependency>
        <dependency>
            <groupId>org.springframework.boot</groupId>
            <artifactId>spring-boot-starter-activemq</artifactId>
        </dependency>
    </dependencies>

</project>
YAML
server:
  port: 7777
spring:
  activemq:
    # MQ服务器地址
    broker-url: tcp://192.168.200.130:61616
    # 用户名和密码
    user: admin
    password: admin
  jms:
    # false=Queue true=Topic
    pub-sub-domain: false

# 自己定义队列名称
myqueue: boot-activemq-queue
主启动
package org.hong.boot.activemq;

import org.springframework.boot.SpringApplication;
import org.springframework.boot.autoconfigure.SpringBootApplication;
import org.springframework.jms.annotation.EnableJms;

@SpringBootApplication
@EnableJms // 开启JMS
public class MainApp {
    public static void main(String[] args) {
        SpringApplication.run(MainApp.class, args);
    }
}
Config 配置类
package org.hong.boot.activemq.config;

import org.apache.activemq.command.ActiveMQQueue;
import org.springframework.beans.factory.annotation.Value;
import org.springframework.context.annotation.Bean;
import org.springframework.context.annotation.Configuration;

import javax.jms.Queue;

@Configuration
public class ConfigBean {
    @Value("${myqueue}")
    private String myQueue;

    @Bean
    public Queue queue(){
        return new ActiveMQQueue(myQueue);
    }
}
生产者
package org.hong.boot.activemq.produce;

import org.springframework.beans.factory.annotation.Autowired;
import org.springframework.jms.core.JmsMessagingTemplate;
import org.springframework.stereotype.Component;

import javax.jms.Queue;

@Component
public class QueueProduce {
    @Autowired
    private JmsMessagingTemplate jmsMessagingTemplate;// JmsMessagingTemplate是JmsTemplate的加强版

    @Autowired
    private Queue queue;

    public void produceMsg(){
        jmsMessagingTemplate.convertAndSend(queue, "SpringBoot 整合 ActiveMQ");
    }
}
测试单元
package org.hong.boot.activemq;

import org.hong.boot.activemq.produce.QueueProduce;
import org.junit.jupiter.api.Test;
import org.junit.runner.RunWith;
import org.springframework.beans.factory.annotation.Autowired;
import org.springframework.boot.test.context.SpringBootTest;
import org.springframework.test.context.junit4.SpringJUnit4ClassRunner;
import org.springframework.test.context.web.WebAppConfiguration;

@SpringBootTest(classes = MainApp.class)
@RunWith(SpringJUnit4ClassRunner.class)
@WebAppConfiguration
public class TestActiveMQ {
    @Autowired
    private QueueProduce queueProduce;

    @Test
    void testQueueProduceSend(){
        queueProduce.produceMsg();
    }
}
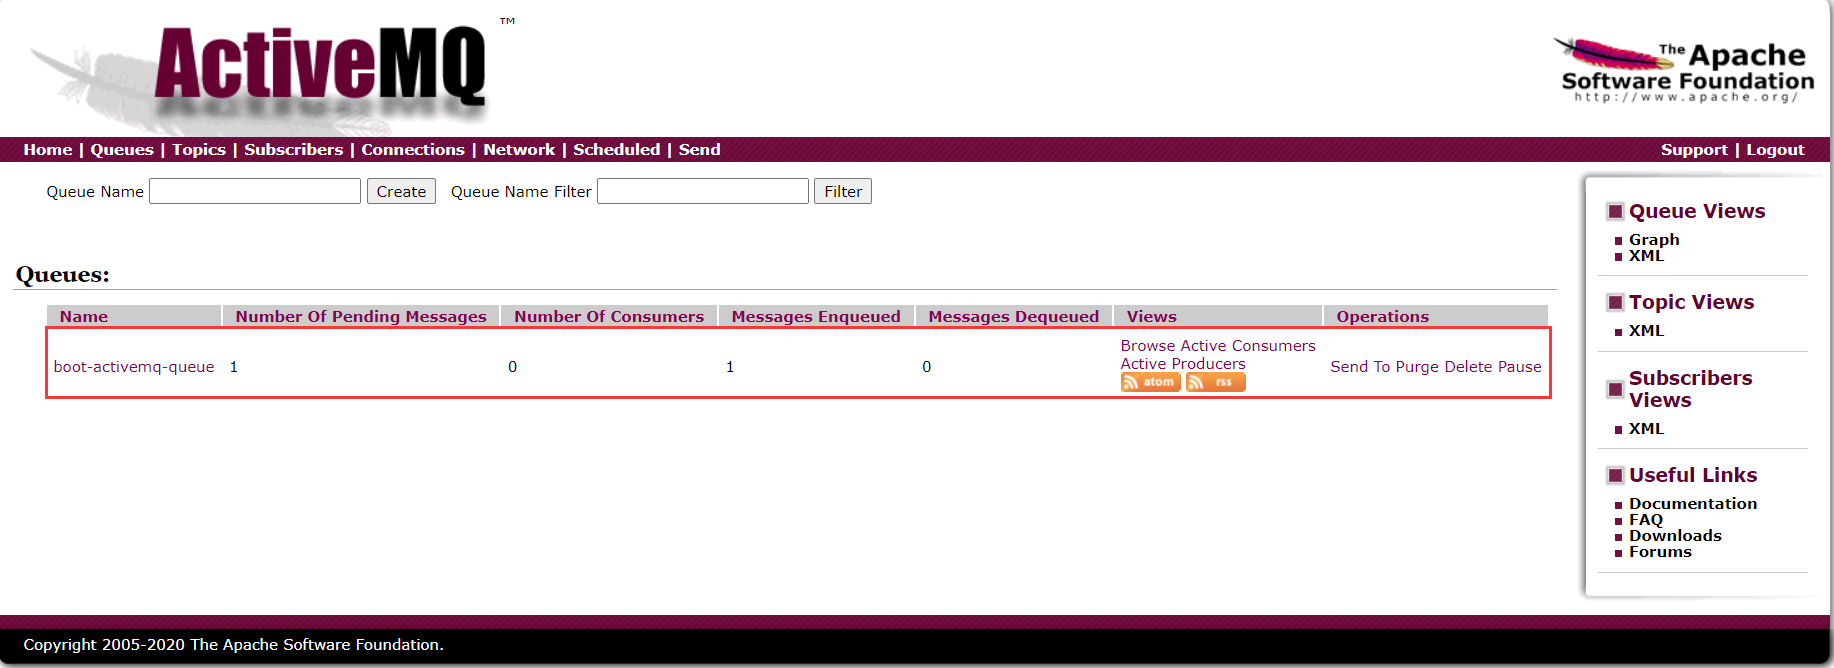
ActiveMQ 控制台
定时发送
案例修改
修改QueueProduce新增定时投递方法
// 间隔3秒定投
@Scheduled(fixedDelay = 3000)
public void produceMsgScheduled(){
    jmsMessagingTemplate.convertAndSend(queue, "Scheduled" + UUID.randomUUID().toString().substring(0, 6));
    System.out.println("produceMsgScheduled send ok");
}
主启动添加 @EnableScheduling 注解
package org.hong.boot.activemq;

import org.springframework.boot.SpringApplication;
import org.springframework.boot.autoconfigure.SpringBootApplication;
import org.springframework.jms.annotation.EnableJms;
import org.springframework.scheduling.annotation.EnableScheduling;

@SpringBootApplication
@EnableJms // 开启JMS
@EnableScheduling // 开启Scheduled注解
public class MainApp {
    public static void main(String[] args) {
        SpringApplication.run(MainApp.class, args);
    }
}
测试
直接运行主启动了,定时投递自动运行。自行观察控制台。
队列消费者
新建 Maven 工程
工程名:boot-mq-consumer
包名:org.hong.boot.activemq
POM
<?xml version="1.0" encoding="UTF-8"?>
<project xmlns="http://maven.apache.org/POM/4.0.0"
         xmlns:xsi="http://www.w3.org/2001/XMLSchema-instance"
         xsi:schemaLocation="http://maven.apache.org/POM/4.0.0 http://maven.apache.org/xsd/maven-4.0.0.xsd">

    <parent>
        <artifactId>spring-boot-parent</artifactId>
        <groupId>org.springframework.boot</groupId>
        <version>2.2.2.RELEASE</version>
    </parent>
    <modelVersion>4.0.0</modelVersion>

    <groupId>org.hong</groupId>
    <artifactId>boot-mq-consumer</artifactId>
    <version>1.0-SNAPSHOT</version>

    <properties>
        <project.build.sourceEncoding>UTF-8</project.build.sourceEncoding>
        <maven.compiler.source>1.8</maven.compiler.source>
        <maven.compiler.target>1.8</maven.compiler.target>
    </properties>

    <dependencies>
        <dependency>
            <groupId>org.springframework.boot</groupId>
            <artifactId>spring-boot-starter</artifactId>
        </dependency>
        <dependency>
            <groupId>org.springframework.boot</groupId>
            <artifactId>spring-boot-starter-web</artifactId>
        </dependency>
        <dependency>
            <groupId>org.springframework.boot</groupId>
            <artifactId>spring-boot-starter-test</artifactId>
            <scope>test</scope>
        </dependency>
        <dependency>
            <groupId>org.springframework.boot</groupId>
            <artifactId>spring-boot-starter-activemq</artifactId>
        </dependency>
    </dependencies>

</project>
YAML
server:
  port: 8888
spring:
  activemq:
    # MQ服务器地址
    broker-url: tcp://192.168.200.130:61616
    # 用户名和密码
    user: admin
    password: admin
  jms:
    # false=Queue true=Topic
    pub-sub-domain: false

# 自己定义队列名称
myqueue: boot-activemq-queue
主启动
package org.hong.boot.activemq;

import org.springframework.boot.SpringApplication;
import org.springframework.boot.autoconfigure.SpringBootApplication;
import org.springframework.jms.annotation.EnableJms;

@SpringBootApplication
@EnableJms
public class  MainApp {
    public static void main(String[] args) {
        SpringApplication.run(MainApp.class, args);
    }
}
消费者
package org.hong.boot.activemq.consumer;

import org.springframework.jms.annotation.JmsListener;
import org.springframework.stereotype.Component;

import javax.jms.JMSException;
import javax.jms.TextMessage;

@Component
public class QueueConsumer {
    // 使用@JmsListener标注这个方法是监听方法, 并指定目的地
    // 因为我们在application.yaml中配置的是队列模式, 因此SpringBoot会根据名字创建队列的目的地
    @JmsListener(destination = "${myqueue}")
    public void receive(TextMessage textMessage) throws JMSException {
        System.out.println("消费者收到消息: " + textMessage.getText());
    }
}
发布订阅
主题生产者
新建 Maven 工程
工程名:boot-mq-topic-produce
包名:org.hong.boot.activemq.topic
POM
<?xml version="1.0" encoding="UTF-8"?>
<project xmlns="http://maven.apache.org/POM/4.0.0"
         xmlns:xsi="http://www.w3.org/2001/XMLSchema-instance"
         xsi:schemaLocation="http://maven.apache.org/POM/4.0.0 http://maven.apache.org/xsd/maven-4.0.0.xsd">
    <parent>
        <artifactId>spring-boot-parent</artifactId>
        <groupId>org.springframework.boot</groupId>
        <version>2.2.2.RELEASE</version>
    </parent>
    <modelVersion>4.0.0</modelVersion>

    <groupId>org.hong</groupId>
    <artifactId>boot-mq-topic-produce</artifactId>
    <version>1.0-SNAPSHOT</version>

    <properties>
        <project.build.sourceEncoding>UTF-8</project.build.sourceEncoding>
        <maven.compiler.source>1.8</maven.compiler.source>
        <maven.compiler.target>1.8</maven.compiler.target>
    </properties>

    <dependencies>
        <dependency>
            <groupId>org.springframework.boot</groupId>
            <artifactId>spring-boot-starter</artifactId>
        </dependency>
        <dependency>
            <groupId>org.springframework.boot</groupId>
            <artifactId>spring-boot-starter-web</artifactId>
        </dependency>
        <dependency>
            <groupId>org.springframework.boot</groupId>
            <artifactId>spring-boot-starter-test</artifactId>
            <scope>test</scope>
        </dependency>
        <dependency>
            <groupId>org.springframework.boot</groupId>
            <artifactId>spring-boot-starter-activemq</artifactId>
        </dependency>
    </dependencies>

</project>
YAML
server:
  port: 6666
spring:
  activemq:
    # MQ服务器地址
    broker-url: tcp://192.168.200.130:61616
    # 用户名和密码
    user: admin
    password: admin
  jms:
    # false=Queue true=Topic
    pub-sub-domain: true

# 自己定义主题名称
mytopic: boot-activemq-topic
主启动
package org.hong.boot.topic;

import org.springframework.boot.SpringApplication;
import org.springframework.boot.autoconfigure.SpringBootApplication;
import org.springframework.jms.annotation.EnableJms;

@SpringBootApplication
@EnableScheduling
@EnableJms
public class MainApp {
    public static void main(String[] args) {
        SpringApplication.run(MainApp.class, args);
    }
}
Config 配置类
package org.hong.boot.topic.config;

import org.apache.activemq.command.ActiveMQTopic;
import org.springframework.beans.factory.annotation.Value;
import org.springframework.context.annotation.Bean;
import org.springframework.context.annotation.Configuration;

import javax.jms.Topic;

@Configuration
public class ConfigBean {
    @Value("${mytopic}")
    private String myTopic;

    @Bean
    public Topic topic(){
        return new ActiveMQTopic(myTopic);
    }
}
生产者
package org.hong.boot.topic.produce;

import org.springframework.beans.factory.annotation.Autowired;
import org.springframework.jms.core.JmsMessagingTemplate;
import org.springframework.scheduling.annotation.Scheduled;
import org.springframework.stereotype.Component;

import javax.jms.Topic;
import java.util.UUID;

@Component
public class TopicProduce {
    @Autowired
    private JmsMessagingTemplate jmsMessagingTemplate;
    @Autowired
    private Topic topic;

    @Scheduled(fixedDelay = 3000)
    public void produceTopic(){
        jmsMessagingTemplate.convertAndSend(topic, "主题消息发布" + UUID.randomUUID().toString().substring(0, 6));
    }
}
主题消费者
新建 Maven 工程
工程名:boot-mq-topic-consumer
包名:org.hong.boot.activemq.topic
POM
<?xml version="1.0" encoding="UTF-8"?>
<project xmlns="http://maven.apache.org/POM/4.0.0"
         xmlns:xsi="http://www.w3.org/2001/XMLSchema-instance"
         xsi:schemaLocation="http://maven.apache.org/POM/4.0.0 http://maven.apache.org/xsd/maven-4.0.0.xsd">
    <parent>
        <artifactId>activemq</artifactId>
        <groupId>org.hong</groupId>
        <version>1.0-SNAPSHOT</version>
    </parent>
    <modelVersion>4.0.0</modelVersion>

    <groupId>org.hong</groupId>
    <artifactId>boot-mq-topic-consumer</artifactId>
    <version>1.0-SNAPSHOT</version>

    <properties>
        <project.build.sourceEncoding>UTF-8</project.build.sourceEncoding>
        <maven.compiler.source>1.8</maven.compiler.source>
        <maven.compiler.target>1.8</maven.compiler.target>
    </properties>

    <dependencies>
        <dependency>
            <groupId>org.springframework.boot</groupId>
            <artifactId>spring-boot-starter</artifactId>
        </dependency>
        <dependency>
            <groupId>org.springframework.boot</groupId>
            <artifactId>spring-boot-starter-web</artifactId>
        </dependency>
        <dependency>
            <groupId>org.springframework.boot</groupId>
            <artifactId>spring-boot-starter-test</artifactId>
            <scope>test</scope>
        </dependency>
        <dependency>
            <groupId>org.springframework.boot</groupId>
            <artifactId>spring-boot-starter-activemq</artifactId>
        </dependency>
    </dependencies>

</project>
YAML
server:
  port: 5555
spring:
  activemq:
    # MQ服务器地址
    broker-url: tcp://192.168.200.130:61616
    # 用户名和密码
    user: admin
    password: admin
  jms:
    # false=Queue true=Topic
    pub-sub-domain: true

# 自己定义主题名称
mytopic: boot-activemq-topic
主启动
package org.hong.boot.activemq.topic;

import org.springframework.boot.SpringApplication;
import org.springframework.boot.autoconfigure.SpringBootApplication;
import org.springframework.jms.annotation.EnableJms;

@SpringBootApplication
@EnableJms
public class MainApp {
    public static void main(String[] args) {
        SpringApplication.run(MainApp.class, args);
    }
}
消费者
package org.hong.boot.activemq.topic.consumer;

import org.springframework.jms.annotation.JmsListener;
import org.springframework.stereotype.Component;

import javax.jms.JMSException;
import javax.jms.TextMessage;

@Component
public class TopicConsumer {
    @JmsListener(destination = "${mytopic}")
    public void receive(TextMessage textMessage) throws JMSException {
        System.out.println("消费者收到订阅的主题: " + textMessage.getText());
    }
}
主题测试
先启动消费者再启动生产者
启动多个消费者,IDEA 启动多个微服务。
每隔3秒,消费者服务会消费一条消息。

ActiveMQ 的传输协议
简介
ActiveMQ 支持的 client-broker 通信协议有:TCP、NIO、UDP、SSL、Http(s)、VM。
启动配置 Transport Connector 的文件在 ActiveMQ 安装目录的 conf/activemq.xml 中的 transportConnectors 标签之内。

在上文给出的配置文件中。
URI 描述消息的头部都是采用协议名称:
描述 amqp 协议的监听端口时,采用的 URI 描述格式为 amqp://...。
唯独在进行 openwire 协议描述时,URI 头却采用 tcp://。这是因为 ActiveMQ 中默认的消息协议就是 openwire。
传输协议简介
Transmission Control Protocol ( TCP )
- 这是默认的 Broker 配置,TCP 的 Client 监听端口 61616
- 在网络创数数据前,必须要序列化数据,消息是通过一个叫
wire protocol来序列化成字节流。默认情况下 ActiveMQ 把wire protocol叫做OpenWire,它的目的是促使网络上的效率和数据快速交互。 - TCP 连接的 URI 形式如:tcp://hostname:port?key=value&key=value,后面是参数是可选的
- TCP 传输的优点
- TCP 协议传输可靠性高,稳定性强
- 高效性:字节流方式传递,效率很高
- 有效性、可用性:应用广泛,支持任何平台
- 关于 Transport 协议的可配置参数可以参考官网:http://activemq.apache.org/configuring-version-5-transports.html
NEW I/O API Protocol ( NIO )
- NIO 协议和 TCP 协议类似但是 NIO 更侧重于底层的访问操作。它允许开发人员对同一资源可有更多的 client 调用和服务端有更多的负载。
- 适合使用 NIO 协议的场景:
- 可能有大量的 Client 去连接 Broker,一般情况下,大量的 Client 去连接 Broker 是被操作系统的线程所限制的。因此 NIO 的实现比 TCP 需要更少的线程去运行,所以建议使用 NIO 协议
- 可能对于 Broker 有一个很迟钝的网络传输,NIO 比 TCP 提供更好的性能。
- NIO 连接的 URI 形式:nio//hostname:port?key=value
- Transport Connector 配置示例,参考官网:http://activemq.apache.org/configuring-version-5-transports.html
<transportConnectors>
	<transportConnector name="nio" uri="nio://localhost:61618?trace=true"/>
</transportConnectors>
NIO 案例演示
修改 activemq.xml
<transportConnectors>
	<transportConnector name="nio" uri="nio://0.0.0.0:61618?trace=true"/>
</transportConnectors>
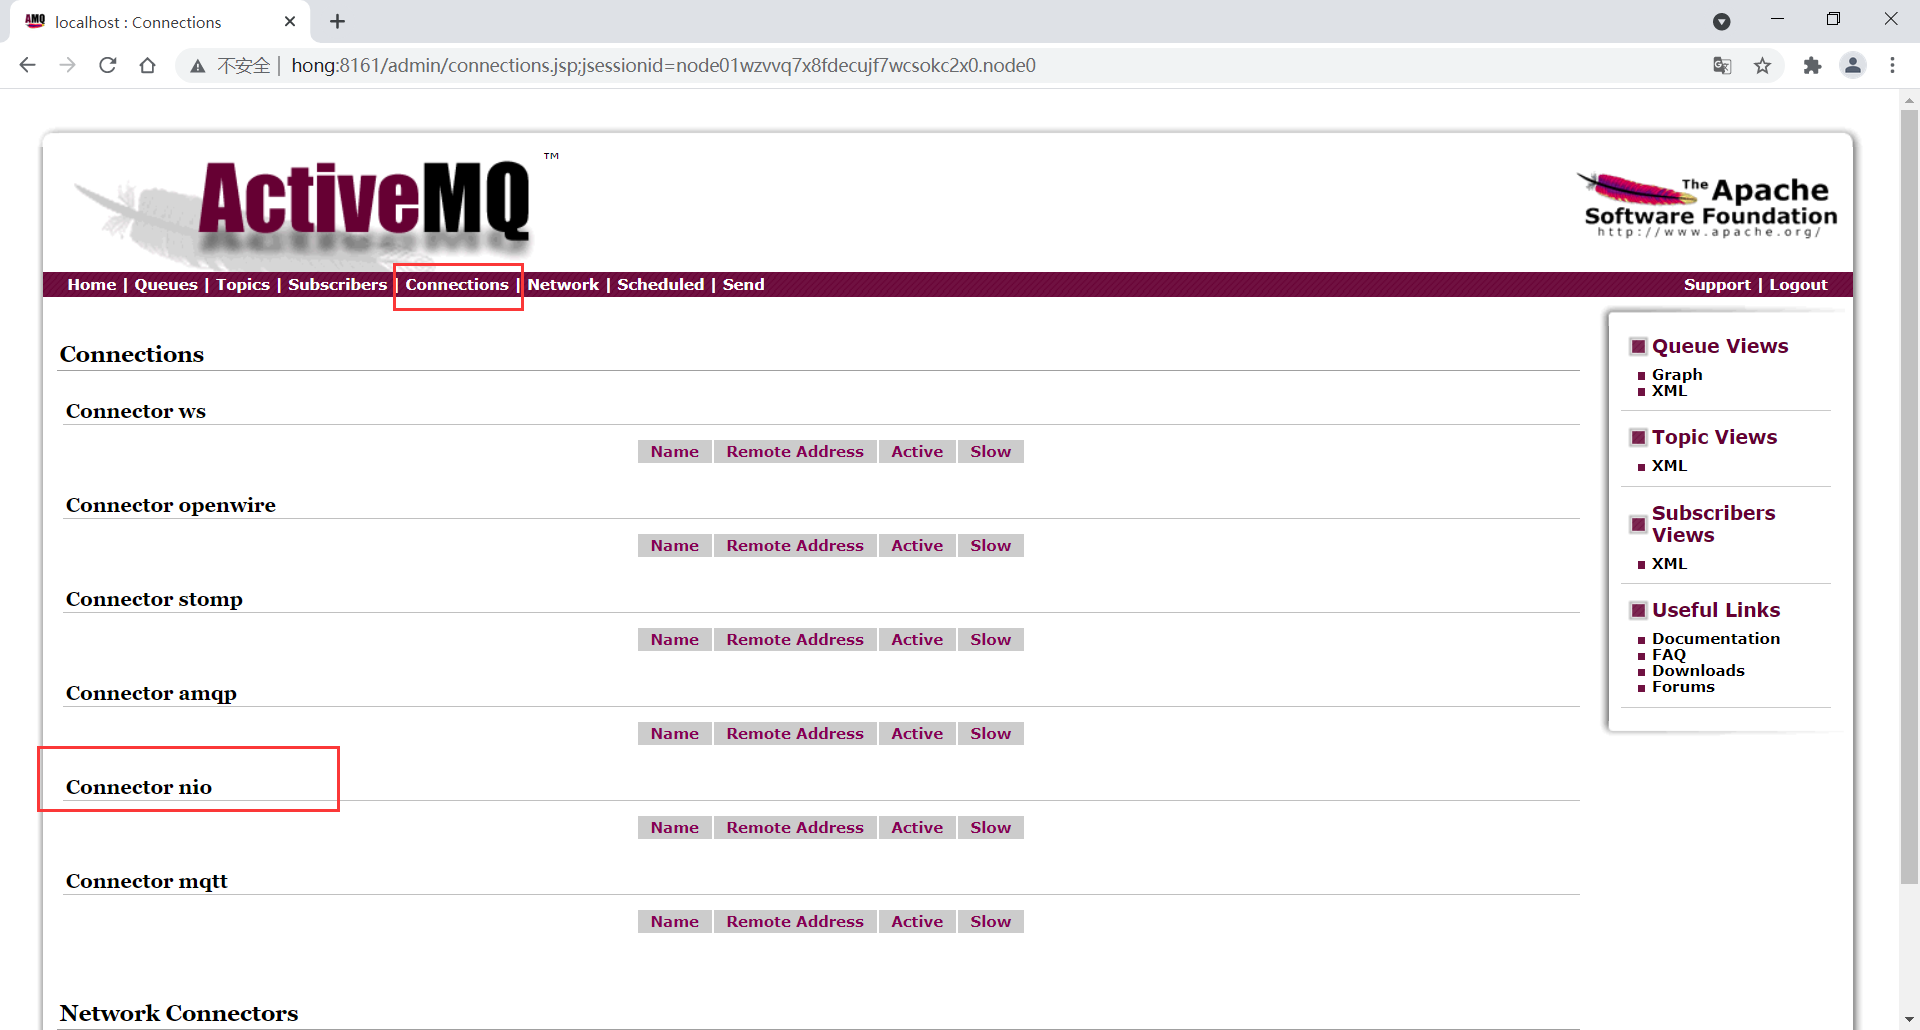
如果不特别指定 ActiveMQ 的网络监听端口,那么这些端口都将使用过 BIO 网络 IO 默认。( OpenWire,STOMP,AMQP......就是默认带的5个 )。所以为了首先提高单节点的网络吞吐性能,我们需要明确指定 Active 的网络 IO 模型。如下所示:URI 格式头以 nio 开头,表示这个端口使用以 TCP 协议为基础的 NIO 网络 IO 模型。( BIO:阻塞 IO,NIO:非阻塞 IO )

修改完成后重启 ActiveMQ。
ActiveMQ 控制台
测试
修改入门案例代码,并且打开 61618 端口。
private static final String ACTIVE_URL = "nio://192.168.200.130:61618";
自行测试,肯定是没问题的。就算不修改连接地址,一样不受影响,之前的 tcp 协议依旧能过使用。
NIO 增强
问题
URI 格式头以 nio 开头,表示这个端口使用以 TCP 协议为基础的 NIO 网络 IO 模型,但是这样的设置方式,只能使这个端口支持 Openwire 协议,我们这么让这个端口支持 NIO 网络 IO 模型,又让它支持多个协议呢?
解决
使用 auto 关键字
使用 + 符号来为端口设置多种特性
<transportConnector name="auto+nio" uri="auto+nio://0.0.0.0:61618?maximumConnections=1000&wireFormat.maxFrameSize=104857600&org.apache.activemq.transport.nio.SelectorManager.corePoolSize=20&org.apache.activemq.transport.nio.SelectorManager.maximumPoolSize=50"/>
测试
private static final String ACTIVE_URL = "nio://192.168.200.130:61618";
private static final String ACTIVE_URL = "tcp://192.168.200.130:61618";
我们使用 tcp 或者 nio 协议访问 61618 端口进行测试,都不会有问题。
ActiveMQ 的消息存储和持久化
概述
为了避免意外宕机以后丢失信息,需要做到重启后可以恢复消息队列,消息系统一般都会采用持久化机制。ActiveMQ 的消息持久化机制有 JDBC、AMQ、KahanDB 和 LevelDB,无论使用哪种持久化方式,消息的存储逻辑都是一致的。
就是在发送者将消息发送出去后,消息中心首先将消息存储到本地数据文件、内存数据库或者远程数据库等再试图将消息发送给接收者,成功则将消息从存储中删除,失败则继续尝试发送。
消息中心启动以后首先要检查指定的存储位置,如果有未发送成功的消息,则需要把消息发送出去。
持久化方式介绍
AMQ ( Message Store )
基于文件的存储方式,是以前的默认消息存储,现在不用了。
KahaDB 消息存储 ( 默认 )
基于日志文件,从 ActiveMQ5.4 开始默认的持久化插件

JDBC 消息存储
消息基于 JDBC 存储
LevelDB 消息存储
这种文件系统是从 ActiveMQ5.8 之后引进的,它和 KahaDB 非常相似,也是基于文件的本地数据库存储形式,但是它提供比 KahaDB 更快的持久性。但它不使用自定义 B-Tree 来实现索引预写日志,而是使用基于 LevelDB 的索引
默认配置
<persistenceAdapter>
	<levelDB directory="activemq-data"/>
</persistenceAdapter>
JDBC Message store with ActiveMQ Journal
后面有
JDBC 消息存储
-
拷贝一个 MySQL 数据库的驱动包到 lib 文件夹下
-
jdbcPersistenceAdapter 配置
修改
activemq.xml配置文件,修改如下:修改前
<persistenceAdapter>
	<kahaDB directory="${activemq.data}/kahadb"/>
</persistenceAdapter>
修改后
<persistenceAdapter> <jdbcPersistenceAdapter dataSource="#mysql-ds"/> </persistenceAdapter>dataSource指定将要引用的持久化数据库的 bean 名称,可以任意写,#不能丢。createTablesOnStartup是否在启动的时候创建数据库,默认值是 true,这样每次启动都会去创建数据表,一般是第一次启动的时候设置为 true 之后改为 false。
-
数据库连接池配置
修改
conf/activemq.xml配置文件<bean id="mysql-ds" class="org.apache.commons.dbcp2.BasicDataSource" destroy-method="close"> <property name="driverClassName" value="com.mysql.jdbc.Driver"/> <property name="url" value="jdbc:mysql//192.168.200.1:3306/activemq?relaxAutoCommit=true"/> <property name="username" value="root"/> <property name="password" value="1234"/> <property name="maxTotal" value="200"/> <property name="poolPreparedStatements" value="true"/> </bean>注意添加的位置。
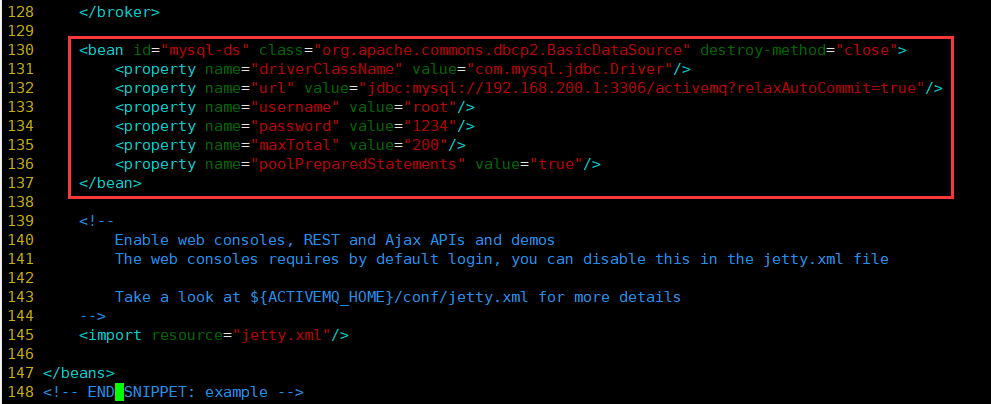
-
创建数据库和对应的表
-
创建一个名为 activemq 的数据库
create database activemq; -
启动 ActiveMQ 后运行程序会自动创建表
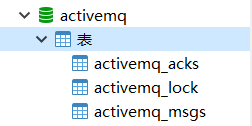
如果启动不了,可能是 MySQL 不允许外部连接
-- '%'允许任意主机使用root用户名的1234密码进行连接
GRANT ALL PRIVILEGES ON *.* TO 'root'@'%' IDENTIFIED BY '1234' WITH GRANT OPTION;
FLUSH PRIVILEGES;
-
Queue
在没有消费者消费的情况下会将消息保存到 activemq_msgs 表中,只要有任意一个消费者已经消费过了,消费之后这些消息将会被立即删除
Topic
一般是先启动消费订阅然后再生产的情况下会将消息保存到 activemq_acks 表中。
下划线坑爹
java.lang.IllegalStateException:BeanFactory not initialized or already closed 这是因为你的操作系统的机器名中有 _ 符号。
JDBC Message store with ActiveMQ Journal
简介
这种方式克服了 JDBC Store 的不做,JDBC 每次消息过来,都需要去写库和读库。ActiveMQ Journal 使用高速缓存写入技术,大大提高了性能。当消费者的消费速度能够及时跟上生产者消费的生产速度时,Journal 文件能够大大减少需要写入到 DB 中的消息。
举个栗子
生产者生产了 1000 条消息,这 1000 条消息会保存到 Journal 文件,如果消费者的消费是速度很快的情况下,在 Journal 文件还没有同步到 DB 之前,消费者已经消费了 90% 消息,那么这个时候只需要同步剩余的 10% 的消息到 DB。如果消费者的消费速度很慢,这个时候 Journal 文件可以使消息以批量方式写到 DB。
配置
修改 conf/activemq.xml 文件
修改前
<persistenceAdapter>
	<jdbcPersistenceAdapter dataSource="#mysql-ds"/>
</persistenceAdapter>
修改后
<persistenceFactory>
    <journalPersistenceAdapterFactory
        journalLogFiles="4"
        journalLogFileSize="32768"
        useJournal="true"
        useQuickJournal="true"
        dataSource="#mysql-ds"
        dataDirectory="activemq-data"/>
</persistenceFactory>
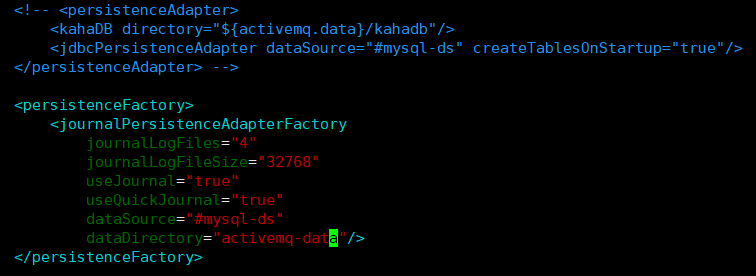
高级特性
异步投递
概述
ActiveMQ 支持同步、异步两种方式的模式将消息发送到 broker,模式的选择对发送延时有巨大的影响。使用异步发送可以显著的提高发送的性能
ActiveMQ 默认使用异步发送的模式:除非明确指定使用同步发送的方式或者在未使用事务的前提下发送持久化的消息,这两种情况都是同步发送的。
如果你没有使用事务且发送的使持久化的消息,每一次发送都是同步发送的且会阻塞 producer 直到 broker 返回一个确认,表示消息已经被安全的持久化到磁盘。确认机制提供了消息安全的保障,但同时会则色客户端带来了很大的延时。
很多高性能的应用。允许在失败的情况下有少量的数据丢失。如果你的应用满足这个特点,你可以使用异步发送。
异步发送
它可以最大号 producer 端的发送效率。通常在发送消息量比较密集的情况下使用异步发送,它可以很大的提升 producer 性能。不过这也带来了额外的问题:
- 需要小号较多的 Client 端内存同时也会导致 broker 端性能消耗增加
- 不能有效的确保消息的发送成功。在
useAsyncSend = true的情况下客户端需要容忍消息丢失的可能
三种开启方式
Connection URI
new ActiveMQConnectionFacttory("tcp://localhost:61616?jms.useAsyscSend=true");
ConnectionFatory
((ActiveMQConnectionFactory)connectionFactory).setUseAsyncSend(true);
Connection
((ActiveMQConnection)connection).setUseAsyncSend(true);
异步投递如何确认发送成功
异步发送丢失消息的场景使:生产者设置 UseAsyncSend=true,使用 producer.send(msg) 持续发送消息。由于消息不阻塞,生产者会认为所有send 的消息均被成功发送至 MQ。如果 MQ 突然宕机,此时生产者端内容中尚未被发送至 MQ 的消息都会丢失。所以,正确的异步发送方法使需要接收回调的。
代码示例
package org.hong.activemq;

import org.apache.activemq.ActiveMQConnectionFactory;
import org.apache.activemq.ActiveMQMessageProducer;
import org.apache.activemq.AsyncCallback;

import javax.jms.*;
import java.util.UUID;

public class JmsProduce {
    private static final String ACTIVE_URL = "tcp://192.168.200.130:61616";
    private static final String QUEUE_NAME = "queue";

    public static void main(String[] args) throws JMSException {
        ActiveMQConnectionFactory activeMQConnectionFactory = new ActiveMQConnectionFactory(ACTIVE_URL);
        Connection connection = activeMQConnectionFactory.createConnection();
        connection.start();
        Session session = connection.createSession(false, Session.AUTO_ACKNOWLEDGE);
        Queue queue = session.createQueue(QUEUE_NAME);
        // 消息生产者使用ActiveMQMessageProducer
        ActiveMQMessageProducer producer = (ActiveMQMessageProducer) session.createProducer(queue);
        producer.setDeliveryMode(DeliveryMode.NON_PERSISTENT);

        for (int i = 0; i < 3; i++) {
            TextMessage textMessage = session.createTextMessage("msg---" + i);
            String id = UUID.randomUUID().toString();
            textMessage.setJMSMessageID(id);
            producer.send(textMessage, new AsyncCallback() {
                // 成功的回调
                @Override
                public void onSuccess() {
                    System.out.println(id + "发送成功");
                }

                // 失败的回调
                @Override
                public void onException(JMSException e) {
                    System.out.println(id + "发送失败");
                }
            });
        }
        producer.close();
        session.close();
        connection.close();
        System.out.println("消息发布到MQ完成");
    }
}
延迟投递和定时投递
修改
conf/activemq.xml
新增 schedulerSupport="true" 属性。

四大属性
| Property Name | type | description |
|---|---|---|
| AMQ_SCHEDULED_DELAY | long | 延迟投递的时间 |
| AMQ_SCHEDULED_PERIOD | long | 重复投递的的时间间隔 |
| AMQ_SCHEDULED_REPEAT | int | 重复投递次数 |
| AMQ_SCHEDULED_CRON | String | Cron 表达式 |
代码案例
package org.hong.activemq;

import org.apache.activemq.ActiveMQConnectionFactory;
import org.apache.activemq.ScheduledMessage;

import javax.jms.*;

public class JmsProduce {
    private static final String ACTIVE_URL = "tcp://192.168.200.130:61616";
    private static final String QUEUE_NAME = "queue";

    public static void main(String[] args) throws JMSException {
        ActiveMQConnectionFactory activeMQConnectionFactory = new ActiveMQConnectionFactory(ACTIVE_URL);
        Connection connection = activeMQConnectionFactory.createConnection();
        connection.start();
        Session session = connection.createSession(false, Session.AUTO_ACKNOWLEDGE);
        Queue queue = session.createQueue(QUEUE_NAME);
        MessageProducer producer = session.createProducer(queue);
        producer.setDeliveryMode(DeliveryMode.NON_PERSISTENT);

        long delay = 3 * 1000;
        long period = 4 * 1000;
        int repeat = 5;

        for (int i = 0; i < 3; i++) {
            TextMessage textMessage = session.createTextMessage("msg---" + i);
            textMessage.setLongProperty(ScheduledMessage.AMQ_SCHEDULED_DELAY, delay); // 延迟投递的时间
            textMessage.setLongProperty(ScheduledMessage.AMQ_SCHEDULED_PERIOD, period); // 重复投递的时间间隔
            textMessage.setIntProperty(ScheduledMessage.AMQ_SCHEDULED_REPEAT, repeat); // 重复投递次数
            producer.send(textMessage);
        }

        producer.close();
        session.close();
        connection.close();

        System.out.println("消息发布到MQ完成");
    }
}
消息重发
消息重发的情况
- Client 用了 Transactions 且在 session 中调用了 rollback()
- Client 用了 Transactions 且在调用 commit() 之前关闭或者没有 commit()
- Client 在 CLIENT_ACKNOWLEDGE 的传递模式下,在 sessino 中调用了 recover()
消息重发时间间隔和重发次数
间隔:1
次数:6
测试
消费者端开启事务,但是不提交事务,会造成重复消费,但是由于消息重发机制的存在,在进行第7次消费时将无法再消费到数据。
消息去哪了?
一个消息被 redelivedred 超过默认的最大重发次数时,消费端会给 MQ 发送一个 poison ack 表示这个消息有毒,告诉 broker 不要再发了。这个时候 broker 会把这个消息方法 DLQ ( 死信队列 )。
自定义重发策略
package org.hong.activemq;

import org.apache.activemq.ActiveMQConnectionFactory;
import org.apache.activemq.RedeliveryPolicy;

import javax.jms.*;
import java.io.IOException;

public class JmsConsumer {
    private static final String ACTIVE_URL = "tcp://192.168.200.130:61616";
    private static final String QUEUE_NAME = "queue01";

    public static void main(String[] args) throws JMSException, IOException {
        ActiveMQConnectionFactory activeMQConnectionFactory = new ActiveMQConnectionFactory(ACTIVE_URL);

        // 自定义重发策略
        RedeliveryPolicy redeliveryPolicy = new RedeliveryPolicy();
        redeliveryPolicy.setMaximumRedeliveries(3);
        activeMQConnectionFactory.setRedeliveryPolicy(redeliveryPolicy);

        Connection connection = activeMQConnectionFactory.createConnection();
        connection.start();
        Session session = connection.createSession(true, Session.AUTO_ACKNOWLEDGE);
        Queue queue = session.createQueue(QUEUE_NAME);
        MessageConsumer consumer = session.createConsumer(queue);

        while (true) {
            TextMessage textMessage = (TextMessage) consumer.receive(4000L);
            if(textMessage != null){
                System.out.println("消费者接收到消息:" + textMessage.getText());
            }else{
                break;
            }
        }

        // session.commit(); 不提交事务
        consumer.close();
        session.close();
        connection.close();
    }
}
属性说明
collisionAvoidanceFactor:设置防止冲突访问的正负百分比,只用
| 属性 | 默认值 | 描述 |
|---|---|---|
backOffMultiplier |
5 |
重连时间间隔递增倍数,只有值大于1和启动 useExponentialBackOff 参数时才生效。 |
collisionAvoidanceFactor |
0.15 |
设置防止冲突访问的正负百分比,只有启动 useCollisionAvoidance 参数时才生效。也就是延迟时间上再加一个时间波动范围。 |
initialRedeliveryDelay |
1000L |
初始重发延迟(以毫秒为单位)。 |
maximumRedeliveries |
6 |
最大重传次数,达到最大重连次数后抛出异常。为-1时不限制次数,为0表示不进行重传。 |
maximumRedeliveryDelay |
-1 |
最大传送延迟,只在 useExponentialBackOff=true 时生效。 |
redeliveryDelay |
1000L |
重发延迟时间,当 initialRedeliveryDelay=0 时生效。 |
useCollisionAvoidance |
false |
启用防止冲突功能。 |
useExponentialBackOff |
false |
启动指数倍数递增的方式增加延迟时间。 |
死信队列
ActiveMQ 中引入了 死信队列(Dead Letter Queue)的概念。即一条消息在被重发了多次后,将会被 ActiveMQ 移入死信队列。开发人员可以在这个 Queue 中查看处理出错的消息,进行人工干预。


 浙公网安备 33010602011771号