ssm知识点总结
项目名称:教育网—在线调查系统
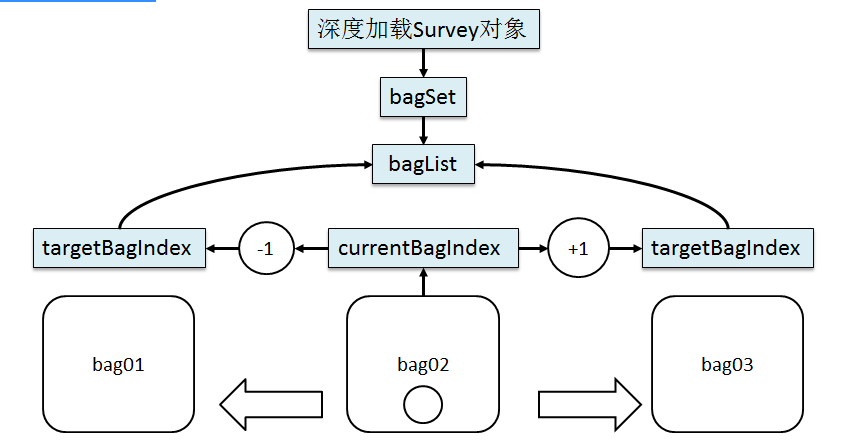
项目总体流程图:
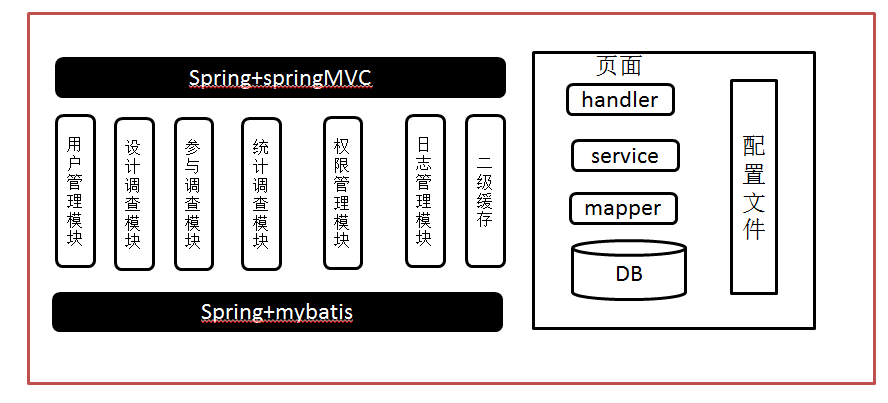
设计调查:调查-->包裹--->问题(增删改查)
1.调整包裹顺序
2.移动复制包裹
3.深度删除
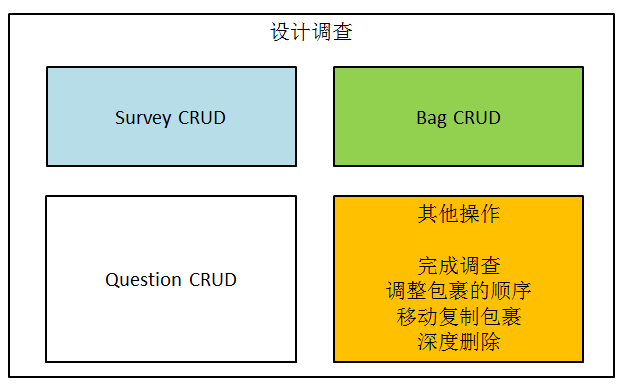
主要生成survey_id、survey_name、completed(是否完成)、logoPath(涉及到图片上传)
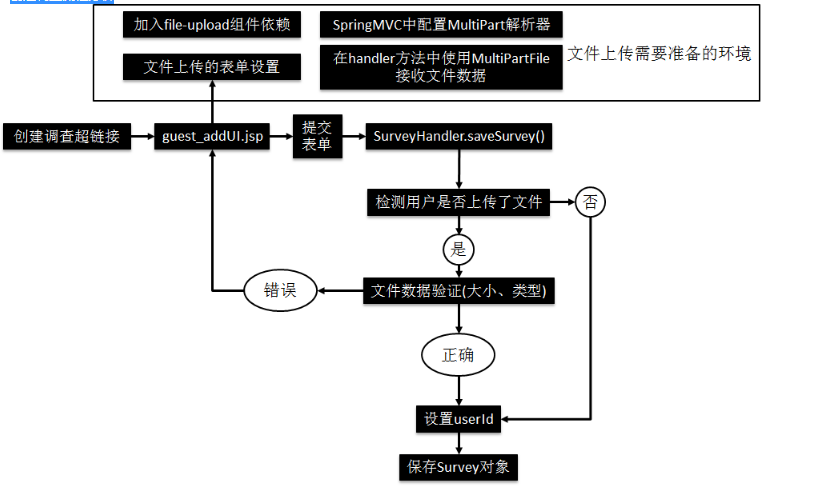
springMVC文件上传:
①form标签的enctype属性:multipart/form-data②form标签的method属性:post
③生成文件上传框:input type="file"
文件的保存
①调用multiPartFile.transfer()方法
②文件的路径不能使用绝对的物理路径
<img src="E:\good.jpg"/>
这样的路径浏览器无法显示图片
③有效的路径形式
<img src="surveyLogos/logo.gif"/>
这个路径有效是因为它是一个虚拟路径。
④虚拟路径VS真实物理路径
[1]真实物理路径:Web应用中的文件和目录在硬盘上保存的真实路径(注意:这里指的是部署目录)。
D:\WorkSpaceShenZhen170228\.metadata\.plugins\org.eclipse.wst.server.core\tmp0\wtpwebapps\Survey_1_UI\surveyLogos\logo.gif
浏览器不能直接访问这个路径,所以需要由服务器将它转换为浏览器可以访问的虚拟路径
Web应用在不同的操作系统下、在不同的服务器上部署时真实物理路径是有可能变化的。
[2]虚拟路径:服务器虚拟出来供浏览器访问的路径,以主机地址为基准的
http://localhost:8080/Survey_1_UI/surveyLogos/logo.gif
不管Web应用部署在什么操作系统的什么服务器上,虚拟路径都是相同的。
⑤在handler方法中保存文件时如何将文件保存到img标签可以访问的路径下
[1]保存文件的目标路径一定在部署目录下
[2]部署目录会随着部署的服务器、操作系统不同而发生变化
[3]所以要通过不变的虚拟路径动态生成有可能变化的真实物理路径
String 真实物理路径 = servletContext.getRealPath(虚拟路径);
⑥压缩图片
[1]直接复制一个工具方法resizeImages()
[2]两个需要手动导入的API
import com.sun.image.codec.jpeg.JPEGImageEncoder;
import com.sun.image.codec.jpeg.JPEGCodec;
[3]传入的参数
inputStream:上传文件的输入流
realPath:/surveyLogos目录的真实路径,后面没有斜杠,而且不带具体文件名
[4]返回值:可以直接用于设置Survey对象的logoPath属性
①验证的内容
[1]文件的大小[2]文件的类型
[1]检测用户是否上传了文件[2]获取相关数据:文件大小、文件内容类型[3]如果检测到大小或类型不符合要求,则抛出对应的异常
①分页支持:MyBatis插件PageHelper②要查询的数据:Survey对象
[1]限制条件1:当前用户[2]限制条件2:未完成③SurveyMapper.selectAllSurvey(userId,completed);
考虑到将来也会查询所有已完成的调查,所以userId和completed都需要传入
[1]用户没有上传文件时保持旧的logo_path字段值不变[2]用户如果上传了文件那么就将logo_path字段值修改为新值[3]用户如果上传了不符合要求的图片要回到更新调查的表单页面并显示错误消息[4]回到更新调查的表单页面显示错误消息时要保证表单上模型数据回显正常[5]更新完成后回到分页页面,且回到的是之前所在的页码
[6]文件上传验证失败后,再正常更新还是能够回到之前所在的分页页面
包裹的CRUD
包裹的序号默认采用包裹的id
原理:通过mybatis的xml映射文件获取自增主键获取包裹的序号,如果采用插入后查询id最大值赋值给Order会因为线程问题出错。
- 保存bag对象
- 查询guest_bag表中bag_id的最大值
- 使用这个最大值设置bag_order
- T1:保存bag对象(bag_id的最大值是6)
- T2:保存bag对象(bag_id的最大值是7)
- T1:查询最大值,得到的结果:7
- T1:设置bag_order为7就错了
- T2……
- T1:保存bag对象,立即获取刚刚自增产生的bag_id——6
- T2:保存bag对象,立即获取刚刚自增产生的bag_id——7
- T1:使用已经获取到的自增主键值设置bag_order为6
- T2:使用已经获取到的自增主键值设置bag_order为7
③获取自增主键值的方式以及相关UPDATE语句
useGeneratedKeys="true" keyProperty="bagId"update guest_bag set bag_order=#{bagId} where bag_id=#{bagId}
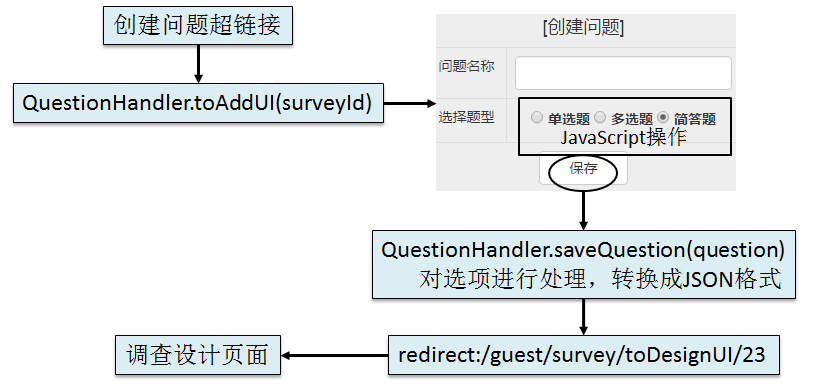
难点:将选项转化为json进行处理。
DataprocessUtils.processOptionToJson(Question question);
判断题型,简答题不处理将option字符串根据“\r\n”拆分为数组借助于工具将数组转换为JSON字符串DataprocessUtils.processOptionFromJson(Question question);判断题型,简答题不处理借助于工具将JSON格式的option字符串还原为List将List组合成以“\r\n”分开的字符串
借助于工具将JSON格式的option字符串还原为List
将重复操作提取出来
答案回显:type1,2,3
包裹和问题数据的来源
答案数据存储的数据结构:
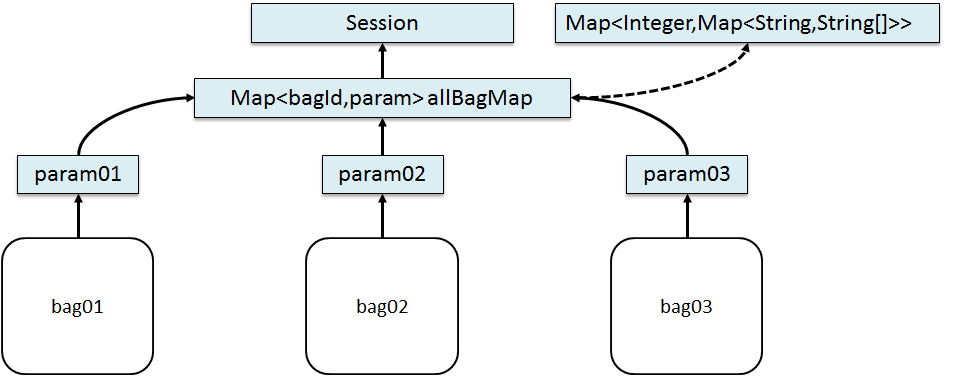
Session
allBagMap
根据bagId→paramMap
根据表单标签的name属性值→values数组
根据values数组进行标签的回显
checkboxradiotext
<input type="submit" name="submit_prev" value="返回上一个包裹"/>
<input type="submit" name="submit_next" value="进入下一个包裹"/>
<input type="submit" name="submit_quit" value="放弃"/>
<input type="submit" name="submit_done" value="完成"/>
boolean contains = parameterMap.containsKey("submit_prev");if(contains){//说明用户点击的是"返回上一个包裹"
}
③四个按钮的显示条件
size-1实际上就是最后一个包裹的索引
1、使用异常映射机制统一管理项目中错误消息
why?
常规的是当不符合业务情况时产生异常信息返回,但容易因为个人书写代码的行为习惯导致,编程混乱,
会增加交流的成本,降低开发效率。所以需要采用异常映射机制统一管理错误消息。
if(错误条件){
map.put("message","对不起,这个用户名已经被占用了,请重新注册!");return "页面";
}
how?
异常映射机制统一管理项目错误信息:
拿注册用户名字存在为例:
//已存在则抛出异常
if(adminCount > 0) {

throw new AdminNameExistsException(GlobalMessage.ADMIN_NAME_EXISTS);

}
AdminNameExistsException是自定义的Exception
public class AdminNameExistsException extends RuntimeException {

    private static final long serialVersionUID = 1L;

    public AdminNameExistsException(String message) {
        super(message);
    }

}
异常映射机制在spring.xml中进行异常映射:映射到相应页面
<!--简单异常映射解析器,对于用户 名存在throw的异常进行映射跳转到指定视图  -->
    <bean id="SimpleMappingExceptionResolver" class="org.springframework.web.servlet.handler.SimpleMappingExceptionResolver">
        <property name="exceptionMappings">
            <!-- key属性是异常类型 -->
            <!-- 标签体配置目标视图 -->
            <props>
                <prop key="com.lamsey.survey.e.UserNameAlreadyExistException">guest/user_regist</prop>
                <prop key="com.lamsey.survey.e.UserLoginFailedException">guest/user_login</prop>
                <prop key="com.lamsey.survey.e.UserAccessForbiddenException">guest/user_login</prop>
                <prop key="com.lamsey.survey.e.FileTypeInvalidForSaveException">guest/survey_addUI</prop>
                <prop key="com.lamsey.survey.e.FileTooLargeForSaveException">guest/survey_addUI</prop>
                <prop key="com.lamsey.survey.e.FileTypeInvalidForEditException">guest/survey_editUi</prop>
                <prop key="com.lamsey.survey.e.FileTooLargeForEditException">guest/survey_editUi</prop>
                <prop key="com.lamsey.survey.e.RemoveSurveyException">error</prop>
                <prop key="com.lamsey.survey.e.RemoveBagException">error</prop>
                <prop key="com.lamsey.survey.e.SurveyWithoutAnyBagException">error</prop>
                <prop key="com.lamsey.survey.e.SurveyHasEmptyBagException">error</prop>
                <prop key="com.lamsey.survey.e.BagOrderDuplicateException">guest/bag_AdjustUI</prop>
                <prop key="com.lamsey.survey.e.AdminLoginFailedException">manager/admin_login</prop>
                <prop key="com.lamsey.survey.e.HasNoAuthorityException">error</prop>
                <prop key="com.lamsey.survey.e.AdminAccessForbiddenException">error</prop>
            </props>
        </property>
    </bean>
页面对异常进行捕获显示:
 <c:if test="${requestScope.exception != null }">
                          <%-- request.setAttribute("exception",exception) --%>
                        <%-- request.getAttribute("exception") --%>
                        <%-- exception.getMessage() --%>
                          <div class="form-group"> ${requestScope.exception.message}</div>
                  </c:if>
jsp四大域对象经常用来保存数据信息。
pageContext 可以保存数据在同一个jsp页面中使用
request 可以保存数据在同一个request对象中使用。经常用于在转发的时候传递数据
session 可以保存在一个会话中使用
application(ServletContext) 就是ServletContext对象
jsp 中九大内置对象分别是:
request 对象 请求对象,可以获取请求信息
response 对象 响应对象。可以设置响应信息
pageContext 对象 当前页面上下文对象。可以在当前上下文保存属性信息
session 对象 会话对象。可以获取会话信息。
exception 对象 异常对象只有在jsp页面的page 指令中设置 isErrorPage="true" 的时候才会存在
application 对象 ServletContext对象实例,可以获取整个工程的一些信息。
config 对象 ServletConfig对象实例,可以获取Servlet的配置信息
out 对象 输出流。
page 对象 表示当前Servlet对象实例(无用,用它不如使用this对象)。
九大内置对象,都是我们可以在【代码脚本】中或【表达式脚本】中直接使用的对象。
2、通过序列化和反序列化技术实现对象的深度复制
为什么用深度复制?
若我们系统中存在大量的对象是通过拷贝生成的,如果我们每一个类都写一个clone()方法,并将还需要进行深拷贝,新建大量的对象,这个工程是非常大的,
这里我们可以利用序列化来实现对象的拷贝。
复制包裹,
执行深度复制
Bag targetBag = (Bag)DataprocessUtils.deeplyCopy(sourceBag);
如何利用序列化来完成对象的拷贝呢?
在内存中通过字节流的拷贝是比较容易实现的。把母对象写入到一个字节流中,再从字节流中将其读出来,
这样就可以创建一个新的对象了,并且该新对象与母对象之间并不存在引用共享的问题,真正实现对象的深拷贝。
1.首先将数据进行序列化
deeplyCopy(Serializable source)

2.将序列化的数据
    /**
     * 通过序列化和反序列的方式对对象进行深度复制
     */
    //深克隆: 具有相同的值,但是两个全新的对象实例,相互之间不会受影响
    //         被复制对象的所有变量都含有与原来的对象相同的值,除去那些引用其他对象的变量。
    //        那些引用其他对象的变量将指向被复制过的新对象,而不再是原有的那些被引用的对象。
    public static Object deeplyCopy(Serializable source){

        if(source == null) {
            return null;
        }
        //1.声明一个变量用来保存复制得到的目标对象
        Object targetObject = null;
        //2.声明四个变量用来保存四个流
        ObjectInputStream ois =null;
        ObjectOutputStream oos = null;
        ByteArrayInputStream bais = null;
        ByteArrayOutputStream baos = null;
        //3.try...catch...finally结构
        try{
            //4.创建字节数组输出流
            baos = new ByteArrayOutputStream();
            //5.根据字节数组输出流创建对象输出流
            oos = new ObjectOutputStream(baos);
            //6.执行对象的序列化操作(本质:将对象序列化后得到的数据写入字节数组)
            oos.writeObject(source);
            //7.获取保存了序列化数据的字节数组
            byte[] byteArray = baos.toByteArray();
            //8.创建字节数组输入流
            bais = new ByteArrayInputStream(byteArray);
            //9.根据字节数组输入流创建对象输入流
            ois = new ObjectInputStream(bais);
            //10.执行反序列化操作
             targetObject = ois.readObject();
        }catch(Exception e){
            e.printStackTrace();
        } finally{
            //11.释放资源
            if(oos != null){
                try{
                    oos.close();
                }catch(Exception e){
                    e.printStackTrace();
                }
            }
            if(ois != null){
                try{
                    ois.close();
                }catch(Exception e){
                    e.printStackTrace();
                }
            }
        }
        return targetObject;
    }
3、使用pageHelper对商品结果进行分页浏览功能
why?
普通的sql语句分页:
limit x,y;
#x:起始数据行,y:要查询的数据行
SELECT last_name,salary
FROM employees
ORDER BY salary DESC
#分页 (写在order by的后面)
#limit 0,10;
LIMIT 20,10;#21-30段数据:第3页
#公式:limit (pageNo - 1) * pageSize , pageSize;
使用普通分页太麻烦了,利用mybatis的pageHelper插件会更容易操作。
how?
public PageInfo<Survey> getSurveyPage(Integer userId, boolean completed, Integer pageNum) {

        //设置每页显示数量
        int pageSize = 5;
        PageHelper.startPage(pageNum, pageSize);
        //执行分页查询
        List<Survey> list = surveyMapper.selectAllSurvey(userId, completed);
        //用PageInfo对结果进行包装
        int navigatePages = 6;
        PageInfo<Survey> page = new PageInfo<>(list, navigatePages);
        return page;
    }
4.JFreeChart将选择题的答案数据导出为饼图
why?
JFreeChart是JAVA平台上的一个开放的图表绘制类库。它完全使用JAVA语言编写,是为applications, applets, servlets 以及JSP等使用所设计。
JFreeChart可生成饼图(pie charts)、柱状图(bar charts)、散点图(scatter plots)、时序图(time series)、甘特图(Gantt charts)等等
多种图表,并且可以产生PNG和JPEG格式的输出,还可以与PDF和EXCEL关联。
因为要对每道题统计数据,所以采用饼状图进行显示每道选择题的结果。简答题
how?
@RequestMapping(value="manager/statistics/showAnswerChart/{questionId}",method=RequestMethod.GET)
    public void showAnswerChart(@PathVariable(value="questionId") Integer questionId,
            HttpServletResponse response) throws IOException{
        //1.调用Service方法生成JFreeChart对象
        JFreeChart chart = statisticsService.getChart(questionId);
        //2.将JFreeChart对象生成的图表图片返回给浏览器
        //通过response对象获取一个能够给浏览器返回数据的输出流
        ServletOutputStream outputStream = response.getOutputStream();
        //借助ChartUtilities工具类的方法将图表数据写入到上面获取的输出流
        ChartUtilities.writeChartAsJPEG(outputStream, chart, 1200, 600);
        //③当前Handler方法通过上面的输出流已经能够给浏览器明确的响应数据,所以不再前往任何一个视图
        //所以没有任何返回值
    }
JFreeChart对象的创建
public JFreeChart getChart(Integer questionId) {

        //获取题目数据
        Question question = questionMapper.selectByPrimaryKey(questionId);
        int count = answerMapper.selectQuestionEngagedCount(questionId);

        //获取图例区数据
        List<String> optionList = question.getOptionList();

        //获取标签区数据
        Map<String, Object> map = new HashMap<>();
        for(int index= 0;index < optionList.size();index++){
            //(1)option作为标签名
            String option = optionList.get(index);
            //(2)index结合questionId查询optionEngagedCount
            String optionValue = "%," + index + ",%";
            int optionCount = answerMapper.SelectOptionEngagedCount(questionId,optionValue);
            map.put(option, optionCount);
        }

        String title = question.getQuestionName()+count+"次参与";
        Object chart = DataprocessUtils.generateChart(title, map);

        return (JFreeChart) chart;
    }
    //通过response对象获取一个能够给浏览器返回数据的输出流
        ServletOutputStream outputStream = response.getOutputStream();
        //借助ChartUtilities工具类的方法将图表数据写入到上面获取的输出流
        ChartUtilities.writeChartAsJPEG(outputStream, chart, 1200, 600);
统计答案中的数据,
SELECTCOUNT(*)FROMguest_answerWHERE question_id = 19AND CONCAT(",", answer_content, ",") LIKE '%,1,%'
answer_context

总结:首先创建JFreeChart对象(title,各个选项的count存进map里面),然后借助ChartUtilities工具类的方法将图表数据写入文件到指定目的地
创建response的outPutStream进行输出到浏览器
5.使用POI汇总数据,并将整个调查参与的结果导出为Excel表格
why?
为了将所有调查问卷的数据进行收集
how?
[1]数据→Excel[2]Excel→数据
②项目中将数据导出为Excel的数据来源
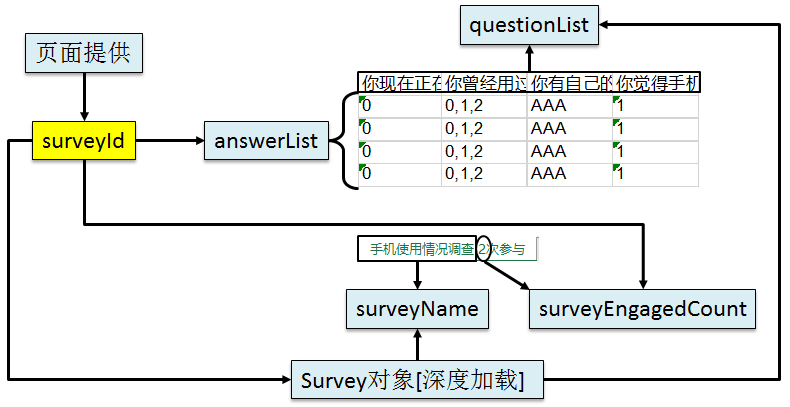
[1]从URL地址中匹配surveyId[2]根据surveyId深度加载Survey对象[3]根据Survey对象中的包裹、问题数据创建List<Question>[4]根据surveyId查询所有答案数据:List<Answer>[5]根据surveyId查询surveyEngagedCount④生成Excel文件所需要的数据的要求

⑤符合要求的数据结构
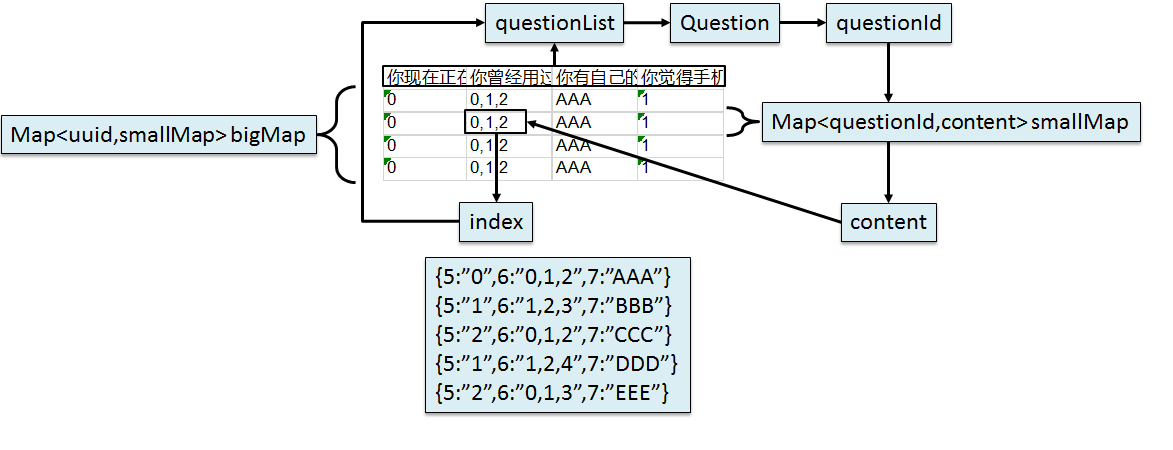
  /**
     * 导出excel表
     * @throws IOException
     */
    @RequestMapping(value="manager/survey/exportExcel/{surveyId}",method=RequestMethod.GET)
    public void exportExcel(@PathVariable(value="surveyId") Integer surveyId,
            HttpServletResponse response) throws IOException{
        //1.生成excel对象
        HSSFWorkbook workbook = statisticsService.getWorkBook(surveyId);
        //2.将Excel文件以下载形式返回给浏览器
        //i.设置响应数据的内容类型
        response.setContentType("application/vnd.ms-excel");
        //ii.生成文件名
        String filename = System.nanoTime()+".xls";
        //iii.在响应消息头中设置文件名
        response.setHeader("Content-Disposition", "attachment;filename="+filename);
        //iv.获取一个能够给浏览器返回二进制数据的输出流
        ServletOutputStream outputStream = response.getOutputStream();

        //v.将workbook对象写入这个输出流
        workbook.write(outputStream);
    }
//1.生成excel对象
public HSSFWorkbook getWorkBook(Integer surveyId) throws FileNotFoundException {
        //1.获取数据
        //2.建表
        HSSFWorkbook workbook = new HSSFWorkbook();
        //获取表名
        //获取题目数据,构建excel表名
        Survey survey = surveyMapper.getSurveyDeeply(surveyId);
        String surveyName = survey.getSurveyName();
        int count = answerMapper.getSurveyEngagedCount(surveyId);
        String sheetName = surveyName+"共有"+count+"调查";
        HSSFSheet sheet = workbook.createSheet(sheetName);

        //iv.如果surveyEngagedCount被参与的次数为零,则停止函数执行
        if(count == 0) {
            return workbook;
        }
        //创建首行,包括行标题
        //1.遍历所有题目填进第一行
        LinkedHashSet<Bag> bagSet = survey.getBagSet();
        List<Question> questionList = new ArrayList<>();
        for(Bag bag:bagSet){
            LinkedHashSet<Question> questionSet = bag.getQuestionSet();
            //把set转化为List方便索引一一取出
            questionList.addAll(questionSet);
        }
        //填写首行
        HSSFRow firstRow = sheet.createRow(0);

        for(int i=0;i<questionList.size();i++){
            Question question = questionList.get(i);
            String questionName = question.getQuestionName();
            HSSFCell cell = firstRow.createCell(i);
            cell.setCellValue(questionName);
        }
        //填充所有行答案数据
        //查出所有批次的answerContext
        //answerContext必须要与questionId一一对应
        //uuid questionId answerContext
        //[4]根据surveyId查询所有答案数据:List<Answer>
        List<Answer> answerList = answerMapper.selectAnswerListBySurveyId(surveyId);
        //2.转换数据格式
        Map<String, Map<Integer, String>> bigMap = getBigMap(answerList);
        //填充答案行
        //按照questionList中一一查出的id对smallMap进行取值,从而一一对应
        //v.从bigMap中获取values部分
        Collection<Map<Integer,String>> values = bigMap.values();
        //vi.将values转换为List集合
        List<Map<Integer,String>> smallMapList = new ArrayList(values);
        //遍历smallMapList
        //Map<uuid, Map<questionId, answerContext>> bigMap
        //uuid-->对应一行的questionId,所以uuid的数目为行(即smallMapList.size()),以questionId遍历question单元格
        for(int i=0;i<smallMapList.size();i++){
            //获取第一个
            Map<Integer, String> smallMap = smallMapList.get(i);
            //viii.这里注意:i控制行索引
            int rowIndex = i + 1;
            //ix.根据rowIndex创建行
            HSSFRow row = sheet.createRow(rowIndex);
            //x.创建具体单元格
            for(int j=0;j<questionList.size();j++){
                HSSFCell cell = row.createCell(j);
                //xi.以j为索引从questionList中获取Question对象
                Question question = questionList.get(j);
                //xii.从Question对象中获取questionId
                Integer questionId = question.getQuestionId();
                //xiii.以questionId为键从smallMap中获取对应的答案内容
                String context = smallMap.get(questionId);
                //xiv.用content设置当前单元格内容
                cell.setCellValue(context);
            }
        }
        return workbook;
    }
把所有答案内容进行处理:
//根据answerList将数据转换为适合生成Excel表的形式
    //一个uuid对应一套的questionId,所以smallMap中的questionId只要相同就要赋值给一样的smallMap元素
    //不停创建map,得到不同的地址,相同的uuid的smallMap指向同一个地址
    private Map<String, Map<Integer, String>> getBigMap(List<Answer> answerList) {
        //1.创建空的bigMap
        Map<String,Map<Integer,String>> bigMap = new HashMap<>();

        //2.遍历answerList,在遍历过程中解析Answer对象的数据存入bigMap
        for(int i=0;i<answerList.size();i++){
            Answer answer = answerList.get(i);
            String uuid = answer.getUuid();
            Integer questionId = answer.getQuestionId();
            String context = answer.getAnswerContext();
            //3.先尝试从bigMap中获取smallMap,因为answer中有很多重复的uuid
            //避免重复创建
            Map<Integer, String> smallMap = bigMap.get(uuid);
            if(smallMap==null){
                //4.smallMap如果为null,说明这是此前没有创建过对应的smallMap
                smallMap = new HashMap<>();
                //5.将创建好的smallMap存入bigMap,下次再通过同样的uuid获取就不会是null了
                bigMap.put(uuid, smallMap);
            }
            //6.将数据存入smallMap
            smallMap.put(questionId, context);
        }
        return bigMap;
    }
关键点:
创建bigMap-->smallMap得到
String context = smallMap.get(questionId);
按照questionList中一一查出的id对smallMap进行取值,从而一一对应

总结:创建
HSSFWorkbook 建表

1).对每一行进行填充,第一行填充题目:
构建questionList,list有索引,后面进行答案填充时可以利用索引找到对应的答案
for(Bag bag:bagSet){
            LinkedHashSet<Question> questionSet = bag.getQuestionSet();
            //把set转化为List方便索引一一取出
            questionList.addAll(questionSet);
        }
        //填写首行
        HSSFRow firstRow = sheet.createRow(0);

        for(int i=0;i<questionList.size();i++){
            Question question = questionList.get(i);
            String questionName = question.getQuestionName();
            HSSFCell cell = firstRow.createCell(i);
            cell.setCellValue(questionName);
        }
2).填充答案
for(int i=0;i<smallMapList.size();i++){
            //获取第一个
            Map<Integer, String> smallMap = smallMapList.get(i);
            //viii.这里注意:i控制行索引
            int rowIndex = i + 1;
            //ix.根据rowIndex创建行
            HSSFRow row = sheet.createRow(rowIndex);
            //x.创建具体单元格
            for(int j=0;j<questionList.size();j++){
                HSSFCell cell = row.createCell(j);
                //xi.以j为索引从questionList中获取Question对象
                Question question = questionList.get(j);
                //xii.从Question对象中获取questionId
                Integer questionId = question.getQuestionId();
                //xiii.以questionId为键从smallMap中获取对应的答案内容
                String context = smallMap.get(questionId);
                //xiv.用content设置当前单元格内容
                cell.setCellValue(context);
            }
        }
6、使用Spring提供的缓存抽象机制整合EHCache为项目提供二级缓存
why?
为了减轻数据库的负担,每次加载调查问卷时可以进行缓存。
适合作为缓存的条件:
1.经常查询
2.可以容忍偶尔的并发问题
3.不会被其他应用修改
Survey项目中适合存入二级缓存的数据
EngageService.PageInfo<Survey> getSurveyPage(Integer userId, boolean completed, Integer pageNum);EngageService.Survey getSurveyDeeply(Integer surveyId);
    try{
    //1.查询缓存
              value = getCache(key);
    //2.如果缓存不存在
    if(value==null){
    //3.查询数据库
       value=dao.select();
    //4.设置缓存
       setCache(key,value);
    }
    //5.返回查询值
    return value;
}
catch(Exception e){

}
配置EhCacheCacheManager
切面及切面表达式配置(帅选出需要缓存的方法)
<!-- spring 整合ehcache -->
     <!-- 自定义key生成器 -->
     <bean id="userKeyGenerator" class="com.lamsey.survey.Ehcache.UserKeyGenerator"/>
     <!-- 配置 EhCacheManagerFactoryBean工厂-->
     <bean id="ehCacheManagerFactoryBean" class="org.springframework.cache.ehcache.EhCacheManagerFactoryBean" >
        <property name="configLocation" value="classpath:ehcache.xml"></property>
    </bean>
    <!-- 配置EhCacheCacheManager -->
    <bean id="ehCacheCacheManager" class="org.springframework.cache.ehcache.EhCacheCacheManager" >
        <property name="cacheManager" ref="ehCacheManagerFactoryBean"></property>
    </bean>
    <!--切面及切面表达式配置  -->
    <aop:config>
        <!-- 利用切面表达式找到切面切入点,进行切面编程 -->
         <aop:pointcut expression="execution(* *..ResService.getResByServletPath(String))
                     or execution(* *..AnswerService.getSurveyPage(Integer, boolean, Integer))
                     or execution(* *..AnswerService.getSurveyDeeply(Integer))
                     or execution(* *..SurveyService.completedSurvey(Integer))" id="cachePointCut" />
         <!-- 承上启下,得到切入点,同时连接处理的方法。对切入点进行处理(cache) -->
         <!-- 缓存切面优先级高于数据库事务切面优先级 -->
         <aop:advisor advice-ref="cacheAdvice" pointcut-ref="cachePointCut" order="1"/>
   </aop:config>
   <!-- 对切入点进行处理,这里表现为缓存 -->
   <!-- 这里的自定义key【className.method.param1..paramn】 -->
       <cache:advice id="cacheAdvice" cache-manager="ehCacheCacheManager" key-generator="userKeyGenerator">
        <!-- 在cache属性中指定缓存区域的名称 -->
        <!-- 指定要使用缓存的具体方法,要求必须是缓存切入点覆盖范围内的方法 -->
        <cache:caching cache="surveyCache">
            <cache:cacheable method=" getResByServletPath" />
            <cache:cacheable method="getSurveyDeeply"/>
        </cache:caching>
        <!-- 使用另外一个有可能被清空数据的缓存区域 -->
        <cache:caching cache="surveyCacheEvicable">
            <cache:cacheable method="getSurveyPage" />
            <!-- 执行updateSurveyCompleted方法时清空当前缓存区域 -->
            <!-- 因为调查有可能更新,当更新后就需要进行重新获取参与调查 ,所以清空该缓存-->
            <cache:cache-evict method="completedSurvey" all-entries="true" />
        </cache:caching>
   </cache:advice>
为了减少不必要的事务操作让缓存切面的优先级高于事务切面的优先级。

因为是记录到数据库,考虑到杀鸡不用牛刀。所以采用aop进行日志记录
- log_id
- log_operator
- log_operate_time
- method_name
- method_type
- input_data
- output_data
- exception_type
- exception_message
利用切面来记录日志:
环绕通知,记录用户操作信息等(利用ThreadLocal产生request)
环绕通知:一个完整的try...catch...finally结构
/**
 * 日志记录仪
 * @author Administrator
 *
 */
@Component
@Aspect
public class LogRecord {
    @Autowired
    LogService logService;

    @Around("execution(* *..*Service.update*(..)) || execution(* *..*Service.remove*(..))||execution(* *..*Service.regist(..))||execution(* *..*Service.save*(..)) && !execution(* com.lamsey.survey.component.service.m.LogServiceImpl.*(..))" )
    public Object recordLog(ProceedingJoinPoint joinPoint){

        String logOperator=null;
        String logOperateTime=null,
               methodName=null,
               methodType=null,
               inputData=null,
               outputData=null,
               exceptionType=null,
               exceptionMessage=null;
        Object returnValue =null;
         //获取调用目标方法时的实参数组

         //调用目标方法
        try {
            //获取目标方法签名
             Signature signature = joinPoint.getSignature();
            //签名中获取方法类型属于的类,接口
             methodType = signature.getDeclaringTypeName();
            //获取方法的名字
             methodName = signature.getName();
            //输入的参数
             Object[] args = joinPoint.getArgs();
            if(args.length>0 && args!=null){
                List<Object> list = Arrays.asList(args);
                inputData = list.toString();
            } else{
                inputData="没有输入的参数";
            }
            //
             returnValue = joinPoint.proceed(args);
            //
        } catch (Throwable e) {
            //将捕获到的目标方法异常继续向上抛出
            e.printStackTrace();
            //异常的类型及信息
            Throwable cause = e.getCause();
            if(cause!=null){
                //获取异常原因的类型
                exceptionType  = cause.getClass().getName();
                cause = cause.getCause();
            }
            exceptionMessage = e.getMessage();
        } finally{
            //时间
            logOperateTime = new SimpleDateFormat("yyyy年MM月dd日hh:mm:ss").format(new Date());
            //outputValue
            if(returnValue!=null){
                outputData = returnValue.toString();
            } else{
                outputData ="无有效的输出数据";
            }
        }
        //收集当前登录的用户信息
        //创建TreadLocal,从该变量中当前线程上获取request对象:获取session
        HttpServletRequest request = SysContent.getRequest();
        HttpSession session = request.getSession();
        Admin admin=(Admin) session.getAttribute(GlobalNames.LOGIN_ADMIN);
        User user = (User) session.getAttribute(GlobalNames.LOGIN_USER);
        String adminPart = (admin==null)?"admin没有登陆":admin.getAdminName();
        String userPart = (user==null)?"user没有登陆":user.getUserName();
        //logOperator
        logOperator = adminPart + "/" + userPart;
        //将产生的信息存进日志数据库
        logService.saveLog(new Log(null, logOperator, logOperateTime,
                methodName, methodType,inputData, outputData, exceptionType, exceptionMessage));
        //将目标方法返回的数据继续返回给上层调用的方法
        return returnValue;
    }
}
①配置切面类对应的bean②配置日志切面的切入点表达式
③整体配置方式
④无限死循环的问题
保存日志的方法本身也要记录日志,从而导致无限死循环
①在固定时间执行固定操作。②石英调度(Quartz)是实现定时任务的其中一种方式。
③石英调度和Spring整合思路
1.)工作bean配置
工作bean:创建Quartz任务类:继承org.springframework.scheduling.quartz.QuartzJobBean
2.)配置石英任务触发器(克龙表达式)
<property name="cronExpression" value="0 0 0 15 * ? *"></property>
3.)配置任务调度工厂Bean
<!-- 注册监听器 ,保证一启动就创建三张表-->
    <bean id="createTableListener" class="com.lamsey.survey.log.listener.CreateTableListener"></bean>
<!--========= Quartz石英时钟====== -->
    <!-- 工作的bean -->
    <bean id="jobDetailBean" class="org.springframework.scheduling.quartz.JobDetailBean">
        <!--CreateTable的bean由 JobDetailBean创建,不是ioc容器创建,所以logServiceImpl需要注意 -->
        <property name="jobClass" value="com.lamsey.survey.log.quartz.CreateTable" ></property>
        <property name="jobDataMap">
            <map>
                <!-- 特殊配置:装配logService -->
                <entry key="logService" value-ref="logServiceImpl"></entry>
            </map>
        </property>
    </bean>
<!-- 配置石英任务触发器 -->
     <bean id="cronTriggerFactoryBean" class="org.springframework.scheduling.quartz.CronTriggerFactoryBean">
         <property name="jobDetail" ref="jobDetailBean"></property>
         <property name="cronExpression" value="0 0 0 15 * ? *"></property>
     </bean>
     <!-- 设置日程表 -->
    <!-- 配置任务调度工厂Bean -->
     <bean id="startQuertz" class="org.springframework.scheduling.quartz.SchedulerFactoryBean">
         <property name="triggers">
             <list>
                 <ref bean="cronTriggerFactoryBean"/>
             </list>
         </property>
     </bean>
7.使用路由器数据源实现数据库操作在主数据库和日志数据库之间的切换
多数据源使用路由器数据源管理然后再装配

路由器数据源:抽象类AbstractRoutingDataSource
所以要想实现数据库操作的切换,需要实现抽象路由数据源
③在Spring配置文件中配置自定义路由器数据源从当前线程上获取key信息将key信息从线程上移除将key信息作为返回值返回
以键值对形式指定所有目标数据源指定默认数据源——在determineCurrentLookupKey()返回null时使用
Spring监听器建表石英任务建表保存日志信息分页查询日志数据※注意:因为每次用完后key信息需要从线程上移除,所以哪怕是同一个线程每一个具体操作前也需要重复设置※注意:自动建表时的SQL需要参照主数据库的manager_log或将manager_log复制到日志数据库
import org.springframework.jdbc.datasource.lookup.AbstractRoutingDataSource;

import com.lamsey.survey.log.thread.NMRoutingToken;
/**
 * 路由器数据源切换实现
 * @author Administrator
 *
 */
public class NMRoutingDataSource  extends AbstractRoutingDataSource{

    @Override
    protected Object determineCurrentLookupKey() {
        //获取当前线程的令牌
         NMRoutingToken token = NMRoutingToken.getCurrentToken();
            if (token != null) {
                String dataSourceName = token.getDataSourceName();
                //将key从当前线程上移除
                NMRoutingToken.unbindToken();
                return dataSourceName;
            }
            return null;
        }
}
<!--2.配置数据源  -->
    <!-- 垂直分库,log库另外存储,所以需要采用路由数据源 -->
    <context:property-placeholder location="classpath:dbconfig.properties"/>
    <bean id="comboPooledDataSource" class="com.mchange.v2.c3p0.ComboPooledDataSource">
        <property name="user" value="${prop.user}"></property>
        <property name="password" value="${prop.password}"></property>
        <property name="jdbcUrl" value="${prop.jdbcUrl}"></property>
        <property name="driverClass" value="${prop.driverClass}"></property>
    </bean>
    <bean id="logDataSource" class="com.mchange.v2.c3p0.ComboPooledDataSource">
        <property name="user" value="${log.user}"></property>
        <property name="password" value="${log.password}"></property>
        <property name="jdbcUrl" value="${log.jdbcUrl}"></property>
        <property name="driverClass" value="${log.driverClass}"></property>
    </bean>
    <!-- 实现了抽现类AbstractRoutingDataSource的类 -->
    <bean id="nMRoutingDataSource" class="com.lamsey.survey.log.router.NMRoutingDataSource">
        <property name="targetDataSources">
            <map>
                <!-- 当输入log时,调用 logDataSource数据库-->
                <entry key="LOG_DATA_SOURCE_KEY" value-ref="logDataSource"></entry>
            </map>
        </property>
        <property name="defaultTargetDataSource" ref="comboPooledDataSource"/>
    </bean>


