Ubuntu下搭建yocto
参考自:
https://www.jianshu.com/p/f6e0debb5e1f
https://blog.csdn.net/qq_31041847/article/details/90211464
原文设置repo使用镜像需要FQ才能下载使用,基于原文修改镜像源为清华镜像,另修改build-dir/conf/local.conf配置文件加快yocto编译速度,亲测可用。
目标:搭建支持设备树的yocto环境,yocto的内核版本更高4.1.5
安装软件包
$ sudo apt-get install gawk wget git-core diffstat unzip texinfo gcc-multilib build-essential chrpath socat libsdl1.2-dev
$ sudo apt-get install libsdl1.2-dev xterm sed cvs subversion coreutils texi2html docbook-utils python-pysqlite2 help2man make gcc g++ desktop-file-utils libgl1-mesa-dev libglu1-mesa-dev mercurial autoconf automake groff curl lzop asciidoc
安装u-boot-tools
$ sudo apt-get install u-boot-tools
设置repo()
$ mkdir /work/tools/yocto/bin
$ cd /work/tools/yocto/bin
$ curl https://mirrors.tuna.tsinghua.edu.cn/git/git-repo -o repo
$ chmod a+x repo
$ export REPO_URL='https://mirrors.tuna.tsinghua.edu.cn/git/git-repo/'
$ export PATH=/work/tools/yocto/bin:$PATH
设置git环境
$ git config --global user.name "Your Name"
$ git config --global user.email "Your Email"
$ git config --list
repo同步
$ mkdir /work/tools/yocto/fsl-release-bsp
$ cd /work/tools/yocto/fsl-release-bsp
$ repo init -u git://git.freescale.com/imx/fsl-arm-yocto-bsp.git -b imx-4.1-krogoth
$ repo sync
然后等待同步完成,如果同步过程出错,可以用ctrl+c中断执行,并重新执行repo sync直到同步成功。
编译yocto工程
$ DISTRO= MACHINE= source fsl- setup-release.sh -b
DISTRO有如下四种设置:
fsl-imx-x11
fsl-imx-wayland
fsl-imx-xwayland
fsl-imx-fb
我选择fsl-imx-x11
MACHINE同样有多种配置:
imx6qpsabreauto
imx6qpsabresd
imx6ulevk
imx6ull14x14evk
imx6ull9x9evk
imx6dlsabreauto
imx6dlsabresd
imx6qsabreauto
imx6qsabresd
imx6slevk
imx6solosabreauto
imx6solosabresd
imx6sxsabresd
imx6sxsabreauto
imx7dsabresd
我选择imx6qsabresd。因此我执行的最终命令如下:
$ DISTRO=fsl-imx-x11 MACHINE=imx6qsabresd source fsl-setup-release.sh -b build
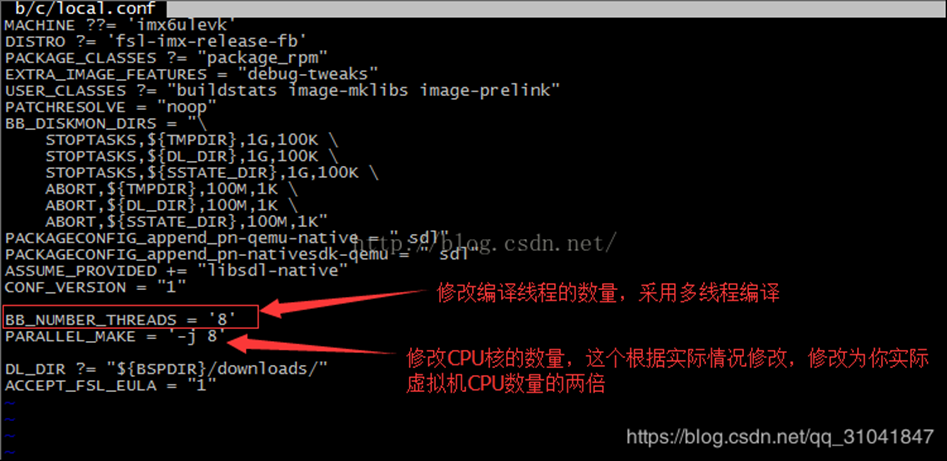
修改配置文件加快yocto编译速度,具体修改如下图:

编译镜像文件
$ bitbake fsl-image-qt5
同样的bitbake可以编译以下多种镜像:
core-image-minimal
core-image-base
core-image-sato
fsl-image-machine-test
fsl-image-gui
fsl-image-qt5,
如未修改build-dir/conf/local.conf配置文件编译fsl-image-qt5的时间非常长,在网速飞快的情况下也需两天,如果编译中途出错,可以ctrl+c中断后重新执行命令:
$ bitbake fsl-image-qt5
如果编译过程中无意关掉了终端,那么重新打开终端进入fsl-release-bsp目录后只需要执行以下命令就可以重新进入编译环境:
$ source setup-environment build
编译结束后会占用80G左右空间,虚拟机默认配置空间会不足
编译qt5的交叉编译工具链
$ bitbake meta-toolchain-qt5
编译完成后会在/opt/yocto/fsl-release-bsp/build/tmp/deploy/sdk目录下
生成文件fsl-imx-fb-glibc-i686-meta-toolchain-qt5-cortexa9hf-neon-toolchain-4.1.15-2.0.0.sh。
执行如下命令安装qt5的交叉编译工具链:
$ cd ~/fsl-release-bsp/build/tmp/deploy/sdk
$ ./fsl-imx-x11-glibc-x86_64-meta-toolchain-qt5-cortexa9hf-neon-toolchain-4.1.15-2.1.0.sh
…
SDK has been successfully set up and is ready to be used.
Each time you wish to use the SDK in a new shell session, you need to source the environment setup script e.g.
$ . /opt/fsl-imx-x11/4.1.15-2.1.0/environment-setup-cortexa9hf-neon-poky-linux-gnueabi
执行如下命令安装GCC的交叉编译工具链:
$ source setup-environment build
$ bitbake meta-toolchain
$ cd ~/fsl-release-bsp/build/tmp/deploy/sdk
$ ./fsl-imx-x11-glibc-x86_64-meta-toolchain-cortexa9hf-neon-toolchain-4.1.15-2.1.0.sh
一路选择默认设置,最终将在/opt/fsl-imx-x11/4.1.15-2.1.0/目录下生成我们所需要的工具链。
SDK has been successfully set up and is ready to be used.
Each time you wish to use the SDK in a new shell session, you need to source the environment setup script e.g.
$ . /opt/fsl-imx-x11/4.1.15-2.1.0/environment-setup-cortexa9hf-neon-poky-linux-gnueabi
至此,我们所需要的所有文件均已生成,包含了uboot,kernel,rootfs以及交叉编译qt应用程序的交叉编译工具。相对应的软件版本如下:
uboot:v2016.03
kernel:v4.1.15
qt版本:qt5.6.2
当然最重要的是yocto编译生成的rootfs中包括了imx6所需要的各种库,特别是有我们所需要的能完整的支持imx6的gpu性能的qt5.6.
设置开机自动运行脚本
cd /opt/fsl-imx-x11/4.1.15-2.1.0
chmod a+x environment-setup-cortexa9hf-neon-poky-linux-gnueabi
vim ~/.bashrc
在最后一行添加
source /opt/fsl-imx-x11/4.1.15-2.1.0/environment-setup-cortexa9hf-neon-poky-linux-gnueabi


