SpringBoot综合笔记
最近想试试面试个实习生,于是就寻思快速的过一遍SpringBoot的课,所以就找了个网课来看。
我看的是这个:点击跳转,然后看了两天了,快撸完了,一点儿笔记没记,虽然记了也会忘,但还是感觉踏实一点。
parent以及starter
提供经过测试的兼容版本
通过父项目的
dependencyManagement来定义常用组件的版本,对于这些组件,你无需担心兼容性问题。
做项目时经常要导入很多依赖,最恶心的一种Bug就是依赖之间的兼容性问题,这种问题产生的效果常常令人很迷惑,找不到原因,而且处理这种问题浪费时间且没有任何意义。
SpringBoot提供了一个父pom,其中定义了大量的项目中可能用到的组件的版本,这些版本是经过兼容性测试的,直接使用应该不会出现问题。
一个SpringBoot项目的pom文件中应该依赖这个父pom:
<parent>
    <groupId>org.springframework.boot</groupId>
    <artifactId>spring-boot-starter-parent</artifactId>
    <!-- SpringBoot版本 -->
    <version>2.7.2</version>
    <relativePath/>
</parent>
这个pom中并没有定义什么实质性的内容,不过它又继承了另一个pom:
<!-- In the pom.xml of `spring-boot-starter-parent` -->
<parent>
    <groupId>org.springframework.boot</groupId>
    <artifactId>spring-boot-dependencies</artifactId>
    <version>2.7.2</version>
</parent>
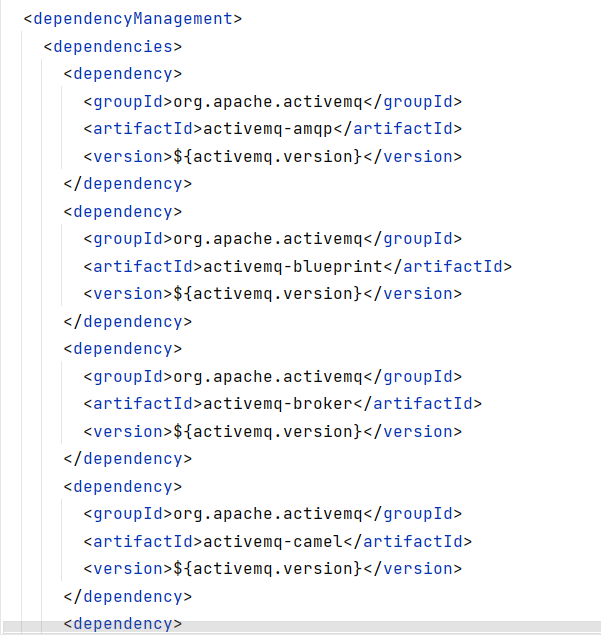
这个spring-boot-dependencies中才定义了大量的版本:

而且,它定义了dependencyManagement并引用这些版本,这让它的子项目在导入其中定义过的dependency时无需填写version:
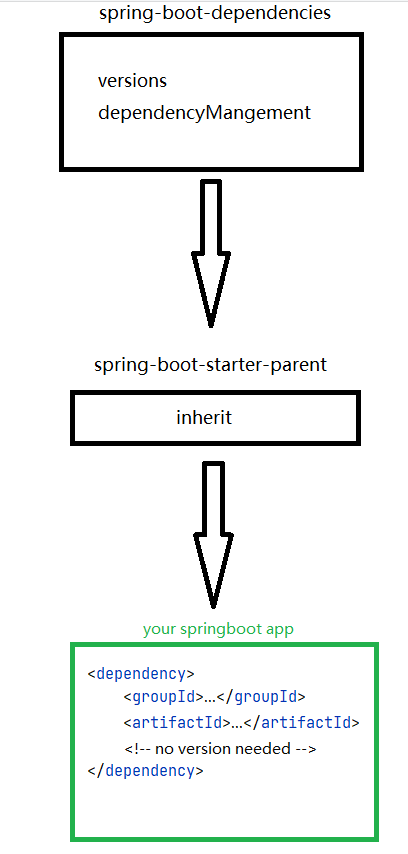
所以整个pom的层级关系如下:
由于一个pom继承另一个pom的机会只有一次,所以,你也可以直接在项目中导入spring-boot-denpendencies,而非通过继承的方式:
<dependencyManagement>
    <dependencies>
        <dependency>
            <groupId>org.springframework.boot</groupId>
            <artifactId>spring-boot-dependencies</artifactId>
            <version>${spring-boot.version}</version>
            <type>pom</type>
            <scope>import</scope>
        </dependency>
    </dependencies>
</dependencyManagement>
一次性导入所有相关组件
starter是你想让boot项目实现某种功能所需要的依赖的整合包,你无需去搜寻为实现这个功能所用到的所有依赖并一个一个的添加,只需使用starter进行一次添加即可
想要实现一个web功能,你需要导入spring-webmvc,如果你需要编写RESTful服务,可能还需要jackson进行json处理,你可能还需要一个tomcat服务器。
使用SpringBoot后,你可以直接导入下面一个starter,web相关的依赖就被导入了进来:
<dependency>
    <groupId>org.springframework.boot</groupId>
    <artifactId>spring-boot-starter-web</artifactId>
</dependency>
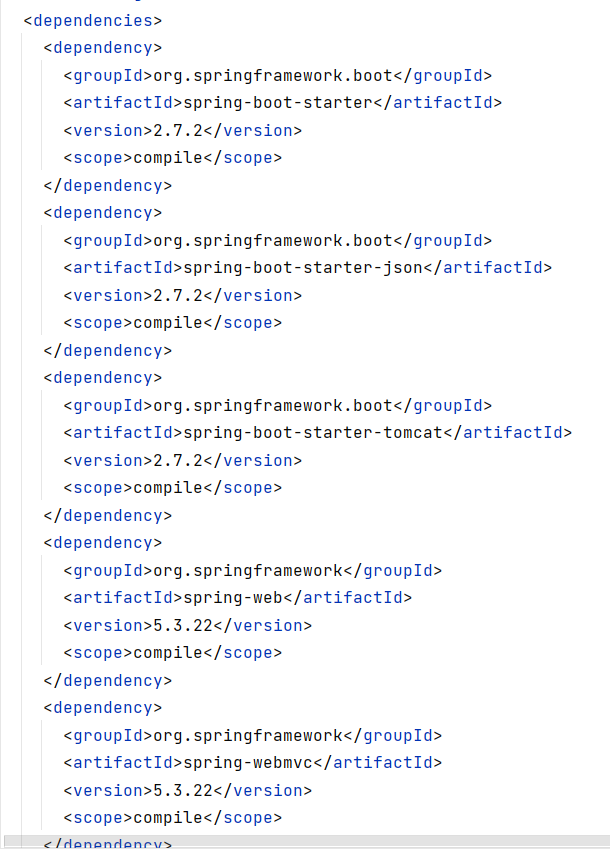
下面是这个starter-web中定义的内容,其中导入了SpringBoot的基础功能,json基础功能,内嵌的tomcat,web和webmvc。同时,除了web和webmvc,其它的也是嵌套的starter。
- SpringBoot官方的starter:
spring-boot-starter-xxx - 非官方starter:
项目名-boot-starter
整合MyBatis Plus
MyBatis Plus是国人基于MyBatis框架之上开发的一款框架,它提供了和jpa类似的功能,提供基础Mapper,继承该接口直接具有相应功能,还提供了基础Service,简化Service开发。
这个框架还有很多功能,请移步官网。
导入
SpringBoot官方未提供该项目的starter,所以我们需要自己整合:
<dependency>
    <groupId>com.baomidou</groupId>
    <artifactId>mybatis-plus-boot-starter</artifactId>
    <version>3.4.2</version>
</dependency>
配置
spring:
  datasource:
    driver-class-name: com.mysql.cj.jdbc.Driver
    url: jdbc:mysql://localhost:3306/dbconcept
    username: root
    password: <password>

mybatis:
  configuration:
    # 下划线命名转小驼峰
    map-underscore-to-camel-case: true
继承通用Mapper
@Mapper
public interface InstructorMapper extends BaseMapper<Instructor> {
}
测试
@SpringBootTest
class Boot04MybatisplusApplicationTests {

    @Autowired
    InstructorMapper mapper;
    @Test
    void testSelectById() {
        Instructor instructor = mapper.selectById("10101");
        System.out.println(instructor);
    }

}
SpringBoot整合的套路
有官方或非官方starter的情况
- 添加starter
- 去配置文件中填写配置
- 使用功能
配置文件中的全部属性列表:点击这里
无starter的情况
一般情况下需要自行进行配置,并把配置好的结果作为一个SpringBean,并在项目中其它组件中使用
配置读取
@ConfigurationProperties
当一个Spring组件上添加了下面的注解,SpringBoot就会去配置文件中读取servlet-config之下的配置,并自动将配置注入到Bean中:
// [!] 必须是一个组件
@Component
@ConfigurationProperties(prefix = "servlet-config")
public class ServerConfig {
    private String ipAddress;
    private Integer port;
    private Integer timeout;
}
配置文件中提供相应内容:
servlet-config:
  ipAddress: 192.168.0.1
  port: 2345
  timeout: -1
@ConfigurationProperties支持松散绑定,它会忽略yaml的key上的下划线、中划线和大小写来与Bean进行匹配并设置值。
@Value
不介绍了,经常使用,不支持松散绑定。
JSR303校验
当你在pom中导入JSR303校验API以及一个校验实现时:
<dependency>
    <groupId>jakarta.validation</groupId>
    <artifactId>jakarta.validation-api</artifactId>
</dependency>
<dependency>
    <groupId>org.hibernate.validator</groupId>
    <artifactId>hibernate-validator</artifactId>
</dependency>
你就可以对@ConfigurationProperties标注的Bean上的属性进行校验:
@Component
@Data
@ConfigurationProperties(prefix = "servlet-config")
// [!] 校验注解
@Validated
public class ServerConfig {
    private String ipAddress;
    // [!] 定义属性校验规则
    @Min(value = 10000, message = "server-config.port must great than 9999")
    @Max(value = 60000, message = "server-config.port must less than 60001")
    private Integer port;
    private Integer timeout;
}
配置优先级
本节中的优先级列表,上面的优先级高于下面的
总体优先级
- 命令行参数
- 环境变量
- 配置文件
实际上官方文档中定义了十多种优先级,这里我只写出了常用的三个
配置文件之间的优先级
SpringBoot的配置文件为:
application.properties,同时扩展名可以是properties、yaml以及yml
同级配置文件
- properties
- yaml
- yml
非同级配置文件
- 运行目录下的config目录下的配置文件,比如
config/application.yaml - 运行目录下的配置文件
- classpath下的config目录下的配置文件
- classpath下的配置文件
不同级别之间的不同扩展名的优先级不互相影响,比如classpath下的application.properties不会比运行目录下的application.yml优先级更高
多环境
SpringBoot提供多环境的配置文件,可以方便的基于不同的运行场景指定不同的配置
如下是用于支持多环境的一些配置文件属性:
spring.profiles:指定环境名spring.profiles.active:指定当前激活环境spring.config.activate.on-profile:高版本中指定环境名的属性,在更高的版本中好像没了
Yaml单文件多环境配置
# 默认环境
spring:
    profiles:
        # 开启开发环境
        active: dev

# 一些多环境间公用的配置...

---

spring:
    profiles: dev

# 开发环境特有的配置

---

spring:
    profiles: prod

# 生产环境特有的配置
多文件环境配置
SpringBoot的配置文件命名规范如下:
application[-profilename].[extname],用yaml格式举例来说,下面的都是符合规范的:
application.yaml:默认配置文件,无论当前激活什么环境都生效application-dev.yaml:当前激活环境名为dev时生效的配置文件application-prod.yaml:当前激活环境名为prod时生效的配置文件
配置文件格式也可以混用:
# application.yaml 默认配置文件
spring:
    profiles:
        active: dev

# 通用配置
# application-dev.properties
spring.profiles=dev

# dev环境特有的配置
# application-prod.yaml
spring:
    profiles: prod

# prod环境特有的配置
include
当项目变大,将所有配置都放在一个配置文件中是不理智的行为,spring.profiles.include属性可以导入其它配置文件中的内容
# application-dev.yaml
spring:
    profiles:
        # 导入开发环境特有的数据库配置和缓存配置
        include: dev-db, dev-cache
# application-prod.yaml
spring:
    profiles:
        # 导入生产环境特有的数据库配置和缓存配置
        include: prod-db, prod-cache
# application.yaml
spring:
    profiles:
        active: dev
        # 导入通用的数据库配置和缓存配置
        include: db, cache
上面的代码运行后,以下的配置文件被使用(靠后的配置覆盖靠前的配置):

命令行参数设置激活环境
通过命令行参数指定property,可以在打包后替换执行时激活的环境
java -jar springapp.jar --spring.profiles.active=dev
在测试类下,可以通过@SpringBootTest的args属性来添加命令行参数

Maven设置激活环境
略
MockMVC测试Controller层
你可以很方便的测试Service层、Repository层,但对于Controller层,好像你只能手动发起HTTP请求来测试,貌似没有什么自动化测试的办法。
MockMVC是一个测试工具,它自动构建HTTP请求并发到Controller中,封装返回结果,帮助我们完成测试。
在Web环境中,可以通过MockMVC测试Controller层,只要导入了spring-boot-starter-test
在测试类上:
// 启动Web环境测试,并且设置随机端口
@SpringBootTest(webEnvironment = SpringBootTest.WebEnvironment.RANDOM_PORT)
// 打开自动配置MockMVC
@AutoConfigureMockMvc
// 下面这个注解放在测试类上可以让所有事务不提交,而是回滚,这样不会因为测试影响数据库的结构
// @Transactional
public class StudentControllerTest {
    // 自动注入MockMvc对象
    @Autowired
    MockMvc mockMvc;
    // ...
}
MockMVC的API我就不写上了,这里贴上一个我写的测试类:
@SpringBootTest(webEnvironment = SpringBootTest.WebEnvironment.RANDOM_PORT)
@AutoConfigureMockMvc
@TestMethodOrder(MethodOrderer.OrderAnnotation.class)
// 测试类上添加@Transactional,会在事务走完之后回滚事务,也就造成不了数据库的实际修改
// 但是我们这个测试类由于需要自己创建数据并删除,所以它需要事务的实际提交,而且它会将自己给数据库造成的修改抹除
//@Transactional
public class StudentControllerTest {
    @Autowired
    MockMvc mockMvc;


    @Test
    @Order(1)
    void testGetAll() throws Exception {
        doMockRequest(
                "getAll",  // testName
                "", // subUrl
                "GET", // http request method
                false, // with request body?
                true  // check the resposne body?
        );
    }

    @Test
    @Order(2)
    public void testSave() throws Exception {
        doMockRequest(
                "save",  // testName
                "", // subUrl
                "POST", // http request method
                true, // with request body?
                true  // check the resposne body?
        );
    }

    @Test
    @Order(3)
    public void testUpdate() throws Exception {
        doMockRequest(
                "update",
                "",
                "PUT",
                true,
                true
        );
    }

    @Test
    @Order(4)
    void testDelete() throws Exception {
        doMockRequest(
                "delete",
                "/99999",
                "DELETE",
                false,
                true

        );
    }

    @Test
    @Order(5)
    void testGetById() throws Exception {
        doMockRequest(
                "getById",
                "/00128",
                "GET",
                false,
                true
        );
    }

    @Test
    @Order(6)
    void testGetByPage() throws Exception {
        doMockRequest(
                "getByPage",
                "/1/5",
                "GET",
                false,
                true
        );
    }

    @Test
    @Order(7)
    void testGetByPageAndCondition() throws Exception {
        doMockRequest(
                "getByPageAndCondition",
                "/1/5?totCred=60",
                "GET",
                false,
                true
        );
    }

    // 读取classpath下`requests/students/{name}`的文件中的内容
    public String requestJson(String name) throws IOException {
        return ClasspathFileUtils.getClasspathFileContent("requests/students/" + name);
    }

    // 读取classpath下`responses/students/{name}`的文件中的内容
    public String responseJson(String name) throws IOException {
        return ClasspathFileUtils.getClasspathFileContent("responses/students/" + name);
    }

    public void doMockRequest(String testName, String subUrl, String method, boolean withRequestContent, boolean checkResponseContent) throws Exception {
        // 构建请求Buidler
        MockHttpServletRequestBuilder requestBuilder = MockMvcRequestBuilders
                .request(HttpMethod.valueOf(method), URI.create("/students" + subUrl));
        // 如果需要携带请求体,携带
        if (withRequestContent)
            requestBuilder.contentType("application/json").content(requestJson(testName));
        // 执行mock请求
        ResultActions resultActions = mockMvc.perform(requestBuilder);
        // 测试返回状态码
        resultActions.andExpect(status().isOk());
        // 如果需要检查响应体,检查
        if (checkResponseContent)
            resultActions.andExpect(content().json(responseJson(testName), false));
    }
}
Cache
一些经常必须存储起来的东西我们并非非要存到性能低下的关系型数据库中,对于一些经常变动且不是特别重要的东西,可以存到缓存中
SpringBoot提供一套缓存接口让我们很方便的应用缓存:
下面使用短信验证码的例子看看这套接口怎么使用:
// 这里定义一个获取和校验验证码的Service接口,稍后我们会有不同的实现
public interface SMSVerifyCodeService {
    String generateAndSendCode(String phoneNumber);
    boolean verifyCode(String phoneNumber, String code);
}
generateAndSendCode方法的任务是生成一个验证码,并保存起来,返回这个验证码给上层调用者。vertifyCode方法的任务是根据传入的手机号和验证码去保存的数据中进行比对,如果对上了就返回true,否则返回false。
你可以使用关系型数据库甚至文件系统来编写实现类,但是这个业务中有频繁的插入、销毁操作,使用这两种方式实现可能性能很差。所以,我们后面的所有实现类都使用缓存来做。
SpringBoot缓存使用
导入cache的starter:
<dependency>
    <groupId>org.springframework.boot</groupId>
    <artifactId>spring-boot-starter-cache</artifactId>
</dependency>
然后,你就可以使用缓存了,我们使用缓存功能来编写上面的验证码服务的实现类:
/**
* 这个实现类是基于SpringBoot官方规范实现的验证码服务
*/
@Service
@Slf4j
public class SpringCacheSMSVerifyCodeService implements SMSVerifyCodeService {
    @Autowired
    VerifyCodeUtils codeUtils;

    @Override
    // @CachePut注解每次都将方法的返回值存储到缓存中,缓存的key为参数的值
    @CachePut(value = "codeSpace", key = "#phoneNumber")
    public String generateAndSendCode(String phoneNumber) {
        log.info("SpringCacheSMSVerifyCodeService generating the code!");
        return codeUtils.generateCode(phoneNumber);
    }

    @Override
    public boolean verifyCode(String phoneNumber, String code) {
        return code.equals(codeUtils.getCodeByPhoneNumberFromCache(phoneNumber));
    }
}
先不用管VerifyCodeUtils这个工具类,generateAndSendCode的方法上被标注了@CachePut注解,这代表该方法的返回值将被添加到缓存中,缓存的key是方法的phoneNumber参数。@CachePut的value字段指定的是该缓存区域的名字,比如用于实现验证码功能的缓存区域被称作codeSpace。不同的区域可能有不同的配置,比如缓存过期时间、替换算法等。
SpringBoot应该是使用了AOP功能创建了一个切点,并在每次调用这个方法时将对应的缓存代码织入。
下面看看VerifyCodeUtils的实现:
@Component
public class VerifyCodeUtils {

    private static final Random r = new Random();

    // 随机生成验证码
    public String generateCode(String phoneNumber) {
        return String.valueOf(100000 + r.nextInt(900000));
    }

    // @Cacheable方法在缓存中没有指定key时将返回值放到缓存中,后面都是从缓存中读取数据,缓存的key是方法的参数值
    @Cacheable(value = "codeSpace", key = "#phoneNumber")
    public String getCodeByPhoneNumberFromCache(String phoneNumber) {
        return null;
    }
}
它的getCodeByPhoneNumberFromCache方法被标注了@Cacheable注解,该注解的功能是,如果缓存中没有key(参数)的对应值,就实际调用方法并使用方法返回值填充,否则不调用方法,直接返回缓存中的值。
这样,验证码功能就实现了:
- Service层的
generateAndSendCode方法上的@CachePut会将生成的验证码放入缓存中 VerifyCodeUtils中的getCodeByPhoneNumberFromCache方法会每次读取缓存中的值
实际上,这个是网课的老师写的用于演示的代码,它需要一步一步的引导学生,所以这个代码的职能很不清晰。应该将操作缓存的两个方法放到一个类中,而不是一个在Service中一个在工具方法中。
一个需要注意的点是,你不能在类中使用普通方法调用来调用被缓存注解标注的方法,这会让动态代理拦截不到方法的调用,导致产生一次普通方法调用,缓存功能根本没用上。
切换缓存实现——ehcache
由于SpringBoot上面的缓存操作是一套定义好的规范,所以,当你切换它支持的缓存实现时,几乎不需要改动任何业务代码。
下面我们将缓存切换到ehcache上,只需要添加一个依赖:
<dependency>
    <groupId>net.sf.ehcache</groupId>
    <artifactId>ehcache</artifactId>
</dependency>
然后,在配置文件中指定:
spring:
  cache:
    type: ehcache
现在,缓存实现被切换成了ehcache,添加ehcache的配置文件:
<!-- ehcache.xml -->
<ehcache xmlns:xsi="http://www.w3.org/2001/XMLSchema-instance"
         xsi:noNamespaceSchemaLocation="http://www.ehcache.org/ehcache.xsd">
    <!-- 缓存文件路径 -->
    <diskStore path="D:\ehcache" />
    <!-- 默认缓存配置 -->
    <defaultCache
            maxElementsInMemory="1000"
            maxElementsOnDisk="10000000"
            eternal="false"
            overflowToDisk="false"
            timeToIdleSeconds="60"
            timeToLiveSeconds="60"
            diskExpiryThreadIntervalSeconds="120"
            memoryStoreEvictionPolicy="LRU">

    </defaultCache>
    <!-- codeSpace缓存配置 -->
    <cache
        name="codeSpace"
        maxElementsInMemory="1000"
        maxElementsOnDisk="10000000"
        eternal="false"
        overflowToDisk="false"
        timeToIdleSeconds="60"
        timeToLiveSeconds="60"
        diskExpiryThreadIntervalSeconds="120"
        memoryStoreEvictionPolicy="LRU">
    </cache>
</ehcache>
现在,缓存实现被切换成了ehcache,默认情况下是Spring内置的内存缓存,被称作simple。
切换缓存实现——redis
略
不被官方支持的缓存——memcached
如果我们想使用不被官方支持的缓存,那么我们就必须跳出上面那一套SpringBoot提供的缓存框架。
下面我们编写Service的另一个实现类,基于memcached的缓存验证码Service。
memcached的安装不在本篇文章的讨论范围
导入依赖:
<dependency>
    <groupId>com.googlecode.xmemcached</groupId>
    <artifactId>xmemcached</artifactId>
    <version>2.4.7</version>
</dependency>
编写配置类,创建用于和Memcached服务器通信的Bean——MemcachedClient,以被我们的Service所用:
@Configuration
public class XMemcachedConfig {
    @Bean
    public MemcachedClient memcachedClient() throws IOException {
        // 创建客户端,填写服务器地址和端口
        MemcachedClientBuilder builder = new XMemcachedClientBuilder("host:port");
        return builder.build();
    }
}
创建使用Memcached的Service实现类:
@Primary
@Service
@Slf4j
public class XMemcachedCacheSMSVerifyCodeService implements SMSVerifyCodeService {
    @Autowired
    private MemcachedClient memcachedClient;
    // 导入这个组件,但只使用了生成随机验证码的功能,所以与Spring自带的缓存规范无关
    @Autowired
    private VerifyCodeUtils verifyCodeUtils;
    @Override
    public String generateAndSendCode(String phoneNumber) {
        String code = verifyCodeUtils.generateCode(phoneNumber);
        log.info("XmemcachedCacheSMSVerifyCodeService generating the code!");
        try {
            memcachedClient.set(phoneNumber, 0, code);
        } catch (Exception e) {
            e.printStackTrace();
        }
        return code;
    }

    @Override
    public boolean verifyCode(String phoneNumber, String code) {
        try {
            String cachedCode = memcachedClient.get(phoneNumber);
            return code.equals(cachedCode);
        } catch (Exception e) {
            e.printStackTrace();
        }
        return false;
    }
}
这样就完成了Memcached缓存的集成
消息队列整合
消息队列是用于将用户请求与响应由同步转换为异步的。使用消息队列,用户发送一个请求后立即返回,请求作为消息被添加到队列中,有一些工作者会实际进行处理这些消息。
一个很常见的场景又是发送短信,我们构建一个虚拟的给用户发送短信的系统。
SMSMessage代表着一个短信,其中包含要发送到的手机号以及短信的内容:
@Data
public class SMSMessage implements Serializable {
    private String phone;
    private String message;
}
MessageService是提供提交发送短信任务以及取出待处理的短信的功能的一个Service:
/**
 * MessageService需要维护一个队列来保存用户提交的发送短信的申请,并且允许其它组件拿取这个申请并处理
 * MessageService的实现可以是同步阻塞的或异步的,但一般情况下都是异步的
 */
public interface MessageService {
    /**
     * 提交一个消息
     * @param msg
     * @return 成功或失败。有些实现从不会失败,比如同步阻塞的MessageService。具体要看实现类如何实现
     */
    boolean emit(SMSMessage msg);

    /**
     * 拿取一个消息
     * @return 如果拿取成功,返回拿到的消息,否则返回null。有些实现从不会返回null,比如同步阻塞的MessageService。具体要看实现类如何实现
     */
    SMSMessage take();
}
SendMessageController被需要短信功能的服务调用:
@RestController
@RequestMapping("/sendmsg")
public class SendMessageController {

    @Autowired
    private MessageService service;

    @PostMapping
    public ResponseObject sendMessage(@RequestBody SMSMessage message) {
        // 提交一个SMSMessage
        boolean result = service.emit(message);

        // 返回结果,提交成功则是`success`
        // 否则返回SERVER_INTERNAL_ERROR
        return ResponseObjectBuilder.newBuilder()
                .successIf(result, ResponseStatus.CODE_SERVER_INTERNAL_ERROR)
                .build();
    }

}
TakeMessageController被实际处理短信发送的服务调用,这些服务周期性的调用TakeMessageController,拿出一个SMSMessage并实际发送SMSMessage代表的短信:
@RestController
@RequestMapping("/takemsg")
public class TakeMessageController {

    @Autowired
    private MessageService service;

    @GetMapping
    public ResponseObject takeMessageToHandle() {
        SMSMessage message = service.take();

        // 如果拿出的SMSMessage不是null,则成功
        // 否则返回SERVER_INTERNAL_ERROR
        return ResponseObjectBuilder.newBuilder()
                .successIf(message != null, ResponseStatus.CODE_SERVER_INTERNAL_ERROR)
                .data(message)
                .build();
    }
}
基于BlockingQueue手动实现消息队列
BlockingQueue是一个首先就能想到的用于实现这种消息队列的一个数据结构:
@Service
@Slf4j
@Qualifier("blockingqueue")
public class BlockingQueueMessageService implements MessageService, InitializingBean {

    // 配置类,用于接收application.yaml中的配置信息
    @Autowired
    private BlockingQueueMessageServiceProperties properties;

    // 阻塞队列
    private volatile BlockingQueue<SMSMessage> messageQueue;
    // 阻塞队列超时时间
    private volatile Duration timeout;

    @Override
    public boolean emit(SMSMessage msg) {
        try {
            return messageQueue.offer(msg, timeout.toMillis(), TimeUnit.MILLISECONDS);
        } catch (InterruptedException e) {
            log.debug("emit faild because thread is interrupted!");
            // 获取并恢复线程中断状态
            boolean isInterrupted = Thread.interrupted();
            log.debug("current interrupted state => " + isInterrupted);
        }
        return false;
    }

    @Override
    public SMSMessage take() {
        try {
            return messageQueue.poll(timeout.toMillis(), TimeUnit.MILLISECONDS);
        } catch (InterruptedException e) {
            log.debug("take faild because thread is interrupted!");
            // 获取并恢复线程中断状态
            boolean isInterrupted = Thread.interrupted();
            log.debug("current interrupted state => " + isInterrupted);
        }
        return null;
    }

    @Override
    public void afterPropertiesSet() throws Exception {
        // 初始化 messageQueue和timeout
        messageQueue = new LinkedBlockingQueue<>(properties.getQueueSize());
        timeout = properties.getTimeout();
    }
}
配置类使用@ConfigurationProperties来读取配置文件:
@Data
@Component
@ConfigurationProperties(prefix = "blocking-message-service")
public class BlockingQueueMessageServiceProperties {
    // 队列大小,默认1024
    private Integer queueSize = 1024;
    // 超时时间,默认1秒
    @DurationUnit(ChronoUnit.MILLIS)
    private Duration timeout = Duration.ofMillis(1000);
}
application.yaml中编写配置:
blocking-message-service:
  queue-size: 10
  timeout: 1000
上面通过使用
BlockingQueue实现了一个简单的异步消息队列。就像缓存一样,Spring默认也给我们提供了基于JMS的消息队列规范,并且有一批成熟的消息队列可以直接整合到这套系统中。
整合ActiveMQ
导包:
<!-- activemq的starter -->
<dependency>
    <groupId>org.springframework.boot</groupId>
    <artifactId>spring-boot-starter-activemq</artifactId>
</dependency>

<!-- jms连接池 -->
<dependency>
    <groupId>org.messaginghub</groupId>
    <artifactId>pooled-jms</artifactId>
</dependency>
配置:
spring:
  activemq:
    # 配置activemq服务器的url
    broker-url: tcp://localhost:61616
    # 信任的包,下面的包中的类(可以被序列化的)能正常的被发布到activemq中和从中被取出
    packages:
      trusted: top.yudoge.domain
    # 开启连接池,最大连接数100,如果满了不阻塞
    pool:
      enabled: true
      max-connections: 100
      block-if-full: false
  jms:
    template:
      # 默认消息存放目的地
      default-destination: msg-default-dest
    # 使用发布订阅模型,默认是点对点
#    pub-sub-domain: true
概念
这里面有一些在我们使用BlockingQueue实现时没有的概念。
首先就是trusted属性所指定的包,因为我们使用了外部的消息队列服务器,而不是在JVM的内存中使用阻塞队列,所以我们要把要发布的对象序列化,通过网络传输到MQ服务器上,取回时再反序列化。ActiveMQ的trusted属性配置了这个包下的类是可信任的,会对它们的对象进行序列化操作,同时这些类必须是可序列化的。
然后就是有一个默认消息存放目的地,因为使用BlockingQueue时,这个队列就单单用来存储SMSMessage,所以不会出现什么问题,而消息队列服务器中要存储很多很多消息,不同业务的消息不能放一起,所以需要指定消息的存放目的地。default-destination是指你发布消息时如果没有指定目的地,消息存放的位置。
pub-sub-domain是是否开启发布订阅模型,默认是点对点的,这和消息队列的两种模型有关。简单的说,点对点是一个消息的生产者生产一个消息,这个消息只能被一个消费者拿走,发布订阅是一个生产者生产一个消息,所有订阅的消费者都能接到这个消息并消费。
编写使用ActiveMQ的实现类
使用SpringBoot提供的JmsMessagingTemplate,我们可以很轻松的使用任何支持JMS标准的MQ实现,所以下面的类名是JMSMessageService而不是ActiveMQMessageService,因为对于所有支持JMS的系统,这个Service是通用的:
@Service
@Qualifier("jms")
public class JMSMessageService implements MessageService {

    // 消息存放的目的地
    private static final String DEST = "order.queue.id";

    @Autowired
    private JmsMessagingTemplate messagingTemplate;

    @Override
    public boolean emit(SMSMessage msg) {
        // 将消息序列化并传递到MQ服务器
        messagingTemplate.convertAndSend(DEST, msg);
        return true;
    }

    @Override
    public SMSMessage take() {
        // 从MQ服务器取出消息
        SMSMessage message = messagingTemplate.receiveAndConvert(DEST, SMSMessage.class);
        return message;
    }
}
现在运行程序会出错,因为我们有两个MessageService实现,Spring不知道使用哪个。好在我们在上面都添加了@Qualifier,我们可以在Controller中使用限定符限定我们当前使用的实现。
@Autowired
@Qualifier("jms")
private MessageService service;
自动监听并处理消息
现实业务中,我们往往需要监听MQ中的消息,一旦有消息就拿出来处理,而不是提供一个API让其他人主动获取。SpringBoot也提供了这方面的支持,下面编写一个类:
@Component
@Slf4j
public class JMSMessageListener {

    // 监听JMS消息队列的消息,一来消息立马调用这个方法处理消息
    @JmsListener(destination = "order.queue.id")
    // 将这个方法的返回值作为一个消息发送给另一个目的地
    @SendTo("order.other.queue.id")
    public SMSMessage receiveAndHandle(SMSMessage message) {
        log.info("handle SMSMessage " + message);
        message.setMessage("redirect: " + message.getMessage());
        return message;
    }
}
整合RabbitMQ
RabbitMQ是AMQP规范的一个实现。
AMQP的基本概念
- Queue:消息队列,用来保存产生的消息
- Exchange:交换器,用来接收生产者产生的消息并将它们路由到服务器中的队列上
- Binding:交换器和队列之间的绑定,一个交换器可以绑定到多个队列上,可以认为是交换器和队列的路由表
所以,在AMQP模型中,生产者产生的消息并不直接放到队列中,而是交给Exchange,Exchange负责将消息放置到队列中,放置到哪一个队列,由Binding中的注册信息来决定。。
AMQP中有五种Exchange类型:
- direct exchange
- fanout exchange
- topic exchange
- headers exchange
- system exchange
这里主要介绍direct exchange和topic exchange,它们有点像JMS消息模型中的p2p和发布订阅。
开始整合
导入amqp的starter,其中自带RabbitMQ:
<dependency>
    <groupId>org.springframework.boot</groupId>
    <artifactId>spring-boot-starter-amqp</artifactId>
</dependency>
配置RabbitMQ的服务器地址和端口号:
spring:
  rabbitmq:
    host: localhost
    port: 5672
配置Queue、Exchange以及Binding:
@Configuration
public class AMQPConfig {
    public static final String SMS_MESSAGE_QUEUE_NAME = "sms_queue";
    public static final String DIRECT_EXCHANGE_NAME = "direct_exchange";
    public static final String SMS_DIRECT_ROUTING_KEY = "sms_direct_routing_key";


    // 创建一个用于保存SMSMessage的Queue
    @Bean
    public Queue smsMessageQueue() {
        return new Queue(SMS_MESSAGE_QUEUE_NAME);
    }

    // 创建一个直接Exchange
    @Bean
    public DirectExchange directExchange() {
        return new DirectExchange(DIRECT_EXCHANGE_NAME);
    }

    // 创建一个Binding,它用来绑定SMS队列和直接Exchange之间的关系
    // Routing Key是`SMS_DIRECT_ROUTING_KEY`这个常量
    // 外界会使用一个Exchange和这个RoutingKey来进行消息发布
    // 这样才知道使用什么Exchange发布到哪一个Queue
    @Bean
    public Binding bindingSMSToDirectExchange() {
        return BindingBuilder.bind(smsMessageQueue()).to(directExchange()).with(SMS_DIRECT_ROUTING_KEY);
    }
}
创建基于AMQP标准的MessageService实现类:
@Service
@Qualifier("amqp")
public class AMQPMessageService implements MessageService {
    @Autowired
    private AmqpTemplate amqpTemplate;

    @Override
    public boolean emit(SMSMessage msg) {
        // 指定使用的exchange以及routing key
        amqpTemplate.convertAndSend(AMQPConfig.DIRECT_EXCHANGE_NAME, AMQPConfig.SMS_DIRECT_ROUTING_KEY, msg);
        return true;
    }

    // Not implemented! Always return null!
    @Override
    public SMSMessage take() {
        return null;
    }
}
由于我们更加倾向于监听消息队列的变化并处理消息而不是手动轮询,所以没有实现take方法,转而实现了一个RabbitMessageListener:
@Component
@Slf4j
public class RabbitMessageListener {

    // 监听RabbitMQ消息队列的消息,一来消息立马调用这个方法处理消息
    @RabbitListener(queues = AMQPConfig.SMS_MESSAGE_QUEUE_NAME)
    public void receiveAndHandle(SMSMessage message) {
        log.info("handle SMSMessage " + message);
    }

}
监听同一个队列的多个RabbitListener,它们轮询处理消息,比如第一个处理消息1,第二个处理消息2,第一个再处理消息3......
使用topic exchange
很简单,我们只需要定义一个新的TopicExchange和一个Binding即可:
public static final String TOPIC_EXCHAGNE_NAME = "topic_exchange";
public static final String SMS_TOPIC_ROUTING_KEY = "sms_topic_routing_key";

// 定义TopicExchange
@Bean
public TopicExchange topicExchange() {
    return new TopicExchange(TOPIC_EXCHAGNE_NAME);
}
// 将TopicExchange与SmsMessageQueue绑定
@Bean
public Binding bindingSMSToTopicExchange() {
    return BindingBuilder.bind(smsMessageQueue()).to(topicExchange()).with(SMS_TOPIC_ROUTING_KEY);
}
然后,我们在Service中使用这个Exchange以及RoutingKey即可:
@Override
public boolean emit(SMSMessage msg) {
    // 使用新的Exchange和RoutingKey
    amqpTemplate.convertAndSend(AMQPConfig.TOPIC_EXCHAGNE_NAME, AMQPConfig.SMS_TOPIC_ROUTING_KEY, msg);
    return true;
}
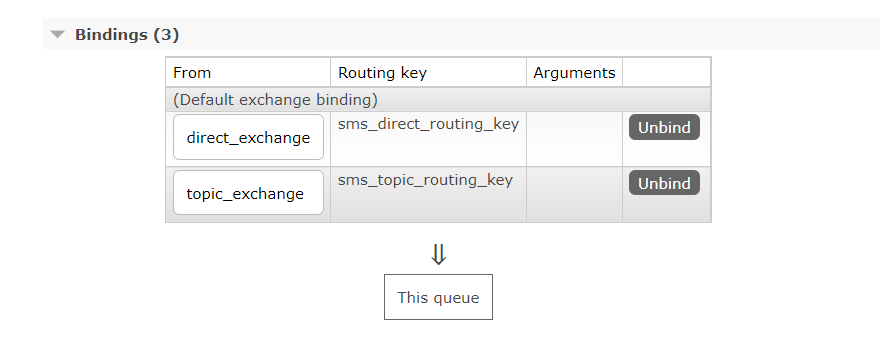
此时,我们在RabbitMQ的控制台上也可以看到sms_queue被绑定了两个Exchange,这意味着这两个Exchange都可以向这个队列发送消息。
topic exchange的特殊之处
topic exchange相比direct exchange,它在Binding的时候可以写一个模糊的routingkey,这样,用户发布消息的时候,所有与用户传入的routingkey匹配的Binding所绑定的队列都会接到消息。
举个例子,定义另一个消息队列:
@Bean
public Queue anotherSmsMessageQueue() {
    return new Queue("another_sms_queue");
}
定义另一个Binding,将TopicExchange模糊绑定到这个新建的队列上:
@Bean
public Binding anotherSMSTOTopicExchange() {
    return BindingBuilder.bind(anotherSmsMessageQueue()).to(topicExchange()).with("#");
}
这一下,TopicExchange上绑定了两个Queue,一个是具有特定routingkey的绑定,一个是具有模糊routingkey,匹配所有routingkey的绑定:
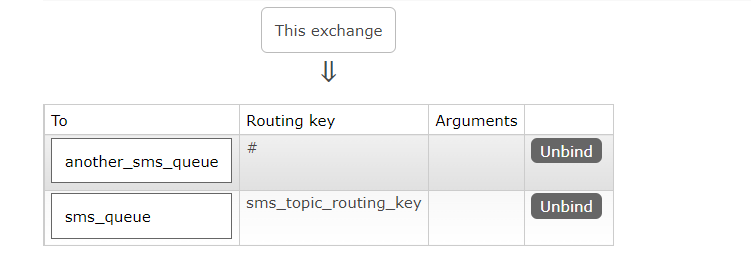
这下,用户再发布消息,这两个队列都能够接收到,我们再创建一个another_sms_queue的监听器:
@RabbitListener(queues = "another_sms_queue")
public void receiveAndHandle2(SMSMessage message) {
    log.info("handle SMSMessage from another sms queue" + message);
}
重新运行之前的程序并发布一条消息:

两个队列监听器都受到了这条消息。
整合RocketMQ
略
整合Kafka
略

 浙公网安备 33010602011771号