SpringBoot实战 一
Spring Initializer#
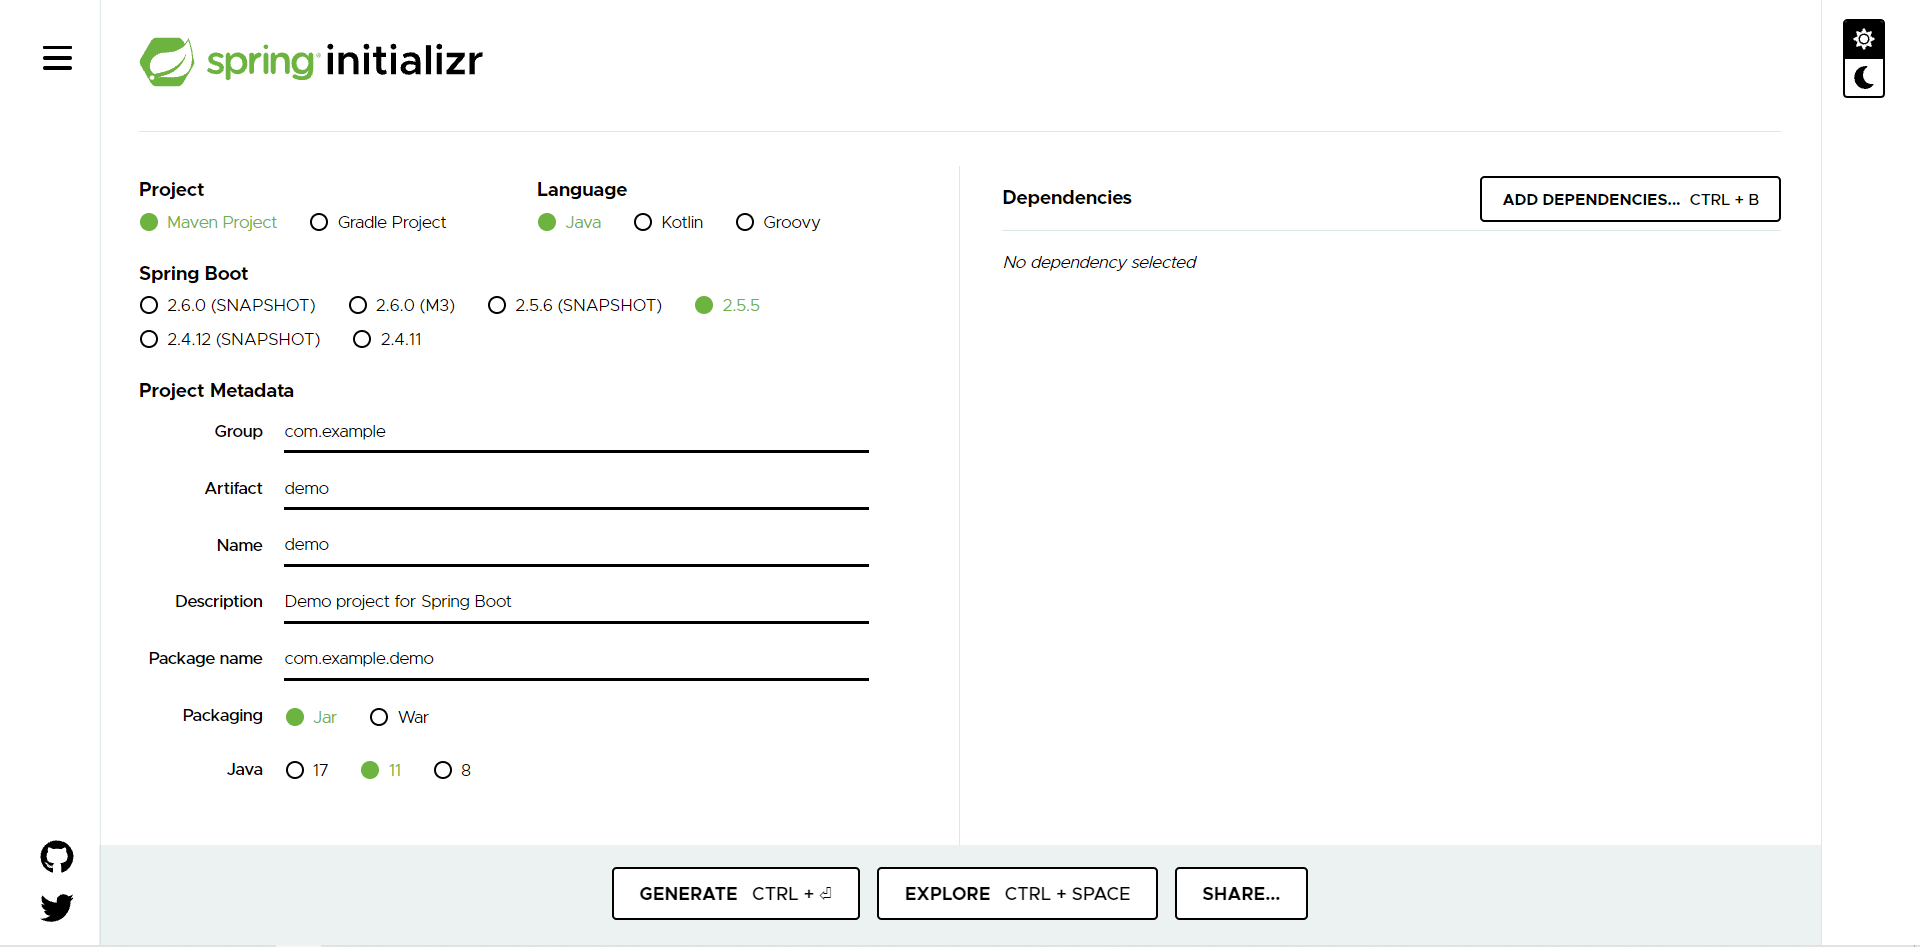
左侧配置项目详情,包括项目使用的依赖管理工具、语言、SpringBoot版本、项目源信息等。
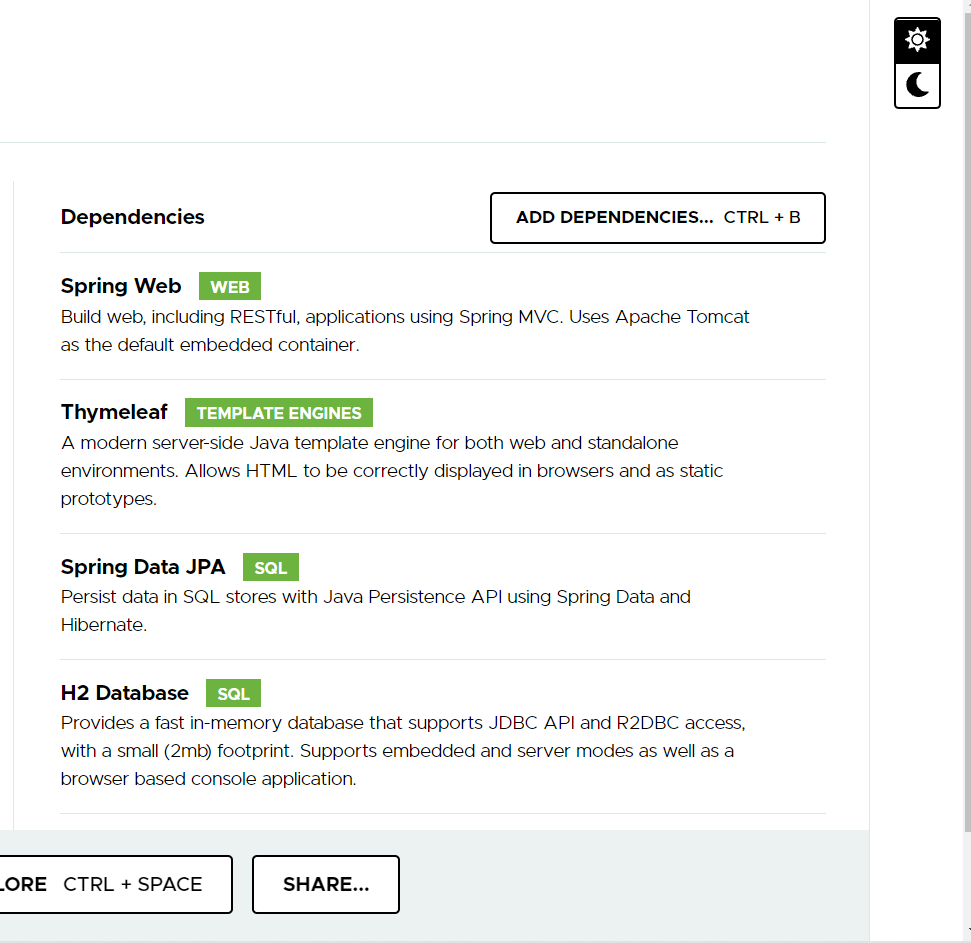
右侧为项目选择需要的功能,各种功能被SpringBoot封装成一个个starter。
比如你想要创建一个web项目,使用jpa作为持久化技术,h2作为开发阶段嵌入式数据库,使用thymeleaf模板,那你就可以添加这些starter。
starter的主要功能就是自动为你引入依赖,如果是我们手工引入依赖,就拿Spring Data Jpa来说,在没使用SpringBoot时,我们想要使用spring-data-jpa,我们得先引入JDBC,如果需要事务,你还要引入事务相关的依赖,而且我们要考虑这些依赖版本能不能互相兼容,有没有潜在的兼容性问题。
starter是经过Spring官方测试的一些maven项目而已,它们会自动帮我们引入一些相关依赖,并且我们无需考虑兼容性问题。
如下是我们使用Spring Initializer后得到的pom,jpa、thymeleaf、web、test等相关的依赖都被定义在这些starter中了,通过maven的依赖传递性引入到我们的项目中。
<dependencies>
    <dependency>
        <groupId>org.springframework.boot</groupId>
        <artifactId>spring-boot-starter-data-jpa</artifactId>
    </dependency>
    <dependency>
        <groupId>org.springframework.boot</groupId>
        <artifactId>spring-boot-starter-thymeleaf</artifactId>
    </dependency>
    <dependency>
        <groupId>org.springframework.boot</groupId>
        <artifactId>spring-boot-starter-web</artifactId>
    </dependency>

    <dependency>
        <groupId>com.h2database</groupId>
        <artifactId>h2</artifactId>
        <scope>runtime</scope>
    </dependency>

    <dependency>
        <groupId>org.springframework.boot</groupId>
        <artifactId>spring-boot-starter-test</artifactId>
        <scope>test</scope>
    </dependency>
</dependencies>
随便点开一个starter,这里就用thymeleaf的举例,可以看到这个starter里才是实际引入thymeleaf的位置。
<dependencies>
    <dependency>
        <groupId>org.thymeleaf</groupId>
        <artifactId>thymeleaf-spring5</artifactId>
        <version>3.0.12.RELEASE</version>
        <scope>compile</scope>
    </dependency>
    <dependency>
        <groupId>org.thymeleaf.extras</groupId>
        <artifactId>thymeleaf-extras-java8time</artifactId>
        <version>3.0.4.RELEASE</version>
        <scope>compile</scope>
    </dependency>
</dependencies>
所以starter的目的就是将我们从具体的依赖项和依赖项的版本兼容中解脱出来,如果你要web相关的依赖,那么直接使用一个spring-boot-starter-web,如果你需要jpa相关的功能,那么直接使用spring-boot-starter-data-jpa。
如果你很介意starter将你不需要的依赖也传导进你的项目中了,或者你需要使用和starter中定义版本不同的依赖,可以使用exclusions来排除项目。
项目结构#
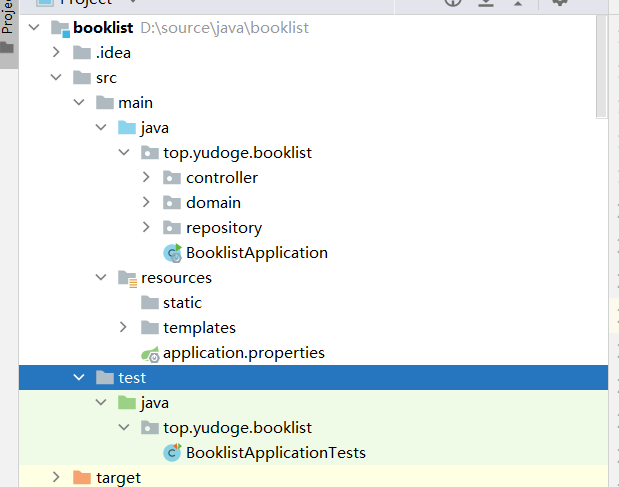
如上是使用Spring Initializer得到的项目结构。当然,controller、domain和repository都是我们后添加进去的。
项目遵循maven和gradle的项目结构,src/main/java存放java代码,src/test/java存放测试代码,src/main/resources存储资源。
static文件用于存储web项目中的静态资源,templates用存储视图模板,application.properties是项目的配置文件,BooklistApplication是项目的启动类。
@SpringBootApplication
public class BooklistApplication {

    public static void main(String[] args) {
        SpringApplication.run(BooklistApplication.class, args);
    }

}
启动类很简单,使用了一个@SpringBootApplication注解并在主方法中调用SpringApplication.run启动程序。
@SpringBootApplication注解代码如下:
@Target(ElementType.TYPE)
@Retention(RetentionPolicy.RUNTIME)
@Documented
@Inherited
@SpringBootConfiguration
@EnableAutoConfiguration
@ComponentScan(excludeFilters = { @Filter(type = FilterType.CUSTOM, classes = TypeExcludeFilter.class),
		@Filter(type = FilterType.CUSTOM, classes = AutoConfigurationExcludeFilter.class) })
public @interface SpringBootApplication {
    // ...
}
@EnableAutoConfiguration启用自动配置功能,@ComponentScan用来扫描包下的类作为Bean,所以我们直接在包下编写@Controller、@Service、@Repository都可以被SpringBoot扫描。
编写一个项目#
图书列表项目
实体类
@Entity
public class Book {
    @Id
    @GeneratedValue(strategy = GenerationType.AUTO)
    private Long id;
    private String reader;
    private String isbn;
    private String title;
    private String author;
    private String description;
}
Repository
@Repository
public interface BookRepository extends JpaRepository<Book, Long> {
    List<Book> findBooksByReader(String reader);
}
Controller
@RequestMapping("/")
public class BookController {
    @Autowired
    private BookRepository bookRepository;

    @GetMapping("/{reader}")
    public String readerBooks(@PathVariable String reader, Model model) {
        List<Book> books = bookRepository.findBooksByReader(reader);
        model.addAttribute("books", books);
        return "readingList";
    }

    @PostMapping("/{reader}")
    public String addToReadingList(
            @PathVariable("reader") String reader,
            Book book
    ) {
        book.setReader(reader);
        bookRepository.save(book);
        return "redirect:/{reader}";
    }
}
模板
<!DOCTYPE html>
<html lang="en">
<head>
    <meta charset="UTF-8">
    <title>Reading List</title>
</head>
<body>
    <h2>Your Reading List</h2>
    <div th:unless="${#lists.isEmpty(books)}">
        <dl th:each="book : ${books}">
            <dt class="bookHeadline">
                <span th:text="${book.title}">TITLE</span> by
                <span th:text="${book.author}">AUTHOR</span>
                (ISBN: <span th:text="${book.isbn}"></span>)
            </dt>
            <dd class="bookDescription">
                <span th:if="${book.description}" th:text="${book.description}">DESCRIPTION</span>
                <span th:if="${book.description eq null}">No Description Available</span>
            </dd>
        </dl>
    </div>
    <div th:if="${#lists.isEmpty(books)}">
        You have no books in your list
    </div>

    <hr>

    <h3>Add A Book</h3>
    <form method="post">
        Title: <input type="text" name="title"><br>
        Author: <input type="text" name="author"><br>
        isbn: <input type="text" name="isbn"><br>
        Description: <textarea type="text" name="description" cols="80"></textarea><br>
        <input type="submit" value="Submit"/>
    </form>
</body>
</html>
现在这个项目就能运行了,确实没有使用一行配置代码。
自动配置是如何运行的#
前面,确实没有使用一行配置代码,项目就跑起来了。前几天我使用SpringMVC编写程序时,光是配置就弄了一下午。
条件化定义Bean#
要想了解自动配置是如何运行的,就得知道Spring的条件化Bean定义。
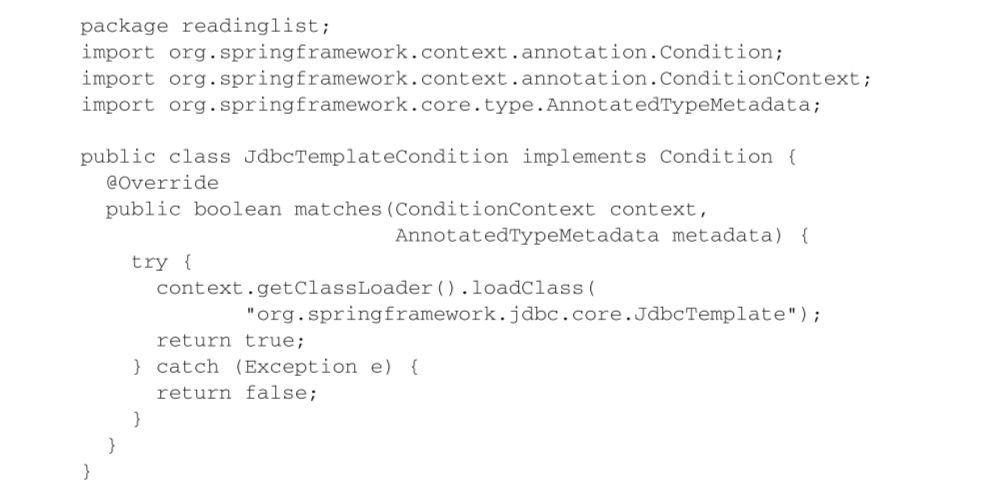
Spring提供了@Conditional注解,这个注解需要指定一个实现Condition接口的类,这个类代表一个条件,条件的真假在matches方法中返回。比如下面的条件用来查看classpath中是否存在JdbcTemplate
然后我们定义Bean时可以这样
这时只有当JdbcTemplate类存在于classpath下,才创建这个MyServiceBean。
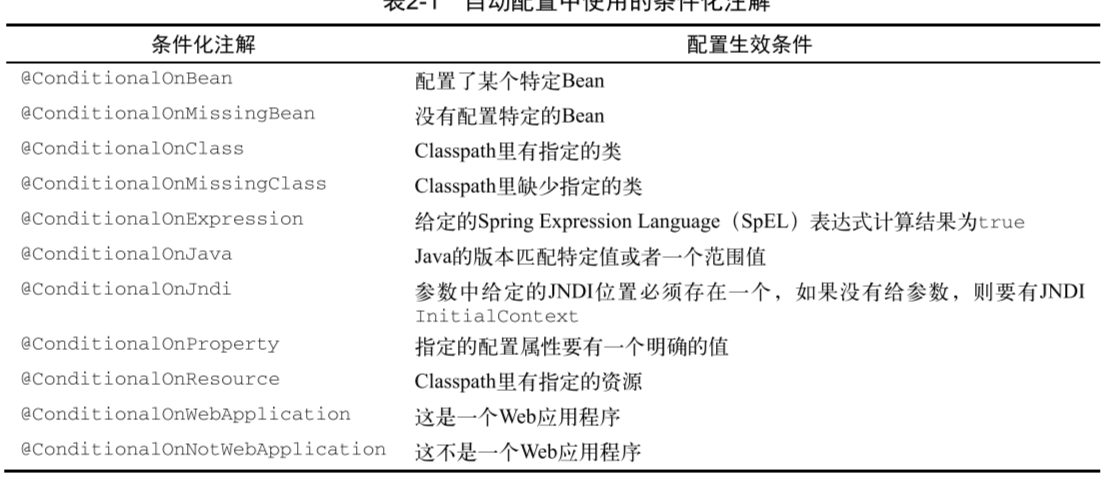
Spring还提供了一些方便的条件注解
AutoConfiguration#
所以我们就可以大体猜到了,这些自动配置的Bean全是根据条件创建的。
比如之前如果我们想使用Thymeleaf,我们得先定义一个SpringResourceTemplateResolver Bean,现在SpringBoot使用条件来自动决策是否定义这个Bean,所以便不用我们配置了。
这是ThymeleafAutoConfiguration,它就是一个普通的Configuration类,唯一不同的是,它检测了类路径下是否有需要的类,如果有,这个配置类才生效。
@Configuration(proxyBeanMethods = false)
@EnableConfigurationProperties(ThymeleafProperties.class)
@ConditionalOnClass({ TemplateMode.class, SpringTemplateEngine.class })
@AutoConfigureAfter({ WebMvcAutoConfiguration.class, WebFluxAutoConfiguration.class })
public class ThymeleafAutoConfiguration {
    // ...
}
再看看其中定义视图解析器的代码,也不过是检测,如果不存在thymeleafViewResolver这个Bean的话就定义。
@Configuration(proxyBeanMethods = false)
static class ThymeleafViewResolverConfiguration {

    @Bean
    @ConditionalOnMissingBean(name = "thymeleafViewResolver")
    ThymeleafViewResolver thymeleafViewResolver(ThymeleafProperties properties,
            SpringTemplateEngine templateEngine) {
        ThymeleafViewResolver resolver = new ThymeleafViewResolver();
        resolver.setTemplateEngine(templateEngine);
        resolver.setCharacterEncoding(properties.getEncoding().name());
        resolver.setContentType(
                appendCharset(properties.getServlet().getContentType(), resolver.getCharacterEncoding()));
        resolver.setProducePartialOutputWhileProcessing(
                properties.getServlet().isProducePartialOutputWhileProcessing());
        resolver.setExcludedViewNames(properties.getExcludedViewNames());
        resolver.setViewNames(properties.getViewNames());
        // This resolver acts as a fallback resolver (e.g. like a
        // InternalResourceViewResolver) so it needs to have low precedence
        resolver.setOrder(Ordered.LOWEST_PRECEDENCE - 5);
        resolver.setCache(properties.isCache());
        return resolver;
    }
    // ...
}
自定义配置#
自动配置大部分时间能满足需求,也有一些时间无法满足需求。
比如安全配置,我们只需要向pom中添加如下starter,我们的应用就具有了安全保护。但是安全保护往往跟实际业务逻辑密切相关,这种情况下Spring也没法给你一个万全的自动配置,还得你自己来。
<dependency>
    <groupId>org.springframework.boot</groupId>
    <artifactId>spring-boot-starter-security</artifactId>
</dependency>
默认情况下,Spring拦截任何一个请求,并要求它们认证,并且提供一个user用户,密码是随机的,每次都会在日志里打出来。
现在我们需要自定义我们应用自己的安全规则。
通过覆盖Bean配置#
和SpringMVC差不多,我们直接通过继承WebSecurityConfigurerAdapter编写配置类即可。
@Configuration
@EnableWebSecurity
public class MyWebSecurityConfig extends WebSecurityConfigurerAdapter {
    @Autowired
    private ReaderRepository readerRepository;

    @Override
    protected void configure(AuthenticationManagerBuilder auth) throws Exception {
        auth.userDetailsService(username -> readerRepository.findByUsername(username));
    }

    @Override
    protected void configure(HttpSecurity http) throws Exception {
        http.authorizeRequests()
                .antMatchers("/").access("hasRole('READER')")
                .antMatchers("/**").permitAll()
            .and()
            .formLogin();
    }
}
上面使用UserDetailsService来配置安全数据的来源,并且提供了一些其它的请求URL限制规则。这样我们的配置会覆盖掉原先SpringBoot的默认配置。
我们的配置是如何覆盖掉原先的配置的呢?
查看SpringBoot中的SpringBootWebSecurityConfiguration,它是一个安全的自动配置类
@Configuration(proxyBeanMethods = false)
@ConditionalOnDefaultWebSecurity
@ConditionalOnWebApplication(type = Type.SERVLET)
class SpringBootWebSecurityConfiguration {
    // ...
}
它的条件是@ConditionalOnDefaultWebSecurity,从名字来看就是当默认Web安全配置应用时该类产生作用。
而这个注解类又引用了@Conditional(DefaultWebSecurityCondition.class):
@Conditional(DefaultWebSecurityCondition.class)
public @interface ConditionalOnDefaultWebSecurity {

}
然后这个DefaultWebSecurityCondition里又写了如下条件
@ConditionalOnMissingBean({ WebSecurityConfigurerAdapter.class, SecurityFilterChain.class })
static class Beans {

}
意思就是只有当WebSecurityConfigurerAdapter类型的Bean不存在时,自动配置才生效。所以我们创建了一个这个类型的实现类,那么默认配置肯定会被我们给替换掉。
通过属性配置#
假设如果只是因为默认配置中的一小部分配置不满足你的需求了,比如你只是想改一下默认数据源配置的url,然后你就要将这个配置Bean完全重写,这是很不划算的一件事。
SpringBoot提供了几百个配置项,你可以通过配置项只修改默认配置的一小部分。
直接在项目的application.properties中编写
spring.datasource.url=jdbc:mysql://localhost:3307
属性可以通过如下方式设置,优先级降序
- 命令行参数
- java:comp/env里的JNDI属性
- JVM系统属性
- 操作系统环境变量
- 随机生成的带random.*前缀的属性
- 应用程序以外的
application.properties或application.yml文件 - 应用程序以内的
application.properties或application.yml文件 - 通过
@PropertySource标注的属性源 - 默认属性
yml比properties优先
yml和properties可以放在(优先级降序)
- 外置,相对于应用程序运行目录的/config子目录中
- 外置,在应用程序运行的目录里
- 内置,在config包下
- 内置,在classpath根目录
下面还有一些小示例
禁用模板缓存#
spring.thymeleaf.cache=false
修改服务器端口#
server.port=8088
配置数据源#
spring.datasource.url=jdbc:mysql://localhost:3306/readinglist
spring.datasource.username=root
spring.datasource.password=root
spring.datasource.driver-class-name=com.mysql.cj.jdbc.Driver
注入配置项#
@RequestMapping("/readinglist")
@ConfigurationProperties(prefix = "amazon")
public class BookController {
    private String associateId;

    public void setAssociateId(String associateId) {
        this.associateId = associateId;
    }
    // ...
}
amazon.associateId=yulaoba
@ConfigurationProperties会从配置文件中读取以prefix为前缀的属性并通过setter方法注入到本类的属性中。
SpringBoot的属性解析器具有下划线转驼峰命名功能。
按理说应该加上
@EnableConfigurationProperties注解,@ConfigurationProperties才会生效,但是Spring的自动配置都应用了这个注解,所以你无需开启。
现在有个问题就是,Amazon开头的属性和BookController并没啥实际的联系,只是当前Controller引用了其中的一个属性,我们以后其它的Controller中可能都会引用这个属性,当前的BookController可能也会引用别的属性,所以把这个注解放在BookController上不太好。
定义成一个单独的Bean
@Component
@ConfigurationProperties(prefix = "amazon")
public class AmazonProperties {
    private String associateId;

    public void setAssociateId(String associateId) {
        this.associateId = associateId;
    }

    public String getAssociateId() {
        return associateId;
    }
}
注入这个Bean
@Controller
@RequestMapping("/readinglist")
public class BookController {

    @Autowired
    private AmazonProperties amazonProperties;

}
Profile#
SpringBoot可以直接在properties文件中指定当前激活的profile
spring.profiles.active=dev
SpringBoot把所有的配置基本都移动到自动配置或配置文件里了,我们很少自己创建Bean,所以我们需要将profile的配置转移导配置项级别、配置文件级别。
可以创建application-{profile}.properties文件,它们代表不同profile下生效的配置文件。
使用yml文件时,可以配置到同一个文件中
logging:
    level:
        root: INFO

---

spring:
    profiles: development

logging:
    level:
        root: DEBUG

---

spring:
    profiles: production

logging:
    path: /tmp/
    file: BookWorm.org
    level:
        root: DEBUG
作者:Yudoge
出处:https://www.cnblogs.com/lilpig/p/15375756.html
版权:本作品采用「署名-非商业性使用-相同方式共享 4.0 国际」许可协议进行许可。
欢迎按协议规定转载,方便的话,发个站内信给我嗷~




【推荐】国内首个AI IDE,深度理解中文开发场景,立即下载体验Trae
【推荐】编程新体验,更懂你的AI,立即体验豆包MarsCode编程助手
【推荐】抖音旗下AI助手豆包,你的智能百科全书,全免费不限次数
【推荐】轻量又高性能的 SSH 工具 IShell:AI 加持,快人一步
· AI与.NET技术实操系列:向量存储与相似性搜索在 .NET 中的实现
· 基于Microsoft.Extensions.AI核心库实现RAG应用
· Linux系列:如何用heaptrack跟踪.NET程序的非托管内存泄露
· 开发者必知的日志记录最佳实践
· SQL Server 2025 AI相关能力初探
· 震惊!C++程序真的从main开始吗?99%的程序员都答错了
· 【硬核科普】Trae如何「偷看」你的代码?零基础破解AI编程运行原理
· 单元测试从入门到精通
· winform 绘制太阳,地球,月球 运作规律
· 上周热点回顾(3.3-3.9)