MyBatis笔记 一
《深入浅出MyBatis技术原理与实战》
MyBatis基本构成#
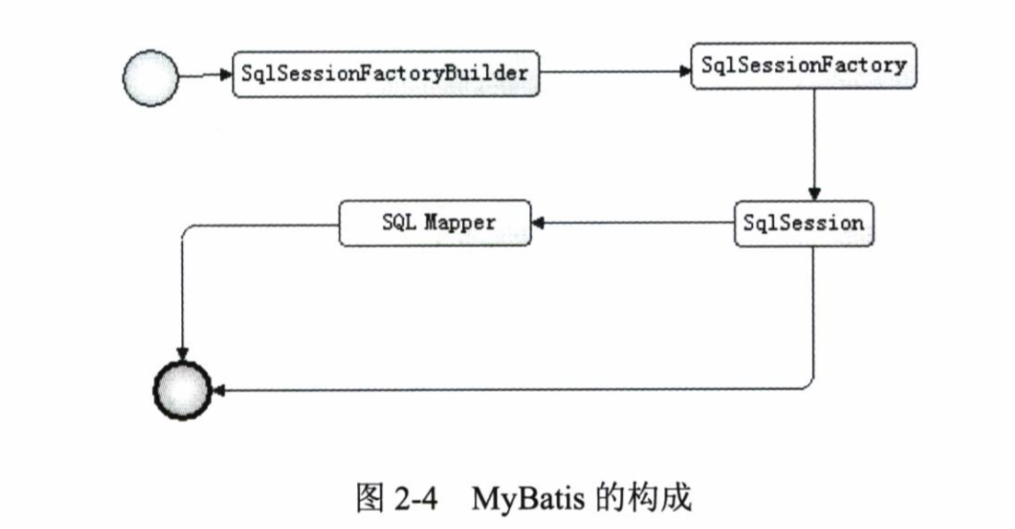
MyBatis有几个构成要素
SqlSessionFactoryBuilder
用于创建SqlSessionFactory,用完即扔,系统中不应该保存这个对象。可以传入一些配置(Configuration类)SqlSessionFactory
SqlSessionFactory用于创建SqlSession,它是一个工厂,里面保存了一些数据库配置,通常一个项目中的一个数据库会拥有一个全局单例的SqlSessionFactory对象,大部分应用只有一个数据库系统,所以全局只有一个SqlSessionFactorySqlSession
SqlSession代表一次数据库连接,就像Connection一样,只不过是封装了一下,用完需要关闭SqlMapper代表Sql语句和返回结果之间的映射桥梁
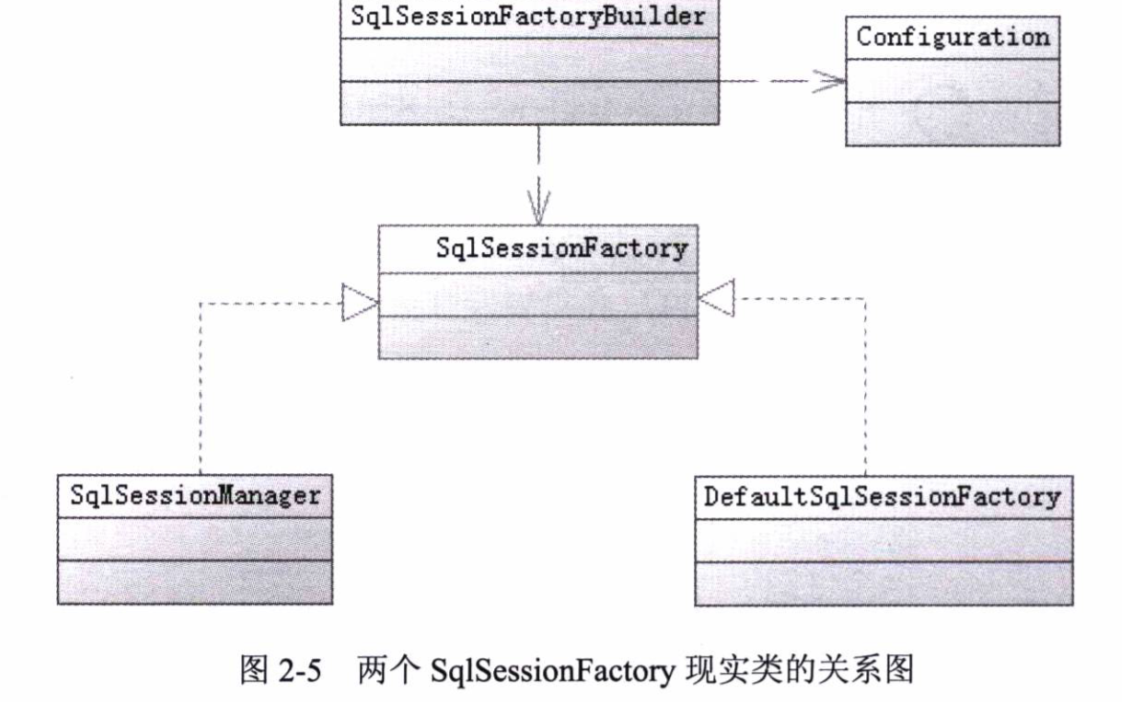
SqlSessionFactory有两个实现类,SqlSessionManager和DefaultSqlSessionFactory,目前MyBatis中使用的是DefaultSqlSessionFactory
编写一个SqlSessionFactoryUtils,用于使用SqlSessionFactoryBuilder来生成单例的SqlSessionFactory。
public class SqlSessionFactoryUtils {
    private static SqlSessionFactory factory;
    private static final Class CLASS_LOCK = SqlSessionFactoryUtils.class;

    /**
    *
    * 初始化SqlSessionFactory,读取classpath下的`mybatis_config.xml`
    * 并且使用类锁保证系统中不会存在多个Factory
    *
    */
    public static SqlSessionFactory initSqlSessionFactory() {
        InputStream ins = null;
        try {
            ins = Resources.getResourceAsStream("mybatis_config.xml");
        } catch (IOException e) {
            e.printStackTrace();
            return null;
        }

        synchronized (CLASS_LOCK) {
            if (factory == null) {
                factory = new SqlSessionFactoryBuilder().build(ins);
            }
        }

        return factory;

    }

    /**
    *
    * 打开一个session
    *
    */
    public static SqlSession openSession() {
        if (factory == null)
            initSqlSessionFactory();
        return factory.openSession();
    }
}
创建xml文件
<?xml version="1.0" encoding="UTF-8" ?>
<!DOCTYPE configuration
        PUBLIC "-//mybatis.org//DTD Config 3.0//EN"
        "http://mybatis.org/dtd/mybatis-3-config.dtd">

<configuration>
    <typeAliases>
        <typeAlias type="io.lilpig.mybatislearn.c01basic.pojo.Role" alias="role"/>
    </typeAliases>
    <environments default="development">
        <environment id="development">
            <transactionManager type="JDBC"></transactionManager>
            <dataSource type="POOLED">
                <property name="driver" value="com.mysql.cj.jdbc.Driver"/>
                <property name="url" value="jdbc:mysql://localhost:3306/mbts_role"/>
                <property name="username" value="root"/>
                <property name="password" value="root"/>
            </dataSource>
        </environment>
    </environments>

    <mappers>
        <mapper resource="io/lilpig/mybatislearn/c01basic/pojo/role.xml"/>
    </mappers>
</configuration>
这里面的配置项具体的内容后面再说,transactionManager设置了基于JDBC的事务管理器,dataSource设置了基于连接池的数据源,并在其中编写了配置。
最主要的是mappers,mappers设置了上面所说的映射SQL语句到对象的SqlMapper部分。
SqlMapper#
创建刚刚的SqlMapper文件,就是那个role.xml
<?xml version="1.0" encoding="UTF-8" ?>
<!DOCTYPE mapper
        PUBLIC "-//mybatis.org//DTD Mapper 3.0//EN"
        "http://mybatis.org/dtd/mybatis-3-mapper.dtd">

<mapper namespace="io.lilpig.mybatislearn.c01basic.pojo.RoleMapper">
    <select id="getRole" parameterType="long" resultType="io.lilpig.mybatislearn.c01basic.pojo.Role">
        SELECT * FROM role WHERE id=#{id}
    </select>
</mapper>
然后还需要一个RoleMapper接口
package io.lilpig.mybatislearn.c01basic.pojo;

public interface RoleMapper {
    Role getRole(Long id);
}
一个mapper项目通过namespace与一个Java中的接口绑定,接口中的每一个用于,查询、更新、删除和添加的方法都可以在mapper项目中定义id相同的项目。比如上面的getRole对应着接口中的getRole。
parameterType指定了接口中的参数类型,resultType指定了返回类型,MyBatis可以将SQL查询的结果集转换成Java对象,具体的原理会在后面描述。
#{arg}可以获取接口方法中的参数。
不必定义接口的实现类,MyBatis会自动创建,并且将你的SQL语句的执行和结果的返回封装到实现类中。
public class RoleMapperTest {
    @Test
    public void testGetRole() {
        RoleMapper mapper = SqlSessionFactoryUtils
            .openSession().getMapper(RoleMapper.class);
        Role role = mapper.getRole(1l);
        System.out.println(role);
    }
}
对了对了,maven默认不会打包xml文件到target目录,所以我们要在pom.xml中添加这些
<build>
    <resources>
        <resource>
            <directory>src/main/java</directory>
            <includes>
                <include>**/*.xml</include>
            </includes>
        </resource>
    </resources>
</build>
其他参数#
properties#
properties可以设置一些配置项目共以后使用
<properties>
    <property name="driver" value="com.mysql.cj.jdbc.Driver"/>
</properties>


<property name="driver" value="${driver}"/>
也可以使用外部文件
<properties resource="jdbc.properties"></properties>
typeAliases#
类型需要写入全限定名,太丑了,太长了,定义别名
<typeAliases>
    <typeAlias type="io.lilpig.mybatislearn.c01basic.pojo.Role" alias="role"/>
</typeAliases>
然后可以直接使用别名
<select id="getRole" parameterType="long" resultType="role">
    SELECT * FROM role WHERE id=#{id}
</select>
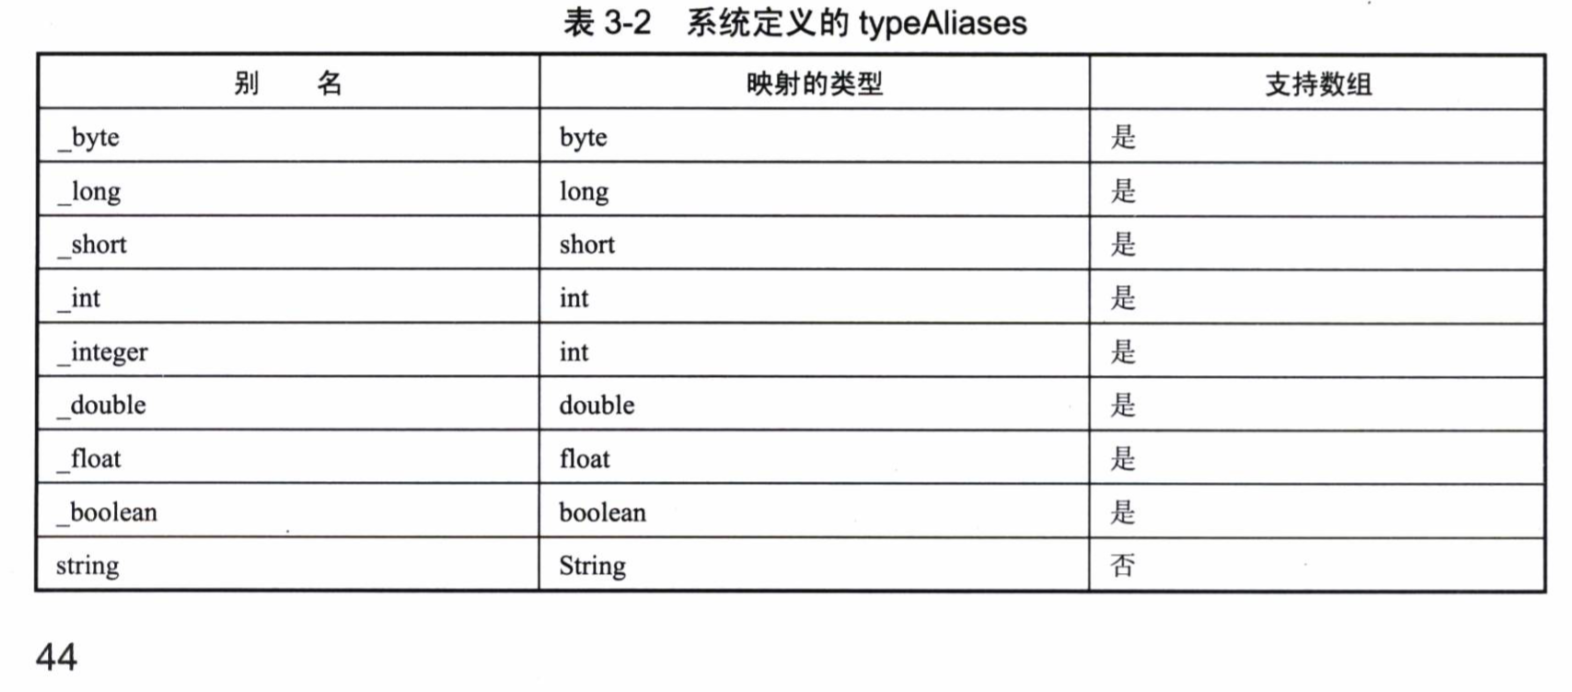
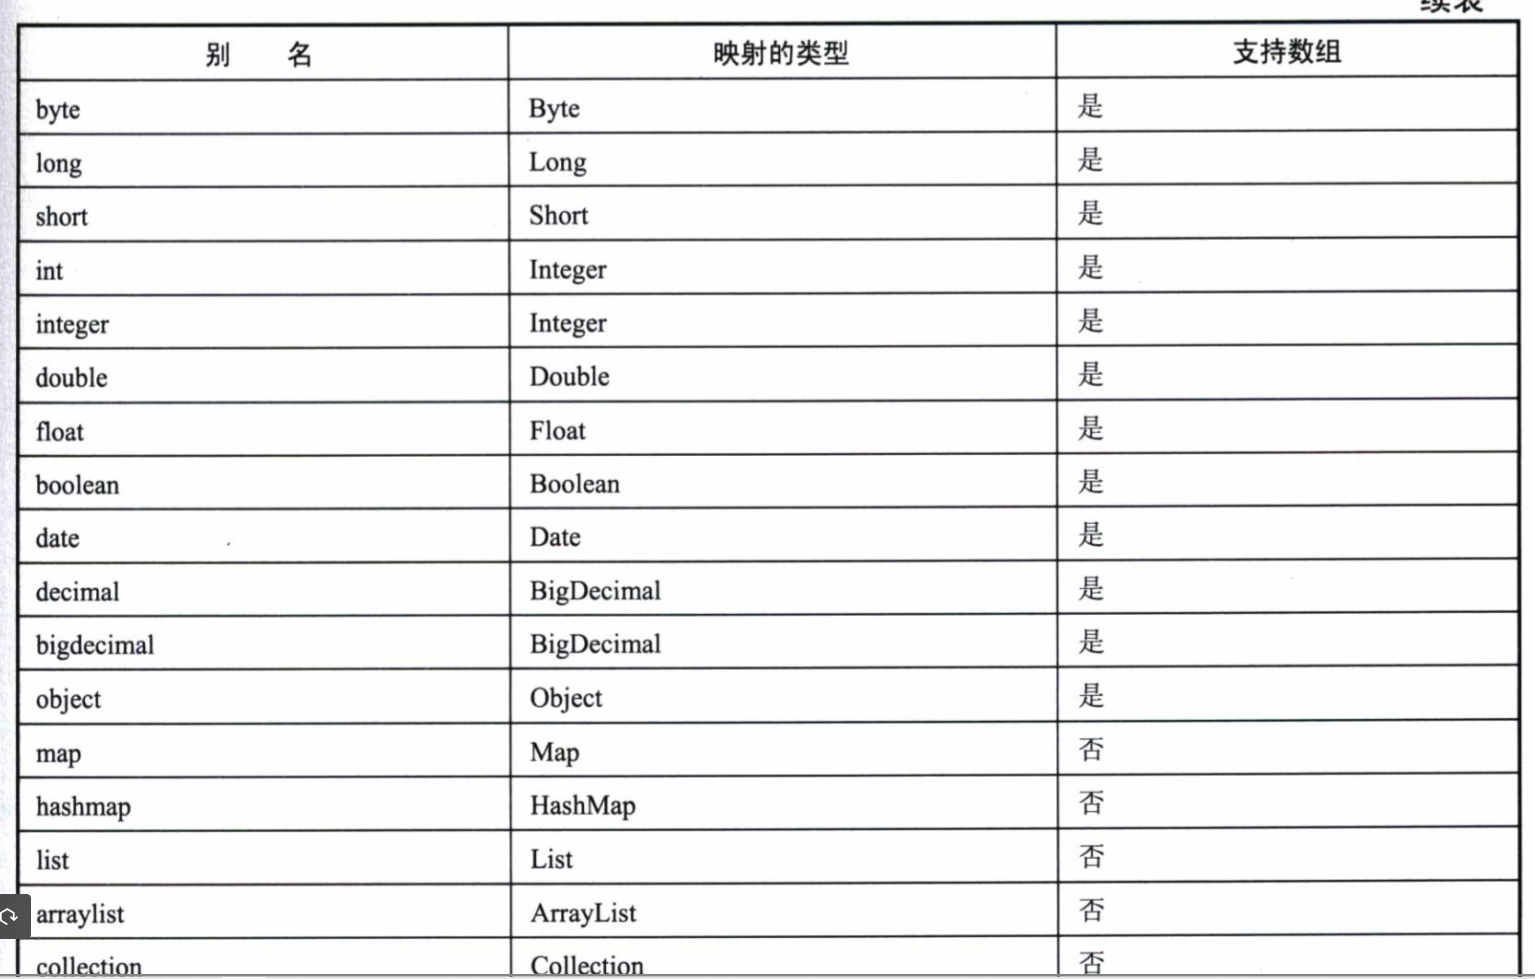
下面是MyBatis定义的别名。
可以通过扫描包的形式定义别名
<typeAliases>
    <package name="io.lilpig.mybatislearn.c01basic.pojo"/>
</typeAliases>
这样会扫描对应包下的所有类,该类如果使用@Alias标注则使用注解中定义的作为别名,如果没有则将类的首字母小写作为别名。
typeHandler#
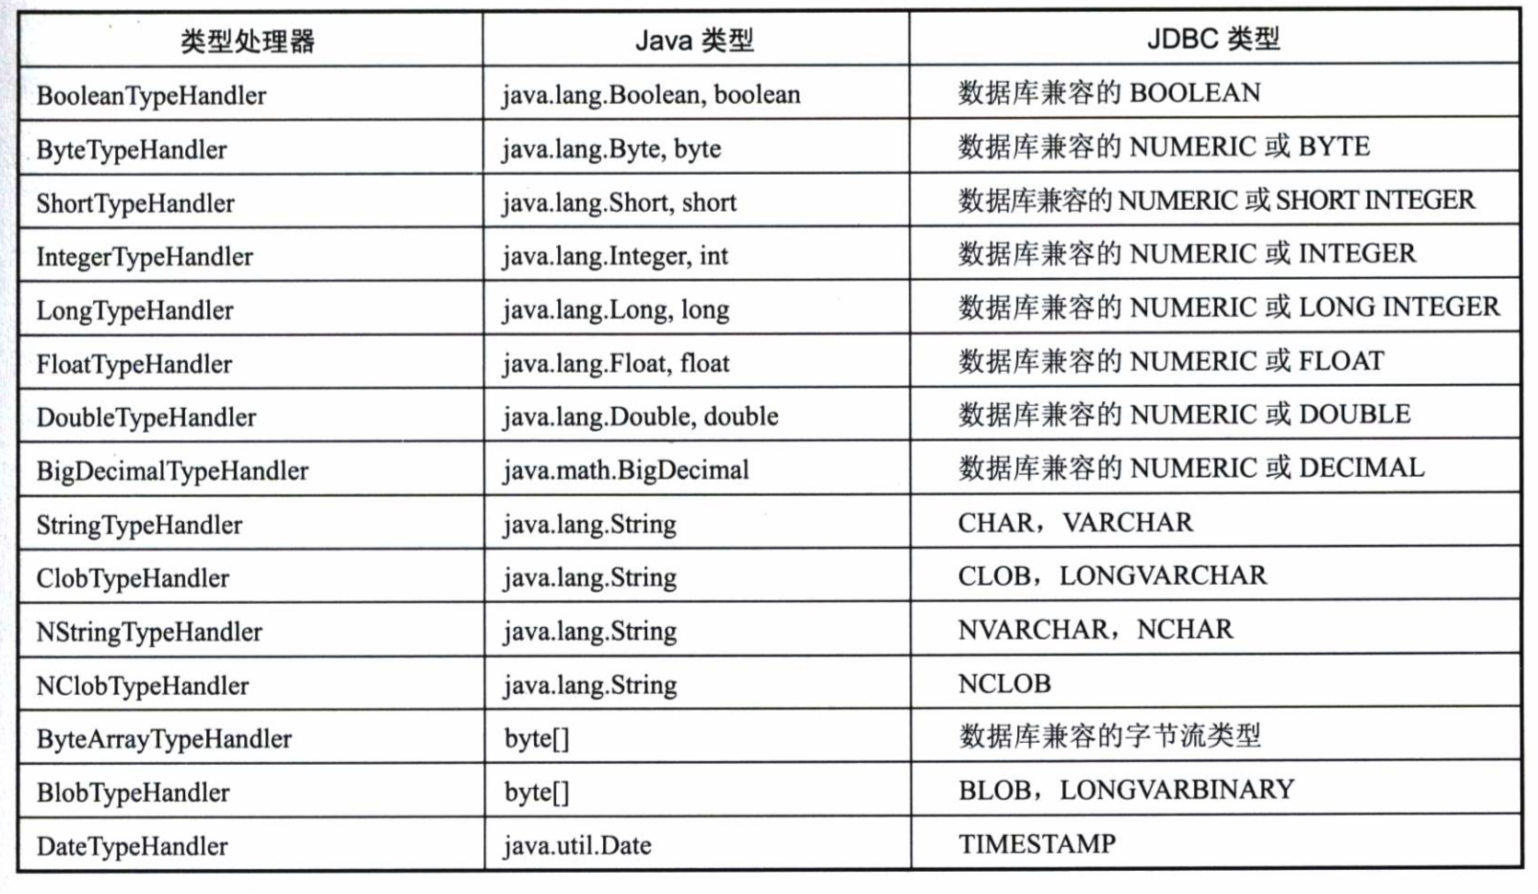
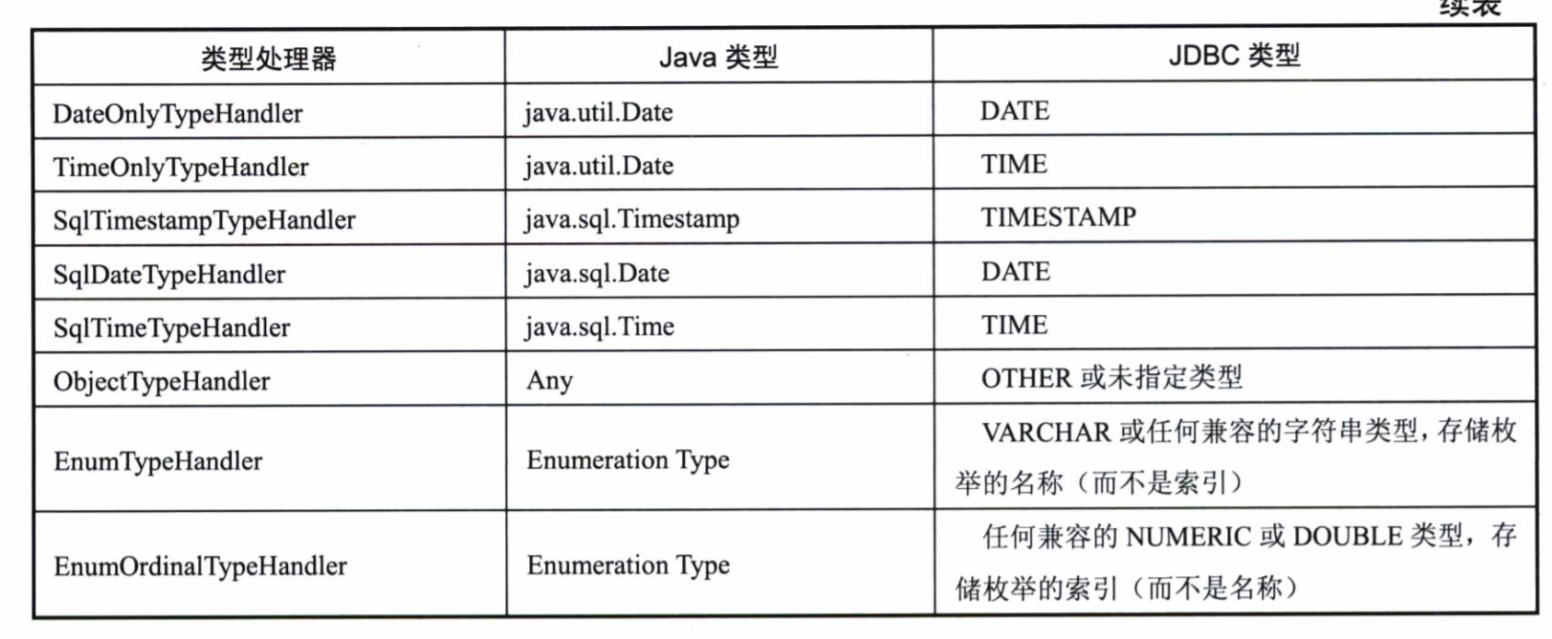
MyBatis需要在数据库类型和Java类型中做双向转换,这个转换就是typeHandler做的。
MyBatis提供了一些默认的TypeHandler
我习惯在Java中存储Date类型的数据,在数据库中存储1970年至今的Unix时间戳,我们在MyBatis中创建一个typeHandler来实现双向的转换。
一个TypeHandler要实现TypeHandler接口,更简单的办法是直接继承一个高级类BaseTypeHandler
@MappedJdbcTypes(JdbcType.BIGINT)
public class DateToTimeStampTypeHandler extends BaseTypeHandler<Date> {
    @Override
    public void setNonNullParameter(PreparedStatement ps, int i, Date parameter, JdbcType jdbcType) throws SQLException {
        ps.setLong(i,parameter.getTime());
    }

    @Override
    public Date getNullableResult(ResultSet rs, String columnName) throws SQLException {
        return new Date(rs.getLong(columnName));
    }

    @Override
    public Date getNullableResult(ResultSet rs, int columnIndex) throws SQLException {
        return new Date(rs.getLong(columnIndex));
    }

    @Override
    public Date getNullableResult(CallableStatement cs, int columnIndex) throws SQLException {
        return new Date(cs.getLong(columnIndex));
    }
}
在其中的四个方法中实现类型之间的转换。BaseTypeHandler中的泛型指定了Java类型是Date,@MappedJdbcTypes(JdbcType.BIGINT)指定了数据库中的类型。
然后我们需要在mybatis的配置文件中注册这个typeHandler
<typeHandlers>
    <typeHandler handler="io.lilpig.mybatislearn.typehandlers.DateToTimeStampTypeHandler"/>
</typeHandlers>
之后我们就可以在对应的位置使用它了
<insert id="insertRole" parameterType="role">
    INSERT INTO role (roleName, note, createTime, sex)
        VALUES (#{roleName}, #{note},
                #{createTime, typeHandler=io.lilpig.mybatislearn.typehandlers.DateToTimeStampTypeHandler})
</insert>
还可以通过在resultMap中指定javaType和jdbcType来指定,当这两个类型和配置中指定的一致,那么就会应用这个TypeHandler
MyBatis提供了两个枚举TypeHandler
- EnumTypeHandler 使用枚举字符串名称作为参数
- EnumOrdinalTypeHandler 使用枚举整数下标作为参数
package io.lilpig.mybatislearn.c01basic.pojo;

public enum Sex {

    MALE(1, "男"), FEMALE(2, "女");

    private int id;
    private String name;

    private Sex(int id, String name) {
        this.id = id;
        this.name = name;
    }

    public int getId() {
        return id;
    }

    public String getName() {
        return name;
    }
}
<typeHandlers>
    <typeHandler handler="org.apache.ibatis.type.EnumOrdinalTypeHandler"
                    javaType="io.lilpig.mybatislearn.c01basic.pojo.Sex"/>
</typeHandlers>
这里指定了javaType,如果在对应类的注解中也有配置,那么配置文件中的优先,对于jdbcType也是一样的。
映射器#
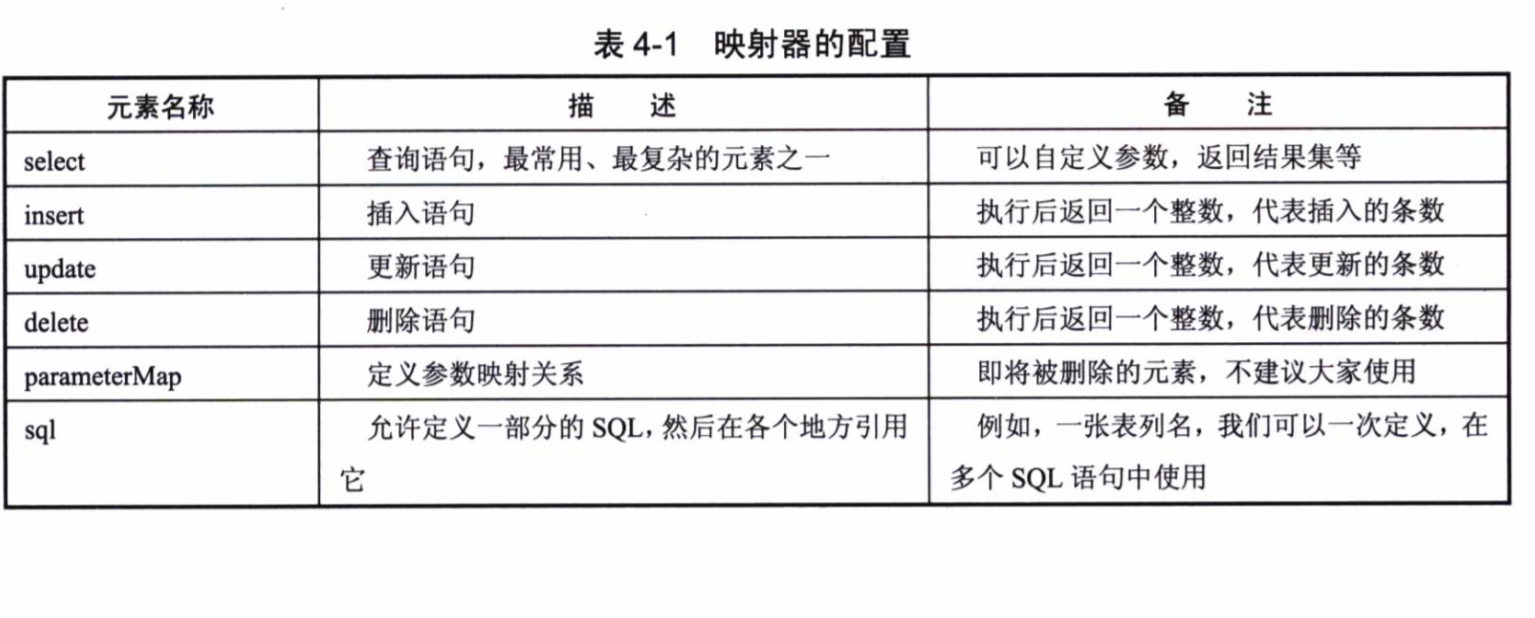
映射器就是mapper,其中可以定义如下元素
select元素#
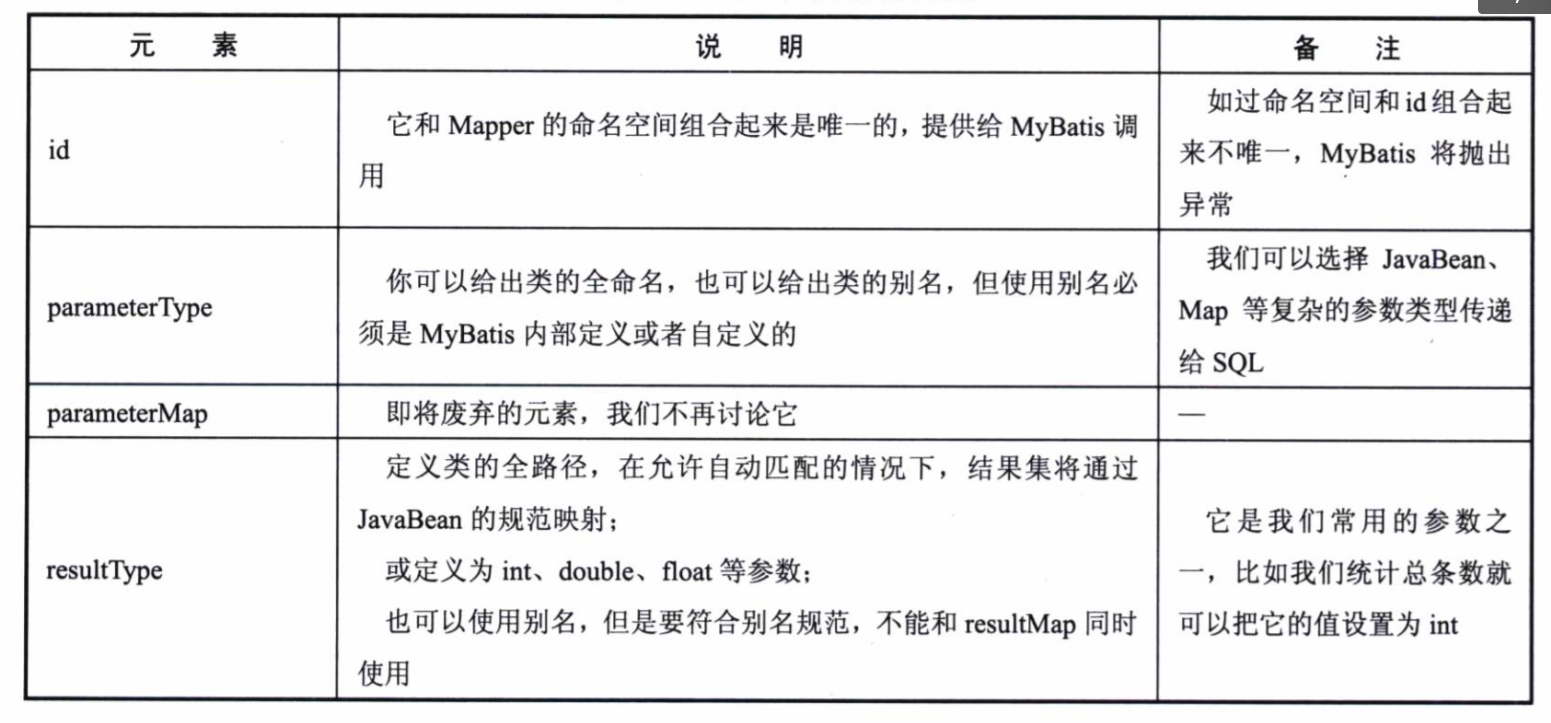
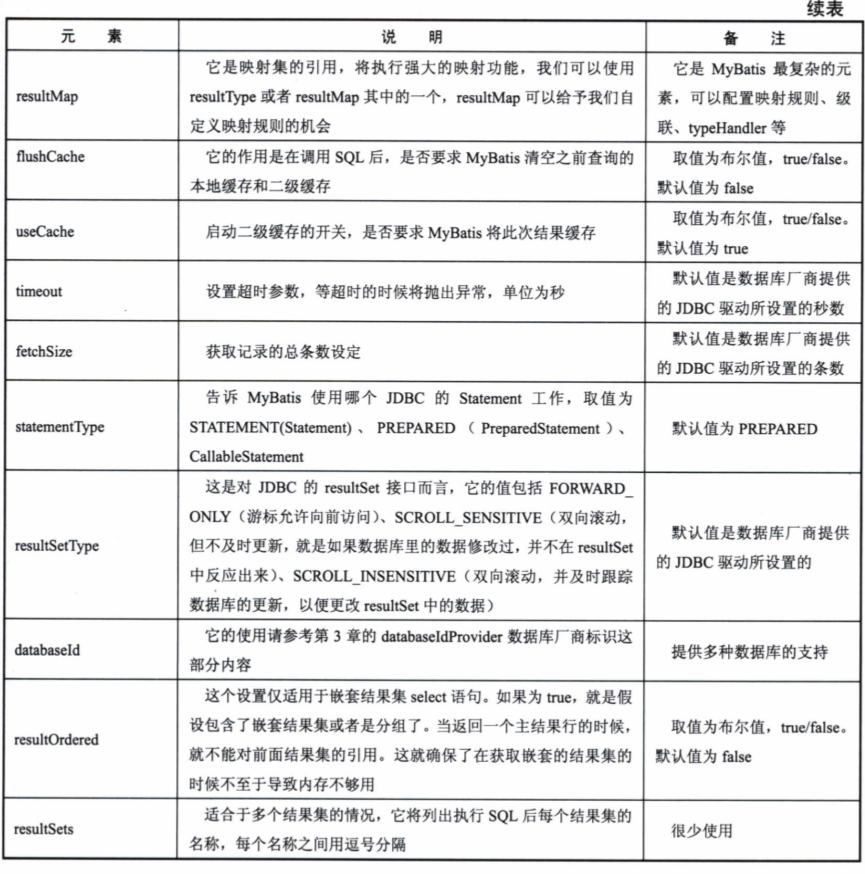
select定义一个查询,可以有如下属性
比如
<select id="getCountByFirstName" parameterType="string" resultType="int">
    SELECT count(*) FROM user WHERE first_name like contact(#{firstName},'%')
</select>
自动映射#
select语句的autoMappingBehavior不为NONE时,则会启用自动映射,会将结果集中的对应列自动映射为Java对象的对应属性。
如果在配置文件中配置开启驼峰命名方式,那么select语句会将数据库中的小写下划线命名方式转换为驼峰命名方式。
<configuration>
    <settings>
      <setting name="mapUnderscoreToCamelCase" value="true"/>
    </settings>
</configuration>
传递多个参数#
当需要传递多个参数时,可以使用Map
<select id="getRoleByNameAndSex" parameterType="map" resultType="role">
    SELECT * FROM role WHERE roleName=#{roleName}
        AND sex=#{sex, typeHandler=org.apache.ibatis.type.EnumOrdinalTypeHandler}
</select>
List<Role> getRoleByNameAndSex(Map<String,Object> map);
Map<String, Object> map = new HashMap<>();
map.put("roleName", "AFAsdf");
map.put("sex", Sex.FEMALE);

System.out.println(
        SqlSessionFactoryUtils.openSession()
                .getMapper(RoleMapper.class).getRoleByNameAndSex(map)
    );
还可以使用更简洁更加业务相关的注解
resultMap#
如果我们数据库和pojo对象的映射关系比较复杂,就可以使用resultMap
<resultMap id="roleResultMap" type="role">
    <id property="id" column="id"/>
    <result property="roleName" column="roleName" />
    <result property="note" column="note"/>
    <result property="sex" column="sex"/>
    <result property="createTime" column="createTime"
            typeHandler="io.lilpig.mybatislearn.typehandlers.DateToTimeStampTypeHandler"/>
</resultMap>
这里使用id和result将每个字段和pojo中的属性进行映射。对于createTime需要指定typeHandler来进行数据库中bigint到java中java.util.Date的转换(与反向转换)。
也可以通过指定javaType和jdbcType,MyBatis会自动寻找已经在配置文件中注册的,支持这两个类型的typeHandler
<result property="createTime" column="createTime"
            javaType="java.util.Date" jdbcType="BIGINT"/>
有几个疑问
- 既然使用
resultMap时需要指定typeHandler那么为什么使用resultType进行默认转换时不需要指定。 - 为什么
sex字段的enum转jdbc的int类型不需要指定typeHandler?
通过查阅文档大概理解了,如果一个TypeHandler在创建时没通过@MappedJdbcTypes指定jdbc类型,在注册时没通过jdbcType指定Jdbc类型,那么它所能够处理的类型信息就是javaType=[javaType], jdbcType=null,这是定义和注册阶段的事。而对于使用阶段,我估计在使用resultType进行默认转换时,MyBatis由于不能确定jdbc类型,就会使用javaType=[javaType]并忽略jdbcType进行查询,所以我们在默认转换时不用指定typeHandler。而在resultMap中,如果不指定typeHandler则会使用javaType=[javaType], jdbcType=null来进行查询,如果这时你的TypeHandler的jdbcType也没定义,也是null,那么就能够匹配上,第二个问题迎刃而解,因为那个EnumOrdinalTypeHandler没有定义jdbcType。
如果你希望你的处理器在指定JDBCType的同时,也能够接受jdbcType=null的处理器查询,那么,可以使用@MappedJdbcTypes(value = JdbcType.BIGINT, includeNullJdbcType = true)。
上面有说错的请指正
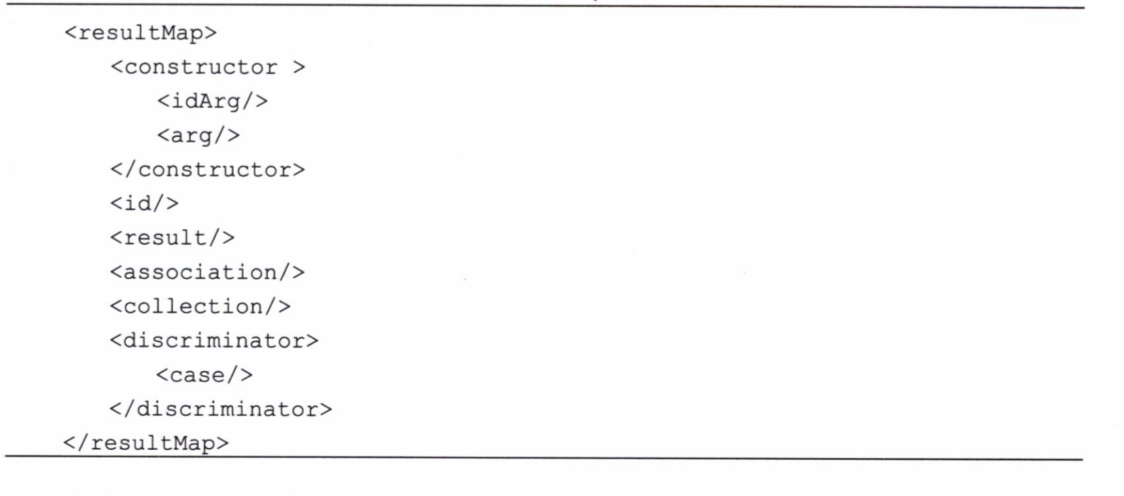
resultMap中可以有如下元素
当POJO中的构造方法中有参数时可以使用constructor
insert#
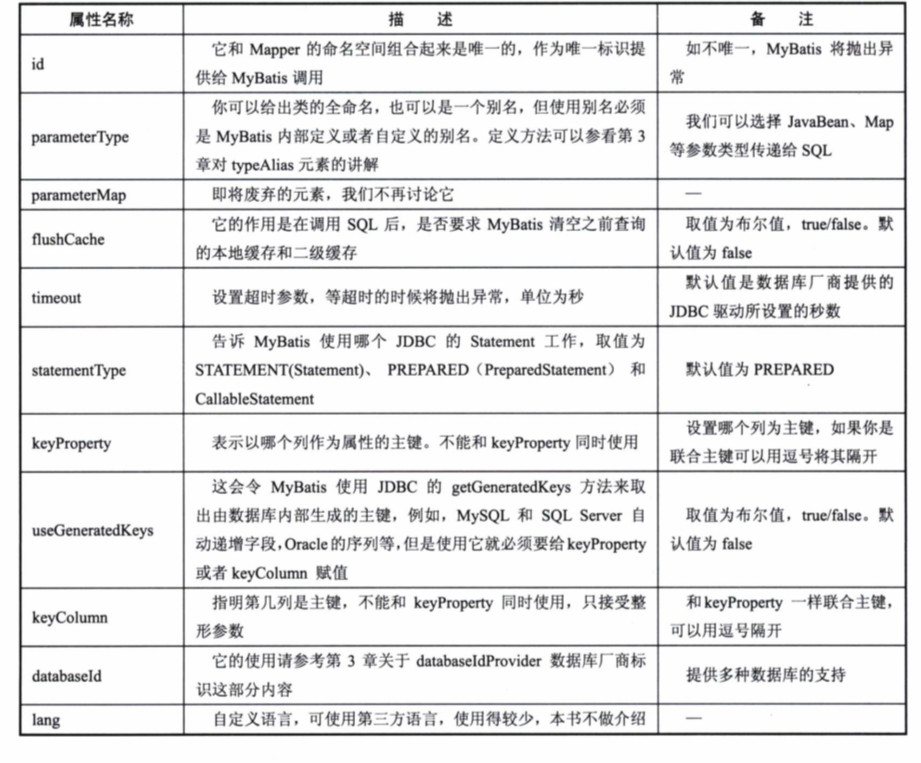
insert用于插入数据,返回插入几行,有如下可配置项
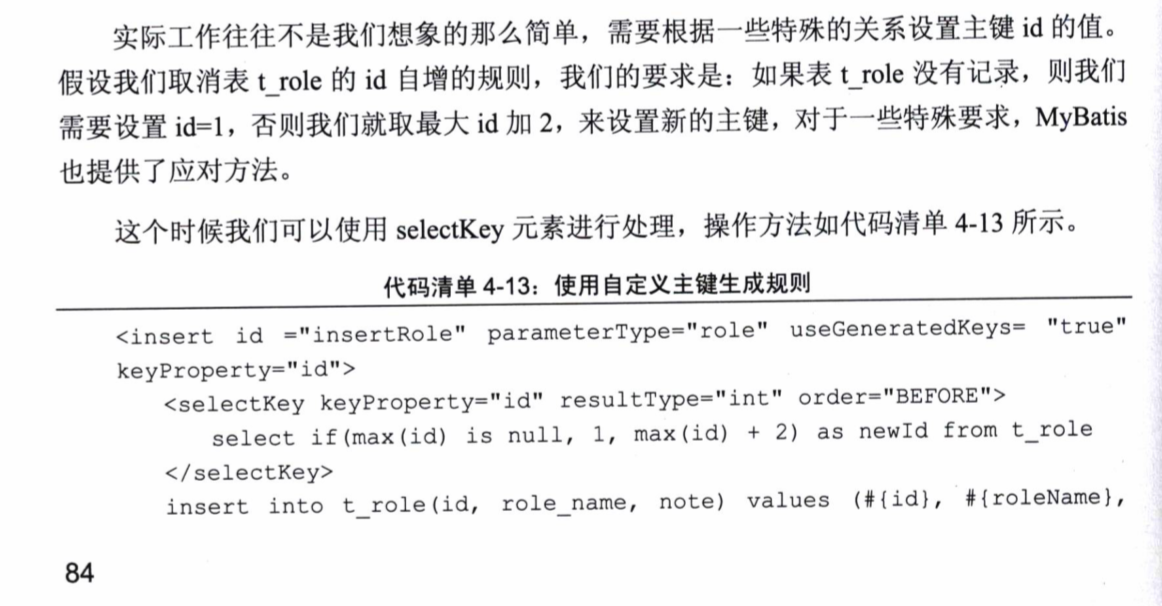
主键回填和自定义#
使用useGeneratedKeys和keyProperty的组合可以回填主键
<insert id="insertRole" parameterType="role" useGeneratedKeys="true" keyProperty="id">
    INSERT INTO role (roleName, note, createTime, sex)
        VALUES (#{roleName}, #{note},
                #{createTime, typeHandler=io.lilpig.mybatislearn.typehandlers.DateToTimeStampTypeHandler},
                #{sex, typeHandler=org.apache.ibatis.type.EnumOrdinalTypeHandler})
</insert>
update和delete#
略
参数配置#
对于可能返回null的值,MyBatis无法判断其jdbc类型,这时可以使用jdbcType来明确指定需要使用哪一个处理器处理
#{note, jdbcType=VARCHAR}
当然不设置一般情况下MyBatis的默认TypeHandler也能处理。
#和$#
#{}会对其中的参数进行转义,${}不会,当我们想动态在Java程序中传递SQL语句本身时我们可以使用${}
sql元素#
sql元素的目的是将冗长并经常复用的sql语句块定义成可复用的代码片段。
<sql id="values">
    (#{roleName}, #{note},
        #{createTime, typeHandler=io.lilpig.mybatislearn.typehandlers.DateToTimeStampTypeHandler},
        #{sex, typeHandler=org.apache.ibatis.type.EnumOrdinalTypeHandler})
</sql>
然后我们可以这样使用它
<insert id="insertRole" parameterType="role" useGeneratedKeys="true" keyProperty="id">
    INSERT INTO role (roleName, note, createTime, sex)
        VALUES <include refid="values"></include>
</insert>
级联#
级联允许将数据库中通过键的映射关系给直接转换成java对象的包含关系。
一对一级联#
一对一级联可以使用association。
假设我们有一个学生表,还有一个学生证表,学生和学生证是一对一关系,不过学生证有它特有的字段,所以不适合将它和学生存储在一个表中。
drop table if exists student;
drop table if exists selfcard;

create table student(
    id int primary key auto_increment,
    name varchar(10) not null,
    sex tinyint not null,
    selfcard_id int not null,
    note varchar(255)
);

create table selfcard(
    id int primary key auto_increment,
    student_id int not null,
    native_place varchar(60) not null,
    start_time bigint not null,
    end_time bigint not null,
    note varchar(255)
);

insert into student (name, sex, selfcard_id, note) VALUES ('于八', 0, 1, '品学兼优');
insert into selfcard (student_id, native_place, start_time, end_time, note) VALUES (1, 'M78', 1632796779000, 1632796779000, null);
这样我们建出了两个表,一个是学生一个是学生证。下面建立Java对象
public class Student {
    private Long id;
    private String name;
    private Sex sex;
    private SelfCard selfCard;
    private String note;
    // ...
}
public class SelfCard {
    private Long id;
    private String nativePlace;
    private Date startTime;
    private Date endTime;
    private String note;
    // ...
}
让Student类持有一个SelfCard对象,而不仅仅是保存SelfCard的id,之后再查询,前者是对于应用层开发来说更好的方式。
使用association关键字,property是student类中SelfCard属性的名字,column是作为SelfCard的外键的student的id(虽然这里没有显式使用外键),而select是定义在SelfCardMapper的一个查询方法,即通过学生id查询学生证。
<resultMap id="studentMap" type="student">
    <id property="id" column="id"/>
    <result property="name" column="name"/>
    <result property="sex" column="sex"/>
    <result property="note" column="note"/>
    <association property="selfCard" column="id"
                    select="io.lilpig.mybatislearn.c01basic.pojo.SelfCardMapper.findSelfCardByStudentId"/>
</resultMap>
<select id="getStudent" parameterType="long" resultMap="studentMap">
    SELECT * FROM student WHERE id=#{id}
</select>
<mapper namespace="io.lilpig.mybatislearn.c01basic.pojo.SelfCardMapper">
    <resultMap id="selfCard" type="io.lilpig.mybatislearn.c01basic.pojo.SelfCard">
        <id property="id" column="id"/>
        <result property="nativePlace" column="native_place"/>
        <result property="startTime" column="start_time" typeHandler="io.lilpig.mybatislearn.typehandlers.DateToTimeStampTypeHandler"/>
        <result property="endTime" column="end_time" typeHandler="io.lilpig.mybatislearn.typehandlers.DateToTimeStampTypeHandler"/>
        <result property="note" column="note"/>
    </resultMap>
    <select id="findSelfCardByStudentId" parameterType="long" resultMap="selfCard">
        SELECT id, native_place, start_time, end_time, note FROM selfcard WHERE student_id=#{studentId}
    </select>
</mapper>
当然,对应的接口自己创建。
collection#
用法和association没什么区别,只是这个是一对多
下面的例子给学生添加上课程和成绩信息,lecture表代表一门课程,它只有课程名和备注字段,student_lecture将学生表和课程表关联,实现了学生与学生选课的一对多关系,学生选课与学生选课成绩的一对一关系。
drop table if exists lecture;
drop table if exists student_lecture;

create table lecture(
    id int primary key auto_increment,
    name varchar(60) not null,
    note varchar(255)
);

create table student_lecture(
    id int primary key auto_increment,
    student_id int not null,
    lecture_id int not null,
    score decimal(16,2) not null,
    note varchar(255)
);

insert into lecture(name, note) VALUES ('离散数学',null);
insert into lecture(name, note) VALUES ('Java',null);
insert into lecture(name, note) VALUES ('概率统计',null);

insert into student_lecture(student_id, lecture_id, score, note) VALUES (1,1,100,null);
insert into student_lecture(student_id, lecture_id, score, note) VALUES (1,2,100,null);
insert into student_lecture(student_id, lecture_id, score, note) VALUES (1,3,100,null);
然后向学生字段中添加List<StudentLecture>,代表学生选课列表,一个学生可以有多个学生选课,所以一对多。
学生选课类StudentLecture又持有一个Lecture对象,用于记录该门课是什么课。
public class Student {
    // ...
    private List<StudentLecture> lectures;
    // ...
}

public class StudentLecture {
    private Long id;
    Lecture lecture;
    private Double score;
    private String note;
    // ...
}

public class Lecture {
    private Long id;
    private String name;
    private String note;
    // ...
}
然后学生mapper文件中的resultMap也得改,这里调用了StudentLectureMapper中的根据学号查找学生选课。
<resultMap id="studentMap" type="student">
    <!-- ... -->
    <collection property="lectures" column="id"
                select="io.lilpig.mybatislearn.c01basic.pojo.StudentLectureMapper.findStudentLecturesByStudentId"/>
</resultMap>
然后就是学生选课的mapper,这里同样用了association来查询lecture
<mapper namespace="io.lilpig.mybatislearn.c01basic.pojo.StudentLectureMapper">
    <resultMap id="studentLecture" type="io.lilpig.mybatislearn.c01basic.pojo.StudentLecture">
        <id property="id" column="id"/>
        <result property="score" column="score"/>
        <result property="note" column="note"/>
        <association property="lecture" column="lecture_id"
                     select="io.lilpig.mybatislearn.c01basic.pojo.LectureMapper.getLecture"/>
    </resultMap>

    <select id="findStudentLecturesByStudentId" resultMap="studentLecture">
        SELECT * FROM student_lecture WHERE student_id=#{studentId}
    </select>
</mapper>
下面是lecture mapper
<mapper namespace="io.lilpig.mybatislearn.c01basic.pojo.LectureMapper">
    <select id="getLecture" resultType="io.lilpig.mybatislearn.c01basic.pojo.Lecture">
        SELECT * FROM lecture WHERE id=#{id};
    </select>
</mapper>
延迟加载#
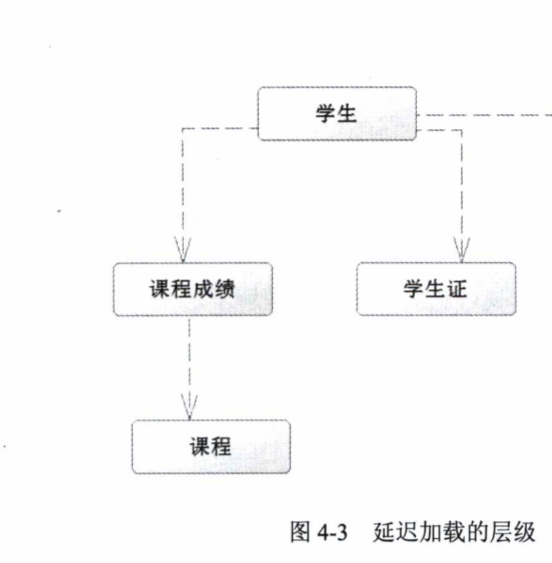
现在有一个问题,我们的层级关系越来越复杂,有时候我们只是想获取学生对象而不关心它的成绩,它的学生证等信息,但是现在MyBatis一股脑全部获取了。
在xml中编写设置,lazyLoadingEnabled代表是否启用延迟加载。延迟加载就是使用动态代理技术对getter进行封装,当调用getter获取对应值时再去发送SQL语句。
<settings>
    <setting name="lazyLoadingEnabled" value="true"/>
<!--        <setting name="aggressiveLazyLoading" value="true"/>-->
</settings>
现在我们的程序具有了延迟加载功能,如果只在代码里获取学生的话,只会发送一条语句
@Test
public void testLazyLoad() {
    StudentMapper mapper = SqlSessionFactoryUtils.openSession().getMapper(StudentMapper.class);
    Student student = mapper.getStudent(1l);
}
如果我们指定aggressiveLazyLoading为true,那么就是开启按层级的延时加载。默认没打开。
意思就是,当通过学生获取学生证时,由于课程成绩和学生证处于同一层级,那么课程成绩也会被加载,但是课程是下一层级的,它不会被加载。
关闭这个选项则用到哪个属性才加载哪个,不存在层级加载操作。
BUTTTT!!!!
还有些问题。
有的属性我们很常用,比如学生证,几乎是访问学生就要携带学生证信息,而课程成绩则是当学生主动查询时才会用到。
如果学生证是延时加载,那么就会分两次发送SQL语句,而不是一次发送两条,这又降低了性能。
可以在对应的association和collection上添加fetchType属性,有两个取值,lazy代表延迟加载,eager代表立即加载。
如下的代码指定了学生证的加载是立即加载,而课程信息没有指定,就应用默认的懒加载。
<resultMap id="studentMap" type="student">
    <association property="selfCard" column="id" fetchType="eager"
                    select="io.lilpig.mybatislearn.c01basic.pojo.SelfCardMapper.findSelfCardByStudentId"/>
    <collection property="lectures" column="id"
                select="io.lilpig.mybatislearn.c01basic.pojo.StudentLectureMapper.findStudentLecturesByStudentId"/>
</resultMap>
缓存#
MyBatis默认开启了一级缓存,一级缓存的作用范围是在一个SqlSession中。
如果运行下面的代码,会发现通过第一个SqlSession两次获取同一个学生对象,第二次没有发送SQL语句,而是使用了缓存。而通过第二个SqlSession再次获取相同的学生则重新发送了SQL语句。
@Test
public void testCache() {
    SqlSession sqlSession = SqlSessionFactoryUtils.openSession();
    StudentMapper mapper = sqlSession.getMapper(StudentMapper.class);
    System.out.println(mapper.getStudent(1l));
    System.out.println(mapper.getStudent(1l));

    SqlSession sqlSession2 = SqlSessionFactoryUtils.openSession();
    StudentMapper mapper2 = sqlSession2.getMapper(StudentMapper.class);
    System.out.println(mapper2.getStudent(1l));
}
这种缓存说实话有点鸡肋,没啥用啊。。。我们几乎很少在一次请求里两次获取同一个对象吧。
所以还得开启二级缓存,开启二级缓存非常困难,一般人学不会,需要在mapper文件中配置
<cache/>
配置完了。
现在开启了二级缓存。
记得在查询后添加commit,因为二级缓存只有提交后才有用。
@Test
public void testCache() {
    SqlSession sqlSession = SqlSessionFactoryUtils.openSession();
    StudentMapper mapper = sqlSession.getMapper(StudentMapper.class);
    System.out.println(mapper.getStudent(1l));
    sqlSession.commit();
    System.out.println(mapper.getStudent(1l));
    sqlSession.commit();

    SqlSession sqlSession2 = SqlSessionFactoryUtils.openSession();
    StudentMapper mapper2 = sqlSession2.getMapper(StudentMapper.class);
    System.out.println(mapper2.getStudent(1l));
    sqlSession.commit();
}
注:开启缓存必须将对应的类实现Serializable接口
默认情况下
- 映射文件中所有select语句会被缓存
- 映射文件中的insert、update、delete语句会刷新缓存
- 缓存使用默认的LRU算法(最近最少使用)
- read/write策略,可读写
我们也可以配置
<cache eviction="LRU" flushInterval="100000" size="1024" readOnly="true"/>
在语句中使用useCache和flushCache可以指定语句级别的缓存开关和刷新
<select id="selectUserAndJob" resultMap="JobResultMap2" useCache="true">
        select * from lw_user
</select>
作者:Yudoge
出处:https://www.cnblogs.com/lilpig/p/15347730.html
版权:本作品采用「署名-非商业性使用-相同方式共享 4.0 国际」许可协议进行许可。
欢迎按协议规定转载,方便的话,发个站内信给我嗷~









【推荐】国内首个AI IDE,深度理解中文开发场景,立即下载体验Trae
【推荐】编程新体验,更懂你的AI,立即体验豆包MarsCode编程助手
【推荐】抖音旗下AI助手豆包,你的智能百科全书,全免费不限次数
【推荐】轻量又高性能的 SSH 工具 IShell:AI 加持,快人一步
· AI与.NET技术实操系列:向量存储与相似性搜索在 .NET 中的实现
· 基于Microsoft.Extensions.AI核心库实现RAG应用
· Linux系列:如何用heaptrack跟踪.NET程序的非托管内存泄露
· 开发者必知的日志记录最佳实践
· SQL Server 2025 AI相关能力初探
· 震惊!C++程序真的从main开始吗?99%的程序员都答错了
· 【硬核科普】Trae如何「偷看」你的代码?零基础破解AI编程运行原理
· 单元测试从入门到精通
· winform 绘制太阳,地球,月球 运作规律
· 上周热点回顾(3.3-3.9)