Spring实战 十四 保护方法应用
概述
本篇笔记使用Spring Security提供方法级别的保护。
本篇笔记会给Spittr应用的各种方法提供保护,比如只允许管理员和Spitter发送Spittle。
先导知识:Spring实战 九 保护Web应用
本篇笔记会因为之前Spittr应用的API定义的不足而添加一些新方法,会大概说下这些方法的细节,尽管这些方法和Spring Security没什么关系
配置方法保护
就像页面级别的保护需要继承WebSecurityConfigurerAdapter一样,方法级别的保护需要继承GlobalMethodSecurityConfiguration,这两个类的用法风格一致,需要实现其中的configure方法让Spring Security能够从一个源中获取用户信息进行验证ss
@Configuration
@EnableGlobalMethodSecurity(securedEnabled = true)
public class GlobalMethodSecurityConfig extends GlobalMethodSecurityConfiguration {

    @Autowired
    private UserDetailsService service;

    @Override
    protected void configure(AuthenticationManagerBuilder auth) throws Exception {
        auth.userDetailsService(service)
                .passwordEncoder(new BCryptPasswordEncoder());
    }
}
通过@EnableGlobalMethodSecurity注解开启全局方法保护,并且我们把之前的UserDetailsService单独作为一个Bean注入了,而不是每次都new一个。
现在我们的应用就可以使用Spring提供的方法级别保护了。
@Secured注解
@Secured基于用户拥有的权限限制对方法的访问。类似的还有JSR-250提供的@RoleAllowed注解,这两个都能被Spring识别。
比如现在我们可以在SpittleRepository的addSpittle方法中添加这个注解,只允许Spitter和Admin访问这个方法。
@Secured({"ROLE_SPITTER","ROLE_ADMIN"})
int addSpittle(Spittle spittle);
注意,这个addSpittle是原来Spittr应用中没有的,使用jdbcTemplate实现类的实现如下
@Override
public int addSpittle(Spittle spittle) {
    return jdbcOperations.update(
            "INSERT INTO spittle (spitterId, message, createTime, latitude, longtitude) VALUES (?,?,?,?,?)",
            spittle.getSpitterId(), spittle.getMessage(),spittle.getTime().getTime(),spittle.getLatitude(),spittle.getLongtitude()
    );
}
而且我们还给Spittle添加了一个spitterId属性,用于标识该spittle由哪个用户发送。
Controller方法如下:
@GetMapping("/addSpittle")
public String addSpittle(Model model) {
    model.addAttribute("spittle", new Spittle());
    return "addSpittle";
}
页面如下,latitude和longtitude都是写死的:
<body>
    <h1>发布Spittle</h1>
    <form th:action="@{/spittles}" method="post" th:object="${spittle}">
        <label>Message</label>
        <textarea type="text" th:field="*{message}"></textarea> <br>
        <input type="hidden" name="latitude" value="20.0">
        <input type="hidden" name="longtitude" value="20.0">
        <button type="submit">发布</button>
    </form>
</body>
现在你去调用这个addSpittle控制器返回的页面进行添加,肯定需要登陆了。下面我们就来编写实际发送spittle的Controller代码
@PostMapping
public String postSpittle(
    @Valid Spittle spittle,
    @AuthenticationPrincipal SpitterDetials detials,
    Errors errors) {

    if (errors.hasErrors()){
        return "addSpittle";
    }
    spittle.setTime(new Date());
    spittle.setSpitterId(detials.getSpitter().getId());
    repository.addSpittle(spittle);
    return "redirect:spittles";
}
首先第一步,检测异常,如果有异常返回页面,如果没有就设置Spittle的时间和发送用户的id,然后才调用repository的addSpittle方法。说实话这些代码不应该由Controller处理,而是在Controller和Repository层中间再抽象出来一个Service层进行处理。
这个SpitterDetials是我们自己定义的类,复习一下,Spring需要一个UserDetailService来提供loadUserByUsername方法,Spring会在用户登陆时调用这个方法,这个方法返回一个UserDetails,包含用户密码和基本的用户信息,Spring会使用这个返回值校验用户名和密码是否正确以及用户是否已经disabled等,这是第九篇笔记的内容。之前我们使用的是Spring自带的UserDetails实现,如下是原来的代码:
@Override
public UserDetails loadUserByUsername(String s) throws UsernameNotFoundException {
    Spitter spitter = repository.getOneByUserName(s);
    if (spitter!=null) {
        List<GrantedAuthority> authorities = new ArrayList<>();
        authorities.add(new SimpleGrantedAuthority("ROLE_SPITTER"));

        return new User(spitter.getUserName(),
                new BCryptPasswordEncoder().encode(spitter.getPassword()),
                authorities);
    }
    throw new UsernameNotFoundException("User " + s + " not found!");
}
这个简单是简单,但是也有一个问题,我们项目中的用户类的一些属性无法设置到返回的UserDetails中,就比如刚刚我们需要在Controller中获取当前登录用户的Id并设置给Spittle对象,这样的需求它就没法满足。所以我们需要自定义一个UserDetails的实现类。
代码多,但很简单,我们只是多了一个将Spitter对象设置进去并提供getter方法的功能,其它的没动,至于下面的一堆is开头用于判断用户是否过期,用户是否启用等功能,我们的程序不需要,全部通过。
public class SpitterDetials implements UserDetails {
    private final Collection<? extends GrantedAuthority> authorities;
    private Spitter spitter;
    public SpitterDetials(Spitter spitter, Collection<? extends GrantedAuthority> authorities) {
        this.spitter = spitter;
        this.authorities = authorities;
    }

    public Spitter getSpitter() {
        return spitter;
    }

    @Override
    public Collection<? extends GrantedAuthority> getAuthorities() {
        return authorities;
    }

    @Override
    public String getPassword() {
        return new BCryptPasswordEncoder().encode(spitter.getPassword());
    }

    @Override
    public String getUsername() {
        return spitter.getUserName();
    }

    @Override
    public boolean isAccountNonExpired() {
        return true;
    }

    @Override
    public boolean isAccountNonLocked() {
        return true;
    }

    @Override
    public boolean isCredentialsNonExpired() {
        return true;
    }

    @Override
    public boolean isEnabled() {
        return true;
    }
}
下面我们就将这个SpitterDetails给声明成Bean
@Bean
public UserDetailsService userDetailsService(SpitterRepository repository) {
    return new SpitterUserService(repository);
}
修改loadUserByUserName
public UserDetails loadUserByUsername(String s) throws UsernameNotFoundException {
    Spitter spitter = repository.getOneByUserName(s);
    if (spitter!=null) {
        List<GrantedAuthority> authorities = new ArrayList<>();
        authorities.add(new SimpleGrantedAuthority("ROLE_SPITTER"));

        return new SpitterDetials(spitter,authorities);
    }
    //...
}
这样给addSpittle添加认证功能就实现了
登录成功自动跳转
现在我们的程序在登陆成功后不会跳转到登陆前的页面,而是跳转到首页,这是默认行为。
现在我们需要添加一个这个功能,思路就是先将登录前的URL缓存起来,登录成功后跳转过去。
对于缓存功能,我们可以使用requestCache
先定义一个基于HttpSession的RequestCache
@Bean
public RequestCache requestCache() {
    return new HttpSessionRequestCache();
}
然后在configure中配置
http.requestCache().requestCache(requestCache)
        .and()
        .formLogin()
        // ...
现在跳转到登录页面之前就会使用session记录url的变化。
然后就是登录成功后的跳转,这里我们需要给formLogin添加一个登录成功的监听
formLogin()
    .successHandler(successHandler)
这个成功监听哪里来呢?通过继承AuthenticationSuccessHandler,再将它声明为Bean再注入到安全配置类中
public class LoginSuccessHandler implements AuthenticationSuccessHandler {
    @Override
    public void onAuthenticationSuccess(HttpServletRequest request, HttpServletResponse response, FilterChain chain, Authentication authentication) throws IOException, ServletException {
        AuthenticationSuccessHandler.super.onAuthenticationSuccess(request, response, chain, authentication);
    }

    @Override
    public void onAuthenticationSuccess(HttpServletRequest httpServletRequest, HttpServletResponse httpServletResponse, Authentication authentication) throws IOException, ServletException {
        RequestCache cache = new HttpSessionRequestCache();
        SavedRequest savedRequest = cache.getRequest(httpServletRequest, httpServletResponse);
        String url = savedRequest.getRedirectUrl();
        httpServletResponse.sendRedirect(url);
    }
}
在登录成功的方法中我们先获取了RequestCache,然后跳转到登陆前的Url。
声明为Bean并自动注入
@Autowired
private AuthenticationSuccessHandler successHandler;

@Bean
public AuthenticationSuccessHandler authenticationSuccessHandler() {
    return new LoginSuccessHandler();
}
现在自动跳转功能配置好了。
表达式实现方法级别的安全性
Spring提供了四个注解可以使用SpEL来在方法调用前后来进行保护方法的操作。

在使用之前,需要在@EnableGlobalMethodSecurity注解上设置prepostEnable=true
@EnableGlobalMethodSecurity(securedEnabled = true, prePostEnabled = true)
@PreAuthorize注解
如下@PreAuthorize注解和之前的@Secured注解功能一致,但是@PreAuthorize的功能并不仅限于此。
//@Secured({"ROLE_SPITTER","ROLE_ADMIN"})
@PreAuthorize("hasAnyRole('ROLE_SPITTER', 'ROLE_ADMIN')")
int addSpittle(Spittle spittle);
如下注解的功能是,如果用户是ROLE_PREMIUM那么不对它上传的spittle做字数限制,否则限制spittle为140字以内。
@PreAuthorize("hasRole('ROLE_PREMIUM') or" +
        " (hasRole('ROLE_SPITTER') and #spittle.message.length() < 140)")
int addSpittle(Spittle spittle);
@PostAuthorize注解
@PostAuthorize注解常用于在方法调用之后才能确定是否具有权限的时候使用。
比如getSpittleById方法,我们想让返回spiitle的username和当前Spitter的username一致时再成功返回,这时我们可以使用@PostAuthorize注解
@PostAuthorize("returnObject.spitter.userName == principal.username")
public Spittle getSpittleById(Long id);
由于该方法首先要执行完成,所以像修改Spittle这种方法并不适合使用@PostAuthorize,因为当你发现用户不是上传spittle的用户时,对应的spittle也已经修改完了。
过滤方法输入输出
有时需要的不是将用户拦截到方法之外,而只是对方法的输入输出进行过滤。比如有一个批量删除Spittle的方法传入List<Spittle>,如果传入的Spittle不是用户上传的那么我们就将这个Spittle从列表中移除,如果是管理员则可以无视这条规则。
@Secured({"ROLE_SPITTER","ROLE_ADMIN"})
@PreFilter("hasRole('ROLE_ADMIN') or "+
            "filterObject.spitter.userName == principal.name")
public void deleteSpittles(List<Spittle> spittles);
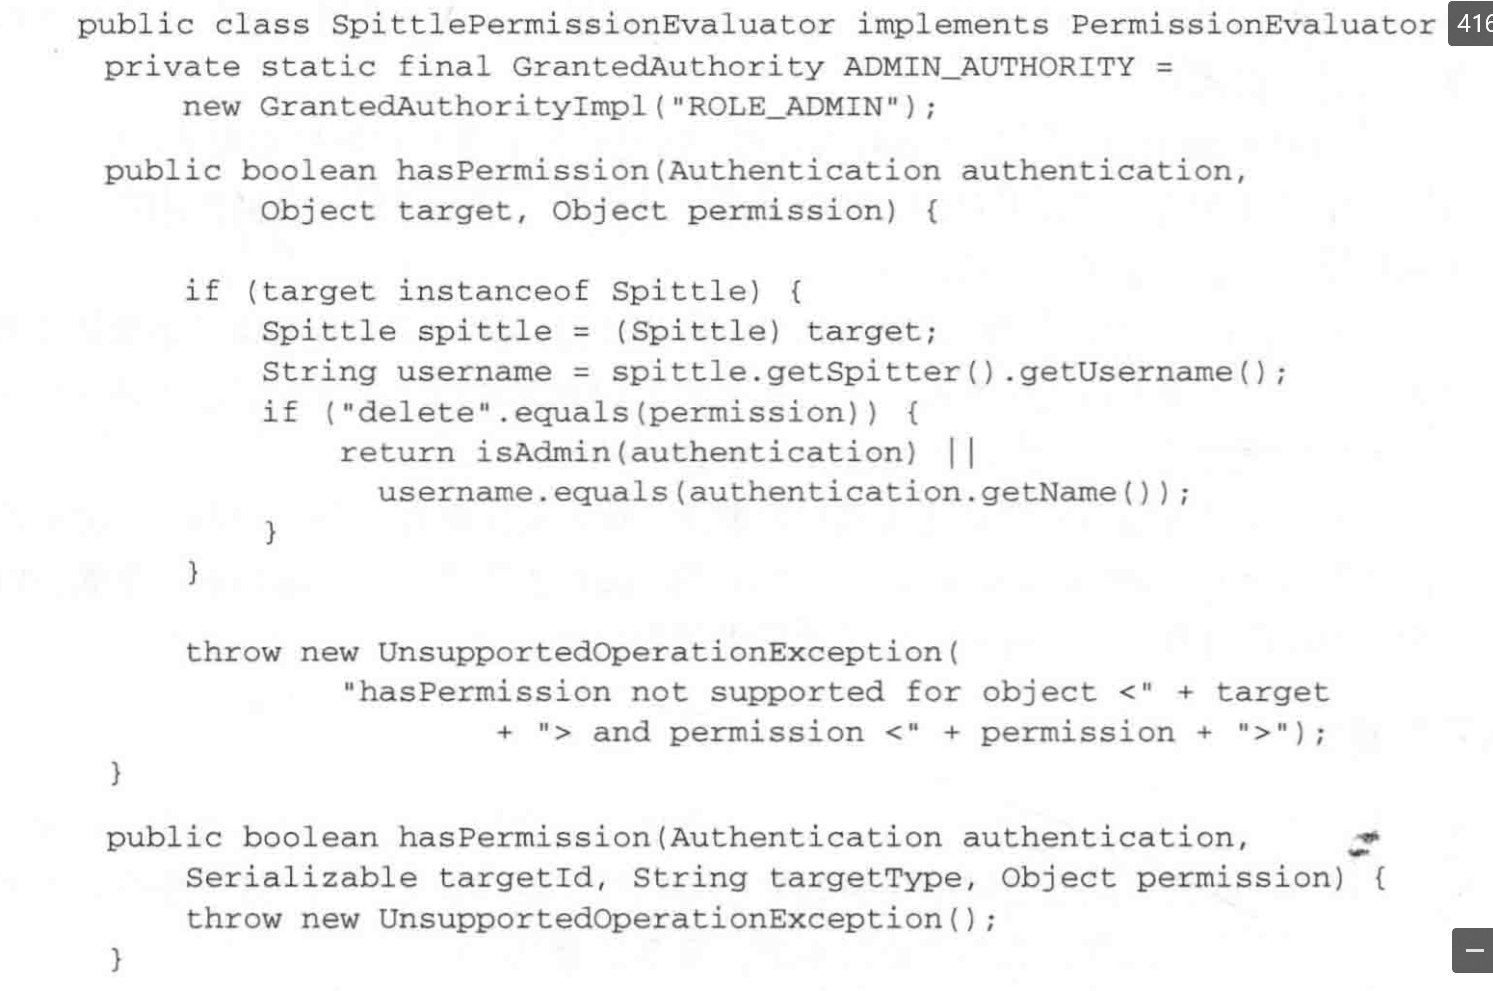
许可计算器
SpEL应付一些小的过滤规则还行,如果碰到更大一点的过滤规则,那么注解中的过滤字符串会不断膨胀,而且注解中的IDE支持很差,可读性和可维护性都很差。这时就需要定义许可计算器了。

注意要重载GlobalMethodSecurityConfiguration的方法


