Spring实战 十二十三 NoSQL数据库和缓存
整合MongoDB
很多情况下关系型数据库并不是很合适,比如博客园的评论系统,使用关系型数据库就显得庞大。文档型数据库比较适合这个需求。
导包
导入如下包
<dependencyManagement>
    <dependencies>
        <dependency>
            <groupId>org.springframework.data</groupId>
            <artifactId>spring-data-bom</artifactId>
            <version>${spring.data.version}</version>
            <scope>import</scope>
            <type>pom</type>
        </dependency>
    </dependencies>
</dependencyManagement>


<dependency>
    <groupId>org.springframework.data</groupId>
    <artifactId>spring-data-mongodb</artifactId>
</dependency>

<dependency>
    <groupId>org.mongodb</groupId>
    <artifactId>mongodb-driver-core</artifactId>
    <version>4.0.4</version>
</dependency>

<dependency>
    <groupId>org.mongodb</groupId>
    <artifactId>mongodb-driver-sync</artifactId>
    <version>4.0.4</version>
</dependency>
类似于Spring Data JPA,Spring Data MongoDB将Java对象映射为文档。
配置
我们需要编写配置类,@EnableMongoRepositories和@EnableJpaRepositories作用差不多,扫描某个包下的持久层接口,生成对应实现。
@Configuration
@EnableMongoRepositories("io.lilpig.springnosql.web.repositories")
@ComponentScan("io.lilpig.springnosql.web.repositories")
public class DBConfig {

    @Bean
    public MongoClientFactoryBean mongo() {
        MongoClientFactoryBean factoryBean = new MongoClientFactoryBean();
        factoryBean.setHost("localhost");
        return factoryBean;
    }

    @Bean
    public MongoTemplate mongoTemplate(MongoClient mongoClient) {
        return new MongoTemplate(mongoClient, "OrdersDB");
    }

}
MongoClientFactoryBean返回一个MongoClient,在这里可以做一些Mongo服务器的配置,因为我们是测试环境,所以也没有认证什么的,显得很简单。 MongoTemplate和其它的数据库Template差不多,就是提供一些持久层方法将对象保存到数据库中。
编写实体类
同时,我们需要为Pojo类上添加注解,用于将对象转换成文档数据

@Document
public class Order {
    @Id
    private Long id;
    @Field("client")
    private String customer;
    private String type;
    private Collection<Item> items = new LinkedHashSet();
    // 省略getter setter
}
上面的例子中,@Document表明该类代表Mongo数据库中的一个文档,@Id代表该字段为文档id,@Field字段和别名的功能差不多,用于将字段名映射到文档中的名字。
Item类如下,它并不需要标注任何注解,因为在文档数据库中它只是作为Order的一个属性,而不是单独的一个集合。
public class Item {
    private Long id;
    private Order order;
    private String product;
    private double price;
    private int quantity;
}
编写Repository
下面我们使用MongoTemplate创建Repository
@Repository
public class OrderRepository {
    @Autowired
    MongoOperations mongo;

    public void save(Order order) {
        mongo.save(order, "order");
    }

    public Order findById(Long id) {
        return mongo.findById(id, Order.class);
    }

    public List<Order> findChuckAndWeb() {
        return mongo.find(
                Query.query(
                        Criteria.where("customer").is("Chunk Wagon")
                            .and("type").is("WEB")
                ), Order.class
        );
    }
}
MongoOperations和JdbcOperations一样,只是MongoTemplate的抽象。
同时也可以继承MongoRepository,自动化实现Repository。
缓存
这本书里的缓存篇已经过时很久了,没法正常运行,新的看起来很懵,推荐两篇缓存相关的文章作为先导知识
javax.cache中定义了一套缓存API
<dependency>
    <groupId>javax.cache</groupId>
    <artifactId>cache-api</artifactId>
    <version>1.1.1</version>
</dependency>
这套缓存API规范了Java中缓存系统的样貌,分Cache、CacheManager、CachingProvider和Configuration模块。
Cache就是存储缓存的类,使用起来和Map差不多,有如下API

CacheManager是缓存管理器,我们通过它建立、配置和关闭缓存。
CachingProvider用来创建管理CacheManager的生命周期。
Configuration就是缓存的配置。
最简单的缓存配置如下:

至此,已经可以在Spring项目中使用缓存了,@EnableCaching通知Spring开启缓存系统,ConcurrencyMapCacheManager看名字就知道是使用ConcurrencyMap实现的缓存管理器。这个缓存管理器在生产中不太够用,使用更加高级的实现。
使用EhCache
ehcache是一个Java缓存实现。我们在导入它的同时也要导入spring-context-support,提供了一些更高级的Spring中的缓存支持。
<dependency>
    <groupId>org.springframework</groupId>
    <artifactId>spring-context-support</artifactId>
    <version>${spring.version}</version>
</dependency>

<!-- https://mvnrepository.com/artifact/net.sf.ehcache/ehcache -->
<dependency>
    <groupId>net.sf.ehcache</groupId>
    <artifactId>ehcache</artifactId>
    <version>2.10.6</version>
</dependency>
这里我们使用了EhCache的实现,指定了一个本地Ehcache配置路径,EhCacheManagerFactoryBean返回一个EhCache中的CacheManager对象,我们需要用Spring的CacheManager将它包装起来。
@Configuration
@EnableCaching
public class CacheConfig {

    @Bean
    public EhCacheManagerFactoryBean factoryBean() {
        EhCacheManagerFactoryBean factoryBean = new EhCacheManagerFactoryBean();
        factoryBean.setConfigLocation(new ClassPathResource("ehcache.xml"));
        return factoryBean;
    }

    @Bean
    public CacheManager cacheManager(net.sf.ehcache.CacheManager cacheManager) {
        return new EhCacheCacheManager(cacheManager);
    }

}
如下是配置文件
<?xml version="1.0" encoding="UTF-8"?>
<ehcache xmlns:xsi="http://www.w3.org/2001/XMLSchema-instance"
         xsi:noNamespaceSchemaLocation="http://ehcache.org/ehcache.xsd"
         updateCheck="false" monitoring="autodetect" dynamicConfig="true">

    <diskStore path="java.io.tmpdir"/>

    <defaultCache
            maxElementsInMemory="10000"
            eternal="false"
            timeToIdleSeconds="120"
            timeToLiveSeconds="120"
            overflowToDisk="true"
            maxElementsOnDisk="10000000"
            diskPersistent="false"
            diskExpiryThreadIntervalSeconds="120"
            memoryStoreEvictionPolicy="LRU"/>
    <cache name="spitterCache"
        maxElementsInMemory="1000"
        eternal="false"
        overflowToDisk="true"
        timeToIdleSeconds="300"
        timeToLiveSeconds="600"/>
</ehcache>
使用缓存系统
配置了半天,现在试试这玩意儿得劲不得劲儿。
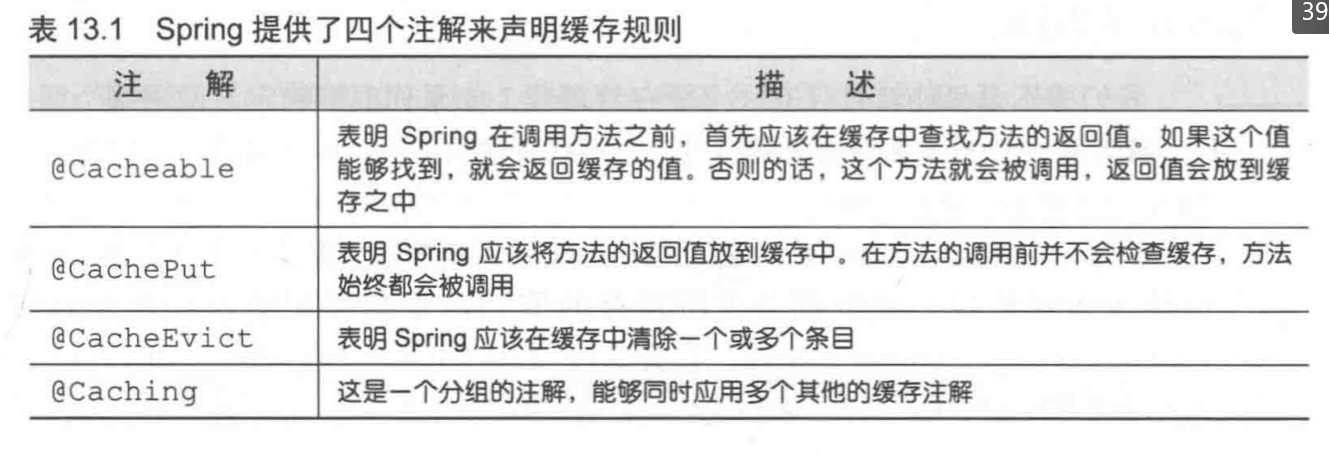
Spring使用AOP技术,提供了四个注解,在调用方法后执行相应的缓存操作。建议在此之前,先去看看前面推荐到前导文章,了解非Spring下的缓存系统是如何使用的。

@Cacheable
@Cacheable注解代表该方法的返回值需要缓存起来,下次调用时,如果之前通过本次的参数调用过该方法,并且已经将结果存到缓存中了,那么就直接使用缓存中的结果。
一般用在查询上,指定一个缓存名。
public interface SpitterRepository {
    int save(Spitter spitter);
    @Cacheable("spitterCache")
    Spitter getOne(Long id);
    @Cacheable("spitterCache")
    Spitter getOneByUserName(String username);
}
我们在接口上添加注解,接口的实现类都会应用缓存功能。这里将使用id查询Spitter和使用username查询spitter的结果缓存起来,下次如有相同的id和用户名调用这些方法,会先去缓存中查找是否已经有了这些结果,如果有就不再进行方法调用,直接返回缓存的结果。
@CachePut
@CachePut("spitterCache")
int save(Spitter spitter);
@Cacheput也是向缓存中存储数据,但是它是不管缓存中是否已有该数据,而是每次调用都更新缓存中的数据,将它放在save方法上非常合适。
该方法有个问题,默认是使用参数作为缓存的key的,那么我们这里就是使用Spitter类型的Key存了一个Spitter类型的值。。。并且在getOne方法中,这个没法复用,getOne方法感知不到数据库中的值已经发生变化,仍然使用缓存中的数据。
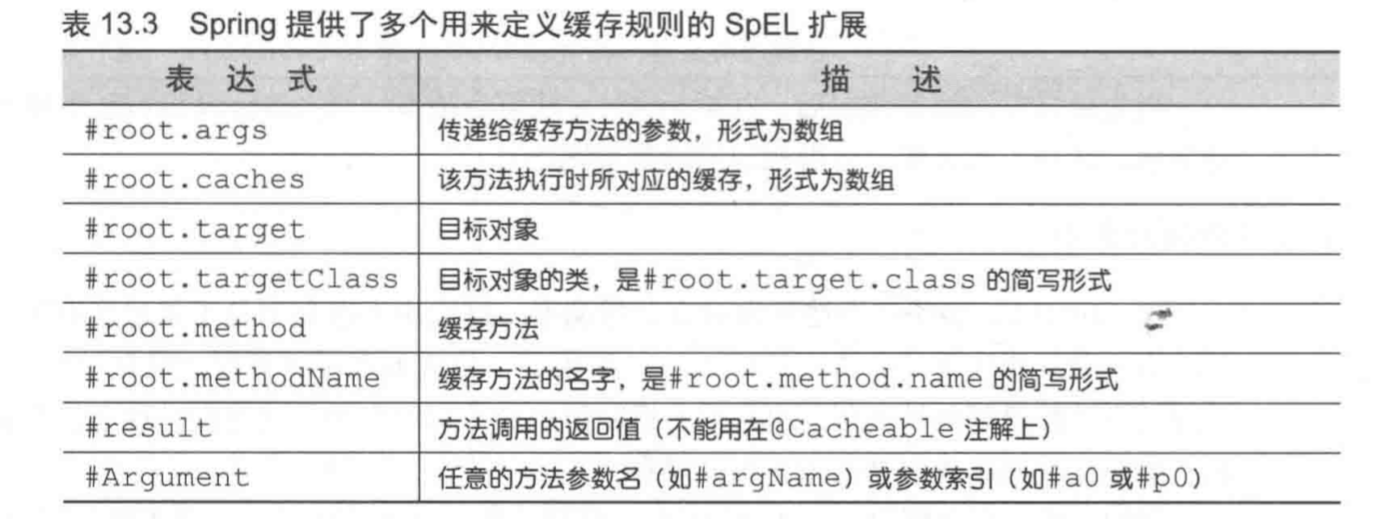
下面使用key参数来指定存储的缓存的key,值是一个SpEL表达式。
@CachePut(value = "spitterCache", key="#spitter.id")
int save(Spitter spitter);
可以使用如下SpEL扩展语法

除了id,还有使用username作为key进行缓存的spitter数据,我们要让spitter更新时,username作为key的缓存数据也能感知到,避免客户端获得陈旧的数据。但java语言限制,我们不能在一个方法上使用两个@CachePut
@Caching
@Caching用于将多个注解添加在一起
@Caching(
    put = {
        @CachePut(value = "spitterCache", key = "#spitter.id"),
        @CachePut(value = "spitterCache", key = "#spitter.userName")
    }
)
int save(Spitter spitter);
@CacheEvict
@CacheEvict用于移除缓存条目
@CacheEvict("spitterCache")
int remove(Long id);
条件化缓存
unless代表如果条件不满足,那么放到缓存中,condition代表条件满足放到缓存中


