Spring实战 三 高级装配
先导
Profile
项目会经历各种阶段,比如开发阶段,测试阶段,生产阶段等等。
不同的阶段往往需要使用不同的配置。比如你在开发阶段可能使用一个很简单的内嵌数据库,并且使用很持有连接很少的连接池。但是在生产阶段这些东西会完全不同。
Spring的Profile结合Bean依赖注入,可以让你想要的东西就像一个组件一样被注入到开发的各个阶段中,这也许就是@Component之所以叫这个名字吧。
基于JavaConfig配置Profile
还是上一个笔记中的例子,再简要介绍一下
interface MediaPlayer  一种媒体播放器
interface CompactDisc  CD盘接口
class CDPlayer  CD播放器,实现自MediaPlayer
class SgtPeppers  一张披头士乐队的CD,实现自CompactDisc
在上一个笔记中我们的例子运行完好,但是现在我觉得CDPlayer对于开发阶段太笨重了,我们编写了一个更简单的实现(虽然代码量上差不多-_-||)。我们希望在开发环境中使用SimpleCDPlayerImpl,在项目实际投入生产之后再使用CDPlayer。
public class SimpleCDPlayerImpl implements MediaPlayer{

    @Autowired private CompactDisc cd;

    @Override
    public void play() {
        System.err.println("This implemention (SimpleCDPlayerImpl) is can only used in dev environment.");
        cd.play();
    }
}
那么我们可以创建两个Configuration类,下面的这个用于开发环境,我们通过@Profile标签给了它一个环境名,方便日后指定。
@Configuration
@Profile("dev")
public class CDPlayerDevConfiguration {

    @Bean
    public CompactDisc setCompactDisc(){
        return new SgtPeppers();
    }

    @Bean
    public MediaPlayer setMediaPlayer(CompactDisc cd) {
        // 使用简单实现
        return new SimpleCDPlayerImpl();
    }
}
第二个配置类用于生产环境,还是通过@Profile设置,这次它的环境名是prod。
@Configuration
@Profile("prod")
public class CDPlayerProdConfiguration {

    @Bean
    public CompactDisc setCompactDisc(){
        return new SgtPeppers();
    }

    @Bean
    public MediaPlayer setMediaPlayer(CompactDisc cd) {
        // 使用复杂实现
        return new CDPlayer(cd);
    }
}
这样就可以辣!!!
这样就定义了两个环境,如何在运行时指定一个环境呢!?之后再说,目前我们只是简单的看看使用JUnit测试时如何指定。
@RunWith(SpringJUnit4ClassRunner.class)
@ContextConfiguration(classes = {CDPlayerDevConfiguration.class, CDPlayerProdConfiguration.class})
@ActiveProfiles("dev")
public class ProfileTest {
    @Autowired
    private MediaPlayer player;

    @Test
    public void testPlay() {
        player.play();
    }
}
其它的代码都没区别,我们在@ContextConfiguration时指定了两个配置文件,然后使用@ActiveProfiles指定了使用dev环境,那么使用@Profile("dev")注解的类的Bean会被解析,而@Profile("prod")中的Bean会被忽略。
当指定了一个环境之后,其他环境中定义的Bean都会被忽略,而没有指定环境的Bean会正常解析。这样我们可以看出上面的配置类中setCompactDisc可以被提取到一个单独的配置中,因为两个环境里都有它。
Spring3.2起,除了将Profile注解应用在配置类上,还可以应用在Bean上,这是两种思路,一种是把相同的环境中的Bean写在一起,一种是把相关的组件写在一起。
// 把CDPlayer相关的Bean都写到一个配置类中
@Configuration
public class CDPlayerConfiguration {
    @Bean
    public CompactDisc setCompactDisc(){
        return new SgtPeppers();
    }

    @Bean
    @Profile("prod")
    public MediaPlayer setMediaPlayerProd(CompactDisc cd) {
        return new CDPlayer(cd);
    }
    @Bean
    @Profile("dev")
    public MediaPlayer setMediaPlayerDev(CompactDisc cd) {
        return new SimpleCDPlayerImpl();
    }
}
基于XML配置Profile
在<beans>中设置profile属性来声明一个环境的配置文件。
下面使用配置文件完成上面的操作
<!-- filename: cdplayer-dev.xml -->
<?xml version="1.0" encoding="UTF-8" ?>
<beans xmlns="http://www.springframework.org/schema/beans"
       xmlns:xsi="http://www.w3.org/2001/XMLSchema-instance" xmlns:aop="http://www.springframework.org/schema/aop"
       xmlns:context="http://www.springframework.org/schema/context"
       xsi:schemaLocation="http://www.springframework.org/schema/beans
            http://www.springframework.org/schema/beans/spring-beans-4.0.xsd
            http://www.springframework.org/schema/aop
            http://www.springframework.org/schema/aop/spring-aop-4.0.xsd
            http://www.springframework.org/schema/context
            http://www.springframework.org/schema/context/spring-context-4.0.xsd"
       profile="dev">
       <!-- 上面一行,指定该配置文件中的bean在dev环境中生效 -->

    <bean id="sgtpeppers" class="io.lilpig.springlearn.springlearn01.chapter03.profile01.SgtPeppers"/>
    <!-- 使用简单实现 -->
    <bean id="cdplayer" class="io.lilpig.springlearn.springlearn01.chapter03.profile01.SimpleCDPlayerImpl"/>

</beans>
<!-- filename: cdplayer-prod.xml -->
<?xml version="1.0" encoding="UTF-8"?>
<beans xmlns="http://www.springframework.org/schema/beans"
       xmlns:xsi="http://www.w3.org/2001/XMLSchema-instance"
       xmlns:c="http://www.springframework.org/schema/c"
       xmlns:p="http://www.springframework.org/schema/p"
       xmlns:util="http://www.springframework.org/schema/util"
       xsi:schemaLocation="
            http://www.springframework.org/schema/util
            http://www.springframework.org/schema/util/spring-util-4.0.xsd
            http://www.springframework.org/schema/beans
            http://www.springframework.org/schema/beans/spring-beans-4.0.xsd
            http://www.springframework.org/schema/context
            http://www.springframework.org/schema/context/spring-context-4.0.xsd"
       profile="prod">
       <!-- 上面一行,指定该配置文件中的bean在prod环境中生效 -->

    <bean id="sgtpeppers" class="io.lilpig.springlearn.springlearn01.chapter03.profile01.SgtPeppers"/>
    <!-- 使用复杂实现 -->
    <bean id="cdplayer" class="io.lilpig.springlearn.springlearn01.chapter03.profile01.CDPlayer"/>

</beans>
然后再使用测试类,这次我们指定xml文件作为配置类。
@RunWith(SpringJUnit4ClassRunner.class)
@ContextConfiguration(value = {
        "classpath:cdplayer-dev.xml",
        "classpath:cdplayer-prod.xml"
})
@ActiveProfiles("dev")
public class ProfileTest2 {

    @Autowired private MediaPlayer player;

    @Test
    public void testPlay() {
        player.play();
    }
}
你也可以把不同的环境配置到一个文件中
<?xml version="1.0" encoding="UTF-8" ?>
<beans xmlns="http://www.springframework.org/schema/beans"
       xmlns:xsi="http://www.w3.org/2001/XMLSchema-instance" xmlns:aop="http://www.springframework.org/schema/aop"
       xmlns:context="http://www.springframework.org/schema/context"
       xsi:schemaLocation="http://www.springframework.org/schema/beans
            http://www.springframework.org/schema/beans/spring-beans-4.0.xsd
            http://www.springframework.org/schema/aop
            http://www.springframework.org/schema/aop/spring-aop-4.0.xsd
            http://www.springframework.org/schema/context
            http://www.springframework.org/schema/context/spring-context-4.0.xsd">


    <!-- 公共bean -->
    <bean id="sgtpeppers" class="io.lilpig.springlearn.springlearn01.chapter03.profile01.SgtPeppers"/>

    <!-- dev环境 -->
    <beans profile="dev">
        <bean id="cdplayer" class="io.lilpig.springlearn.springlearn01.chapter03.profile01.SimpleCDPlayerImpl"/>
    </beans>

    <!-- prod环境 -->
    <beans profile="prod">
        <bean id="cdplayer" class="io.lilpig.springlearn.springlearn01.chapter03.profile01.CDPlayer"/>
    </beans>

</beans>
激活Profile
Spring有两个参数控制当前有哪些Profile处于激活状态,第一个是spring.profiles.active,它代表当前激活的Profile们,没错,可以同时激活多个Profile。第二个是spring.profiles.default,它代表spring.profiles.active缺省状态下激活的的Profile们。
大多数人的用法是在开发环境中使用spring.profiles.default让开发环境的Profile激活,并且不设置spring.profiles.active,测试阶段和生产阶段时,它们各自去设置各自的spring.profiles.active。
设置这两个属性有几种方法:
- 作为DispatcherServlet的参数(SpringWeb的默认Servlet,所有的请求经过它转发)
- 作为Web应用的上下文参数
- 作为JNDI条目
- 作为环境变量
- 作为JVM的系统属性
- 在集成测试类上使用
@ActiveProfiles注解
嘶,有些看不懂,没事,我也看不懂,后面知识积累起来了就好了。
条件化定义Bean
除了Profile外,Spring还提供了更加灵活的Bean定义方式,就是使用@Conditional注解进行条件化定义Bean。SpringBoot中大量使用了这个。
条件化定义就是你在定义Bean的时候使用@Conditional注解指定一个条件(比如某个类已经被加载),当条件满足时该Bean就生效。
如何方便的在注解中编写条件,并且让这个条件很方便进入到Spring环境中进行各种各样的检测?显然单单让用户为注解提供一个布尔值不行。Spring的解决办法是在@Conditional注解中指定一个类,这个类是Condition的一个实现类,提供一个matches方法,在matches方法中Spring会传入和环境相关的一些参数,你可以利用这些参数完成一次判断,并返回一个布尔值。
如下Condition实现类获取当前的Spring运行时环境,并且检测其中是否有magic属性。
public class MagicPropExistsCondition implements Condition {
    @Override
    public boolean matches(ConditionContext conditionContext, AnnotatedTypeMetadata annotatedTypeMetadata) {
        Environment env = conditionContext.getEnvironment();
        return env.containsProperty("magic");
    }
}
但凡使用@Conditional(MagicPropExistsCondition.class)的Bean,都会被Spring调用MagicPropExistsCondition中的matches方法,检测环境中是否包含magic属性,如果不包含就不会创建这个Bean。
ConditionContext是一个接口,其中定义了如下方法

getRegistry返回BeanDefinitionRegistry用于检测Bean定义getBeanFactory返回ConfigurableListableBeanFactory用于检测Bean是否存在,探查Bean的属性getEnvironment用于检查环境变量是否存在以及它的值getResourceLoader返回ResourceLoader可以用于检查它加载的资源getClassLoader返回ClassLoader检查类是否存在
有些陌生的东西,先忽略就好。
AnnotatedTypeMetadata也是一个接口,其中的方法如下
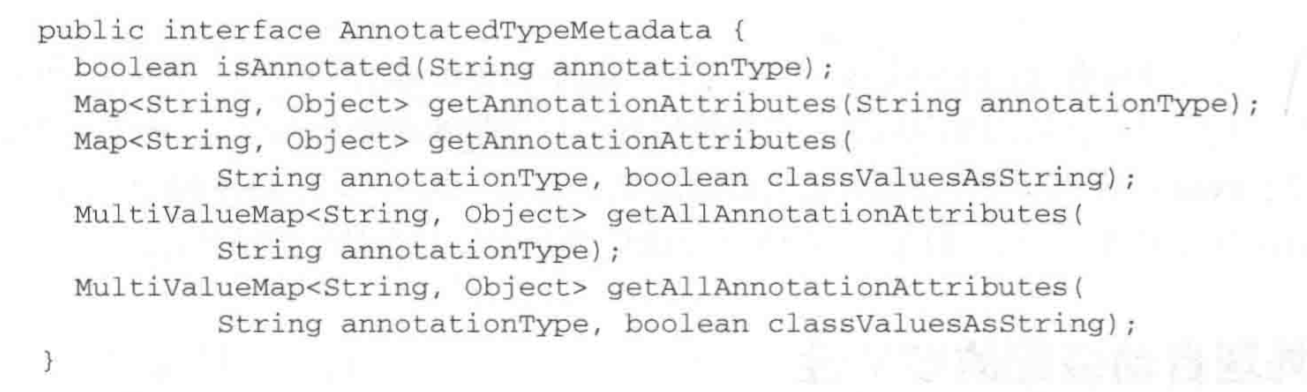
其中isAnnotated用于检测Bean是否还标注了其他注解。其它的方法用来获取注解的属性等等。
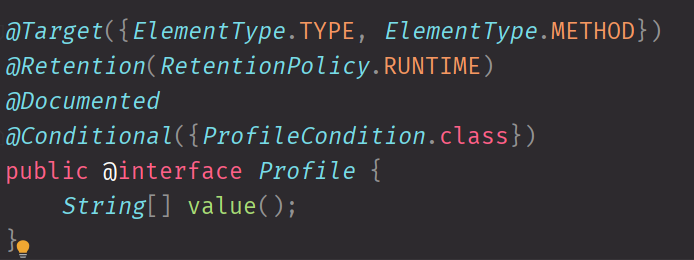
Spring4对@Profile注解进行了重构,使用@Condition来实现。
@Profile也指定了@Conditional注解,并传入了一个ProfileCondition.class用于执行条件判断。
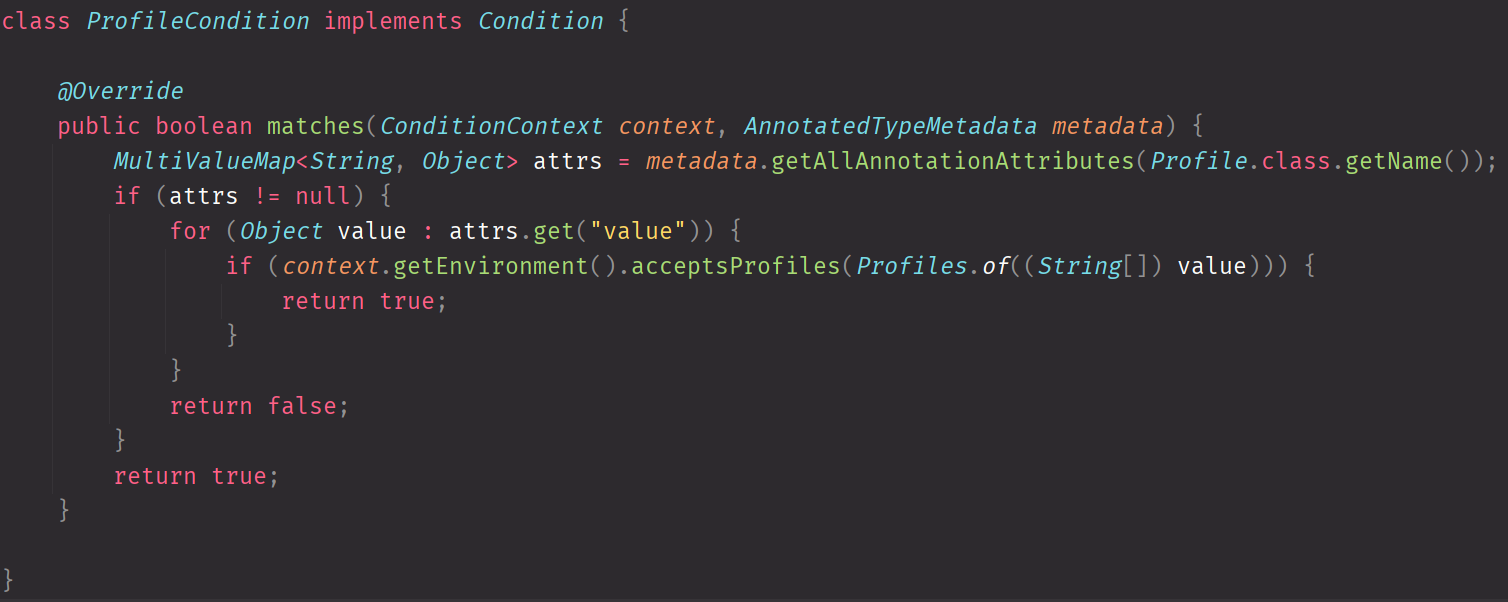
ProfileCondition主要在matches方法中做的就是如下内容,首先获取Bean上的@Profile注解的属性,并且获取其中的value属性,也就是profile的环境名,比如dev,调用acceptsProfiles检测环境中是否启动了这个环境。
处理自动装配歧义性
自动装配给我们省了太多配置代码,尤其是在那种与环境无关的配置上,难道仅仅是注入一个Bean就要我们写好多行代码吗?
自动装配解决了这个问题,让我们只用一个注解就可以实现Bean的注入,但是好像,一旦遇到有两个相同类型的Bean,自动装配就不起效果了,Spring不知道你要装的是哪个。
如下代码,有三个类型为Dessert的Bean,Customer类要求向setDessert方法中注入一个Dessert,Spring自然不知道应该注入哪一个。
public interface Dessert {}

@Component
public class Cake implements Dessert {}

@Component
public class Cookies implements Dessert {}

@Component
public class IceCream implements Dessert{}


@Component
public class Customer {

    private Dessert dessert;

    @Autowired
    public void setDessert(Dessert dessert) {
        this.dessert = dessert;
    }

}
运行,你会看到如下的结果

首选Bean
解决办法之一就是设置一个首选Bean。
你给IceCream加上@Primary,所有需要Dessert的地方都会注入它。当显式指定需要更精细的子类Bean的时候,子类才会被注入。
@Component
@Primary
public class IceCream implements Dessert {}
虽能解决一部分问题,但是这个解决办法的粒度还是太粗了。
限定符
限定符是比较好的解决办法。
@Autowired
@Qualifier("iceCream")
public void setDessert(Dessert dessert) {
    this.dessert = dessert;
}
上面使用@Qualifier指定了注入的Bean的限定符,要求被注入的Bean的限定符必须时iceCream,这是当Bean没被指定限定符时的默认限定符,和Bean的ID相同。虽然现在对于我们的示例也能很好的工作,但这并不是限定符存在的意义。
限定符的意义是描述一个Bean特有的属性,因为不同的实现类代表不同事物,它们会有不同的属性,比如IceCream,它是冷的,那么就可以给它加一个冷的属性。
@Component
@Qualifier("cold")
public class IceCream implements Dessert {}
然后在需要注入的地方,描述你需要的实现类特有的属性。
@Autowired
@Qualifier("cold")
public void setDessert(Dessert dessert) {
    this.dessert = dessert;
}
即可正确注入。
如果有两个实现类都有cold这一属性呢?那就继续添加更细化的属性。
由于Java早期和Spring的限制,不允许在一个类上添加两个@Qualifier注解,解决的办法就是自己定义注解类。
下面定义了三个限定符注解,感觉有点麻烦,但是想法是好的,如果Qualifier本身就支持在一个类上使用多个就好了。
@Target({ElementType.FIELD, ElementType.METHOD, ElementType.PARAMETER, ElementType.TYPE})
@Retention(RetentionPolicy.RUNTIME)
@Qualifier("cold")
public @interface Cold { }


@Target({ElementType.FIELD, ElementType.METHOD, ElementType.PARAMETER, ElementType.TYPE})
@Retention(RetentionPolicy.RUNTIME)
@Qualifier("creamy")
public @interface Creamy {}


@Target({ElementType.FIELD, ElementType.METHOD, ElementType.PARAMETER, ElementType.TYPE})
@Retention(RetentionPolicy.RUNTIME)
@Qualifier("fruity")
public @interface Fruity { }
这下,@Cold用于描述凉的,@Creamy用来描述奶油的,@Fruity用于描述果味的。
然后我们给对应的实现类安上这些注解
@Component
@Cold @Creamy
public class IceCream implements Dessert { }


@Component
@Cold @Fruity
public class Popsicle implements Dessert { }
现在它们有了独一无二的特征描述,我们在自动注入的位置可以通过这些描述来唯一确定一个实现类。
@Component
public class Customer {

    private Dessert dessert;

    @Autowired
    @Cold @Creamy
    public void setDessert(Dessert dessert) {
        this.dessert = dessert;
    }

}
Bean作用域
默认情况下,Spring中的Bean都是以单例形式存在的,类似Service,Dao,Controller这类资源确实最好的办法就是单例,而且WEB应用中大部分的资源以单例存在也没问题,但是确实有很多需求要求Bean以其他形式存在。
Spring提供了四种作用域
- 单例(Singleton),整个应用中只有一个实例
- 原型(Prototype),每次注入都是一个新的实例,只配置Bean的原型
- 会话(Session),在Web应用中,一个会话创建一个新的实例
- 请求(Request),在Web应用中,一次请求创建一个新的实例
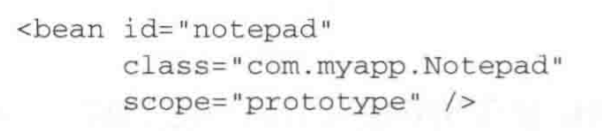
@Scope注解可以指定Bean的作用域,先试试。
还是上次甜点的例子,我们现在要求Spring给我们注入两个customer,然后检测是否是同一个实例。
@RunWith(SpringJUnit4ClassRunner.class)
@ContextConfiguration(classes = AutoInjectConfiguration.class)
public class AutoInjectTest {

    @Autowired
    private Customer customer;

    @Autowired
    private Customer customer2;

    @Test
    public void testInject() {
        assertEquals(customer,customer2);
    }
}
会通过测试。
现在我们修改Customer类的Scope
@Component
@Scope(ConfigurableBeanFactory.SCOPE_PROTOTYPE)
再次运行,它们已经不是一个实例。

会话作用域和请求作用域
这两个作用域是SpringWeb中提供的。
先在pom.xml中引用这个。
<dependency>
    <groupId>org.springframework</groupId>
    <artifactId>spring-web</artifactId>
    <version>${springframework.version}</version>
</dependency>
在Web应用中经常在Session范围和Request范围内创建对象,传统的方式是使用HttpSession.setAttribute和HttpServletRequest.setAttribute,Spring提供了注解式的写法并帮我们自动注入对象。
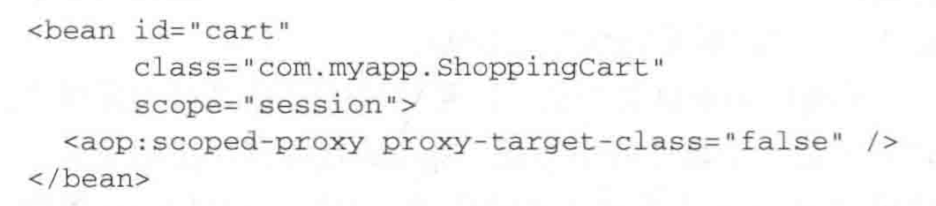
假如有一个购物车对象,这个对象肯定是Session范围内有效的,那么可以这样写

将value指定为WebApplicationContext.SCOPE_SESSION,并且设置一个代理。
代理的目的是啥呢?就是一般情况下,我们的购物车是要作为一个对象注入到Service层的,而Service层又是单例的,并且可能有无数个线程同时调用它。那到底应该什么时候注入这个会话作用域的购物车对象呢???
Spring的方法就是使用一个代理,将这个代理传递给Service层,然后代理会委托调用存在对应的Session中的Bean实例,它们真正的处理逻辑。
而ScopedProxyMode.INTERFACE用于指定代理模式,最理想的代理模式就是这个Bean是一个接口类型,这样Spring只需要生成一个实现了这个接口的类即可。而如果是一个具体的类,就需要使用ScopedProxyMode.TARGET_CLASS,它会使用CGLib生成基于类的代理。
XML中声明作用域
一样的。
在XML中指定作用域只需要bean的scope属性。
如果需要代理呢?那就需要使用aop动态织入一个代理了。
运行时注入
@Bean
public CompactDisc setCompactDisc(){
    return new BlankCompactDisc(
            "When It's All Said And Done... Take Time",
            "Giveon"
    );
}
之前我们的这个类中,有两个属性是写死的,也许对于该例子来说没啥,但是Spring推荐我们将所有的硬编码转换到程序外,这样打包的时候我们可以在外部重新配置这些属性而不用重新修改编译(因为生产环境中往往不方便做这些事)。
Spring提供了两种运行时求值的方式
- 属性表达式
- SpEL(Sring表达式语言)
属性表达式注入外部的值
使用@PropertySource加载一个外部的资源文件,并通过Environment对象来获取资源文件中定义的属性。
@Configuration
@PropertySource("classpath:app.properties")
public class CDPlayerConfiguration {
    @Autowired
    private Environment env;

    @Bean
    public CompactDisc setCompactDisc(){
        return new BlankCompactDisc(
                env.getProperty("disc.title"),
                env.getProperty("disc.author")
        );
    }
}
下面是资源文件中的内容
disc.author=Giveon
disc.title=When It's All Said And Done... Take Time

没有问题。
使用XML也可以,只需要在Bean中指定c:title="${disc.title}即可。注意,${expression}这就是属性表达式。
<!-- 使用context:property-placeholder的location属性定位配置文件位置-->
<context:property-placeholder location="classpath:app.properties" />

<bean
        id="compactdisc"
        class="io.lilpig.springlearn.springlearn01.chapter03.runtimeinject.BlankCompactDisc"
        c:title="${disc.title}"
        c:author="${disc.author}"/>
        <!-- 使用c:命名空间来获取外部属性 -->
<bean
        id="cdplayer"
        class="io.lilpig.springlearn.springlearn01.chapter03.runtimeinject.CDPlayer"
        p:compactDisc-ref="compactdisc"/>
使用自动注入的时候,可以使用@Value注解指定属性表达式。

但是必须在配置文件中指定一个PlaceHolderConfigurer的Bean用于解析占位符。

Spring表达式语言 SpEL
不同于属性占位符,SpEL使用#{expression}。
使用字面量
#{1}#{2.314}#{'string'}
引用其他bean
#{sgtPeppers.author}引用sgtPepers Bean中的author属性#{sgtPeppers.getAuthor().toUpperCase()},调用方法#{sgtPeppers.author?.toUpperCase()},空安全运算符,如果前面的对象为null,整个表达式是null
类方法和常量
- `#{T(System).out},T运算符返回一个类对象,之后访问它的静态方法和常量
SpEL运算符
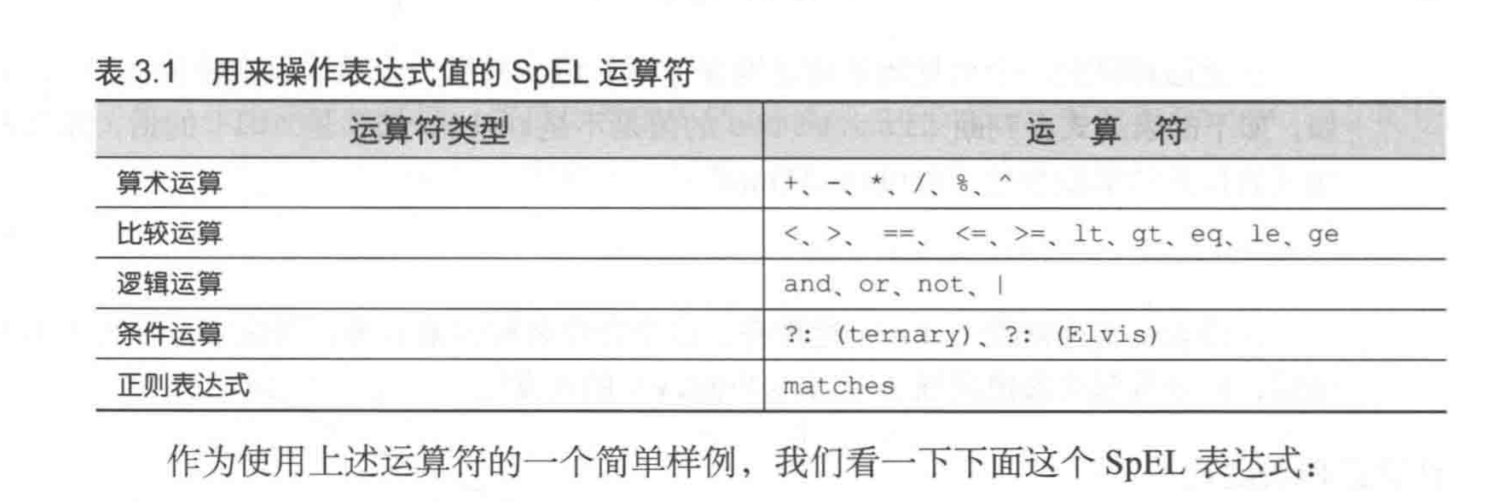
除了能进行简单的算术,逻辑运算,SpEL还能对集合进行操作。如下随即从jukebox对象的songs属性中选择一首歌


 浙公网安备 33010602011771号