Spring Cloud Alibaba Nacos 服务发现
1.Nacos 简介
发音: /nɑ:kəʊs/
全称:Name and Config Service,nacos 是其首字母的拼写。
Nacos 的核心功能 = 服务注册 + 动态配置
可以理解为 Nacos = SpringCloud Eureka + SpringCloud Config
2.什么是服务发现
服务消费者怎么找到服务提供者的机制就是服务发现。
3.实现服务发现机制需要解决很多的问题
健康检查:
问题:服务实例故障了,无法主动注销自己的信息怎么办?
方案:通过心跳机制进行健康检查,注册中心删除无心跳的实例信息
本地缓存:
问题:每次服务调用之前都查询注册中心,性能差、不可靠,怎么办?
方案:本地缓存、定时更新(定时查询服务列表、服务注册中心主动推送)
数据同步:
问题:注册中心集群中各个节点的数据如何同步?
方案:强一致性,例如 ZooKeeper。弱一致性,例如 Eureka。
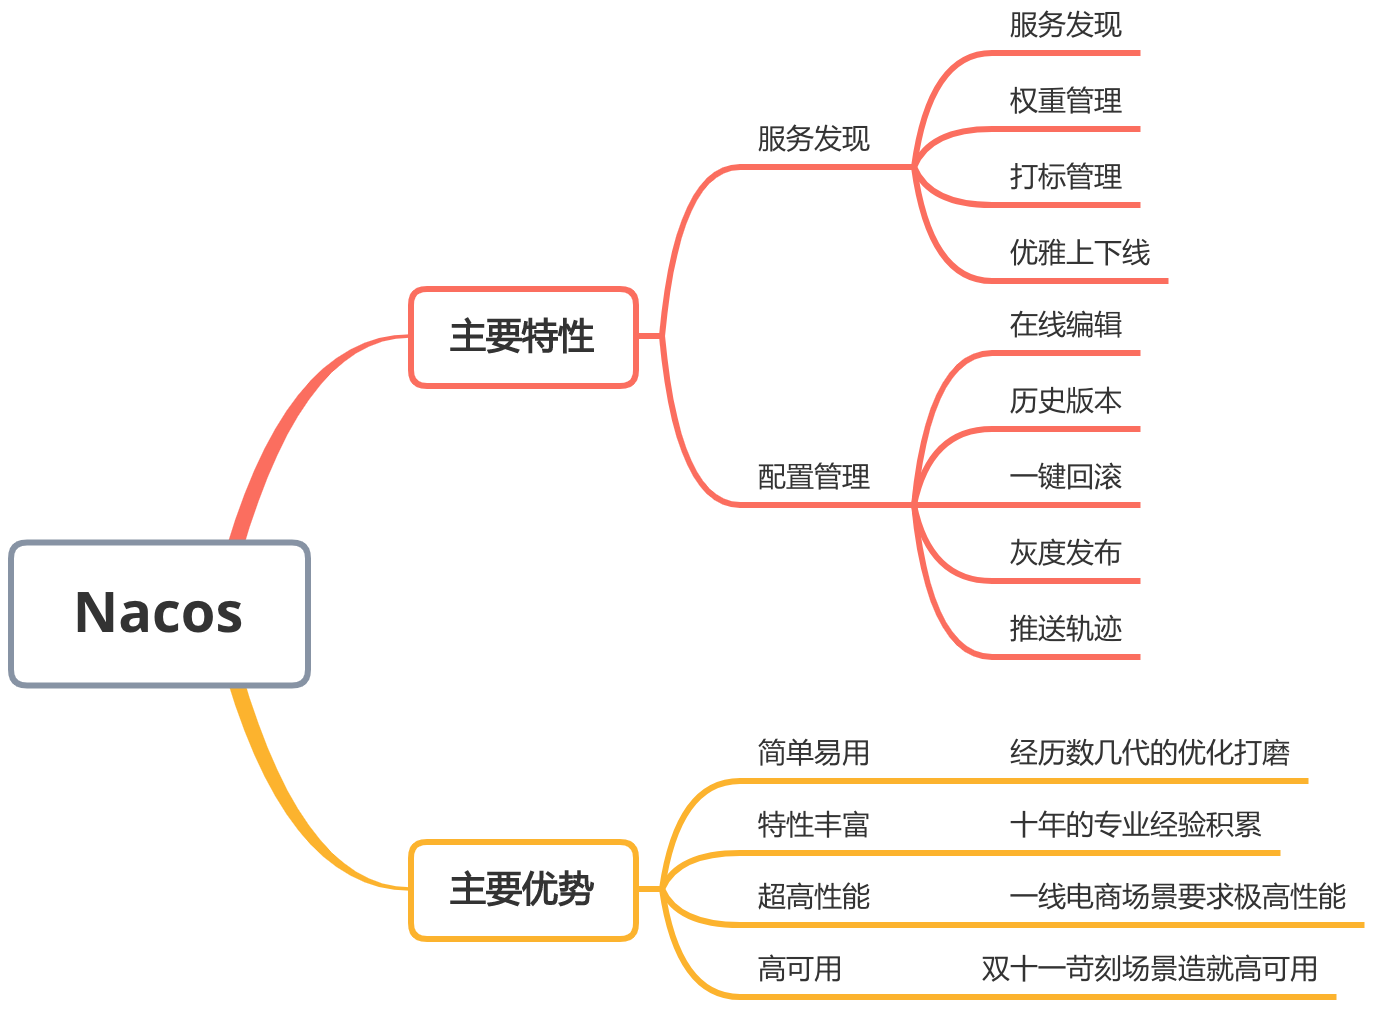
4.Nacos 特征与优势
5.Nacos环境搭建
官网文档:https://nacos.io/zh-cn/docs/quick-start.html
下载地址:https://gitee.com/mirrors/Nacos、https://github.com/alibaba/nacos/releases
Spring Boot 2.3.x:https://github.com/alibaba/nacos/releases/tag/1.4.1
windows安装方式
选择 nacos-server-1.4.1.zip 进行下载
解压进入到 C:\Software\nacos-server-1.4.1\bin 目录
双击 startup.cmd 一闪而过代表失败,注意Java环境是否安装和配置。
浏览器访问:http://127.0.0.1:8848/nacos
用户名和密码都是nacos
服务注册(linux)
curl -X POST 'http://127.0.0.1:8848/nacos/v1/ns/instance?serviceName=nacos.naming.serviceName&ip=20.18.7.10&port=8080'
服务发现(linux)
curl -X GET 'http://127.0.0.1:8848/nacos/v1/ns/instance/list?serviceName=nacos.naming.serviceName'
使用 Postman
File => Import => Raw test
粘贴curl命令
6.服务提供者和消费者整合Nacos
6.1 provider(服务提供者)
6.1.1 加依赖
<dependency>
 <groupId>com.alibaba.cloud</groupId>
 <artifactId>spring-cloud-starter-alibaba-nacos-discovery</artifactId>
</dependency>
6.1.2 加注解
package com.example.serviceprovider;

import org.springframework.boot.SpringApplication;
import org.springframework.boot.autoconfigure.SpringBootApplication;
import org.springframework.cloud.client.discovery.EnableDiscoveryClient;

@SpringBootApplication
// 加注解(开启服务发现)
@EnableDiscoveryClient
public class ServiceProviderApplication {

    public static void main(String[] args) {
        SpringApplication.run(ServiceProviderApplication.class, args);
    }

}
6.1.3 改配置
server:
  port: 8081
spring:
  application:
    name: service-provider
  # 添加 nacos 地址
  cloud:
    nacos:
      discovery:
        server-addr: localhost:8848
        namespace: 23ffbc32-5bde-4451-9683-c346220fa282
        group: g1
        cluster-name: beijing
6.1.4 创建测试接口
package com.example.serviceprovider;

import org.springframework.web.bind.annotation.GetMapping;
import org.springframework.web.bind.annotation.RequestParam;
import org.springframework.web.bind.annotation.RestController;

@RestController
public class TestController {

    @GetMapping("hello")
    public String hello(@RequestParam String name){
        return "hello " + name;
    }
}
6.2 consumer(消费者)
6.2.1 加依赖
<dependency>
 <groupId>com.alibaba.cloud</groupId>
 <artifactId>spring-cloud-starter-alibaba-nacos-discovery</artifactId>
</dependency>
6.2.2 加注解
package com.example.serviceprovider;

import org.springframework.boot.SpringApplication;
import org.springframework.boot.autoconfigure.SpringBootApplication;
import org.springframework.cloud.client.discovery.EnableDiscoveryClient;

@SpringBootApplication
// 加注解(开启服务发现)
@EnableDiscoveryClient
public class ServiceConsumerApplication {

    public static void main(String[] args) {
        SpringApplication.run(ServiceConsumerApplication.class, args);
    }

}
6.2.3 改配置
server:
  port: 8082
spring:
  application:
    name: service-consumer
  cloud:
    nacos:
      discovery:
        server-addr: localhost:8848
6.2.4 配置 RestTemplate
package com.example.serviceprovider;

import org.springframework.context.annotation.Bean;
import org.springframework.context.annotation.Configuration;
import org.springframework.web.client.RestTemplate;

@Configuration
public class ConsumerConfig {
    @Bean
    public RestTemplate restTemplate(){
        return new RestTemplate();
    }
}
6.2.5 发起服务调用
package com.example.serviceprovider;

import org.springframework.beans.factory.annotation.Autowired;
import org.springframework.cloud.client.ServiceInstance;
import org.springframework.cloud.client.loadbalancer.LoadBalancerClient;
import org.springframework.web.bind.annotation.GetMapping;
import org.springframework.web.bind.annotation.RequestParam;
import org.springframework.web.bind.annotation.RestController;
import org.springframework.web.client.RestTemplate;

import java.net.URI;


@RestController
public class TestController {
    // 引入 RestTemplate
    @Autowired
    RestTemplate restTemplate;

    // 引入 LoadBalancerClient
    @Autowired
    LoadBalancerClient loadBalancerClient;

    @GetMapping("hello")
    public String hello(@RequestParam String name) {
        String result = "";

        // 根据服务名获取服务实例
        ServiceInstance serviceInstance = loadBalancerClient.choose("service-provider");

        // 发起调用
        URI uri = serviceInstance.getUri();
        result = restTemplate.getForObject(uri + "/hello?name=test", String.class);

        // 返回结果
        return result;
    }
}
7.Nacos 服务领域模型
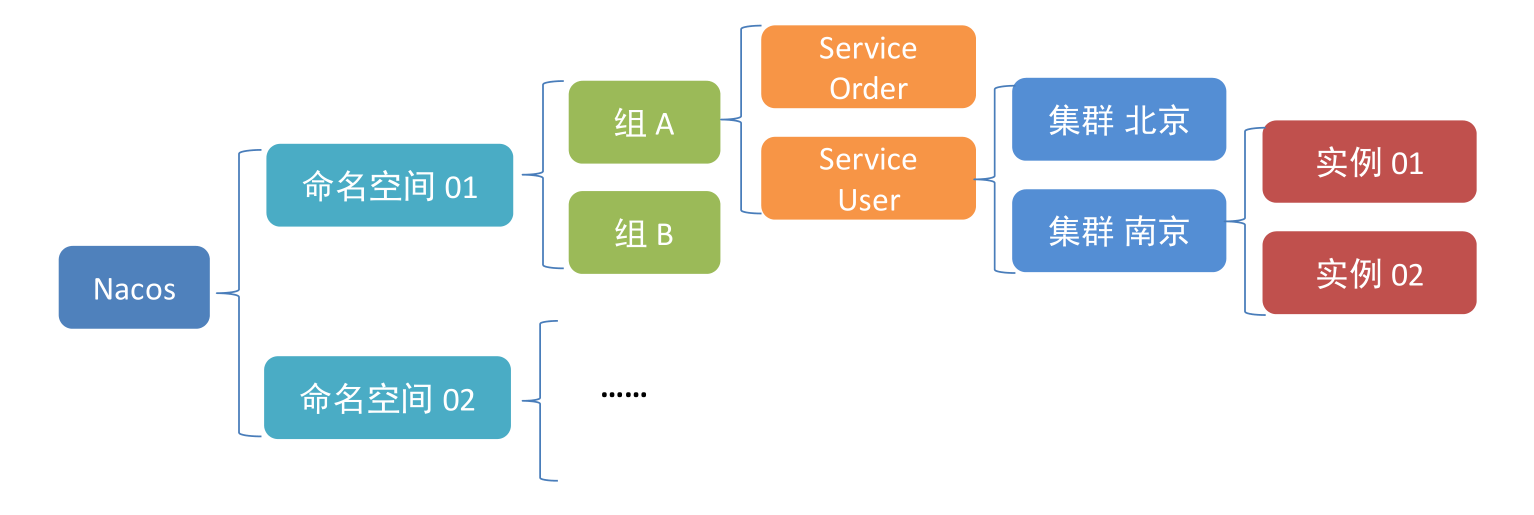
namespace :命名空间ID
group:组
cluster-name:集群
Nacos 三层数据模型:NameSpace, Group, Service
Nacos 服务领域模型:NameSpace, Group, Service,Cluster, Instance
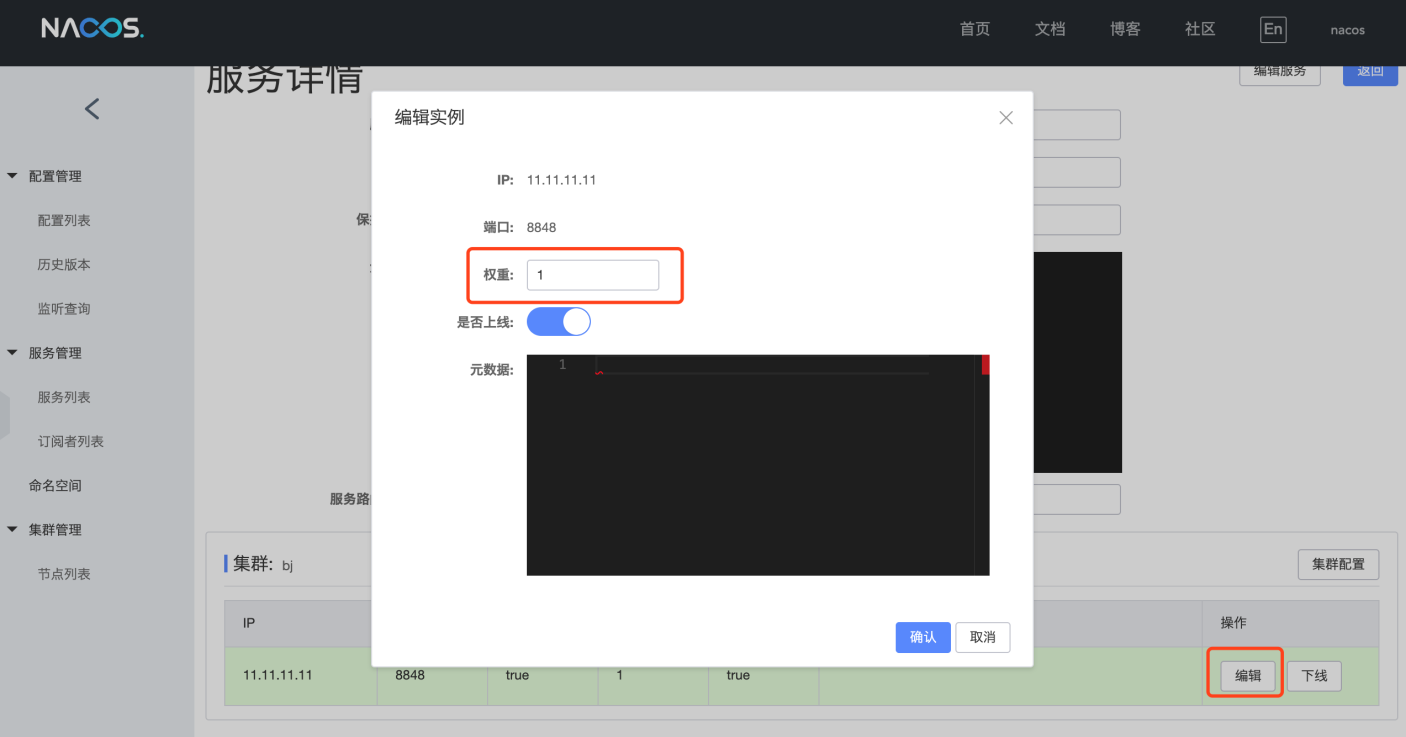
8.负载均衡与权重
负载均衡的类型
服务端负载均衡:如nginx 根据负载均衡策略选择某个实例转发请求
客服端负载均衡:根据自己实现的负载均衡策略选择
8.1 provider(服务提供者),使用配置的服务端口号
package com.example.serviceprovider;

import org.springframework.beans.factory.annotation.Value;
import org.springframework.web.bind.annotation.GetMapping;
import org.springframework.web.bind.annotation.RequestParam;
import org.springframework.web.bind.annotation.RestController;

@RestController
public class TestController {
    @Value("${server.port}")
    Integer port;

    @GetMapping("hello")
    public String hello(@RequestParam String name){
        return "hello " + name + " " + port;
    }
}
8.2 consumer(消费者),使用负载均衡注解
package com.example.serviceprovider;

import com.netflix.loadbalancer.IRule;
import com.netflix.loadbalancer.RandomRule;
import org.springframework.cloud.client.loadbalancer.LoadBalanced;
import org.springframework.context.annotation.Bean;
import org.springframework.context.annotation.Configuration;
import org.springframework.web.client.RestTemplate;

@Configuration
public class ConsumerConfig {
    // 使用负载均衡注解
    @LoadBalanced
    @Bean
    public RestTemplate restTemplate(){
        return new RestTemplate();
    }

}
服务调用
package com.example.serviceprovider;

import org.springframework.beans.factory.annotation.Autowired;
import org.springframework.web.bind.annotation.GetMapping;
import org.springframework.web.bind.annotation.RequestParam;
import org.springframework.web.bind.annotation.RestController;
import org.springframework.web.client.RestTemplate;

@RestController
public class TestLBController {
    @Autowired
    RestTemplate restTemplate;

    @GetMapping("/testlb")
    public String testlb(@RequestParam String name){
        String  result = "";
        result = restTemplate.getForObject("http://service-provider/hello?name=" + name, String.class);
        return result;
    }
}
负载均衡策略
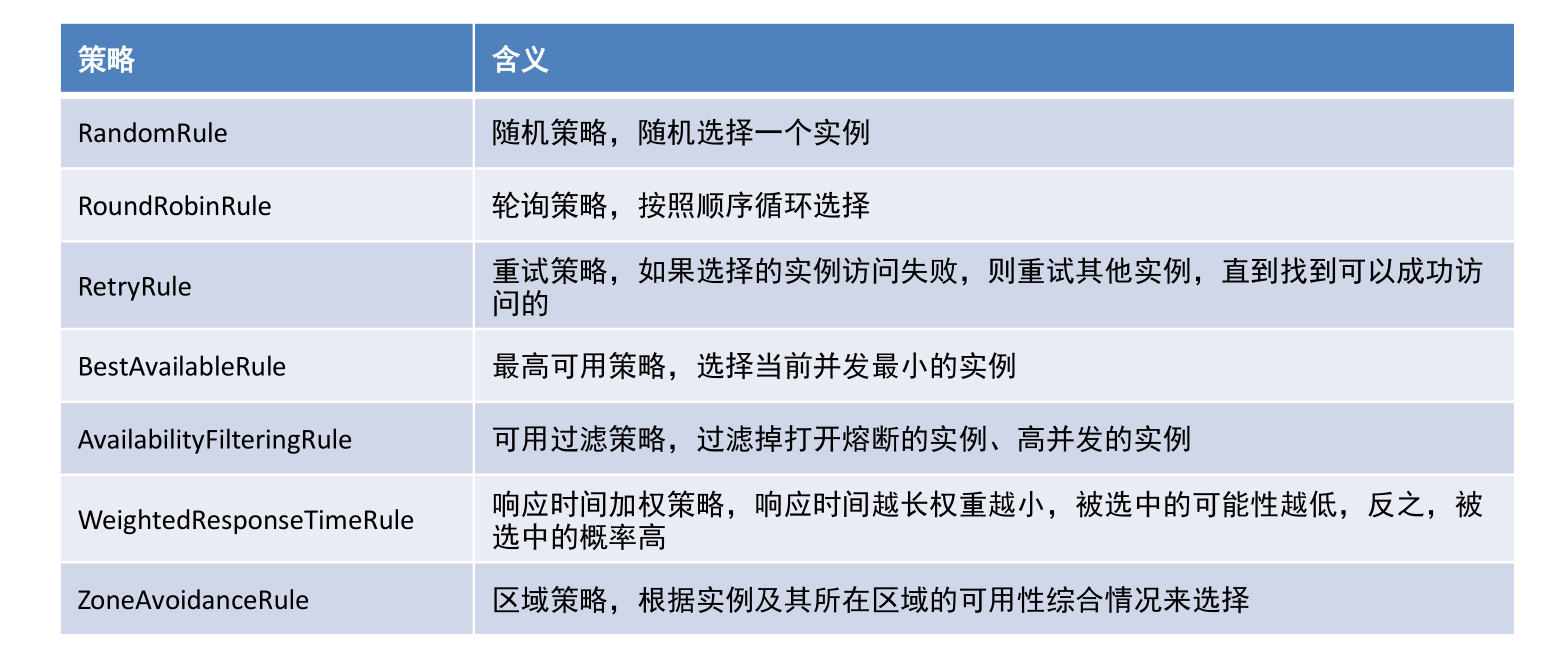
SpringBoot 配置文件修改负载均衡策略
package com.example.serviceprovider;

import com.netflix.loadbalancer.IRule;
import com.netflix.loadbalancer.RandomRule;
import org.springframework.cloud.client.loadbalancer.LoadBalanced;
import org.springframework.context.annotation.Bean;
import org.springframework.context.annotation.Configuration;
import org.springframework.web.client.RestTemplate;

@Configuration
public class ConsumerConfig {
    @LoadBalanced
    @Bean
    public RestTemplate restTemplate(){
        return new RestTemplate();
    }

   // 负载均衡策略
    @Bean
    public IRule iRule(){
      return new RandomRule();
} }
8.3 自定义基于权重的负载均衡策略的方法
服务消费者中实现基于权重的负载均衡策略
package com.example.serviceprovider;

import com.alibaba.cloud.nacos.NacosDiscoveryProperties;
import com.alibaba.cloud.nacos.ribbon.NacosServer;
import com.alibaba.nacos.api.naming.NamingService;
import com.alibaba.nacos.api.naming.pojo.Instance;
import com.netflix.client.config.IClientConfig;
import com.netflix.loadbalancer.AbstractLoadBalancerRule;
import com.netflix.loadbalancer.BaseLoadBalancer;
import com.netflix.loadbalancer.Server;
import org.springframework.beans.factory.annotation.Autowired;

public class NacosWeightRule extends AbstractLoadBalancerRule {
    // 引入 NacosDiscoveryProperties
    @Autowired
    private NacosDiscoveryProperties nacosDiscoveryProperties;

    // 重写 choose 方法
    @Override
    public Server choose(Object o) {
        // 获取服务提供者的名字
        // 拿到 nacos 的命名服务对象
        // 通过 nacos 的命名服务根据权重获取实例
        // 封装 server 对象,返回

        BaseLoadBalancer loadBalancer = (BaseLoadBalancer) this.getLoadBalancer();
        String name = loadBalancer.getName();

        NamingService namingService = nacosDiscoveryProperties.namingServiceInstance();
        try {
            Instance instance = namingService.selectOneHealthyInstance(name);
            return new NacosServer(instance);
        }catch (Exception e){
            e.printStackTrace();
        }

        return null;
    }

    @Override
    public void initWithNiwsConfig(IClientConfig iClientConfig) {

    }
}
Nacos配置修改权重配置
@Configuration
public class ConsumerConfig {
    @LoadBalanced
    @Bean
    public RestTemplate restTemplate(){
        return new RestTemplate();
    }

    @Bean
    public IRule iRule(){
       //根据权重的负载均衡策略
        return new NacosWeightRule();
    }

}
9.Nacos集群部署

9.1 创建数据库和表
使用sql脚本创建数据库
nacos-server => conf => nacos-mysql.sql
9.2 配置MySQL连接
nacos-server => conf => application.properties
# 表明用MySQL作为后端存储
spring.datasource.platform=mysql
# 有几个数据库实例
db.num=1
# 第1个实例的地址
db.url.0=jdbc:mysql://[mysqlIP]/nacos?characterEncoding=utf8&connectTimeout=1000&socketTimeout
=3000&autoReconnect=true
db.user=[数据库用户名]
db.password=[数据库密码]
9.3 配置集群节点IP端口
nacos-server => conf => application.properties
# nacos01
server.port=8841
# nacos02
server.port=8842
# nacos03
server.port=8843
nacos-server => conf => cluster.conf.example 复制一份 去掉后缀example ,每个集群实例配置,相同配置文件。
server 127.0.0.1:8841;
server 127.0.0.1:8842;
server 127.0.0.1:8843;
启动各个nacos
9.4 配置Nginx
nginx.conf 配置文件 include servers/* 意思是加载servers文件夹下所以配置文件,所以进入到servers文件夹 创建 nocos.conf 配置文件,以下是nocos.conf 内容
upstream nacos {
 server 127.0.0.1:8841;
 server 127.0.0.1:8842;
 server 127.0.0.1:8843;
}

server {
 listen 9090;
 server_name localhost;
 location /nacos/ {
  proxy_pass http://nacos;
 }
}

 浙公网安备 33010602011771号