SpringBoot 自动装配
前言
我们都会用Springboot,例如使用redis,首先引入依赖,然后yml文件中进行配置,第三步,使用RedisTemplate类,就可以使用了。看起来就这么简单。
其实越简单的的东西,在背后越是有复杂的逻辑帮助我们实现了具体的细节。
1.demo
看个小demo(github访问不了,就不上传项目了)
第一个工程代码

 1 package com.auto.spring.my;
 2
 3 import org.springframework.beans.factory.annotation.Autowired;
 4 import org.springframework.boot.autoconfigure.condition.ConditionalOnMissingBean;
 5 import org.springframework.boot.context.properties.EnableConfigurationProperties;
 6 import org.springframework.context.annotation.Bean;
 7 import org.springframework.context.annotation.Configuration;
 8
 9 @Configuration
10 @EnableConfigurationProperties({MyProperty.class})
11 public class CustomAutoConfiguration {
12
13     @Autowired
14     private MyProperty myProperty;
15
16     @Bean
17     @ConditionalOnMissingBean
18     public MyPro myPro(){
19         MyPro myPro = new MyPro();
20         if (myProperty.getName() != null) {
21             myPro.setName(myProperty.getName());
22         } else {
23             myPro.setName("缺失姓名");
24         }
25         myPro.setAge(77);
26
27         if (myProperty.getGender() != null) {
28             myPro.setGender(myProperty.getGender());
29         } else {
30             myPro.setGender("缺失姓名");
31         }
32
33         return myPro;
34     }
35 }

 1 package com.auto.spring.my;
 2
 3 import lombok.Data;
 4
 5 @Data
 6 public class MyPro {
 7
 8     private String name;
 9
10     private Integer age;
11
12     private String gender;
13 }

 1 package com.auto.spring.my;
 2
 3 import lombok.Data;
 4 import org.springframework.boot.context.properties.ConfigurationProperties;
 5
 6 @ConfigurationProperties(prefix = "custom")
 7 @Data
 8 public class MyProperty {
 9
10     private String name;
11
12     private Integer age;
13
14     private String gender;
15 }

org.springframework.boot.autoconfigure.EnableAutoConfiguration=com.auto.spring.my.CustomAutoConfiguration
上述四个文件,亲测可以使用.
再新建一个项目,引入第一个工程的依赖,配置custom.name 和 custom.gender就可以使用了。
2.原理
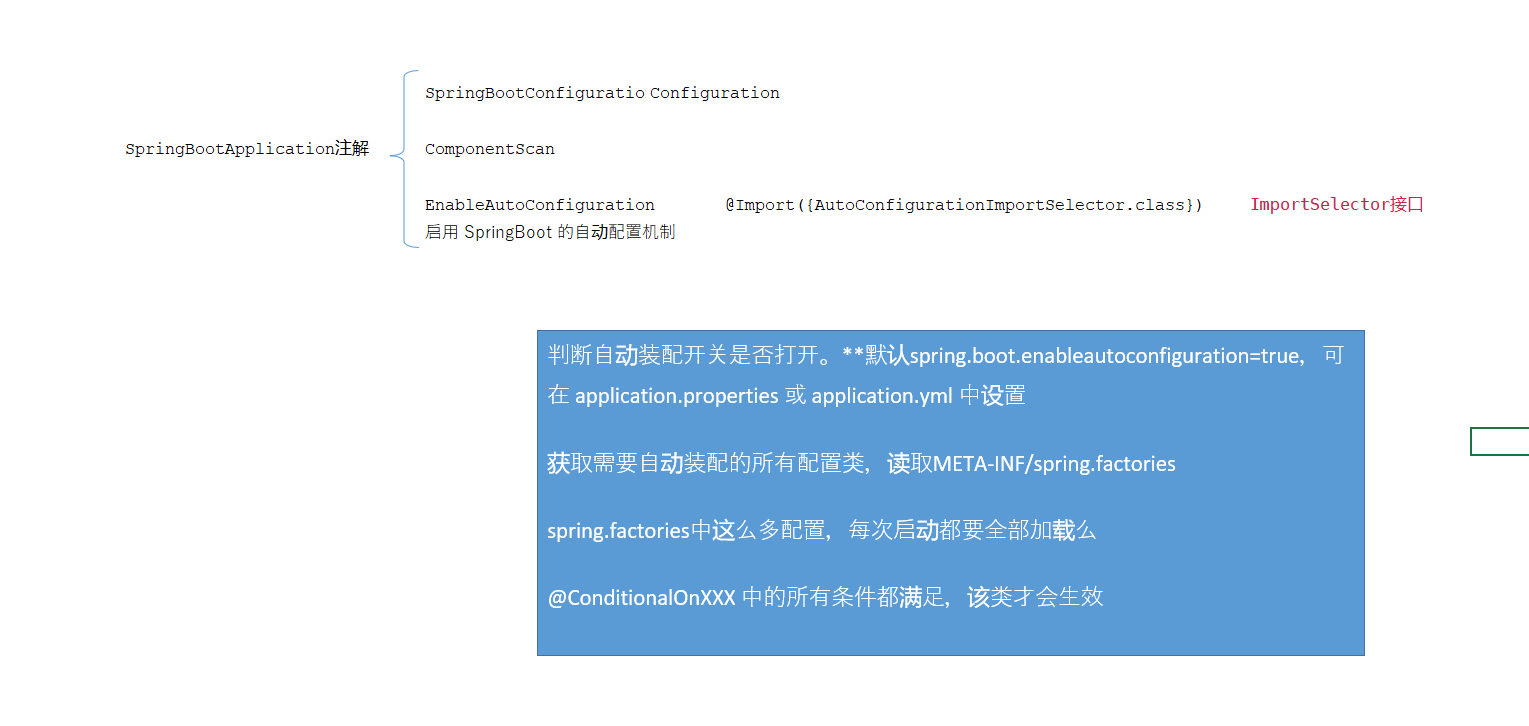
QA1:如何实现自动装配?
QA2:如何实现按需加载?

整理出一个纲要。下次有利于回忆。
3.实战分析
努力到无能为力,奋斗到感动上天!


【推荐】国内首个AI IDE,深度理解中文开发场景,立即下载体验Trae
【推荐】编程新体验,更懂你的AI,立即体验豆包MarsCode编程助手
【推荐】抖音旗下AI助手豆包,你的智能百科全书,全免费不限次数
【推荐】轻量又高性能的 SSH 工具 IShell:AI 加持,快人一步
· TypeScript + Deepseek 打造卜卦网站:技术与玄学的结合
· .NET Core 中如何实现缓存的预热?
· 阿里巴巴 QwQ-32B真的超越了 DeepSeek R-1吗?
· 如何调用 DeepSeek 的自然语言处理 API 接口并集成到在线客服系统
· 【译】Visual Studio 中新的强大生产力特性