"""
Web server script that exposes endpoints and pushes images to Redis for classification by model server. Polls
Redis for response from model server.
Adapted from https://www.pyimagesearch.com/2018/02/05/deep-learning-production-keras-redis-flask-apache/
"""import base64
import io
import json
import os
import time
import uuid
from keras.preprocessing.image import img_to_array
from keras.applications import imagenet_utils
import numpy as np
from PIL import Image
import redis
from fastapi import FastAPI, File, HTTPException
from starlette.requests import Request
app = FastAPI()
db = redis.StrictRedis(host=os.environ.get("REDIS_HOST"))
CLIENT_MAX_TRIES = int(os.environ.get("CLIENT_MAX_TRIES"))
def prepare_image(image, target):
# If the image mode is not RGB, convert itif image.mode != "RGB":
image = image.convert("RGB")
# Resize the input image and preprocess it
image = image.resize(target)
image = img_to_array(image)
image = np.expand_dims(image, axis=0)
image = imagenet_utils.preprocess_input(image)
# Return the processed imagereturn image
@app.get("/")
def index():
return"Hello World!"
@app.post("/predict")
def predict(request: Request, img_file: bytes=File(...)):
data = {"success": False}
if request.method == "POST":
image = Image.open(io.BytesIO(img_file))
image = prepare_image(image,
(int(os.environ.get("IMAGE_WIDTH")),
int(os.environ.get("IMAGE_HEIGHT")))
)
# Ensure our NumPy array is C-contiguous as well, otherwise we won't be able to serialize it
image = image.copy(order="C")
# Generate an ID for the classification then add the classification ID + image to the queue
k = str(uuid.uuid4())
image = base64.b64encode(image).decode("utf-8")
d = {"id": k, "image": image}
db.rpush(os.environ.get("IMAGE_QUEUE"), json.dumps(d))
# Keep looping for CLIENT_MAX_TRIES times
num_tries = 0
while num_tries < CLIENT_MAX_TRIES:
num_tries += 1
# Attempt to grab the output predictions
output = db.get(k)
# Check to see if our model has classified the input imageif output isnot None:
# Add the output predictions to our data dictionary so we can return it to the client
output = output.decode("utf-8")
data["predictions"] = json.loads(output)
# Delete the result from the database and break from the polling loop db.delete(k)
break# Sleep for a small amount to give the model a chance to classify the input image
time.sleep(float(os.environ.get("CLIENT_SLEEP")))
# Indicate that the request was a success
data["success"] = True
else:
raise HTTPException(status_code=400, detail="Request failed after {} tries".format(CLIENT_MAX_TRIES))
# Return the data dictionary as a JSON responsereturn data
modelserver
"""
Model server script that polls Redis for images to classify
Adapted from https://www.pyimagesearch.com/2018/02/05/deep-learning-production-keras-redis-flask-apache/
"""import base64
import json
import os
import sys
import time
from keras.applications import ResNet50
from keras.applications import imagenet_utils
import numpy as np
import redis
# Connect to Redis server
db = redis.StrictRedis(host=os.environ.get("REDIS_HOST"))
# Load the pre-trained Keras model (here we are using a model
# pre-trained on ImageNet and provided by Keras, but you can
# substitute in your own networks just as easily)
model = ResNet50(weights="imagenet")
def base64_decode_image(a, dtype, shape):
# If this is Python 3, we need the extra step of encoding the# serialized NumPy string as a byte objectif sys.version_info.major == 3:
a = bytes(a, encoding="utf-8")
# Convert the string to a NumPy array using the supplied data# type and target shape
a = np.frombuffer(base64.decodestring(a), dtype=dtype)
a = a.reshape(shape)
# Return the decoded imagereturn a
def classify_process():
# Continually poll for new images to classifywhile True:
# Pop off multiple images from Redis queue atomically with db.pipeline() as pipe:
pipe.lrange(os.environ.get("IMAGE_QUEUE"), 0, int(os.environ.get("BATCH_SIZE")) - 1)
pipe.ltrim(os.environ.get("IMAGE_QUEUE"), int(os.environ.get("BATCH_SIZE")), -1)
queue, _ = pipe.execute()
imageIDs = []
batch = None
for q in queue:
# Deserialize the object and obtain the input image
q = json.loads(q.decode("utf-8"))
image = base64_decode_image(q["image"],
os.environ.get("IMAGE_DTYPE"),
(1, int(os.environ.get("IMAGE_HEIGHT")),
int(os.environ.get("IMAGE_WIDTH")),
int(os.environ.get("IMAGE_CHANS")))
)
# Check to see if the batch list is Noneif batch is None:
batch = image
# Otherwise, stack the dataelse:
batch = np.vstack([batch, image])
# Update the list of image IDs
imageIDs.append(q["id"])
# Check to see if we need to process the batchif len(imageIDs) > 0:
# Classify the batchprint("* Batch size: {}".format(batch.shape))
preds = model.predict(batch)
results = imagenet_utils.decode_predictions(preds)
# Loop over the image IDs and their corresponding set of results from our modelfor (imageID, resultSet) in zip(imageIDs, results):
# Initialize the list of output predictions
output = []
# Loop over the results and add them to the list of output predictionsfor (imagenetID, label, prob) in resultSet:
r = {"label": label, "probability": float(prob)}
output.append(r)
# Store the output predictions in the database, using image ID as the key so we can fetch the results db.set(imageID, json.dumps(output))
# Sleep for a small amount
time.sleep(float(os.environ.get("SERVER_SLEEP")))
if__name__ == "__main__":
classify_process()
from locust import HttpLocust, TaskSet, task


class UserBehavior(TaskSet):
    @task
    def predict(self):
        with open('jemma.png', 'rb') as image:
            self.client.post('/predict', files={'img_file': image})


class WebsiteUser(HttpLocust):
    task_set = UserBehavior
    min_wait = 500
    max_wait = 5000
Load testing with Locust
Locust is a load testing tool designed for load-testing websites. It is intended for load testing websites but also works great for simple HTTP endpoints like ours.
It’s easy to get it up and running. First install it with pip install locustio then start it up by running within the project directory:
locust --host=http://localhost
This uses the provided locustfile to test the /predict endpoint. Note that we’re pointing the host to localhost — we’re testing the response time of our machine learning service without any real network latency.
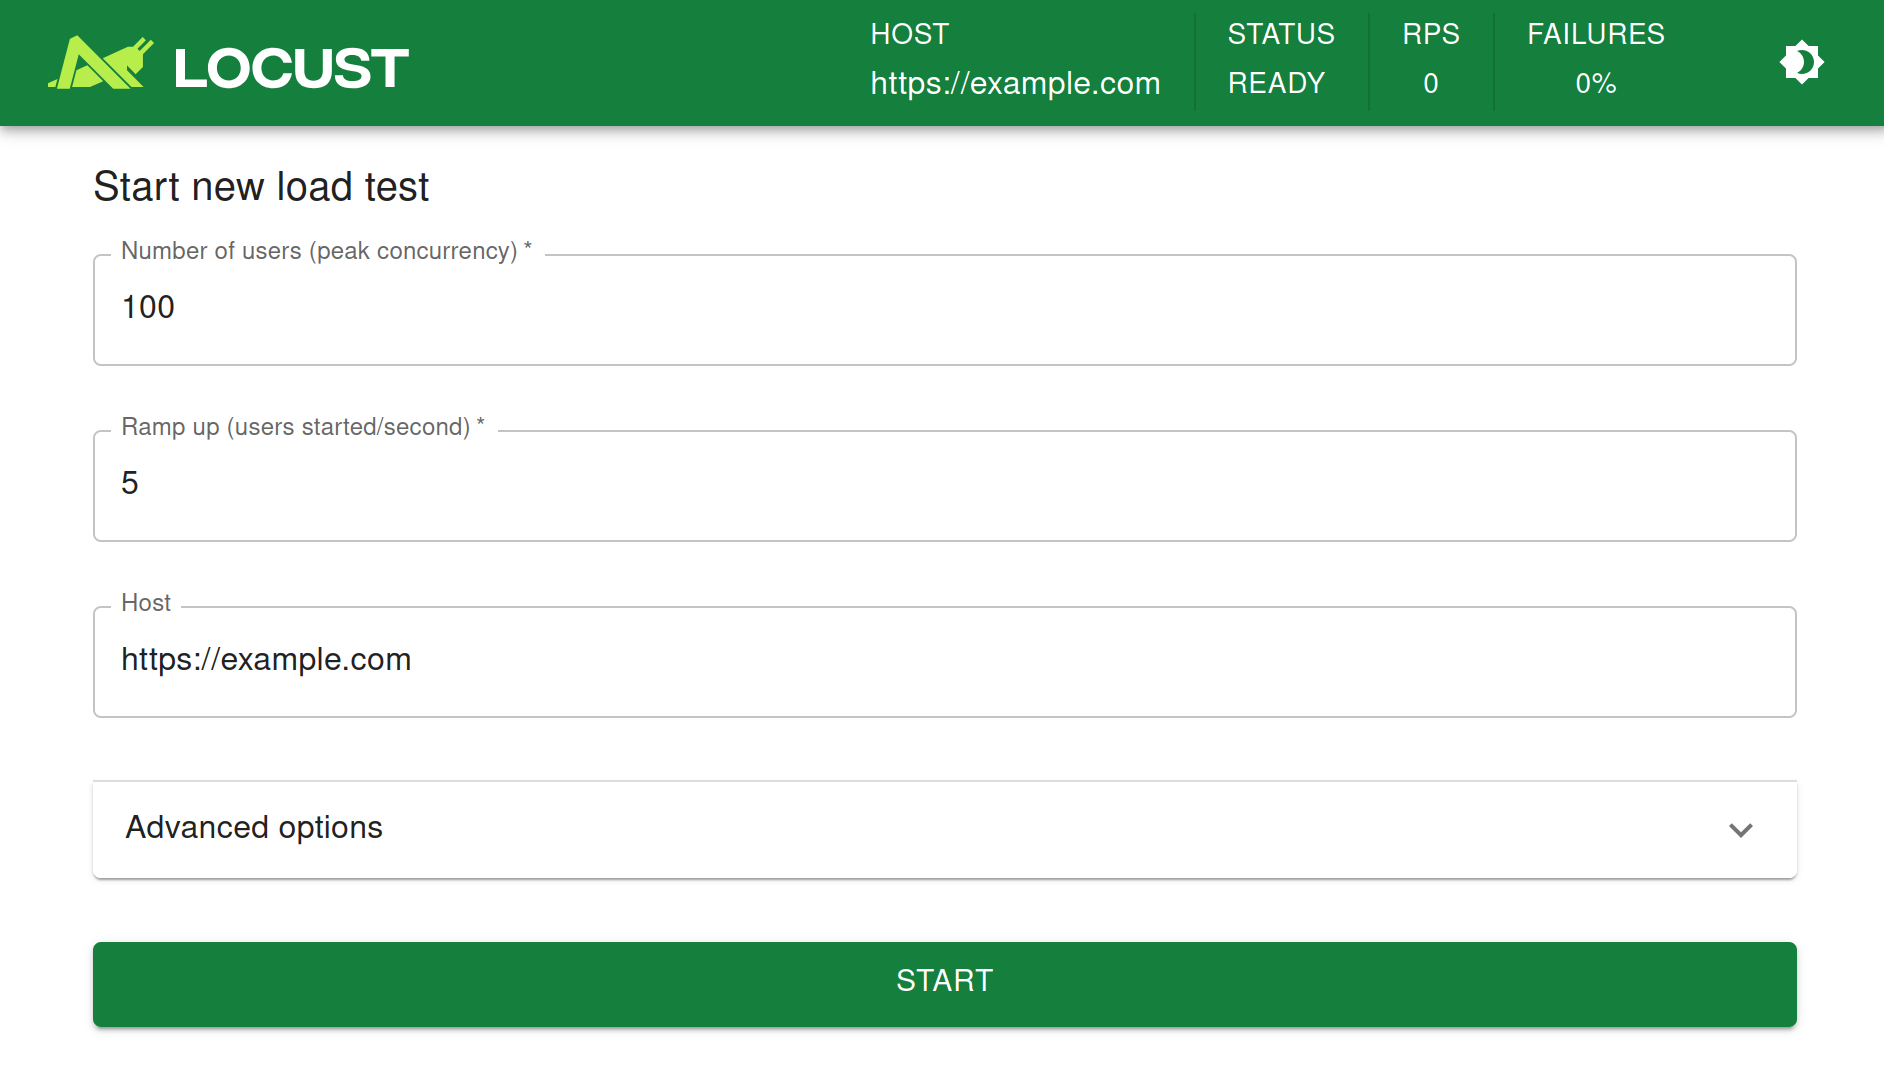
Now point your browser to http://localhost:8089 to access the locust web ui.
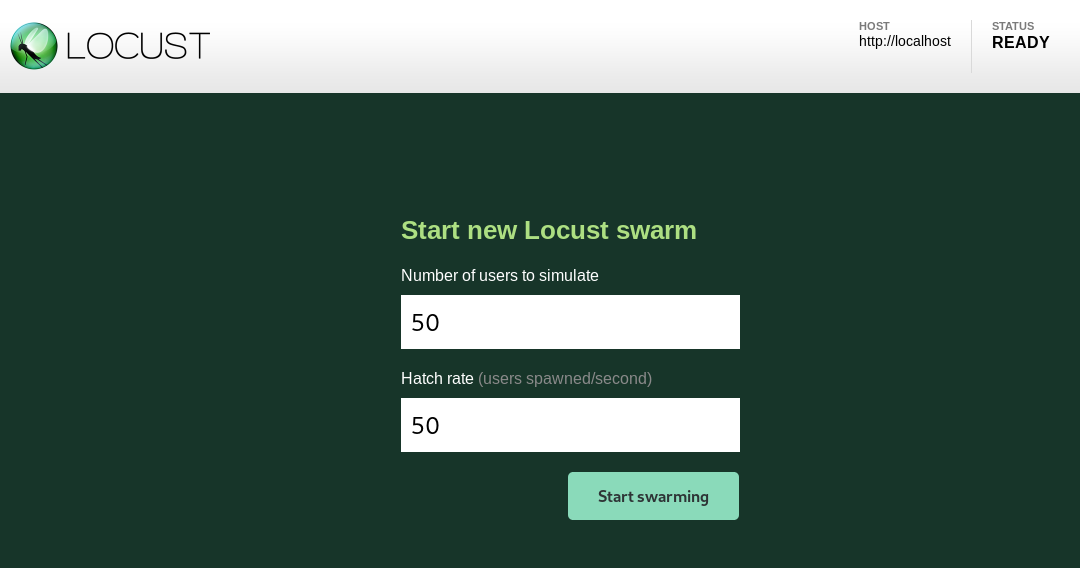
Locust Web UI
We’ll simulate 50 users (who are all hatched at the start).
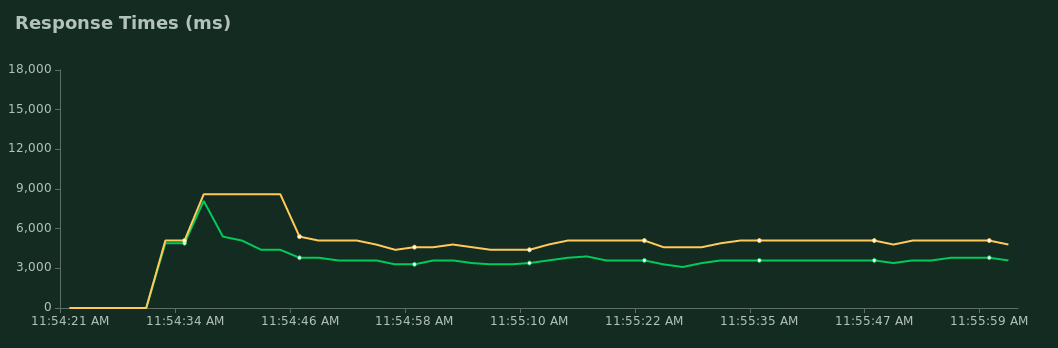
Green for median response time; yellow for p95
A p95 response time of around 5000ms means that 95% of requests should complete within 5 seconds. Depending on your use case and expected load, this could be far too slow.
https://locust.io/
https://github.com/locustio/locust
Locust is an open source performance/load testing tool for HTTP and other protocols. Its developer-friendly approach lets you define your tests in regular Python code.
Locust tests can be run from command line or using its web-based UI. Throughput, response times and errors can be viewed in real time and/or exported for later analysis.
You can import regular Python libraries into your tests, and with Locust's pluggable architecture it is infinitely expandable. Unlike when using most other tools, your test design will never be limited by a GUI or domain-specific language.
To get started right away, head over to the documentation.
Features
Write user test scenarios in plain old Python
If you want your users to loop, perform some conditional behaviour or do some calculations, you just use the regular programming constructs provided by Python. Locust runs every user inside its own greenlet (a lightweight process/coroutine). This enables you to write your tests like normal (blocking) Python code instead of having to use callbacks or some other mechanism. Because your scenarios are “just python” you can use your regular IDE, and version control your tests as regular code (as opposed to some other tools that use XML or binary formats)
from locust import HttpUser, task, between

class QuickstartUser(HttpUser):
    wait_time = between(1, 2)

    def on_start(self):
        self.client.post("/login", json={"username":"foo", "password":"bar"})

    @task
    def hello_world(self):
        self.client.get("/hello")
        self.client.get("/world")

    @task(3)
    def view_item(self):
        for item_id in range(10):
            self.client.get(f"/item?id={item_id}", name="/item")
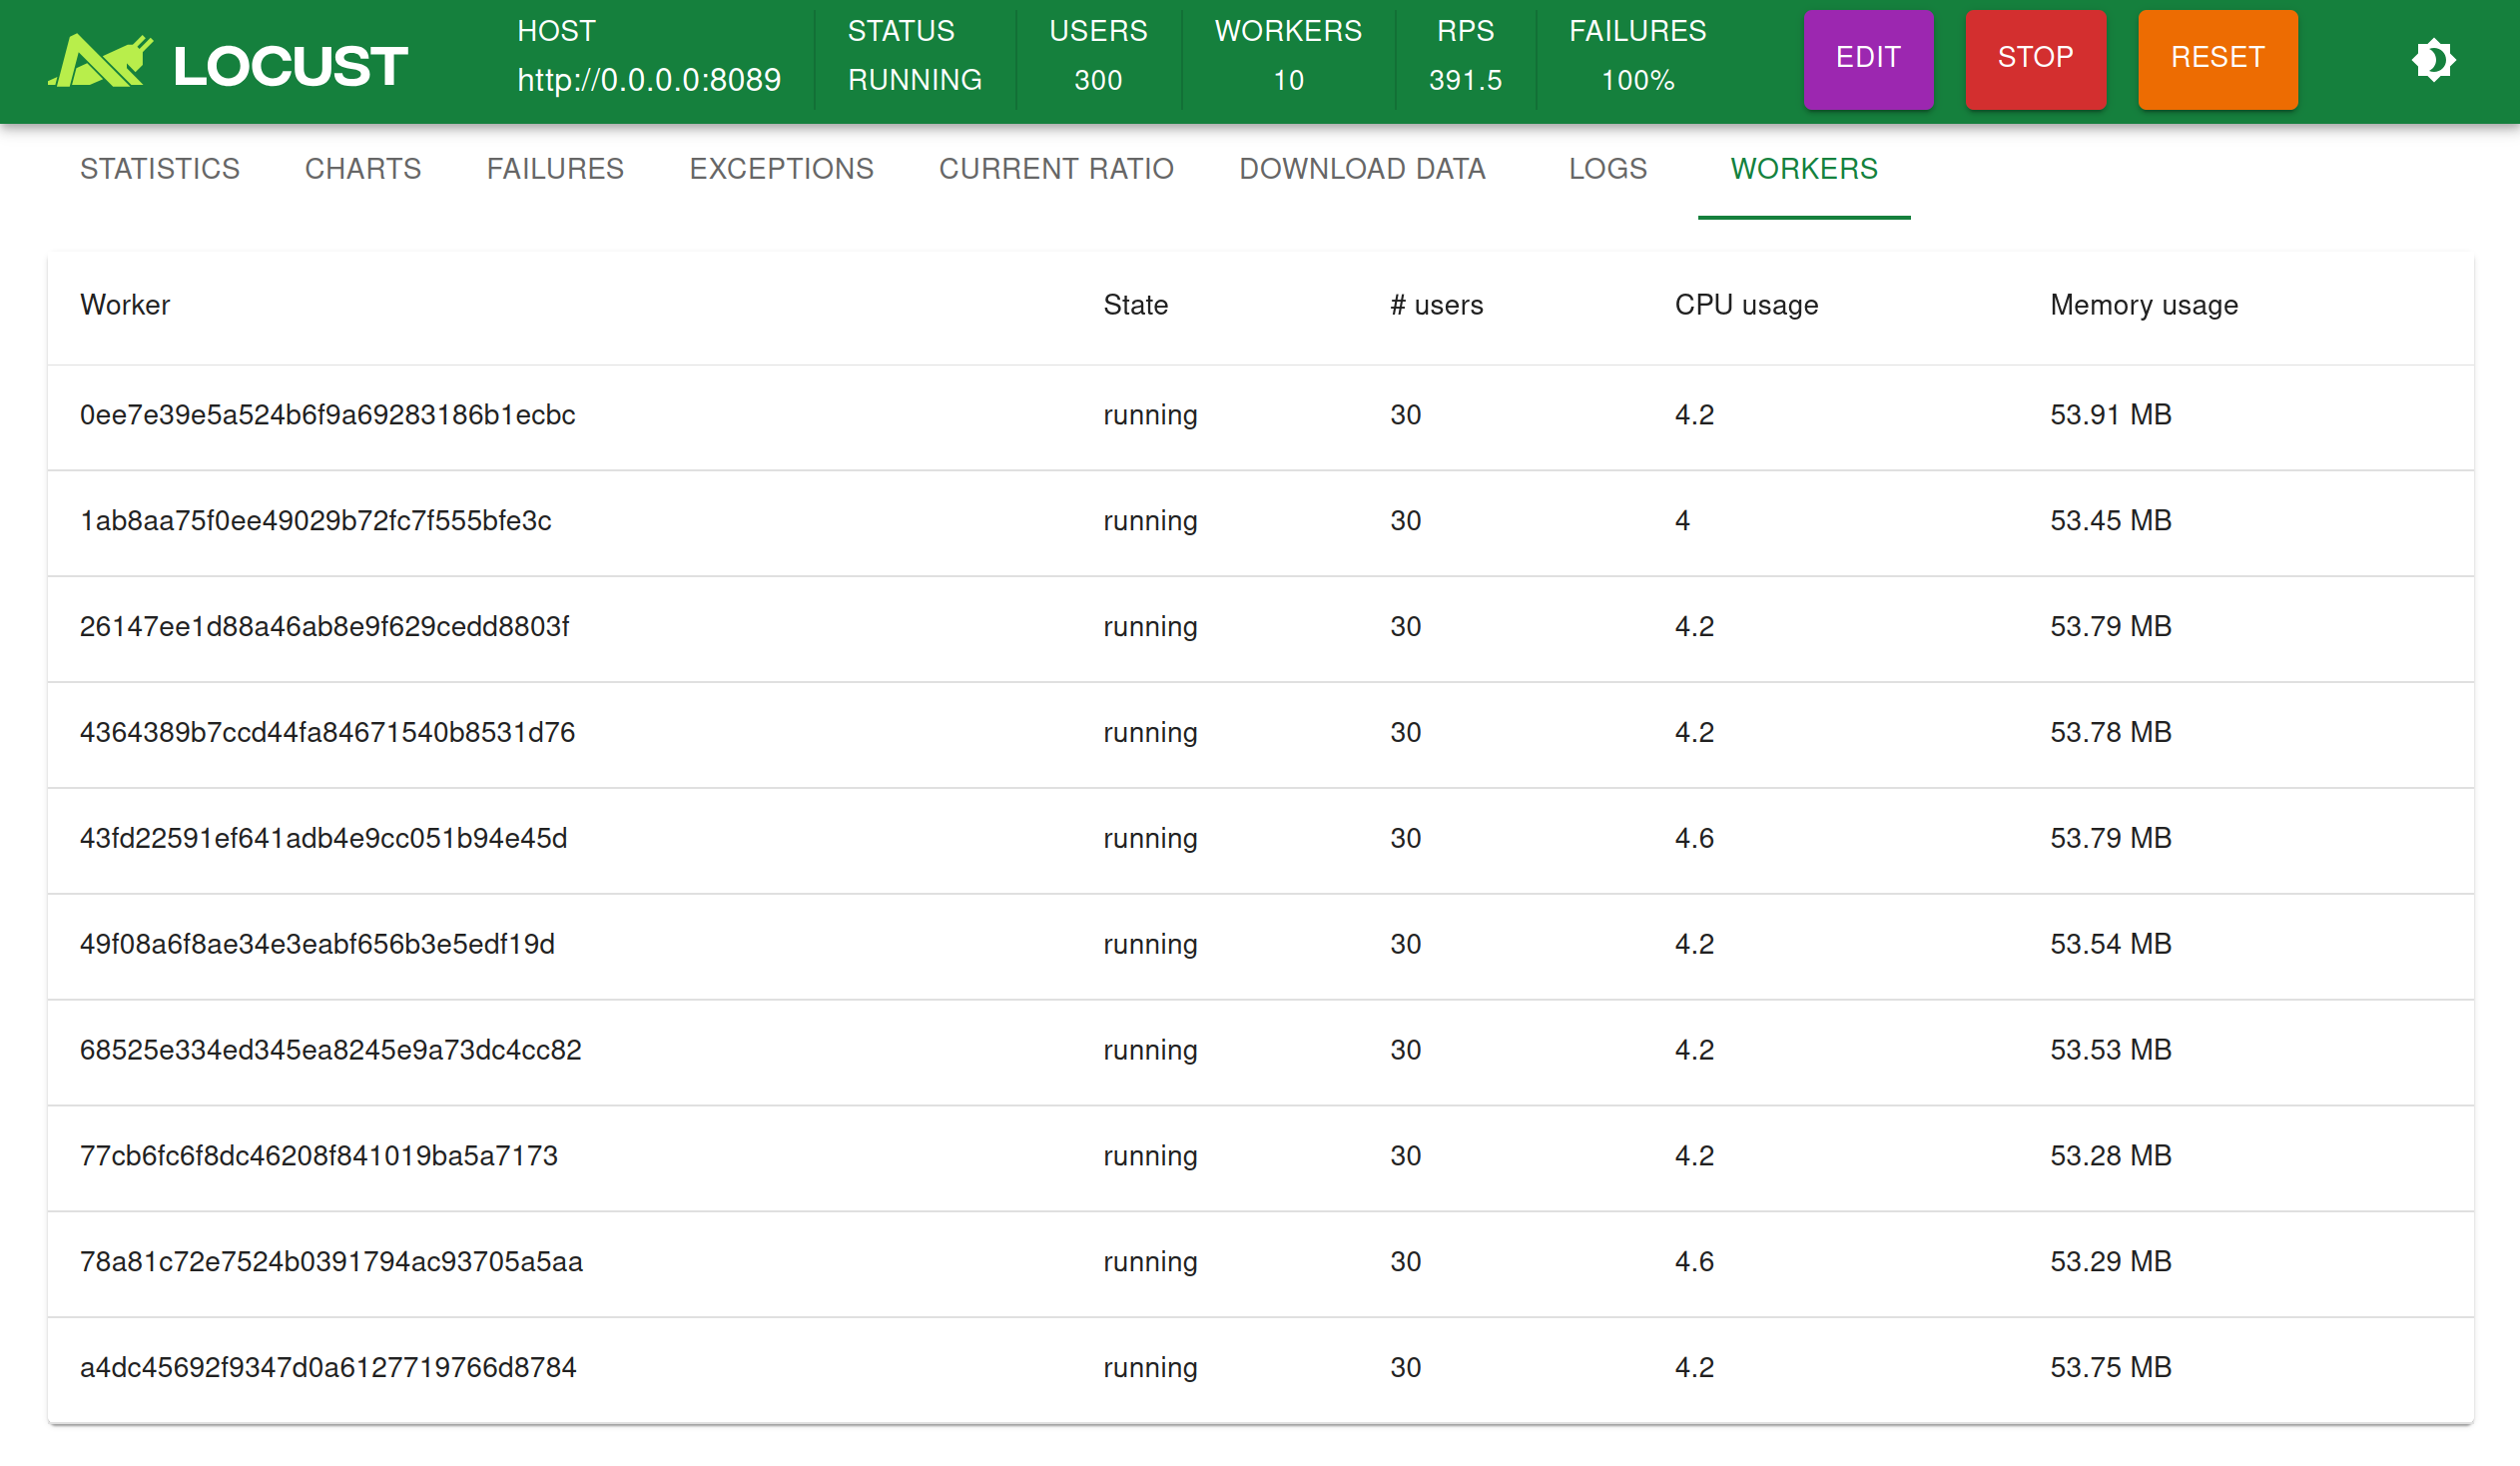
Distributed & Scalable - supports hundreds of thousands of users
Locust makes it easy to run load tests distributed over multiple machines. It is event-based (using gevent), which makes it possible for a single process to handle many thousands concurrent users. While there may be other tools that are capable of doing more requests per second on a given hardware, the low overhead of each Locust user makes it very suitable for testing highly concurrent workloads.
Web-based UI
Locust has a user friendly web interface that shows the progress of your test in real-time. You can even change the load while the test is running. It can also be run without the UI, making it easy to use for CI/CD testing.


 浙公网安备 33010602011771号